This article first appeared in 2014. We are reprising it at the request of many readers who are fans of the .30-06 cartridge.
The “Old Warhorse” .30-06 Springfield cartridge is not dead. That’s the conclusion of Forum member Rick M., who has compared the 1000-yard performance of his .30-06 rifle with that of a rig chambered for the more modern, mid-sized 6.4×47 Lapua cartridge. In 12-16 mph full-value winds, the “inefficient and antiquated” .30-06 ruled. Rick reports:
“I was shooting my .30-06 this past Sunday afternoon from 1000 yards. The wind was hitting 12-16 mph with a steady 9 O’clock (full value) wind direction. My shooting buddy Jeff was shooting his 6.5×47 Lapua with 123gr Scenar bullets pushed by Varget. Jeff needed 13 MOA left windage to keep his 6.5x47L rounds inside the Palma 10 Ring. By contrast I only needed 11.5 MOA left windage with my .30-06. I was shooting my ’06 using the 185gr Berger VLD target bullet with H4350. I managed the same POI yet the .30-caliber bullet only needed 11.5 MOA windage. That’s significant. From this experience I’ve concluded that the Old Warhorse ain’t quite dead yet!”
Rick likes his “outdated” .30-06 rifle. He says it can deliver surprisingly good performance at long range:
“To many of the younger generation, the Old Warhorse .30-06 is ‘outdated’ but I can guarantee that the .30-06 Springfield is a VERY ACCURATE cartridge for 1000-yard shooting (and even out further if need be). With some of the advanced powders that we have today, the .30-06 will surprise many shooters with what it’s capable of doing in a good rifle with the right rate of twist. My rifle has a 1:10″ twist rate and I had it short-throated so that, as the throat erodes with time, I could just seat the bullets out further and keep right on shooting. My recent load is Berger 185gr Target VLDs pushed by IMR 4350. This is a very accurate load that moves this bullet along at 2825 fps.”
How would you like to get marksmanship training from the reigning High Power National Champion? Get yourself to Oregon this June and you can. SFC Brandon Green of the USAMU will be one of the instructors for the CMP Small Arms Firing School in Eagle Creek, Oregon in June. A three-time National High Power Champion, Brandon is one of the greatest marksmen on the planet. Yesterday he posted: “Three of us will be at the SAFS/junior clinic in Oregon. Come check it out!” If you can make it to Oregon June 8-9, we definitely recommend this class. It will be the only SAFS in the Western USA this year.
Along with the June SAFS in Oregon, there will be eight other rifle SAFS programs this year at locations nationwide. Some of these will be held in connection with major matches, such as the Eastern CMP Games in April at Camp Butner.
CMP Rifle SAFS Locations and Dates:
1. Eastern Cup & Games Matches, April 30 | Camp Butner, NC
2. Douglas Ridge Rifle Club, June 8-9 | Eagle Creek, OR (Range Officer Class is Jun 7)
3. Fairfax Rod & Gun Club, June 22-23 | Manassas, VA
4. National Matches, July 27-28 | Camp Perry, Port Clinton, OH
5. Oak Ridge Shooting Assoc., August 24-25 | Oak Ridge, TN
6. Camp Ethan Allen, September 19 | Camp Ethan Allen Training Site, Jericho, VT
7. Fort Hill Rifle & Pistol, September 28-29 | Keyser, WV
8. Oklahoma Cup & Games Matches, October 10 | Oklahoma City Gun Club, OK
9. Talladega 600 Matches, November TBD | CMP Talladega Marksmanship Park, AL
Led by certified military and/or civilian instructors, SAFS programs offers high level training in a safe, supportive setting, with rifles and ammo provided. The school is structured toward teaching new shooters, so no past firearm experience is required, though intermediate and advanced marksmen are also welcome to participate. During the course, students will learn basic instruction and firing practices, competition skills and live range firing, as well as compete in a real M16 EIC Match.
CMP Provides Rifles and Ammo at Small Arms Firing Schools
At each SAFS, equipment, including rifles and ammunition, will be provided. Personal equipment, such as a shooting jacket or glove, will be permitted during the course as well. Participants are required to bring hearing protection and eye protection is strongly encouraged.
For more information or ask additional questions, please contact Amy Cantu at acantu@thecmp.org or (419) 635-2141 ext 602. The Small Arms Firing School (SAFS) has been an instrumental source for individuals to delve into firearm safety and competition technique. The SAFS course has been a staple event in the National Matches at Camp Perry since 1918 and has expanded its outreach to other areas of the country through CMP’s Travel Games matches in recent years.
The First Shot, the CMP’s online magazine, features a well-written article on Prone Shooting Technique by SPC Matthew Sigrist of the U.S. Army Marksmanship Unit (USAMU). The article covers all the major points of gun hold and body position: hand position, elbow position, stock weld, buttstock placement, and sling position/tension.
Keep it Steady — The Elements of a Good Prone Position
Part 1 — Building the Position By SPC Matthew Sigrist
Imagine the following scenario: You are at the last stage of fire in the National Trophy Individual Match, firing at the 600 yard line in the prone position and every point matters. What should you reflect on as you prepare to shoot this final string? As your eyes cloud from sweat, you realize that all you have to rely on is your experience and knowledge of the fundamentals.
During the National Trophy Individual Match, you will fire 60 percent of your shots from the prone position. This article will address the fundamentals of a good prone position and help you learn the techniques required to be successful in both the slow and rapid-fire stages of National Match competition.
This article will be divided into two parts. In part one, we will discuss the elements of a good prone position. In part two, we will cover the techniques you will in the rapid-fire and slow-fire stages.
The Fundamentals
The fundamentals are the building blocks of a position. Much like the framework of a house, a correct application of the fundamentals ensures a solid and stable structure. Since each person’s position will depend on their particular body build and shape, there is no “perfect position” that applies to everyone. Experience, practice and knowledge of the correct fundamentals will dictate the best position for you.
There are six key elements of any position. The purpose for these six points is to achieve a solid platform that allows for consistent sight alignment using the least amount of muscle tension.
1. Placement of the Firing Hand (the hand that pulls the trigger)
The firing hand needs to be placed high on the pistol grip. This high hand position will give you better control of the rifle. Combined with a firm grip there will be a reduced amount of hand movement when pulling the trigger. Wrap your thumb over the three fingers on the pistol grip (excluding the trigger finger). This will help isolate the movement of the trigger finger.
2. Placement of the Non-firing Hand (the hand supporting the rifle).
The non-firing hand should grip the handguard or stock in the flat portion of the hand between the thumb and forefinger. The fingers should curl naturally around the stock, but they should not grip it tightly. The position of the hand on the stock will depend on the physical size of the shooter. Generally speaking, taller shooters with longer arms will grip the rifle further out, near the sling swivel, while shorter shooters will need to pull their hand rearward. This is sometimes referred to as “short-stocking” the rifle.
3. Stock Weld
Stock weld is the contact that the face makes with the stock. It is important because it directly effects your sight alignment. Consistent head placement will help you achieve consistent sight alignment. The human head weighs an average of 8 to 10 pounds. The full weight of the head must rest on the stock. In doing this you achieve two things, a relaxed neck and reduced recoil because of the pressure of the head.
4. Placement of the Rifle (the contact that is made in the firing shoulder)
The rifle butt placement needs to be consistent. If this changes between shots, it effects your sight alignment and the effect of recoil. In the prone position the rifle will sit lower in the shoulder compared to other shooting positions. This allows for a more forward head and a lower position as a whole.
5. Position of the Sling
The sling should be high on the arm, above the bicep. This way the sling will have less leverage on the arm so it doesn’t cut off the circulation.
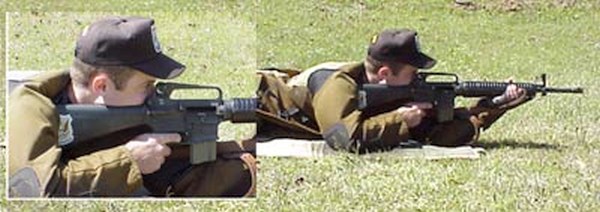
Demonstration of the placement of the firing elbow (left) and non-firing elbows (right).
6. Placement of both the firing, and non-firing elbows
A guideline for non-firing elbow placement is that there should be 1 ½’’ to 2’’ gap between your non-firing arm and the rifle’s magazine. (NOTE: this references the AR-15 service rifle) Your arm should be almost straight up and down; this will transfer the weight directly down the arm and not to the side (see picture above). Think of the firing arm as only a kind of kickstand, it doesn’t support weight it only holds the firing hand in position.
Variations of the Prone Position
There are two main variations of the prone position; open/spread legged, and bent-legged. The two types will be discussed below.
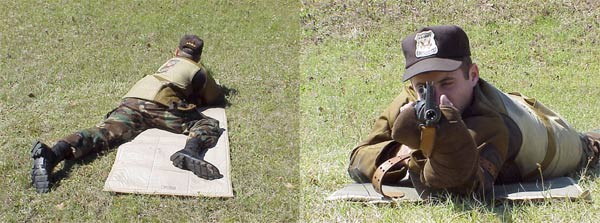
Open/Spread Leg Position
Demonstration of the Open/Spread Leg Position.
The first position is the open/spread legged position. This is when the shooter spreads their legs shoulder width or more apart. This allows for a more forward pressure on the sling and elbows. This position requires a tighter sling and solid elbow placement. The rifle should sit tight in the shoulder. With this position, your body will be farther behind the rifle compared to the bent leg position, allowing for minimum disturbance from recoil.
Bent Leg Position
Demonstration of the Bent Leg Position.
The bent leg position is when the shooter bends the firing side leg up towards the firing hand making the knee at a rough 90 degree angle to the body. The non-firing leg will remain straight and inline with the body. This will take pressure off the lungs and heart minimizing the pulse from the chest as well as easing the pressure on the lungs which will allow for easy breathing and control.
Summary
You now know the fundamentals of a good prone position, as well as the two types most commonly used. Extensive dry-firing will reveal which is the best position for you. If possible, have a friend take pictures of you in position. This will enable you to better diagnose and correct your errors. Remember, a position must be both fundamentally sound and comfortable. Practice frequently to learn your new position and to develop the conditioning required to endure long days on the range.
The 2018 Western CMP Cup and CMP Games Event kicked off today at the Ben Avery Range in Phoenix, Arizona. The event runs through Monday, October 22, 2018. For 2018 the CMP takes over what were the Creedmoor Cup Matches, and all matches will now follow CMP High Power Rifle Competition Rules. Notably, this year the Cup and Games matches on the High Power range will be fired on the CMP’s electronic targets. That means less time in the pits, and faster cyeling of relay. Also new this year, the CMP will be adding more smallbore events at Ben Avery. Click HERE for full schedule of events.
The CMP Cup Matches include two CMP 1000 Aggregate Matches followed by a 4-Man Team Match and an EIC Service Rifle Match. Following the CMP Cup Matches will be the CMP Games Matches, which will include Small Arms Firing School (SAFS), Garand/Springfield/Vintage/Modern Military Matches, Carbine Match, Rimfire Sporter match and Vintage Sniper Team Match.
In past years, Dennis DeMille, former Creedmoor Sports General Manager, served as an instructor for the Small Arms Firing School at the Western Games. Below, Dennis shows a young competitor at the CMP Western Games how to adjust his leather sling.
Sling Shooting Tip — The Benefits of Leather
“Many shooters shy away from using a leather sling because they have never been taught how to use one. That’s unfortunate. A leather sling offers more support than a web sling, which is important when competing with the heavier than normal rifles.” — Dennis DeMille
The Benefits of Dry-Fire Training
Once you set up your sling properly, you’ll need practice. Dennis DeMille stresses the importance of dry-fire practice with sling and shooting coat. Dry-Fire training is essential to the sling disciplines. DeMille, a past National Service Rifle Champion, told us that, for every minute he spent in actual competition, he would spend hours practicing without ammunition. While in the USMC, Dennis would practice in the barracks, working on his hold and dry-firing:
“The most important thing is to spend time off the range practicing. Most of what I learned as a High Power shooter I learned without ammunition — just spending time dry firing and doing holding exercises. Holding exercises will really identify the weak parts of your position. The primary purpose of dry firing is to get you used to shooting an empty rifle. If you can shoot a loaded rifle the same way you shoot an empty rifle then eventually you will become a High Master.”
Dennis DeMille shows a young competitor at the CMP Western Games how to adjust his leather sling.
Setting-Up a Leather Service Rifle Sling for Competition
So you made the mistake of disassembling your leather service rifle sling, or are intimidated about how to use one? In this Creedmoor Sports InfoZone video, Creedmoor G.M. Dennis DeMille explains how to set up and use a sling. The covers the basics — Dennis starts with a totally disassembled leather service rifle sling and shows you how to set it up properly.
Tip: “Many shooters shy away from using a leather sling because they have never been taught how to use one. That’s unfortunate. In my opinion a leather sling offers more support than a web sling, which is important when competiting with the heavier than normal rifles.”
Configuring the Sling for the Standing (Offhand) Position
In this second in a series of Creedmoor InfoZone videos on the setup and use of the leather service rifle sling, Dennis DeMille details how to configure and best utilize the leather service rifle sling while shooting from the standing position.
Tip: “Putting the Frogs in different hole will change the amount of added elevation a sling provides.”
Looking at Sling Types — Comparing the Features
In this video Dennis showcases a large variety of shooting slings. He explains the strong points of each type so you can choose the sling best suited to your discipline and shooting style.
The Benefits of Dry-Fire Training
Once you know how to set up your sling properly, you’ll want to practice. Dennis DeMille stresses the importance of dry-fire practice with sling and shooting coat. Dry-Fire training is essential to the sling disciplines. Dennis DeMille, a national Service Rifle Champion, told us that, for every minute he spent in actual competition, he would spend hours practicing without ammunition. While in the USMC, Dennis would practice in the barracks, working on his hold and dry-firing:
“The most important thing is to spend time off the range practicing. Most of what I learned as a High Power shooter I learned without ammunition — just spending time dry firing and doing holding exercises. Holding exercises will really identify the weak parts of your position. The primary purpose of dry firing is to get you used to shooting an empty rifle. If you can shoot a loaded rifle the same way you shoot an empty rifle then eventually you will become a High Master.”
Each Wednesday, the U.S. Army Marksmanship Unit publishes a reloading “how-to” article on the USAMU Facebook page. A while back, the USAMU’s reloading gurus looked at the subject of case lubrication. Tasked with producing thousands of rounds of ammo for team members, the USAMU’s reloading staff has developed very efficient procedures for lubricating large quantities of cases. This article reveals the USAMU’s clever “big-batch” lube methods. For other helpful hand-loading tips, visit the USAMU Facebook page on upcoming Wednesdays.
Rapid, High-Volume Case Lubrication
Today’s topic covers methods for quickly applying spray lube to cartridge cases prior to sizing. A typical order for this shop may be 25,000 rounds, so [speeding up] the lubrication process can be a real time-saver. While your ammunition lots probably aren’t this large, the efficient methods discussed here may help save a considerable amount of time over your handloading career. Our case lubrication rates range from 1500-1600 cases per hour, to 2400-2500 cases per hour, depending on caliber.
This shop uses virgin brass, whereas most home handloaders use fired brass, which necessitates some small changes at times. These will be discussed as they arise. Begin with fired brass that has been tumbled clean.
Ensure as much tumbling media as possible is removed from the brass, as when it gets into a size die, it can dent cases significantly. This is a good time to round out dents in the case mouths using a tapered tool to prevent damage from the decapping stem.
First, dump the clean cases into a large box or reloading bin. Shake the bin back and forth so that many cases are oriented with the mouths up. Next, pick up as many cases as is convenient with the mouths “up”, from natural clusters of correctly-oriented cases. With 7.62mm-size cases, this is usually 3-4, and with 5.56mm cases, this can be up to 8-10. Place the cases into the rack slots, mouth-up. Doing this in groups rather than singly saves considerable time. Once these clusters have been depleted, it will be time to re-shake the bin to orient more cases “up.”.
This photo shows a case lubrication rack made by a USAMU staffer.
Naturally, adjust the spacing to best fit the calibers you reload. We have found this size … convenient for handling through the various phases of case lubrication/transfer to progressive case feeders for processing. Note that the 1/2-inch angle does not cover much of the critical case area at the base, just forward of the extractor groove, where most re-sizing force will be exerted. As the USAMU uses virgin brass, less lubrication is required for our brass than would be needed for Full Length (FL) sizing of previously-fired brass.
NOTE: The amount applied using our rack is easily enough for our purpose. If using fired brass, be sure to adequately lube this base area to avoid having cases stick in the full-length sizing die.
Using a spray lube, coat the cases adequately, but not excessively, from all sides. Be sure to get some lube into the case mouths/necks, in order to reduce expander ball drag and case stretching/headspace changes. The spray lube this shop uses does not harm primers or powder, and does not require tumbling to remove after lubing.*
Take a close look at the photo above. The USAMU shop uses a common kitchen turntable, which allows the rack to be rotated easily. We place this in a custom-made box which prevents over-spray on to floors and walls.
Angled Box Method for Smaller Cases to be Neck-Sized
A refinement of the above method which especially speeds processing of 5.56x45mm cases is as follows. A small cardboard box which holds about 100 cases is fitted with an angled “floor” secured by tape. With the smaller 5.56mm cases, usually about 8-10 cases per handful can be picked up, already correctly-oriented, and placed into the box together. This prevents having to place them into the rack slots, saving time.
HOWEVER, note that this does not allow nearly as much lube access to the case bodies as does the rack. For our purposes — neck-sizing and setting neck tension on new brass, this works well. If using this procedure with fired brass, take steps to ensure adequate lube to prevent stuck cases.
As always, we hope this will help our fellow handloaders. Good luck, and good shooting!
*A two-part test performed here involved spraying primed cases heavily, while getting more lube into the case mouth/body than even a careless handloader would likely apply. The second part of the test involved literally spraying considerable quantities of the lube directly into the cases, drenching the primers. After a several-day wait to allow the lube to penetrate the primers, they were then fired in a test barrel. All fired normally; no unusual reports were noted. This bolstered confidence that normal amounts of the lube would not adversely affect our ammunition, and we have been pleased with the results over several years.
Next week, on August 2, 2017, the nation’s top Service Rifle Teams will compete in National Trophy Infantry Team (NTIT) Match at Camp Perry, Ohio. In this match, known informally as the “Rattle Battle”, six-member teams shoot at 200, 300, 500 and 600 yards with time limits — 384 rounds total. To win this match, the six shooters must work like a finely-tuned machine. This is a popular match with spectators as there is plenty of action in a short time span. SEE Camp Perry 2018 NM Schedule.
This video shows the winning 2011 NTIT team at Camp Perry. Six USAMU shooters started with a combined load of 384 rounds to be fired at 8 targets from 600 and 500 yards prone, then 300 yards seated, and finally 200 yards standing.
Last year, the USAMU-Barnhart Team won the title with a score of 1439, with the USMC Team seconed as 1406. The record for this match is 1466, set by the USAMU-Remily Team in 1996. 2017 Team Barnhart members included: SFC Shane Barnhart (coach), SFC Evan Hess (captain), SFC Brandon Green, SFC William Pace, SSG Cody Shields, SGT Joseph Peterson, SPC Lane Ichord, and PVT Forrest Greenwood. (U.S. Army photos by Michelle Lunato/released).
The National Trophy Infantry Team Match (NTIT) was first fired in 1922 and is part of the the CMP’s annual National Rifle Matches at Camp Perry. The NTIT is called the “Rattle Battle” because it emphasizes extremely fast, accurate fire.
Our friend Grant U., who runs the Precision Shooting Journal on Facebook, says the NTIT is a special match, a real “crowd-pleaser: “The National Trophy Infantry Team Match (Rattle Battle)… was always one of my favorite team events. It takes a hell of a lot more planning, practice, and precision than one might expect. You get one shot at it and the entire team had better be running on all cylinders because there are no alibis. Each team of six shooters is allocated 384 rounds and when the teams fire at 600 and 500 yards, it sounds like a war.”
SFC Brandon Green, one of the nation’s finest marksmen, won the 2018 NRA High Power Rifle Championship at Camp Atterbury, Indiana.
PHOTOS courtesy U.S. Army Marksmanship Unit. See more on USAMU Facebook Page.
AR-platform rifles are fun and versatile, but the standard, mil-spec triggers leave much to be desired. They tend to be gritty, with creep and heavy pull weight. One of the easiest, most effective AR upgrades is a trigger group swap. An improved fire control group makes a huge difference. There are many aftermarket trigger options for the AR platform rifles. Choose single-stage or two-stage, either standard trigger assembly or unitized “drop-in” trigger, such as those made by Timney or Triggertech.
When upgraded with a precision trigger and match barrel, AR-platform rigs work great in NRA High Power competitions (Photo from NRA Blog, at Camp Perry).
Two-Stage vs. Single-Stage Triggers
Two-stage triggers have two separate movements. The first stage offers a light, spring-loaded pressure that works against the shooter’s pull until stopping at the second stage – this is called “take-up”. If there is no spring pressure, it is known as “slack”. Should the shooter continue to pull the trigger once he’s arrived at the second stage, the mechanism will operate like a single-stage trigger from there until engaging the sear and firing the gun. Good trigger reset requires the shooter to keep pressure on the trigger, even during reset, to minimize movement of the muzzle.
Single-stage triggers feature no take-up or slack, as they begin engaging the sear as soon as the shooter begins pulling the trigger. Some competitive shooters prefer the two-stage trigger because of the feedback it provides during its first stage, while other shooters, including those using their rifle in tactical scenarios, may want the surety of a single-stage trigger, ready to engage and fire once their finger is inside the trigger guard. Regardless of preference, a good trigger will feature minimal creep and should be free of grittiness, providing a smooth, even break.
Drop-In Trigger Assembly vs. Standard Trigger Group
Once you decide between a single-stage or two-stage trigger, you can choose between standard and drop-in trigger groups. Standard trigger groups feature all the fire control group parts separated, and need to be pieced together and installed much like a mil-spec trigger, while drop-in trigger are pre-assembled and contained within a casing that simply drops in to the receiver and accepts the pins, hence the name.
After-Market Trigger Comparison
Some shooters prefer drop-in triggers due to the ease of installation, while others opt for standard groups so they can access the components individually for cleaning adjustment or replacement. If one piece of a drop-in trigger fails, you’ll need to either replace the entire unit or send it to the manufacturer for repair, whereas you may be able to simply replace the broken component of a standard trigger without needing a whole new trigger set.
Trigger Terminology — “Creep”, “Stacking”, “Overtravel”
“Creep” or “travel” is the distance the trigger moves between the end of take-up and when the trigger breaks to fire the fun. Too much creep can affect accuracy, but no creep can be unsafe, as the shooter may not be prepared to fire. “Stacking” occurs when the trigger weight actually increases during travel — this shouldn’t happen. Lastly, “overtravel” is the distance the trigger continues moving back after the gun fires.
This article is based on a longer story in the NRA Blog.
TALLADEGA, Alabama — The Annual D-Day Anniversary Matches will be held June 8-10, 2018, at the CMP’s Talladega Marksmanship Park in Alabama. The event commemorates the Anniversary of the Allied landing at Normandy in June, 1944. In 2015, the $20-million-dollar Talledega Park celebrated its Grand Opening with its first D-Day Match. That was a great success, and the 2018 D-Day Match promises to be even better. This has become a hugely popular event — last year there were over 250 competitors. For many, this match was their first opportunity to shoot on electronic targets. That speeds up the relays and nobody complained about not having to do pit duty.
It’s not too late to join the fun — there are still slots available for the event. You can register online. For more information, email shall [at] thecmp.org or phone 256-474-4408 ext. 414.
EDITOR: Worth Watching! Guys, this nicely-produced video shows multiple disciplines (including Service Rifle, Carbine, Pistol, and Vintage Sniper) and lets you see how the electronic targets work. We highly recommend you watch this video.
Electronic Targets + No Pit Duty = More Fun
Competitors will be firing all matches on electronic targets. The John C. Garand Range has a huge firing line with monitors at all shooting stations. These connect to three banks of electronic targets positioned at 200, 300, and 600 yards. Spectators can view the results in real time on large monitors.
INVITATION: The CMP’s John C. Garand D-Day Anniversary Match is a big event with many different competitions for rifle and pistol shooters. Along with the signature M1 Garand event, a Vintage Sniper Match, EIC Service Rifle Match, .22 Rimfire Pistol Match, EIC Service Pistol Match, and .22 Rimfire Pistol matches will be conducted.
State of the Art Shooting Facility in Alabama
The 500-acre CMP Talladega Marksmanship Park is one of the most advanced outdoor shooting facilities in the Western Hemisphere. The facility includes a 600-yard rifle range, a 100-yard multi-purpose range, and a 50-yard pistol range, equipped with Kongsberg electronic targets and scoring monitors that allow shooters on the firing line to review shots in a matter of seconds. Since the 54 targets at each line register hits and calculate the scores, no pit duty is required at Talladega.
State-of-the-art Kongsberg target systems are used at the CMP’s Talladega Marksmanship Park.
The 2018 CMP competition rules are now approved and posted on the CMP website. The 2018 CMP Highpower Rifle and Pistol Competition Rules and the 2018 CMP Games Rifle and Pistol Competition Rules can be downloaded on the CMP Competition Rules Page.
Evolution of CMP Competition Rules
There are a number of important CMP Rule changes for 2018 that are spelled out below. CMP Competition Rules have undergone major changes in the last few years that were aimed at modernizing the CMP competition program and promoting greater participation in rifle and pistol target shooting. In 2015, rule changes expanded the types of pistols that can be used in EIC and National Match Service Pistol events and introduced the immediately popular CMP 22 Rimfire Pistol Distinguished program. The most significant 2016 change was the authorization for Service Rifle shooters to use optical sights with 4.5X max magnification. 2017 saw the introduction of a new classification system, rules for electronic targets and the addition of rules for “Alternative Rifles” and “Match Rifles”.
Important Rules Changes for 2018
The biggest change in the 2018 Rules is the introduction of a two-track system for conducting CMP-sanctioned Highpower Rifle Matches. Highpower Rifle events can now be conducted as either traditional “National Trophy Rifle Events” where there are no sighting shots and competitors start rapid-fire series from standing or as “CMP Cup Match Events” where sighting shots are allowed before each stage and competitors start rapid-fire series in position. All EIC Rifle Matches and Camp Perry National Trophy Matches will continue to be conducted according to National Trophy rules, with no sighters and rapid-fire starting from standing. The CMP Cup Matches, which are scheduled at the beginning of the 2018 CMP Highpower Rifle Matches at Camp Perry on 23-25 July, and the CMP Cup Matches, which are included in the 2018 CMP Travel Games programs, will be conducted under Cup Match rules with sighters and rapid-fire stages starting in position.
The rules for CMP As-Issued Military Rifle and Pistol events and Rimfire Sporter Matches remain unchanged in this regard. These events typically allow sighters at the beginning of each course of fire. Competitors start rapid-fire series from standing, but any competitors who are 70 or over or who have physical limitations that prevent them from readily standing and getting back into position are allowed to start rapid-fire series in position.
Otherwise the 2018 CMP Games Rifle and Pistol Rules, which include Rimfire Sporter Rifle Rules, have only minor changes from the 2017 edition.
National Records — Rules providing for the official recognition of National Records in open and junior categories in CMP-recognized events were added for 2018. The CMP is compiling its first list of official records and will post it on the CMP website as soon as it is ready. To be recognized as National Records, scores must be fired in the National Matches or in competitions conducted by the CMP staff such as CMP Travel Games or National Range Matches.
CMP Smallbore Matches Coming to Camp Perry
Traditional smallbore rifle championships are returning to Camp Perry in 2018 and rules for those events are being drafted now. The 2018 National Matches Calendar features six days of CMP Smallbore Rifle shooting on 17-22 July. There will be two days of smallbore position and four days of smallbore prone shooting, along with one full day of Rimfire Sporter Rifle competition on 22 July. Provisional CMP Smallbore Rifle Rules will be released in the next few weeks.
Electronic Targets — A new section has been added to the CMP Rulebooks to help explain and clarify the CMP’s Electronic Scoring Target Rules. See Rule 7.0 in the CMP Competition Highpower Rifle and Pistol Competition Rules or Rule 9.0 in the CMP Games Rifle and Pistol Competition Rules.


 The Benefits of Dry-Fire Training


