Try Using O-Rings with Sizing Dies for Reduced Neck Run-out
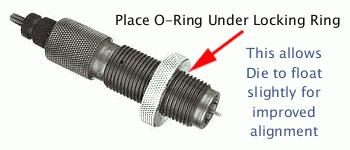
Here’s an inexpensive procedure that can help you load straighter ammo, with slightly better measured concentricity (i.e. less run-out) on the case necks and bullets. Simply use a rubber O-Ring on the underside of the die locking ring. This allows the die to self-align itself (slightly) to the case that is being sized. Without the O-Ring, if the flat surface on the top of your press is not perfectly square with the thread axis, your die can end up slightly off-angle. This happens when the bottom of the locking ring butts up tight against the top of the press. The O-Ring allows the die to float slightly, and that may, in turn, reduce the amount of run-out induced during case sizing.

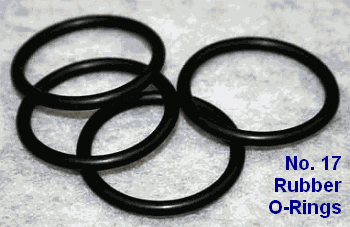
Top prone shooter GSArizona has tried this trick and he says it works: “Go to your local hardware store and get a #17 O-Ring (that’s the designation at Ace Hardware, don’t know if its universal). Slip the O-Ring on the die and re-adjust the lock ring so that the O-Ring is slightly compressed when the die is at the correct height. Size and measure a few more cases. You will probably see a slight improvement in neck concentricity as the die can now float a bit as the case enters and leaves it. This isn’t going to be a dramatic improvement, but it’s a positive one.” We want to stress that adding O-Rings to sizing dies may help some reloaders, but we don’t offer this as a panacea. Try it — if using the O-Ring reduces measured runout that’s great. If it doesn’t, you’ve only spent a few pennies to experiment.

Lee Precision makes die lock rings with built-in O-Rings. Lee’s distinctive lock ring design allows the same kind of self-alignment, which is good. However, Lee lock rings don’t clamp in place on the die threads, so they can move when you insert or remove the dies — and that can throw off your die setting slightly. By using an O-Ring under a conventional die lock ring (that can be locked in place), you get the advantages of the Lee design, without the risk of the lock ring moving.


Although the lock ring on the Lee dies do not lock onto the die, the O ring compression within the ring and against the die allow the pair to be finger tightened and removed without the ring moving in relation to the die. Via O ring, the die and lock ring form a very tight connection.
I have read about this tip previously, and wondered about its use when bumping the shoulder .001 or .0005. Are those who use this system finding that their brass is being sized too much, or is the amount of compression that the rubber ring experiences negligible.
thanks,
mike
If you use the Lee locking ring with its own O ring then just double nut it on the top of the ring. Plus if you wrap the treads with Teflon tape for a firm threat fit it will be more resistant to loosing.
I have drilled and tapped my Lee lock locrings to accept a locking screw(4mm)
and find it a positive locking system using the original “O Ring”.
I realize the O-rings are being used, but for the life of me cannot understand how a rubber o-ring that is flexible and can be compressed to different degrees can control the headspace adjustment on a body sizer die. I know with my cross-bolt die lock rings, when I loosen the locking screw & move the lock ring a barely perceptable amount, the headspace dimension will change by several thousandths. How can this dimension be controlled each time the die is screwed into a single stage press, like my Rockchucker? Just one of the things that make me go “hmmmm”.
I full length size, shell holder and die touching at the top of the stroke, eliminating any sizing inconsistency. I also use an O-ring between the die body and the decapping stem (RCBS dies) so when I pull the expander ball through the neck it centers itself better. I shoot a 6mm wildcat out of a Savage 110 I built (.243 case shortened to 1.8″, not-so-tight chamber and headspace). A couple of weeks ago I shot a 4″ group at 1,000 yards in a variable crosswind, using a bipod. The O-ring technique certainly has merit.
It’s all about line bore,keeping things
perpendicular,linear and “0” during manufacturing processes, reamers and taps
can walk during manufacturing.That includes the lock rings also.
I have used the O-ring on my FL sizing die. Headspace control, at least on a short BR case, is fine. Using a Sharpie pen I put an index mark on the RockChucker press insert and on the locking ring. This way I can visually confirm nothing’s shifted. I then measure each case after sizing using a Harrell’s neck-shoulder collar. So long as I confirm the index mark hasn’t shifted, I can maintain my desired .0015 shoulder bump.
Whidden Gun Works has a clever fix for the Dillon progressive presses that accomplishes the same thing. The lock rings are notched to accept a roll pin (loose fit) that allows the die to self-align in the toolhead, but adjustments remain consistent because the die cannot rotate.
As our editor Paul says, the index mark on the die and a quick check of the first few pieces of brass sized each time will confirm the headspace setting and it stays very consistent throughout the session. I’ve been doing this for about 15 years and it works beautifully. If you have a few rifles with slightly different headspace, it makes for very quick adjustment for each one. I have an article on setting headspace when reloading here: http://riflemansjournal.blogspot.com/2009/08/reloading-headspace.html if it’s of interest to anyone.
There’s also a good write-up of this technique in Glen Zediker’s handloading book
Or buy a Forster Co-Ax press!
The o-ring functions as a centering aid by putting a slight load on the threads. Nothing more than the lockring does when it’s tightened against a press head. The value comes when the die “self-centers” a little bit on each case that’s being sized, and if you choose to make an index mark on each die (once you’ve set it to where it provides the proper headspace but make sure you don’t switch shell holders!) and your press it’s easy to return dies to the exact same position down the road.
Since it’s been three years since this repeat has had a comment…….
I find it better to modify the slot the shellholder slides into allowing the shellholder to be held just a little loosely – this allows the case to center into the die as it enters rather than being held rigidly by the shellholder.
I use both Whidden and Redding size/seating dies and runout is nil and never stuck a case.
Cheers.
The O-ring kind of makes it impossible to keep the should bump to what you want. It defeats the purpose of the other article
A little wiggle on the shellholder (not vertically) to let it seek it’s path is best. Also; do not tighten the bushing into the die, but keep it 1/8 of a turn clear so it too can find it’s own path.
Editor: You might be surprised. I’ve used dies with O-ring locking rings and been able to hold bump dimensions just fine. Good tip about letting the bushing float — that really can make a difference in run-out.
FOSTER CO AX floating system would seem to be the best solution. Certainly when using bushings they should be left a bit loose and when using O-rings chamber the first few pieces of brass and check every so often by chambering brass. For heavens sake put a mark on the die once you get it. On my full length Lee die the F for full length falls right on my die depth for the perfect shoulder bump using the feel method.RCBS micrometer,WilsonGage,Sinclair,Hornady all work ok to some degree. Feel method is great but best if firing pin removed from bolt or 3 way wing safety set in position so bolt drops freely with no pressure.JUST KEEP CHECKING BY CHAMBERING EVERY SO OFTEN.