Eurooptic vortex burris nightforce sale


teslong borescope digital camera barrel monitor


As an Amazon Associate, this site earns a commission from Amazon sales.


August 15th, 2024

Blueprinting and Truing Remington 700 Action — Expert Methods

Bill Marr Rifleshooter.com truing Remington Rem 700 action accurizing

Bill Marr Rifleshooter.com truing Remington Rem 700 action accurizingYou may have heard the phrase “blueprinting an action”, but do you know what that really means? Do you know what operations are done to an action during the blueprinting process? To help you understand, gunsmith Bill Marr of RifleShooter.com has created a helpful article showing a Rem 700 blueprinting job start to finish. This article spotlights how the procedures can be done with manual tools. Bill, who runs 782 Custom Gunworks Ltd., can also perform many of these operations with modern automated machinery. In fact, Bill has written a follow-up article on Truing a Rem 700 receiver with a Lathe.

READ Full Action Blueprinting Article HERE with 30+ Photos »

READ Blueprinting Rem 700 Action with Lathe Article HERE »

Bill explains: “Blue-printing, or truing a rifle action, ensures the receiver face, threads, lugs, bolt lugs, and bolt face are square to the center line of the receiver.” In Bill’s informative article, Bill shows how he blueprints a Remington 700 short action receiver with .308 Win bolt face. He covers the following procedures step by step:

Action Disassembly
Ream Minor Diameter of Receiver Threads
Square the Receiver Lugs
Square the Face of the Receiver
Lap the Bolt Lugs
Square the Bolt Face

Bill employed a variety of tools from Brownells to complete the blueprinting job, including: Remington 700 Armorer’s Kit; Manson Receiver Accurizing Kit; Bolt Lapping Kit; Bolt Face Truing Tool; Manson Receiver Ring Facing Cutter; Multi-Vise with Jaw Pads; Silicone Carbide Abrasive; and Do-Drill Cutting Oil.

Highlights from the Rifleshooter.com article:

1. Chasing the Threads

We use the bushings to guide the receiver tap. This chases the threads and ensures they are square.

Bill Marr Rifleshooter.com truing Remington Rem 700 action accurizing

2. Truing the Receiver Face

Using the receiver facing tool, the front of the receiver is trued. The tool is placed over the tap and turned by hand. We used Do Drill to lubricate it.

Bill Marr Rifleshooter.com truing Remington Rem 700 action accurizing

3. Lapping the Lugs

The bolt lapping tool screws into the front of the action and applies rearward pressure on the bolt face. A little bit of lapping compound is placed on the front of the receiver lugs. The bolt handle is then raised and lowered repeatedly. Note — it is critical that we do not get any lapping compound on any other surfaces.

Bill Marr Rifleshooter.com truing Remington Rem 700 action accurizing

4. Truing the Bolt Face

On this bolt, the central part of the bolt face was low. After the truing operation, this Rem 700 bolt face is now completely square to the action.

Bill Marr Rifleshooter.com truing Remington Rem 700 action accurizing

IMPORTANT: Rifleshooter.com states: “This article highlights our project and is presented for information purposes only. This provides an overview of the process and should not be attempted without the guidance and supervision of an experienced gunsmith“.

Permalink Gear Review, Gunsmithing, Tech Tip No Comments »
August 15th, 2024

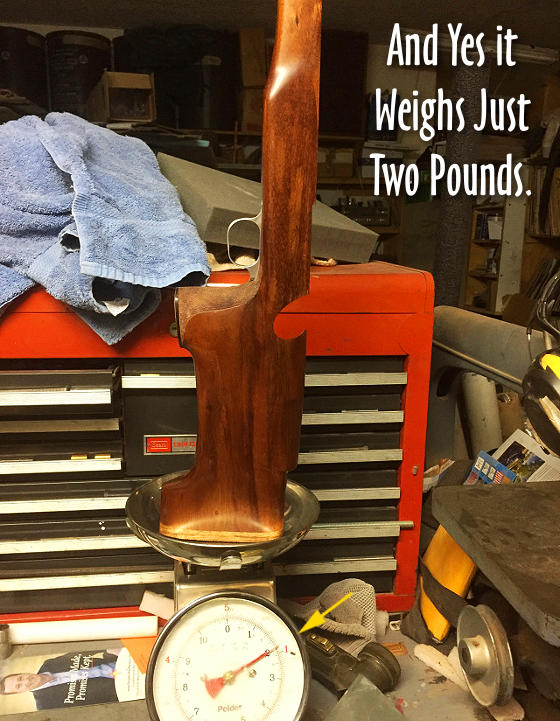
Lightweight (2-lb) Koa Wood Wonder Stock from Doan Trevor

Doan Trevor gunstock koa wood silhouette Anschutz rimfire carve stock

Gunsmith/stockmaker Doan Trevor created a lovely, one-of-a-kind silhouette stock for an Anschutz rimfire action. Built as a true custom design, this stock combines ideal standing position ergonomics with light weight — the entire stock weighs a mere two pounds. This project really showcases Doan’s remarkable skills with wood. Read the full story about this project (with more photos) at DoanTrever.com.

Doan explains his design process: “A customer came to me wanting to know if I could build a silhouette stock that was 2 pounds or less. I used the Koa wood because it is a lower specific gravity than Walnut (which makes it lighter) and stronger. I was still able to use pillar bedding and keep the weight down. The fore-end could be shortened to reduce the weight even more.

Since the drops on a silhouette rifle are different than a prone rifle, I kept the pistol grip from the prone rifle which is comfortable and tried to come up with a higher cheek piece and more drop to the buttplate. All of this required lots of hand carving.”

Doan Trevor gunstock koa wood silhouette Anschutz rimfire carve stock

Doan Trevor gunstock koa wood silhouette Anschutz rimfire carve stock

Permalink - Articles, Gear Review, Gunsmithing No Comments »
August 15th, 2024

Selecting Optimal Neck Bushing Size — Tips from John Whidden

John Whidden Dies Neck Bushing diameter reloading

Whidden Gunworks makes great sizing and seating dies. The Whidden full-length sizing die with neck bushing is very popular because it allows you to “tune” the neck tension by using different bushings, with larger or smaller inside diameters. In this video, John Whidden explains how to choose a the right bushing size for use with your neck-sizing and full-length sizing bushing dies.

For most applications, John suggest starting with the caliper-measured outside diameter of a loaded cartridge (with your choice of bullet), and then SUBTRACT about three thousandths. For example, if your loaded round mics at .333, then you would want to start with a 0.330 neck bushing. John notes, however, that you may want to experiment with bushings, going down a thousandth and up a thousandth. With thin In addition, as your brass ages and the necks harden, you may want to change your bushing size.

John Whidden Dies Neck Bushing diameter reloadingQuick Tip: Try Flipping Your Bushings
You may also want to experiment with “flipping” your neck bushings to alternate the side that first contacts the neck of the case. (One side of the bushing is usually marked with the size, while the other side is unmarked.) So try “number side up” as well as “number side down”.

Some folks believe that one side of the bushing may allow a smoother entry, and that this can enhance concentricity. Other people think they can get very slightly more or less neck tension depending on how the bushing is oriented. This is a subtle effect, but it costs nothing to experiment.

If one bushing orientation proves better you can mark the “up” side with nail polish so that you can always orient the bushing optimally. NOTE: We have confirmed that some bushings are actually made with a slight taper. In addition, bushings may get distorted slightly when the brand name and size is stamped. Therefore there IS a reason to try both orientations.

Permalink Bullets, Brass, Ammo, Gear Review, Reloading No Comments »