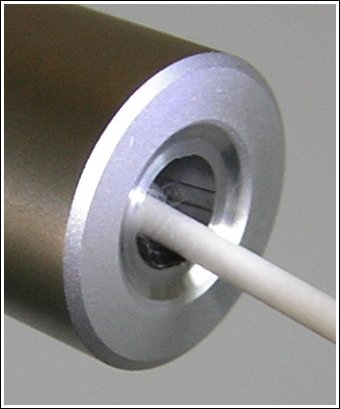
The last half-inch or so of your barrel is absolutely critical. Any damage (or abnormal wear) near the crown will cause a significant drop-off in accuracy. Here are ways you can check the end of your barrel, using a common Q-Tip.
Use Q-Tip for Barrel Inspection
To find out if you have a burr or damage to your crown, you can use an ordinary Q-tip cotton swab. Check the edges of the crown by pulling the Q-tip gently out past the edge of the crown. If you have a burr, it will “grab” the cotton and leave strands behind.
Larry Willis has another way to use a Q-Tip: “Here’s a neat trick that will surprise you with how well it works.” Just insert a Q-Tip into your barrel (like the picture below), and it will reflect enough light so that you can get a real good look at the last half inch of rifling and the crown of your barrel. In most cases you’ll find that this works much better than a flashlight. Larry tells us: “I’ve used this method about a jillion times. Q-Tips are handy to keep in your cleaning supplies anyway. This is a good way to judge approximately how well you are cleaning your barrel when you’re at the range. It’s also the best way to examine your barrel when you’re in the field.”
This article comes from the Criterion Barrels website. It provides good, conservative advice about barrel cleaning. Understand that cleaning methods may need to be adapted to fit the amount and type of fouling (and the particular barrel). In general, we do try to minimize brushing, and we follow the procedures Criterion recommends respecting the crown/muzzle. We have also had very good success using wet patches followed by Wipe-Out bore foam. Along with the practices outlined by Criterion below, you may want to try Wipe-Out foam. Just be sure to use a fitted cleaning rod bore guide, to keep foam out of the action recesses and trigger assembly.
The above video shows how to apply Wipe-Out or other bore-cleaning foam. We use a slightly different method. First, we use 3-4 wet patches to remove loose carbon fouling. Then we apply the foam as shown, but usually from the muzzle end (with bore guide in chamber). Here’s the important point — after 20-30 minutes, once the bubbles have dissipated, we apply the foam a second time, getting more of the active ingredients into the barrel. We then patch out, as shown, after 3-4 hours.
What is the Best Way to Clean a Rifle Barrel?
We are asked this question quite frequently alongside requests for recommended break-in procedures. Improper barrel cleaning methods can damage or destroy a barrel, leading to diminished accuracy or even cause a catastrophic failure. When it comes to barrel maintenance, there are a number of useful techniques that we have not listed. Some techniques may work better with different barrel types. This series of recommendations is designed to incorporate a number of methods that the Criterion Barrels staff has used successfully both in the shop and on their personal rifles. Please feel free to to list your own recommendations in the below comments section.
We recommend the use of the following components during rifle cleaning:
• Cloth patches (sized for the appropriate caliber)
• Brass jag sized properly for your bore
• One-piece coated cleaning rod
• General bore cleaner/solvent (Example: Hoppes #9)
• Copper solvent of your choosing (Example: Sweets/KG 12)
• Fitted cleaning rod bore guide
• Plastic AP brush or toothbrush
• Q-Tips
• Plastic dental picks
• CLP or rust preventative type cleaner
There are a number of schools of thought relating to the frequency in which a barrel should be cleaned. At minimum we recommend cleaning a barrel after each shooting session to remove condensation, copper, and carbon build-up. Condensation is the greatest immediate threat, as it can cause the barrel to rust while the rifle sits in storage. Copper and carbon build-up may negatively impact future barrel performance, increasing the possibility of a failure in feed or function. Fouling should be removed whenever possible.
The below tips will help limit the wear of different parts of your barrel during routine maintenance, helping extend the life of the barrel and improving its performance.
The Lands and Grooves
This portion of the barrel may experience reduced efficiency due to copper fouling and cleaning rod damage. If copper fouling takes place during the initial break-in of the rifle, make sure to check our barrel break-in article.
For regular maintenance we suggest using a single piece coated cleaning rod rather than the traditional segmented rod or bore snake. While segmented rods and bore snakes may be convenient for field use, the corners between the segments may bow out and catch on the lands, scraping along the length of the rifling. Residual grit and particles from expended cartridges may also get caught between segments, resulting in an abrasive surface working its way down the length of the barrel. Most bore snakes will remove significant amounts of carbon fouling, but may fall short in the removal residual carbon buildup and copper fouling during deep cleaning. Good rods can be sourced from multiple manufacturers, but we have found good results using both Pro-Shot and Dewey brand products.
General cleaning requires the use of patches rather than nylon or brass bore brushes. Brass brushes may be required when aggressive cleaning is required, but can lead to unnecessary wear on the barrel if used frequently. This is not due to the nature of the soft brushes themselves, but from the abrasive particles of grit that become embedded in the material that is being run repeatedly through the bore. We recommend the use of bore guides when cleaning from both the muzzle and breech. These bore guides will help serve to protect the crown and throat from cleaning rod damage.
If significant resistance develops while running the cleaning rod through the bore, no attempt should be made to force it in further. Back the rod out and inspect the barrel to determine the cause of the resistance. The jag may be pushing between a bore obstruction and the rifling, digging a divot into the barrel before pushing the obstruction back through the muzzle. One way to minimize the risk of a stuck rod is by utilizing a slightly smaller patch during the initial push.
The process of cleaning the length of the rifling is relatively straightforward:
1. Check to make sure the rifle is safely unloaded.
2. Carry out any necessary disassembly procedures prior to cleaning.
3. Remove bolt (if possible) and insert fitted cleaning rod bore guide in action.
4. Soak a patch in bore solvent (similar to Hoppes #9).
5. Center and affix the patch on the brass jag, inserting it into the chamber end of the barrel. A misaligned patch may cause the jag to damage the lands of the rifling, so make sure the patch is centered on the jag.
6. Run the patch the full length of the barrel, retracting it upon reaching the end of the muzzle.
7. Let the solvent sit for a minute.
8. Continue to run patches through the bore until carbon residue is minimized.
9. Run a dry patch through the bore to ensure carbon residue has been removed.
10. Soak a patch in copper solvent (Sweet’s or KG-12).
11. Run the patch through the bore, leaving it to sit for 3-5 minutes (do not let solvent sit for more than 15 minutes.*)
12. Repeat this process until no blue residue remains on the patches.
13. Run a patch of Hoppes #9 and a dry patch through the bore to neutralize the copper solvent.
14. Inspect the barrel prior to reassembling the rifle, verifying that no bore obstructions remain.
*Please note that some ammonia-based copper solvents may prove to be corrosive if left sitting in the barrel for an extended period of time. It is essential that these solvents be removed within 15 minutes to avoid ruining the bore.
The Crown
The crown is the portion of the barrel where the bullet loses contact with the lands and grooves and proceeds to exit the firearm. The area most critical to accuracy potential is the angle where the bullet last touches the bore of the barrel.
Avoid damage to this area by using a plastic toothbrush and CLP type cleaner to scrub the crown from the exterior of the barrel. Even the most minimal variation in wear to the crown will negatively impact barrel performance, so be careful to avoid nicking or wearing away this part of the barrel.
Over 22 million carry permits have been issued in the United States according to a recent study. Overall 8.5% of American adults now have carry permits. Along with CCW permit holders, millions of other gun owners may carry defensive pistols in “open carry” states. Carrying a defensive pistol is a big responsibility. That’s why all those who carry handguns for self-protection should definitely practice regularly. For many, pistol practice is an indoor experience. Indoor ranges are most convenient for those who live near urban centers, where the biggest threats to public safety currently exist. This article covers indoor firearms training and the proper procedures you should follow at indoor ranges.
This Video Covers Basic Gun Range Safety Rules and Etiquette
FIVE IMPORTANT SAFETY PROCEDURES for Indoor Ranges
1. Follow the Three Fundamental Rules for Safe Gun Handling
ALWAYS keep the gun pointed in a safe direction. ALWAYS keep your finger off the trigger until ready to shoot. ALWAYS keep the gun unloaded until ready to use.
2. Follow ALL Range Officer Instructions
ROs are the first and final authority on any range and their decisions are generally final. Arguing with a Range Officer may just get you thrown out.
3. Don’t Bother Others or Touch Their Guns
Respect other shooters’ privacy unless a safety issue arises. Do NOT engage other shooters to correct a perceived safety violation unless absolutely necessary – inform the RO instead. NEVER handle or touch another shooter’s firearm without their permission!
4. Know Your Range’s Rules
Review and understand any and all range rules and requirements/expectations. For example, what is the range’s maximum rate of fire? Are you allowed to collect your brass?
5. Know What To Do During a Cease Fire
IMMEDIATELY set down your firearm, pointed downrange, and STEP AWAY from the shooting booth (or bench). Range Officers do not want shooters trying to “secure/unload” their firearms in a cease fire situation — they want the shooters separated from their guns instantly.
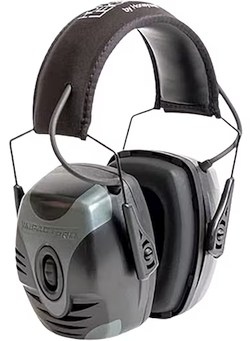
Double-Up on Hearing Protection When Shooting Indoors
Howard Leight states that Impact Pro muffs are “designed for handgun and pistol shooters looking for high NRR … for indoor ranges, covered ranges or other extremely loud shooting environments.”
When shooting indoors we recommend quality muffs with earplugs underneath, offering double protection. When inside an enclosed range, with other shooters blasting away right next to you, you really need effective hearing protection. But you also need to hear range commands and be able to communicate. That’s why we recommend electronic muffs with quality plugs underneath. We recommend the NRR 33 Howard Leight Max-1 Plugs. These tapered plugs are comfortable, easy to insert, and have a flared end for better sound seal.
On top of those plugs, run high-quality muffs. For indoor ranges where sound levels can be extremely high, we recommend Howard Leight Impact Pro Muffs. These offer an impressive 30 dB Noise Reduction Rating (NRR) and the effective noise reduction can be improved by 4 decibels or more by running plugs as well.* These muffs are pretty comfortable and offer Headphone Functionality so you can connect to your phone, MP3 player, or audio device. These muffs are $90.55 on Amazon and $90.55 at MidwayUSA.
* Four decibels may not sound like much, but remember the decibel measurement system is logarithmic, so four decibels is VERY significant. We have discussed the merits of “doubling up” hearing protection with Ph.D. sound engineers. They told us that a combination of muffs and plugs could reduce effective noise levels by up to five decibels compared to plugs alone. In addition, good muffs will block bone conduction sound energy better than plugs alone.
Kirsten Weiss knows a thing about accuracy. She won the 2012 NRA Three-Position Women’s Smallbore Championship, while finishing as the National Overall Woman Champion. She used to shoot with the American team in top-level World Cup competition. Kirsten started shooting fairly late — at age 16. Despite her relatively late start, she earned a place on the University of Nebraska shooting team. That literally opened up a new world for Kirsten: “During the course of my career, I’ve had a lot of success. I’ve gone to World Cups… in Zagreb, Croatia, in Munich, Germany. I’ve won National Championships, and got on to the U.S. Olympic short list, so it’s been a good career.”
In these three videos, Kirsten offers key tips on accurate shooting. In the first video she explains how to get and maintain the proper cheek weld on your rifle. In the second, Kirsten talks about canting error — how having inconsistent side-to-side tilt on your rifle. In the third video, Kirsten explains the importance of proper trigger placement.
Proper Cheek Weld
No matter what your discipline — smallbore, silhouette, High Power, F-Class, or even PRS — it’s vital to have a consistent cheek weld for every shot. You want your head to be in the same position on the stock each time.
In this video, Kirsten explains how to find the best position for your head on the stock, which may require adjusting the cheekpiece. Then Kirsten demonstrates how to maintain consistent cheek weld shot after shot.
Consistent Rifle Cant (Tilt from Centerline)
Kirsten says most training manuals don’t explain rifle cant: “You won’t find this shooting technique just anywhere. Most shooters don’t even think about it — and they’re missing out. Proper Rifle Cant or Gun Cant (also known as cant error or even scope cant) is a complicated topic, but I’ll explain it simply — and how to simply avoid cant error.”
Want to know how to actually aim a gun right? This accuracy tip covers a crucial aspect of marksmanship. If you cant your rifle inconsistently from shot to shot, the point of impact will change, even with “perfect aim”. This is another episode in Kirsten’s How to Shoot Awesomely video series.
Proper Trigger Finger Technique
Kirsten tells us: “Finger placement on the trigger might not seem like a big deal, but it actually is. The reason for this is because, depending on where your index finger is placed on the trigger, [this] translates to different muscle interactions with the gun.” Watch this video to see Kirsten demonstrate proper finger placement (and explain problems caused by improper finger positioning).
When you pull the trigger, you only want to engage the last section of your finger, in order to avoid unwanted muscle engagement and to achieve a smooth shot. Remember there is a “sweet spot” between the crease (first joint) and the tip of the finger. If you position the trigger in that “sweet spot”, you should see an increase in your accuracy. Don’t make the mistake of putting the trigger in the crease of your finger, as shown below.
A while back, the Precision Rifle Blog conducted a fascinating study of Muzzle Brakes. PRB figured out a way to show the actual “blast pattern” of gasses ejecting from the ports of muzzle brakes. The result was a fascinating (and eye-catching) series of images revealing the distinctive gas outflows of 20+ different types of muzzle brakes. If you are considering buying and installing a muzzle brake on your rifle, you should definitely review this important PRB Muzzle Brake Test.
For a prone shooter, particularly on dusty, dirty or sandy ground, muzzle blast is a major bummer. Muzzle blast can be very disturbing — not just for the trigger-puller but for persons on either side of the gun as well. Some muzzle brakes send a huge shockwave back towards the shooter, and others send blast towards the ground, kicking dirt and debris into the prone shooter’s face. If there was a way to illustrate those factors — shockwave and debris — that might help shooters select one brake design over another.
Cal Zant at PrecisionRifleBlog.com applied a unique blend of creativity and resourcefulness to try to answer that question for 20+ muzzle brakes. Using high-speed photography and household products, he captured the blast pattern of 20+ different brake designs for easy side-by-side comparison. Can you figure out how Cal managed to show muzzle brake blasts so clearly? His “hi-viz” solution, revealed in the article, is very clever. See the eye-opening results for 20+ brakes, with illustrative photos, by visiting the Precision Rifle Blog Muzzle Brake Ground Signature Test Page.
In the wintertime, it’s common to encounter problems with static electricity when throwing your powder charges. The static can cause powder kernels to cling to the surface of reloading components, and can cause powder clumping. Clumped or sticky powder may make your measure bind or grab in the middle of the cycle, which can throw off your charge weight. Here are a couple simple ways you can minimize the effects of static electricity and improve the consistency of your powder measuring.
Ground Your Powder Measure — If you’re throwing powder charges in the fall or winter and have problems with bridging or sticking powder, use a ground wire. Bullet-smith Victor Johnson (Johnson Precision Bullets) tells us: “I have a 25-foot piece of real small wire with alligator clips on each end. It’s that long so I can run it down the hall to a water pipe. Use the wire tie from a bread bag to hold it in a small roll to put in the range box. When using it at the range use a 6″ nail from the co-op or Lowe’s / Home Depot and just push it into the ground.”
Use Bounce Dryer Sheets — A quick pass with the thin sheets used in dryers will eliminate “static cling” on your plastic reloading parts like powder throwers, powder funnels, and reloading press guides. Thanks to Doc76251 for this tip.
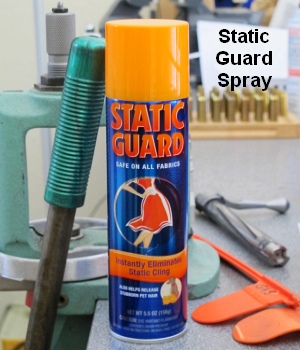
Reduce Electronic Scales’ Drift with Anti-Static Spray
Very sadly, GS Arizona, the creator of the Rifleman’s Journal website, passed away unexpectedly in June of 2022. Here is one of the many great tips he provided to handloaders through that website.
Apparently reducing static charges on and around electronic scales can reduce their propensity to drift, lessening the problem of “wandering zero”. Just how and why static charges interfere with scale performance is unclear, but many shooters have noticed that static electricity can cause electronic scales to behave strangely. So how do you reduce static charges around your digital balance? GS Arizona has found a very simple solution — an anti-static aerosol spray — that, by all indications, actually works. When this “spray-can solution” was suggested by a fellow shooter, GS was skeptical. However, he tried the stuff and he says that it really does help the scale maintain zero over time, with much less observed drift.
GS explains that the use of “Static Guard” spray helped mitigate the problem of a drifting zero on his Ohaus electronic scale: “My electronic scale… suffers from drifting zero (as they all seem to). I’ve read dozens of forum posts about drift and how to minimize its occurrence, so I know this problem isn’t limited to my scale or my workshop. Sometime last year, John Lowther mentioned the use of anti-static spray as a solution to the drift problem. John stated that the spray had virtually eliminated drift for him.”
GS found that the Static Guard actually worked: “The spray works great, just as John said it would. I spray all surfaces that I touch with my hands and arms as well as the pan (top and bottom), the metal tray on which the pan rests and the table under the scale. In six months or so of using the spray I’ve re-applied it about two or three times; it certainly isn’t something that you need to do each time you sit down to load. Before using the spray, it was not uncommon for me to re-zero the scale 10 times in the course of loading 72 rounds; now it might need it once during a session.”
Click Map to launch interactive webpage with info for all 50 states.
Going hunting soon? Need to find out about hunting licenses, deer tags, local regulations, and the best hunting areas? Then visit WheretoHunt.org. This website has an interactive map of the country. Simply click on a state to find the info you need.
For all 50 states, the NSSF provides information about hunting licenses and permits, where to hunt, hunter education classes, laws and regulations and more. For each state you’ll also find a link for required applications and license forms. Have a safe and productive hunt this year.
NRA publication Shooting Sports USA (SSUSA) has thousands of articles online, all free for the reading. Many of these stories have been written by top competitors, including National and Olympic Champions. You will find SSUSA articles spotlighted every week on the NRA Competitive Shooting Facebook page. We recommend you bookmark that page as a valuable resource. Here are four notable SSUSA articles that have been featured on Facebook this month. Go to SSUSA.org to see even more current articles, with new content every day.
Here is an insightful, fairly lengthy 1850-word article about the phenomenon we call mirage. The article explains how and why mirage appears, how it can best be monitored, and how mirage can indicate both wind velocity and direction. Top competitors follow the adage “Mirage is your friend”, because mirage can often be the most important indicator of wind variables — sometimes even more important than wind flags. “The mirage is more sensitive than the flags since it has less inertia and momentum”, wrote Desmond T. Burke, in his book, Canadian Bisley Shooting, an Art and a Science.
Well worth reading, this SSUSA article talks about the properties of mirage. Here is a sample:
“Mirage — can make all the difference between a shot landing squarely in the X-ring or being victimized by an undetected downrange breeze. The true power of mirage is found in its ability to betray the subtlest of breezes downrange. Its fluid movement… can not only provide wind direction, but speed as well.
Typically, the ability to detect mirage is maximized on warm, sunny and sultry days. Expect mirage to be most pronounced in mid-morning or early afternoon, although it ignores these rules with regularity[.]
Mirage is extremely powerful at identifying winds of less than 12 mph, particularly those gentle breezes subtle enough to not even bother moving the flags.
When there is no wind, or a gentle head or tail wind, mirage will appear to be ‘bubbling’ directly up from the ground. Many call this ‘boiling’, and it is probably the easiest of all to detect.
As a general rule of thumb, when wind speed increases, overall height of the waves produced by the mirage is reduced. Large peaks and valleys in the waves mean that particular mirage is being driven by a very slight breeze. Conversely, crest size is reduced with wind speed, making it harder and harder to detect, until the mirage disappears entirely at somewhere around 12 miles per hour. In other words, the taller mirage’s waves appear, the slower the breeze.”
Authored by the late Glen Zediker, this article covers barrel break-in procedures. It is particularly useful for dealing with factory barrels. We CAUTION readers — with outstanding, hand-lapped custom barrels from top barrel-makers, you may want to do very little break-in — clean sparingly and keep barrel heat low. Do NOT use abrasives aggressively. On our Krieger and Brux barrels, we simply wet-patched every 2-3 rounds for 20 rounds and the barrels shot superbly from the start with minimal fouling. But for factory barrels, a moderate break-in process may prove beneficial.
Zediker explains: “Lesser, lower-cost barrels are going to have more pronounced … imperfections within the bore[.] These imperfections are largely tool marks resulting from the drilling and rifling processes. And if it’s a semi-automatic, like an AR-15, there might be a burr where the gas port was drilled. The goal of break-in is to knock down these imperfections, thereby smoothing the interior surface.”
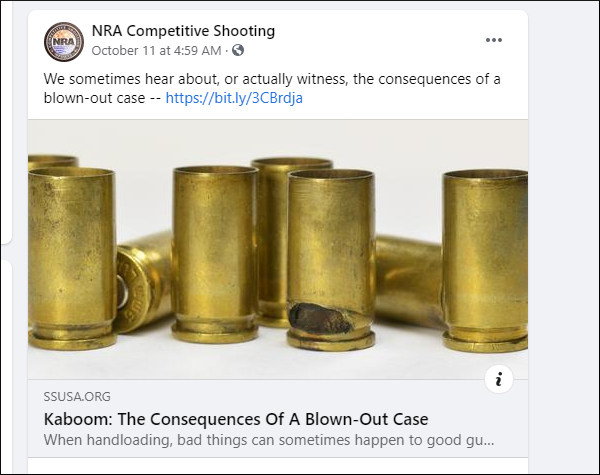
As one who has experienced a cartridge case-head blow-out with a 9mm pistol, this Editor is very conscious of the risks involved and the damage a blow-out can do to the pistol, to the magazine, and (worst of all) to the shooter. Even with new brass, the possibility of a case failure is always present. And even if the case remains intact, we’ve seen primer failures that create a dangerous jet back towards the pistol shooter. That’s why shooters should always employ protective eyewear whenever they shoot.
We love our wheelguns, but there’s no doubt that forcing cone damage can occur, particularly with hot loads and if your cylinder-to-barrel gap is excessive. This article explains how to inspect your revolvers, and how to mitigate the likelihood of forcing cone damage. The article also explains how to clean your revolvers properly. This is very important to avoid build-up of lead and powder residues.
2025 CMP Top Four Winners of Recurring $5000 Grants
Since 2005, the CMP has annually offered one-year scholarships to current high school seniors based on academic merit, humanitarian efforts, extracurricular activities, and marksmanship participation. Continuing this tradition, this year the CMP presented four, $5,000 annual scholarships ($20,000 over four years) to this year’s top four applicants, as determined by members of the CMP Scholarship Committee.
Each of the four recurring $20,000 scholarships are named in honor of past CMP Board members Harry Sieben, Carolyn Hines, Jon Bengston and former Chair Judith Legerski.
This year’s Four Top Scholarship recipients are…
Elisa Boozer, Oklahoma City, OK (Judith Legerski Scholarship)
A former member of the Oklahoma Sharpshooters junior team, Elisa is a multi-time Oklahoma State Champion for both smallbore and air rifle and qualified for the Junior Olympics five times for air rifle and four times for smallbore. She also found international success, earning silver in the 10-meter women’s air rifle junior competition at the Leppa Grand Prix in Finland. Elisa went on to earn her Junior Distinguished Badge from the CMP in 2023 and is an honorary life member of the Oklahoma Rifle Association.
She credits marksmanship for teaching her focus, hard work and community. Academically, Elisa was a straight-A student, taking AP Honors and dual credit classes. She joined the University of Kentucky rifle team this fall. She is a business major.
Hanna Goin, Walla Walla, WA (Jon Bengston Scholarship)
Hanna is a former member of the Walla Walla High School JROTC program’s rifle team, where her competitive marksmanship career began. While there, she competed multiple times at the Army JROTC and CMP National Championships and at the Junior Olympics in 2025. She also took first overall at the Idaho State Junior Olympics in air and smallbore rifle and was part of the Washington State Champion Precision Air Rifle Team.
Hanna has said that marksmanship has taught her that there is nothing desirable about staying within a comfort zone, helping her to stay mentally strong through adversity. Academically, she took Honors, AP and dual enrollment courses during high school. Hanna joined the Morehead State rifle team this fall. She is a pre-med major.
Katlyn Sullivan, Statesboro, GA (Carolyn Hines Scholarship)
Among several accolades, including multiple medals at the state and national level, Katlyn was a Georgia High School Association (GHSA) Individual State Champion in 2024 and 2025 and was a member of the All-Star State Team from 2023-2025. She was also a four-time qualifier for the National Junior Olympics in air rifle and was a two-time qualifier for smallbore. In 2023, she earned her Junior Distinguished Badge.
Katlyn has said marksmanship has taught her leadership, a growth mindset and how to achieve her goals – changing how she handles setbacks. Academically, Katlyn finished second out of 392 other students, mastering multiple AP classes, and she earned a place in the National Honor Society. Katlyn joined the Nebraska Cornhuskers rifle team this fall. She is a mechanical engineering major.
Dominic DeBenedetto, Prairieville, LA (Harry Sieben Scholarship)
Domonic began marksmanship through his local 4-H program at just nine years old. He’s a six-time Nationals qualifier and placed fifth overall at the 4-H Nationals in air rifle (his team placing first in both air rifle and smallbore). He is also an accomplished rifle silhouette competitor who has competed in local, regional and national championships in the discipline, and he takes part in pistol/air pistol shooting.
He credits marksmanship for leading him to a role as an ambassador within his community – hoping to make a difference in the lives of other youth. Domonic finished in the top 3% of his 500-student class. He has enrolled at Louisiana Tech as an engineering major.
Other Scholarship Winners for Fall 2025
In addition to the 4-year recurring $5K scholarships, the CMP offers $1000, $3000, and $5000 one-time grants to qualified junior marksmen. These $1000, $3000, and $5000 scholarships can fund any accredited education, technical/trade school, or vocational program. Shown below are the eleven $5000 one-time scholarship winners for 2025. There were also 32 $3000 grant recipients, and 80 $1000 grant recipients.
At the request of our readers, we provide select “Deals of the Week”. Every Sunday afternoon or Monday morning we offer our Best Bargain selections. Here are some of the best deals on firearms, hardware, reloading components, optics, and shooting accessories. Be aware that sale prices are subject to change, and once clearance inventory is sold, it’s gone for good. You snooze you lose.
NOTE: All listed products are for sale to persons 18 years of age or older. No products are intended for use by minors.
1. Palmetto State Armory — CANIK 9mm Pistol Sale and REBATE
⏺️ » Good handguns with Factory Rebates up to $100
If you’re in the market for 9mm target or carry pistol check out the CANIK TP9SFx and MC9L pistols now on sale at Palmetto SA. The full-frame CANIK TP9SFx is great for gun games with a good trigger, long sight radius, and ability to mount red-dot (reflex) optics. The more compact CANIK Mete MC9L has adjustable backstraps, is also red-dot capable, and despite its compact size it boasts a 17+1 capacity. NOTE: CANIK is offering significant rebates (up to $100) on many handguns through 9/30/2025. To qualify for a rebate: 1. Purchase a qualifying CANIK pistol; 2. Scan the QR Code; 3. Complete the Online Rebate Form.
2. Amazon — RCBS Chargemaster Link, $299.99
⏺️ » Popular Electronic Scale/Dispenser with Bluetooth App
The RCBS Chargemaster Link is a top-grade electronic powder scale/dispenser. This unit is fast and accurate. It also connects with an RCBS reloading App via Bluetooth. Using the RCBS ChargeMaster Link is easy. You can use the keypad or run the RCBS App that allows you to customize powder dispensing settings. The ChargeMaster Link’s load cell and electronics are extremely accurate, providing precise measurements with all powder types for rifles and handguns.
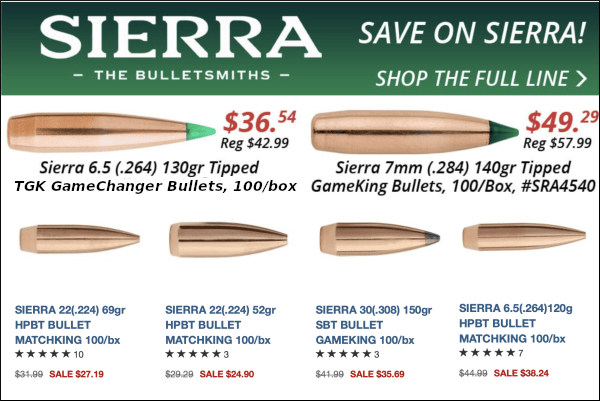
3. Graf & Sons — Sierra Bullet Sale, Save 15%
⏺️ » Major savings on excellent match and hunting bullets
Sierra bullets are a top choice for hunting, target shooting, PRS/NRL competition, and self-defense. Right now a vast selection of Sierra bullets are on sale at Grafs.com. Save 15% on popular .22, 6mm, 6.5mm, .277, 7mm, and .308 Caliber rifle bullets, plus pistol projectiles, and get $12.95 flat rate shipping. For example the .224 40gr BlitzKing is just $28.04/100, the 6mm 107gr MatchKing is just $38.24/100, and the 6.5mm 120gr ProHunter is just $35.69/100. There are dozens of other Sierra bullet types on sale. NOTE: If Graf’s doesn’t have the Sierra bullets you want, Midsouth has 28 Sierra bullet types on sale right now. Midsouth deals include: .224 60gr MatchKing $21.99/100; 6mm 110gr MatchKing $99.99/250, .308 155gr TMK, $49.99/100.
4. Amazon — Lyman 8-station Turret Press, $279.99
⏺️ » 8-station turret press is great for loading multiple cartridge types
The 8-station Lyman Brass Smith All-American 8 Press (#ad) is an impressive product. This sturdy turret press is made from heavy-duty cast iron. The 8-die station turret will hold up to four 2-die sets. Below the turret is a rigid cast iron frame, housing a 1″-diameter ram and compound linkage. NOTE: With a $279.99 price on Amazon, the 8-station Lyman is $109 cheaper than the $389.05 7-station Redding T-7. No question, that’s a significant price advantage.
5. EuroOptic — TriggerTech Trigger Sale, 34-40% Off
⏺️ » Save up to 40% on popular triggers for bolt guns and ARs
Upgrading your trigger is an efficient way to improve performance. We like the TriggerTech line of triggers. Currently there are a number of very good TriggerTech triggers on sale at EuroOptic. You will find nice, adjustable triggers for Remington 700s and Rem 700 clone actions. In addition, TriggerTech offers a large selection of AR triggers suitable for both match and defensive applications. Save up to 40% with this sale.
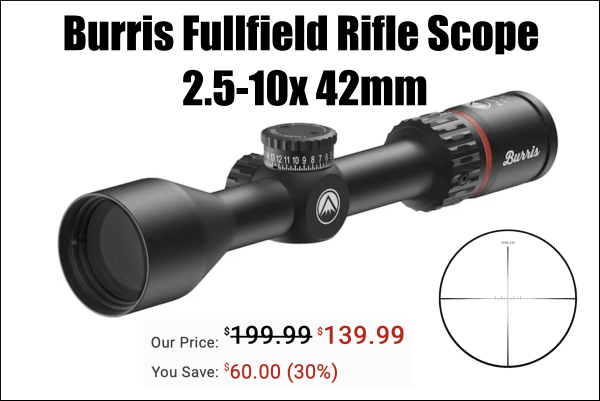
6. Midway — Burris Fullfield Scope, $139.99
⏺️ » Good, light-weight hunting rifle scope at ultra-low price
Need a compact, lightweight, affordable optic for your hunting rifle? Check out this Burris Fullfield 2.5-10x42mm, now just $139.99 on sale ($60 OFF). Constructed from a single piece of durable aluminum, the Fullfield’s 2.5-10X magnification range is just about ideal for game hunters, and the scope’s mere 15-oz. weight reduces the burden of your rifle in the field. The knobs offer smooth elevation/windage adjustments, and the Wind MOA reticle is very good for hunting. This scope comes with the Burris “Forever” warranty.
7. Amazon — Hornady Rapid Safe, $112.24
⏺️ » Good fast-access handgun safe for home or shop
Prevent firearm accidents, theft, and misuse with the Hornady Rapid Safe Keypad Vault RFID (#ad) now $112.24 on sale. This rapid access safe can store handguns, ammo, and/or valuables. With the RFID technology, this safe can be opened in seconds. This Hornady Rapid Safe is made from 14-gauge steel and has a thick steel lid for added security. A pre-drilled housing allows you to bolt this safe to a secure structure. This safe has a back-up mechanical lock.
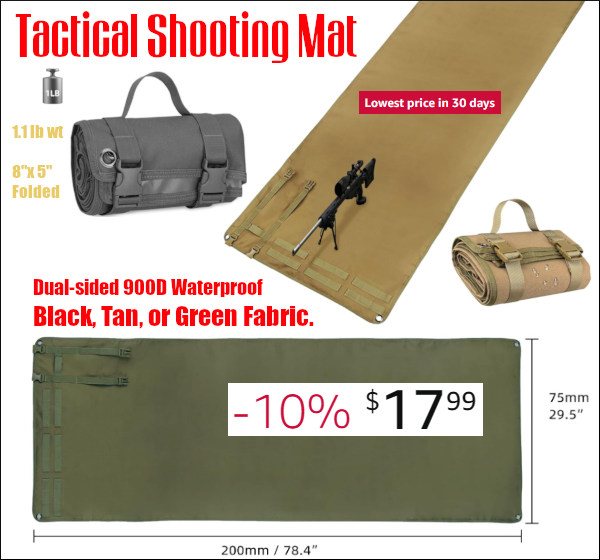
8. Amazon — Tactical Shooting Mat, $17.99
⏺️ » Very affordable waterproof nylon mat
All shooters need a good, durable shooting mat. A good, low-cost option is this Tactical Shooting Mat. Priced at just $17.99 on Amazon (#ad), this mat measures 78.4″ x 29.5″, long enough for even a tall shooter. The 900D Nylon fabric is waterproof with good tear resistance. This mat can do double-duty as a sleeping mat for camping. This mat also features 2 rows of MOLLE mil-spec webbing. Note, the Amazon header erroneously lists a 98″x29″ size. This mat is actually 78.4″ x 29.5″ inches.
9. MidwayUSA — Vortex Diamondback Gen 1 Binoculars, $129.99
⏺️ » Save $100 on good compact binoculars for hunters
Hunting season is almost here. Every hunter should have a decent set of binoculars to spot deer and elk. These 10-power Vortex Diamondback Binoculars are rubber-armored and 100% weatherproof with O-Ring seals. Get these for just $129.99, a 43% savings off the regular $229.99 price. These binocs come with Rainguard eyepiece cover, lens covers, comfort neck strap, and a deluxe carry case.
10. Amazon — Frankford Arsenal Powder Funnel Kit, $29.99
⏺️ » Handy smooth-flow funnels with 8 sizes
Charging cartridges has never been so easy. The Frankford Arsenal Aluminum Powder Funnel Kit (#ad) includes 8 interchangeable nozzles, eliminating the need for caliber-specific funnels. Each nozzle fits over the neck of your brass, providing a smooth surface for powder to flow while avoiding spills. Overall, this funnel kit makes accurate powder measurements a simple process.
As an Amazon affiliate, this site can earn revenues through sales commissions.


 The last half-inch or so of your barrel is absolutely critical. Any damage (or abnormal wear) near the crown will cause a significant drop-off in accuracy. Here are ways you can check the end of your barrel, using a common Q-Tip.
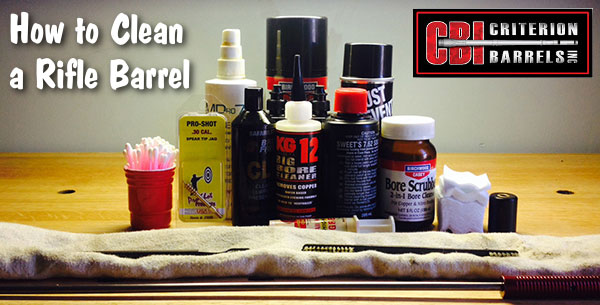


 Apparently reducing static charges on and around electronic scales can reduce their propensity to drift, lessening the problem of “wandering zero”. Just how and why static charges interfere with scale performance is unclear, but many shooters have noticed that static electricity can cause electronic scales to behave strangely. So how do you reduce static charges around your digital balance? GS Arizona has found a very simple solution — an anti-static aerosol spray — that, by all indications, actually works. When this “spray-can solution” was suggested by a fellow shooter, GS was skeptical. However, he tried the stuff and he says that it really does help the scale maintain zero over time, with much less observed drift.