Let’s say you’ve purchased a new scope, and the spec-sheet indicates it is calibrated for quarter-MOA clicks. One MOA is 1.047″ inches at 100 yards, so you figure that’s how far your point of impact (POI) will move with four clicks. Well, unfortunately, you may be wrong. You can’t necessarily rely on what the manufacturer says. Production tolerances being what they are, you should test your scope to determine how much movement it actually delivers with each click of the turret. It may move a quarter-MOA, or maybe a quarter-inch, or maybe something else entirely. (Likewise scopes advertised as having 1/8-MOA clicks may deliver more or less than 1 actual MOA for 8 clicks.)
Reader Lindy explains how to check your clicks: “First, make sure the rifle is not loaded. Take a 40″ or longer carpenter’s ruler, and put a very visible mark (such as the center of an orange Shoot’N’C dot), at 37.7 inches. (On mine, I placed two dots side by side every 5 inches, so I could quickly count the dots.) Mount the ruler vertically (zero at top) exactly 100 yards away, carefully measured.
Place the rifle in a good hold on sandbags or other rest. With your hundred-yard zero on the rifle, using max magnification, carefully aim your center crosshairs at the top of the ruler (zero end-point). Have an assistant crank on 36 (indicated) MOA (i.e. 144 clicks), being careful not to move the rifle. (You really do need a helper, it’s very difficult to keep the rifle motionless if you crank the knobs yourself.) With each click, the reticle will move a bit down toward the bottom of the ruler. Note where the center crosshairs rest when your helper is done clicking. If the scope is accurately calibrated, it should be right at that 37.7 inch mark. If not, record where 144 clicks puts you on the ruler, to figure out what your actual click value is. (Repeat this several times as necessary, to get a “rock-solid”, repeatable value.) You now know, for that scope, how much each click actually moves the reticle at 100 yards–and, of course, that will scale proportionally at longer distances. This optical method is better than shooting, because you don’t have the uncertainly associated with determining a group center.
Using this method, I discovered that my Leupold 6.5-20X50 M1 has click values that are calibrated in what I called ‘Shooter’s MOA’, rather than true MOA. That is to say, 4 clicks moved POI 1.000″, rather than 1.047″ (true MOA). That’s about a 5% error.
I’ve tested bunches of scopes, and lots have click values which are significantly off what the manufacturer has advertised. You can’t rely on printed specifications–each scope is different. Until you check your particular scope, you can’t be sure how much it really moves with each click.
I’ve found the true click value varies not only by manufacturer, but by model and individual unit. My Leupold 3.5-10 M3LR was dead on. So was my U.S.O. SN-3 with an H25 reticle, but other SN-3s have been off, and so is my Leupold 6.5-20X50M1. So, check ‘em all, is my policy.”
From the Expert: “…Very good and important article, especially from a ballistics point of view. If a ballistics program predicts 30 MOA of drop at 1000 yards for example, and you dial 30 MOA on your scope and hit high or low, it’s easy to begin questioning BCs, MVs, and everything else under the sun. In my experience, more than 50% of the time error in trajectory prediction at long range is actually scope adjustment error. For serious long range shooting, the test described in this article is a MUST!” — Bryan Litz, Applied Ballistics LLC.
Bryan also uses a Tall Target Test to determine true click values. CLICK HERE to read a detailed, explanatory article about Litz’s Tall Target Test.
This article, as published in AccurateShooter.com, contains copyrighted content. It shall not be republished in whole or in part without advanced permission in writing. The act of republishing constitutes legal consent to licensing fees.
Want to see some handgun shooting fun on TV tonight? Today Shooting USA television will feature the 2024 IDPA National Championship on the Outdoor Channel.
The International Defensive Pistol Association (IDPA) sponsors practical competitions that focus on skills used with concealed handguns. More than 370 competitors gathered at the 2024 IDPA Nationals in Alabama. The event ran August 15-17, 2024 at the CMP Talladega Marksmanship Park in Talladega, Alabama.
The IDPA event airs Wednesday 11/19/25 at 9:00 PM Eastern/Pacific, 8:00 PM Central on the Outdoor Channel. If you miss the broadcast you can view the episode at any time for $0.99 on Vimeo. Or, subscribe to see all Shooting USA shows on Vimeo as often as you wish for $2.99 per month.
NOTE: The 2025 Championship was held in September at the Mission 160 Range in Whitewright, Texas. Here is a video showing highlights from the 2025 IDPA Nationals event:
What More? CLICK HERE for another 2025 IDPA Championship Video with Music.
Basics of IDPA Competition — Equipment and Scoring
Most of our readers are rifle guys, but it’s fun to shoot a pistol match now and then. You don’t need a lot of equipment, and if you shoot IDPA (Int’l Defensive Pistol Assn.) matches, you can really win with a $400 pistol and $25.00 worth of bulk 9mm ammo. That’s a bargain compared to what you’ll spend on a competitive PRS or F-Class rig and custom hand-loads.
If you want to get into the IDPA game, Shooting Sports USA has a good article that explains the basic rules and classifications. IDPA is not your grandad’s bullseye pistol match. There is movement and action. Stages are timed, and competitors engage targets from cover if available. Singled-handed shooting is sometimes required, as is shooting while moving. You can compete with pretty much any handgun suitable for self-defense — but no $4000 Raceguns with fancy optics. The fact that you can be 100% competitive without spending a ton of money is what makes IDPA so popular.
Along with SSP and ESP, there are three other main IDPA classes: Custom Defensive Pistol (CDP) for .45 ACPs (mostly 1911 types), Concealed Carry Pistol (CCP), and Revolver (REV). All classes have a minimum power factor. Scores are based on time and shot placement on the IDPA target.
IDPA Scoring System
The official IDPA Target (right) has multiple scoring zones. If you don’t hit the target’s center mass zone or head zone (both appear green in illustration), you drop one or three points. Here’s the formula: Score (in seconds) = Time + Points Down + Penalties. In IDPA, “points down” (and penalties) are added to your time. If you hit the outer edge of the target, you get 3 points down. Nearer center can be 1 point down. Center hit or head shot is 0 points down. See IDPA Scoring for Dummies.
Here’s a cool way to save money — but you need to act quickly. Today — November 19, 2025 — Powder Valley Outdoors is offering FREE SHIPPING on orders over $99.00. So if you need powder, primers, bullets, brass, ammo or other products (including reloading gear), head over to PowderValley.com and take advantage of this special ONE-DAY Only deal on 11/19/2025!
NOTE: In addition to today’s FREE Shipping offer, Powder Valley is currently offering FREE Hazmat on qualifying orders of $599.00 or more. NOTE: This is a completely separate deal from the 11/19/2025 one-day FREE Shipping offer. But it can save you $23 with a large order of powder and/or primers.
Hunting season is underway now across the country. You’ll definitely want to zero your hunting rifle before the hunt, and you need to know how your shots will impact with a cold barrel.
Commonly, hunters won’t have the ability to fire one or two fouling shots before heading out on a hunt. Therefore it’s important that a hunter understands how his rifle shoots with a “cold bore shot”. Both the point of impact (and possibly velocity), may be different with a cold bore than with a barrel that has been warmed and fouled with a series of shots. In this video from the U.S. Army Marksmanship Unit (USAMU), you’ll learn how to determine your cold bore point of impact (POI) for a rifle that just been cleaned, as well as the cold bore POI with a barrel that has already been “fouled in”.
SGT Joe Hein of the USAMU shows how to plot cold bore POI with both a clean bore and a fouled bore. Note that the “cold bore” shot from a fouled barrel was closer to the follow-up shots than the cold bore shot from a clean barrel. This is typical of many factory barrels. SGT Hein provides a simple way to understand your rifle’s cold bore performance. Hein’s advice can keep you from missing that long range shot at that big buck on opening day. A little time spent on the range before that critical first shot will help ensure you have meat in the freezer this season.
Do you find that the crosshairs in your scope get blurry after a while, or that you experience eye strain during a match? This is normal, particularly as you get older. Focusing intensely on your target (through the scope or over iron sights) for an extended period of time can cause eye strain. Thankfully, there are things you can do to reduce eye fatigue. For one — breathe deeper to take in more oxygen. Secondly, give your eyes a break between shots, looking away from the scope or sights.
In our Forum there is an interesting thread about vision and eye fatigue. One Forum member observed: “I have noticed recently that if I linger on the target for too long the crosshairs begin to blur and the whole image gradually darkens as if a cloud passed over the sun. I do wear contacts and wonder if that’s the problem. Anyone else experienced this? — Tommy”
Forum members advised Tommy to relax and breath deep. Increase oxygen intake and also move the eyes off the target for a bit. Closing the eyes briefly between shots can also relieve eye strain. Tommy found this improved the situation.
Keith G. noted: “Make sure you are still breathing… [your condition] sounds similar to the symptoms of holding one’s breath.”
Phil H. explained: “Tom — Our eyes are tremendous oxygen hogs. What you are witnessing is caused by lack of oxygen. When this happens, get off the sights, stare at the grass (most people’s eyes find the color green relaxing), breath, then get back on the rifle. Working on your cardio can help immensely. Worked for me when I shot Palma. Those aperture sights were a bear! The better my cardio got the better and longer I could see. Same thing with scopes. Try it!”
Watercam concurred: “+1 on breathing. Take a long slow deep breath, exhale and break shot. Also make sure you take a moment to look at the horizon without looking through rifle or spotting scope once in a while to fight fatigue. Same thing happens when using iron sights.”
Arizona shooter Scott Harris offered this advice: “To some extent, [blurring vision] happens to anyone staring at something for a long time. I try to keep vision crisp by getting the shot off in a timely fashion or close the eyes briefly to refresh them. Also keep moisturized and protect against wind with wrap-around glasses”.
Breathing Better and Relaxing the Eyes Really Worked…
Tommy, the shooter with the eye problem, said his vision improved after he worked on his breathing and gave his eyes a rest between shots: “Thanks guys. These techniques shrunk my group just a bit and every little bit helps.”
Read more tips on reducing eye fatigue in our Forum Thread: That Vision Thing.
To avoid eye fatigue, take your eyes away from the scope between shots, and look at something nearby (or even close your eyes briefly). Also work on your breathing and don’t hold your breath too long — that robs your system of oxygen.
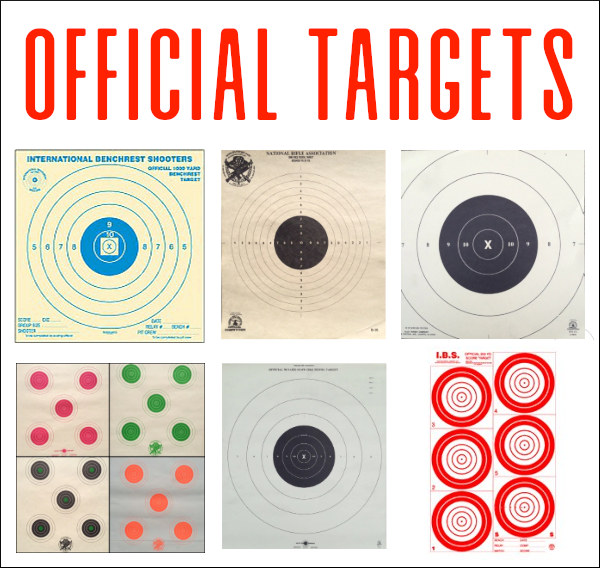
While some shooting disciplines have moved to electronic targets, most shooting matches still use paper targets, which must have precise dimensions for the particular distance and discipline. If you need correctly-sized targets for specific shooting disciplines (such as NRA Smallbore, F-Class, and 1K Benchrest) check out the links in this article. Precise, dimensionally-correct competition targets are produced by a half-dozen specialty printers. In this article we provide links to the leading target sellers, with a chart showing “who’s got what”. Look for your particular discipline and the vendors will be specified.
Sources for Official Shooting Competition Targets:
AccurateShooter.com offers dozens of FREE, printable targets for target practice, load development, and fun shooting. We also offer a few of the most popular NRA Bullseye targets. One or more of these printable targets should work for most training purposes. However, some readers have asked: “Where can we get the real targets… exactly like the ones used in NRA, IBS, and NBRSA shooting matches?”
All these vendors carry nearly all the NRA High Power and Smallbore targets, including the smaller F-Class targets. National Target has the F-Class and High Power targets, including 100-yard reductions of the 200, 300, and 600-yard military targets.
Here are some of the air rifle, smallbore, and High Power targets at Creedmoor Sports:
Orrville Printing currently sells IBS targets for rimfire (50 yard) benchrest, short-range centerfire Benchrest (100, 200, 300 yards), Hunter BR Rifle (100, 200, 300 yards), plus the official 600-yard and 1000-yard IBS targets. National Target Company also has most of the IBS targets. NBRSA short-range, 600-yard, and 1000-yard benchrest targets are available directly from the NBRSA Business Office. Send an email to nbrsa@icloud.com or call (434) 993-9201.
Good Source for Specialty Targets and Target Stands
Need Steel, Cardboard Silhouettes or specialty targets? ALCO Target Company in Duarte, California is the USA’s leading producer of the full spectrum of shooting targets including paper targets, cardboard targets, steel targets, and target stands.
At the request of our readers, we provide select “Deals of the Week”. Every Sunday afternoon or Monday morning we offer our Best Bargain selections. Here are some of the best deals on firearms, hardware, reloading components, optics, and shooting accessories. Be aware that sale prices are subject to change, and once clearance inventory is sold, it’s gone for good. You snooze you lose.
NOTE: All listed products are for sale to persons 18 years of age or older. No products are intended for use by minors.
EuroOptic — Major Multi-Brand Optics Sale, up to 65% Off
⏺️ » Fantastic Deals on major brand optics
EuroOptic.com is running a major clearance sale this week on big name optics. You can save hundreds on quality scopes from Vortex, Leupold, Burris, Althon, Schmidt & Bender, and many other brands. This Limited Time Sale at EuroOptic offers huge savings up to 60% with specials and close-out deals. Click these links for sale listings by manufacturers: Vortex | Leupold | Burris | Swarovski | Athlon | Schmidt & Bender.
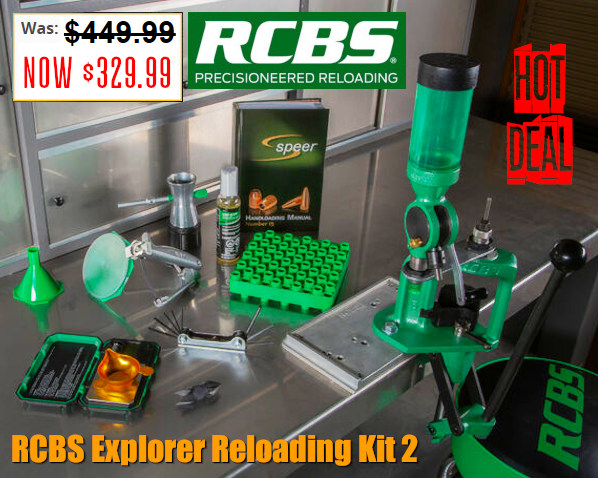
Midsouth — RCBS Explorer Reloading Kit 2, $329.99
⏺️ » Great price for everything you need — press, powder measure, scale etc.
For folks getting started with hand-loading, a great basic package is the RCBS Explorer Reloading Kit 2. On sale for $329.99 at Midsouth, this RCBS Package features pretty much all you need to load rifle and pistol ammo: Reloader Special 5 single-stage press, Uniflow-III Powder Measure, 1500gr digital scale, hand priming tool, powder funnel, powder trickler, hex key set, deburring tool, loading block, and Case Slick spray lube. You even get a Speer Reloading Manual.
The First Shot, the CMP’s online magazine, features a well-written article on Prone Shooting Technique by SPC Matthew Sigrist of the U.S. Army Marksmanship Unit (USAMU). The article covers all the major points of gun hold and body position: hand position, elbow position, stock weld, buttstock placement, and sling position/tension.
Keep it Steady — The Elements of a Good Prone Position
Part 1 — Building the Position By SPC Matthew Sigrist
Imagine the following scenario: You are at the last stage of fire in the National Trophy Individual Match, firing at the 600 yard line in the prone position and every point matters. What should you reflect on as you prepare to shoot this final string? As your eyes cloud from sweat, you realize that all you have to rely on is your experience and knowledge of the fundamentals.
During the National Trophy Individual Match, you will fire 60 percent of your shots from the prone position. This article will address the fundamentals of a good prone position and help you learn the techniques required to be successful in both the slow and rapid-fire stages of National Match competition.
This article will be divided into two parts. In part one, we will discuss the elements of a good prone position. In part two, we will cover the techniques you will in the rapid-fire and slow-fire stages.
The Fundamentals
The fundamentals are the building blocks of a position. Much like the framework of a house, a correct application of the fundamentals ensures a solid and stable structure. Since each person’s position will depend on their particular body build and shape, there is no “perfect position” that applies to everyone. Experience, practice and knowledge of the correct fundamentals will dictate the best position for you.
There are six key elements of any position. The purpose for these six points is to achieve a solid platform that allows for consistent sight alignment using the least amount of muscle tension.
1. Placement of the Firing Hand (the hand that pulls the trigger)
The firing hand needs to be placed high on the pistol grip. This high hand position will give you better control of the rifle. Combined with a firm grip there will be a reduced amount of hand movement when pulling the trigger. Wrap your thumb over the three fingers on the pistol grip (excluding the trigger finger). This will help isolate the movement of the trigger finger.
2. Placement of the Non-firing Hand (the hand supporting the rifle).
The non-firing hand should grip the handguard or stock in the flat portion of the hand between the thumb and forefinger. The fingers should curl naturally around the stock, but they should not grip it tightly. The position of the hand on the stock will depend on the physical size of the shooter. Generally speaking, taller shooters with longer arms will grip the rifle further out, near the sling swivel, while shorter shooters will need to pull their hand rearward. This is sometimes referred to as “short-stocking” the rifle.
3. Stock Weld
Stock weld is the contact that the face makes with the stock. It is important because it directly effects your sight alignment. Consistent head placement will help you achieve consistent sight alignment. The human head weighs an average of 8 to 10 pounds. The full weight of the head must rest on the stock. In doing this you achieve two things, a relaxed neck and reduced recoil because of the pressure of the head.
4. Placement of the Rifle (the contact that is made in the firing shoulder)
The rifle butt placement needs to be consistent. If this changes between shots, it effects your sight alignment and the effect of recoil. In the prone position the rifle will sit lower in the shoulder compared to other shooting positions. This allows for a more forward head and a lower position as a whole.
5. Position of the Sling
The sling should be high on the arm, above the bicep. This way the sling will have less leverage on the arm so it doesn’t cut off the circulation.
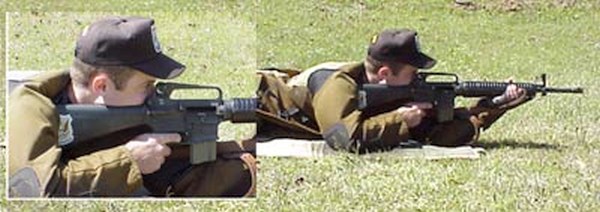
Demonstration of the placement of the firing elbow (left) and non-firing elbows (right).
6. Placement of both the firing, and non-firing elbows
A guideline for non-firing elbow placement is that there should be 1 ½’’ to 2’’ gap between your non-firing arm and the rifle’s magazine. (NOTE: this references the AR-15 service rifle) Your arm should be almost straight up and down; this will transfer the weight directly down the arm and not to the side (see picture above). Think of the firing arm as only a kind of kickstand, it doesn’t support weight it only holds the firing hand in position.
Variations of the Prone Position
There are two main variations of the prone position; open/spread legged, and bent-legged. The two types will be discussed below.
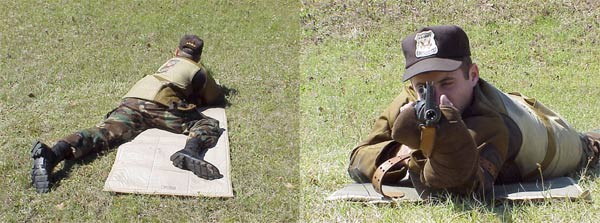
Open/Spread Leg Position
Demonstration of the Open/Spread Leg Position.
The first position is the open/spread legged position. This is when the shooter spreads their legs shoulder width or more apart. This allows for a more forward pressure on the sling and elbows. This position requires a tighter sling and solid elbow placement. The rifle should sit tight in the shoulder. With this position, your body will be farther behind the rifle compared to the bent leg position, allowing for minimum disturbance from recoil.
Bent Leg Position
Demonstration of the Bent Leg Position.
The bent leg position is when the shooter bends the firing side leg up towards the firing hand making the knee at a rough 90 degree angle to the body. The non-firing leg will remain straight and inline with the body. This will take pressure off the lungs and heart minimizing the pulse from the chest as well as easing the pressure on the lungs which will allow for easy breathing and control.
Summary
You now know the fundamentals of a good prone position, as well as the two types most commonly used. Extensive dry-firing will reveal which is the best position for you. If possible, have a friend take pictures of you in position. This will enable you to better diagnose and correct your errors. Remember, a position must be both fundamentally sound and comfortable. Practice frequently to learn your new position and to develop the conditioning required to endure long days on the range.
Here’s a simple solution for lumpy front sandbags. Cut a small block the width of your fore-end and place that in the front bag between matches. You can tap it down firmly with a rubber mallet.
The block will keep the front bag nice and square, without bunching up in the center. That will help your rifle track straight and true. Rick Beginski uses wood (see photo), while our friend John Southwick uses a small block of metal. The metal block might work a little better, but the wood version is easier to make with simple tools. Shown above is a slick Delrin block with a built-in bubble level used with a quality J.J. Loh front rest. Using a good block on your front bag helps ensure that the actual top surface of your front bag is level, as distinct from the front rest assembly.
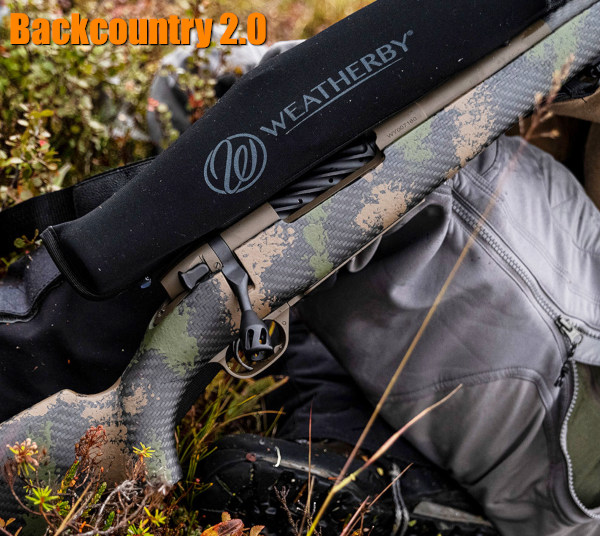
It’s the heart of hunting season in many parts of the country. Game hunters are heading out for their late fall deer hunts. For hunters making long treks in the back-country, reducing carry weight is a big deal. That’s why we’ve seen a trend among rifle-makers to introduce rifles that weigh significantly less. This is accomplished through use of carbon fiber stocks, carbon-wrapped or fluted barrels, and even titanium actions. The Weatherby rifles showcased here feature such lightweight components. For example, the Weatherby Mark V Backcountry 2.0 Ti (Titanium) model comes in at just 4.7 pounds before optics. That’s mighty light for a hunting rifle.
Weatherby Backcountry 2.0 Ti with titanium action, fluted barrel, and carbon-fiber stock, 4.7 pounds.
Light-Weight, Carbon-Stock Backcountry 2.0 from Weatherby
Here is good news for backcountry hunters. Weatherby’s Backcountry 2.0 carbon-stocked hunting rifles weigh well under 6 pounds before optics. There is even one titanium action model series that weighs just 4.7 pounds. The 2.0 series now offers both standard steel receivers or even lighter titanium receivers. And Backcountry 2.0 Carbon models are equipped with a new carbon fiber stock that is the lightest in the industry — weight is a mere 20 ounces for standard actions. For further weight savings, some models feature a tensioned carbon fiber-wrapped barrel. But all that high-tech doesn’t come cheap — MSRP for the Titanium action, carbon-wrapped barrel model is $3849.00!
Ultralight Carbon Stock — Weatherby’s new Blacktooth stock features a Carbon Link™ bedding system which engages the recoil lug and distributes recoil throughout the stock without the weight of a traditional aluminum bedding block. This makes the overall stock lighter and stiffer.
The Backcountry 2.0 Ti Carbon combines a tensioned carbon fiber barrel with the ultra-lightweight Titanium Weatherby Mark V action. This barrel system has shown excellent accuracy, making it a good choice for a long-range hunter. Registering a very low 5.3 lb starting weight, the Backcountry 2.0 Ti Carbon combines a titanium action with the Peak 44 Blacktooth stock — which Weatherby claims is the “lightest production carbon fiber stock on the market.”
Along with the new ultra-light elements, these Weatherbys have premium Mark V features: 54-degree bolt lift for fast cycling, fluted bolts, TriggerTech triggers, and Cerakote finish on metal parts. All the Backcountry 2.0 series rifles have a sub-MOA accuracy guarantee. CLICK HERE for Weatherby Backcountry 2.0 Field Test by Peterson’s Hunting.
Light is Right — Weatherby’s Backcountry 2.0 rifles weigh as little as 4.7 pounds (before optics).
Weights for Backcountry 2.0 Models range with chamberings:
Weight Saving Secrets — How Weatherby Achieved Such Light Weights GunsAmerica Digest reports: “A huge amount of the weight savings comes thanks to the updated carbon fiber Blacktooth stock by Peak 44. This stock uses what they call their Rock Solid Carbon Link bedding system which eliminates the need for a metallic bedding block. The Blacktooth stock weighs less than 20 ounces. The Backcountry 2.0 [series adds] both a carbon fiber stock and either fluted #1 MOD-profile or #2 MOD-profile carbon steel barrels or #4 MOD-profile BSF carbon fiber-tensioned barrel to achieve these light weights.” READ GunsAmerica Review.
To mitigate recoil Weatherby developed its new 3DHEX recoil pad — the gun industry’s first production 3D-printed pad. The 3DHEX’s three-dimensional honeycombed design extends the duration of the recoil pulse — taking away the sharp kick. Weatherby explains: “With the same amount of recoil spread out over a much greater time period, felt recoil is greatly reduced[.]” Backcountry 2.0 rifle recoil is also reduced by factory-fitted Accubrakes, contoured to match barrel profile.
Field Test of Titanium Action Weatherby Backcountry in 6.5-300 Whby Magnum
In this video, Hunter Todd Helms reviews Weatherby’s Backcountry T1 rifle in 6.5-300 Weatherby Magnum. This rifle is meant for fast and light travel in the backcountry. A fluted barrel, titanium action, and carbon fiber stock minimize weight. Todd says the 3DHEX recoil pad really does tame the magnum kick. This model also features a new streamlined muzzle brake.
Preparations Before The Hunt
1. Map Your Hunt and Notify Others — Before your hunt, make a plan and notify friends and family members about WHERE you are going and your intended return date and time. Print out a Google Satellite map and locate landmarks and trailheads. Mark where you plan to park your vehicle and give a copy of this map to friend and/or family members. A hunter may injure himself by falling off a rock, or tumbling in a creek-bed. After that kind of injury the hunter may be confused or unable to walk. If you get stranded in the wilderness, you want trusted persons to know where you are. So, before you leave on a trip, provide a map to a friend or family member. Show them where you will leave your vehicle, and where you expect to be every day of your hunting adventure.
2. Licenses and Permits — Make sure you have a valid hunting licenses and all the necessary tags. Begin this process with ample time before your intended hunt(s). The NSSF adds: “If you are crossing state or national borders, find out about any special considerations you must take care of. Border crossings can mean knowing about firearm transport laws or Chronic Wasting Disease-related regulations.”
3. Work on Your Fitness — On a multi-day hunt you may be trekking many miles. You need to be in good shape. If you are out of shape you may be putting yourself in a precarious situation, particularly if you underestimate the terrain difficulty. As the NSSF says: “Not being able to handle the conditions lessens your chances of success, can turn a great experience into an agonizing one and can endanger your health.”
4. Do Your Homework — Study the area you will be hunting. Talk to other hunters. Look at satellite photos. Get a real sense of the walking and terrain challenges. For a multi-day hunt, MAKE a PLAN. The NSSF states: “Eliminate surprises. Learn as much about where you will be staying, the area you will be hunting, what the weather might be like and what you need to bring[.]”
5. Rifle and Ammo — Make sure your rifle is sighted-in and your ammo is tested. Sight-in your rifle with the ammo you plan to use on your hunt. CLICK HERE for 4-Shot Sight-in Method. After sighting-in from the bench, confirm your zero by shooting from typical hunting positions (kneeling and with forearm supported on a rock or post).
6. Communications and GPS — Bring a GPS if you are in a wilderness area far from civilization. It’s a good idea to bring a cell phone, but you may not have coverage if you’re quite a distance from populated areas. A smart-phone also doubles as a digital camera to record your trophies. For navigation and safety, consider getting Garmin inReach Explorer+. This high-tech handheld unit features interactive SOS, connecting you to the GEOS 24/7 search-and-rescue monitoring center. They also allow you to send and receive text messages, no matter where you are, via advanced inReach satellite technology. Yes you can communicate even if you are miles from the nearest cell tower.
Visit WhereToHunt.org
There’s a great online resource for hunters that will help you find game locations in your state and ensure you have all the proper permits and game tags. WheretoHunt.org features an interactive map of the country. For all 50 states, the NSSF has compiled information about hunting license and permits, where to hunt, hunter education classes, laws and regulations and more. For each state you’ll also find a link for required applications and license forms.


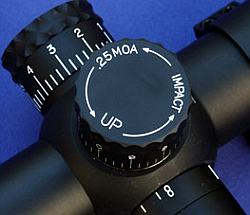 Reader Lindy explains how to check your clicks: “First, make sure the rifle is not loaded. Take a 40″ or longer carpenter’s ruler, and put a very visible mark (such as the center of an orange Shoot’N’C dot), at 37.7 inches. (On mine, I placed two dots side by side every 5 inches, so I could quickly count the dots.) Mount the ruler vertically (zero at top) exactly 100 yards away, carefully measured.

 Want to see some handgun shooting fun on TV tonight? Today Shooting USA television will feature the 2024 IDPA National Championship on the Outdoor Channel.
 Along with SSP and ESP, there are three other main IDPA classes: Custom Defensive Pistol (CDP) for .45 ACPs (mostly 1911 types), Concealed Carry Pistol (CCP), and Revolver (REV). All classes have a minimum power factor. Scores are based on time and shot placement on the IDPA target.


 Here’s a simple solution for lumpy front sandbags. Cut a small block the width of your fore-end and place that in the front bag between matches. You can tap it down firmly with a rubber mallet.