Many years ago, when we decided to do a story about SAKO’s TRG series of rifles, we remembered our friend Terje Fjørtoft in Norway. Terje has owned, and hunted with, both the TRG-22 (in .308 Win), and its big brother, the TRG-42 (chambered in .338 Lapua Magnum). Unlike many TRG owners in the USA, Terje has carried his “tactical hunters” into the field, and tested their effectiveness on large game in both coastal and mountain environments, in warm weather and cold. Terje tells us the TRGs have proven to be rugged and reliable. And they are accurate. The .308 Win TRG-22 delivers about 0.45 MOA groups at 420 yards shot from bipod. The .338 LM TRG-42 shoots about 0.55 – 0.7 MOA at that distance.
A Tale of Two TRGsby Terje Fjørtoft
I live in Brattvåg, along the coast of Norway, but I hunt and shoot at the nearby island “Fjørtoft” (same as my last name) and a small island outside Fjørtoft. I grew up on Fjørtoft as a child, and we hunt seals there in the spring and fall. The large, top photo shows me with my black TRG-42 338 Lapua Mag (“LM”) during a seal hunt a couple years ago. Click on the thumbnail at right to watch a video that shows me shooting the .338 LM. Most of the photos in this story are from that hunt. Because the .338 LM was really “overkill” on the seals (and expensive to reload), I replaced that rifle with a TRG-22 in .308 Winchester.
We hunt seals primarily for wildlife control. This is because the seals carry an internal parasite, called “Kveis”, a small worm that breeds inside the seals (after eating contaminated fish). When the seals expel the Kveis into the water, the Kveis larvae are consumed by the fish and then the fish become unfit to eat. The parasite literally eats the fish from the inside out. It’s not very pretty and it has hurt our Norwegian fishing industry. So there is an important purpose for our seal hunting. We hunt mostly from islands, targeting the seals in the water, and retrieving them with a small boat.
Because the seals spend most of their time in the water, a seal-hunter needs a very accurate rifle [to take head shots at distance]. I like the TRG-22 because it is very accurate out of the box, with a very nice bipod that works well in the field. The stock is comfortable with good adjustment range. The TRG features a 10-rd magazine and the barrel is pre-threaded for a muzzle brake or suppressor.
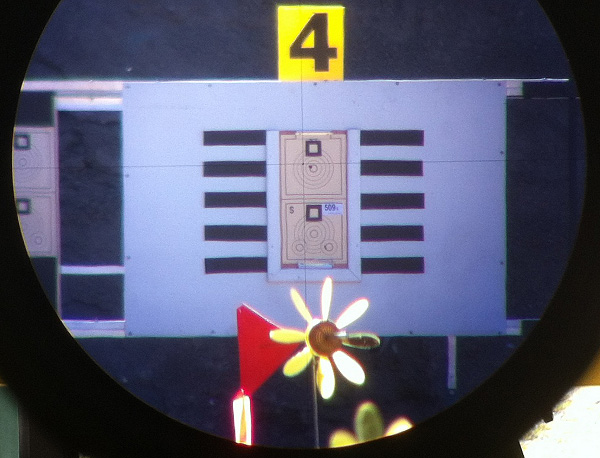
I have also used my TRGs for hunting big game, deer and what Americans call “Elk”. You can see, further down on this page, a picture from a hunting stand taken late in the evening, in the fading light. Yes I successfully bagged a nice buck during that trip with my TRG-42. When hunting, I use a Leica 900 rangefinder, Swarovski 7×42 Habicht binoculars, and a Silva windwatch. For Optics on the TRG-22, I have a Zeiss 6-24×56 scope, in Tikka Optilock rings. To get more scope adjustment I milled 0.9 mm off the front scope base mount. The Zeiss is great for viewing small targets past 400 meters. It was very difficult to find a longer shooting place than 575 meters on this Island (Uksnøy) but I found a place where I can shoot out to 930 meters, and I’ve made an 80-cm steel gong for a target. At this range, the bullet must fly nearly all the distance over the water.
Terje Shooting the TRG-42 without suppressor. Big recoil, big flash.
Both the TRG-22 and TRG-42 are very accurate right out of the box. The only thing I did before I first shot the TRGs was to clean the barrels very thoroughly. This is because the SAKO factory test shoots the gun without cleaning the barrel. I also adjust the cheek piece upward when shooting the rifles with a big scope. However, if you raise the cheek piece too high you can’t get the bolt out without removing the whole cheek piece. The only real modification I’ve made to my TRGs was to put rubber foot pads on the feet of the SAKO factory bipod. This gives the bipod better grip on slick surfaces such as concrete, or the rocks on the offshore islands.
.338 LM vs. .308 Win — Smaller Can Be Better
A few years ago I had a black TRG-42 (338 LM), but after a year, I sold it, and ordered a TRG-22 from the SAKO factory. After a one-year wait, I got the new green TRG-22 in February this year. One main reason I changed to .308 Win was the cost of ammo. I can reload .308 Win ammo for about one-third the price that it costs to reload .338 LM. One other reason is that my usual shooting distance is about 390 meters–at that distance the .308 is more than effective enough. Also, with the .338 LM, the barrel and the suppressor heated up after only a few shots, but with my new .308, I can shoot at my own pace without this problem. After my most recent shooting trip I once again confirmed how accurate, and fun-to-shoot, the TRG-22 is. I think now the TRG-22 has become my favorite plinking gun.
Though it is fun to experience the big boom and flash of the .338 LM, I’ll admit that it is just too much rifle for most applications. The .338 LM is REAL overkill for seal hunting. Here in Norway we have a rule that the smallest caliber we can use is 6.5×55 with a 140gr (or heavier) bullet, but everyone who hunts seals knows that the seals stay mostly in the water, and therefore you must take a headshot at distance up to about 200 meters. Making the headshot with a smaller caliber is advised for two reasons. First, when a big .338 bullet hits the water, there is a danger it will skip and ricochet quite some distance. Second, if you use too powerful a load/gun/caliber and take a headshot on a swimming seal, the seal sinks like a rock.
Reloading for the TRG-22 (.308 Win) With the TRG-22, I found it was easy to get an accurate load. My groups with 155gr Scenars are consistently good with a variety of different powders. I’ve tried both light and heavy bullets, but I favor the 155gr Scenars over the 185gr Scenars because the 155s fly a lot faster and drop less.
Three loads (all with Fed 210m primers) that have worked well are: 155gr Scenar with VV N150, 885m/sec; 155gr Scenar with Norma N-11, 890m/sec, and 185gr Scenar, VV N150, 770m/sec. Norma N-11 is a low-cost powder for target shooting. N-11 is similar to Norma 203B or Norma 202 but it varies quite a bit from lot to lot.
I use a RCBS Rock Chucker press, and currently use a standard RCBS full-length die kit to reload my .308 rounds. However, I recently ordered a Redding Competition 3-die set with a .335 bushing. I look forward to trying the Reddings. I have just started to test different seating depths. The 155s just “kiss” the lands at 74.10 mm. I’ve tried 74.00 mm, 74.10 mm and 73.55 mm, but so far saw no significant differences.
Reloading for the TRG-42 (.338 LM)
For the .338 LM, I started with a 250gr Scenar and 95 grains of Vihtavuori N-170. That load was very accurate at about 850 m/sec, but it produced excessive muzzle flash. And, in the winter, the muzzle velocity was inconsistent, and there was too much unburned powder. Next I tried Norma N-15, which proved very accurate at about 880 m/sec. With that load I shot my best TRG-42 group at 380 meters. I set the 250gr Scenar to touch the rifling with 93.2 mm COAL, and I used Federal 215m primers in Lapua-brand brass. Norma MPR2 and VV N-560 (860 m/sec) also were very accurate with the 250 Scenar.
My seal hunting bullet was the 200gr Nosler BT. This bullet grouped very well with 90-94 grains Norma N-15. Velocity was about 970m/sec if I remember correctly. I also tried the 300gr Sierra MK, and got 1/2″ 3-shot groups at 100 meters with 93.5 grains of VV N-170, but this combination produced terrible groups at longer range.
Loading for the .338 LM was not difficult — about the same as loading for .308 Win, except that you use nearly twice the amount of powder. I didn’t crimp the bullets in the neck, didn’t use any special tricks or neck lube. I used RCBS .338 LM full-length die. That functioned, but it would not be my first choice today. Overall, my better loads in the .338 shot in the 0.5-0.7 MOA range. My best group was four shots in 25mm (1″) at 380 meters (416 yards).
Hunting in Norway
I’m not a competitive sport-shooter. Normally, the only time I go to a “commercial” rifle range is to take the test for my hunting license. Every year, I must re-qualify for a shooting license to hunt big game and seals.
Hunters Tested Annually
In Norway, you must pass an actual shooting test before you can hunt big game. This test requires five shots at a deer silhouette target at 100 meters. No rests are allowed–you must shoot off-hand or with a sling only. You have to place five shots inside a 30 cm circle over the front leg.
Every big game hunter that passes this test is authorized to hunt at “dusk and dawn” and in moonlight. So, we do a lot of our hunting in the twilight hours. However, no night-vision or artificial illumination (spotlights) are allowed. We usually hunt deer at dusk and dawn. In the evening, we go on post two to three hours before it is dark, and sit there waiting for the deer to show up–hopefully before it is too dark. In the morning we go to the post one hour before you see any light of the sun, and wait for the deer to show up until the daylight. But when it is full moon we sometime have enough light to hunt in the middle of the night. In the photo, you can see a deer through the scope of my TRG-42. This was very late in the evening. CLICK HERE for BIG Photo.
Sound Suppressors for Hunting Rifles
Suppressors are legal to use for hunting in Norway. I have suppressors on all my rifles, even my little CZ 452 in 17 HMR. To me, shooting a rifle without a suppressor is like driving a car without an exhaust system. The suppressor reduces both noise AND recoil significantly. With a good suppressor, there is no loss of accuracy. The only “negative” in using a suppressor is extra weight on the end of the barrel.
I crafted my own home-made suppressor. It’s similar to my commercially-made TRG-22 suppressor, but the core is made from titanium to be lighter in weight and more corrosion-resistant. I used a lathe at work to craft the inside of the new suppressor. The core of the unit is built from a 27.5 cm X 40mm round bar of titanium while the outer cylinder is made from a 42mm stainless steel tube. I wanted to use titanium for the exterior cylinder as well, but I couldn’t source the right size titanium tube.
Commercial Suppressor on TRG-42
Comparing .308 Win vs. 6mmBR I also have a 6BR hunting rifle (compensated of course). I have a lot of field time with the 6BR rifle, and feel very confident with that gun. When I got the Krieger 6mmBR barrel on the SAKO Varminter, I fell in love with that rifle from day one, and that rifle is my first choice for small game hunting.
I also like the TRG-22 gun very much and enjoy it more and more with each new field trip. That .308 is my big game rifle and my long-range target rifle.
I recently tested my TRG-22 rifle at 387 meters. This was just “fun shooting” at steel plates, and I didn’t measure groups. But I was happy with the results. Once I corrected for the 5 m/sec crosswind, I was able to put five successive shots on a 10 cm (4″) diameter steel target at 387 meters (423 yards).
My SAKO Varminter in 6mm BR and my TRG-22 are two very different rifles. The TRG-22 is much heavier. I guess the TRG-22 is about 6.5-7 kg while my SAKO 6BR is about 4.5-5 kg, both with suppressor, scope, and bipod. The 6BR with suppressor is much quieter than the TRG-22 with suppressor. The recoil of the 6BR is a lot softer than the TRG-22. So far my 6BR is more accurate. A typical three-shot group with the 6BR is 25-40 mm at 387 meter (423 yards), and that is with just 10X magnification from a Zeiss scope. With my TRG-22, my 3-shot groups run about 50-60 mm, shooting with bipod and beanbag. But I think with a better .308 Win reloading die and more practice, I can improve my groupings with the TRG-22.
SPEC SHEET
The SAKO TRG-22 and TRG-42 are built in Finland by SAKO, a subsidiary of Beretta. In America, the guns are distributed by Beretta USA. Both TRGs (22/42) are available in forest green or a matte black textured finish. A two-stage match trigger is standard.
The stock is somewhat unconventional. It is an external shell, bolted to an internal metal chassis. The action bolts directly to the chassis, without bedding. The injection-molded stock is adjustable for comb height, length of pull (with spacers), vertical butt-pad height and cast-off.
Weight TRG-22 4.7 kg (black) 4.9 kg (green)
Barrel TRG-22 660 mm (26″), hammer-forged, optional stainless or phosphate finish
It’s Pistol Time at Camp Perry this weekend. Today Saturday July 17, 2021, Perry’s Pistol ranges will see hundreds of competitors for the President’s 100 Pistol Match, the National Trophy Individual Match, the National Trophy Team Matches, and the Glock Match. Tomorrow, July 18th, the handgun phase of the CMP National Matches concludes with the Oliver Hazard Perry Pop-Up Pistol Match, Military & Police Pistol Match, 1911 As-Issued Pistol Match, and the final Glock Match. After the last match of each day, the CMP Pistol Games Awards will be distributed to the top shooters. SEE 2021 CMP National Matches Calendar.
This video shows .45 ACP centerfire pistol competitors at Camp Perry
Civilians and military shooters competed together at the 2019 NTT Pistol Match.
The 2021 National Matches encompass multiple pistol competitions, including a Centerfire Pistol 900 Aggregate, a .45 Pistol 900 Aggregate, and a CMP Revolver Match. To learn more about CMP events at the 2021 National Matches at Camp Perry, visit the CMP Nat’l Matches Website.
It took decades of competition to acquire all those patches — that’s dedication to the sport.
See Photos from 2019 NRA Pistol Championships
Shooting Sports USA has a slide-show featuring 40 images from the 2019 NRA Pistol Championships at Camp Perry. SSUSA Editor John Parker noted: “A big thank you to Mr. John Rickards for his hard work on the firing line to grab the majority of these great images.”
HOW TO SEE 40 PHOTOS — IMPORTANT: Click the above photo. Then when you get to the SSUSA.org site, put your finger (or mouse arrow) on the first photo. Then SWIPE LEFT to see the next of 40 total images. As you progress, you can then swipe back and forth.
An American Tradition — National Pistol Matches at Camp Perry
The National Matches at Camp Perry are a great American tradition. Over the past 114 years, hundreds of thousands of competitors have attended the matches at Perry on the shores of Lake Erie. Don Weihl, an avid shooter now in his 80s, has great memories from pistol matches at Camp Perry. In a story for the CMP, Don recounts the halcyon days of pistol competition at Camp Perry, when thousands of shooters competed on the pistol firing lines each summer. Don attended over 40 matches at Camp Perry starting in 1963. Here is part of his account:
Best Camp Perry times were in the Sixties
The 1963 through 1967 years were the best…
There were more than 2,000 competitors each year. There were 600 targets — numbered 1 through 600, from left to right — across the ranges and grouped into six ranges, 100 targets wide. The matches ran like a well-oiled machine. There was a print shop on the base. All competitors could get a printed match report for each match, not too long after scores were in.
Most nights in those years, there were movies for the competitors and their families in the base theater. The mess hall in those years served three meals a day to over 3,000 hungry mouths – every day.
Forum member F-Class John is an avid F-Class competitor and expert handloader. John reviews reloading hardware and shooting-related products for his popular F-Class John YouTube Channel, which now boasts 220+ videos. John also does important product testing for AccurateShooter.com. Through his YouTube channel, John has reviewed many of the latest and greatest reloading tools and accessories. For today’s Video Showcase, we selected eight F-Class John tool and reloading product reviews.
If you like these selected videos, consider joining F-Class John’s Patreon Channel for live video meetings, more in-depth videos, and detailed explanations.
21st Century Hydro Press and Standard Arbor Press
John notes: “You can’t really talk about precision reloading without taking about inline dies and arbor presses. For my money there’s nothing better than the lineup from 21st Century Shooting. They offer the Hydro Seater which is hands-down the best manual seater out there as well as their standard arbor press which is great for taking on the road to push back bullets as needed.”
Primal Rights Competition Priming Seater (CPS) Review
If there is a Ferrari of priming tools, it has to be the Primal Rights Competition Primer Seater (CPS). This impressive bench-mounted tool allows very precise control over primer seating depth. A vertical tube holds primers ready for insertion. The action is smooth and precise. John believes that this is definitely the best priming tool on the market, though it may not be for everyone given its premium $600.00 price.
Lyman Powered Case Trimmer Review
The Lyman Case Trim Xpress is an efficient, precise unit that allows easy adjustment of trim length with a click-adjustable collar. The trimmer comes with a set of cartridge-specific bushings that index off the case shoulder. One nice feature is a variable speed control. For the price, $154.99 on Amazon, this trimmer delivers excellent performance. F-Class John has another video review of the Lyman Case Trim Xpress which shows set-up and operation.
Dillon 750 Tips and Tricks
The Dillon XL 750 is a favorite of high-volume reloaders. With the optional case feeder, the XL 750 offers high output with great reliability. And Dillon offers one of the best warranties in the business. In this video, F-Class John features upgrades including the Armanov tool-head holders from Europe. These are drilled and tapped for all FIVE stations allowing the user to put threaded dies in any station.
Gunsmithing Torque Wrench Comparisons
When you are working on custom rifles that might cost $5000+, and mounting scopes that can run $3000 (or more), you need to use very high-quality tools. Precise torque settings are essential, both to avoid damage to valuable parts, and to have the rifle and optic perform optimally. In this video, F-Class John looks at a variety of torque wrenches suitable for gunsmithing duties.
Concentricity Checking with Accuracy One Gauge
Every serious hand-loader needs a quality concentricity gauge. The Accuracy One Concentricity Gauge boasts a smart design that delivers precise, repeatable results. We like the unit’s easy adjustability and its ability to work in a variety of configurations. The Accuracy One Gauge measures internal and external neck runout of cartridge cases as well as seated bullet runout. It can also measure the runout of the ogive, bearing surface, and boat-tail of individual bullets. And it can even measure your primer pocket runout.
Teslong Rigid (Shaft) Borescope with Monitor
Seeing inside your barrel can provide clues to how well you’re cleaning and the bore’s overall health. One of the best tools on the market is the Teslong Rigid Borescope. This features a solid rod for easy use in barrels. Plus it comes with a self-contained high-definition viewing monitor so no smartphones or WiFi tablets are needed. If you’re looking for something more portable and a bit more versatile, try the Teslong Flexible Borescope, $99.99 including monitor. John was impressed with the new rigid Teslong he tested, and he likes having a dedicated monitor (no WiFi required).
Zero Turret Press with Whidden Sizing Die
The new Zero Press from Area 419 is arguably the best turret press ever crafted. It offers unrivaled precision, along with the highest-capacity turret head with NINE die/tool stations. Milled from billet aluminum and stainless steel, this press moves with the help of 14 bearings. In this video, F-Class John shows how to use a Whidden Gunworks full-length sizing die on the Zero Press. And John has two other video reviews of the $1200 Zero Press: 1. Zero Press First Thoughts Video; 2. Loading on a Zero Press.
Kirsten Weiss knows a thing about accuracy. She won the 2012 NRA Three-Position Women’s Smallbore Championship, while finishing as the National Overall Woman Champion. She used to shoot with the American team in top-level World Cup competition. Kirsten started shooting fairly late — at age 16. Despite her relatively late start, she earned a place on the University of Nebraska shooting team. That literally opened up a new world for Kirsten: “During the course of my career, I’ve had a lot of success. I’ve gone to World Cups… in Zagreb, Croatia, in Munich, Germany. I’ve won National Championships, and got on to the U.S. Olympic short list, so it’s been a good career.”
In these three videos, Kirsten offers key tips on accurate shooting. In the first video she explains how to get and maintain the proper cheek weld on your rifle. In the second, Kirsten talks about canting error — how having inconsistent side-to-side tilt on your rifle. In the third video, Kirsten explains the importance of proper trigger placement.
Proper Cheek Weld
No matter what your discipline — smallbore, silhouette, High Power, F-Class, or even PRS — it’s vital to have a consistent cheek weld for every shot. You want your head to be in the same position on the stock each time. This helps ensure proper eye-to-sights/optic alignment and consistent rifle balance.
In this video, Kirsten explains how to find the best position for your head on the stock, which may require adjusting the cheekpiece and/or length of pull. Then Kirsten demonstrates how to maintain consistent cheek weld shot after shot.
Consistent Rifle Cant (Tilt from Centerline)
Kirsten says most training manuals don’t explain rifle cant: “You won’t find this shooting technique just anywhere. Most shooters don’t even think about it — and they’re missing out. Proper Rifle Cant or Gun Cant (also known as cant error or even scope cant) is a complicated topic, but I’ll explain it simply — and how to simply avoid cant error.”
Want to know how to actually aim a gun right? This accuracy tip covers a crucial aspect of marksmanship. If you cant your rifle inconsistently from shot to shot, the point of impact will change, even with “perfect aim”. This is another episode in Kirsten’s How to Shoot Awesomely video series.
Proper Trigger Finger Technique
Kirsten tells us: “Finger placement on the trigger might not seem like a big deal, but it actually is. The reason for this is because, depending on where your index finger is placed on the trigger, [this] translates to different muscle interactions with the gun.” Watch this video to see Kirsten demonstrate proper finger placement (and explain problems caused by improper finger positioning).
When you pull the trigger, you only want to engage the last section of your finger, in order to avoid unwanted muscle engagement and to achieve a smooth shot. Remember there is a “sweet spot” between the crease (first joint) and the tip of the finger. If you position the trigger in that “sweet spot”, you should see an increase in your accuracy. Don’t make the mistake of putting the trigger in the crease of your finger, as shown below.
Performs as Promised — Prevents Mess at Home or at Range
When cleaning rifles, wet and dirty patches can make a real mess. And solvent spray from the muzzle is another issue. Here’s a solution — the MTM Gun Cleaning Patch Catcher. Simply slip it over your barrel to contain all the patches pushed out the muzzle. No more mess and stains on your bench/table. When cleaning tasks are done, simply remove the Patch Catcher and dump the contents into the trash.
We’ve tried this product and it definitely helps keep your work surfaces and floors clean. No more messes on the bench or spray from solvents. Purchasers really like this product — it has 80% five-star reviews on Amazon (current Price $9.03). Watch the video to see how the MTM Patch Catcher works.
Here are product reviews from actual MTM Patch Catcher purchasers:
“This box straps over the muzzle end of a barrel and keeps the mess completely contained. Excess cleaning solvents collect in the bottom. Patches fall off the jag and are captured as well when the cleaning rod is withdrawn. It also completely contains the splatter burst when a bore brush exits the muzzle of whatever firearm is being cleaned.” — D.J. Bradley
“This little device is more than a patch catcher. It also contains that dirty, smelly spray when a bore bristle exits the barrel. With the top open, it will also catch spray cleaners and lubes when used on small parts. It takes a little work to mount it on a railed over/under, but it gets the job done there too.” — TwoBoxer
“This does exactly what it claims. It keeps the table or floor clean while you are cleaning barrels. It is easy to use and easy to clean. If you are cleaning guns outside on a range, then you probably don’t need this. If you cleaning them in your garage, then buy this. Your garage and workbench will love you.” — DDDnotes
Q: Does this fit securely if you have a standard muzzle break?
Answer: Yes, I regularly use this product on all of my rifles including my Savage 111 Long Range Hunter with a factory brake. It really keeps the smell down with the top closed. Also stops the splatter of a stiff brush exiting the muzzle. Great Product! — Iklwa
Q: Has anyone used this with an AR15?
Answer: It works quite well — goes on and off easily. Slide it on the barrel until you can tighten the strap behind the flash suppressor.” — Cactus
Today we feature the short-range group Benchrest game, where it’s all about shooting tiny groups in the ones and even “zeros”. Seeing the tiny groups 6 PPC aces produce, it’s easy to think that precision is all about the equipment. But there is a lot more involved. A talented human still has to watch the flags, run the gun properly, and tune his loads for the conditions. Here are some tips from one of the world’s best benchresters, Charles Huckeba.
If you were an aspiring basketball player, you’d surely study All-Stars such as Stephen Curry and Devin Booker to see how they shoot so well. This article provides a chance to see how a world-class benchrest All-Star drills tiny 5-shot groups at 100 and 200 yards.
Texan Charles Huckeba was the top individual shooter at the 2013 World Benchrest Championships (WBC) held near Sydney Australia in October 2013. In this video, 2013 WBC Two-Gun Overall winner Charles shoots a 1/8th MOA group at 200 yards — “a little bitty dot” as a fellow Team USA shooter observes. That’s impressive. If you can describe Huckeba’s style in a nutshell it would be “smooth, consistent, and rapid but not hurried”.
Charles also employed some unusual hardware. In the video, take a close look at the joystick on the Farley Coaxial front rest. There’s no knob at the end. In its place is a small, wood ammo caddy. Charles removed the standard knob from the handle of his Farley rest and replaced it with a home-made wood block that holds cartridges for the record target. The 10.5-lb Light Varmint rifle is chambered in 6PPC with a BAT Machine Action and a composite wood and carbon-fiber stock.
Watch Charles Huckeba Shoot 1/8 MOA, 200-yard group at World Benchrest Championships
Here is the actual 200-yard, 5-shot group Charles shot in the video. Photo (by Stuart Elliot) taken through the lens of Huckeba’s 50X March scope (reticle has 1/16th MOA Dot).
Analyzing the Fine Points — What Makes Huckeba So Good
Short-range benchrest shooter Boyd Allen saw some interesting things in Huckeba’s WBC performance, as captured on video. Boyd noticed Huckeba’s smooth gun-handling and efficient loading. But Boyd also spied some interesting equipment, including an innovative joystick “handle-caddy”.
1. Low Friction Bags — When Huckeba slid his rifle, there was very little apparent friction. The front bag features the new 3M material (ScotchLite) on the sliding surfaces. The rear Protektor bag has ears of the same low-friction material.
2. Pause Before Chambering — While he was watching the flags and deciding when to start firing, Charles kept his first round in the action, but out of the barrel’s chamber, probably so as not to heat the cartridge and change the round’s point of impact.
3. Ammo Caddy on Joystick Arm – Charles shoots a Right Bolt/Left Port action, so he pulls his rounds with his left hand. Note that Huckeba’s record rounds rest in a small, wood ammo caddy attached to the end of the joystick shaft. Look carefully, you’ll see the wood ammo block in place of the normal black ball at the end of the joystick. That allows Charles to pull shots with the absolute minimum of hand movement. Ingenious! Huckeba is very fast, with a great economy of motion. I believe that because his ammo was literally at hand, Charles was better able to keep his focus on aiming and the flags.
4. Smooth-Cycling BAT Action — Note how smoothly Huckeba’s action operates. When Charles lifts the bolt handle (to extract a round and cock the firing pin), this does not disturb the rifle. Likewise, as he closes the bolt, the gun doesn’t wobble. The smooth action allows Charles to hold point of aim even when shooting relatively quickly. Huckeba’s BAT action is chrome-moly steel. Some shooters believe this metal makes for a smoother action than stainless steel or aluminum.
5. Long-Wheelbase Stock — The wood and carbon fiber stock is light, long, and stiff. Yet, importantly, the stock is also well-damped. The longer-than-average stock length (with extended forearm) seems to help the gun track well without jumping or rocking. The longer forearm allows a longer “wheelbase”, effectively shifting the weight distribution rearward (less weight on the front, more weight on the rear). This places a greater share of the gun’s weight on the rear bag, as compared to a more conventional benchrest stock. Huckeba’s stock, built by Bob Scoville, is at the cutting edge of short-range benchrest design. Its light-weight balsa wood and carbon fiber construction provides a combination of stiffness and vibration damping that allows its relatively long fore-end to be fully utilized to increase the weight on the rear bag (always an issue with 10.5-pound rifles).
To learn more about this benchrest stock design, read the comments by stock-builder Bob Scoville in our PPC with Pedigree story in our Gun of the Week Archives. Bob observed:
“There is a lot more to the structure of the stocks than meets the eye. The carbon fiber skin with which I cover the stocks creates a light, tough exterior surface. However, this contributes very little to the overall performance of the stocks. The real strength and stiffness is the result of an internal beam utilizing balsa core/carbon fiber technology.
This type construction can be found in aircraft, race cars, powerboats, and sailboats. It is interesting to note, balsa has the highest strength to weight ratio of all woods and carbon fiber is one of the lowest stretch (modulus of elasticity) relative to weight of all materials. The marriage of these two materials is common in the high-performance world. Additionally, balsa is used commercially for vibration dampening and sound reduction.”
Video find by Boyd Allen. Video by Stuart Elliot of BRT Shooters Supply, Brisbane, Australia.
Tumblers and walnut/corncob media are old school. These days many shooters prefer processing brass rapidly with an ultrasonic cleaning machine. When used with the proper solution, a good ultrasonic cleaning machine can quickly remove remove dust, carbon, oil, and powder residue from your cartridge brass. The ultrasonic process will clean the inside of the cases, and even the primer pockets. Tumbling works well too, but for really dirty brass, ultrasonic cleaning may be a wise choice.
Our friend Gavin Gear recently put an RCBS Ultrasonic cleaning machine through its paces using RCBS Ultrasonic Case Cleaning Solution (RCBS #87058). To provide a real challenge, Gavin used some very dull and greasy milsurp brass: “I bought a huge lot of military once-fired 7.52x51mm brass (fired in a machine gun) that I’ve been slowly prepping for my DPMS LR-308B AR-10 style rifle. Some of this brass was fully prepped (sized/de-primed, trimmed, case mouths chamfered, primer pockets reamed) but it was gunked up with lube and looking dingy.”
UltimateReloader.com Case Cleaning Video (7.5 minutes):
Gavin describes the cleaning exercise step-by-step on UltimateReloader.com. Read Gavin’s Cartridge Cleaning Article to learn how he mixed the solution, activated the heater, and cycled the machine for 30 minutes. As you can see in the video above, the results were impressive. If you have never cleaned brass with ultrasound before, you should definitely watch Gavin’s 7.5-minute video — it provides many useful tips and shows the cleaning operation in progress from start to finish.
Ultra Dry Necks After Ultrasonic Cleaning — Some Suggestions
The Ultrasonic cleaning process gets cartridge brass so “squeaky clean” that increased force may be required to seat your bullets, or they may “grab” as they go in the necks. To reduce bullet-seating effort, you may benefit from adding a little dry case lube inside the case-neck before loading (use a nylon brush). Another trick is adding a teaspoon of Ballistol lube to the cleaning solution. That provides a trace lubricant inside the necks, but does not interfere with powder ignition in any way.
The latest Gen2 RCBS ultrasonic cleaning machine has a large 6.3-quart capacity. That’s nearly 100% larger than the first generation machine in Gavin’s video. The Gen2 machine, $385.49 on Amazon, features a second ceramic heater and transducer to better clean brass cases and firearm parts. The LED is easily programmable, and the timer can be set for up to 30 minutes of cleaning. The original 3.2 quart-capacity RCBS ultrasonic machine, as shown in Gavin’s video, is still available for $180.72 at Midsouth Shooters.
Our friend Robert Whitley of ARX Enterprises LLC has learned, through careful measurement and testing, that some barrels threaded 5/8″ x 24 TPI at the muzzle may not deliver optimal accuracy. The reason is that the end of the barrel can bell out slightly, like a trombone, because too much steel has been removed. This is particularly true with .30-caliber barrels, but it can also be a problem with smaller caliber barrels (even 6mm). Robert demonstrates this phenomenon in the video below. All gunsmiths, and anyone considering threading a barrel, should watch the video. At 1:00 – 1:30 Robert gauges a 5/8″ x 24-threaded .30-Caliber barrel. You can see the belling effect clear as day.
“When setting up a commercial barrel in the lathe, we noticed that the maximum-sized bushing that would fit in the bore at the chamber end was almost .0015” smaller [than what would fit] at the muzzle. That precipitated my pin-gauging of a number of different commercial barrels that were threaded for 5/8” x 24 tpi. What I found is what’s shown on the video.” – R. Whitley
Solve Problem with a Larger Thread Diameter
If 5/8″ x 24 threading is potentially harmful to accuracy, is there a solution? Yes, you simply need to leave a little more steel on the barrel. (See Video starting at 02:40.) Frank Green of Bartlein barrels states: “We get these questions all the time. I say run the largest thread diameter that is possible.” Robert Whitley has found that a 3/4″ x 28 TPI threading does not cause the “belling effect”. Accordingly Robert recommends 3/4″ x 28 if you need to thread your barrel for a muzzle brake or suppressor. Robert explains: “We only make 3/4” x 28 TPI muzzle brakes and that’s what we recommend to customers.”
“See how much meatier the 3/4″ threading is vs. the 5/8″. The 3/4″ threading offers a lot more metal around the bore. There’s a lot less opportunity for the bore to become bell-mouthed…” – Robert Whitley
Barrel Threading Diameter — What’s Important to Know
By Robert Whitley
In truth, the 5/8” x 24 TPI threading never came out of any accuracy-based think tank or set-up, it’s a military .30-Cal threading for barrels that someone has to carry around (they needed to keep the barrel weight down so it was smaller in diameter and the threading had to work with that situation). People have somehow assumed because the military uses that threading for certain things that it must mean that it’s also fine for a highly accurate rifle too, but that’s not really correct.
I don’t think there is any better and realistic option than the 3/4″ muzzle threading, and we also do it so there is no relief cut behind the threads on the barrel (i.e. put the relief cut on the brake or jam nut, don’t chop down on the muzzle of the barrel). For some reason many have a hard time grasping that the metal at the muzzle end of a rifle is “sacred” and you should not cut it down any more than absolutely necessary. A little threaded pencil diameter nub on the end of a barrel is not ideal for accuracy especially if it’s threaded and you need to torque on it. I cringe when I see a barrel with something like an MTU or Heavy Varmint contour, only to have an itty-bitty pencil thin threaded nub right at the muzzle so someone can “screw on a can” or a muzzle brake.
Lessons Learned Over the Years
A number of years ago I did a 30BR rifle project with Craig Kostyshyn who was big in the 30BR game and he made some of the best 30BR rifle barrels for benchrest competition. When I did the project I wanted a medium-heavy Palma type contour barrel I could use and also have a muzzle turndown for a front sight band. When he found out I was going to have the muzzle turned down he said “whoa, I need to provide for that when I make the barrel because if you turn the front down later you’ll be shooting a trombone” (i.e. the muzzle bore dimension would open up).
What he did was rough contour the barrel with the turndown (about .010” oversize) before he lapped the barrel, then when he lapped the barrel he took it easy in the muzzle area and worked the back of the barrel more. I thought he was a little bit excessive in his concerns but the barrel shot great and I wasn’t going to argue with him, after all he was shooting groups in the ones. I kind of just filed that away and never thought about it until recently when I went to have Fred from Sabreco do some chamber re-work on a commercial .30-caliber barrel I had. When setting up the barrel in the lathe and indicating things Fred noticed that the maximum-sized bushing that would fit in the bore at the chamber end was almost .0015” smaller [than what would fit] at the muzzle and he mentioned it to me. That precipitated my pin-gauging of a number of different commercial barrels I had that were threaded for 5/8” x 24 TPI. What I found is what’s shown on the video.
NOTE: This is a copyrighted article. Do not reproduce or re-link more than 75 words without written permission from AccurateShooter.com.
Here’s a very cool 3D Animation showing pistol rounds being fired. Computer-generated graphics provide a look inside the cartridge at the moment of ignition as the primer fires and the flame front moves through the ignited powder. It’s really kind of mesmerizing. If you’ve every wondered just what happens inside your cartridges the moment that firing pin strikes, then watch this video…
Watch Video to See Handgun Ammo Being Chambered and Fired:
Mute Enabled — Click Speaker Icon to Hear Audio. Firing Sequence Starts at 1:28.
This animated video from German ammo-maker GECO (part of the Swiss RUAG group of companies) reveals the inside of a pistol cartridge, showing jacket, lead core, case, powder and primer. Employing advanced 3D rendering and computer graphics, the video shows an X-ray view of ammo being loaded in a handgun, feeding from a magazine.
Then it really gets interesting. At 1:28 – 1:50 you’ll see the firing pin strike the primer cup, the primer’s hot jet streaming through the flash-hole, and the powder igniting. Finally you can see the bullet as it moves down the barrel and spins its way to a target. This is a very nicely-produced video. If you’ve ever wondered what happens inside a cartridge when you pull the trigger, this video shows all. They say “a picture’s worth a thousand words”… well a 3D video is even better.
Running out of space in your gun safe? Here’s a clever product that will allow you to store more long guns in your current vault. The plastic Rifle Rods from Gun Storage Solutions slip in long-gun barrels and then grip the shelf above using Velcro pads. This allows you to nestle your rifles and shotguns much closer together than with the conventional racks provided with most gunsafes. The rods are offered in bright orange or basic black. We prefer the safety orange rods (shown above with the Velcro “receiver” shelf liner provided with the Rod Kit).
Rifles with narrow furniture (such as lever guns) can be placed very close together, saving lots of space. For benchrest or varmint rifles with wider fore-ends, you won’t benefit as much. Note that, in the photo above, all of the guns are fairly slim — none have wide fore-ends. Still we think these Rifle Rods could open up 12″ or more horizontal clearance in a medium-sized safe — that could easily allow you to store six (6) more guns in two rows, as shown.
Rifle Rod Kits Starting at $21.70
A kit with 5 Rifle Rods and fabric shelf liner costs $21.70 on Amazon.com, while the 10-Rod Kit with liner costs $34.70 on Amazon. That’s a lot cheaper than buying a new safe. A six-pack of additional rods is $19.95 from StoreMoreGuns.com. NOTE: Some Amazon kits have black rods. To get the bright orange rods you may have to pay a few dollars more and order directly from Gun Storage Solutions.
WARNING: Always REMOVE Rod from barrel before taking gun to the range. Never place live ammunition in a gun with storage Rod in the barrel!


 Because the seals spend most of their time in the water, a seal-hunter needs a very accurate rifle [to take head shots at distance]. I like the TRG-22 because it is very accurate out of the box, with a very nice bipod that works well in the field. The stock is comfortable with good adjustment range. The TRG features a 10-rd magazine and the barrel is pre-threaded for a muzzle brake or suppressor.
 Both the TRG-22 and TRG-42 are very accurate right out of the box. The only thing I did before I first shot the TRGs was to clean the barrels very thoroughly. This is because the SAKO factory test shoots the gun without cleaning the barrel. I also adjust the cheek piece upward when shooting the rifles with a big scope. However, if you raise the cheek piece too high you can’t get the bolt out without removing the whole cheek piece. The only real modification I’ve made to my TRGs was to put rubber foot pads on the feet of the SAKO factory bipod. This gives the bipod better grip on slick surfaces such as concrete, or the rocks on the offshore islands.
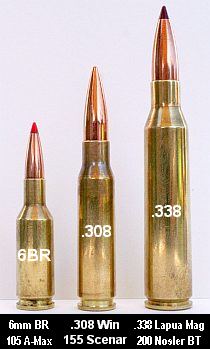 .338 LM vs. .308 Win — Smaller Can Be Better
 Reloading for the TRG-22 (.308 Win)
 Reloading for the TRG-42 (.338 LM)
 Hunting in Norway


 I also have a 6BR hunting rifle (compensated of course). I have a lot of field time with the 6BR rifle, and feel very confident with that gun. When I got the Krieger 6mmBR barrel on the SAKO Varminter, I fell in love with that rifle from day one, and that rifle is my first choice for small game hunting.


 3. Ammo Caddy on Joystick Arm – Charles shoots a Right Bolt/Left Port action, so he pulls his rounds with his left hand. Note that Huckeba’s record rounds rest in a small, wood ammo caddy attached to the end of the joystick shaft. Look carefully, you’ll see the wood ammo block in place of the normal black ball at the end of the joystick. That allows Charles to pull shots with the absolute minimum of hand movement. Ingenious! Huckeba is very fast, with a great economy of motion. I believe that because his ammo was literally at hand, Charles was better able to keep his focus on aiming and the flags.


 This animated video from German ammo-maker


