Do you find that the crosshairs in your scope get blurry after a while, or that you experience eye strain during a match? This is normal, particularly as you get older. Focusing intensely on your target (through the scope or over iron sights) for an extended period of time can cause eye strain. Thankfully, there are things you can do to reduce eye fatigue. For one — breathe deeper to take in more oxygen. Secondly, give your eyes a break between shots, looking away from the scope or sights.
In our Forum there is an interesting thread about vision and eye fatigue. One Forum member observed: “I have noticed recently that if I linger on the target for too long the crosshairs begin to blur and the whole image gradually darkens as if a cloud passed over the sun. I do wear contacts and wonder if that’s the problem. Anyone else experienced this? — Tommy”
Forum members advised Tommy to relax and breath deep. Increase oxygen intake and also move the eyes off the target for a bit. Closing the eyes briefly between shots can also relieve eye strain. Tommy found this improved the situation.
Keith G. noted: “Make sure you are still breathing… [your condition] sounds similar to the symptoms of holding one’s breath.”
Phil H. explained: “Tom — Our eyes are tremendous oxygen hogs. What you are witnessing is caused by lack of oxygen. When this happens, get off the sights, stare at the grass (most people’s eyes find the color green relaxing), breath, then get back on the rifle. Working on your cardio can help immensely. Worked for me when I shot Palma. Those aperture sights were a bear! The better my cardio got the better and longer I could see. Same thing with scopes. Try it!”
Watercam concurred: “+1 on breathing. Take a long slow deep breath, exhale and break shot. Also make sure you take a moment to look at the horizon without looking through rifle or spotting scope once in a while to fight fatigue. Same thing happens when using iron sights.”
Arizona shooter Scott Harris offered this advice: “To some extent, [blurring vision] happens to anyone staring at something for a long time. I try to keep vision crisp by getting the shot off in a timely fashion or close the eyes briefly to refresh them. Also keep moisturized and protect against wind with wrap-around glasses”.
Breathing Better and Relaxing the Eyes Really Worked…
Tommy, the shooter with the eye problem, said his vision improved after he worked on his breathing and gave his eyes a rest between shots: “Thanks guys. These techniques shrunk my group just a bit and every little bit helps.”
Read more tips on reducing eye fatigue in our Forum Thread: That Vision Thing.
To avoid eye fatigue, take your eyes away from the scope between shots, and look at something nearby (or even close your eyes briefly). Also work on your breathing and don’t hold your breath too long — that robs your system of oxygen.
The First Shot, the CMP’s online magazine, features a well-written article on Prone Shooting Technique by SPC Matthew Sigrist of the U.S. Army Marksmanship Unit (USAMU). The article covers all the major points of gun hold and body position: hand position, elbow position, stock weld, buttstock placement, and sling position/tension.
Keep it Steady — The Elements of a Good Prone Position
Part 1 — Building the Position By SPC Matthew Sigrist
Imagine the following scenario: You are at the last stage of fire in the National Trophy Individual Match, firing at the 600 yard line in the prone position and every point matters. What should you reflect on as you prepare to shoot this final string? As your eyes cloud from sweat, you realize that all you have to rely on is your experience and knowledge of the fundamentals.
During the National Trophy Individual Match, you will fire 60 percent of your shots from the prone position. This article will address the fundamentals of a good prone position and help you learn the techniques required to be successful in both the slow and rapid-fire stages of National Match competition.
This article will be divided into two parts. In part one, we will discuss the elements of a good prone position. In part two, we will cover the techniques you will in the rapid-fire and slow-fire stages.
The Fundamentals
The fundamentals are the building blocks of a position. Much like the framework of a house, a correct application of the fundamentals ensures a solid and stable structure. Since each person’s position will depend on their particular body build and shape, there is no “perfect position” that applies to everyone. Experience, practice and knowledge of the correct fundamentals will dictate the best position for you.
There are six key elements of any position. The purpose for these six points is to achieve a solid platform that allows for consistent sight alignment using the least amount of muscle tension.
1. Placement of the Firing Hand (the hand that pulls the trigger)
The firing hand needs to be placed high on the pistol grip. This high hand position will give you better control of the rifle. Combined with a firm grip there will be a reduced amount of hand movement when pulling the trigger. Wrap your thumb over the three fingers on the pistol grip (excluding the trigger finger). This will help isolate the movement of the trigger finger.
2. Placement of the Non-firing Hand (the hand supporting the rifle).
The non-firing hand should grip the handguard or stock in the flat portion of the hand between the thumb and forefinger. The fingers should curl naturally around the stock, but they should not grip it tightly. The position of the hand on the stock will depend on the physical size of the shooter. Generally speaking, taller shooters with longer arms will grip the rifle further out, near the sling swivel, while shorter shooters will need to pull their hand rearward. This is sometimes referred to as “short-stocking” the rifle.
3. Stock Weld
Stock weld is the contact that the face makes with the stock. It is important because it directly effects your sight alignment. Consistent head placement will help you achieve consistent sight alignment. The human head weighs an average of 8 to 10 pounds. The full weight of the head must rest on the stock. In doing this you achieve two things, a relaxed neck and reduced recoil because of the pressure of the head.
4. Placement of the Rifle (the contact that is made in the firing shoulder)
The rifle butt placement needs to be consistent. If this changes between shots, it effects your sight alignment and the effect of recoil. In the prone position the rifle will sit lower in the shoulder compared to other shooting positions. This allows for a more forward head and a lower position as a whole.
5. Position of the Sling
The sling should be high on the arm, above the bicep. This way the sling will have less leverage on the arm so it doesn’t cut off the circulation.
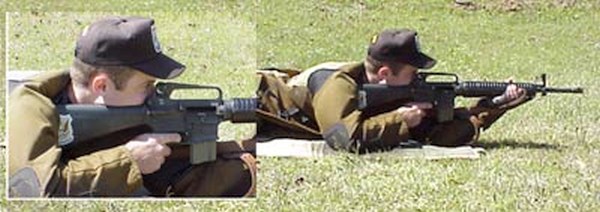
Demonstration of the placement of the firing elbow (left) and non-firing elbows (right).
6. Placement of both the firing, and non-firing elbows
A guideline for non-firing elbow placement is that there should be 1 ½’’ to 2’’ gap between your non-firing arm and the rifle’s magazine. (NOTE: this references the AR-15 service rifle) Your arm should be almost straight up and down; this will transfer the weight directly down the arm and not to the side (see picture above). Think of the firing arm as only a kind of kickstand, it doesn’t support weight it only holds the firing hand in position.
Variations of the Prone Position
There are two main variations of the prone position; open/spread legged, and bent-legged. The two types will be discussed below.
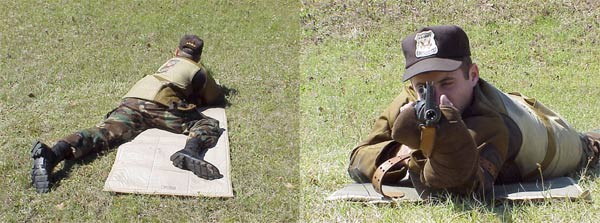
Open/Spread Leg Position
Demonstration of the Open/Spread Leg Position.
The first position is the open/spread legged position. This is when the shooter spreads their legs shoulder width or more apart. This allows for a more forward pressure on the sling and elbows. This position requires a tighter sling and solid elbow placement. The rifle should sit tight in the shoulder. With this position, your body will be farther behind the rifle compared to the bent leg position, allowing for minimum disturbance from recoil.
Bent Leg Position
Demonstration of the Bent Leg Position.
The bent leg position is when the shooter bends the firing side leg up towards the firing hand making the knee at a rough 90 degree angle to the body. The non-firing leg will remain straight and inline with the body. This will take pressure off the lungs and heart minimizing the pulse from the chest as well as easing the pressure on the lungs which will allow for easy breathing and control.
Summary
You now know the fundamentals of a good prone position, as well as the two types most commonly used. Extensive dry-firing will reveal which is the best position for you. If possible, have a friend take pictures of you in position. This will enable you to better diagnose and correct your errors. Remember, a position must be both fundamentally sound and comfortable. Practice frequently to learn your new position and to develop the conditioning required to endure long days on the range.
Thanksgiving is Thursday, November 27th this year. Looking for culinary inspiration for your holiday gatherings? The NRA Blog offers three special (and delicious) Wild Game Recipes for your family feasts:
Honey Mustard Planked Wild Turkey Breast
Mushroom-Stuffed Wild Boar Roast with Black Truffle Sauce
BBQ Brined Pigeon
These recipes come from some of the country’s best chefs, and they all seem mouth-watering. You’ll find a full list of ingredients plus step-by-step cooking tips.
One of the many advantages to hunting is the assortment of game you can gather that lasts for an extended period of time. Just because it’s Thanksgiving doesn’t mean you have to stick with a whole turkey from the store and a ham hock.
We have three unique spins on wild game recipes that will suit your dining table perfectly. Even if you’re one of those hunters who enjoys a quick hunt the morning of Thanksgiving, these recipes will make your holiday more delicious than ever. — NRABlog.com
And for those folks who hope to harvest their own gobbler for the Thanksgiving holiday, here is a special NRA Turkey target that can help you hone your turkey-hunting skills.
GetZone.com offers a turkey hunting video with expert guidance on Turkey hunting, specifically stalking and shot placement: “When it comes to shotgun hunting, you don’t want to get BBs in the meat, so the most common (and lethal) shot with a shotgun is a headshot.”
This photo is from GetZone.com, a website that provides information on shooting and hunting. CLICK HERE to watch a GetZone video on turkey hunting. Work Warning: When you click photo, a loud audio track may start immediately, so turn down the audio volume.
The NRA Foundation is providing new grant awards supporting school security initiatives through the NRA School Shield program. These grants were made possible in part by a generous estate gift. This gift enabled the Foundation to expand its commitment to helping schools strengthen their security infrastructure and create safer learning environments for students nationwide.
$304,447 in School Security Grants
This year the NRA Foundation awarded 30 School Shield grants totaling $304,447 to schools seeking to enhance their security through equipment upgrades, facility improvements, and training resources. In determining the grants, the NRA Foundation partnered with the NRA Law Enforcement Division. Staffers with extensive law enforcement experience and school safety knowledge reviewed each request to ensure grants can produce optimal security enhancement.
“The NRA Foundation is proud to help schools across the country strengthen their safety posture”, said Peter Churchbourne, Exec. Director of The NRA Foundation. “This year’s grant cycle demonstrates how philanthropy, in particular planned giving, can have a lasting impact on the well-being of communities. The estate gift dedicated to School Shield allowed us to expand our reach and help even more schools[.]”
The Foundation will again process School Shield grant applications in 2026, continuing to support schools seeking to implement comprehensive, security-focused solutions.
The NRA School Shield program provides schools with tools, assessments, and training to enhance campus safety, offering a multifaceted approach to help keep children safe where they learn. To learn more, visit NRASchoolShield.org.
“On that day, let us solemnly remember the sacrifices of all those who fought so valiantly, on the seas, in the air, and on foreign shores, to preserve our heritage of freedom, and let us reconsecrate ourselves to the task of promoting and enduring peace so that their efforts shall not have been in vain.”
– 1954, President Dwight D. Eisenhower, Veterans Day proclamation.
107 Years Later…
On the 11th hour, of the 11th day, of the 11th month of 1918, bugle calls signaled the ‘cease fire’ ending the First World War. (The official Armistice was signed earlier that morning.) To those who endured it, WWI was the “Great War”, “the War to End All Wars.” Tragically, an even greater conflict consumed the world just two decades later.
Today, 107 years after the end of WWI, Americans mark the anniversary of the WWI Armistice as “Veterans Day”. In Canada it is known as Remembrance Day. On this solemn occasion we honor all those who have served in the military in times of war and peace.
While more veterans pass away each year, there are still about 16.5 million veterans in the United States. Take time today to honor those soldiers, sailors, and airmen who have served their nation with pride. Today we remember that… “All gave some, and some gave all.” History of Veterans Day.
Former Secretary of Veterans Affairs Dr. James Peake asked Americans to recognize the nation’s 16.5 million living veterans and the generations before them who fought to protect freedom and democracy: “While our foremost thoughts are with those in distant war zones today, Veterans Day is an opportunity for Americans to pay their respects to all who answered the nation’s call to military service.”
On Veterans Day we especially need to remember the seriously wounded combat veterans. These men and women summon great courage every day to overcome the lasting injuries they suffered in battle. Some of these soldiers have lost limbs, yet volunteered to return to combat duty. That is dedication beyond measure — true patriotism.
National Veterans Day Ceremony
The Veterans Day National Ceremony is held each year on November 11th at Arlington National Cemetery. The ceremony commences precisely at 11:00 a.m. with a wreath laying at the Tomb of the Unknowns and continues inside the Memorial Amphitheater with a parade of colors by veterans’ organizations. The ceremony is intended to honor and thank all who served in the U.S. Armed Forces. Major regional ceremonies and events are also held throughout the country.
Ask 10 shooters about barrel cleaning and you’ll get 10 different opinions. This reflects that fact that different fouling problems demand different solutions. For example, solvents that work well for copper may not be the best for hard carbon (and vice-versa). To come up with the right solution, first you must understand the nature of the fouling in your barrel.
John Krieger Interview with AccurateShooter at SHOT Show:
The debate about the proper care of a match barrel is a hot one, spiked with folklore and old wives’ tales, Lohman said. He and his staff set out to set the record straight: “We tried to interject some science into the discussion of cleaning a match barrel,” he explained. In his article, Lohman writes:
Why worry about a little barrel fouling when the throat is subjected to a brutal 5,600° F volcano at 55,000 PSI? To investigate these and other questions about taking care of a match barrel, we spoke with a dozen experts and share their knowledge in this first of a series of articles.
After listening to folks who shoot, build barrels or manufacture cleaning solvents for a living, we concluded that even the experts each have their own unique recommendations on how to care for a match barrel. But they all agree on one thing — the gun will tell you what it likes best. Because the life expectancy of a match barrel is about 1,500 to 2,500 rounds, the objectives of cleaning one should include: preserve accuracy, slow the erosion, and remove fouling — all without damaging the gun. This article doesn’t claim that one cleaning method is better than the next. Rather, we set out to interject a little science into the discussion and to share some lessons learned from experts in the field.
For more Shooting Sports USA articles, visit www.ssusa.org.
The NRA has produced a good video on general principles of gun safety. New shooters should definitely watch this video, which provides many important reminders for long-time gun owners as well. This video and other safety principles are featured in a Shooting Sports USA article.
While at the range, shooters should practice Three Basic Rules:
1) Always keep the gun pointed in a safe direction.
2) Always keep your finger OFF the trigger until ready to shoot.
3) Always keep the gun UNLOADED until ready to use.
In addition, whenever you are shooting, indoors or outdoors, know what is behind your target and never shoot if there is not a safe backstop. With a centerfire rifle at an outdoor range, just a few degrees of elevation can cause a shot to impact more than a mile away.
Store Guns Safely When Not in Use
After your range sessions or hunts, is vital to store all guns safely. We recommend storing all firearms (pistols, rifles, shotguns) in a sturdy gun safe with thick steel walls. Use a GoldenRod or other device to control humidity inside the safe. We also like to use Bore-Stores or other treated gun sacks to help protect against corrosion.
If the battery on your safe’s electronic lock is more than a year old, or if it is not giving you the right voltage, replace it today!
This time of year, many readers are putting their guns away in a safe for the winter. It’s easy to just tuck the guns away and forget about them. But there’s something you should do before you shut the safe door.
If you have a safe with an electronic keypad, you should replace the battery every year as a precautionary measure. Trust us, you don’t want to come back in a few months and find that the keypad memory is kaput, and you’re locked out. That can lead to an expensive locksmith visit.
NOTE: Some lock systems use more power and you may need to change your batteries TWICE a year. Batteries aren’t that expensive — you may want to replace batteries TWICE a year if you open and close your safes very frequently.
Low Voltage Battery? You May Be Locked Out…
Here’s a true story. I have one safe with a Sargent & Greenleaf (S&G) keypad. A couple years back, in early December, I went to get into the safe. I punched in the correct combination, but all I got was a rapid “beep, beep, beep, beep” after I finished the last combination entry. I tried again to ensure I entered the combination correctly (I did). But again, the locking system responded with multiple rapid beeps indicating something was wrong. And the safe would not open. Now I was worried….
I popped out the battery holder (which slides in from the bottom of the keypad housing on the door). I removed the battery and tested it with a volt-meter. The 12-month-old Duracell 9-volt battery only registered 6.1 volts.
Low voltage was the problem. I went down to the store and got a couple new 9V batteries. I tested the new batteries and both measured 9.4 volts output. I slipped one of the new 9V batteries into the keypad housing, punched in the combination and everything worked OK again. Eureka.
Most electronic locks for safes WILL “remember” the combination for a period of time even when the battery is low (and the keypad’s “brain” should retain the combination when you remove the battery for replacement). However, a dead battery, or extended periods of low voltage can give you problems. Don’t rely on wishful thinking…
That’s custom paint on the stock, NOT a Hydro-dip coating. Impressive paintwork!
Our Sunday GunDay showcase rifle belongs to Shane Sivertsen (aka SoDakDasher in our Forum). This eye-catching tactical rig was smithed by Travis Stevens at TS Customs in Miller, South Dakota. Shane tells us that Travis is a “top-notch builder who builds tack-driving rifles that are still extremely shooter-friendly. Plus he is one of the friendliest guys you’ll meet.”
This rifle features a Lone Peak Fuzion Action with Trigger Tech Diamond trigger (flat shoe). Up front is a Benchmark 26″ MTU barrel chambered in 6mm BRA (a 40-degree 6mmBR Improved “BR Ackley”). It’s all nestled into a McMillan A5 stock with adjustable cheekpiece. Getting him on target is a Vortex Razor 4.5-27x56mm optic in Hawkins rings with a Vortex throw lever on the power ring for quick magnification changes. The Atlas PRS Bipod rides on an Area 419 ARCA rail up front. The barrel is finished off with a Piercision 5-Port Self-Timing Muscle Brake.
Custom Camo-Pattern Paint Job
All work on this rig was performed at TS Customs, including Cerakoting the action. The pattern on the McMillan A5 stock is NOT a hydro-dip! That is a custom Kryptek camo paint-job done in-house by a TS Customs employee. Shane liked the Kryptek pattern from day one: “It’s always a good thing to do something a little different to your equipment to stand apart from the rest of the pack.” Shane says the paint pattern is the first thing everyone notices about the rifle.
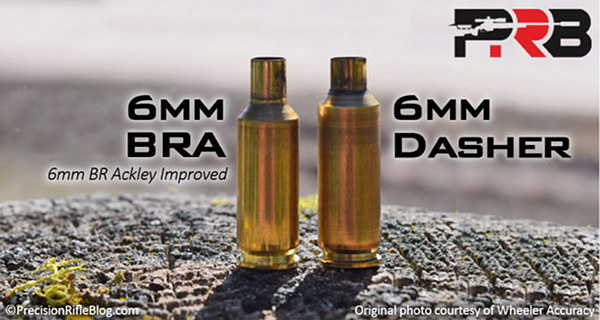
6mm BRA Chambering
Shane spent quite some time trying to decide which 6mm cartridge to choose. After much deliberation with Travis, he chose the 6mm BRA (aka “6BRA” or “6 BRA”), mainly due to the reputation this little cartridge has earned for accuracy and ease of tuning. This rifle is Shane’s second TS Customs-crafted rifle: “the [other] is basically the same action/barrel combo but set in an MPA chassis and chambered in 6mm Dasher.”
Excellent Accuracy with Varget and Berger 105gr Hybrids
Shane’s 6mm BRA is showing impressive accuracy: “Thanks to Mother Nature this spring (with cold, snowy weather), I have only been able to get 100 rounds fire-formed and the barrel broken-in. I started with 30.5 grains Varget in Lapua BR brass with CCI 450s and topped off with Berger 105gr Hybrids. Velocity averaged 2830 FPS with an SD of 4.7 from 10 rounds randomly picked from the lot.”
Shane knows there’s still more load development to do. But this rifle is grouping under one-half MOA and Shane says the gun can definitely out-shoot his abilities. He admits it’s still a work in progress but he is happy with the gun’s performance so far.
Shane praised his Piercision 5 port Muscle brake. Shane tells us: “While I am a suppressed shooter by preference, I wanted to give this brake a try. It works very well — the control and ability to stay on target for followups is remarkable. This brake works perfect on my 18-lb 6mm BRA and will be used indefinitely. Plus it will be a little payback to the other big-braked shooters on the line.”
While it’s still such a new toy, Shane doesn’t expect to make any modifications in the near future. However he says he might “upgrade to a Tangent Theta optic by the end of this season.”
Below is a comparison between the 6mm BRA and the 6mm Dasher. The Dasher has slightly more capacity, but a much shorter neck. There is some evidence that barrel throat erosion may be slower with the 6mm BRA, and the 6mm BRA is easier to fire-form.
This is a grim tale. A man almost lost the use of his right hand, and did suffer terrible injuries to his fingers. All because he picked the wrong bottle of powder off the shelf. We have run this story before, and we will continue to run it every year, as a caution to our readers. This mistake is easy to make, but the consequences can be dire. Always, always double-check your powder labels before you start the hand-loading process. If you don’t, you may not have a hand to load with next time…
Similar Labels, Disasterous Consequences
The shooter, Denny K., was assembling some rounds for his brand new 7mm-08 Savage hunting rifle. He thought he was loading with Hodgdon Varget. Instead he had filled his powder measure with Hodgdon TiteGroup, a fast-burning pistol powder. The labels are similar, so the mistake is understandable. But the results were devastating. Here’s what 41 grains of TiteGroup can do in a 7mm-08:
Posting on the Firing Line, in a thread entitled “Lucky to Be Alive”, Denny writes:
“This is the hardest post to post. I know if I had read it a week ago my comment would have been: ‘You have no business reloading’. I had everything perfect, except pouring the wrong powder in the powder measure. I type this slowly with my left hand, embarrassed but … possibly saving someone else a tragedy or, like me, a long drive to the Emergency Room and surgery to save my finger.”
The Still-Sealed Bottle of Varget
Denny did not initially comprehend exactly why the kaboom happened. He thought maybe his new Savage rifle was at fault. Then, on his return home, he discovered something…
Denny wrote: “The seven-hour period it took to go to ER, transport to Trauma Center and surgery made me think it was a Savage rifle issue. Brand new rifle, new brass, triple-checked loading data. The next day I was humbled when I realized the Varget powder was still sealed.
I knew what powder to use. I thought [Varget] was what I used. Not until the following day did I realize the Varget was still sealed.”
At that point, Denny realized what caused the accident — “operator error”. He knew he had to warn others about using the wrong powder: “I knew I needed to share my mistake, even though it is embarrassing, just to remind people. I’ve been reloading for 30 years…”
Editor’s Comment: Denny was not a novice reloader. His experience demonstrates that this kind of mistake can be made by any hand-loader, even one with decades of experience. Be safe guys, take your time when you load your ammo. Remove powders from measures after your loading sessions (pistol powders can look very similar to rifle powders). And by all means CHECK the LABEL on the jug. As the TiteGroup label says: “A little goes a long way.”
It’s not a bad idea to separate your pistol powders from your rifle powders, or perhaps even load for pistol in a separate part of your workshop.


 This time of year, many readers are putting their guns away in a safe for the winter. It’s easy to just tuck the guns away and forget about them. But there’s something you should do before you shut the safe door.


 Custom Camo-Pattern Paint Job