Today we feature the short-range group Benchrest game, where it’s all about shooting tiny groups in the ones and even “zeros”. Seeing the tiny groups 6 PPC aces produce, it’s easy to think that precision is all about the equipment. But there is a lot more involved. A talented human still has to watch the flags, run the gun properly, and tune his loads for the conditions. Here are some tips from one of the world’s best benchresters, Charles Huckeba.
If you were an aspiring basketball player, you’d surely study All-Stars such as Stephen Curry and Devin Booker to see how they shoot so well. This article provides a chance to see how a world-class benchrest All-Star drills tiny 5-shot groups at 100 and 200 yards.
Texan Charles Huckeba was the top individual shooter at the 2013 World Benchrest Championships (WBC) held near Sydney Australia in October 2013. In this video, 2013 WBC Two-Gun Overall winner Charles shoots a 1/8th MOA group at 200 yards — “a little bitty dot” as a fellow Team USA shooter observes. That’s impressive. If you can describe Huckeba’s style in a nutshell it would be “smooth, consistent, and rapid but not hurried”.
Charles also employed some unusual hardware. In the video, take a close look at the joystick on the Farley Coaxial front rest. There’s no knob at the end. In its place is a small, wood ammo caddy. Charles removed the standard knob from the handle of his Farley rest and replaced it with a home-made wood block that holds cartridges for the record target. The 10.5-lb Light Varmint rifle is chambered in 6PPC with a BAT Machine Action and a composite wood and carbon-fiber stock.
Watch Charles Huckeba Shoot 1/8 MOA, 200-yard group at World Benchrest Championships
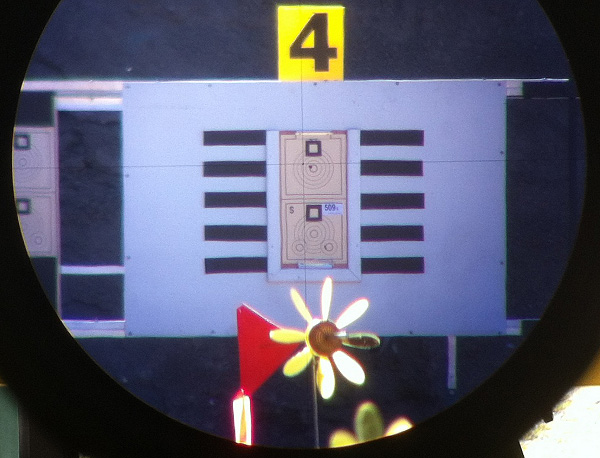
Here is the actual 200-yard, 5-shot group Charles shot in the video. Photo (by Stuart Elliot) taken through the lens of Huckeba’s 50X March scope (reticle has 1/16th MOA Dot).
Analyzing the Fine Points — What Makes Huckeba So Good
Short-range benchrest shooter Boyd Allen saw some interesting things in Huckeba’s WBC performance, as captured on video. Boyd noticed Huckeba’s smooth gun-handling and efficient loading. But Boyd also spied some interesting equipment, including an innovative joystick “handle-caddy”.
1. Low Friction Bags — When Huckeba slid his rifle, there was very little apparent friction. The front bag features the new 3M material (ScotchLite) on the sliding surfaces. The rear Protektor bag has ears of the same low-friction material.
2. Pause Before Chambering — While he was watching the flags and deciding when to start firing, Charles kept his first round in the action, but out of the barrel’s chamber, probably so as not to heat the cartridge and change the round’s point of impact.
3. Ammo Caddy on Joystick Arm – Charles shoots a Right Bolt/Left Port action, so he pulls his rounds with his left hand. Note that Huckeba’s record rounds rest in a small, wood ammo caddy attached to the end of the joystick shaft. Look carefully, you’ll see the wood ammo block in place of the normal black ball at the end of the joystick. That allows Charles to pull shots with the absolute minimum of hand movement. Ingenious! Huckeba is very fast, with a great economy of motion. I believe that because his ammo was literally at hand, Charles was better able to keep his focus on aiming and the flags.
4. Smooth-Cycling BAT Action — Note how smoothly Huckeba’s action operates. When Charles lifts the bolt handle (to extract a round and cock the firing pin), this does not disturb the rifle. Likewise, as he closes the bolt, the gun doesn’t wobble. The smooth action allows Charles to hold point of aim even when shooting relatively quickly. Huckeba’s BAT action is chrome-moly steel. Some shooters believe this metal makes for a smoother action than stainless steel or aluminum.
5. Long-Wheelbase Stock — The wood and carbon fiber stock is light, long, and stiff. Yet, importantly, the stock is also well-damped. The longer-than-average stock length (with extended forearm) seems to help the gun track well without jumping or rocking. The longer forearm allows a longer “wheelbase”, effectively shifting the weight distribution rearward (less weight on the front, more weight on the rear). This places a greater share of the gun’s weight on the rear bag, as compared to a more conventional benchrest stock. Huckeba’s stock, built by Bob Scoville, is at the cutting edge of short-range benchrest design. Its light-weight balsa wood and carbon fiber construction provides a combination of stiffness and vibration damping that allows its relatively long fore-end to be fully utilized to increase the weight on the rear bag (always an issue with 10.5-pound rifles).
To learn more about this benchrest stock design, read the comments by stock-builder Bob Scoville in our PPC with Pedigree story in our Gun of the Week Archives. Bob observed:
“There is a lot more to the structure of the stocks than meets the eye. The carbon fiber skin with which I cover the stocks creates a light, tough exterior surface. However, this contributes very little to the overall performance of the stocks. The real strength and stiffness is the result of an internal beam utilizing balsa core/carbon fiber technology.
This type construction can be found in aircraft, race cars, powerboats, and sailboats. It is interesting to note, balsa has the highest strength to weight ratio of all woods and carbon fiber is one of the lowest stretch (modulus of elasticity) relative to weight of all materials. The marriage of these two materials is common in the high-performance world. Additionally, balsa is used commercially for vibration dampening and sound reduction.”
Video find by Boyd Allen. Video by Stuart Elliot of BRT Shooters Supply, Brisbane, Australia.
This photograph and all images for this story are by Bill White, aka “CT10Ring” in our Forum.
AccurateShooter Forum member Bill White (aka “CT10Ring”) is not your typical member. For 37 years, Bill worked in NYC as a studio photographer specializing in still lifes and products. A neighbor visiting Bill’s home in Connecticut with a .270 Sako inspired Bill to revive his interest (obsession?) with shooting after a 25-year drought. And he owns a few Sakos now! With his gun hobby renewed, for many years Bill drove to the Western USA to shoot long range steel and a LOT of prairie dogs in season. He loved the life of the varminter, so it made sense for him to move West after retiring. He choose Idaho as his new home.
From his Idaho base, Bill enjoys long-range target shooting. But his favorite gun pastime has been varmint hunting in nearby states — the Dakotas, Montana, and Wyoming. Bill found prairie dog shooting rewarding and mapped out a western circuit route of ranches and National Grasslands in SD, ND, MT, and WY. Every year he loads up his truck and hits the road, often doing a grand circle route, visiting prairie dog havens in multiple states. In this article we feature photos from Bill’s annual “grand circle” varmint safari.
For his many cartridge types, Bill learned about reloading methods, loads, and vendors (and more) primarily from AccurateShooter.com. We start today’s story with the biggest caliber rifle he shoots regularly, his 6.5-284 Winchester. Bill favors this rig for his long-range steel shooting. He also uses it for prairie dog shooting, but only “sparingly”, because he wants to preserve barrel life, and he has many other dedicated varmint rigs.
6.5-284 for Long Range Steel Targets (and Sometimes Varmints)
In his home state of Idaho, Bill likes to shoot steel at long range. For distance work, Bill favors his McMillan-stocked 6.5-284 Win. This rifle was crafted in 2012 by Bob Green of York, PA, using a 1:8″-twist 28″ Krieger HV barrel (.298″ neck). The trued Rem 700 action was purchased from Long Rifles in Sturgis, SD. Bill did the Cerakote and bedded the action. For his 6.5-284, Bill loads 139gr Lapua Scenars, H4831sc powder and BR2 primers. He shoots both steel and varmints with this rifle, but the varmint work is limited because the 6.5-284 cartridge tends to be a barrel burner. The photo below from an Idaho range was taken near a 500-yard target, looking back at the firing line.
In the Varmint Fields — Traveling Light
Once situated, Bill (shown above) prefers to walk to Prairie Dog towns with a shooting mat, two bipod-equipped rifles slung up, rear bag, water, and his trusty Leica 10X42 GeoVid binoculars. While he has used a portable bench, he prefers to shoot from bipod, firing down from a mound if possible. This allows him to set up a line-of-fire that minimizes cross-wind effects. Bill notes: “While I often start early, end-of-day shooting has worked worked well for me. A setting sun shows targets better, the wind is usually down, and it’s not so hot. Often you can spot the bullet trace and that’s fun.”
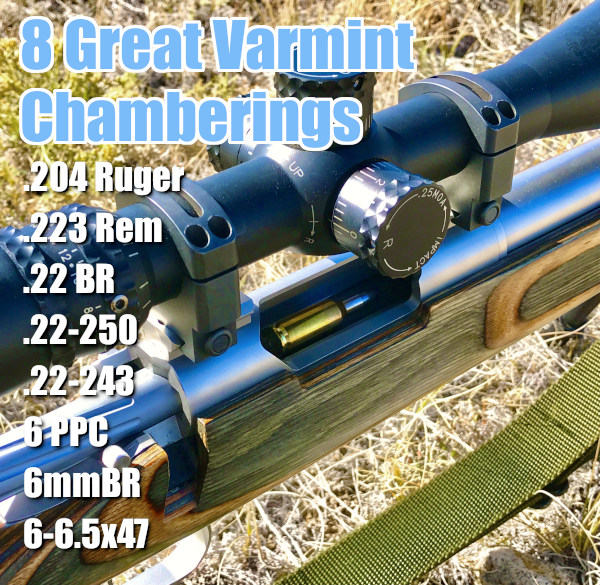
Eight Great Varmint Cartridge Types — .204, .224, .243 Calibers
Here is one of Bill Reid’s 6mmBR (6BR) rigs. Like his Sako 6 PPC, this is exceptionally accurate.
Bill has a large rifle collection, most of which see duty in the varmint fields of Montana, North Dakota, South Dakota, and Wyoming. Here are his key “take-aways” for his eight favorite varmint chamberings: .204 Ruger, .223 Rem, .22-250, .22 BR, .22-243, 6 PPC, 6mmBR, and 6-6.5×47 Lapua (aka 6×47).
.204 Ruger — This delivers great velocity with the little .20-caliber bullets, with mild recoil. The .204 Ruger easily reaches out to 400 yards, but heavier winds do move the tiny bullet around. Tremendous splat factor under 250 yards. I use Sierra 39gr bullets with IMR 8208 XBR in a Sako 75. Even now, .204 Ruger ammo is relatively easy to find.
.223 Remington — Probably the most popular centerfire rifle round in the USA, the .223 Rem offers inexpensive brass, and is a great choice for AR-15 owners. If you run short on ammo, you can find it nearly everywhere. I often bring one AR-15 and one .223 Rem bolt gun on varmint safaris. My Rem 700 5R 1:9″-twist barrel likes 53gr V-Max bullets.
.22 BR — My .22 BR is my first choice for most prairie dog missions. Accuracy is superb with necked-down 6mmBR Lapua brass — quarter-MOA and blazing fast. With the right twist rate, this chambering can shoot anything from 40gr FB bullets to 80gr VLDs. Load development is easy. Below is my .22 BR ammo for another varmint trip. I use 55gr Sierra BlitzKings with Varget in my 1:12″-twist Shilen-barreled rifle. 60gr Bergers are very accurate with a fairly flat trajectory for useful distances.
.22-250 Rem — A classic varmint cartridge, the .22-250 with 50gr V-Maxs delivers spectacular hits. If three P-Dogs happen to be lined up, I’ve witnessed one .22-250 shot take ‘em all out with a triple hit. I currently have five .22-250-chambered rifles: 3 Sako 75s, one Rem 700, and a single shot Nesika that shoots tiny groups. I favor the very deadly Berger 52gr Varmint HP. Making a custom .22-250? With a 1:8″-twist barrel you can use the full weight range of .22-cal bullets, while spinning the lighter bullets fast for “red mist” effect. Remember this cartridge can be a barrel burner. Don’t shoot too many rounds too quickly.
.22-243 Win — This wildcat is even more potent than the .22-250, delivering devastating results on P-Dogs. Run a .243 Win case slowly through a full-length .22-243 die, with plenty of lube to form the brass. I start with Lapua .243 Win brass. There can be some issues necking-down the brass. Watch for donuts forming at the neck-shoulder junction. I bought my .22-243 rifle not sure how it would perform. But now I love shooting it. My .22-243 delivers half-MOA groups with 41.0 grains RL-22 and Hornady 75gr Amax bullets. With those 75-grainers, it’s great in the wind and good to 600 yards easily.
6 PPC — You may consider the 6 PPC a benchrest competition cartridge only, requiring fire-forming. However I have an original Sako 75 single-shot 6 PPC rifle that I load with Sako-headstamp 6 PPC brass (see below) so no fire-forming is required. This Sako 75 came with a test target that measured 0.113″! With my 6 PPC Sako, I found that 58gr V-Maxs, pushed by Vihtavuori N133, are potent out to 300 yards.
6mmBR — The 6mmBR Norma (6BR) offers a nearly unbeatable combination of accuracy, efficiency, and tunability. With the 6BR and a fast twist barrel, you can shoot everything from 40gr flat-base bullets to the latest 105-110gr match bullets. I load Lapua brass, Vihtavuori N135, and Hornady 58, 65, and 75gr bullets for my Krieger 1:14″-twist HV barrel. While this cartridge is capable of long-range accuracy, I usually limit my 6BR shots to 350-400 yards.
6-6.5×47 Lapua — In this story’s lead photo is my 6-6.5×47 Lapua varmint rifle, with Surgeon action and Manners stock. I Cerakoted the barreled action and then bedded the action. Shown below is 6-6.5×47 ammo I loaded for recent testing. Note how I separated different bullets and powder loads into multiple, labeled bags. Hodgdon H4350 is a great choice for this cartridge — 39 grains H4350 with 105gr Amax was the winner here, but 88gr Bergers also shot well. This cartridge has tremendous “critter dismantling” abilities out to 600-700 yards.
Six Tips for Novice Long Range Varmint Hunters
1. Take twice as much ammo you think you may need. The fields could be particularly rich, or, because of wind or other variables, you may have far more misses than expected.
2. When possible, set up with the wind at your back (or, alternatively, directly ahead). This will minimize the effect of cross-winds. Set up a stake with a ribbon to show wind direction.
3. Bring at least two rifles. Ideally one would be a low-recoil rifle with cheaper components for the closer shots. Then bring a rifle with higher-BC bullets for longer shots where wind is a bigger factor.
4. Check the weather before you head out. Prairie dogs like sunshine and calm conditions. If a cloudy, very blustery day is predicted, considering staying in town and cleaning the rifles.
5. Bring plenty of water on a trip. An adult male should be drinking at least 64 ounces of water (or other liquid) every day — more if it’s very hot or you are sweating a lot.
6. Preferably always hunt with a companion. If you do go out solo, have a Garmin inReach SatComm/GPS for emergencies if there is no cell coverage in your location.
Veteran Varmint Hunter Shares his Secrets
Where to Find Abundant Prairie Dogs — Generally, black-tailed P-Dogs are found in the Western high desert, in the same states/areas where cattle are raised. You’ll find good hunting in Montana, North and South Dakota, Colorado, and Wyoming. There are good hunting grounds on private ranches, BLM tracts, and U.S. National Grasslands. To find specific locations, I’d suggest calling the USFS, BLM, and State Fish & Game. Some have lists of ranches that allow P-Dog shooting. Give the agencies a call before your trip and then check in with ranchers. IMPORTANT: You need a current hunting license in some states.
How to Connect with Ranch Owners– A good varmint adventure can begin with a local connection. Stop into the local Ag/feed store and the town breakfast spot. I bet you’ll find some retired ranchers having coffee together who may direct you to a place that needs rodents thinned out. Let’s say you’re in Roundup, Montana. Stop by a local store and ask what ranchers allow PD shooting. Keep in mind that ranchers may be wary of allowing a total stranger to sling lead on their place. Show respect and if you had a good experience, send a thank-you note. A guided shoot is worth considering — the outfitter will know where the P-Dogs are and he has arrangements with landowners. He may even supply benches. I’ve taken two guided trips, with excellent results, one near Sturgis, SD, and the other on Sioux tribal land near Rosebud, SD.
Getting Set Up — I start early in the a.m. to mitigate mirage. Plus there is usually less wind at that hour. I prefer to drive to within half mile or so of a PD town, then walk and shoot prone. Most shooters like to set up a rotating bench on a knoll. This is a tried-and-true way to shoot long distances accurately, especially if you are on top of a hill and can shoot 360 degrees. I once shot from a rotating bench, but I prefer walking now. Some country is quite stunning and that’s half the fun — being out in nature. But yes there are negatives to shooting prone — ground hazards and tall grass can impede your vision.
Equipment for a Serious P-Dog Safari — In the field, I normally carry two rifles with Harris 9-13″ bipods, backpack, a rolled-up shooting mat, at least two liters of water, food, ammo, two rear bags, and binoculars. A good laser rangefinder comes in handy. If you prefer shooting from a bench you may want to have a front rest and a spotting scope. Many guys will shoot prone from the bed of a truck. That gets you off the ground without the need to haul around a heavy bench. But some locations restrict vehicles. Before a P-Dog trip, I make a detailed pack list and check off as I load my truck and camper. I would suggest bringing waterproof rubber or muck boots. June in South Dakota can be cold and wet, and the mud there is not to be believed. Don’t attempt to drive off road in it!
It’s good insurance to bring an extra 5 gallons of fuel for your vehicle in a jerry can and 2 gallons of H20. There may be NO shade for miles and dehydration is a real possibility. Having a couple heavy duty tarps will provide a sun shade and cover your gear in a rainstorm. I bring a 16″ X 20″ plywood target backer, a stand, and paper targets. This allows me to check zero on each rifle before I head out to the Dog Town.
Western Varmint Country Vistas
Taking Photos on Shooting Adventures
Bill knows a thing or two about taking pictures, having been a professional photographer in NYC for many decades. He uses modern digital cameras for both his outdoor and indoor work. Most photos in this story were taken with a Canon EOS 5DSR MKIV. We asked Bill for some tips on taking good photos. Here are his FIVE Top Tips for Photography:
1. Take photos in the early a.m. and later p.m. when the light has definition. Mid-day results will not be so nice.
2. Use the highest-resolution camera available that fits your budget. Yes lens quality, focus, and exposure controls make a big difference.
3. When feasible, shoot using a manual setting with the lens wide open (for shallow focus). Set the focus on the most important object/subject in the frame.
4. Photoshop is useful, especially when RAW images need to be corrected to show the scene more faithfully, or enhance it.
5. After you take a picture, before you post it on social media, learn to crop the image, straighten the horizon, and do other basic fixes. This can make a big difference.
AIM SMALL, MISS SMALL: At 25 yards, this is a fun rimfire plinking target. At longer distances it can be a great training target for precision centerfire shooters.
We’re seeing great interest in NRL22 competition as well as .22 LR rimfire tactical cross-training . With a rimfire rig, you can practice regularly for a fraction of the cost of centerfire training. That way you can build your skill set without breaking the bank. Decent rimfire ammo can be had for five cents a round. Compare that to fifty cents (or more) for handloads and maybe $1.20 per round for factory ammo.
To help with rimfire cross-training, here are some of our favorite rimfire tactical targets, all in easy-to-print PDF format. Click each target image to download the FREE target. You’ll find more free targets for load development, precision practice, and fun shooting on our AccurateShooter FREE Targets Page
Targets for Rimfire Training and Fun Matches
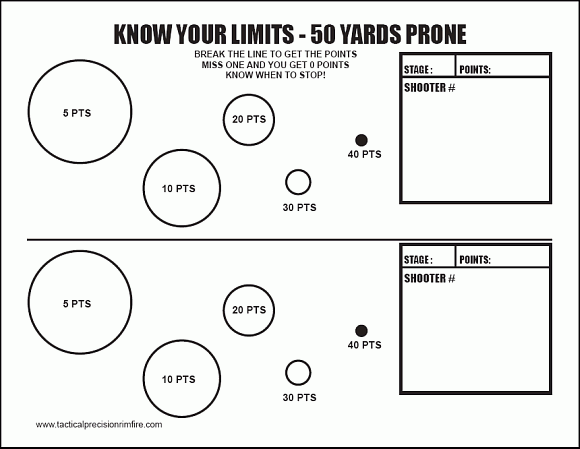
Here’s a rimfire training target with “big to small” target circles. Start with the largest circles, then move to the smaller ones in sequence. This systematic drill provides increasing challenge shot-by-shot. Novices often are quite surprised to see their accuracy improve as they move from bigger to smaller aiming points. That provides positive feedback — always a good thing.
Right Click and “Save as” to download printable PDF versions of target.
Rimfire Practice Targets
SPECIAL BONUS–Rimfire Tactical Precision Targets
These FREE targets by DesertFrog are offered in Adobe Acrobat format for easy printing. CLICK HERE to download all six targets as a .ZIP archive.
NRL22 Competition — Tactical Rimfire Matches
The NRL22 match format is a great shooting discipline. NRL22 offers a high fun factor at relatively low cost. You don’t have to reload match ammo. A couple of 50-round boxes of .22 LR ammo will get you through the match. While some people bring lots of gear to matches, that’s by choice and not by necessity. You can keep it simple and still be competitive (and win).
Tips for NRL22 Competitorsby Jonathan Ocab
I am a match director at my gun club and run our local NRL22 matches. People often ask me for tips for competing in NRL22. First, I recommend getting the course of fire for the month in advance and practicing those stages at the range. Here are other specific tips that should help NRL22 competitors improve their gun-handling and match results.
1. Dry Fire Practice — If you are not able to do live fire practice at the range, I encourage shooters to practice their shooting positions at home via dry fire. Setup props or barricades with pasters or other faux targets on a wall in the garage or inside the house and run through each stage.
2. Scope Magnification Level — The most common issue I see with newer shooters in NRL22 is the tendency to maximize their scope magnification. The timer will start, and the shooter gets into position on a target, but the scope is set to 15x or higher and the shooter can’t find the target. The shooter lowers the magnification, locates the target, and then increases the magnification again, takes the shot, transitions to another target, and repeats the process of decreasing magnification, locating target, etc. Novice NRL22 shooters should try using the mid-range magnification. Try shooting 7x-12x and learn to balance field of view and target image.
3. Support Side Shooting — NRL22 matches often include support-side shooting stages. This requires you to shoot with your opposite (non-dominant) hand and eye. I often hear people complain about shooting support-side. My only real tip for this is to actually spend time at the range shooting this way. Practice makes perfect. It’s all a question of learning how to shoot again and using fundamentals. Learn to get a consistent cheek weld and consistent eye relief. If necessary, figure out if you need to set your scope’s diopter for your opposite eye and mark it on the scope.
A few good men (and women) — that’s what the shooting sports need these days. We need skilled, trained personnel to serve as Range Safety Officers (RS0s). Without RSOs, there would be no shooting matches — no F-Class, no High Power, no Smallbore Matches — you get the idea. Thankfully there are now ways to get requisite RSO training without costly travel far from home.
The NRA now offers an online training course for its Range Safety Officer (RSO) program. The online course teaches the skills needs to conduct and supervise safe shooting activities and range operations. Online RSO Course students can access the electronic course materials for 90 days. You can complete the course in multiple sessions. The program will save your progress so you can return later.
• Intro to the NRA Basic Range Safety Officer Course
• The Role of the NRA Range Safety Officer and Range Standard Operating Procedures
• Range Inspection and Range Rules
• Range Safety Briefing
• Emergency Procedures
• Firearm Stoppages and Malfunctions
Who Can Take the Course?: The Online RSO Course is available to anyone who currently possess a valid NRA Firearms Instructor certification or NRA Coach appointment. Course cost is $125.00. Individuals without a trainer rating must attend the in-person Range Safety Officer course consisting of both classroom time and practical exercises on a range.
Certification Procedure: Students must complete all six lessons and a short electronically administered test in order to become a certified Range Safety Officer. Once the test has been passed, newly certified Range Safety Officers will receive an electronic completion certificate that can be printed or saved to a computer.
The NRA RSO program was developed in response to the demand for a nationally-recognized range safety officer certification. More than 54,000 NRA Range Safety Officers are involved in aspects of target shooting, training, and range supervision around the USA.
Range Safety Officer supervises the line at Berger SW Nationals. Without dedicated RSOs, we could not have matches like these.
Hardware Choices: Actions, Stocks, Barrels, Optics and More Tech Talk by Jeff Stover
This article was prepared by past IBS President Jeff Stover based on results from the 2019 IBS 100/200 Group Nationals held August 12-17, 2019 at the Holton Gun & Bow Club in western Michigan.
Let’s examine the Top Ten rifles from the 2019 IBS Group Nationals in the 10.5-lb Light Varmint Class. We’ll focus on the most popular rifle components — the choices for Actions, Stocks, Barrels, and Scopes.
Hall of Famer Jeff Gaidos taking aim at the 2018 IBS Group Nationals. He has a low-profile carbon-fiber stock with a Leupold fixed-power scope.
For some years now, BAT has been the predominant action. This year BAT actions held nearly 100% of the Top Ten places in all the Bag Gun equipment lists. Bruce Thom’s Idaho-crafted actions, except for a couple stray actions in Heavy Bench, swept the top rankings.
Next, look at barrels. Bartlein or Krieger seem to rule with upstate New York’s venerable Hart barrels as competitive. Shooters tend to go with winners, so Wayne Campbell and Jeff Peinhardt dominate as gunsmiths for the top benchrest shooters.
In stocks there seems to be variety, but there is some commonality. The Scoville and Scarbrough stocks, both Michigan-made, are laminated wood (balsa and other wood) with carbon fiber and wrapped in carbon fiber. The Scoville stock on my 10.5-lb rifle weighs 18 ounces but is full size with a nice long fore-end. Bob Scarbrough makes a very similar product. Both are winners — it’s a choice of Ferrari or Lamborghini. The Roy Hunter and Terry Leonard stocks among these top rifles take a different route to winner’s circle. Both are wood (cedar or other), but super high-tech as they are laminated with carbon fiber. They are beautiful to boot. High-magnification Leupold, March, and Nightforce scopes rule the roost among benchrest optics.
Bullets and Powder
Bullets are important. Really important. A hot bullet gives you “Teen Aggs” and lots of trophies. An average bullet does not. Most of these are 68 grain 6mm boattails. The Peinhardt (StaMoly Precision) bullet is well represented on this list, but some top shooters make their own as you can see. Bullet jackets are likely StaMoly or J4. For powder, nearly everyone shoots Vihtavouri N133 except a few guys running LT30/32 or surplus 8208.
Here’s a product we’re pleased to see on the market. Walker’s, a major supplier of hearing protection for shooters, offers smaller-sized NRR 23 ear muffs specifically designed for small children from six months to eight years of age. Walker’s basic Kid’s Folding Muffs provide protection for children against dangerous loud noises. The muffs are designed to fit smaller heads properly, and protect the sensitive hearing of youngsters. Priced under $15.00 on Amazon, these are very affordable so there’s no excuse not to protect your childrens’ hearing.
The adjustable headband on these muffs is designed for the smaller heads of kids up to age 8. These Kids’ Folding Muffs have a 23 NRR noise reduction rating. We wish that were at least 25 NRR, but this can be supplemented with foam plugs for extra protection (plugs under the muffs). The important thing is that these muffs are sized right for youngsters and fit properly (for a good sound-seal). Walker’s Kids’ Folding Muffs start at $14.99 MSRP and come in seven color choices: Coral, Highlighter Yellow, NEXT Camo, Blue, Green, Orange, and Pink. (Other colors are offered on Amazon including Purple and Black.)
In addition, Walker’s has a new series of Youth and Infant Muffs, designed expressly for smaller kids. These fit the smaller heads of youngsters and have comfortable padding so the young ones will tolerate them for longer periods. There is an Infant Muff for children 0-2 years, and a larger Youth Muff for kids 3-7 years. CLICK HERE for Product Info.
Baby BANZ for Children 0-2 Years Parents of very young infants should consider Baby BANZ Muffs, which are designed for infants 0-2 years. These small-sized muffs can protect toddlers’ hearing during rock concerts, when loud machinery is running, during fireworks displays, or other noisy activities. With an impressive NRR 31 dB rating, these really work for tiny tots and toddlers.
One mother reports: “I bought these for my two-month old and they work great! He’s never fought us putting them on. He’s now falling asleep with them. He’s slept through a demolition derby and a rowdy wedding reception. I’m ordering another pair for my nephew.” Another mom says: “We bought these when we took our four month-old to a loud event. They fit her head well and were well-padded. She looked very comfortable, so comfortable in fact that she slept for most of her first rock concert. I’d say they worked exceptionally well!”
We know that many of our readers will be heading to Indiana soon to attend the F-Class National Championships at Camp Atterbury July 22-30. If you’ll be flying to Indiana this month, or venturing to another destination by air, you need to be careful when transporting firearms through airports both in the USA and in other countries. It is important that you comply with all Homeland Security, TSA, and Airline policies when transporting guns and ammunition. Following the rules will help ensure you (and your gear) make it to your destination without hassles, delays or (God forbid), confiscations.
Guidelines for Air Travel in 2021
To help our readers comply with rules and regulations for air travel, we offer these guidelines, courtesy “Ron D.”, a member of our Shooters’ Forum. Before he retired, Ron D. served as a Police Officer assigned to Chicago’s O’Hare airport. Here Ron offers some very important advice for shooters traveling with firearms and expensive optics.
First, Ron explains that airport thieves can spot bags containing firearms no matter how they are packaged: “Don’t think you’re safe if your guns are placed in cases designed for golf clubs or trade show items. Baggage is X-Rayed now and cases are tagged with a special bar code if they contain firearms. It doesn’t take long for bad guys to figure out the bar coding for firearms.”
Use Carry-On for Scopes and Expensive Items
Ron advises travelers to avoid placing very expensive items in checked baggage: “When traveling by air, carry on your rangefinder, spotting scope, rifle scope, medications, camera, etc. You would be surprised at the amount of people that carry-on jeans and shirts, but put expensive items in checked baggage. Better to loose three pairs of jeans than some expensive glass.”
Mark Bags to Avoid Confusion
Ron notes that carry-on bags are often lost because so many carry-on cases look the same. Ron reports: “People do accidentally remove the wrong bag repeatedly. I frequently heard the comment, ‘But it looks just like my bag.’ When de-planing, keep an eye on what comes out of the overhead that your bag is in. It’s easy to get distracted by someone that has been sitting next to you the whole flight. I tie two streamers of red surveyors’ tape on my carry-on bag.” You can also use paint or decals to make your carry-on bag more distinctive.
The 2021 NRA F-Class Nat’l Championships at Camp Atterbury, Indiana begin soon. The Mid-Range F-Class Nationals run July 22-26, 2021, while the Long Range F-Class Nationals take place July 27-30, 2021.
General Advice for Air Travelers
Ron cautions: “Keep your hands on your items before boarding. One of the most often heard comments from theft victims was, ‘I just put my computer down for a minute while I was on the phone.’ Also, get to the baggage claim area quickly. If your family/friends can meet you there, so can the opportunists. Things do get lost in the claim area. Don’t be a Victim. Forewarned is forearmed.”
Choosing a Rifle Transport Case
Ron advises: “Buy the best [rifle case] that you can afford. Don’t cry when your $3,000+ Benchrest rifle has a cracked stock or broken scope. Think about what it would be like to travel across the country (e.g. to Montana or the Cactus Classic) and arrive with a damaged rifle. Remember the Samsonite commercial. (For you younger shooters, it shows a monkey throwing the suitcase around in his cage at the zoo.) Baggage handling is NOT a fine art. There is no guarantee that your rifle case will be on top of all the other baggage. Then there is shifting of baggage in the belly of the plane. Ponder that for a while. Rifle and pistol cases must be locked. It doesn’t take a Rocket Scientist to figure out that a simple pry tool will open most case locks. There is not much that you can do to disguise a rifle case. It is what it is, and opportunists know this. Among thieves, it doesn’t take long for the word to get around about a NEW type of case.”
Plano Two-Gun Tactical Case
The Plano AW2 two-gun case offers the functionality and durability of an SKB-type hard case for HALF the money. This is now just $116.67, while the equivalent SKB is around $300.00.
This Plano AW2 two-gun case is Amazon’s #1 Best Seller in wheeled, heavy-duty firearms cases. This is offered in three sizes: 36″, 42″, and 52″. We like the biggest 52″ version, as it is long enough inside to fit most scoped match rifles. Alternatively, if you have a really long F-Class, ELR, or Palma rig, you can detach the barreled action from the stock, and run the two sections in the shorter 42″ case. This case is strong enough for airline travel, meeting FAA requirements for checked baggage. This Plano case offers a good balance between strength and weight, all for a reasonable cost — $116.67 on Amazon.
This week’s Shooting USA TV episode features CMP High Power competition. High Power Rifle, sometimes called XTC from “Across the Course”, is a shooting sport using centerfire (aka “fullbore”) target rifles. Major High Power matches are run by the CMP and NRA, as well as state rifle groups. The sport is divided into classes by equipment, and popular classifications include Service Rifle, and Open Class. This episode of Shooting USA focuses on High Power competition at the Talladega Marksmanship Park in Alabama.
This episode of Shooting USA airs Wednesday, July 7, 2021, 9:00 PM Eastern and Pacific, 8:00 PM Central on the Outdoor Channel. Shooting USA is also available On Demand via Vimeo.com.
This week Shooting USA TV features CMP High Power competition from the Talladega Marksmanship facility in Alabama. High Power is a challenging discipline that requires high accuracy in the rifle and great marksmanship skills in three positions — standing, sitting/kneeling, and prone. The CMP competition involves slow- and rapid-fire at 200, 300, and 600 yards in all three positions. There are separate Service Rifle and Open divisions.
Young 15-year-old Tyler Fisher from Arizona shot superbly at the 2020 CMP Western Games Match in Phoenix (Ben Avery). His impressive marksmanship secured second place overall (and High Junior) at the Western Games EIC Match shooting Service Rifle, a subclass of High Power.
High Power Open division Tubb 2000 with a shortened handguard, and custom hand support bracket forward of mag well.
HIGHPOWER CLINICS
The CMP conducts a number of High Power clinics each year. The CMP offers a pair of High Power clinics in conjunction with the U.S. Marine Corps Rifle Team and members of the Remington-Bushmaster rifle team. There is a Junior Clinic as well as an advanced High Power clinic. Both focus on service rifle disciplines.
USAMU PRO TIP: Bullseye Pistol Competition
In addition to the High Power rifle feature, this week’s Shooting USA episode has a good USAMU Pro Tips segment about bullseye pistols. Staff Sergeant Ryan Franks with the USAMU Service Pistol Team shows the fundamentals of bullseye shooting, the classic pistol competition shot from a one-handed standing position. In this Pro Tip, SSG Franks focuses on proper stance and grip.
Shooting USA will air Wednesday, July 7, 2021, at 9:00 PM Eastern and Pacific (8:00 PM Central) on the Outdoor Channel. Shooting USA is also available On Demand via Vimeo.com. Watch a single episode for $0.99, or get a full-month subscription for $3.99 and watch as many shows as you like with limited commercial interruptions.
The National Rifle Association (NRA) recently announced the reopening of the NRA Public Range Fund. Established in 2009, the NRA Public Range Fund is a grant-matching program that encourages city and county governments, along with state or federal agencies, to work with NRA to build and improve public ranges across the United States.
This matching grant program encourages federal, state, and local governments to work with NRA to construct, maintain, and augment public shooting facilities. At the NRA’s sole discretion, grants are awarded to assist with the acquisition, development, and improvement of public shooting facilities.
Make Range Improvements and Resolve Environmental Issues
In addition to physical improvements, NRA’s Public Range Fund allows qualifying agencies or local governments to improve community relations and address environmental issues related to range operations. With grants awarded on a 50/50 matching basis, 50% of project cost are provided by the applicant and the remaining 50% are provided by the Fund. In-kind services such as labor, materials, and equipment may be considered to provide the applicant’s 50% contribution.
“Our grants provide … recreational facilities for entire communities. Public ranges allow hundreds of thousands of hunters, competitive shooters, and target shooters to work on their marksmanship under safe and responsible conditions. More than 90 public ranges have been awarded funds to date and we look forward to assisting the next 90.” — Liz Bush, managing director of NRA Community Engagement
More than $2 million in NRA Public Range Fund grants have been awarded since the program began. To learn about this program and other available grants, visit the NRA Grant Program Webpage.
Range Improvement Grants
Helping clubs improve shooting range facilities is one of the main missions of the NRA Grant Program. Such programs might include: Berm improvements (example below), Clubhouse improvements, Target pits, Covered firing lines, Road improvements, Trap Machines, Storage buildings and other permanent improvements to club properties and/or facilities.
Today we feature a modern switch-barrel PRS chassis rifle set up for quick changes between 6mm Creedmoor and 6.5 Creedmoor barrels. The owner, Forum member Jeff Cosgrove (aka “Punkur67″) uses the 6 CM barrel for competition, favoring the reduced recoil over its 6.5 mm big brother. He does use the 6.5 CM barrel for practice (given its better barrel life). The 6.5 CM barrel also gives him the chance to shoot a variety of factory 6.5 Creedmoor ammo.
- Terminus Zeus action with Quick Change (QC) barrel option.
– 6mm Creedmoor Pre-Fit Bartlein Heavy Varmint 400MODBB barrel for matches
– 6.5 Creedmoor Pre-Fit Benchmark Heavy Palma barrel for training
– MPA BA Competition chassis with full weight kit
– Zero Compromise Optic ZCO 5-27x56mm FFP scope
– TriggerTech Diamond trigger
This rifle represents an evolution for Jeff. Each step along the way in his PRS journey, he has learned more about what he wants and needs in a competition rifle. And what you see here, from the $3760 ZC527 scope to his high-tech reloading equipment, represents pursuit of excellence. Jeff even created a modern, spacious man cave/reloading center in his new house (photos below).
Quick-Change Barrel System with Terminus Zeus QC Action
This rifle has two pre-fit barrels that work with the Terminus Zeus QC Action for fast and easy barrel swaps. To remove a barrel, you simply release two tension screws on the front of the action and then unscrew the barrel. To swap in a different pre-fit barrel, reverse the process and then tension the screws. The Terminus Zeus is 3-lug receiver with 60° bolt and integral recoil lug. Both the receiver and bolt are DLC-treated. Jeff reports this action is extremely smooth and has met all of his expectations. Some other Zeus features are threaded trigger pins for quick/easy trigger installation, and a roller-tipped cocking piece.
PRS Discipline Offers Fun, New Challenge for Long-Time Shooter
My name is Jeff Cosgrove, I live in Winchester, California and do commercial heating and air conditioning. I have shot for 20+ years but I found my interest in shooting was dwindling over time. I got somewhat bored with shooting paper at 100 yards or plinking cans out in the desert. About 18 months ago I decided I wanted to shoot long range. I picked up a used MPA in .300 Winchester Magnum and started shooting long range with a new buddy. That day I fell in love with guns all over again with more intensity than ever.
How I Got Started in PRS
With that new .300 WM I soon found my reloads were not up to my expectations (high ES/SD), so I purchased all new reloading hardware. One of my purchases was a used Benchsource Annealer. The guy I bought that from asked if I had ever tried PRS and he invited me to check out a match. So I went to a local PRS event as a spectator. I looked at many rigs on the firing line and took notes. By the end of the day I knew this was something I really wanted to do. I then acquired a used chassis rifle that I thought would work well for PRS. I went to a PRS match the following month but shot poorly.
After working with that first PRS rifle, a 6.5 CM with Stiller Tac30 action, MDT chassis, and Proof Carbon-wrapped barrel, I quickly learned that gun did not handle and balance the way I hoped.* It was too light in the front, the ergos were poor, and scope eye relief was not optimal. So I decided to build my own GEN 2 PRS rifle. This is the story of how I put together my new switch-barrel rig that I now use in competition.
PRS Rifle and Gear Selection — Learning What Works
Barrel availability was limited given the current shortages. Luckily I was able to obtain a 6mm Creedmoor pre-fit Bartlein Heavy Varmint 400MODBB from Southern Precision Rifles. The 6mm Creedmoor is notorious for being a barrel burner cartridge so I went with the special 400MODBB metal. Bartlein says that barrel life expectancy is 1.5 to 2 times longer than the standard 416 grade steel. I also purchased a 6.5 Creedmoor pre-fit Benchmark Heavy Palma barrel for training (Source: Straight Jacket Armory). With the Terminus Zeus quick change system I am able to swap from my match barrel to my trainer barrel in just a couple minutes. I loosen two set screws, unthread the barrel, thread the new barrel on, and torque the set screws to 10 inch-pounds. This also affords me caliber options in case I’m in a pinch for ammo. If I have some 6.5 CM loaded up and don’t have time to load 6mm Creedmoor for a match, then I’m covered.
For the trigger, I went with a TriggerTech Diamond Pro curve model. I have Timney, Jewell, and TriggerTech triggers in other rifles. I like them all but I liked the feel of the TT Diamond the best so that is what I used on this build. I set my triggers around 18-20 oz. — I am not a fan of ultra-light trigger pulls.
MPA BA Competition Chassis with Added Weight
I went with an MPA BA Comp chassis with full internal and external weight kit. I also have Gray Ops external weight on the handguard. I had the same chassis on my .300 WinMag and felt very comfortable with it. I took a PR1 class and found that, with a different gun, I had to force a comfortable hand position for proper trigger pull. After that class I grabbed my MPA and my hand fell in to the perfect position. I did not need to hunt or index my hand with the MPA. The built ARCA rail (RAT) lowered the rifles center of gravity more than my old setup with the ARCA rail bolted to the bottom of the handguard. With the current configuration, the rifle weighs in at 24 lbs. and balances three inches in front of the magwell. I now have the flexibility to add, subtract, or move approximately 6 lbs. of weight.
The Attraction of PRS/NRL Practical Competitions
I really enjoy PRS-style shooting because there seems to be a new challenge every time you compete — no matter what. With PRS I am shooting many different positions and ranges with the pressure of a stopwatch. This keeps things interesting for me. I have taken a few training classes to help establish good, clean fundamentals.
Jeff says it is hard to practice for the many unconventional shooting positions at PRS matches.
My biggest challenges so far have been: 1) building stable shooting positions that I have not practiced enough; 2) proper equipment selection; and 3) time management. Regarding the shooting positions — PRS/NRL is not like F-Class where you can always practice from one position. And it’s hard to practice for unusual set-ups (barriers and positions) you’ve not encountered before. Concerning equipment — you need some experience in the game to determine what really works best for you.
Innovative Zero Compromise Optic — Optimized for the Tactical Game
The scope is a Zero Compromise ZC527 (5-27x56mm FFP) with MPCT2 reticle. Zero Compromise Optic is a relatively new manufacturer, but their scopes are top-flight. The First Focal Plane ZCO has excellent glass that is extremely bright and clear. With a big 36mm main tube, the ZC527 offers 35 Mils Elevation and 21 Mils Windage adjustment. The field of view is 21 feet at 100 yards — one of the widest in the industry. The ZC527 also offers illuminated reticle and locking turrets. When I was at my first PRS match I looked through several different scopes. When I got behind a ZCO scope I knew this was what I wanted — the ZCO scope was super clear, super sharp, with very positive controls.
I put a protective wrap on the scope because with some of our PRS stages it is easy to scratch or dent the scope tube. You don’t want to bang up an expensive scope — the ZC527 retails for $3760.
Reloading for 6mm Creedmoor and 6.5 Creedmoor
When starting out with a new cartridge I like to search places like AccurateShooter.com and UltimateReloder.com for popular recipes used by knowledgeable shooters. I am all about paving your own way on certain things but with the consistency, higher cost, and limited supply of components these days I try to stick with the most common loads. I also want to limit barrel wear and get through load development quickly. I don’t want to chase loads for 300 rounds to ultimately land in the same place that so many other people have already found.
I start my new barrels with virgin brass and load three rounds at each charge weight in 0.2 grain increments. I put the most popular charge weight (for my chosen bullet) in the middle of my load range and load above and below to find a good node while paying close attention for pressure signs along the way. I use the 6.5 Guys spreadsheet (see below) to help analyze my results. With those results I like to re-test a narrower range with 5-10 rounds each charge weight in 0.2 grain increments. I again use the 6.5 Guys spreadsheet to make a final charge weight selection and then I move on to seating depth. I will load different depths to tighten the groups up.
Load Development Using 6.5 Guys Custom Spreadsheet
To hold and analyze my load development data I use the spreadsheet from 65Guys.com. It helps a ton with making a decision on your final load. This Excel spreadsheet works great and makes it simple to analyze your data. You can even copy and paste your chronograph data if your chrono logs on to a SD card.
In this 6.5 Guys video Steve provides an overview and tutorial for using the Excel load development analysis model that he has developed. The Excel Load Development Analysis Spreadsheet version 2.0 is FREE. Download from the 6.5 Guys Website.
In this video Steve explains some key statistical concepts for performing load data analysis. He also provides tips and guidance for determining the optimal load for your rifle as you analyze the load data you’ve collected.
New House, New Man Cave/Reloading Room
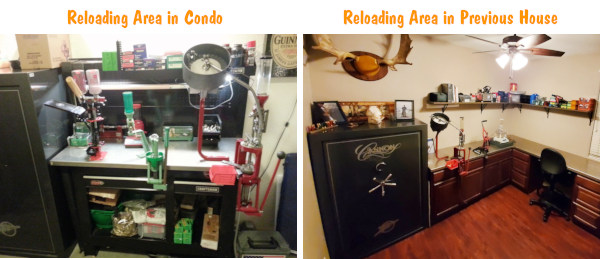
Jeff recently moved with his family into a great new house. One bonus of this move was that he upgraded from a cramped reloading area to a dedicated “Man Cave” that has ample space for his gun safes, multiple presses, and all his reloading components. Large upper and lower cabinets plus a dedicated “gun closet” provide plenty of storage. Read all about this move in this AccurateShooter Forum Thread.
Here is Jeff’s first reloading area years ago: “My first reloading setup was smashed in my two-bedroom condo so I had a very small bench that was very cluttered. I had to deal with the limited space I had but I made it work. Then in our first house I had a larger bench/cabinet, but it was still not ideal.”
Here is the new Man Cave in the new house — very open, spacious, with plenty of storage.
This animated GIF shows the new Man Cave move-in process start to finish:



 3. Ammo Caddy on Joystick Arm – Charles shoots a Right Bolt/Left Port action, so he pulls his rounds with his left hand. Note that Huckeba’s record rounds rest in a small, wood ammo caddy attached to the end of the joystick shaft. Look carefully, you’ll see the wood ammo block in place of the normal black ball at the end of the joystick. That allows Charles to pull shots with the absolute minimum of hand movement. Ingenious! Huckeba is very fast, with a great economy of motion. I believe that because his ammo was literally at hand, Charles was better able to keep his focus on aiming and the flags.




 Bill knows a thing or two about taking pictures, having been a professional photographer in NYC for many decades. He uses modern digital cameras for both his outdoor and indoor work. Most photos in this story were taken with a Canon EOS 5DSR MKIV. We asked Bill for some tips on taking good photos. Here are his FIVE Top Tips for Photography:





 The
The 
 Certification Procedure: Students must complete all six lessons and a short electronically administered test in order to become a certified Range Safety Officer. Once the test has been passed, newly certified Range Safety Officers will receive an electronic completion certificate that can be printed or saved to a computer.







 First, Ron explains that airport thieves can spot bags containing firearms no matter how they are packaged: “Don’t think you’re safe if your guns are placed in cases designed for golf clubs or trade show items. Baggage is X-Rayed now and cases are tagged with a special bar code if they contain firearms. It doesn’t take long for bad guys to figure out the bar coding for firearms.”