|
|
February 20th, 2019

 We know you guys like taking photos of your rifles at the range. And, if you’re selling a rifle, scope, front rest, or rear bag, you need good photos to post in our Forum classifieds. Here’s a basic photography tip that can help you produce dramatically better photos. Use your camera’s ability to add “fill flash” even in daylight. We know you guys like taking photos of your rifles at the range. And, if you’re selling a rifle, scope, front rest, or rear bag, you need good photos to post in our Forum classifieds. Here’s a basic photography tip that can help you produce dramatically better photos. Use your camera’s ability to add “fill flash” even in daylight.
There’s plenty of light on a bright day. But bright light also means strong shadows. The shadows can leave parts of your subject literally in the dark. Daylight flash will help fill in those dark spots. In addition, if you are on a covered firing area, and want to include the range in your photo, you can benefit from using flash. This will prevent the foreground subject from being too dark while the downrange background is much too bright.
Photo without Flash


The photo above was taken without flash. As you can see, the rifle is too dark so details are lost. At the same time, the background (downrange) is over-exposed and washed out. The second photo below is taken with daylight flash. The difference is dramatic. Now you can see details of the rifle, while the background is exposed properly. Note how much easier it is to see the the targets downrange and the colors of the front rest. NOTE: these two photos were taken at the same time — just seconds apart.
Photo with Daylight “Fill-Flash”

Be sure to click on the larger versions of each photo.
How to Activate Daylight Flash
Most digital cameras have daylight flash capability. Some cameras have a separate setting for “auto fill flash”. On other cameras, you’ll have to set the camera to aperture priority and stop down the aperture to force the flash to fire. Read your camera’s manual. On many Canons, a menu that lets you set the “flash output”. For “fill flash” we like to set the flash at 30% to 50% output. This fills in the shadows sufficiently without “killing contrast” or creating too much reflection on shiny metal. Below is a photo taken with 30% flash output. Note the rich colors and how the exposure is balanced between foreground and background. Without flash the sky and target area would be “washed out”.

Here’s another tip for Canon owners. If you like deep, rich colors, use the “Vivid” setting in the effects menu. This punches up saturation and contrast.
February 19th, 2019

Gear Report by Kip Staton
Shooters in the market for an accurate anemometer that doesn’t break the bank need to take a hard look at the WeatherFlow Wind Meter, which retails on Amazon.com for just $39.89. Even though it is inexpensive, owner reviews have been generally very positive (so long as the software is compatible with your device). One Amazon reviewer says the WeatherFlow measures wind velocity as accurately a dedicated anemometer.
A big part of the reason the WeatherFlow Wind Meter is so inexpensive is that you’ve probably already got the brains of the system in your pocket. Yes, it connects to and communicates with any standard smartphone or tablet, in either iOS or Android flavors. Users simply download the free WeatherFlow Wind Meter app to their smart device, insert the anemometer into the headphone jack, and can immediately start measuring the wind.

 Of course, the first question any serious shooter will ask is “How accurate is this thing?” Pretty dang accurate, as it turns out. The device was calibrated by the University of Florida’s Aerospace Engineering Department, and the unique design allows it to consistently report to within a half a percentage point of the true wind value, even if the breeze is up to 15 degrees off-axis to the meter. Of course, the first question any serious shooter will ask is “How accurate is this thing?” Pretty dang accurate, as it turns out. The device was calibrated by the University of Florida’s Aerospace Engineering Department, and the unique design allows it to consistently report to within a half a percentage point of the true wind value, even if the breeze is up to 15 degrees off-axis to the meter.
Wind speeds are measurable from as slow as two miles per hour to as high as 125 MPH. The Wind Meter outputs average, lull, and gusts windspeed data to your phone, with velocities indicated in 0.1 MPH increments. Furthermore, a hard-sided protective case is included for safe transportation.
Naturally, since the WeatherFlow Wind Meter is App-based, it’s connectable to a variety of social media websites and distribution sources. This makes saving and sharing information about climate conditions a breeze.
To read more gear reviews by Kip Staton, visit KipStaton.com.
February 18th, 2019

SUMMARY: Powder can have a very long shelf life. You need to watch for changes in smell and color. A reddish tinge, almost like rust on the powder, is a bad sign, as is a foul odor, not to be confused with a normal chemical smell. Either of these signs indicate it is time to dispose of your powder by means other than shooting.
Ever wondered about the stability of the propellants in your reloading room? There are some important things you should know about powder storage, to ensure consistent powder performance and safety. On its website, Western Powders (vendors of Accurate, Norma, and Ramshot powders) published an informative Q & A series entitled Dear Labby: Questions for our Ballistics Lab. Here are some excerpts that pertain to powder storage and shelf life. Worried that your powder may be too old? Western’s experts explain how to check your propellants for warning signs.
Proper Powder Storage
Q: I live in southern Arizona where it is very hot. I am told powders will become unstable if stored in an area not air-conditioned. My wife says no powder or primers in the house. Can powder be stored in a refrigerator? What about using a fireproof safe? I would appreciate your ideas. — M.C.
Lab Answer: SAAMI guidelines are pretty clear on issues of storage. They recommend storing smokeless powder in containers that will not allow pressure to build if the powder is ignited — ruling out gun safes and refrigerators.
CLICK HERE to Read SAAMI Guidelines for Powder Storage (PDF)
In their original containers smokeless powder’s lifespan is quite long, even in your hot, arid climate, typically longer than the average handloader would need to store them. Stored safely in a garage or outbuilding, your powder should last years. If you see the powder developing a reddish tint, or giving off a foul odor, it is time to discard it.
Clumps in Powder Container
Q: I ordered some of your Accurate 1680 powder back about in December. I just now opened it … and it is full of clumps. My knowledge tells me that means moisture. Am I wrong? I just now broke the seal and it has been stored in a ammo can with desiccant packs around it and a dehumidifier running 14-16 hours a day. I can’t imagine this being my fault, if this does indicate moisture. I don’t know if the pink part on the label is suppose to be red or not, but it is definitely pink, so if it was red I am wondering if I was shipped an old container? I hope that this isn’t bad and I am stuck with it…
Lab Answer: All powder contains a certain amount of moisture. When the powder is stored or during shipping, it can go through temperature cycles. During the cycling, the moisture can be pulled to the surface and cause clumping. Clumping can also be caused by static electricity if too dry or the powder has limited graphite content. You can break up the clumps before metering and they shouldn’t be a problem. This will not affect the powder performance, so your product is fine. Accurate 1680 labels are designed in Pink. As a side note, specification for testing powder is at 70° F and 60% humidity.
February 17th, 2019
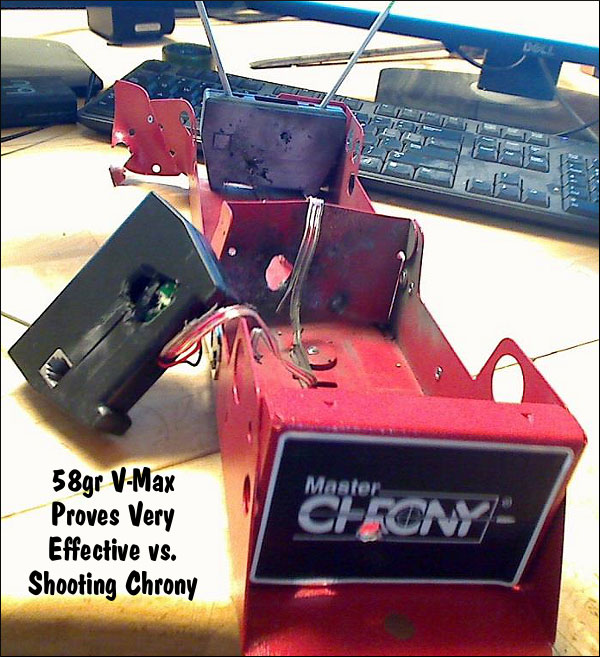
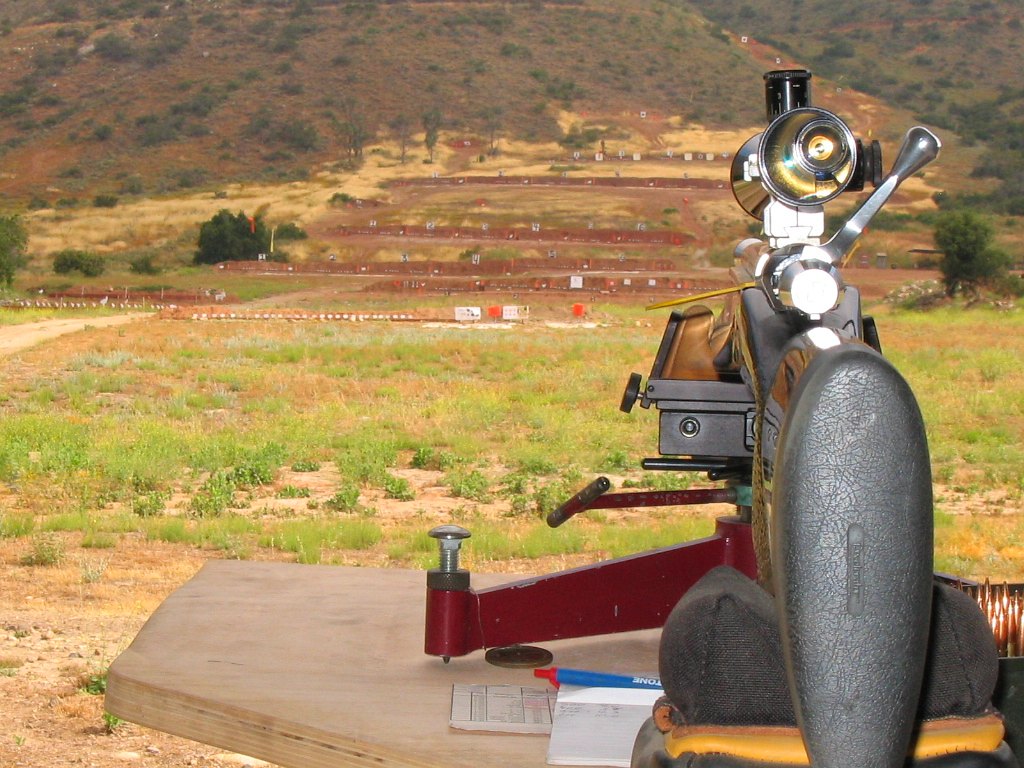
There is nothing more frustrating (or embarassing) than sending a live round into your expensive new chronograph. As the photo below demonstrates, with most types of chronographs (other than the barrel-hung Magnetospeed), you can fatally injure your expensive chrono if it is not positioned precisely.
 When setting up a chrono, we always unload the rifle, remove the bolt and bore-sight to ensure that the path of the bullet is not too low. When bore-sighting visually, set up the rifle securely on the sandbags and look through the bore, breech to muzzle, lining up the barrel with your aim point on the target. Then (during an appropriate cease-fire), walk behind the chronograph. Looking straight back through the “V” formed by the sky-screens, you should be able to see light at the end of the barrel if the gun is positioned correctly. You can also use an in-chamber, laser bore-sighter to confirm the visual boresighting (see photo). When setting up a chrono, we always unload the rifle, remove the bolt and bore-sight to ensure that the path of the bullet is not too low. When bore-sighting visually, set up the rifle securely on the sandbags and look through the bore, breech to muzzle, lining up the barrel with your aim point on the target. Then (during an appropriate cease-fire), walk behind the chronograph. Looking straight back through the “V” formed by the sky-screens, you should be able to see light at the end of the barrel if the gun is positioned correctly. You can also use an in-chamber, laser bore-sighter to confirm the visual boresighting (see photo).

Adjust the height, angle and horizontal position of the chronograph so the bullet will pass through the middle of the “V” below the plastic diffusers, no less than 5″ above the light sensors. We put tape on the front sky-screen supports to make it easier to determine the right height over the light sensors.
Use a Test Backer to Confirm Your Bullet Trajectory
You can put tape on the support rods about 6″ up from the unit. This helps you judge the correct vertical height when setting up your rifle on the bags. Another trick is to hang a sheet of paper from the rear skyscreen and then use a laser boresighter to shine a dot on the paper (with the gun planted steady front and rear). This should give you a good idea (within an inch or so) of the bullet’s actual flight path through the “V” over the light sensors. Of course, when using a laser, never look directly at the laser! Instead shine the laser away from you and see where it appears on the paper.

Alignment of Chronograph Housing
Make sure the chrono housing is parallel to the path of the bullet. Don’t worry if the unit is not parallel to the ground surface. What you want is the bullet to pass over both front and rear sensors at the same height. Don’t try to set the chrono height in reference to the lens of your scope–as it sits 1″ to 2″ above your bore axis. To avoid muzzle blast interference, set your chronograph at least 10 feet from the end of the muzzle (or the distance recommended by the manufacturer).

Rifles with Elevated Iron Sights
All too often rookie AR15 shooters forget that AR sights are positioned roughly 2.4″ above the bore axis (at the top of the front sight blade). If you set your bullet pass-through point using your AR’s front sight, the bullet will actually be traveling 2.4″ lower as it goes through the chrono. That’s why we recommend bore-sighting and setting the bullet travel point about 5-8″ above the base of the sky-screen support shafts. (Or the vertical distance the chronograph maker otherwise recommends). NOTE: You can make the same mistake on a scoped rifle if the scope is set on very tall rings, so the center of the cross-hairs is much higher than the bore axis line.

TARGET AIM POINT: When doing chrono work, we suggest you shoot at a single aiming point no more than 2″ in diameter (on your target paper). Use that aiming point when aligning your chrono with your rifle’s bore. If you use a 2″ bright orange dot, you should be able to see that through the bore at 100 yards. Using a single 2″ target reduces the chance of a screen hit as you shift points of aim. If you shoot at multiple target dots, place them in a vertical line, and bore sight on the lowest dot. Always set your chron height to set safe clearance for the LOWEST target dot, and then work upwards only.
Other Chronograph Tips from Forum Members:
When using a chronograph, I put a strip of masking tape across the far end of the skyscreens about two-thirds of the way up. This gives me a good aiming or bore-sighting reference that’s well away from the pricey bits. I learned that one the hard way. — GS Arizona
A very easy and simple tool to help you set up the chronograph is a simple piece of string! Set your gun (unloaded of course) on the rest and sight your target. Tie one end of the string to the rear scope ring or mount, then pull the string along the barrel to simulate the bullet path. With the string showing the bullet’s path, you can then easily set the chronograph’s placement left/right, and up/down. This will also let you set the chrono’s tilt angle and orientation so the sensors are correctly aligned with the bullet path. — Wayne Shaw
If shooting over a chrono from the prone position off a bipod or similar, beware of the muzzle sinking as recoil causes the front of the rifle to drop. I “killed” my first chronograph shooting off a gravel covered firing point where I’d not given enough clearance to start with and an inch or two drop in the muzzle caused a bullet to clip the housing. — Laurie Holland
February 12th, 2019

Today is Day One of the Berger Southwest Nationals, at the Ben Avery Range outside Phoenix, AZ. There will be a 600-yard mid-range match. Many of the nation’s most talented F-Class and sling shooters will be there. But no matter what your skill level, it is still possible to make major mistakes, that can spoil the day and/or put you out of the running for the entire match.

Photo by Sherri Jo Gallagher.

In any shooting competition, you must try to avoid major screw-ups that can ruin your day (or your match). In this article, past F-TR National Mid-Range and Long Range Champion Bryan Litz talks about “Train Wrecks”, i.e. those big disasters (such as equipment failures) that can ruin a whole match. Bryan illustrates the types of “train wrecks” that commonly befall competitors, and he explains how to avoid these “unmitigated disasters”.
Urban Dictionary “Train Wreck” Definition: “A total @#$&! disaster … the kind that makes you want to shake your head.”
 Train Wrecks (and How to Avoid Them) Train Wrecks (and How to Avoid Them)
by Bryan Litz of Applied Ballistics LLC.
Success in long range competition depends on many things. Those who aspire to be competitive are usually detail-oriented, and focused on all the small things that might give them an edge. Unfortunately it’s common for shooters lose sight of the big picture — missing the forest for the trees, so to speak.
Consistency is one of the universal principles of successful shooting. The tournament champion is the shooter with the highest average performance over several days, often times not winning a single match. While you can win tournaments without an isolated stellar performance, you cannot win tournaments if you have a single train wreck performance. And this is why it’s important for the detail-oriented shooter to keep an eye out for potential “big picture” problems that can derail the train of success!
Train wrecks can be defined differently by shooters of various skill levels and categories. Anything from problems causing a miss, to problems causing a 3/4-MOA shift in wind zero can manifest as a train wreck, depending on the kind of shooting you’re doing.

Photo by Sherri Jo Gallagher.
Below is a list of common Shooting Match Train Wrecks, and suggestions for avoiding them.
1. Cross-Firing. The fastest and most common way to destroy your score (and any hopes of winning a tournament) is to cross-fire. The cure is obviously basic awareness of your target number on each shot, but you can stack the odds in your favor if you’re smart. For sling shooters, establish your Natural Point of Aim (NPA) and monitor that it doesn’t shift during your course of fire. If you’re doing this right, you’ll always come back on your target naturally, without deliberately checking each time. You should be doing this anyway, but avoiding cross-fires is another incentive for monitoring this important fundamental. In F-Class shooting, pay attention to how the rifle recoils, and where the crosshairs settle. If the crosshairs always settle to the right, either make an adjustment to your bipod, hold, or simply make sure to move back each shot. Also consider your scope. Running super high magnification can leave the number board out of the scope’s field view. That can really increase the risk of cross-firing.
2. Equipment Failure. There are a wide variety of equipment failures you may encounter at a match, from loose sight fasteners, to broken bipods, to high-round-count barrels that that suddenly “go south” (just to mention a few possibilities). Mechanical components can and do fail. The best policy is to put some thought into what the critical failure points are, monitor wear of these parts, and have spares ready. This is where an ounce of prevention can prevent a ton of train wreck. On this note, if you like running hot loads, consider whether that extra 20 fps is worth blowing up a bullet (10 points), sticking a bolt (DNF), or worse yet, causing injury to yourself or someone nearby.

[Editor’s Note: The 2016 F-Class Nationals will employ electronic targets so conventional pit duties won’t be required. However, the following advice does apply for matches with conventional targets.]
3. Scoring/Pit Malfunction. Although not related to your shooting technique, doing things to insure you get at least fair treatment from your scorer and pit puller is a good idea. Try to meet the others on your target so they can associate a face with the shooter for whom they’re pulling. If you learn your scorer is a Democrat, it’s probably best not to tell Obama jokes before you go for record. If your pit puller is elderly, it may be unwise to shoot very rapidly and risk a shot being missed (by the pit worker), or having to call for a mark. Slowing down a second or two between shots might prevent a 5-minute delay and possibly an undeserved miss.
 4. Wind Issues. Tricky winds derail many trains. A lot can be written about wind strategies, but here’s a simple tip about how to take the edge off a worse case scenario. You don’t have to start blazing away on the command of “Commence fire”. If the wind is blowing like a bastard when your time starts, just wait! You’re allotted 30 minutes to fire your string in long range slow fire. With average pit service, it might take you 10 minutes if you hustle, less in F-Class. Point being, you have about three times longer than you need. So let everyone else shoot through the storm and look for a window (or windows) of time which are not so adverse. Of course this is a risk, conditions might get worse if you wait. This is where judgment comes in. Just know you have options for managing time and keep an eye on the clock. Saving rounds in a slow fire match is a costly and embarrassing train wreck. 4. Wind Issues. Tricky winds derail many trains. A lot can be written about wind strategies, but here’s a simple tip about how to take the edge off a worse case scenario. You don’t have to start blazing away on the command of “Commence fire”. If the wind is blowing like a bastard when your time starts, just wait! You’re allotted 30 minutes to fire your string in long range slow fire. With average pit service, it might take you 10 minutes if you hustle, less in F-Class. Point being, you have about three times longer than you need. So let everyone else shoot through the storm and look for a window (or windows) of time which are not so adverse. Of course this is a risk, conditions might get worse if you wait. This is where judgment comes in. Just know you have options for managing time and keep an eye on the clock. Saving rounds in a slow fire match is a costly and embarrassing train wreck.
5. Mind Your Physical Health. While traveling for shooting matches, most shooters break their normal patterns of diet, sleep, alcohol consumption, etc. These disruptions to the norm can have detrimental effects on your body and your ability to shoot and even think clearly. If you’re used to an indoor job and eating salads in air-conditioned break rooms and you travel to a week-long rifle match which keeps you on your feet all day in 90-degree heat and high humidity, while eating greasy restaurant food, drinking beer and getting little sleep, then you might as well plan on daily train wrecks. If the match is four hours away, rather than leaving at 3:00 am and drinking five cups of coffee on the morning drive, arrive the night before and get a good night’s sleep.”
Keep focused on the important stuff. You never want to lose sight of the big picture. Keep the important, common sense things in mind as well as the minutia of meplat trimming, weighing powder to the kernel, and cleaning your barrel ’til it’s squeaky clean. Remember, all the little enhancements can’t make up for one big train wreck!
February 8th, 2019

While many of our readers are caught in the wicked cold-spell hitting the North Central states, take heart — spring is right around the corner. That means folks will be getting ready for varmint safaris. Here’s a story that may help you choose a cartridge for your next varmint rifle.
For many years, Ken Lunde journeyed to South Dakota to visit with his father, and do a little varmint hunting. This article features Ken’s Cooper Model 21 Montana Varminter chambered in .204 Ruger. During past varminting holidays in South Dakota, Ken had a chance to try the speedy .204 against his “old reliable” .223. He came to favor the .204 for its accuracy, flat trajectory, and superior performance in the wind. Ken told us: “I love my .223, but the .204 has the edge for Dog-Town duty.”
The Cooper Montana Varminter in .204 Ruger
by Ken Lunde
Photos Copyright © Ken Lunde, All Rights Reserved
I’ve been a big fan of Cooper Arms rifles ever since my dad introduced them to me a few years ago. I prefer Cooper Arms rifles over others because they perform as they should out-of-the-box, and have outstanding workmanship and beauty. You get form and function. You don’t need to choose one over the other. For the price one pays, Cooper Arms rifles are a great bargain. I mount a quality scope, usually a higher-end Leupold with a 40mm objective, go through barrel break-in, and they always perform extraordinarily well. I should state that all of my rifle shooting is geared towards hunting. In other words, any shooting I do on paper is treated as preparation for using the same rifle for hunting, whether it’s for varmints such as prairie dogs, or for larger game.
Cooper Varmint Rifles–Components and Variations
The featured rifle is a Cooper Arms M21 Montana Varminter (aka “MTV”) chambered in .204 Ruger. It has a 24″ varmint-taper stainless steel barrel with a 1 in 12-inch twist. This twist rate seems to be typical of .204 Ruger barrels from other manufacturers. The stock is AA+ grade Claro Walnut, and has the varmint fore-end, “Buick” vents, and steel grip cap that are standard on the Montana Varminter configuration. Among Cooper’s three wood-stocked varmint rifle configurations — Varminter, Montana Varminter, and Varmint Extreme — I prefer the Montana Varminter as it seems to be the best balance of value versus features. Plus, I like the “Buick” vents. They’re very pleasing, at least to my eyes. Maybe that’s why I own seven of them, in M21 and M22 actions, and in a variety of calibers. [Editor: Ken’s father has a near-identical .204 Ruger Cooper, with consecutive serial number.]
For this rifle, I decided to mount a Leupold VX-III 6.5-20×40 LR scope with the Varmint Hunter reticle. The rifle came with Leupold STD bases in Matte finish, and I used Leupold 30mm STD rings in Medium height and Matte finish. I took the time to align the bottom rings on the bases, and properly lapped them. Other than mounting the scope, no custom work was done, because none was necessary. The trigger is superb out-of-the-box, which is typical of Cooper rifles.

Load Development and Accuracy
 I first tried factory ammo, loaded with Hornady 32gr and 40gr V-Max. The 32gr load shot the best—five-shot groups were slightly larger than a half-inch at 100 yards. My dad heard that Alliant Reloder 10X was a good powder for this cartridge, and he worked up a load using the Sierra 32gr BlitzKing bullet. He found that 26.5 grains was the right amount for his rifle. Considering that my rifle was probably made on the same day, having a consecutive serial number, I decided to try my dad’s load, along with a half-grain up and down, meaning 26, 26.5, and 27 grains of powder. I, too, found that my rifle prefers 26.5 grains of RL 10X. With this load, I’ve been able to shoot consistent quarter-inch, five-shot groups at 100 yards. Cartridge OAL is 2.353″, or 1.990″ measured from the ogive. I first tried factory ammo, loaded with Hornady 32gr and 40gr V-Max. The 32gr load shot the best—five-shot groups were slightly larger than a half-inch at 100 yards. My dad heard that Alliant Reloder 10X was a good powder for this cartridge, and he worked up a load using the Sierra 32gr BlitzKing bullet. He found that 26.5 grains was the right amount for his rifle. Considering that my rifle was probably made on the same day, having a consecutive serial number, I decided to try my dad’s load, along with a half-grain up and down, meaning 26, 26.5, and 27 grains of powder. I, too, found that my rifle prefers 26.5 grains of RL 10X. With this load, I’ve been able to shoot consistent quarter-inch, five-shot groups at 100 yards. Cartridge OAL is 2.353″, or 1.990″ measured from the ogive.
I am using Winchester brass, Federal 205M primers, Alliant Reloder 10X powder, and Sierra 32gr BlitzKing bullets. I use Forster dies, and load with a Forster Co-Axial single-stage press. Here are two typical targets. As you can see, this .204 can shoot.
 |
 |
Cartridge Smack-Down — .204 Ruger vs. .223 Remington
Ken made these comments when he first tested his .204 Ruger vs. his trusty (and very accurate) .223 Remington: “I brought along two rifles. The first was my ‘proven’ varmint rifle, the one chambered in .223 Rem. It has stunning wood, and clearly escaped the factory with AAA grade Claro Walnut. That rifle also shoots consistent five-shot, quarter-inch groups at 100 yards. For the .223, my preferred load uses Winchester brass, Federal 205M primers, Hornady 40gr V-Max bullets (non-moly), and 26.2gr of Vihtavuori N133 powder.

I found that I very much enjoyed shooting the .204 Ruger rifle, which explains why I used only the .204 Ruger during the second trip, although I also brought along the .223. Why did I favor the .204? Well, those little 32gr bullets really zing out of the barrel, with a very flat trajectory, like a .22-250. And, to my surprise, they buck the wind very well, perhaps even better than .223. While I am no ballistics expert, I think that this may be due to its high velocity, clearly over 4,000 fps.”
February 5th, 2019

This week we return to our 6mmBR.com roots with an article on David Bergen’s slick 24″ Drop-Port Viper. This was one of the first 6BR rifles we featured. David, who hails from Belgium, developed this project over many months, and the gun proved to be a true tack-driver, with the ability to group in the Ones, even with the heavy boat-tail bullets. David talks about the build and his reloading methods while action designer Jerry Stiller provides technical insights into the design features of his Viper action.
It was a long journey looking for the perfect custom action to build my new rifle. I searched the internet and visited various forums. I even re-read all my old Precision Shooting magazines to find what I was looking for. One evening I conferred by telephone with Mr. Jerry Stiller of Stiller’s Actions in Texas. He patiently answered all my questions. That moment I decided that I wanted a Viper Drop-Port action. [Editor: Sadly, the Viper Drop-Port is no longer in production.]
Component Selection
At the heart of this gun is a Viper action. This medium-sized action can handle cartridges from a small BR up to a 6.5-284. (Stiller’s smaller Cobra action is for PPC and BRs only.) The Viper is milled from aluminum. This keeps weight down while still allowing Vipers to have a large bedding surface like a Stolle Panda.

At first I was a bit sceptical about the aluminum’s toughness, but Mr. Stiller informed me that the action is the perfect marriage between steel and aluminum. The bolt is hard-chromed and the action body is hard-anodized. This gives it two surfaces that resist wear and make an already-slick action even slicker. Stainless steel is used for all the heavy-stress points including barrel threads, locking lugs, and the rear camming surface. The bolt is made of steel with a very light, small-diameter firing pin to prevent primer piercing with heavy loads. Everything is held very concentric to the bore axis. The Viper is a very smooth action mainly because the design and the precise machining of the camming surfaces. Combined with optimal bolt-lift timing, this gives a smooth action. Stiller also keeps the tolerances very tight on these actions, though they are as fast-handling as any you can buy. The trigger is of course a Jewell BR model.
The rifle is chambered in 6mmBR Norma, my favorite cartridge. I have two HV-contour Shilen match barrels, both with 1 in 8″ twists and finished lengths of 24 inches. The chamber has a .266″ neck so neck-turning is necessary. Freebore is .060″ but combined with a 1.5° throat angle this lets me seat a wide range of bullets from 58 grains up to 107 grains.
The stock is a McMillan Edge with moulded-in gray and black marble swirl. I specified 60% black and dark and light gray both at 20%. I went with the Edge stock because I was always pleased with McMillan products and because it had a very low center of gravity. I wanted the barrels very low in the stock because I think it makes the gun track better.

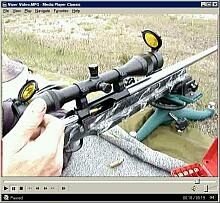 Details of the Drop-Port–with VIDEO! Details of the Drop-Port–with VIDEO!
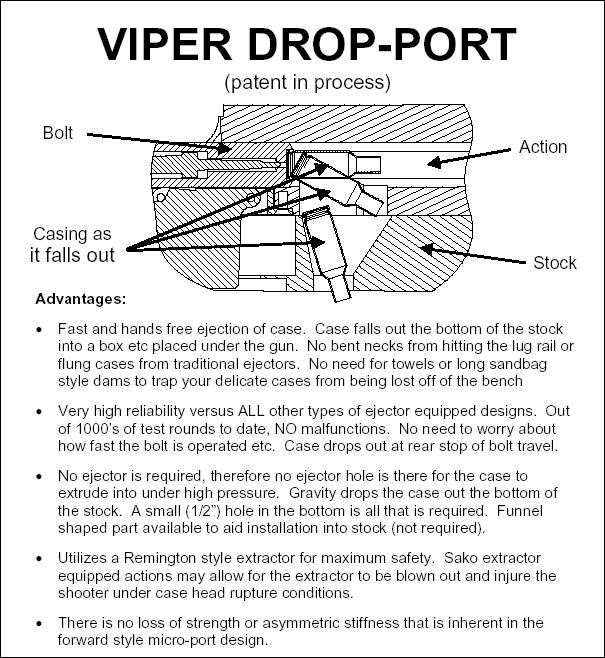
The visible part of the Drop-Port is a cartridge-sized cut-out in the floor of the action. This tapers into a funnel shape that lets the spent case fall nose-first through a single hole in the underside of the stock. The Drop-Port is carefully sized so that empty brass will fall through from gravity but a loaded round won’t. I’ve found that getting a BR case to eject 100% reliably in a standard action is not easy. The round is short and fat so it clears the chamber too early and the ejector pushes the cases out the extractor too fast. This can result in an empty case sitting in your action, no longer held by the extractor. Needless to say, this can slow you down during a stressful competition. When you get a Drop-Port you can forget all those problems.
Failure to eject is NOT going to happen with a Drop-Port. The system just works every time, and it’s FAST. Right-Click on the Media Player image and “Save As” to download a video (6.9 megs) showing me cycling the action during live fire.
One smart feature of the Drop-Port is the extractor location. A Remington extractor is located at the bottom of the bolt. This way the case is supported by the extractor until the front of the case lines up with the cut-out in the action. At that moment the front of the case tilts down and the rim slips out of the extractor. In the stock there is a funnel which collects the case. The case drops out of the rifle through a single small hole in front of the trigger guard.
 Building an Accurate Load Building an Accurate Load
Tools and Recipes
I start with new Lapua cases and after full-length sizing I trim them with a Wilson trimmer. Then I turn the necks for a .264″ neck diameter with a Lapua 105 seated in the brass. After fire-forming I use a “semi-custom” Harrell’s full-length sizing die with bushing. I use a .262 bushing with the moly-coated bullets. This Harrell’s die is the best I ever used — it gives very low run out. [Editor’s Note: Harrell’s stocks a number of dies with various internal dimensions. You send them three fire-formed cases and they’ll pick out a die that fits your brass the best. The cost is very reasonable.] Overall the excellent concentricity I’m seeing with my rounds is a combination of a superb chambering job, a neck-turned Lapua case and the Harrell’s sizing die. The die is supplied with a brass bushing that allows you to measure the amount of sizing you are doing.
For seating I use both a Wilson inline seater (hand die) and a Forster seating die that threads into a press. The latter gets the most use because I find it easier to use. Run out with both is around 0.001″ or better measured on the bullet.
Load development was very easy. I started with Varget and all loads … shot well. Vihtavuori N150 also shot very well with… moly-coated Lapua 105s. To my delight, the light bullets are also shooting very well in the 1:8″ twist. Nosler Ballistic Tips are giving very good results with a case full of N140. I’ve also tried N150, N540 and AA 2520. For all loads I’ve been using CCI BR4. Bullets are seated well into the lands with square marks showing. This gives an overall length around 59 mm (2.32″), depending on the bullet used.
 Shooting the Rifle–How It Performs Shooting the Rifle–How It Performs
The rifle is very easy to shoot and it is very accurate, but it had some drawbacks in the beginning. First there is the stock. It is designed for bench shooting and on a table it does this very well. I use a Caldwell front rest and a Protektor rear bag. When shooting prone I’ll also use the rest but the cheek weld is not ideal (the Edge was optimized for free recoil shooting from the bench). The rings that are supplied with the action are rather high. I looked around and found some that were lower. This made shooting easier, but I still wasn’t satisfied. The gun was a bit nose-heavy. There is a weight system built into the stock, but it wasn’t enough to bring the gun in balance. I like the balance point to be just in front of the receiver ring. So I cut the rear off the stock and put in a larger tube and turned some weights to put in it. I also made up an aluminum butt plate. Then I installed a Harrell’s brake to cut recoil to a minimum. With these modifications, the rifle is now shooting the way I want. I think the Edge stock is a very good design for benchrest shooting but for prone shooting it has some shortcomings. I think the MBR is a better stock for shooting prone.
Muzzle Brake–Less Recoil, Same Excellent Accuracy
After testing the barrel with different loads, I decided to put a brake on one barrel. Most of my guns are muzzle-braked and since I had two virtually identical barrels, I put a Harrell’s brake on one. The barrel had to be threaded to mount the brake and here I was a little concerned–I remembered the advice to “never mess with a winner”. The un-braked barrel was ultra-accurate and I was curious whether the process of fitting the brake might affect the accuracy.

Thankfully, my worries were unfounded. My targets showed no loss of accuracy — there was no evidence that the brake had caused any changes (except as to recoil). I have wondered though, perhaps the brake makes the gun more shootable and in that way compensates for some small accuracy loss that may be there? Whatever the case, the gun shoots just as tight as before, except now it’s a lot more user-friendly with less muzzle hop and less “push” on recoil.
 This Rifle Literally Shoots Bug-Holes This Rifle Literally Shoots Bug-Holes
And now I come to the end of the story. One day when testing the rifle at 100 meters (with brake installed), I spied a fly on the target. Well now, I thought, here is an interesting “precision shooting” challenge. I put the crosshair on the fly, squeezed the trigger, and the fly was history.
One shot, one kill. Now THAT is impressive precision. If you look closely you’ll see what’s left of Mr. Fly around the bullet hole. Or “bug-hole” as you Americans would say. This kind of performance is a real confidence-booster for the trigger-puller, let me tell you.

The Drop-Port — Simple Yet Advanced
Jerry Stiller tells us: “The drop-port ejects the case out the bottom of the action using only gravity. No ejector plunger is required so the system is as foolproof as anything can be. (A normal spring-loaded ejector creates an uneven load on one side of the case head.) Unlike other ejection systems, micro-ports etc., a Drop-Port doesn’t require tuning or adjusting, and just works. Many top shooters tell us they can cycle rounds faster with a Drop-Port action than with any other design.”
“The engineering of the Viper reflects some key design objectives. I wanted it to be able to fit standard commercially available stocks and have a barrel fit-up that was well known in the industry. I liked the idea of the larger bedding area and higher stiffness of the aluminum actions, so I chose the Panda footprint and barrel tenon for the Viper. I also made some changes to what was available at the time to make the product better. I used a smaller diameter firing pin to eliminate primer piercing, hard anodized all the aluminum parts for corrosion resistance and to make the surface hard and slick. The bolts are also coated for the same reasons.
Drop-Port technical drawing, Copyright © 2005, Stiller’s Precision Firearms, All Rights Reserved.
February 2nd, 2019

 Sinclair International has released an interesting article about Case Concentricity* and bullet “run-out”. This instructional article by Bob Kohl explains the reasons brass can exhibit poor concentricity, and why high bullet run-out can be detrimental to accuracy. Sinclair International has released an interesting article about Case Concentricity* and bullet “run-out”. This instructional article by Bob Kohl explains the reasons brass can exhibit poor concentricity, and why high bullet run-out can be detrimental to accuracy.
Concentricity, Bullet Alignment, and Accuracy by Bob Kohl
The purpose of loading your own ammo is to minimize all the variables that can affect accuracy and can be controlled with proper and conscientious handloading. Concentricity and bullet run-out are important when you’re loading for accuracy. Ideally, it’s important to strive to make each round the same as the one before it and the one after it. It’s a simple issue of uniformity.
The reason shooters work with tools and gauges to measure and control concentricity is simple: to make sure the bullet starts down the bore consistently in line with the bore. If the case isn’t properly concentric and the bullet isn’t properly aligned down the center of the bore, the bullet will enter the rifling inconsistently. While the bore might force the bullet to align itself with the bore (but normally it doesn’t), the bullet may be damaged or overstressed in the process – if it even it corrects itself in transit. These are issues we strive to remedy by handloading, to maintain the best standard possible for accurate ammunition.
The term “concentricity” is derived from “concentric circle”. In simple terms it’s the issue of having the outside of the cartridge in a concentric circle around the center. That goes from case head and center of the flash hole, to the tip of the bullet.
Factors Affecting Concentricity
The point of using this term is to identify a series of issues that affect accurate ammunition. Ideally this would work best with a straight-walled case; but since most rifle cartridge cases are tapered, it equates to the smallest cross section that can be measured point by point to verify the concentric circle around the center. For the examples below, I’m working with .308 Winchester ammo.
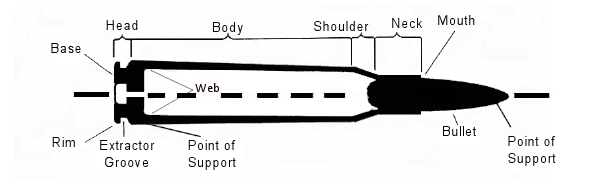
Figure 1: The cartridge.
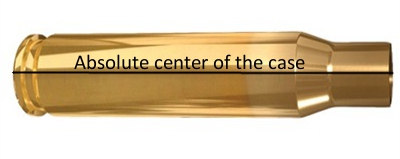
Figure 2: Centerline axis of the case, extending from flash hole to case mouth.
The case walls have to be in perfect alignment with the center, or axis, of that case, even if it’s measured at a thousandth of an inch per segment (in a tapered case).
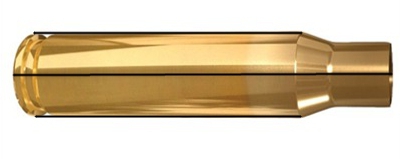
Figure 3: Case body in alignment with its axis, or centerline, even in a tapered case.
The case neck must also be in alignment with its axis. By not doing so you can have erratic bullet entry into the bore. The case neck wall itself should be as uniform as possible in alignment and in thickness (see the M80 7.62x51mm NATO cartridge in Figure 5) and brass can change its alignment and shape. It’s why we expand the case neck or while some folks ream the inside of the neck and then turn the outside for consistent thickness, which affects the tension on the bullet when seated.
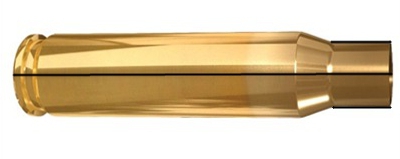
Figure 4: Neck in alignment with center of the case axis.
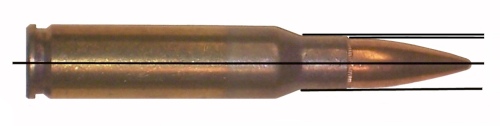
Figure 5: Variations in case neck wall thickness, especially on some military brass, can cause an offset of the bullet in its alignment. This is an M80 ball round. Note the distinct difference of the neck walls.
Having a ball micrometer on hand helps, especially with military brass like 7.62x51mm in a semi-auto rifle, where there are limits as to how thin you want the neck walls to be. In the case of 7.62 ball brass you want to keep the wall to .0145″.
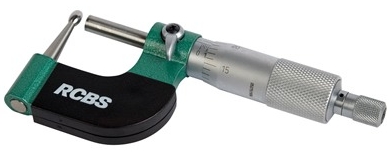
Figure 6: A ball micrometer like this RCBS tool (#100-010-268) can measure case neck thickness.
Turning the outside of the neck wall is important with .308 military cases regardless of whether you expand or ream the neck walls. There are several outside neck turning tools from Forster, Hornady, Sinclair, and others. I’ve been using classic Forster case trimming (#100-203-301) and neck turning (#749-012-890) tools for 40 years.
Bullet Run-Out
The cartridge, after being loaded, still needs to be in alignment with the center of the case axis. Figure 7 shows a bad example of this, a round of M80 ball. A tilted bullet is measured for what’s known as bullet “run-out”.
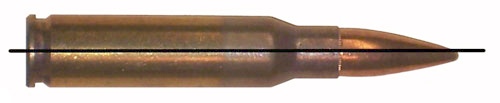
Figure 7: An M80 round with the bullet tilted and not aligned with the axis. This will be a flyer!
Run-out can be affected by several things: (1) improperly indexing your case while sizing, which includes not using the proper shell holder, especially while using a normal expander ball on the sizing die (it also can stretch the brass). (2) The head of a turret press can flex; and (3) improper or sloppy bullet seating. This is also relevant when it comes to using a progressive press when trying to load accuracy ammo.
Mid Tompkins came up with a simple solution for better bullet seating years ago. Seat your bullet half way into the case, back off the seater die and rotate the case 180 degrees before you finish seating the bullet. It cuts down on run-out problems, especially with military brass. You also want to gently ream the inside of the neck mouth to keep from having any brass mar the surface of the bullet jacket and make proper seating easier. A tilted bullet often means a flyer.
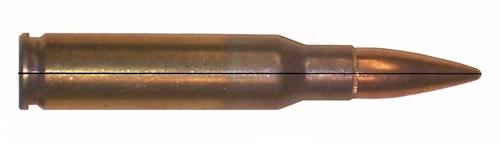
Figure 8: Proper alignment from the center of the case head to the tip of the bullet.
(NOTE: This links to a Web Archive version of older Sinclair Int’l article.)
*Actually some folks would say that if we are talking about things being off-center or out-of-round, we are actually talking about “eccentricity”. But the tools we use are called “Concentricity Gauges” and Concentricity is the term most commonly used when discussing this subject.
Story Tip from EdLongrange. We welcome reader submissions.
January 29th, 2019

In the video below, Forum member (and F-Class ace) Erik Cortina shows how to install a Jewell Benchrest trigger into a Kelbly F-Class Panda action. You could follow the same simple procedure to install a Jewell in a standard Panda action. Kelbly’s sell both standard and long versions of the F-Class Panda action. Both versions feature integral recoil lugs in the front.
To see more detail in this “how-to” video, you can zoom it to full-screen size. Simply click the full-screen icon (4-cornered frame) just to the right of the YouTube logo in the lower right.


January 26th, 2019

FREE Digital Editions of SHOT Show Daily
Below you’ll find FREE digital editions of the SHOT Show Daily. This is the publication handed out at SHOT Show. Packed with stories and photos, each edition has a special theme for the new products covered. The daily news of the 2019 Las Vegas SHOT Show is produced by Bonnier Corporation and NSSF®. These are definitely worth checking out — there are hundreds of photos of new products.
NOTE: To READ TEXT, Click Full Screen Bracket Icon at lower right of each frame: [ ]
SHOT Daily DAY ONE
SHOT Daily DAY TWO
SHOT Daily DAY THREE
SHOT Daily DAY FOUR
|