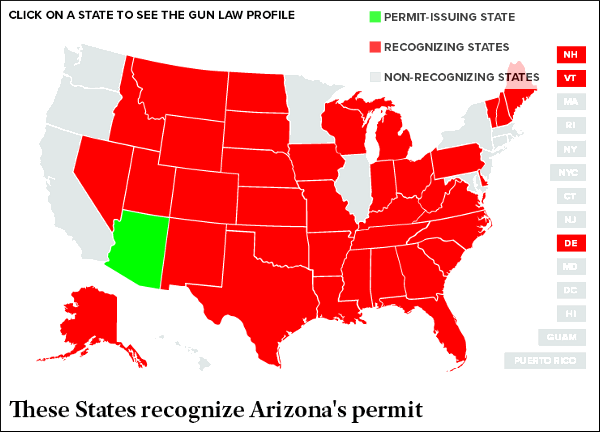
Got questions about gun laws in your home state? Are you curious if other states recognize your carry permit? You can get quick answers to state gun law questions on the NRA-ILA website. The NRA-ILA has compiled gun law information for all 50 states. From the NRA-ILA home page, scroll down, to a box titled “Know Your State’s Gun Laws”. Use the simple pull-down menu to select your state. Then a page will open with key legal information.
For example, shown below are the NRA-ILA’s gun law highlights for Arizona. (The NRA-ILA website has more detailed information on purchase, possession, and carrying of firearms). You will find useful law summaries like this for all 50 states. This can help you understand the laws of other states when traveling — to stay out of trouble. NOTE: While you can use these NRA-ILA law summaries as a starting point, if you have complex questions about gun transfers, we recommend you consult an attorney in your state.
Remember that State Laws Can Change — And Read the Fine Print
Note: For all the state legal summaries (including Arizona above), the NRA-ILA includes an important disclaimer, noting that states laws change frequently: “We have made every effort to report the information correctly, however reciprocity and recognition agreements are subject to frequent change. The information is not intended as legal advice or a restatement of law and does not include: restrictions that may be placed on non-resident permits, individuals under the age of 21, qualifying permit classes, and/or any other factor which may limit reciprocity and/or recognition. For any particular situation, a licensed local attorney must be consulted for an accurate interpretation.”
How would you like to represent the United States in top-level International Shooting competitions? Well, if F-Class is your game, here is your opportunity. F-Class Team USA will be conducting try-outs for the United States squads who will represent our country in F-TR and F-Open divisions (plus Under-25) at the 2021 World Championships. The try-outs are open to any competitive shooter with a class-compliant rifle and the will to win. Team leadership expressly welcomes newcomers.
Initial and primary tryouts are planned during the 2018 U.S. National Championships in Raton, NM, and the 2019 SW Nationals in Phoenix, AZ. There may also be an early 2019 tryout date at Butner, NC.
Dan Bramley Invites Shooters to Team USA F-Class Try-Outs
Official Invitation to Team USA F-Class Try-Outs To the F-Class Community–
On behalf of Team USA 2021, we are pleased to invite the best of USA F-class to consider joining our effort for the 2021 World Championships in Bloemfontein, South Africa. We are reaching out with this invitation to provide some general information on our plans for 2021 and for upcoming try-out dates for the unified Team USA: F-TR, F-Open, and Under 25.
We are moving forward with F-Open, F-TR, and Under 25 unified as one USA F-class 2021 Team. This will allow us to take advantage of each team’s strengths and provide needed purchasing power and coordination for event and logistic costs. We also believe this will help encourage and grow our sport. We will share ideas, event/facility dates and best practices within this unified team, however, individual team segments will make their own decisions. Therefore, please direct your responses and inquiries to the appropriate team leadership.
Being part of Team USA is a major commitment of time and resources. We do have wonderful and sizable sponsorship partners who we thank and rely on for moderating individual team member costs. However, due to the location of this World Championship effort, one can expect to help cover a commensurate level of the costs.
We are now moving into the USA “development team” stage of the process. This team is open to newcomers… there are many newer names showing up on the top of leader-boards and many new teams that are making positive impacts. If you are interested in being part of Team USA, please consider making that commitment. We would like to hear from you by March 23, 2018.
Team Time Expectations
Attendance at SWN and US Nationals will be expected for 2019 and 2020. We will also likely expect the final team to attend the Berger SWN in 2021 or have an alternative site for a final practice prior to our trip. We will try to have afternoon or evening team sessions during these events however we may have team days just prior or after these events to maximize the use of individual travel dollars and time. We will also likely have additional team training dates in 2019 and 2020, likely on east coast ranges to facilitate best availability for all.
Shooting/Coaching Position Opportunities
We are equally passionate about developing coaching/shooting teams for winning gold medal efforts in both the Richardson Cup (8-man) and Rutland Cup (4-man) World Championship Events. Obtaining a shooting or coaching spot on one of these teams is an absolute gauntlet of a commitment and consistent strong results will be required as the USA is blessed with wonderful depth. We encourage all, with proven success in our sport, to test themselves at this highest of levels.
Team Try-Out Dates and Locations
Initial and primary tryouts are planned during the 2018 US National Championships in Raton, NM and the 2019 SW Nationals in Phoenix, AZ. There may also be an early 2019 tryout date at Butner, NC.
If you are interested in further information, please contact our Team USA leadership:
Dan Bramley, Captain USA F-Open
usrifleteam2021fopen [at] gmail.com
Phil Kelley, Jr., Captain USA F-TR
usarifle2021 [at] gmail.com
Rick Jensen, Captain USA U25
U25USAFclass [at] gmail.com
A varmint shooter’s target is not conveniently placed at a fixed, known distance as it is for a benchrester. The varminter must repeatedly make corrections for bullet drop as he moves from closer targets to more distant targets and back again. Click HERE to read an interesting AccurateShooter Varrmint Forum discussion regarding the best method to adjust for elevation. Some shooters advocate using the scope’s elevation adjustments. Other varminters prefer to hold-over, perhaps with the assistance of vertical markers on their reticles. Still others combine both methods–holding off to a given yardage, then cranking elevation after that.
Majority View — Click Your Elevation Knob
“I zero at 100 yards — I mean really zero as in check the ballistics at 200 and 300 and adjust zero accordingly — and then set the scope zero. For each of my groundhog guns I have a click chart taped into the inside of the lid of the ammo box. Then use the knobs. That’s why they’re there. With a good scope they’re a whole lot more accurate than hold-over, with or without hash marks. This all assumes you have a good range finder and use it properly. If not, and you’re holding over you’re really just spraying and praying. Try twisting them knobs and you’ll most likely find that a 500- or 600- or 700-yard groundhog is a whole lot easier than some people think.” – Gunamonth
“I have my elevation knob calibrated in 100-yard increments out to 550. Range-find the critter, move elevation knob up…dead critter. The problem with hold-over is that it is so imprecise. It’s not repeatable because you are holding over for elevation and for wind also. Every time you change targets 50 yards, it seems as if you are starting over. As soon as I got completely away from the hold over method (I used to zero for 200), my hit ratios went way up.” — K. Candler
“When I first started p-dog shooting, I attempted to use the hold-over method with a 200-yard zero with my 6mm Rem. Any dog much past 325-350 yards was fairly safe. I started using a comeups table for all three of my p-dog rifles (.223 Rems and 6mm Rem). 450-yard hits with the .223s are fairly routine and a 650-yard dog better beware of the 6mm nowadays. An added benefit (one I didn’t think of beforehand) with the comeups table (elevation only), is that when the wind is blowing, it takes half of the variables out of the equation. I can concentrate on wind, and not have to worry about elevation. It makes things much more simple.” — Mike (Linefinder).
“I dial for elevation and hold for wind. Also use a mil-dot reticle to make the windage holds easier. For windage corrections, I watch for the bullet strike measure the distance it was “off” with the mil-dot reticle, then hold that much more the other way. Very fast once you get used to it.” — PepeLP
Minority View–Hold-Over is Better
“I try to not touch my knobs once I’m zeroed at 200 meters. Most of my varmint scopes have duplex reticles and I use the bottom post to put me on at 300 meters versus turning knobs. The reason I try to leave my knobs alone is that I have gone one complete revolution up or down [too far] many times and have missed the varmint. This has happened more than once and that is why I try not to change my knobs if at all possible.” — Chino69
“I have been using the hold over method and it works for me most of the time but the 450 yards and over shots get kinda hard. I moved to a 300 yard zero this year and it’s working well. I do want to get into the click-up method though; it seems to be more fool-proof.” — 500YardHog
Compromise View–Use Both Methods
“I use both [methods] as well — hold over out to 250, and click up past that.” — Jack (Wolf)
“I use the target knobs and crank-in elevation. I also use a rangefinder and know how far away they are before I crank in the clicks. I have a scope with drop dots from Premier Recticle and like it. No cranking [knobs] out to 600.” –Vmthtr
Riflescopes are mechanical contraptions. One of the sad realities about precision shooting is that, sooner or later, you will experience a scope failure. If you’re lucky it won’t happen in the middle of a National-level competition. And hopefully the failure will be dramatic and unmistakable so you won’t spend months trying to isolate the issue. Unfortunately, scope problems can be erratic or hard to diagnose. You may find yourself with unexplained flyers or a slight degradation of accuracy and you won’t know how to diagnose the problem. And when a 1/8th-MOA-click scope starts failing, it may be hard to recognize the fault immediately, because the POI change may be slight.
When An Expensive Scope Goes Bad
A few seasons back, this editor had a major-brand 8-25x50mm scope go bad. How did I know I had a problem? Well the first sign was a wild “drop-down” flyer at a 600-yard match. After shooting a two-target relay, I took a look at my targets. My first 5-shot group had five shots, fairly well centered, in about 2.2″. Pretty good. Everything was operating fine. Then I looked at the second target. My eye was drawn to four shots, all centered in the 10 Ring, measuring about 2.4″. But then I saw the fifth shot. It was a good 18″ low, straight down from the X. And I really mean straight down — if you drew a plumb line down from the center of the X, it would pass almost through the fifth shot.
Is My Scope Actually Malfunctioning or Is This Driver Error?
That was disconcerting, but since I had never had any trouble with this scope before, I assumed it was a load problem (too little powder?), or simple driver error (maybe I flinched or yanked the trigger?). Accordingly, I didn’t do anything about the scope, figuring the problem was me or the load.
Even expensive scopes can fail, or start to perform erratically — and that can happen without warning, or for no apparent reason. Here are some signs that you may be having scope issues.
1. Click count has changed signficantly from established zero at known range.
2. Noticeably different click “feel” as you rotate turrets, or turrets feel wobbly.
3. Inability to set Adjustable Objective or side focus to get sharp target image.
4. Shot Point of Impact is completely different than click value after elevation/windage change. For example, when you dial 2 MOA “up” but you observe a 6 MOA rise in POI.
Problems Reappear — Huge POI Swings Affirm This Scope is Toast
But, at the next range session, things went downhill fast. In three shots, I did manage to get on steel at 600, with my normal come-up for that distance. Everything seemed fine. So then I switched to paper. We had a buddy in the pits with a walkie-talkie and he radioed that he couldn’t see any bullet holes in the paper after five shots. My spotter said he thought the bullets were impacting in the dirt, just below the paper. OK, I thought, we’ll add 3 MOA up (12 clicks), and that should raise POI 18″ and I should be on paper, near center. That didn’t work — now the bullets were impacting in the berm ABOVE the target frame. The POI had changed over 48″ (8 MOA). (And no I didn’t click too far — I clicked slowly, counting each click out loud as I adjusted the elevation.) OK, to compensate now I took off 8 clicks which should be 2 MOA or 12″. No joy. The POI dropped about 24″ (4 MOA) and the POI also moved moved 18″ right, to the edge of the target.
For the next 20 shots, we kept “chasing center” trying to get the gun zeroed at 600 yards. We never did. After burning a lot of ammo, we gave up. Before stowing the gun for the trip home, I dialed back to my 100-yard zero, which is my normal practice (it’s 47 clicks down from 600-yard zero). I immediately noticed that the “feel” of the elevation knob didn’t seem right. Even though I was pretty much in the center of my elevation (I have a +20 MOA scope mount), the clicks felt really tight — as they do when you’re at the very limit of travel. There was a lot of resistance in the clicks and they didn’t seem to move the right amount. And it seemed that I’d have four or five clicks that were “bunched up” with a lot of resistance, and then the next click would have almost no resistance and seem to jump. It’s hard to describe, but it was like winding a spring that erratically moved from tight to very loose.
At this point I announced to my shooting buddies: “I think the scope has taken a dump.” I let one buddy work the elevation knob a bit. “That feels weird,” he said: “the clicks aren’t consistent… first it doesn’t want to move, then the clicks jump too easily.”
Convinced that I had a real problem, the scope was packed up and shipped to the manufacturer. So, was I hallucinating? Was my problem really just driver error? I’ve heard plenty of stories about guys who sent scopes in for repair, only to receive their optics back with a terse note saying: “Scope passed inspection and function test 100%. No repairs needed”. So, was my scope really FUBAR? You bet it was. When the scope came back from the factory, the Repair Record stated that nearly all the internal mechanicals had been replaced or fixed: “Replaced Adjustment Elevation; Replaced Adjustment Windage; Reworked Erector System; Reworked Selector; Reworked Parallax Control.”
How to Diagnose Scope Problems
When you see your groups open up, there’s a very good chance this is due to poor wind-reading, or other “driver error”. But my experience showed me that sometimes scopes do go bad. When your accuracy degrades without any other reasonable explanation, the cause of the problem may well be your optics. Here are some of the “symptoms” of scope troubles:
1. Large shot-to-shot variance in Point of Impact with known accurate loads.
2. Uneven tracking (either vertical or horizontal).
3. Change of Point of Impact does not correspond to click inputs.
4. Inability to zero in reasonable number of shots.
5. Unexpected changes in needed click values (compared to previous come-ups).
6. Visible shift in reticle from center of view.
7. Changed “feel” or resistance when clicking; or uneven click-to-click “feel”.
8. Inability to set parallax to achieve sharpness.
9. Turrets or other controls feel wobbly or loose.
10. Internal scope components rattle when gun is moved.
Source of Problem Unknown, but I Have a Theory
Although my scope came with a slightly canted reticle from the factory, it had otherwise functioned without a hitch for many years. I was able to go back and forth between 100-yard zero and 600-yard zero with perfect repeatability for over five years. I had confidence in that scope. Why did it fail when it did? My theory is side-loading on the turrets. I used to carry the gun in a thick soft case. I recently switched to an aluminum-sided hard case that has pretty dense egg-crate foam inside. I noticed it took some effort to close the case, though it was more than big enough, width-wise, to hold the gun. My thinking is that the foam wasn’t compressing enough, resulting in a side-load on the windage turret when the case was clamped shut. This is just my best guess; it may not be the real source of the problem. Remember, as I explained in the beginning of this story, sometimes scopes — just like any mechanical system — simply stop working for no apparent reason.
If you plan to travel far from home this year with firearms, then you should research legal requirements before you head to the airport or hit the road in your car or truck. To help Road Warriors, The Shooting Wire website recently published an excellent article concerning Travel with Firearms. This helpful article by Joe Balog features smart advice from 3-Gun competitor Rich Yoder.
Here are Highlights from the Travel with Firearms Article…
Traveling by Road:
Regulations for transporting firearms in a vehicle vary from state to state. Some are quite lenient, while others are much stricter. Within many states, gun transportation laws also vary considerably from jurisdiction to jurisdiction. If possible, keep your gun cases locked in your vehicle’s trunk or truck bed, as long as your bed has weather-tight and lockable security. If your guns are outside the passenger compartment, in a case, unloaded, and kept separate from ammunition, you’ll be in compliance with all but the strictest of local and state gun laws.
Traveling by Air:
When checking in at the airport, travelers need to declare that they are traveling with a gun. At that point, airline personnel will quickly advise the traveler of the need to open his or her case and inspect the firearm. Always wait for the TSA inspector before unlocking or opening the case, and only do so when clearly directed to do so by TSA personnel. Never take a firearm out of its case in an airport.
You have the right to remain with your firearm at all times during the inspection process. Never leave your firearm until the inspection is complete, the case has been re-locked, and you are in possession of the key or combination.
Traveling Overseas:
There are additional steps during international travel. Specifically, guns must clear customs in the destination country, and once again when entering back into the United States. Multiple government forms may need to be completed and carried with the firearm, like U.S. Customs Form 4457. Be sure to check into all required paperwork well before traveling.
Digital editions of SHOT Daily, the magazine distributed each day of SHOT Show, are available free in Web eZine formats. Two digital editions are available right now, and others should be released soon. You’ll find many product features plus articles that can benefit shooting club directors and range managers. Definitely check out the Day One issue’s extensive coverage of new-for-2018 firearms. SHOT Daily is produced for NSSF by Bonnier Corp., publishers of Outdoor Life, Field & Stream, and many other magazines.
Highlights Day 2: New Optics, New Ammunition, Starline Brass, Outerwear, Cerakote Mossbergs.
SHOT SHOW TV Day 2 Headlines
SHOT Show Product Spotlights
SafeShoot — Downrange Risk Detection Technology
The SafeShoot system is advanced technology that can detect the presence of humans downrange, even in darkness. A sensor attached to a rifle, shotgun, or spotting scope “scans” downrange looking for human profiles. If it “sees” a human in the direction the firearm/spotting scope is pointed, a light in the front sensor unit flashes red. We checked out the system, and the technology really works. This could be very beneficial for anyone shooting on undeveloped land or unsupervised ranges, particularly during hunting season. This SafeShoot technology was developed by experts who have worked with the Israeli military. We think this technology holds much promise.
.224 Valkyrie from Barrett Firearms
The SHOT Show TV crew visits Barrett to check out the Barrett Fieldcraft and REC7 rifles chambered in .224 Valkyrie. This video also previews Barrett’s law enforcement and military products. The .224 Valkyrie is a new cartridge from Federal based on a 6.8 SPC necked down to .224 caliber. It offers excellent long-range performance with the new high-BC .22-caliber bullets (such as Sierra 90gr and 95gr SMK), while still fitting and functioning in a standard AR-15 magazine. We’ve shot the .224 Valkyrie and like it. The round looks like a scaled down 6.5 Creedmoor.
CLICK HERE for more 2018 SHOT Show Product Videos.
Let’s face it, AR-platform rifles run dirty, at least compared to typical bolt-action rifles. The AR15 works by piping gas from the barrel back into the bolt carrier, causing the bolt to unlock and the carrier to move the bolt backward. The “exhaust gas” from the barrel contains soot and carbon. The carbon will form hard deposits on the bolt. In addition, the carbon can combine with lube on the bolt carrier to make a nasty, paste-like sludge. This can be particularly problematic when the black paste pollutes the ejector and extractor recess.
This Editor has inspected dozens of ARs over the years. Other than mag-related malfunctions, the most common cause of AR cycling problems I found was oily gunk in the extractor and ejector areas. Many AR owners overlook these critical areas. Look at an AR that hasn’t been cleaned properly and you’ll probably find black gunk (and small brass shavings) in the ejector and extractor recesses.
If you want to keep your black rifle running smoothly and reliably, you must clean it regularly and follow the correct maintenance procedures. Here are three videos that explain how to properly disassemble and clean AR-platform rifles.
Take-Down and Full Cleaning of AR15 by Jerry Miculek
Here ace shooter Jerry Miculek takes down and cleans an AR-platform rifle belonging to his daughter Lena. This is a good video because Lena’s rifle was “run hard and packed up dirty” so you can see where carbon and grease build up. This 35-minute video is very thorough. Jerry is one of the nation’s top action carbine shooters, so listen carefully to his advice on cleaning and lubrication.
How to Clean Your AR-Platform Rifle
This is a good basic video that shows the take-down and cleaning procedure for a typical AR15. It uses some fast-motion sequences to speed up the story. Check out this video if you don’t have the time to sit through the Miculek video above.
Cleaning and Lubricating AR15 Bolt Carrier Group
This video offers very specific advice on the bolt carrier group, which receives the dirty gas directly from the barrel. Be sure to check the extractor and ejector recesses. That’s where old lube, brass shavings, and carbon accumulate. Follow the directions in this video for lubrication, and don’t over-lubricate the bolt carrier — that will only capture more carbon.
There’s a nice article in the Western Powders Blog that any varminter will enjoy. In this hare-raising tale, gunwriter Jim Waddell explains how he used a self-loading Savage A17 rifle to take care of a serious jack-rabbit problem on a rancho in California. “[My friends] purchased a huge amount of acreage that had some existing alfalfa fields and [surrounding sagebrush]. Sagebrush is home to jack rabbits. Lots of jack rabbits. The previous owner of this property didn’t do any varmint or predator control[.] The ink wasn’t dry on the escrow papers before [my friends] started asking for help shooting rabbits. A problem in taking these critters is it has to be done at night when they come out to feed as they lay low in the bush during the daylight hours.”
Savage A17 Comes to the Rescue
Initially Waddell and some friends took on the jack-rabbit hordes using Ruger 10/22s and a .44 Magnum Marlin lever gun. Neither option was ideal. The .44 Magnum just couldn’t keep up the desired shooting pace (it took too long to reload) ant the .22 LRs were too anemic. So Waddell decided to give the more potent 17 HMR a try. He acquired a Savage A17 and went back for a second bunny-busting session. He came away convinced that the 17 HMR cartridge in the modern semi-auto Savage works great for small varmint control.
Waddell writes: “I wanted more than a .22 after seeing the problems my pals had with their [10/22] bullets not anchoring the rabbits. Armed with my new Savage A17 it was time to head back to the alfalfa fields. This time my hunting partner was Dan, my son-in-law from Seattle. We hunted for four nights. Each night was either raining, windy or both. My question about whether or not rabbits would be out in the weather was answered immediately. They were everywhere. As miserable as the weather was, we got all the shooting we wanted and that Savage rifle was up to the task. We got so many rabbits it was impossible to count.” CLICK HERE for the full account of Waddell’s jack-rabbit adventures on the California rancho. It’s worth a read. Here is a sample:
Wabbits, Wabbits Everywhere — Even Running Right at You
I couldn’t believe my eyes when I saw a sea of rabbits as far as the lights would shine and when the light beams hit the bunnies, they became confused and as often as not, would run right at the lights so a good percentage of our shots were literally in spitting distance. It was also a new experience shooting at targets that are running TOWARD you. Most of us who’ve done much hunting for game or varmints have experienced moving targets but how many of those targets are coming at you?
To err is human… Sooner or later you’ll probably get a case stuck in a die. This “fix-it” article, which originally appeared in the Western Powders Blog, explains the procedure for removing a firmly stuck cartridge case using an RCBS kit. This isn’t rocket science, but you do want to follow the directions carefully, step-by-step. Visit the Western Powders Blog for other helpful Tech Tips.
Curing the Stuck Case Blues
Sticking a case in the sizer die is a rite of passage for the beginning handloader. If you haven’t done it yet, that’s great, but it probably will eventually happen. When it does, fixing the problem requires a bit of ingenuity or a nice little kit like the one we got from RCBS.
The first step is to clear the de-capping pin from the flash hole. Just unscrew the de-capping assembly to move it as far as possible from the primer pocket and flash hole (photo at right). Don’t try to pull it all the way out. It won’t come. Just unscrew it and open as much space as possible inside the case.
Place the die upside down in the padded jaws of a vise and clamp it firmly into place. Using the supplied #7 bit, drill through the primer pocket. Be careful not to go too deeply inside the cartridge once the hole has opened up. It is important to be aware that the de-capping pin and expander ball are still in there and can be damaged by the bit.
Drill and Tap the Stuck Case
Once the cartridge head has been drilled, a ¼ – 20 is tap is used to cut threads into the pocket. Brass is relatively soft compared to a hardened tap, so no lube is needed for the tapping process. RCBS says that a drill can be used for this step, but it seems like a bit of overkill in a project of this nature. A wrench (photo above right) makes short work of the project.
RCBS supplies a part they call the “Stuck Case Remover Body” for the next step. If you are a do-it-yourselfer and have the bit and tap, this piece is easily replicated by a length of electrical conduit of the proper diameter and some washers. In either case, this tool provides a standoff for the screw that will do the actual pulling.
With an Allen Wrench, Finish the Job
Run the screw through the standoff and into the tapped case head. With a wrench, tighten the screw which hopefully pulls the case free. Once the case is free, clamp the case in a vice and pull it free of the de-capping pin. There is tension here because the sizing ball is oversized to the neck dimension as part of the sizing process. It doesn’t take much force, but be aware there is still this last little hurdle to clear before you get back to loading. Don’t feel bad, everyone does this. Just use more lube next time!
Article find by EdLongrange. We welcome reader submissions.
Today, AR-platform rifles are hugely popular. Dozens of manufacturers sell AR-type rifles, in a wide variety of configurations and calibers. But before there were M16s and AR-15s, ArmaLite produced a 7.62×51 caliber rifle, the AR-10. Yes before there were millions of 5.56 black rifles, there was a .30-caliber big brother with reddish-brown furniture. Invented by Eugene (‘Gene’) Stoner for the Armalite company in the late 1950s, this is the father of all of today’s AR-platform rifles. Way ahead of its time, this remarkable, select-fire battle rifle weighed just 7.25 pounds as first developed.
If you’re curious about the AR-10, in this video, Jerry Miculek puts an original 1957-vintage AR-10 through its paces on the range. This extremely rare, early-production rifle was provided by Mr. Reed Knight and the Institute of Military Technology. (The gun in the video was actually produced in the Netherlands under license, see video at 4:40.) This AR-10 is the direct ancestor of the AR-15, M16, and many of the modern sporting rifles that we use today.
The AR-10 was slim and light, weighing in at around 7 pounds. Some folks might argue that the original “old-school” AR10 is actually better that some of today’s heavy, gadget-laden ARs. The AR-10’s charging “lever” was under the carry handle — that made it easier to manipulate with the gun raised in a firing position.
You’ll notice there is no “forward assist”. Inventor Gene Stoner did not believe a separate “bolt-pusher” was necessary. The forward assist was added to solve problems encountered in Viet Nam. Some critics say the forward assist “only takes a small problem and makes it a big problem.” For today’s competition ARs (that are never dragged through the mud) the forward assist probably is superfluous. It is rarely if ever needed.
Note also that the handguards are fairly slim and tapered. Today, six decades after the first AR-10 prototypes, we are now seeing these kind of slim handguards (made from aluminum or lightweight composites) used on “full race” ARs campaigned in 3-gun competition.
History of the AR-10
The AR-10 is a 7.62 mm battle rifle developed by Eugene Stoner in the late 1950s at ArmaLite, then a division of the Fairchild Aircraft Corporation. When first introduced in 1956, the AR-10 used an innovative straight-line barrel/stock design with phenolic composite and forged alloy parts resulting in a small arm significantly easier to control in automatic fire and over one pound lighter than other infantry rifles of the day. Over its production life, the original AR-10 was built in relatively small numbers, with fewer than 9,900 rifles assembled.
In 1957, the basic AR-10 design was substantially modified by ArmaLite to accommodate the .223 Remington cartridge, and given the designation AR-15. ArmaLite licensed the AR-10 and AR-15 designs to Colt Firearms. The AR-15 eventually became the M16 rifle.
AR-10 photos from Arms Izarra, a Spanish company specializing in de-militarized, collectible firearms. Interestingly, this particular AR-10 was produced in the Netherlands under license.


 Being part of Team USA is a major commitment of time and resources. We do have wonderful and sizable sponsorship partners who we thank and rely on for moderating individual team member costs. However, due to the location of this World Championship effort, one can expect to help cover a commensurate level of the costs.

 A varmint shooter’s target is not conveniently placed at a fixed, known distance as it is for a benchrester. The varminter must repeatedly make corrections for bullet drop as he moves from closer targets to more distant targets and back again.
  Minority View–Hold-Over is Better

 For the next 20 shots, we kept “chasing center” trying to get the gun zeroed at 600 yards. We never did. After burning a lot of ammo, we gave up. Before stowing the gun for the trip home, I dialed back to my 100-yard zero, which is my normal practice (it’s 47 clicks down from 600-yard zero). I immediately noticed that the “feel” of the elevation knob didn’t seem right. Even though I was pretty much in the center of my elevation (I have a +20 MOA scope mount), the clicks felt really tight — as they do when you’re at the very limit of travel. There was a lot of resistance in the clicks and they didn’t seem to move the right amount. And it seemed that I’d have four or five clicks that were “bunched up” with a lot of resistance, and then the next click would have almost no resistance and seem to jump. It’s hard to describe, but it was like winding a spring that erratically moved from tight to very loose.


 Sticking a case in the sizer die is a rite of passage for the beginning handloader. If you haven’t done it yet, that’s great, but it probably will eventually happen. When it does, fixing the problem requires a bit of ingenuity or a nice little kit like the one we got from RCBS.


