Lapua offers a sophisticated FREE Ballistics App for iOS and Android smartphones and mobile devices. This state-of-the-art App has many great features — much more than you’d expect for a free App. If you do much shooting past 300 yards, or use a wide variety of bullets and/or cartridge types, we recommend you download the App and give it a try. This article, written by a Lapua technician, explains how to use the App. This article is definitely worth reading — there are many important concepts and procedures discussed here that apply to all Ballistics calculators, not just the Lapua App. For more details, read the Lapua Ballistics App User Manual.
Article by Matti Paananen
As smartphones and tablets are constantly developed, ballistic software and Apps are also improving, and with their help our ability to hit targets can improve significantly. This is a short introduction on why and how to use a ballistic calculator, namely the Lapua Ballistics App, and a few pointers that will help you use the App effectively.
Ballistics software and Apps are designed to help shooters and hunters make calculations to hit distant targets or take down game in the field by offering ballistic solutions. Lapua Ballistics is the first App utilizing the 6DOF calculation model.
Toying around with ballistics apps is always fun, but effective use of ballistic software requires general understanding of how they work. The App gets information from the user and by using mathematical formulas it provides the solution that will give the user a solid starting point to hit the target.
However, it is also important to remember that the App can’t think — it only calculates a solution based on your parameters. You will not know the error until you have already fired the shot.
1. SET UP YOUR SCOPE RETICLE AND RIFLE
Scope manufactures use different units per click, so it’s important that you use the correct unit in the App. For example, in your scope, one click can be 0.1 mil, 1/4 MOA, [or 1/8 MOA depending on the model]. You can find this information in your scope manual and also usually from the scope turrets. Setting your scope reticle is very important, partly because if you use the wrong unit in the App, the ballistic solution will not match your scope. To set up your scope reticle in Lapua Ballistics, go to Manage Rifle / Cartridge Data –> Add Rifle Cartridge Data (or choose to edit a Rifle/Cartridge combo you’ve already set up) –> Reticle –>.
Another thing to setup in Lapua Ballistics is your scope height, i.e. Line of Sight to Bore in the Manage Rifle / Cartridge Data window. This is the distance between the center of the scope and the center of the bore. The default height is 45mm but with tactical rifles, the height can be even 70mm. So check! The height is easy to measure with a ruler. Then there’s also the twist rate of your rifle to set up — look it up in the rifle manual, it can also be stamped on the rifle barrel. The rifle twist rate is needed to calculate spin drift and bullet stability. Spin drift should be taken into account with longer distances, and it can be enabled or disabled in Lapua Ballistics.
2. SET UP YOUR BULLET CHOICE
You can add your bullet of choice from the bullet library, where you find all Lapua bullets. It is also possible to add information manually. In this case, you will need bullet weight, the ballistic coefficient BC and muzzle velocity. The Ballistic coefficient can be given in G1 or G7 values. G7 is designed for low-drag bullets with a boat tail and G1 is used for more traditional flat base bullets. Lapua on the other hand uses Doppler radar-based data to calculate a more accurate ballistic trajectory for Lapua bullets by 6DOF model. Anyway, it is good to remember that the ballistic coefficient changes with velocity, so all changes in a flight path cannot be predicted.
The following thing you will need to set up is the bullet’s actual muzzle velocity. You can reverse engineer the number based on your drop or by using a chronograph. It is good to remember that more rounds you shoot, the better average velocity you will get.
Because temperature affects muzzle velocity, it would be good to shoot velocities in different temperatures and write them down. Those notes can be used with Lapua Ballistics as it is possible to set up the powder temperature variation in the App.
3. SET UP WEATHER CONDITIONS
Lapua Ballistics has settings for temperature, air pressure, and humidity. All these affect the ballistic solution and the chance to hit the target. In a nutshell, temperature affects the powder’s burn speed and in that way the bullet velocity. Air pressure and humidity also affect bullet drag.
If you are shooting approximately on sea level, you do not need to change air pressure values, but if you are shooting or hunting in mountain areas or where there is lot of elevation difference, you might want to check the air pressure. On sea level, the atmospheric pressure is 1013 hPa. The higher you go, the less air pressure you will have and thus less bullet drag. Some like to use handheld weather and wind meters that have a function to get actual air pressure and humidity, however the Get Current Weather function in Lapua Ballistics will give you the air pressure reading from your local and most close weather station, provided that your app is allowed to use your location data.
Temperature is an important variable. To understand how velocity change in different temperatures, only way is to shoot and keep notes. Some ballistic software and apps have values for muzzle velocity in different temperatures. The user needs to input muzzle velocity in different temperatures in order to software to calculate the effect. More velocities in different temperatures the user adds, the more accurate the calculation will be.
4. SET UP A BALLISTIC SOLUTION
After we have set up our own rifle / cartridge data, there are few things that need to be taken into account when shooting: the distance to the target, the wind and our shooting skills. Distance can be measured for example with a laser rangefinder and then put in. Wind can also be measured with a wind gauge but it is important to remember that the wind in the target area can be very different from that in the shooting position. Lapua Ballistics gives a ballistic solution based on stationary wind, so in the end, the shooter’s task is to estimate how much the wind factor will be.
It’s good to remember that Lapua Ballistics is a starting point and designed to assist the shooter. Software and apps have ways of helping us adjust the sight and predict the ballistic solution but they will not replace the shooter. We still have to pull the trigger and record our range data. By keeping good range notes and with the support of good ballistic software like Lapua Ballistics, we should be able hit in all environments.
Watch Video for Explanation of Lapua Ballistics App Features
Article Find by EdLongrange. We welcome reader submissions
M1 Garand Springfield Armory July 1941 production. Facebook photo by Shinnosuke Tanaka.
Want an authentic surplus M1 Garand? You can get these classic battle rifles from the Civilian Marksmaship Program (CMP) through direct sales as well as auctions. If you are looking to obtain an authentic, safe-to-shoot M1 Garand, the CMP is your best bet. Each M1 Garand rifle sold by the CMP is an genuine U.S. Government rifle that has been inspected, head-spaced, repaired if necessary, and test fired for function. Each rifle is shipped with safety manual, one 8-round clip, and chamber safety flag. CMP operations, warehousing, inspection & repair, test firing, sales order processing and distribution activities are headquartered in Anniston, Alabama.
M1 Garand Manufacturer Codes: SA (Springfield Armory), HRA (Harrington & Richardson Arms), IHC (International Harvester Co.), WRA (Winchester Repeating Arms)
The federal law that established the new CMP authorizes the Corporation to sell surplus .30 and .22 caliber military rifles, parts and ammunition to qualified U.S. citizens “for marksmanship”. Accordingly, the CMP sells government-surplus M1 Garands, .22 caliber target rifles, and small quantities of other rifles to qualified purchasers.
How to Order an M1 Garand from the CMP
To purchase an M1 Garand through the CMP, you must be an adult U.S. Citizen, who is a member of an affiliated organization, and who has participated in a “Marksmanship Activity”*. This basically meas you need to join a a gun club and participate in a clinic or match. Proof of club membership and citizenship is mandatory for all ages. However, the marksmanship requirement is waived for those over 60 years. Garands must be ordered by mail or through official CMP Auctions. Orders are filled on a first-come, first-serve basis. Rifles of all grades are packed for shipment purely by “luck of the draw”. Most orders ship within 2-4 weeks. If price has changed after an order has been received, customers will be notified before new prices are charged. Free Shipping except Puerto Rico and P.O. Boxes. CLICK HERE for ordering information.
M1 Garands at CMP Retail Store in Anniston, Alabama.
Garands are Going Up in Value
In the past ten years, the M1 Garand, regardless of condition, has become a hot collectors’ item and sound financial investment. The popularity of the M1 Garand continues to grow as hundreds of new Garand “Fun” Matches are being held all across the USA each year.
Over the past 65 years, most M1 rifles have been arsenal rebuilt, refinished, rebarreled or repaired at least once and often several times. Most will show signs of service (often considerable) and replacement of various parts. They are seldom encountered with all original parts and original finish as delivered from the manufacturer. Such “original” rifles, even in well-used condition, are highly prized by collectors.
Download CMP Catalog
The CMP Catalog lists and describes the current rifles and accessories available.
State Legal Compliance
IMPORTANT: If your State or locality requires you to first obtain a certificate, license, permit, or Firearms Owner ID card in order to possess or receive a rifle, you must enclose a photocopy of your certificate, license, permit, or card with the application for purchase. Rifle shipments to WA, NY and NJ must be made to a state licensed dealer. You must provide a copy of the dealer’s license with your order form. (As a result of CT Bill 1160 and Bill 13-220) Rifle shipments to CA must be made to a State licensed dealer or may be made to individual homes, providing that a CA Certificate of Eligibility and a Curio and Relic License are provided. Rifle shipments to WA & CT must be made to licensed or dealer or may be shipped directly to the customer if a C&R license is provided.
WA, NY, NJ and CT customers who have already mailed their rifle orders to CMP should provide custserve@thecmp.org with dealer information or order cancellation instructions. Information can also be faxed to 256-835-3527 or mailed to CMP Customer Service, (Attn: FFL Order), 1401 Commerce Blvd., Anniston, AL 36207.
* You must provide proof of participation in a marksmanship-related activity or otherwise show familiarity with the safe handling of firearms and range procedures. Proof of marksmanship participation can be provided by documenting any of the following:
• Completion of a marksmanship clinic that included live fire training (provide a copy of the certificate of completion or a statement from the instructor).
• Participation in a rifle, pistol, air gun or shotgun competition (provide copy of results bulletin).
• Certification from range or club official or LEO witnessing shooting activity.
• Completion of a Hunter Safety Course that included live fire training.
• Firearms Owner Identification Card that includes live fire training.
• Current or past military or law enforcement service.
• Distinguished, Instructor, or Coach status.
• Concealed Carry License.
• FFL or C&R license.
A while back, RifleShooter online magazine published a list of the purported Ten Best Bolt-Action Rifles of All Time. Ten classic rifle designs (including the Remington 700 and Winchester Model 70) were featured with a paragraph or two explaining their notable features.
“Best” Lists Stir Controversy…
These Top 10 lists are always controversial. While most readers might approve of half the entries, there are always some items on the Top 10 list that some readers would challenge. Here is RifleShooter’s Top 10 list. What do you think? Are there some other bolt-actions that are more deserving?
1. Springfield M1903
2. Mauser 98
3. Winchester Model 70
4. Remington Model 700
5. Weatherby V
6. Sako L61/AV
7. Savage Model 110
8. Ruger M77
9. Tikka T3
10. Mannlicher-Schonauer
Here is the original Sierra manufacturing facility in Whittier, CA.
On August 22, 2017 it was announced that Sierra Bullets has been sold to Clarus Corporation (NASDAQ: CLAR), a Utah-based holding company that also owns Black Diamond Equipment Ltd., makers of ski and mountain gear/apparel. Given the importance of this acquisition, we thought our readers might want to learn more about Sierra’s history, and how it makes its bullets…
Sierra Bullets — How It Got Started
Report Based on Story by Carroll Pilant, Sierra Bullets Media Relations Manager
What became Sierra Bullets started in the late 1940s in a Quonset hut in California. In 1947, three aircraft machinists, Frank Snow, Jim Spivey, and Loren Harbor, rented machine space to produce rivets for the aircraft industry along with fishing rod guides and rifle front sight ramps. In the post-WWII years, sport shooting was becoming hugely popular, but quality ammunition was in short supply. For shooting enthusiasts, reloading was the solution to the ammo supply shortage. Snow, Spivey, and Harbor recognized this, creating Sierra Bullets to help fill the void. Before long, they were selling a 53-grain match bullet to the Hollywood Gun Shop. These bullets are still in production today as the Sierra #1400 53-grain MatchKing.
A few years later, an accomplished competitive shooter named Martin Hull joined Sierra. Hull helped develop new bullet types and served as manager of Sierra’s ballistics laboratory for nearly 20 years. With Hull’s help, Sierra’s output grew rapidly. The California company outgrew several locations before it moved to a large facility in Santa Fe Springs, CA, in 1963.
New Owners and New President in the Late Sixties
In 1968, the Leisure Group bought Sierra Bullets. Other Leisure Group companies included Lyman Reloading, High Standard Manufacturing Company, Yard Man, Thompson Sprinkler Systems, Flexible Flyer Sleds, and Dodge Trophies (Which made the Oscar and Rose Bowl Game trophies).
Soon after purchasing Sierra, the Leisure Group hired Robert Hayden as President and General Manager. Hayden was a mechanical engineer who had worked for Remington Arms. Hayden remained the president of Sierra for 42 years, retiring in 2012 when Pat Daly became president.
Sierra Moves to Missouri
In 1990, Sierra relocated to Sedalia, Missouri, where the company remains today. Sierra Bullets now employs over 100 people including five full-time ballistic technicians who answer daily reloading and firearms questions by both phone and e-mail.
The Making of MatchKings — How Sierra Produces SMKs
All Sierra bullets begin life as a strip of gilding metal, an alloy consisting of 95% copper and 5% zinc. To meet Sierra’s strict quality requirements, the gilding metal requires three times more dimensional and quality control standards than is considered standard in the copper manufacturing industry.
A blanking press stamps out a uniform disc and forms the cup that will be drawn into the MatchKing jacket. The cup is then polished and sent to a draw press to be drawn into a jacket that is longer than needed for the future MatchKing, thus allowing for the trim process. Press operators constantly check concentricity to make sure we have only quality jackets. The jackets then go to a trimmer where they are visually inspected again.
After being polished a second time, the jacket travels to the bullet press. In the meantime, 80-pound lead billets are being extruded into lead wire for the cores where great care is taken so that the core wire is not stretched. The core wire is lightly oiled before continuing to the bullet press to be swaged.
The lead core wire and trimmed jacket meet at the bullet press where the first stage forms a boattail on the jacket. The lead core is then formed on top of the bullet press and fed down into the jacket. In one stroke of the press, the MatchKing is formed.
Quality control technicians pull samples from each lot of MatchKings to make sure they meet Sierra’s stringent standards. Samples are then sent to Sierra’s 300-meter underground test range (shown below) to be shot for accuracy on mechanical mounts referred to as “unrestricted return to battery rests” that Sierra designed and built in-house.
After inspection, the bullets are placed in the familiar green box along with reloading labels. They are then shrink-wrapped and shipped all over the world.
Burris Signature Rings with polymer inserts are an excellent product. The inserts allow you to clamp your scope securely without ring marks. Moreover, using the matched offset inserts you can “pre-load” your scope to add additional elevation. This helps keep the scope centered in its elevation range while shooting at long range. Additionally, with a -20 insert set in the front and a +20 insert set in the rear, you may be able to zero at very long ranges without using an angled scope base — and that can save money. (To move your point of impact upwards, you lower the front of the scope relative to the bore axis, while raising the rear of the scope.)
Insert Elevation Values and Ring Spacing
People are sometimes confused when they employ the Burris inserts. The inset numbers (-10, +10, -20, +20 etc.) refer to hundredths of inch shim values, rather than to MOA. And you need the correct, matched top/bottom pair of inserts to give you the marked thousandth value. Importantly, the actual amount of elevation you get with Burris inserts will depend BOTH on the insert value AND the spacing between ring centers.
Forum member Gunamonth has explained this in our Shooters’ Forum:
Working with Burris Signature Rings
Burris inserts are [marked] in thousandths of an inch, not MOA. To know how many MOA you gain you also need to know the ring spacing. For example, with a -20 thou insert set in the front and a +20 thou insert set in the rear, if the ring spacing is 6″, the elevation change will be approximately +24 MOA upwards.
Here’s how we calculate that. If you have a 2 X 0.020″ “lift” over a distance of 6 inches (i.e. 0.040″ total offset at 0.5 feet) that’s equivalent to 0.080″ “lift” over 12 inches (one foot). There are 300 feet in 100 yards so we multiply 0.080″ X 300 and get 24″ for the total elevation increase at 100 yard. (Note: One inch at 100 yards isn’t exactly a MOA but it’s fairly close.)
Here’s a formula, with all units in inches:
Total Ring Offset
——————– X 3600 = Change @ 100 yards
Ring Spacing
(.020 + .020)
—————– X 3600 = 24 inches at 100 yards
6
NOTE: Using the above formula, the only time the marked insert offset will equal the actual MOA shift is when the center to center ring spacing is 3.60″. Of course, you are not required to use 3.60″ spacing, but if you have a different spacing your elevation “lift” will be more or less than the values on the inserts.
Photo Credits Laura Perry(top) and Kelly McMillan (bottom)
The 2017 F-Class World Championships wrapped up August 17 with the final day of Team competition. Over the past two days, 8-shooter squads competed in the major international challenge match while 4-shooter teams vied for honor in the Rutland match. Team USA F-TR stole the show with a stirring come-from-behind victory over a very strong Australia F-TR squad. Not to be denied, Aussie F-Open shooters countered America’s F-TR success with a solid win for Australia in the 8-shooter F-Open match. It was Deja Vu… this result was a replay of the 2013 Worlds, where Team USA won the F-TR Team Title, while Team Australia won F-Open.
F-TR World Champions: Team USA, Richardson Trophy — Score: 3400-264V
PERRY, LAURA, AL — 419v31
DROELLE, JOHN, MI — 418v27
BARNHART, ALAN, MI — 433v36
HOGG, TRACY, NC — 424v31
KLEMM, IAN, WI — 426v39
RODGERS, DEREK, NM — 435v39
RORER, JEFFREY, NC — 429v35
POHLABEL, DANIEL, OH — 416v26
GROSS, RAYMOND, MI
HARDIN, CARLTON, GA
PHILLIPS, PAUL, MI
LENTZ, DANIEL, WI
LITZ, BRYAN, MI
FULMER, SCOTT, NY
REEVE, KENT, NC
BOYER, DOUGLAS, MI
F-Open World Champions: Team Australia, Farquharson Trophy — Score: 3511-342V
DAVIES, ROD — 441v45
CARTER, PETER — 437v37
LARSEN, PETER — 442v38
LOBERT, MARTY — 437v43
POHL, ADAM — 440v48
BRAUND, STUART — 431v39
BUNYAN, BRETT — 440v40
NUGENT, TIM — 443v52
MCGOWAN, CRAIG
BRAUND, RICHARD
WAITES, MICHAEL
LAZARUS, STEVE
REID, JOSH
FERRARA, BEN
TILLACK, LOWELL
DOBSON, DAVID
Team USA — Three-time World Champions deliver a come-from-behind win at the 900 meter line.
Along with winning F-Open, the Aussies did well in the 8-man F-TR competition, finishing second overall with a score of 3394-237V, six points behind Team USA F-TR (3400-264V). Third in F-TR was Team South Africa, with 3376-250V.
Team Canada (3506-346V) finished second in F-Open, while Team USA (F-Open) finished third with the interesting score of 3500-350V (that’s not a misprint). We believe Calvin Waldner of Canada had the top individual F-Open score for the match — 444-51V.
The F-TR Team Battle — It Paid to Wait
The top two F-TR squads, Team USA and Team Australia, followed very different strategies. The Australians got off to a quick start, while the Americans waited… and waited … and waited. Being patient and waiting for more readable and stable wind conditions proved a winning strategy for the Yanks who overcame a 9-point deficit to finish with a six-point margin as time closed down in the firing period.
Team USA Captain Ray Gross reports: “The match came down to the last yard line. The Australians were up 11 points to start the day and the Canadians were 6 points behind. We made up 2 points at 700m and shot even with the Australians at 800m, leaving us 9 points down going into the final 900m stage.
The Aussies chose to start shooting right away in what looked liked easy conditions and we waited, hoping for better. While we waited the team stayed focused and ready. Luck was on our side, it calmed down and the shooters and coaches performed flawlessly, making up the nine points and finally pulling ahead in the last few minutes of the match.
We were the last team on the line shooting and everyone was behind us watching. After two days of very close competition, the match was not decided until our last two shooters. Our last shooter started with only 12 minutes left in the match and he finished his string of 15 shots in about five minutes. He only dropped two points giving us a six point victory.
We were so focused on delivering our best performance that we weren’t sure how the other teams had finished. After the last shot the Australian captain came over and congratulated me. They had been watching our score after they had finished and knew that we had won the match. Our gritty determination had paid off and it had been one of the most exciting matches that I’ve ever been a part of. Everyone on the team should be proud that they did not let our slim chances discourage them going into that last yard line. They stayed focused and each delivered a top performance.”
American F-Open Squads Dominate 4-Shooter Rutland Match
In the F-Open Rutland competition for 4-shooter teams, American squads dominated, taking the top 4 places. Team USA Blue (1758-177V) won the Rutland title, edging Spindle Shooters by a slim one-point margin. In third place was Team USA Red followed by the Texas State Rifle Association team.
In F-TR Rutland competition, Team “Da Bulls” secured a very convincing win. Da Bulls’ 1709-131V score was a full 14 points ahead of Team KP Ballistics. This was sort of an American victory… though Da Bulls did have one Canadian “ringer” on the squad, Stephen Ireland of Toronto. Runner-up KP Ballistics was just the opposite — KP had all Canadian members except one Yank, Wade Fillingame of New Hampshire.
Above Team Da Bulls member James Crofts waives “good-bye” from the Connaught Ranges in Ottawa, Ontario, Canada. The next F-Class World Championships will be held in South Africa in 2021. ICFRA Web Page for 2021 FCWC.
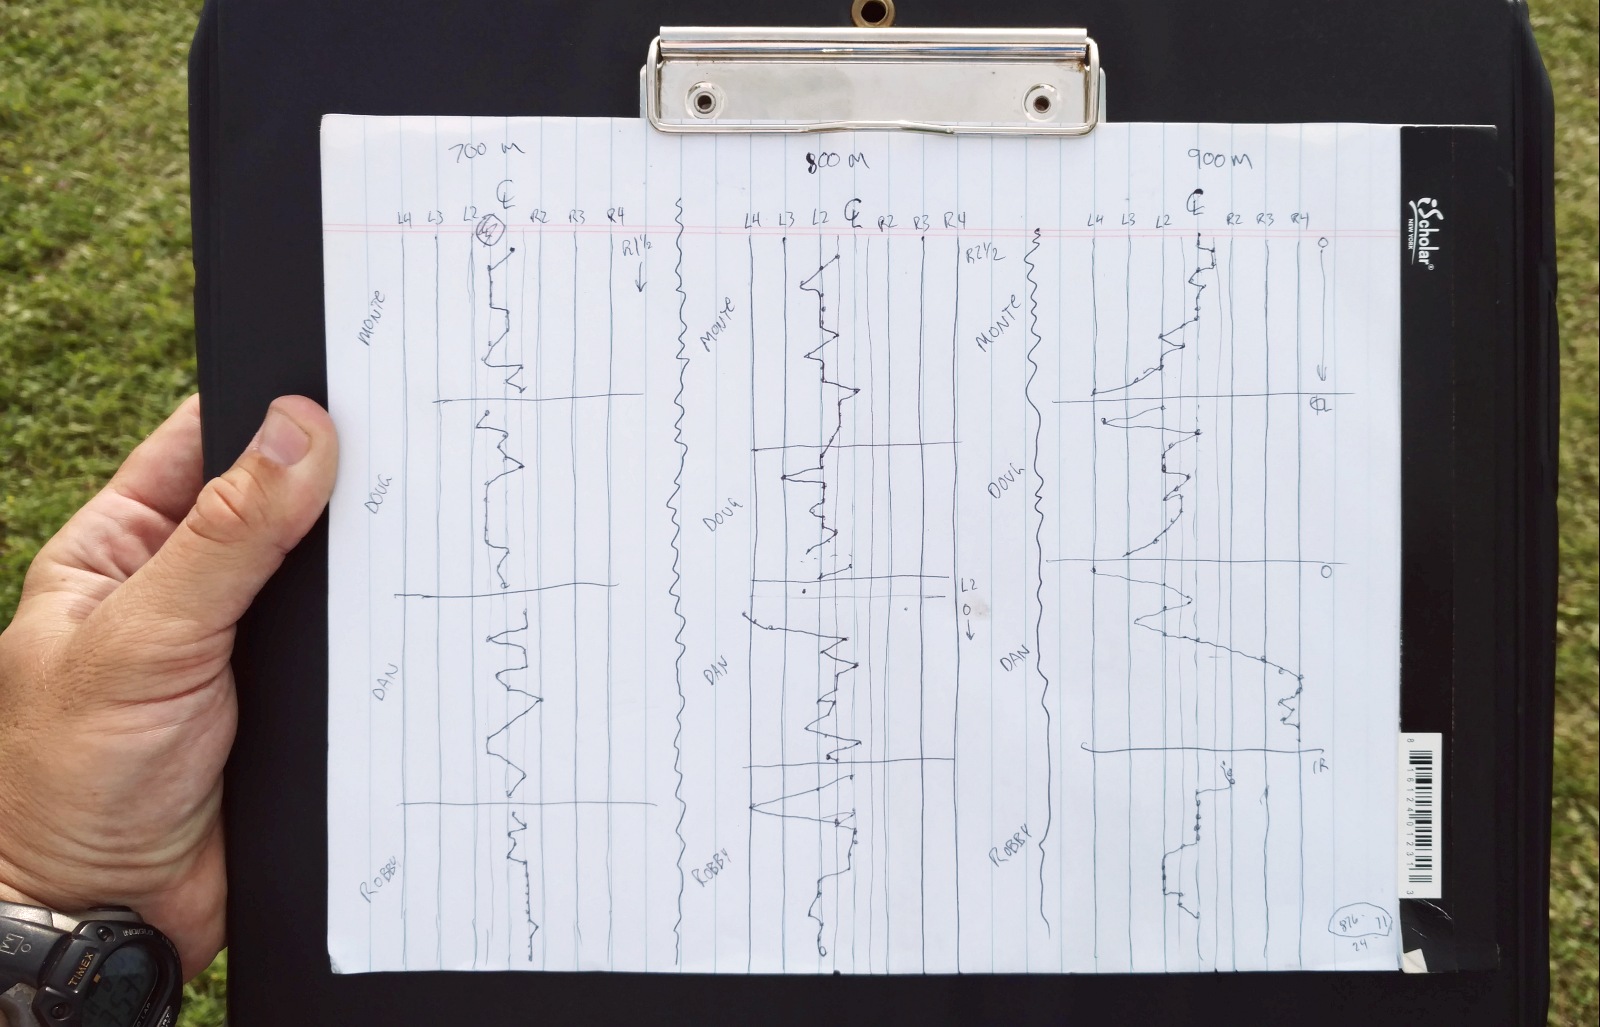
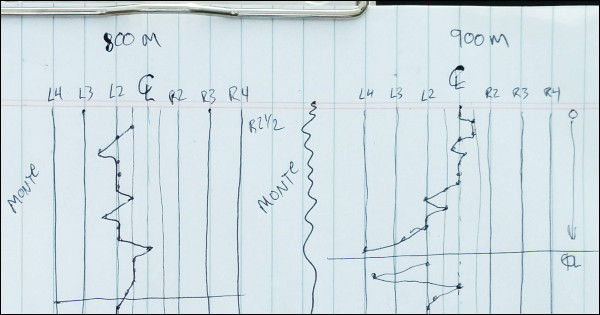
CLICK HERE to see full-screen version of Wind Plot.
The Battle of Nations begins. Today is Day 1 of international team competition at the 2017 F-Class World Championships (FCWC) in Ottawa, ON, Canada. Talented teams, in their nation’s colors, will be competing for glory and national pride.
Team shooting is very different than individual competition. Typically a team coach makes the wind calls for the shooters. In some cases (where the rules allow), the wind coach even dials elevation and windage changes for the active shooter. For the wind coach to do his job effectively, he must follow the changes in the wind and determine what the correct wind call should have been for each shot. (In other words — what was the “right call”)
Past F-TR USA Nat’l Champ Bryan Litz was wind coach for the winning 4-man LUM F-TR Team at the 2017 Canadian F-Class Championships, which preceded the FCWC Worlds. Here Bryan explains how he uses a Wind Plot to make better wind calls, helping his team-mates maximize their scores.
Wind Plot Methodology by Bryan Litz
The wind plot I use is a running history of what the correct wind call was for every shot fired. The more you shoot, the more history you have in a condition, and I find that very useful information. This kind of plot IS NOT showing where the bullet hit, and is NOT showing what you held. It’s showing what you should have held to center each shot. IMO, this is the most valuable information to have when guessing where to hold next for each shot. Here are some key points:
1. I always look for blocks of stable conditions to shoot in and wait out the rest.
2. If the wind plot shows drastic changes, either I’m not picking the right time to shoot or it’s just a really unstable wind condition.
3. When you see many shots using the same hold (e.g. Robby’s 700m and 900m strings on plot), it can indicate very fast shooting and fast pit service.
Q. What are the numbers and Markings on this Wind Plot?
Litz: The wind plot represents the rings on the target. Left 2 for example, is the 5 line on the international target, while Left 2 is the 10 line on the USA target. F-Class shooters and coaches talk about wind holds in relation to these rings. A Left 2 hold isn’t left 2 MOA or 2 MILS, it’s the second ring from center. The vertical lines on the plot represent the rings going out from center, 4 or 5 in each direction. A left or right 5 hold is edge of black on the int’l target.
Q: What Does this Specific Plot Reveal?
Litz: Looking at the plot, from left to right is 700m, 800m, and 900m that we shot progressively through the day. Top to bottom shows each shooter in sequence (shooters names are shown by their blocks). To the right I note what was on the gun for that shooter, and note when it changes. Often times we run the same wind on the gun for several shooters but if it changes, I note what the new windage is and continue on. For example if we’re settled into a condition where we’re shooting Vs with a right 3 hold, I might adjust the scope 1 MOA right because a right 3 hold is equal to 1 MOA. So we can move the scope and start shooting with a center hold.
Q. Are you Plotting Where the Bullet Hits?
Litz: Not exactly. This kind of plot IS NOT specifically showing where the bullet hit, and IS NOT showing what the shooter held. It’s showing what the shooter should have held to center each shot. IMO, this is the most valuable information to have when guessing where to hold next for each shot.
On each shot, the shooter or coach takes a guess about where to hold, and fires the shot. If the bullet hits the center, you plot the point right where you held because it was the correct hold. However, if you miss the call, you plot what hold was required to put that shot in the center. For example if you shoot a right 3 and hit where you held, the correct call would have been “center”. In this way, you’re building a history of what you should have done, which may or may not be what you actually did. This shows you the trends, and brackets which can be used to make future decisions.
Q: Is this Type of Wind Plot Something New?
Litz: I didn’t invent this method, it’s been around a long time. Vertical can be plotted the same way. In team matches, we have a plotter who is advising on elevation trends and suggesting corrections. But, as wind coach, my job is the horizontal so I only keep the wind plot. I have learned lots of strategies from my coaches Emil Praslick and Steve Hardin.
There are many ways to plot and many standard work sheets for this. They’re all tools and the key is to find something that works for you in different situations. I don’t keep a plot when I am personally behind the trigger string firing because I lose more points when I take the time to do it vs. just shooting fast. When pair firing or coaching, I can keep the wind plot without compromising the shooting.
Team Australia used plots and comms linking coaches to help win the 2013 F-Open Team World Championship. We expect other teams will follow suit in Canada in 2017.
Know Your Goal — Keep It Simple
Know your goal of plotting. The simplest plot is where you write the shot number where it hit on a target face. This kind of plotting is useful for evaluating shooter performance because it shows how big the group is (in particular the vertical dispersion). However keeping a plot like this does little to help you figure out the wind. It just shows you what shots you messed up on. It does nothing to help you find the center. [Editor: That’s a whole different matter with many variables.] The wind plot I use is a running history of what the correct wind call was for every shot fired. The more you shoot, the more history you have in a condition, and I find that very useful information.
The F-Class World Championships (FCWC) commence today at the Connaught Ranges outside Ottawa, Ontario, Canada. We wish good luck to all the competitors. Based on the conditions at the recent Canadian F-Class National Championships, conditions could be challenging.
F-Class World Championships EVENT SCHEDULE: Friday, August 11 (REST DAY – RANGE CLOSED)
Competitor Check-In for FCWC; Rifle Inspection; International Teams Reception
Saturday, August 12: Opening Ceremonies; ICFRA FCWC (Individual)
Sunday, August 13: ICFRA FCWC (Individual)
Monday, August 14: ICFRA FCWC (Individual); Awards Prize Giving
Tuesday, August 15: TEAM PRACTICE DAY
Wednesday, August 16: ICFRA FCWC (Teams)
Thursday, August 17: ICFRA FCWC (Teams): Awards Prize Giving & Closing Ceremonies
Tips for Success at the F-Class Worlds — #1, Avoid Train Wrecks
As an assist to all the competitors, we’re repeating an article by Bryan Litz, which many have found very helpful — how to avoid “Train Wrecks” at major championships.
When you have a major, critical problem at a shooting match, i.e. a “train wreck”, this can be the end of your weekend. In this article, Ballistics Guru Bryan Litz talks about “train wrecks” — the big disasters (such as equipment failures) that can ruin a whole match. A recent USA F-TR Champion, Bryan illustrates the types of “train wrecks” that commonly befall competitors, and he explains how to avoid these “unmitigated disasters”.
Success in long range competition depends on many things. Those who aspire to be competitive are usually detail-oriented, and focused on all the small things that might give them an edge. Unfortunately it’s common for shooters lose sight of the big picture — missing the forest for the trees, so to speak.
Consistency is one of the universal principles of successful shooting. The tournament champion is the shooter with the highest average performance over several days, often times not winning a single match. While you can win tournaments without an isolated stellar performance, you cannot win tournaments if you have a single train wreck performance. And this is why it’s important for the detail-oriented shooter to keep an eye out for potential “big picture” problems that can derail the train of success!
Train wrecks can be defined differently by shooters of various skill levels and categories. Anything from problems causing a miss, to problems causing a 3/4-MOA shift in wind zero can manifest as a train wreck, depending on the kind of shooting you’re doing.
Below is a list of common Shooting Match Train Wrecks, and suggestions for avoiding them.
1. Cross-Firing. The fastest and most common way to destroy your score (and any hopes of winning a tournament) is to cross-fire. The cure is obviously basic awareness of your target number on each shot, but you can stack the odds in your favor if you’re smart. For sling shooters, establish your Natural Point of Aim (NPA) and monitor that it doesn’t shift during your course of fire. If you’re doing this right, you’ll always come back on your target naturally, without deliberately checking each time. You should be doing this anyway, but avoiding cross-fires is another incentive for monitoring this important fundamental. In F-Class shooting, pay attention to how the rifle recoils, and where the crosshairs settle. If the crosshairs always settle to the right, either make an adjustment to your bipod, hold, or simply make sure to move back each shot. Also consider your scope. Running super high magnification can leave the number board out of the scope’s field view. That can really increase the risk of cross-firing.
2. Equipment Failure. There are a wide variety of equipment failures you may encounter at a match, from loose sight fasteners, to broken bipods, to high-round-count barrels that that suddenly “go south” (just to mention a few possibilities). Mechanical components can and do fail. The best policy is to put some thought into what the critical failure points are, monitor wear of these parts, and have spares ready. This is where an ounce of prevention can prevent a ton of train wreck. On this note, if you like running hot loads, consider whether that extra 20 fps is worth blowing up a bullet (10 points), sticking a bolt (DNF), or worse yet, causing injury to yourself or someone nearby.
3. Scoring/Pit Malfunction. Although not related to your shooting technique, doing things to insure you get at least fair treatment from your scorer and pit puller is a good idea. Try to meet the others on your target so they can associate a face with the shooter for whom they’re pulling. If you learn your scorer is a Democrat, it’s probably best not to tell Obama jokes before you go for record. If your pit puller is elderly, it may be unwise to shoot very rapidly and risk a shot being missed (by the pit worker), or having to call for a mark. Slowing down a second or two between shots might prevent a 5-minute delay and possibly an undeserved miss.
4. Wind Issues. Tricky winds derail many trains. A lot can be written about wind strategies, but here’s a simple tip about how to take the edge off a worse case scenario. You don’t have to start blazing away on the command of “Commence fire”. If the wind is blowing like a bastard when your time starts, just wait! You’re allotted 30 minutes to fire your string in long range slow fire. With average pit service, it might take you 10 minutes if you hustle, less in F-Class. Point being, you have about three times longer than you need. So let everyone else shoot through the storm and look for a window (or windows) of time which are not so adverse. Of course this is a risk, conditions might get worse if you wait. This is where judgment comes in. Just know you have options for managing time and keep an eye on the clock. Saving rounds in a slow fire match is a costly and embarrassing train wreck.
5. Mind Your Physical Health. While traveling for shooting matches, most shooters break their normal patterns of diet, sleep, alcohol consumption, etc. These disruptions to the norm can have detrimental effects on your body and your ability to shoot and even think clearly. If you’re used to an indoor job and eating salads in air-conditioned break rooms and you travel to a week-long rifle match which keeps you on your feet all day in 90-degree heat and high humidity, while eating greasy restaurant food, drinking beer and getting little sleep, then you might as well plan on daily train wrecks. If the match is four hours away, rather than leaving at 3:00 am and drinking five cups of coffee on the morning drive, arrive the night before and get a good night’s sleep.”
Keep focused on the important stuff. You never want to lose sight of the big picture. Keep the important, common sense things in mind as well as the minutia of meplat trimming, weighing powder to the kernel, and cleaning your barrel ’til it’s squeaky clean. Remember, all the little enhancements can’t make up for one big train wreck!
“Science tells us that exposure to continuous noise of 85 dB for eight hours is enough to cause permanent hearing loss, and worse, spikes of 130 dB and more can result in permanent hearing damage instantly.” Source: NRA Blog.
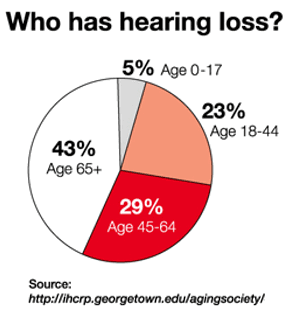
The Risk of Hearing Loss
Hearing loss can be progressive and irreversible. If you are a shooter, this is serious business. As the NRA Blog cautions: “You may not even realize you’re harming your hearing. Hearing loss occurs gradually, and can go effectively unnoticed until symptoms become severe. By then, the damage is done.”
Nobody wants to go deaf. But we often see shooters without effective hearing protection when they are walking around a few yards behind the firing line. That’s bad — even if you are away from the firing line, gunshot noises can damage your hearing. You MUST use effective hearing protection every time you go to the range. Good foam earplugs costs mere pennies but they can prevent deafness in your later years. Many folks also wear muffs over plugs.
Sound Levels for Common Noises:
9mm Luger pistol: 160 dB
Jet aircraft engine (near): 140 dB
.22 LR pistol: 134 dB
Normal human pain threshold: 120 dB
Noisy Nightclub: 110 db
Riding Motorcycle at 65 mph: 103 db
Power Lawnmower: 95 dB
Hearing damage possible: 85 dB (sustained for 8+ hours)
Ringing Telephone: 80 dB
Normal conversation: 60 dB
The Myth of the “Quiet” .22 LR
The NRA Blog notes that “many rimfire shooters, particularly those using the beloved .22 Long Rifle cartridge, argue that the small .22 LR caliber doesn’t produce enough sound to damage your hearing”. So, is that really true … or is it a myth?
In fact, a .22 LR can be much louder than you think — a .22 LR pistol can produce sound levels of 134 dB. That’s well above the normal human pain threshhold.
Highest Protection NRR 34dB-Rated Ear Muffs
For under $20.00 you can buy quality ANSI-approved muffs with a 34dB Noise Reduction Rating — the best you can get. Chose the Bright Yellow TR Industrial Muffs at $13.48, or the dark green Walker EXT Range Muffs for $13.99. Both products have padded head-bands which retract. If you prefer “basic black”, consider the $14.85 ClearArmor Muffs, Amazon’s #1 Best Seller among safety earmuffs.
Howard Leight MAX NRR33 Earplugs, Just $7.39 for 50 Pairs.
20 Pairs
50 Pairs
These Howard Leight NRR33 Max plugs are your Editor’s favorite foam earplugs. Between shooting, motorcycling and mowing lawns, I probably have Max plugs in my ears 2-3 days a week. This is a very good price for a bulk pack of 50 pairs. And if you act soon, you can get free shipping to boot.
The movie “The Patriot” gave us the phrase “Aim small, miss small”. While that’s a good mantra, aiming strategies for long-range competition are a bit more complicated, as this article explains…
The The F-Class World Championships (FCWC) in Canada are just one week away. This August 11-17, the world’s top F-Class shooters will gather at the Connaught Ranges outside Ottawa, Ontario. Here are some tips that can help F-TR and F-Open shooters aim more precisely, and achieve higher scores. F-Class ace Monte Milanuk reviews reticle choices and strategies for holding off.
In our Shooters Forum, one newcomer wanted some advice on selecting a reticle for F-Class optics. He wondered about the advantage of Front (first) Focal Plane (FFP) vs. Second Focal Plane scopes and also wondered if one type of reticle was better for “holding off” than others.
In responding to this question, Forum regular Monte Milanuk provided an excellent summary of aiming methods used in F-Class. For anyone shooting score targets, Monte’s post is worth reading:
Aiming Methods for F-Class (and Long-Range) Shooting — by Monte Milanuk
F-Class is a known-distance event, with targets of known dimensions that have markings (rings) of known sizes. Any ‘holding off’ can be done using the target face itself. Most ‘benefits’ of Front (first) focal plain (FFP) optics are null and void here — they work great on two-way ranges where ‘minute of man’ is the defining criteria — but how many FFP scopes do you know of in the 30-40X magnification range? Very, very few, because what people who buy high-magnification scopes want is something that allows them to hold finer on the target, and see more detail of the target, not something where the reticle covers the same amount of real estate and appears ‘coarser’ in view against the target, while getting almost too fine to see at lower powers.
Whether a person clicks or holds off is largely personal preference. Some people might decline to adjust their scope as long as they can hold off somewhere on the target. Some of that may stem from the unfortunate effect of scopes being mechanical objects which sometimes don’t work entirely as advertised (i.e. one or two clicks being more or less than anticipated). Me personally, if I get outside 1-1.5 MOA from center, I usually correct accordingly. I also shoot on a range where wind corrections are often in revolutions, not clicks or minutes, between shots.
Some shooters do a modified form of ‘chase the spotter’ — i.e. Take a swag at the wind, dial it on, aim center and shoot. Spotter comes up mid-ring 10 at 4 o’clock… so for the next shot aim mid-ring 10 at 10 o’clock and shoot. This should come up a center X (in theory). Adjust process as necessary to take into account for varying wind speeds and direction.
Others use a plot sheet that is a scaled representation of the target face, complete with a grid overlaid on it that matches the increments of their optics — usually in MOA. Take your Swag at the wind, dial it on, hold center and shoot. Shot comes up a 10 o’clock ‘8’… plot the shot on the sheet, look at the grid and take your corrections from that and dial the scope accordingly. This process should put you in the center (or pretty close), assuming that you didn’t completely ignore the wind in the mean time. Once in the center, hold off and shoot and plot, and if you see a ‘group’ forming (say low right in the 10 ring) either continue to hold high and left or apply the needed corrections to bring your group into the x-ring.
Just holding is generally faster, and allows the shooter to shoot fast and (hopefully) stay ahead of the wind. Plotting is more methodical and may save your bacon if the wind completely changes on you… plotting provides a good reference for dialing back the other way while staying in the middle of the target. — YMMV, Monte


 Train Wrecks (and How to Avoid Them)
 4. Wind Issues. Tricky winds derail many trains. A lot can be written about wind strategies, but here’s a simple tip about how to take the edge off a worse case scenario. You don’t have to start blazing away on the command of “Commence fire”. If the wind is blowing like a bastard when your time starts, just wait! You’re allotted 30 minutes to fire your string in long range slow fire. With average pit service, it might take you 10 minutes if you hustle, less in F-Class. Point being, you have about three times longer than you need. So let everyone else shoot through the storm and look for a window (or windows) of time which are not so adverse. Of course this is a risk, conditions might get worse if you wait. This is where judgment comes in. Just know you have options for managing time and keep an eye on the clock. Saving rounds in a slow fire match is a costly and embarrassing train wreck.
 The Risk of Hearing Loss


 F-Class is a known-distance event, with targets of known dimensions that have markings (rings) of known sizes. Any ‘holding off’ can be done using the target face itself. Most ‘benefits’ of Front (first) focal plain (FFP) optics are null and void here — they work great on two-way ranges where ‘minute of man’ is the defining criteria — but how many FFP scopes do you know of in the 30-40X magnification range? Very, very few, because what people who buy high-magnification scopes want is something that allows them to hold finer on the target, and see more detail of the target, not something where the reticle covers the same amount of real estate and appears ‘coarser’ in view against the target, while getting almost too fine to see at lower powers.
 Others use a


