Shooting Industry Magazine has released a helpful blog article concerning airline travel and firearms. Written by well-known shooting instructor, gun writer (and part-time police officer) Massad Ayoob, the article covers key points travelers must understand before carrying firearms into an airport zone. In his article Flying with Firearms, Ayoob warns travelers that “State gun laws change frequently” and that “our country is a 50-piece patchwork quilt of gun laws”.
Here are some of the recommended resources gun-toting travelers should consult before they head to any airport in the United States:
Flying with Firearms — Familiarize Yourself With The Laws by Massad Ayoob
State gun laws change frequently, including reciprocity on concealed-carry permits even in the gun-friendly “red states.” Here are a few sources I recommend for you and your customers.
Online, the best and most up-to-date source of gun laws I’ve found is www.Handgunlaws.us. For smart phones, the best app I can recommend is Legal Heat (www.mylegalheat.com).
The Transportation Security Administration (TSA) and the Federal Aviation Administration (FAA) are the authoritative sources on flying with firearms.
The controlling TSA regulation can be found at www.tsa.gov, search “Firearms.” The FAA’s controlling regulation is 108.11. To view the FAA’s controlling regulation, visit the U.S. Government Printing Office: www.gpo.gov/fdsys, click “Advanced Search” and enter “14 CFR 108.11” — the first result contains the report.
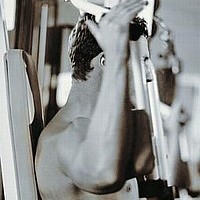
In the archives of The First Shot (the CMP’s Online Magazine), SGT Walter E. Craig of the USAMU discusses physical conditioning for competitive shooters, particularly High Power competitors. Fitness training is an important subject that, curiously, is rarely featured in the shooting sports media. We seem to focus on hardware, or esoteric details of cartridge reloading. Yet physical fitness also matters, particularly for High Power shooters. In his article, Craig advocates: 1) weight training to strengthen the Skeletal Muscle System; 2) exercises to build endurance and stamina; and 3) cardiovascular conditioning programs to allow the shooter to remain relaxed with a controlled heart beat.
SGT Craig explains: “An individual would not enter a long distance race without first spending many hours conditioning his/her body. One should apply the same conditioning philosophy to [shooting]. Physical conditioning to improve shooting skills will result in better shooting performance…. The objective of an individual physical training program is to condition the muscles, heart, and lungs thereby increasing the shooter’s capability of controlling the body and rifle for sustained periods.”
In addition to weight training and cardio workouts (which can be done in a gym), SGT Craig advocates “some kind of holding drill… to develop the muscles necessary for holding a rifle for extended periods.” For those with range access, Craig recommends a blind standing exercise: “This exercise consists of dry-firing one round, then live-firing one round, at a 200-yard standard SR target. For those who have access only to a 100-yard range, reduced targets will work as well. Begin the exercise with a timer set for 50 minutes. Dry-fire one round, then fire one live round and without looking at the actual impact, plot a call in a data book. Continue the dry fire/live fire sequence for 20 rounds, plotting after each round. After firing is complete, compare the data book to the target. If your zero and position are solid, the plots should resemble the target. As the training days add up and your zero is refined, the groups will shrink and move to the center.”
Fitness training and holding drills help position shooters reach their full potential.
Training for Older Shooters
Tom Alves has written an excellent article A Suggested Training Approach for Older Shooters. This article discusses appropriate low-impact training methods for older shooters. Tom explains: “Many of the articles you will read in books about position shooting and the one mentioned above are directed more toward the younger generation of shooters in their 20s. If you look down the line at a typical high power match these days you are likely to see quite a few folks who are in their middle 30s and up. Many people in that age range have had broken bones and wear and tear on their joints so a training program needs to take that into account. For instance, while jogging for an extended period for heart and lung conditioning may be the recommended approach for younger folks, it may be totally inappropriate for older people.”
Forum Member Roy B. has found a website with scores of well-researched articles about guns and shooting. The Firearms History, Technology & Development Blog features a wide variety of posts on myriad subjects, from early black powder firearms to modern match rifles. The latest entry is a fascinating story on the Richardson R5 gun, an ultra-simple shotgun modeled on home-made, slam-fire weapons used by Filipino guerrilla forces. (David Richardson was a PT-boat officer who fought with resistance forces in the Philippines for three years. Hollywood made a movie based on his wartime activities in the Philippines.)
Richardson R5 Philippine Guerrilla Gun
On the Firearms History Blog, you’ll find tons of information on gun design, barrel-making, action types, and firearms testing equipment. To access hundreds of articles, click on the Firearm History Blog Archive Menu on the left side.
Berger Twist-Rate Stability Calculator
On the Berger Bullets website you’ll find a handy Twist-Rate Stability Calculator that predicts your gyroscopic stability factor (SG) based on mulitiple variables: velocity, bullet length, bullet weight, barrel twist rate, ambient temperature, and altitude. This very cool tool tells you if your chosen bullet will really stabilize in your barrel.
LIVE DEMO BELOW — Just enter values in the data boxes and click “Calculate SG”.
How to Use Berger’s Twist Rate Calculator
Using the Twist Rate Calculater is simple. Just enter the bullet DIAMETER (e.g. .264), bullet WEIGHT (in grains), and bullet overall LENGTH (in inches). On its website, Berger conveniently provides this info for all its bullet types. For other brands, we suggest you weigh three examples of your chosen bullet, and also measure the length on three samples. Then use the average weight and length of the three. To calculate bullet stability, simply enter your bullet data (along with observed Muzzle Velocity, outside Temperature, and Altitude) and click “Calculate SG”. Try different twist rate numbers (and recalculate) until you get an SG value of 1.4 (or higher).
Gyroscopic Stability (SG) and Twist Rate
Berger’s Twist Rate Calculator provides a predicted stability value called “SG” (for “Gyroscopic Stability”). This indicates the Gyroscopic Stability applied to the bullet by spin. This number is derived from the basic equation: SG = (rigidity of the spinning mass)/(overturning aerodynamic torque).
If you have an SG under 1.0, your bullet is predicted not to stabilize. If you have between 1.0 and 1.1 SG, your bullet may or may not stabilize. If you have an SG greater than 1.1, your bullet should stabilize under optimal conditions, but stabilization might not be adequate when temperature, altitude, or other variables are less-than-optimal. That’s why Berger normally recommends at least 1.5 SG to get out of the “Marginal Stability” zone.
In his book Applied Ballistics For Long-Range Shooting, Bryan Litz (Berger Ballistician) recommends at least a 1.4 SG rating when selecting a barrel twist for a particular bullet. This gives you a safety margin for shooting under various conditions, such as higher or lower altitudes or temperatures. Try changing the altitude and temperature in the calculator and you will see that the SG can increase or decrease when these environmental factors change. Under optimal circumstances you should aim for a 1.4, that way if you change circumstances you are still over 1.1.
Erik Dahlberg rifling illustration courtesy FireArmsID.com.
Story idea from EdLongrange. We welcome reader submissions.
On German Salazar’s Rifleman’s Journal website, you’ll find an excellent 5-Part Series on barrel chambering. The Series, entitled The Voyeur’s Guide to Barrel Chambering, is not intended to be a “how-to” instructional treatise for gunsmiths. Instead, German’s 5-Part Guide is aimed at the end user — the shooter. German explains: “This Series isn’t intended for anyone who owns a lathe; instead it is for those of us who send an action off to get a new barrel installed. Those who have the equipment know what to do and how to do it and I have nothing to teach them. On the other hand, if you’ve ever wondered just what goes into barrel fitting, this is it.” PART I | PART II | PART III | PART IV | PART V
With well-written text and dozens of very high-quality images, German takes you through the chambering, threading, shoulder-fitting, and crowning processes from start to finish. The idea is to give the “barrel consumer” a clear idea of the processes involved when a barrel blank is converted into functional form, complete with chamber, threaded tenon, fitted breech, and crown.
We highly recommend German’s 5-Part Voyeur’s Guide to Barrel Chambering. German, with the aid of John Lowther (who ran the machines), did a great job. The series has already drawn much attention from our Forum members, along with praise. After reading the articles, John C. from Australia wrote: “Your Chambering articles… really are excellent [and] informative for those of us too scared to watch our gunsmith chamber one of our barrels lest we distract him at a crucial moment!”
We know you’ll learn something from reading through German’s 5-Part Series. And if you see a photo on German’s website that intrigues you, simply click on it to see a larger, higher-resolution version. All the images in the Voyeur Series on RiflemansJournal.com can be zoomed to larger formats.
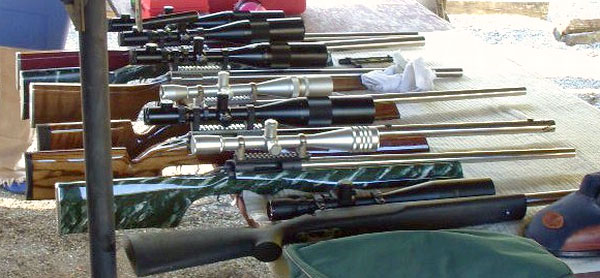
With all the talk about Dashers, 6.5×47 Lapuas, or the big 7mms, it’s worth remembering that the “plain Jane” 6mmBR Norma really is a superb mid-range cartridge. That was demonstrated recently at the 2014 Roanoke Egg Shoot, a clay-bustin’ multi-distance match with targets at 330, 425, and 500 yards. At Roanoke, the 6mmBR (aka 6BR) was the most popular chambering. In fact, 25 out of 43 rifles (58%) were 6BRs. And this little cartridge did most of the winning. In Factory Class, seven of the Top 10 were 6BRs, including first and second place. In Open Class, eight of the Top 10 were 6BRs, including second and third place. And the Open Class winner, a 6BRX piloted by Forum member Mark Schronce, was a 6BR Improved, formed from 6mmBR parent brass.
Mark tells us the conditions were great this year: “We had eleven clean scores [of 15] in Open class. One of the 15s was shot by 8-year-old Cash Brown. Watch out for this young man, he is a shooter!”. With so many cleans there were many shoot-offs to determine the Top Three in each class. Mark explains: “We shoot one round each, no sighter at 500 yards, on 3.5″ clays, until one guy wins.”
*Mark also shot a 15 with his second rifle, chambered in 6mmBR Norma. Mark’s Open Class-winning 6BRX rifle featured a Bat B action and Mike Davis-chambered 26″ Krieger 1:8.5″-twist barrel. Mark loaded Berger 105gr VLDs, pushed by Varget and Fed 205M primers.
Young Guns Shine at Roanoke
Forum member Greg M., (aka Coleridge), also attended the Roanoke Match: “I made it into the Open Class Shoot-Off with two separate guns (6BR and 6-6.5x47L) … only to get whipped by both of the two youngest shooters there (one with my own gun!).” Greg noted that: “the Open Class Second Place finisher was also a youngster, Blake, my 15-year-old son. It won’t be long before Blake and [8-year-old] Cash are whipping us way too often. I’m just glad neither one of them was shooting in factory class!”
Course of Fire
The main match at Roanoke encompasses three yardages. All guns engage 15 clay targets: five 2.5″ clays at 330 yards, five 3.5″ clays at 425 yards, and five 4.5″ clays at 500 yards. Shooters are allowed TWENTY rounds, (no separate sighters). All rounds must be shot in one setting, with a 10-minute time limit. Shooters can shoot targets in any order.
Class Rules
In the primary clays-shooting competition, there are two (2) classes, Open and Factory. In the Open class there is a 30-lb weight limit and no rail guns are permitted. Beyond that, pretty much “anything goes”. The Factory Class is more tightly controlled — this is a true factory class, no customs allowed, not even Coopers. The only upgrades allowed are bedding and trigger job/replacement.
Egg Shoot Is Challenging
In addition to the main clays-shooting match, there is an actual Egg Shoot, conducted separately. For the Egg Shoot, there are no classes — competitors pick their best rifle. After a five-minute warm-up, competitors get two shots to hit one egg at 500 yards. It costs two bucks for each entry — and you can shoot until your money or ammo runs out. All competitors who hit an egg then go into a Shoot-Off for glory and cash awards. Jonathan Dunn, shooting a 6BRX, won the Egg Shoot scoring 3 of 4 hits on eggs in the Shoot-Off stage.
To succeed in long-range shooting matches, given the high level of competition these days, you’ll need solid wind-reading abilities. We’ve found an article by SFC Emil Praslick III, USAMU Service Rifle coach, that can help you make better wind calls in competition.
SFC Praslick is considered one of the best wind gurus in the United States, if not the world. He has authored an excellent two-part article on wind reading that is available on the CMP (Civilian Marksmanship Program) website. Both articles contain helpful illustrations, and are “must-read” resources for any long-range shooter–not just Service Rifle and Highpower competitors.
Part One covers basic principles, tactics, and strategies, with a focus on the 200-yard stages. Emil writes: “There are as many dimensions to ‘wind reading’ as there are stages to High Power competition. Your tactical mindset, or philosophy, must be different for the 200 and 300 yard rapid-fire stages than it would be for the 600 yard slow-fire. In the slow-fire stages you have the ability to adjust windage from shot to shot, utilizing the location of the previous shot as an indicator. Additionally, a change to the existing conditions can be identified and adjusted for prior to shooting the next shot.”
In Part Two, Praslick provides more detailed explanations of the key principles of wind zeros, wind reading, and the “Clock System” for determining wind values: “The Value of the wind is as important as its speed when deciding the proper windage to place on the rifle. A 10 MPH wind from ’12 o-clock’ has No Value, hence it will not effect the flight of the bullet. A 10 MPH wind from ‘3 o’clock’, however, would be classified as Full Value. Failure to correct for a Full Value wind will surely result in a less than desirable result.”
Praslick also explains how to identify and evaluate mirage:
Determine the accuracy of the mirage. Mirage is the reflection of light through layers of air that have different temperatures than the ground. These layers are blown by the wind and can be monitored to detect wind direction and speed.
Focus your scope midway between yourself and the target, this will make mirage appear more prominent. I must emphasize the importance of experience when using mirage as a wind-reading tool. The best way to become proficient in the use of mirage is to correlate its appearance to a known condition. Using this as a baseline, changes in mirage can be equated to changes in the value of the wind. Above all, you must practice this skill!
Click HERE for more excellent instructional articles by Emil Praslick and other USAMU Coaches and shooters.
Our IT guy, Jay (aka JayChris in the Forum), was having some issues with his .260 AI. A load with known accuracy had suddenly and mysteriously stopped shooting well. Jay couldn’t figure out what was going wrong. Then he remembered he had cleaned his brass using a powerful ultrasonic machine.
He inspected his brass carefully and saw that the ultrasonically-cleaned necks were so “squeaky clean” that he was actually scratching the jackets on his bullets when seating them. As well, Jay noticed that it took more force to seat the bullets and the seating force became less uniform case to case. Jay solved the problem by applying NECO Moly dry-lube inside the necks of his brass before seating the bullets.
The Perils of Ultrasonic Brass Cleaning by JayChris
I rotate my brass so that I can keep track of each firing, so I keep a “clean/ready to load” bin and a “fired” bin. I have 400 pieces of .260 AI brass. So, all of it was on its first firing (after doing a Cream of Wheat fire-forming) until I hit the 400-round mark. To my surprise, things went south at the 500-round mark. The first time I noticed it (according to my range log) was at a match last year, when I dropped several points and had some vertical stringing issues. After that match, I had 400 rounds through the barrel and all of my brass had a single firing on it. So, it was time to clean.
I have used an ultrasonic cleaner for a while now. I recently got a more powerful Ultrasonic cleaner, although I don’t know if that makes a difference. My brass comes out dry and squeaky. Emphasis on the “squeaky”.
I found that my new US machine may have been getting the necks TOO clean. After ultrasonically cleaning my brass, I had noticed that it required a little more force to seat the bullets, but I didn’t really think too much about it. But then, after going over my ordeal with a shooting buddy and going over my process in minutiae, we had an “AH HA” moment when it came to cleaning (he uses good ol’ vibratory cleaning).
So, I used some moly dry-lube to pre-lube the case necks and took some rounds out to test at 200 yards. I used my last known good load and sure enough, the vertical flyers disappeared! I shot two, 10-rounds groups with .335 and .353 MOA vertical dispersion, which is consistent with the results I was originally getting.
Other folks have suggested necks may get “too clean” after ultrasonic cleaning. It was pretty sobering to actually witness, first hand, what can happen when brass is “too clean”. I had read some discussions of issues with neck friction/bullet seating after ultrasonic cleaning, but, frankly, I dismissed the idea. Now I understand. The “too clean” effect doesn’t seem to affect my Dasher at all (perhaps because Dasher necks are very short), but on the bigger .260 AI, it definitely does.
Close-Up Photos of Case-Necks
Here are photos Jay took with a microscope. You can see the difference between tumbled brass and ultrasonically-cleaned brass. Jay says: “Here, in sequence, are the Ultrasound-squeaky-clean case neck, a case neck after treatment with NECO moly dry-lube (you can see the particles that will help coat the neck during seating), and, finally, the neck from a case cleaned with corncob media in a vibratory tumbler. You can clearly see how much smoother the inside of the tumbled neck is. Yes, it’s dirty, but it’s also very, very smooth.
Close-Up of Scratched Bullet
Here is a close-up of a bullet that was seated in an ultrasonically-cleaned (“squeaky clean”) neck, with no lubrication. You can clearly see the damage done to the jacket — in fact, in a couple spots you can see the lead core through the scratches! Jay also observed that quite a bit more seating force was required to seat the bullet in a “squeaky clean” neck.
NOTE: The bullet jacket is naked — NOT coated in any way. It looks a little dark because of the shadow from the microscope lens, and the high contrast.
Gun, guns, and more guns — that’s what you’ll find in the May issue of Shooting Illustrated. This special edition, Shooting Illustrated’s largest-ever issue, features more than 100 new firearms. Novel features, technical specifications, and MSRP are included for all 100+ new firearms in the spotlight. From Alexander Arms to Yankee Hill Machine Company, if it’s a new handgun, rifle or shotgun introduced in 2014, chances are Shooting Illustrated has it covered this month.
In addition to covering 100+ new guns for 2014, this issue also includes Shooting Illustrated’s “best of the best” selections from 2013. The Golden Bullseye Award is given to the most innovative, practical and affordable products introduced last year. Also in the May issue is a detailed review of Ruger’s new SR-762 semi-automatic rifle, a piston-driven .308 Win, AR-platform rifle. Look for these articles and more in the May issue of Shooting Illustrated. For more information, visit Shooting Illustrated.com.
We know you guys like exotic hardware, so today we pulled something very exotic from our featured rifle archives. We doubt that you have ever seen anything quite like this before. Gun-builder Richard King says: “I thought you might like to see my latest project. This is my personal gun, built the way I wanted it. I know it’s radical and some may not care for it. But it works.”
Report by Richard King (King’s Armory, Texas; ‘Kings X’ on our Forum)
This is pretty much an all-aluminum rifle. The action is a Kelbly F-Class with a Shilen stainless steel competition trigger. The scope is a 1″-tube Leupold 36X with a Tucker Conversion set in Jewell spherical bearing rings. The .223 barrel is Pac-Nor 3-groove, 1:6.5″-twist mounted in a “V”-type barrel block. The bipod has vertical adjustment only via a dovetail slide activated by a stick handle. It works like a joy-stick, but for vertical only. I adjust for windage by moving the rear sandbag.
The 30″ barrel is 1.250″ in diameter. With the barrel block forward, the vibrations should be at a low frequency. Instead of one long rod whipping, I now have two short rods (barrel haves) being dampened. This is my fourth barrel block gun. They work, but so does a good pillar-bedded action. I just do stuff a little different.
The vertical “keel” down the bottom of the stock stops the “spring” of a flat-bar stock. There is little, if any, noticeable flex before or during recoil. The long length of the stock, the fat barrel, and the forward-mounted barrel block work together to keep the gun from rising off the ground. BUT, remember this is a .223 Rem rifle. A .308 Win version might act very differently. I may try a .308-barreled action soon, just to see what happens. But I will stick with the .223 Rem as my choice for match shooting.
The offset scope idea came from a benchrest “rail” gun. In truth, the whole concept came from a rail gun — just adapted to being shot off a bipod. Sure it isn’t directly over the bore. It is about 1.5″ over to the left. So if you want the scope to be zeroed on the center of the target, you have to adjust for the offset. At 100 yards that is 1.5 MOA. But at 300 it is only 0.5 MOA, at 600 only a ¼-MOA, and at 1000 about 1 click on my scope.
What the offset DOES do for me is eliminate any cheek pressure. My cheek never touches the stock. Since this is only a .223 Rem, I don’t put and shoulder pressure behind it. And I don’t have a pistol grip to hang on to, but I do put my thumb behind the trigger guard and “pinch” the two-ounce trigger.
The offset scope placement could interfere with loading a dual-port action from the left. That’s not a problem for me as I set my spotting scope up on the left side very close to the rifle. I have plenty of time to reload from the right side while the target is in the pits being scored.
Again — this is my rifle. It is designed for my style of shooting. It is not meant to be a universal “fit all” for the general public. However, I will say the design is adaptable. I can easily convert the system to run in F-Open Class. I would drop a big-bore barreled action into the “V” block, slide on a heavier pre-zeroed scope and rings, add plates on the sides up front to bring the width to 3”, and maybe a recoil pad. It might be interesting to offset the wings up from to counter torque of the big bullets. But I would also have to offset the rear bag rider to get the gun to recoil straight back.
How the Gun Performs
I have had “T” to the range only twice for load development. It groups like my present barrel-blocked 223 F-TR gun. But it’s much easier to shoot and it only moves about 3/4” — straight back. I tried to build am omni-directional joy-stick bipod but I could not get all the side-to-side wiggle out of it. So I have set it up so it only moves up and down (horizontal movement is locked-out). As it works now, the joystick on the bipod lets me set elevation on the target quickly (with up/down adjustment). Then, to adjust for windage, I slide my rear bag side-to-side as needed. Once set, I just tickle the trigger and smile.
Gun Handling — Shoot It Like a Bench-Gun
I basically shoot the gun with no cheek or body contact. I don’t grip it, other than maybe a pinch on the trigger guard. The scope was offset to the left to help the shooter move off the gun and avoid the possibility of head/cheek contact with the stock.
[haiku url=”http://accurateshooter.net/Video/RichKingTalks.mp3″ Title=”Richard King Talks”]
VOICE FILE: Richard King Explains How He Shoots his ‘Texas-T’ Rifle:


 In the archives of
  Fitness training and holding drills help position shooters reach their full potential.


 If you have an SG under 1.0, your bullet is predicted not to stabilize. If you have between 1.0 and 1.1 SG, your bullet may or may not stabilize. If you have an SG greater than 1.1, your bullet should stabilize under optimal conditions, but stabilization might not be adequate when temperature, altitude, or other variables are less-than-optimal. That’s why Berger normally recommends at least 1.5 SG to get out of the “Marginal Stability” zone.
 On German Salazar’s


 With all the talk about Dashers, 6.5×47 Lapuas, or the big 7mms, it’s worth remembering that the “plain Jane” 6mmBR Norma really is a superb mid-range cartridge. That was demonstrated recently at the 2014 Roanoke Egg Shoot, a clay-bustin’ multi-distance match with targets at 330, 425, and 500 yards. At Roanoke, the 6mmBR (aka 6BR) was the most popular chambering. In fact, 25 out of 43 rifles (58%) were 6BRs. And this little cartridge did most of the winning. In Factory Class, seven of the Top 10 were 6BRs, including first and second place. In Open Class, eight of the Top 10 were 6BRs, including second and third place. And the Open Class winner, a 6BRX piloted by Forum member Mark Schronce, was a 6BR Improved, formed from 6mmBR parent brass.

 Egg Shoot Is Challenging
 To succeed in long-range shooting matches, given the high level of competition these days, you’ll need solid wind-reading abilities. We’ve found an article by SFC Emil Praslick III, USAMU Service Rifle coach, that can help you make better wind calls in competition.
 Part One covers basic principles, tactics, and strategies, with a focus on the 200-yard stages. Emil writes: “There are as many dimensions to ‘wind reading’ as there are stages to High Power competition. Your tactical mindset, or philosophy, must be different for the 200 and 300 yard rapid-fire stages than it would be for the 600 yard slow-fire. In the slow-fire stages you have the ability to adjust windage from shot to shot, utilizing the location of the previous shot as an indicator. Additionally, a change to the existing conditions can be identified and adjusted for prior to shooting the next shot.”
 Our IT guy, Jay (aka JayChris in the Forum), was having some issues with his .260 AI. A load with known accuracy had suddenly and mysteriously stopped shooting well. Jay couldn’t figure out what was going wrong. Then he remembered he had cleaned his brass using a powerful ultrasonic machine.
 I have used an ultrasonic cleaner for a while now. I recently got a more powerful Ultrasonic cleaner, although I don’t know if that makes a difference. My brass comes out dry and squeaky. Emphasis on the “squeaky”.


 Gun, guns, and more guns — that’s what you’ll find in the May issue of Shooting Illustrated. This special edition, Shooting Illustrated’s largest-ever issue, features more than 100 new firearms. Novel features, technical specifications, and MSRP are included for all 100+ new firearms in the spotlight. From Alexander Arms to Yankee Hill Machine Company, if it’s a new handgun, rifle or shotgun introduced in 2014, chances are Shooting Illustrated has it covered this month.


 The offset scope idea came from a benchrest “rail” gun. In truth, the whole concept came from a rail gun — just adapted to being shot off a bipod. Sure it isn’t directly over the bore. It is about 1.5″ over to the left. So if you want the scope to be zeroed on the center of the target, you have to adjust for the offset. At 100 yards that is 1.5 MOA. But at 300 it is only 0.5 MOA, at 600 only a ¼-MOA, and at 1000 about 1 click on my scope.


