Months ago, we reported on the new, .17 Winchester Super Magnum (Win Super Mag or WSM) rimfire cartridge. Able to drive a 20gr bullet over 3000 fps, this new .17 Win Super Mag raises the bar for rimfire cartridges. The .17 WSM shoots faster, flies flatter, and bucks the wind better than a .17 HMR.
Sounds good right? Well the only problem is that .17 Win Super Mag cartridges (and a rifle that could shoot them) have been virtually impossible to obtain. In January, Savage unveiled its new B-Mag rifle chambered for the .17 Win Super Mag, but there were delays getting the gun into production.
GunsAmerica Tests .17 Win Super Mag
At last, after many months, the B-mag rifle is ready, and .17 Win Super Mag rimfire ammo is starting to hit dealer’s shelves. GunsAmerica managed to score some .17 WSM rimfire ammo, borrow a B-Mag rifle, and test the new cartridge at the range. GunsAmerica has published its findings in a detailed review on the GunsAmerica Blog.
GunsAmerica Says New 17-Cal Rimfire Cartridge Is Promising:
“Savage sent us this test rifle over two months ago, but we had no ammo, so like everyone else, we waited. Finally, as you can see from these tests, the ammo has started to trickle out. Several of our dealers have reported that they have gotten 40 box orders in (and quickly out) the door, and this ammo you see here was purchased retail at Bass Pro in Hollywood, Florida. We were only able to get the 2600 fps 25 grain load, but it is still a rip-roaring monster for a rimfire, and the accuracy is acceptable, (though not fabulous for a Savage).
The Savage “B-Mag” rifle is currently the only gun for the cartridge, and it carries an MSRP of $349.00. As a first effort on a new and revolutionary rimfire, the B-Mag performed well, and the cartridge looks to have great potential.
The .17WSM is not just a hotter .17HMR. It is a different, and much larger case entirely. Winchester based it on a .27 caliber blank made for industrial nail guns used for cement nails…. They beefed up the case by doubling the wall thickness and added extra meat to the top.”
Building your own portable shooting bench is a great do-it-yourself project. You can build a sturdy bench for well under $100 in materials. Compare that to some deluxe factory-built benches which may cost $500.00 or more.
FREE Bench Plans on the Web
You’ll find a wide assortment of home-built shooting bench designs (both portable and fixed) on the internet. Renovation Headquarters has links to FREE Plans and building instructions for fourteen (14) different shooting benches. There are all-wood shooting bench designs as well as benches that combine a wood top with a metal sub-frame or legs.
Reader Jim Jewell has used the eHow bench design shown above. He recommends it highly. Jim reports: “A colleague and I built two of the eHow permanent wood, sturdy benches for our Pt. Phillips Rod and Gun Club in PA, which had outdated benches. I want to tell you that these benches are very stable and a real bargain. The benches cost precisely $100.00 each using the bill of materials and pressure treated wood. The bill of materials, with careful cutting, using a Chop saw, resulted in almost no scrap wood if carefully measured and cut. The plans are terrific and the benches are great platforms for bench-rest shooting. I made only one modification — I left a 6″ wing on both sides of the table to mount a spotting scope. Further we added a base of dry QuickCrete or similar fast setting concrete mix material. Add it dry, make sure the table is level and fill in the 6″ hole. The hole and QuickCrete add maximum stability. The QuickCrete sucks moisture from the ground, hardens in situ, and adds stability to the bench.
I can’t recommend this design highly enough. It is dirt cheap for clubs on a budget, goes together quickly, the table is very stable and there is no waste if you make precise measurements and cuts. A bag of QuickCrete is enough for two tables adding about $2.00 to the cost of each table. We plan on building new tables for the whole club for under $1000. After about a year, with a completely water-free wood in the bench I recommend a coat of Thompson’s Water Seal and these benches should last a long time.”
Heavy Wood Bench That Converts to Three Sections for Transport
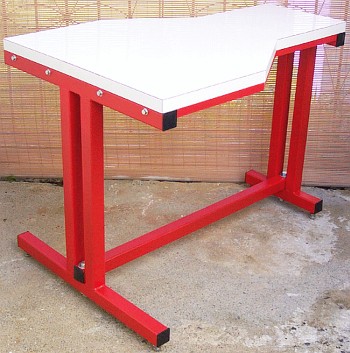
In addition to the fourteen benches mentioned above, here is an interesting break-down bench design. Call it a “semi-portable” bench. The legs and frame are made from stout 4×4 post segments so the bench is fairly heavy. However, this bench can break down into three (3) sections for easier transport to and from the range. Dado-cut channels assure proper top alignment. This might be a good choice if you plan a multi-day excursion to a location without fixed benches. This three-leg bench design can be made from easy-to-locate materials. Note: The dimensions of this bench are are larger than typical fixed benches to accommodate 50 BMGs and other big rifles. CLICK HERE for more details.
Do you like the bench in the illustration at the beginning of this story (top right)? This is a prototype design by Chris Byrne of the Anarchangel Blog. For more details, CLICK HERE.
While the mainstream media (and many politicians) call for new bans on firearms, ammunition, and magazines, not to mention further restrictions of Second Amendment rights, too little attention is being paid to the actual facts in the debate over gun control. Sponsors of new restrictions on firearms claim that gun crime is increasing. A majority of Americans also seem to believe that firearms-related crimes are on the rise. But is this really the case? You may be surprised….
In fact, if you look at the hard facts, firearms homicides and other gun-related crimes have been decreasing for decades. That’s right — gun crimes are down significantly over the past twenty years. Since 1993, in the USA, the number of homicides committed with guns has dropped 39% even while gun ownership rates have increased. The number of “all other” crimes with firearms has dropped 69% in the same period. And the number of fatal gun accidents has declined 58% in the past two decades — that’s a big change.
The numbers don’t lie — over the past twenty years, there has been a significant reduction in actual gun-related crime while gun ownership levels have increased. But despite all this evidence that gun-related crimes have declined precipitously in the past two decades, 56% of Americans have the mistaken notion that gun crime is on the rise. Could that be because mainstream media outlets conveniently ignore the facts?
Actual, verified gun crime trends (based on Federal crime statistics) have been presented in an interesting “infographic” chart prepared by the NSSF. Click on the illustration at right to see the full-size version with data charts.
Daily Bulletin readers often tell us: “I saw a story in the Bulletin a while back, but I can’t find it now. How do I locate it?” In addition, some folks say: “There’s a Bulletin article that I want to share on my Facebook page. How do I do that?”
How to Use Search Features
Take heart, readers. There are quick and easy ways to locate (and share) Daily Bulletin Posts. First, on the right side of the Bulletin you can select stories by topic (e.g. Reloading) or by date. You can also use our SEARCH TOOL. Go to the top right-hand corner of the page, type your search term then click the RED SEARCH BUTTON. This will instantly search over 5,000 Daily Bulletin stories. Matching articles will appear in chronological order, with the newest articles at the top. For best results, try to be pretty specific in your search, and avoid common terms such as “bullet”, “rifle”, “barrel” etc. that may appear in hundreds of articles.
How to Share Daily Bulletin Articles on Facebook, Twitter, and Other Sites
Let’s say you’ve found an interesting article or gear review in the Daily Bulletin that you would like to share on your Facebook page or other social media sites. Or maybe you’d like to email the article URL (web address) to a shooting buddy so he could read the story too. It’s easy to share a story. Simply click on the small RED-ORANGE BOX at the end of the article marked “Share”. This will open up a small window with multiple choices. With your mouse, select “Facebook” to share on your Facebook page. Or, click the “email” or “gmail” icons to email the article’s web URL to your friends.
If you merely want to save the article URL (i.e. its web location), right click on the “Permalink” button at the bottom left of the article frame (look for the dark blue-gray border). When you right click, you’ll see a pull-down menu. Select “Copy Link Address”. Then you can paste this link anywhere you like, using the paste command (CTRL-P on a Windows computer).
A $10 million-dollar CDC report ordered by President Obama determined that victims of crime who were armed with a firearm suffered fewer injuries than crime victims who were un-armed.
Well, at least the CDC came up with the right answer, but we’re flabbergasted at the cost of this study. Dustin Ellermann, past Top Shot Champion, comments: “$10,000,000 to discover the obvious… [at least] maybe now the anti-gunners will stop yelling ‘If you have a gun it will most likely be used against you!'”
According to Texas Fish & Game Blog, the CDC Report, entitled Priorities For Research to Reduce the Threat of Firearm-Related Violence, reveals that “studies that directly assessed the effect of actual defensive uses of guns (i.e., incidents in which a gun was ‘used’ by the crime victim in the sense of attacking or threatening an offender) have found consistently lower injury rates among gun-using crime victims compared with victims who used other self-protective strategies.”
Here are some comments on a related NewsMax.com story about the CDC report:
I am glad that an official Obama research project shows the same thing that Professor Gary Kleck found in his research about 20 years ago. Professor Kleck found that an honest citizen that had a gun saved himself from death more than 1 million times a year and often did not have to fire a shot. Usually when the crook saw that the citizen was armed that was the end of it.
Why does our government have to spend millions of dollars to do a study to find out what everyone else on earth in the history of man has already known?
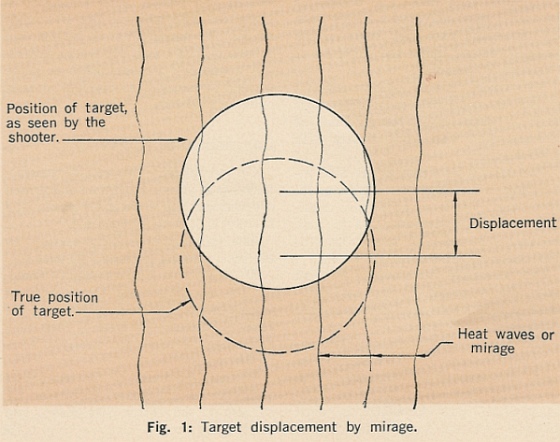
There was an excellent article about Mirage on the South Texas Marksmanship Training Center (STMTC) website. This article explains what causes mirage and how mirage can move the perceived aiming point on your target. Most importantly, the article explains, in considerable detail, how you can “read” mirage to discern wind speeds and wind directions. With simple but effective graphic illustrations, this is one of the best explanations of mirage (and mirage reading) we have found on the internet. This is a “must-read” for any serious competitive shooter. Here is a brief sample from the article, along with an illustration. NOTE: the full article is six times longer and has 8 diagrams.
The term “mirage” as used by the shooter does not refer to a true mirage, but to heat waves and the refraction of light as it is bent passing through air layers of different density. Light which passes obliquely from one wind medium to another it undergoes an abrupt change in direction, whenever its velocity in the second medium is different from the velocity in the first wind medium; the shooter will see a “mirage”.
The density of air, and therefore its refraction, varies with its temperature. A condition of cool air overlaying warm air next to the ground is the cause of heat waves or “mirage”. The warm air, having a lower index of refraction, is mixed with the cooler air above by convection, irregularly bending the light transmitting the target image to the shooter’s eye. Figure 1 shows (greatly exaggerated) the vertical displacement of the target image by heat waves.
Heat waves are easily seen with the unaided eye on a hot, bright day and can be seen with spotting scope on all but the coldest days. To observe heat waves, the scope should be focused on a point about midway to the target. This will cause the target to appear slightly out of focus, but since the high power rifle shooter generally does not try to spot bullet holes, the lack in target clarity is more than compensated by clarity of the heat waves.
Mirage Is Your Friend
While hot days with lots of mirage can be frustrating, mirage can reveal how the wind is flowing (and changing). If you learn how to recognize and read mirage patterns, you can use that information to shoot higher scores. That’s why many leading long-range shooters tell us: “Mirage is your friend.” As the STMTC article explains: “A mirage condition is not a handicap, since it offers a very accurate method of perceiving small wind changes[.]”
Story tip from Boyd Allen. We welcome reader submissions.
In our Shooters’ Forum, one member posed the question: “What makes an AR accurate? What parts on an AR can really affect accuracy — such as free-floating handguards, barrels, bolts, bolt carriers?” He wanted an honest, well-informed answer, not just sales pitches. Robert Whitley posted a very comprehensive answer to this question, based on his experience building and testing dozens of AR-platform rifles. Robert runs AR-X Enterprises, which produces match-grade uppers for High Power competitors, tactical shooters, and varminters.
Building an Accurate AR — What is Most Important
by Robert Whitley
There are a lot of things that can be done to an AR to enhance consistent accuracy, and I use the words “consistent accuracy” because consistency is a part of it (i.e. plenty of guns will give a couple great 5-shot groups, but won’t do a very good 10- or 20-shot groups, and some guns will shoot great one day and not so good on others).
Here are things we think are important to accuracy.
1. Great Barrel: You’ll want a premium match-grade barrel, well-machined with a good crown and a match-type chambering, true to the bore and well cut. The extension threads must also be cut true to the bore, with everything true and in proper alignment.
2. Rigid Upper: A rigid, heavy-walled upper receiver aids accuracy. The typical AR upper receiver was made for a lightweight carry rifle and they stripped all the metal they could off it to make it light to carry (which is advantageous for the military). The net result are upper receivers that are so thin you can flex them with your bare hands. These flexible uppers are “strong enough” for general use, but they are not ideal for accuracy. Accuracy improves with a more rigid upper receiver.
3. True Receiver Face: We’ve found that truing the receiver face is valuable. Some may argue this point but it is always best to keep everything related to the barrel and the bore in complete alignment with the bore (i.e. barrel extension, bolt, upper receiver, carrier, etc.).
4. Barrel Extension: You should Loctite or glue the barrel extension into the upper receiver. This holds it in place all the way front to back in the upper receiver. Otherwise if there is any play (and there typically is) it just hangs on the face of the upper receiver completely dependent on the face of the upper receiver as the sole source of support for the barrel as opposed to being made more an integral part of the upper receiver by being glued-in.
5. Gas Block: You want a gas block that does not impose pointed stress on the barrel. Clamp-on types that grab all the way around the barrel are excellent. The blocks that are pinned on with tapered pins that wedge against the barrel or the slip on type of block with set screws that push up from underneath (or directly on the barrel) can deform the bore inside of the barrel and can wreck the accuracy of an otherwise great barrel.
6. Free-Float Handguard: A rigid, free-float handguard (and I emphasize the word rigid) really makes a difference. There are many types of free-float handguards and a free-float handguard is, in and of itself, a huge improvement over a non-free-float set up, but best is a rigid set-up. Some of the ones on the market are small diameter, thin and/or flexible and if you are shooting off any type of rest, bipod, front bag, etc., a rigid fore-end is best since ARs want to jump, bounce and twist when you let a shot go, as the carrier starts to begin its cycle before the bullet exits the bore.
7. Barrel Contour: You want some meat on the barrel. Between the upper receiver and the gas block don’t go real thin with a barrel (we like 1″ diameter if it’s workable weight-wise). When you touch off a round and the bullet passes the gas port, the gas system immediately starts pressuring up with a gas impulse that provides vibrations and stress on the barrel, especially between the gas block back to the receiver. A heavier barrel here dampens that. Staying a little heavier with barrel contour through the gas block area and out to the muzzle is good for the same reasons. ARs have a lot going on when you touch off a round and the gas system pressures up and the carrier starts moving (all before the bullet exits the bore) so the more things are made heavier and rigid to counteract that the better — within reason (I’m not advocating a 12-lb barrel).
8. Gas Tube Routing Clearance: You want a gas tube that runs freely through the barrel nut, through the front of the upper receiver, and through the gas key in the carrier. Ensure the gas tube is not impinged by any of them, so that it does not load the carrier in a stressed orientation. You don’t want the gas tube bound up so that when the gas tube pressures up it immediately wants to transmit more force and impulse to the barrel than would normally occur. We sometimes spend a lot of time moving the gas block with gas tube on and off new build uppers and tweaking gas tubes to get proper clearance and alignment. Most gas tubes do need a little “tweaking” to get them right — factory tubes may work OK but they typically do not function optimally without hand-fitting.
9. Gas Port Tuning: You want to avoid over-porting the gas port. Being over-gassed makes the gas system pressure up earlier and more aggressively. This causes more impulse, and increases forces and vibration affecting the top end and the barrel. Tune the gas port to give the amount of pressure needed to function properly and adequately but no more.
10. Front/Back Bolt Play: If accuracy is the game, don’t leave a lot of front/back bolt play (keep it .003″ but no more than .005″). We’ve seen factory rifles run .012″ to .015″ play, which is OK if you need to leave room for dirt and grime in a military application. However, that amount of play is not ideal for a high-accuracy AR build. A lot of front/back bolt play allows rounds to be hammered into the chamber and actually re-formed in a non-consistent way, as they are loaded into the chamber.
11. Component Quality: Use good parts from a reputable source and be wary of “gun show specials”. All parts are NOT the same. Some are good, some are not so good, and some aftermarket parts are simply bad. Don’t be afraid to use mil-spec-type carriers; by and large they are excellent for an accuracy build. Also, remember that just because a carrier says “National Match” or something else on it does not necessarily mean it’s any better. Be wary of chrome-plated parts as the chrome plating can change the parts dimensionally and can also make it hard to do hand-fitting for fit and function.
12. Upper to Lower Fit: A good upper/lower fit is helpful. For quick and dirty fit enhancement, an Accu-Wedge in the rear helps a lot. The ultimate solution is to bed the upper to a specific lower so that the upper and lower, when together, are more like one integral unit. For the upper receivers we produce, we try to get the specs as close as we can, but still fit the various lowers in the market place.
13. Muzzle Attachments: Don’t screw up the muzzle (literally). Leave as much metal on the barrel at the muzzle as you can. People like to thread the muzzle for a flash hider, suppressor, muzzle brake, or some other attachment, but if you really want accuracy, leave as much metal as you can there. And, if you have something that screws on, set it up so that it can be put on and have it stay there without putting a lot of torque and stress on it right where the bullet exits the bore. If you are going to thread the end of the barrel, make it concentric with the bore and make sure what you screw on there is as well. For all muzzle attachments, also ensure that the holes through which the bullet passes through are dead true to the bore. Many aftermarket screw-on things are not so good that way. Anything that vents gas should vent symmetrically (i.e. if it vents left, it should vent equally right, and likewise, if it vents up, it should vent down equally). Uneven venting of gas can wreck accuracy.
14. Quality Ammunition: Ammo is a whole story by itself, but loads that are too hot typically shoot poorly in an AR-15. If you want accuracy out of an AR-15, avoid overly hot loads. Shown below are test groups shot with four (4) different uppers, all with moderate loads. These four uppers all pretty much had the same features and things done to them as explained in this article, and they all shot great.
In an article for the CMP Online Magazine, SSG Tobie Tomlinson of the USAMU Service Rifle Team explains the various sight alignments employed by iron sights shooters. Tobie writes: “There are a myriad of sight picture options that shooters have used to great effect over the years. The sight picture that allows you to consistently shoot the smallest group, with a minimal shift in zeros, is the correct one. Remember, for any shooter to be successful, consistent sight picture must be complemented by front sight focus and sight alignment.”
Center Hold
The front sight is placed directly in the center of the target. A center hold is great in different light conditions. On a bright day the target appears small. On a dark day the target appears large. In [any] light conditions the center of the target is always in the center. A shooter who has problems with elevation shots in various light conditions may benefit from a center hold.
6 O’Clock Hold
With the 6 O’Clock hold the front sight is placed at the bottom of the aiming black. For many shooters, this hold allows precision placement of the front sight. The ability to accurately call your shots will come with time and experience. Light changes, which alter the appearance of the target, may affect shooters who utilize the 6 O’Clock hold.
Sub 6 Hold
The sub 6 is just like the 6 O’Clock hold, only there is a small line of white between the front sight and the aiming black. Many shooters have a problem determining the exact 6 O’Clock position with their front sight, but by using a sub 6 or line of white they may be able to better estimate their hold.
Frame Hold
With the frame hold, just like with the other holds, the front sight is in the center of the rear sight. The front sight can then be placed at the 6 or 12 O’Clock position on the frame when there is no visible aiming point. This hold is typically reserved for foul weather and poor light conditions. By placing the front sight at the top or bottom of the frame, a shooter may hold better when there is little target to see. It can be difficult to hold a tight group this way, but it may add more hits in bad conditions. This technique is normally applied when shooting longer ranges such 600 or 1000 yards.
The June, 2013 Edition of Target Shooter Magazine is now available online, in PDF format. This month’s issue contains gear reviews, match reports, and a feature on handloading for the .204 Ruger cartridge. As ever, Target Shooter boasts plenty of great, large-format photos. Optics get considerable play this month with a comparison test of spotting scopes by Richard Utting, and an in-depth review of the Vortex Razor HD 5-20x50mm riflescope by Chris Parkin. There’s plenty of great reading material this month — and it’s all free to read online. (Be patient while downloading the PDF file).
Laurie Holland has authored two major articles in the June issue of Target Shooter Magazine. First, Laurie reviews the latest “Mk. 2″ version of Seb Lambang’s joy-stick bipod. Laurie found that Seb’s new “Joy-Pod” was beautifully built and performs “as advertised”. Laurie writes: “The coarse leg adjustment using the ratchet lock is excellent, allowing quick and easy set-up. The overall stability was better than on the Mk.1 — provided I loaded the butt slightly to push the bi-pod forwards and take up the small amount of slack that shows in the mechanism/joystick-head. I thought the Mk.1 prototype was a winner/game-changer. The Mk.2 is a further and noticeable improvement on that.”
Laurie has also compiled a very authoritative feature story on reloading for the .204 Ruger cartridge. Laurie discusses the available brass, powder, and projectile options for this popular cartridge. Laurie also includes Ballistics tables so you can compare performance with various loads. If you own a .204 Ruger rifle, or plan to get one, Laurie’s .204 Ruger story is definitely a “Must-Read”. This is Part One of a two-part series by Holland.
Many of our readers travel far and wide during summer months, both on family vacations and to participate in shooting matches. When transporting firearms across state lines, it is vital to understand the laws and regulations that apply in each jurisdiction. Moreover, all of us need to stay informed about gun laws in our home states, since new laws are passed every year.
Indiana attorney Brian Ciyou has created an outstanding resource, Gun Laws by State (2013 Ed.) (GLBS), that explains firearms laws in all 50 states. Ciyou’s gun law treatise, available in both book and online (web) formats, covers state laws as well as key federal laws that apply in federal buildings, airports, National Parks, and school zones. There is a handy Reciprocity Map showing which states recognize concealed weapon permits issued in other jurisdictions. GLBS covers Reciprocal Carry for all 50 states, Constitutional Law, Federal Statutory Law, Use of Force, Criminal Provisions, Civil and Criminal Liability, Preemption, Federal Property Rules, and Interstate Transportation.
Amazingly, you can access all this important legal information for FREE on the GLBS website. Click on an interactive map to quickly review gun laws in any state. Navigation links provide quick access to particular topics, such as rules for Airline Travel, Amtrak, National Parks, and Federal properties. The web version of Gun Laws by State is updated regularly, and Ciyou even provides a GLBS Gun Laws Blog with current “news and views” on gun regulations nationwide. This Editor regularly references the Gun Laws by State website. I suggest readers bookmark the site, and consider buying the book if you frequently travel with firearms outside your home state. The printed book version costs $19.95, while a digital eBook is $9.95. Click here to purchase GLBS books and eBooks.


 Months ago, we reported on the new, .17 Winchester Super Magnum (Win Super Mag or WSM) rimfire cartridge. Able to drive a 20gr bullet over 3000 fps, this new .17 Win Super Mag raises the bar for rimfire cartridges. The .17 WSM shoots faster, flies flatter, and bucks the wind better than a .17 HMR.
 Building your own portable shooting bench is a great do-it-yourself project. You can build a sturdy bench for well under $100 in materials. Compare that to some deluxe factory-built benches which may cost $500.00 or more.


 Daily Bulletin readers often tell us: “I saw a story in the Bulletin a while back, but I can’t find it now. How do I locate it?” In addition, some folks say: “There’s a Bulletin article that I want to share on my Facebook page. How do I do that?”
 A $10 million-dollar CDC report ordered by President Obama determined that victims of crime who were armed with a firearm suffered fewer injuries than crime victims who were un-armed.


 5. Gas Block: You want a gas block that does not impose pointed stress on the barrel. Clamp-on types that grab all the way around the barrel are excellent. The blocks that are pinned on with tapered pins that wedge against the barrel or the slip on type of block with set screws that push up from underneath (or directly on the barrel) can deform the bore inside of the barrel and can wreck the accuracy of an otherwise great barrel.


 Center Hold
 6 O’Clock Hold
 Sub 6 Hold
 Frame Hold
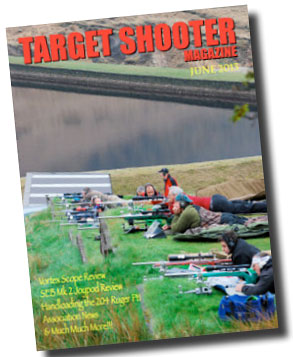 The June, 2013 Edition of


