To get the best accuracy out of any benchrest rifle, you need to find the optimal position of front rest and rear bag. The important point to remember is that each rig is different. One gun may perform best with the front rest right at the tip of the forearm (Position ‘D’ in photo), while another gun will work best with the rest positioned much further back. This Editor’s own 6mmBR rifle has a laminated stock that is pretty flexy in the front. It shoots best with the front rest’s sandbag located a good 6″ back from the forearm tip (position ‘A’).
Here’s some benchrest advice that can help you reduce vertical and shoot tighter groups… without spending another penny. Many benchrest shooters spend a fortune on equipment and devote countless hours to meticulous handloading, but they never experiment with their rifle’s position/balance on the bags. This article explains why you should test your rifle in various positions. What you learn may surprise you (and improve your scores).
Next time you go to the range, experiment with the position of your rifle on the front rest, and try a couple different positions for the rear bag. You may find that the rifle handles much better after you’ve made a small change in the placement of your gun on the bags. Recoil can be tamed a bit, and tracking can improve significantly, if you optimize the front rest and rear bag positioning.
This competitor has the front rest positioned fairly far forward but not all the way out. Note the stop on the front rest — this limits forward stock travel.
A small change in the position of the forearm on the front rest, or in the placement of the rear bag, can make a big difference in how your gun performs.
Balance Your Gun BEFORE You Spend Hours Tuning Loads
In the pursuit of ultimate accuracy, shooters may spend countless hours on brass prep, bullet selection, and load tuning. Yet the same shooters may pay little attention to how their gun is set-up on the bags. When you have acquired a new rifle, you should do some basic experimentation to find the optimal position for the forearm on the front rest, and the best position for the rear bag. Small changes can make a big difference.
Joel Kendrick, past IBS 600-yard Shooter of the Year, has observed that by adjusting forearm position on the front rest, he can tune out vertical. He has one carbon-fiber-reinforced stock that is extremely rigid. When it was placed with the front rest right under the very tip of the forearm, the gun tended to hop, creating vertical. By sliding the whole gun forward (with more forearm overhang ahead of the front sandbag), he was able to get the whole rig to settle down. That resulted in less vertical dispersion, and the gun tracked much better.
Fore/aft stock position is important even with very wide fore-ends.
Likewise, the placement of the rear bag is very important. Many shooters, by default, will simply place the rear bag the same distance from the front rest with all their guns. In fact, different stocks and different calibers will NOT behave the same. By moving the rear bag forward and aft, you can adjust the rifle’s overall balance and this can improve the tracking significantly. One of our shooters had a Savage 6BR F-Class rifle. By default he had his rear bag set almost all the way at the end of the buttstock. When he slid the rear bag a couple inches forward the gun tracked much better. He immediately noticed that the gun returned to point of aim better (crosshairs would stay on target from shot to shot), AND the gun torqued (twisted) less. The difference was quite noticeable.
A small change in the position of the forearm on the front rest, or in the placement of the rear bag, can make a big difference in how your gun performs. You should experiment with the forearm placement, trying different positions on the front rest. Likewise, you can move the rear bag back and forth a few inches. Once you establish the optimal positions of front rest and rear bag, you should find that your gun tracks better and returns to battery more reliably. You may then discover that the gun shoots smaller groups, with less vertical dispersion. And all these benefits are possible without purchasing any expensive new gear.
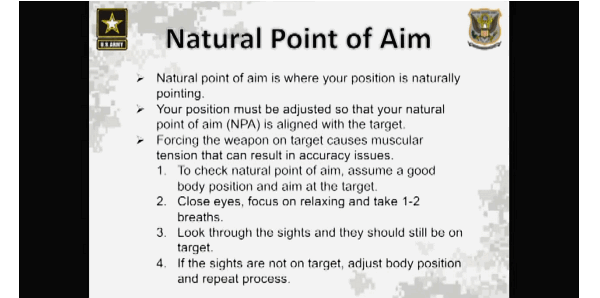
The U.S. Army Marksmanship Unit (USAMU) has produced an excellent series of videos covering the Basic Rifleman’s Course. If you are getting started in High Power shooting, or want to improve your position shooting skills, this series is well worth watching. And these videos are not just for service rifle shooters — even bench shooters can benefit from these videos, particularly Part 5, which explains how to estimate wind speed and direction. The lead instructor for these videos is SFC Brandon Green, three-time National High Power Champion, and 2017 Service Rifle Champion. When SFC Green talks, you should listen.
SFC Brandon Green is a shooting superstar. Green won his third NRA National High Power Rifle Championship in 2018 at Camp Atterbury, Indiana. He dominated the HP Championship cycle, finishing eight points and ten Xs ahead of his nearest competitor. Brandon also won High Power National Championships in 2015 and 2013. One of the greatest marksmen in the nation’s history, SFC Green excels at all positions, both rapid-fire and slow-fire.
Part 5 — Wind and Weather Estimation (Very Useful for All Shooters)
Note: This video includes a hit location “target analysis” in the first 6 minutes.
Part 4 — Minute of Angle Explained
Part 3 — Ballistics and Zeroing
Part 2 — Positions, Sight Alignment, and Natural Point of Aim (Very Useful)
Part 1 — Aiming and Sight Picture
SFC Brandon Green (left above) has set multiple National Records at Camp Perry.
Precision Rifle Challenge on Shooting USA This Week
This week, Shooting USA TV features a show that should interest PRS/NRL fans, tactical marksmen, and long range hunters. Run in Utah’s backcountry, the Hornady Precision Rifle Challenge is a unique long range competition with serious wind and elevation changes.
This isn’t a typical PRS Pro Series match by any means. Participants in this challenging Precision Rifle match encounter tough conditions not typically seen in other tactical matches.
This video is great — lots of equipment closeups, stage set-ups, plus drone footage of range.
This Shooting USA episode airs Wednesday, February 24, 2021, at 9:00 PM Eastern (8:00 PM Central) on the Outdoor Channel. If you miss that, it runs again on Thursday afternoon. In addition, you can watch all episodes of Shooting USA on the VIMEO channel by subscription. Each episode is just $0.99.
Former Army Ranger sniper instructor Ryan Cleckner is the author of the best-selling Long Range Shooting Handbook. Cleckner hosts a series of videos that cover shooting techniques appropriate for tactical and PRS-type disciplines. Here are five short videos that cover various aspects of shooting techniques and rifle set-up. We think PRS/NRL competitors (and long-range hunters) can benefit from these videos.
“Consistency is the key to accuracy.
You need to think about a system of how you’re going to shoot that is not only comfortable, but [is] repeatable when you’re shooting.” — Ryan Cleckner
In this first video, Cleckner explains proper scope position. Ryan finds that some shooters place the scope too far forward or too far rearward. If the scope is too far back you may have issues with eye relief and stock reach to shoulder. If it is too far forward, you may have cheek-weld problems or get neck strain.
Cleckner offers a simple method to check your scope position: “To see if your scope is set up properly … close your eyes, lay your head on your gun, get completely comfortable, and only when you are set-up, then open your eyes. If you can’t see clearly through your scope, CHANGE something [such as comb height or scope position]”. “When you open your eyes, if you see some scope shadow [i.e. the black ring around the edge of the scope picture], figure out which way you need to move your head to get rid of that shadow, and then make adjustments to either your position, the rifle, or the scope.”
Cleckner prefers shooting off a bag when in the prone position, when that is practical. The bag provides a more stable support than a small Harris-type bipod, doesn’t require pre-loading the rifle, and there is less bounce or hop on recoil.
Former Army Ranger sniper team leader Ryan Cleckner explains how important it is to keep your rifle straight up and down when long-range precision shooting. Cleckner demonstrates with an AR-10 modern sporting rifle how slight cant to your rifle can cause a miss over long distances.
Here Cleckner covers some of the basic points of trigger control on tactical-style rifles. These basic principles apply to both single-stage and two-stage triggers. NOTE: For benchrest rigs, with ultra-light pull weights, more refined techniques may be appropriate.
In tactical events, when you’re shooting on the clock and loading from a detachable magazine, you should manipulate the bolt smoothly but strongly. Here Cleckner demonstrates how to cycle a tactical-type rifle. He says, “You should be running the bolt on your rifle with authority. Run it like you mean it!” NOTE: Completely different techniques are appropriate for custom benchrest rifles that manually feed.
Long Range Shooting Handbook — A Good Resource
Cleckner’s Long Range Shooting Handbook covers a wide range of topics important for precision marksmanship — both shooting skills and technical matters. You can view Sample Chapters from Ryan’s Book on Amazon.com. Cleckner’s book is designed as an intro to key concepts such as MOA vs. Mils, External Ballistics, and Environmental Effects. Included are personal tips and advice based on Cleckner’s years of experience as a sniper instructor and special operations sniper.
The Long Range Shooting Handbook is divided into three main categories: What It Is/How It Works, Fundamentals, and How to Use It. “What It Is/How It Works” covers equipment, terminology, and basic principles. “Fundamentals” covers the theory of long range shooting. “How to Use It” gives practical advice on implementing what you’ve learned, so you can progress as a skilled, long range shooter.
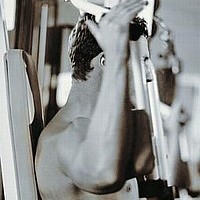
In the archives of The First Shot (the CMP’s Online Magazine), SGT Walter E. Craig of the USAMU discusses physical conditioning for competitive shooters, particularly High Power competitors. Fitness training is an important subject that, curiously, is rarely featured in the shooting sports media. We seem to focus on hardware, or esoteric details of cartridge reloading. Yet physical fitness also matters, particularly for High Power shooters. In his article, Craig advocates: 1) weight training to strengthen the Skeletal Muscle System; 2) exercises to build endurance and stamina; and 3) cardiovascular conditioning programs to allow the shooter to remain relaxed with a controlled heart beat.
SGT Craig explains: “An individual would not enter a long distance race without first spending many hours conditioning his/her body. One should apply the same conditioning philosophy to [shooting]. Physical conditioning to improve shooting skills will result in better shooting performance[.] The objective of an individual physical training program is to condition the muscles, heart, and lungs thereby increasing the shooter’s capability of controlling the body and rifle for sustained periods.”
In addition to weight training and cardio workouts (which can be done in a gym), SGT Craig advocates “some kind of holding drill… to develop the muscles necessary for holding a rifle for extended periods.”
For those with range access, Craig recommends a blind standing exercise: “This exercise consists of dry-firing one round, then live-firing one round, at a 200-yard standard SR target. For those who have access only to a 100-yard range, reduced targets will work as well. Begin the exercise with a timer set for 50 minutes. Dry-fire one round, then fire one live round and without looking at the actual impact, plot a call in a data book. Continue the dry fire/live fire sequence for 20 rounds, plotting after each round. After firing is complete, compare the data book to the target. If your zero and position are solid, the plots should resemble the target. As the training days add up and your zero is refined, the groups will shrink and move to the center.”
Fitness training and holding drills help position shooters reach their full potential.
Training for Older Shooters
Tom Alves has written an excellent article A Suggested Training Approach for Older Shooters. This article discusses appropriate low-impact training methods for older shooters. Tom explains: “Many of the articles you will read in books about position shooting and the one mentioned above are directed more toward the younger generation of shooters in their 20s. If you look down the line at a typical high power match these days you are likely to see quite a few folks who are in their middle 30s and up. Many people in that age range have had broken bones and wear and tear on their joints so a training program needs to take that into account. For instance, while jogging for an extended period for heart and lung conditioning may be the recommended approach for younger folks, it may be totally inappropriate for older people.”
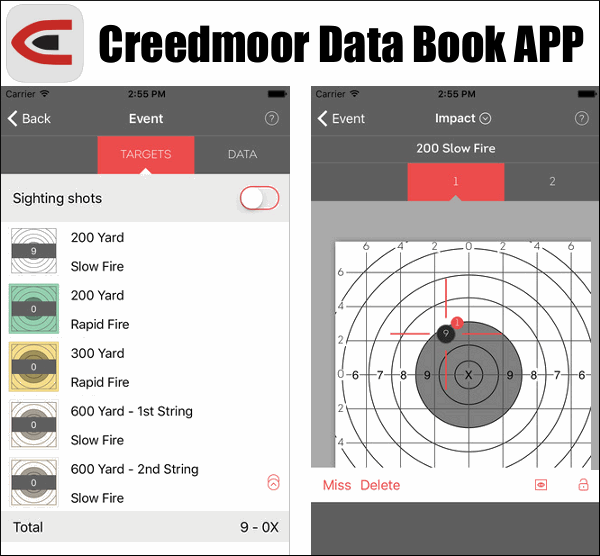
Tired of carrying old-fashioned paper Score Books? Well now you can go digital — Creedmoor Sports offers a full-featured Scoring Book App that lets you plot your shot locations/scores using an Android device or Apple iPhone or iPad. The price is right — FREE! Just visit the Apple App Store or Google Play Store to download the App for FREE.
Record Match and Practice Data
This new App, available for free in the Apple App Store, and the Google Play Store provides all the same functions and capabilities of the traditional, spiral-bound print-format Creedmoor Rifle Data/Score Book, but with the convenience and ease of recording your match and practice information with your mobile device. With this App you can break your 20 shot slow-fire segments into either 10- or 20-shot targets, and also opt for sighting shots. All the specific event data can also be recorded, such as location, wind, light etc., along with wind and elevation adjustments.
COMMUNICATIONS Restrictions: In some matches you are not allowed to have electronic communication ability, so you may have to set your iPhone to “Airplane Mode”, or use this only with an iPod (which does not have two-way communication capability).
Note: This article was written by Glen Zediker. Sadly, Glen passed away in October of 2020. However, you can still order his books from Midsouth and read his articles in the Midsouth Blog.
Most good shooters use mirage as their leading indicator to spot changes in the wind. With well-designed stand, the scope can be set it up where you can see the wind with the left eye and see the sight with the right without anything more than a visual focus shift. That gets the shooter back on the trigger with the least chance of missing another change. In the photo below e you can see 11-time National High Power Champion David Tubb using a spotting scope set up for his left eye.
David Tubb sets up his spotting scope so he can easily see through it with his LEFT eye, without shifting his head and body position.
There are multiple resources that give clues or evidence of wind direction and strength: wind flags, observation of grass and trees, and mirage.
Almost always I use mirage as my leading indicator. Mirage (heat waves) is always present but you’ll need a scope to read it. For 600 yards I focus my scope about halfway to the target. Mirage flows just like water and the currents can be read with respect to wind speed as well, but it’s not clearly accurate beyond maybe a 15 mph speed. The thing is that mirage shows changes, increases or decreases, and also direction shifts, really well.
A couple more things about mirage flow: when mirage “boils,” that is appears to rise straight up, either there’s no wind or the scope is dead in-line with wind direction. And that’s a quick and accurate means to determine wind direction, by the way, move the scope until you see the boil and note the scope body angle. Here’s another tip — the boil can predict when a “fishtail” wind is about to change, a boil precedes a shift.
You don’t need to spend big bucks for an effective spotting scope to view mirage. You can get the Vortex 20-60x60mm Diamondback angled spotting scope for just $399.99 from Midsouth. That’s complete with 20-60X zoom eyepiece. Though inexpensive, the Vortex Diamondback is popular with many competitive shooters and hunters. No, it doesn’t offer the sharpness of an 80mm Kowa Prominar or Swarovski spotting scope, but you’ll pay $2400+ just for the body of those high-end optics.
Choice of EyePiece — Wide-Angle LERs Work Well
I use a long-eye-relief 20X to 25X wide-angle eyepiece. That setup shows the flow best. And pay attention to where the wind is coming from! See what’s headed your way, because what’s passed no longer matters. That’s true for any indicator. Right to left wind? Read off the right side of the range.
Once I get on target then all I am doing is watching for changes. It’s really uncommon to make a big adjustment between shots. The fewer condition changes you are enduring, the easier it is to keep everything on center. That’s why I shoot fast, and why I start at the low point in a wind cycle.
Making Corrections with Limited Sighters
Here’s a Tip for NRA High Power matches where only two sighters are allowed: “Make a full correction off the first sighting shot location! Even if there are minor changes afoot, that’s how to know how well you assessed condition influence pre-shot. Don’t second-guess. After the second sighter you should be on target and then simply watching for changes. Pay attention, correlate visible cues to the results of prior shots, and if in doubt, click into the wind.”
Information in this article was adapted from material in several books published by Glen Zediker and Zediker Publishing. Glen, who passed away in 2020, was an NRA High Master who earned that classification in NRA High Power Rifle using an AR15 Service Rifle. For more information and articles visitZedikerPublishing.com.
TALLADEGA SPRING CLASSIC (March 16-21, 2021)
The show goes on at Talladega! Next month the CMP will host a series of rifle and pistol matches at the CMP Talladega Marksmanship Park in Alabama. The March 2021 Spring Classic event at Talladega includes a mix of both new and traditional rifle matches, along with pistol competitions, and training courses. There will be many new events not previously held at Talladega. CLICK HERE for full details.
NEW EVENTS include First-Ever Benchrest Garand Match
The Talladega Spring Classic will feature traditional matches plus innovative NEW EVENTS. Debuting this year (for the first time at Talladega) will be a Benchrest Garand Match, Mid-Range 3×600 Rifle Match, and Pistol 2700 Match. Along with the new events, there will be CMP staple events including Rimfire Sporter Rifle Match, .22 Rimfire Pistol EIC, Service Pistol EIC, and GSMM (Garand/Springfield/Vintage and Modern Military) Rifle matches.
There will also be multiple training sessions including: Long Range Rifle Clinic, Team CMP 600-Yard Clinic, Rifle Marksmanship 101 Course/M16 Match, and Pistol Marksmanship 101 Course/M9 Match. These classes allow participants the opportunity to learn marksmanship from skilled, certified instructors.
COOL VIDEO — This 22-second drone video shows the Talladega Rifle Range — Worth watching!
Electronic Targets + No Pit Duty = More Fun
Competitors will be firing all matches on electronic targets for pistol and rifle matches. Each firing point of the 500-acre facility is equipped with a state-of-the-art, KTS electronic target and scoring monitor. Located beside the shooter, on the firing line, each monitor allows the competitor to see his/her shot value in a matter of seconds. Spectators can view the results in real time on large monitors.
Off of the firing line, the Club House holds a fully-stocked Pro Shop that includes a collection of rifles, ammunition, marksmanship accessories and CMP memorabilia.
NOTE Regarding Health and Safety: Although it is CMP’s hope to hold our upcoming events, please keep in mind that we may have to cancel due to COVID-19 issues. For those events that we do conduct, we will follow the appropriate state’s guidelines and recommendations. We continue to monitor the venue states’ guidelines and adjust our procedures based on those guidelines and common sense. As always, the safety of our customers and employees is our priority.
The Civilian Marksmanship Program (CMP) now offers Podcasts! The CMP will release a series of informative Audio Podcasts throughout 2021 (and beyond). This is part of the effort to help shooters improve their skills and learn more about the shooting sports.
Podcast episodes will cover a variety of topics, including CMP facilities and upcoming competitions. There will also be interviews with top shooters and shooting sports industry professionals. The first Podcast was released on 1/23/2021. In that episode, Brad Donoho, CMP smallbore manager, talks about the history of CMP Smallbore Rifle Competition and how the program has evolved. Click below to listen. The next Podcast (Coming Soon) will cover the Talladega Marksmanship Park.
PODCAST TOPICS Wanted – If you have topics you would like to see covered on the CMP podcasts, or specific questions answered, contact Ashley at abrugnone@thecmp.org. She will pass on your comments to the programming team.
Among other topics, Marksmanship training will be covered on the podcasts
One of the most important responsibilities of the CMP is to train and educate citizens. Since 1996, the CMP has implemented new ways of fulfilling this purpose through additional programs, competitions and publications. For 2021, the CMP introduces the new CMP Podcast series, with the goal of increasing Marksmanship knowledge through the USA.
The CMP runs pistol competitions as well as rifle events.
About the Civilian Marksmanship Program
The Civilian Marksmanship Program is a federally chartered 501(c)(3) non-profit corporation dedicated to firearm safety and marksmanship training and to the promotion of marksmanship competition. For more information about CMP programs, visit TheCMP.org.
Some folks say you haven’t really mastered marksmanship unless you can hit a target when standing tall ‘on your own hind legs’. Of all the shooting positions, standing can be the most challenging because you have no horizontally-solid resting point for your forward arm/elbow. Here 10-time National High Power Champ Carl Bernosky explains how to make the standing shot.
Carl Bernosky is one of the greatest marksmen in history. A multi-time National High Power Champion, Carl has won ten (10) National High Power Championships in his storied shooting career, most recently in 2012. In this article, Carl provides step-by-step strategies to help High Power shooters improve their standing scores. When Carl talks about standing techniques, shooters should listen. Among his peers, Carl is regard as one of the best, if not the best standing shooter in the game today. Carl rarely puts pen to paper, but he was kind enough to share his techniques with AccurateShooter.com’s readers.
If you are position shooter, or aspire to be one some day, read this article word for word, and then read it again. We guarantee you’ll learn some techniques (and strategies) that can improve your shooting and boost your scores. This stuff is gold folks, read and learn…
How to Shoot Standing by Carl Bernosky
Shooting consistently good standing stages is a matter of getting rounds down range, with thoughtfully-executed goals. But first, your hold will determine the success you will have.
1. Your hold has to be 10 Ring to shoot 10s. This means that there should be a reasonable amount of time (enough to get a shot off) that your sights are within your best hold. No attention should be paid to the sights when they are not in the middle — that’s wasted energy. My best hold is within 5 seconds after I first look though my sights. I’m ready to shoot the shot at that time. If the gun doesn’t stop, I don’t shoot. I start over.
2. The shot has to be executed with the gun sitting still within your hold. If the gun is moving, it’s most likely moving out, and you’ve missed the best part of your hold.
3. Recognizing that the gun is sitting still and within your hold will initiate you firing the shot. Lots of dry fire or live fire training will help you acquire awareness of the gun sitting still. It’s not subconscious to me, but it’s close.
4. Don’t disturb the gun when you shoot the shot. That being said, I don’t believe in using ball or dummy rounds with the object of being surprised when the shot goes off. I consciously shoot every shot. Sometimes there is a mistake and I over-hold. But the more I train the less of these I get. If I get a dud round my gun will dip.* I don’t believe you can learn to ignore recoil. You must be consistent in your reaction to it.
5. Know your hold and shoot within it. The best part of my hold is about 4 inches. When I get things rolling, I recognize a still gun within my hold and execute the shot. I train to do this every shot. Close 10s are acceptable. Mid-ring 10s are not. If my hold was 8 inches I would train the same way. Shoot the shot when it is still within the hold, and accept the occasional 9. But don’t accept the shots out of the hold.
6. Practice makes perfect. The number of rounds you put down range matter. I shudder to think the amount of rounds I’ve fired standing in my life, and it still takes a month of shooting standing before Perry to be in my comfort zone. That month before Perry I shoot about 2000 rounds standing, 22 shots at a time. It peaks me at just about the right time.
This summarizes what I believe it takes to shoot good standing stages. I hope it provides some insight, understanding, and a roadmap to your own success shooting standing.
— Good Shooting, Carl
* This is very noticeable to me when shooting pistol. I can shoot bullet holes at 25 yards, but if I’ve miscounted the rounds I’ve fired out of my magazine, my pistol will dip noticeably. So do the pistols of the best pistol shooters I’ve watched and shot with. One might call this a “jerk”, I call it “controlled aggressive execution”, executed consistently.


 In the archives of
 Tired of carrying old-fashioned paper Score Books? Well now you can go digital —


 Making Corrections with Limited Sighters


 How to Shoot Standing
 5. Know your hold and shoot within it. The best part of my hold is about 4 inches. When I get things rolling, I recognize a still gun within my hold and execute the shot. I train to do this every shot. Close 10s are acceptable. Mid-ring 10s are not. If my hold was 8 inches I would train the same way. Shoot the shot when it is still within the hold, and accept the occasional 9. But don’t accept the shots out of the hold.


