For today’s Sunday GunDay story we showcase seven interesting metal-chassis rifles. While we love the look and feel of wood and fiberglass, metal does have its advantages. It can be crafted very straight and true, and the designs can achieve a very low center-of-gravity without sacrificing rigidity. In addition, a precisioned machined metal chassis tends to track extremely well.
Massive IBS Heavy Gun Milled from Solid Aluminum Billet
This remarkable 70-lb IBS Heavy Gun, was machined from solid aluminum billet, by Bruce Baer. It rests on a G&G Alvey rest split in the middle to comply with rules. This “heavy metal” CNC-machined wonder is a work of art designed for the 1000-yard game in the Heavy Gun class. Wood stocks, and to a lesser extent fiberglass stocks, are more forgiving, offering greater damping and recoil absorption. However, metal stocks offer superior rigidity, and the CNC machining allows tracking surfaces to be perfectly parallel.
Williamsport limits Heavy Guns to 100 pounds. Under IBS and NBRSA rules weight is unlimited. You will see a few massive 200-lb behemoths at IBS matches, but most competitors find that something in the 60-90 pound range works best. Bruce Baer explains, “You can’t stop a gun from recoiling. If it doesn’t recoil it will jump. If it jumps you might as well go home because you won’t shoot a good group. So it is pointless to try to build a gun so heavy as to eliminate all recoil. The more you restrict the rifle’s recoil the more temperamental that rifle will be. The 200-pounders just don’t out-perform something in the 60- to 80-pound range, and I think the optimal weight is 60-70 pounds.”
Bruce Baer likes the 70-lb overall weight for a heavy gun: “Extreme mass is not necessarily an advantage. Watch a locomotive starting up from zero–it will vibrate from one end to another. If the gun is too heavy I think it will vibrate at the start of recoil and that will kill accuracy. I want the gun to start from recoil with very little effort so it will be smooth from start to stop.”
Water-Cooled World Record-Setting Wondergun
We like “outside of the box” thinking. And in the world of competitive shooting, it can’t get more unconventional than this. But this radical liquid-cooled benchrest rig wasn’t just a crazy experiment — it actually delivered the goods. This IBS Heavy Gun, built by Joel Pendergraft, produced a superb 10-shot, 3.044″ group that stood as an International Benchrest Shooters (IBS) 1000-Yard Heavy Gun record for seven years, not being broken until 2016.
Using this water-cooled wondergun, Joel shot the record-breaking group in April 2009 at Hawks Ridge, NC. This monster features a .30-Caliber 12-twist, 4-groove Krieger barrel inside a water-filled sleeve (like on a liquid-cooled machine gun). Joel shot BIB 187gr flat-based bullets in Norma brass, pushed by a “generous amount” of Alliant Reloder 25 and Federal 210M primers. The cartridge was a big custom wildcat Joel listed as “.300 Ackley Improved”.
Pendergraft’s 3.044″ 10-shot group was a great feat, breaking one of the longest-standing, 1000-yard IBS World Records. And Joel’s 3.044″ record stood for 7 years!
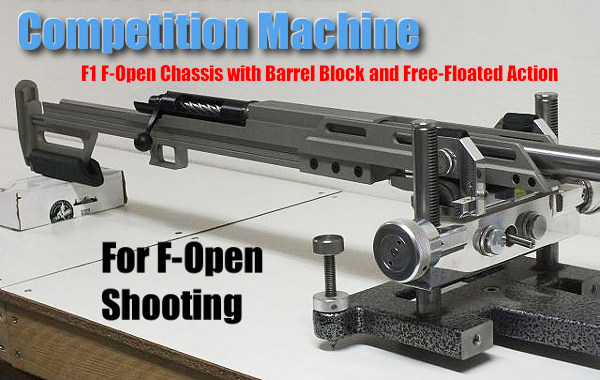
F1 F-Open Chassis from Competition Machine
Along with his famed tube-guns, Gary Eliseo of Competition Machine has designed a modern, low-profile chassis system for F-Open competition. Assembled with Cerakoted aluminum beams, these F1 F-Open chassis systems offer great tracking with an ultra-low center of gravity.
Here is the F1 Chassis with “Marine Corps Red” powder coat finish. Read Full Report.
This F1 aluminum alloy chassis stock features a super-low center of gravity, plus adjustable length of pull, cheek rest, and drop. The stock is available in a wide choice of Cerakote finishes. The current Model F1 chassis features a action block mounting system to fit most actions. There was also an earlier version that had a free-floated action with the barrel in a barrel block, secured with epoxy. Both F1 versions (action block and barrel block) shot great, with excellent performances in competition.
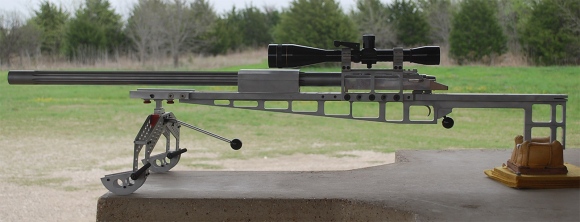
Gen 1 F1 F-Open Chassis System with Barrel Block
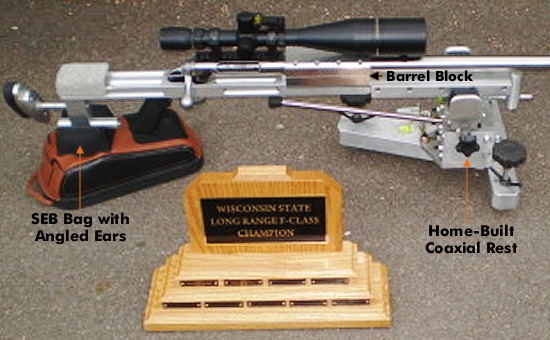
State Championship Win with Home-Built Aluminum Stock
While most of the stocks featured above were crafted by professionals, the properties of aluminum allow it to be used by persons with some basic mechanical skills and metal-working tools. Here’s proof. Back in 2009, Forum Member John Dunbar (aka JD12) crafted his own aluminum F-Open stock. And he used that impressive metal stock to win the Wisconsin State F-Class championship. READ Full Story.
The stock for John’s “home-built” .284 Winchester was mated with a Savage target action. John designed and fabricated the aluminum stock himself. It features a central barrel block clamping a 32″ Brux barrel. Get this — John completed the rifle only 5 days before the match: “I finished machining/assembly on Monday night, did load workup Wednesday and Thursday nights, loaded rounds Friday night, and headed to Lodi at 4:30 on Saturday morning.” John even made his own co-axial front rest (see below)
Richard King’s Radical .223 Rem F-TR Skeleton Rifle
Here’s something exotic from our Gun of the Week archives. We like this rig because it is so radical (we doubt that you have ever seen anything quite like it). Gun-builder Richard King calls this his “Texas-T”, noting that “this is my personal gun, built the way I wanted it. I know it’s radical and some may not care for it. But it works.” The rig was designed to shoot F-TR, but it can also be converted easily to shoot F-Open with a front rest.
Richard reports: “This is pretty much an all-aluminum rifle. The action is a Kelbly F-Class with a Shilen stainless steel competition trigger. The scope is a 1″-tube Leupold 36X with a Tucker Conversion set in Jewell spherical bearing rings. The .223 barrel is 30″ Pac-Nor 3-groove, 1:6.5″-twist mounted in a V-type barrel block. The bipod has vertical adjustment only via a dovetail slide activated by a stick handle. It works like a joy-stick, but for vertical only. I adjust for windage by moving the rear sandbag.”
Richard likes how the barrel block works: “With the barrel block forward, the vibrations should be at a low frequency. Instead of one long rod whipping, I now have two short rods (barrel halves) being dampened. This is my fourth barrel block gun. They work, but so does a good pillar-bedded action. [This rifle] is designed for my style of shooting. It is not meant to be a universal ‘fit all’ for the general public. However, I will say the design is adaptable. I can easily convert the system to run in F-Open Class. I would drop a big-bore barreled action into the V-block, slide on a heavier pre-zeroed scope and rings, add plates on the sides up front to bring the width to 3″, and maybe a recoil pad.”
When Fiberglass Fails, Aluminum Stock Saves the Day
Australian Mark Fairbairn performed a “Quick Fix” during the 2018 Berger SW Nationals. Mark’s F-Open rifle, in a conventional fiberglass stock, was giving him random vertical during one yardage: “I had a bit of a problem with elevation — the stock was hitting somewhere [causing vertical]. I was X-X-X then a shot popped up in the 9 ring with no good reason. So I figured I better put a new stock on it. I got my old aluminium stock I brought from Australia and quickly adjusted it to fit on the Stolle.”
Right on the firing line berm Mark swapped his barreled action into the metal stock of his own design. The clock was ticking… but the story had a happy ending. For the next yardage Mark shot a brilliant 150-7X, not dropping a point. So the “Quick Fix” did the trick. As they say Down Under — “Good on Ya, Mate!”
Home-Built Aluminum Chassis with Innovative A-Arm Bipod
Here is another home-built rig featuring an aluminum chassis mated to a Savage barreled action via a forward-mounted barrel block. This rig was crafted by Forum member Patrick Lundy, who followed the maxim: “If you can’t buy it, then build it.”
Patrick Lundy was so impressed with a fellow shooter’s barrel-block rifle, that he build a similar match gun himself, complete with barrel block and aluminum chassis. Patrick was inspired by a metal stock belonging to Peter Gagne. But he added his own custom touches, including an innovative “A-Arm”-design bipod for shooting in F-TR class. The gun has been very successful in competition. READ FULL Report
Pat told us: “This new stock was a milestone in my shooting career — it was my very first attempt to build a stock. I wasn’t much of a wood worker but I did have a talent for building with metal. The stock was fabricated from 6061 T6 aluminum. With this gun I was able to shoot from a rest or a bipod.”
Pat crafted the bipod from aluminum tubing: “The bipod was a very rigid A-frame design with welded aluminum tubing. I added slippery feet under the pod skis to facilitate smoother recoil. I realized that a wide-stance bipod had to recoil the same on both sides or the group would string horizontally.” Here is the innovative “A-Arm” bipod that Pat Lundy built for his rifle.
A while back, we featured a portable reloading bench built on a Black & Decker Workmate. That proved a VERY popular do-it-yourself project so we’re showing it again, in case you missed it the first time.
Texan Robert Lewis made himself a great portable reloading bench from plywood mounted to a Black & Decker Workmate. The bench, roughly 22″ x 19″ on top, folds up to fit easily in your car’s trunk or behind the seats in a pick-up truck cab. Four recessed bolts hold the wood top section to the collapsible B&D Workmate. The sides and back of the unit are attached to the base with small nails. There is a small shelf (also nailed in place) which can be used to clamp a powder measure or hold a scale. Shown in the photo is a Harrell’s Benchrest measure and Harrell’s single-stage “C” press.
Originally, the whole unit could be built for about $65.00 with pine, or $80.00 with oak (as shown). Robert explained: “The Workmate was $40. If someone bought a 2’x4′ sheet of 3/4″ oak plywood, I think it is around $30. Using pine plywood would be about half that. Fasteners were $3. Spar Urethane would be $5.” [Editor: We have seen major inflation — the Workmate is now $85+ at many vendors and you’ll be spending more for the wood, so figure the whole project might be $150.00.]
Robert told us: “I used a couple ideas I found on the web. The Larry Willis website gave me the idea to use the Black and Decker Workmate as a base. I found the Workmate on sale for $40 and the top is made from oak plywood I had in my shop. I sealed the wood with three coats of Spar Urethane. The whole thing folds into a nice package for transportation to and from the range.”
NOTE: Since we first ran this story, the price of a Black & Decker Workmate WM225 has increased substantially. But good news — Amazon is currently selling WM225-A Workmates for $74.99, a nice price, particularly for Prime members who get FREE shipping. And the WM225-A Workmate is currently $85.88 at Home Depot, with FREE Local Store Pickup or home delivery (in most states).
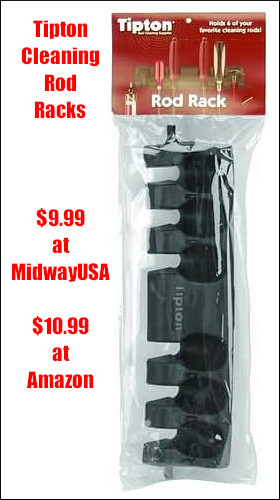
Cleaning Rod Rack Costs Just $9.99
Looking to better organize your reloading room (aka “man cave”)? Here’s a handy, affordable product that will help you organize gear in your reloading room or “man cave”. Tipton’s Cleaning Rod Rack (Tipton #100335) can accommodate up to six rods with various size handles. The wall-mounted Rod Rack also has horizontal studs on either end for additional accessories. These are useful for hanging the Tico Tool shotgun cleaning wands that stow in a tube with a plastic hook on the top.
Tipton Cleaning Rod Racks come complete with mounting screws (and screw slots are molded-in). You’ll find Tipton Cleaning Rod racks for under $12.00 at most vendors. They are $9.99 at MidwayUSA, while Amazon.com offers the racks for $10.99 with free shipping (#ad) with orders over $35.00.
Another advantage of this rack is that it keeps your rods in a convenient, highly visible location. There less chance of the rod being bent or warped. Also having six handle slots allows you to easily keep multiple lengths and diameters of cleaning rods in one handy placement. This holds up to size rods with additional hangers on both outboard ends.
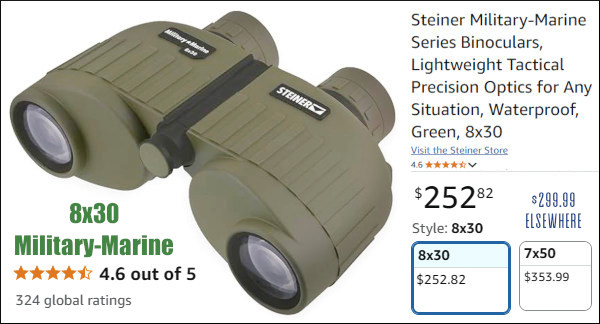
A while back your Editor was in New Mexico, on a prairie dog expedition. While in the field, my companions and I used two pairs of Steiner 8x30mm Military/Marine binoculars to spot the critters. Finding the Prairie Dogs (PDs) could be challenging in the high grass. Often, a PD would reveal only its head — a small target at distances approaching 400 yards. We really needed sharp optics with high contrast to spot the dogs hiding behind tufts of grass or dry brush.
The Steiner Military/Marine binoculars performed superbly. I came away very impressed with these armored 8x30mm binoculars (now called Model 2033). The glass is bright and super-sharp. And the rubber-armored body is truly rugged. These binoculars offer both right and left diopters — important for me as my left eye requires more correction than the right eye. One great feature of the Steiners is the focusing system which keeps everything you can see in focus. This really is a big deal. You don’t have to constantly fiddle with focus — everything past about 20 yards is in sharp focus all the time.
As one Steiner owner reports: “Focusing set-up is worth the price of admission. Set it and forget. Amazing. This single feature makes these worth owning.” And the sharpness is impressive. I compared the Steiners’ image with a 6.5-20x40mm Leupold EFR riflescope set at 8X. Both 8×30 Steiners were brighter than the Leupold scope, and the Steiners resolved individual blades of grass and fine details better than the Leupold. Of course, comparing a binocular optic with a riflescope is like comparing apples and oranges. The advantages of binoculars (compared to a monocular scope) are well known — the brain combines the two images (left eye and right eye) to create a more vivid, 3D effect, with greater perceived contrast.
Good Binoculars Are a “Must-Have” Item for Hunters
After three days in the prairie dog fields I came away convinced that a good set of binoculars is absolutely essential for varmint hunters. As the PD population was fairly thin where we were shooting, we probably spent five minutes glassing for every minute actually behind the trigger. Over 90% of the dogs were first spotted with binocs rather than riflescopes. We had a fixed (non-rotating) bench so it was difficult to swing the rifle more than about 30° from one side to another (60° total arc). With the binoculars, and their wide field of view, we could quickly scan a much wider arc.
Steiner 8×30 Military/Marine Binocs are Just $255.70
At the end of our hunt, I told my host that I planned to purchase some Steiner 8×30 Military/Marine Binoculars similar to the units we used during our New Mexico varmint hunt. When I arrived home I was amazed to see that the Steiner 8×30 Military/Marine Binoculars are now just $252.82 on Amazon.com (#ad), with FREE shipping. That’s a great value, considering the ruggedness and optical quality of the unit. Most other vendors sell these binoculars for $299.99, so you can save $47+ with Amazon, plus get FREE shipping.
Need more power and low-light capability? The Steiner 210 10×50 Military/Marine (#ad) is also offered on Amazon.com. It has more magnification and better low-light performance. However, it costs $524.99, more than double the current price of 8×30 Military/Marine on Amazon! Unless you really need the 10×50’s extra low-light capability, the 8×30 M/M is the smart choice.
Conventional brass jags work great — except for one thing. They can react to solvents, leaving a blue “false positive” on patches. In recent years, jag-makers have experimented with many different materials in an effort to cure the solvent-reaction problem. Today we have polymer jags, nickel-plated jags, and stainless steel jags. And the latest innovation is the aluminum jag from Dewey.
J. Dewey Mfg. offers a series of “Copper Eliminator” jags and brush adapters made from aircraft-grade aluminum with the same hardness as brass. Dewey claims that its aluminum jags will not become embedded with grit or particles that could harm your bore. At the same time, Dewey’s aluminum jags will not react to ammoniated bore solvents that can turn patches blue green when used with brass jags. Dewey aluminum jags are offered with either male OR female 8/32 threads.
Are you looking for a new carry pistol or defensive handgun? Are you curious as to what handguns are most popular with American buyers? Well Gunbroker has published its Top 10 handguns based on sales through the end of 2024. You’ll find these ten pistols ranked below, starting with the SIG Sauer P365.
Gunbroker, via the GunGenius.com site, publishes a monthly Top Sales Report featuring the Best Sellers for each major category of firearms on GunBroker.com. This culminates in a year-end report listing the Top Selling Firearms of the Year. Illustrated below are the Top 10 handguns based on 2024 sales:
Here Are the Top 10 Handguns in 2024:
1. SIG Sauer P365
2. Sig Sauer P320
3. Glock G19
4. Ruger American Pistols
5. Glock G43
6. Glock G17
7. Ruger Mark IV
8. Smith & Wesson M&P9
9. Springfield Hellcat
10. Armscor/RIA Rock
Here is a video review of the SIG Sauer P365, the #1 Selling handgun in 2024:
Halloween, October 31st of each year, is just 10 days away. As we approach “All Hallow’s Eve”, you may want to have fun at the range. We found a cool 4-pack of Halloween-theme targets you may want to buy. This 100-target Halloween Sample Pack is offered by the National Target Company for just $12.10 plus shipping. That’s a great deal — you can pay that much for a burger and fries these days.
The set includes 100 Halloween Targets with four different styles shown above. These paper targets, listed as 12″ × 18″ in size, feature bright orange and black graphics on pale orange backgrounds. There’s a big Jack-0′-Lantern pumpkin with scoring circles, a target with dozen smaller graphics (bats, pumpkins, and spiders), a Zombie Graveyard scene with 3 circles, and a large orange circle with spider and scoring rings.
Target One: 50′ Slow Fire Pistol Pumpkin Target (Jack-O’-Lantern face and rings)
Target Two: 50′ Rifle Silhouette Target (bats, pumpkins, spiders)
Target Three: 25 Yard Slow Fire Pistol Target (circle and spider)
Target Four: 25′ Air Rifle Target (Zombie Graveyard)
NOTE This Option Just SOLD OUT Today: A similar target pack with 10.5″ x 12″ targets is also available from Pistoleer.com for $29.98 on eBay with FREE Shipping. Delivery is promised before October 27, so you should get the 100 targets with time to have fun at the range before Halloween 2025. NOTE: These Pistoleer targets replicate the National Target Company (NTC) designs, but the Pistoleer targets show higher contrast (more white) backgrounds than the same targets displaying on the NTC site. Below are the targets as shown by Pistoleer on eBay:
If you are looking to acquire a reliable, accurate rifle for a late fall hunt, Howa can be a good choice. Howas feature smooth-running actions with fine two-stage HACT triggers. A Howa barreled action can also be a good basis for a DIY project. But some folks have heard that it may be difficult to find stocks, or to fit an after-market barrel. That’s not true. There are many stock options available, and in this article, Bill of RifleShooter.com shows that it is easy to remove the factory-installed barrel with the right tools. We think a Howa makes a fine basis for a varmint rig or field rifle. Or you can build a tactical rifle as Bill did. You can start with the factory barrel and when you want/need more accuracy, then have a gunsmith install a custom barrel from Krieger Barrels, Lilja Barrels or other quality brand.
The Carbon Stalker is an excellent ultralight factory option, weighing just 4.6 lbs. with Mini Action (before optics). All Howa Carbon Fiber Stalker rifles come with a Sub-MOA Guarantee and Lifetime Warranty.
What You Need to Know About Howa 1500-series Rifles
Tech Feature by Bill, editor of RifleShooter.com
Consider this article the “Howa 1500 Overview”. There has been a lot of interest in Howa rifles and barreled actions imported by Legacy Sports International. In addition to being able to buy a complete rifle from a dealer, Brownells sells barreled actions in a wide variety of calibers and configurations. In this post we are going to take a look at the Howa 1500 series.
Howa Rifles — General Background
Howa is a Japanese heavy machinery company. One of its product lines are firearms, which are imported into the United States of America by two different companies, Legacy Sports International and Weatherby. Legacy sells the 1500 under the manufacturers name while Weatherby re-brands the guns as the Weatherby Vanguard. In general, the finishes on the Weatherby rifles are more refined than the LSI-imported 1500s.
General Evaluation of Howa 1500 Rifles
I’ve found Howa 1500s to be solid, entry-level rifles that are capable of sub-MOA accuracy out of the box. I’ve actually purchased two Howa rifles I’ve tested because I like them so much. The gun below, a Howa Mini-Action in 7.62×39 Russian, is one of my favorite factory guns to shoot.
Check out this three-shot group I drilled at 100 yards with the rifle above and 125-grain Sierras. It took a lot of work and load development to get there, but when it did, it worked well.
Howa 1500 HACT 2-Stage Trigger
Howa 1500s feature the very nice Howa HACT trigger. This is an adjustable, two-stage trigger, set for about 3 pounds (combined stages). Crisp and repeatable, this is an excellent trigger for a factory gun. There is no annoying Glock-style safety lever in the middle of the trigger blade. The 2-stage design and pull weight range works well for a hunting rifle or a rig for PRS competition. Rifleshooter.com says the Howa trigger is “one of the best factory triggers, along with Tikka. I’ve found the Howa trigger superior to a Remington 700 — the Howas doesn’t need to be replaced.”
Writing for the Western Outdoor News, WONews.com, Steve Comus has field-tested the HACT Trigger. Steve writes: “I always liked two-stage triggers, because of the way I could take-up the slack and then actually know when the rifle was going to go off. The take-up on the [HACT] trigger was fast and easy. The crisp, positive release when pressure was put on during the second stage [reminded me] of some of the target rifles I shot through the years.”
Howa Actions — Three Options
Howa offers three action lengths: Mini, Short, and Long. You can see the bolts for the three action lengths in the image below. The Mini-Action has similar external dimensions to the Remington Model Seven, however, the Mini-Action’s bolt does not travel as far to the rear. This is a mixed bag. The upside is you have a quicker action (shorter bolt throw). The downside is you are limited to shorter rounds such as the .223 Remington, 7.62×39mm Russian, and 6.5 Grendel. But if you need a bigger cartridge, just choose the standard or long action Howa variant.
Howa 1500 vs. Remington 700 — Important Differences
Is the Howa 1500 a Remington 700 clone, or some kind of improved Remington 700? No, not really. While the top radius of the Howa 1500 does match the Model 700, and they can both use the same two-piece scope bases, there are a number of differences.
If you look at the Howa 1500 alongside the Remington 700 you’ll note the M700 is a round action, while the Howa is a flat-bottom action. In many ways the Howa’s bottom half reminds me of a push-feed Winchester. This means the chassis and stocks that support a Howa 1500 are not V-block based like you’ll find on a 700, instead they have a flat bottom. While the bolt of the Howa is similar in external appearance to the Model 700, it does offer some improvements, notably an M16-style extractor and a firing pin assembly that can be easily removed without tools.
Howa 1500 action screws are metric and are in a different location from the 700. The Howa 1500 has an integral recoil lug that accepts the front action screw, this means you have more of the front action screw engaging the action. WARNING: If you install it into a poorly-fitted stock or action you may bind it.
Can a Howa Action Be Used for a Custom Rifle Project?
Absolutely! You can either buy a barreled action from Brownells and throw it in a chassis system/stock of your choice or you can use a stripped action to build a custom rifle. If you are in the chassis market, MDT offers a wide variety of chassis in different price ranges. All have worked well for me.
How to Remove Howa Factory Barrel from Action
You may have heard internet grumblings about removing Howa barrels. Some keyboard commandos say they are extremely difficult to remove without a relief cut. Well Bill at Rifleshooter.com demonstrates that Howa barrels can be removed without trouble, provided you have the right tools. Watch this video:
Watch Howa Barrel Removal Video — Quick and Easy (Click Speaker Icon for Audio)
Q: Is it difficult to remove a barrel from a Howa 1500?
A: Not very. I’ve heard from some smiths that worked on Howas (years ago) that the factory barrels are difficult to remove. However of the half dozen or so Howa barrels that I’ve pulled, they’ve been very easy. I use a Brownells action wrench with the top piece for a Rem Model 700 and the flat bottom resting against the flat on the wrench.
Howa Actions Require Metric Barrel Threads
It’s easy to thread a barrel for a Howa action. You just have to cut metric threads — most lathes out there can cut them. I cut the threads below on a manual lathe using change gears. [Editor: John Whidden cuts metric tenon threads with a CNC lathe. “It’s easy,” John tells us, “No issue whatsoever.”]
Using Howa Actions for Custom Rifles
I have built a few customs with Howa actions. Below is one of my favorite, a .308 Winchester. It consists of a Howa 1500 action, Shilen Select Match Rem Varmint contour barrel\, and Modular Driven Technologies (MDT) ESS chassis. Great rifle and it hammers!
Hornady has just revealed its new products for 2026. Along with new ammo types and new bullet varieties, there is a new press, an interesting priming tool, and a variety of lock boxes and security cabinets. The video below covers the highlights.
Hornady’s New Products for 2026
Hornady announced its 2026 product lineup on October 15, 2025, revealing new ammunition, bullets, reloading tools, and storage hardware. The new ammo and bullets should offer enhanced performance for hunting and precision shooting. Below is a list of key new offerings, with descriptions based on official announcements. Products will be available through stocking dealers and retailers starting in early 2026.
New Hornady Bullet Types
Hornady will be offering a variety of new bullets this coming year. This will include pistol projectiles, hunting bullets, varmint bullets, and target bullets. Watch the video below to see the notable new-for-2026 Hornady bullet types.
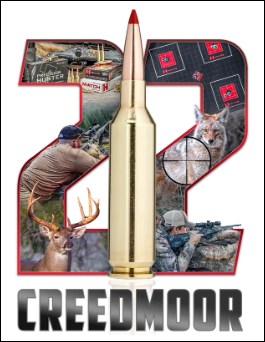
22 Creedmoor Ammunition
The most notable new cartridge for 2026 is the 22 Creedmoor. This could be a good long-range varmint round. Engineered as a high-speed .22 caliber cartridge, this new round delivers very flat trajectories, minimal wind deflection, and great hitting power on small and medium game or predators. Hornady sees the 22 Creedmoor as the “new predator hunting king,” compatible with modern rifles for varmint and hunting applications.
While this will doubtless be a good new cartridge, for small varmints we would still prefer a 22 BR or a 20 Practical, the latter simply being the .223 Rem necked down to .20 caliber. But for very long-range Groundhog hunts or varmint matches this could become popular. There’s also a possiblity of adoption by some target shooters, although Hornady brass has never really been as long-lasting and consistent as Lapua and other premium brands.
Versa-Prime™ Bench Priming Tool
Hornady will offer a new benchtop tool machined from 6061 billet aluminum with hardened steel internals. With a primer feed tube, this allows users to prime multiple cases efficiently. The handle can be switched to right or left side to fit user preference. Consistency is assured by the unit’s strength and tight tolerances. Hornady says its new priming tool “offers smooth, precise operation to streamline workflows and ensure consistent results in high-volume sessions.”
Lock‑N‑Load Classic Pro Press
Built on the solid foundation of the trusted Classic Press, the new Classic Pro features precision‑machined surfaces, linkage pins, brass bushings, and primer cups for tighter tolerances that provide a smoother feel and consistent results. This employs the Hornady Lock‑N‑Load® die bushing system for fast, easy die swaps and repeatable, consistent accuracy. The press has a cast aluminum frame and toggle with precision machined surfaces for exceptionally tight tolerances and repeatable accuracy. Smooth Operation — brass bushings and polished steel components provide a smooth, consistent press stroke.
Hornady Handbook of Cartridge Reloading (12th Edition, 2026)
Hornady’s updated Reloading Handbook includes data for over 400 cartridges and 24+ calibers. The new manual introduces load data for new bullets: CX, ELD-VT (varmint), and Sub-X (subsonic), plus expanded info on ELD Match and SST. Updated propellants include Winchester’s StaBall Match.
Find More Info on the Hornady New Products Website
For the complete new product list and high-resolution images, visit Hornady’s 2026 New Products Page. The Podcast below covers many of the new products as well as new ammo and bullet types.
Hornady New Product Overview sourced from ELR Researcher.
One side of this gauge is the “go” side which quickly tells you the depth of a primer pocket, whether any crimp is properly removed, and whether the primer pocket is loose. If it feels loose on the “go” side, use the other end of the tool, the “no go” side, to test to see if the primer pocket is too loose to hold a primer. If the no-go slides into the pocket, then you know to junk that brass.
Primer Pocket Growth and Useful Case Life
Repeated firings at stout pressures can cause primer pockets to grow in diameter. This can create an unsafe condition if your primers are not seating properly. Are your primer pockets “good to go”, or have they been pushed to the point of no return? Do you really know? Many guys try to gauge primer pocket tightness by “feel”, as they seat the primer. But that method isn’t precise. Now there’s a better way…
The folks at Ballistictools.com have created a handy set of precision-machined gauges that let you quickly and accurately check your primer pockets. These gauges (aka “gages”) are offered in two sizes — for large and small primer pockets. A two-piece set of both large and small gauges costs just $25.99. These gauges let you quickly measure the depth of a primer pocket, and check if the crimp has been removed properly. Most importantly, the gauge tells you if the primer pocket has opened up too much. One side of the gauge has an enlarged diameter plug. If that “No-Go” side fits in the primer pocket, you should ditch the case — it’s toast.
Precision ground from O-1 tool steel, The Ballistic Tools primer pocket gauges serve multiple functions. The inventor of these tools explains: “I created the prototype of this tool for my own use in brass processing. I needed a way to quickly and easily measure primer pockets that was reliable and did not require wasting a primer. This tool has been indispensable for me and I would never go back to the old method of uncertainty and guessing.”
Product tip from Boyd Allen. We welcome reader submissions.


 A while back, we featured a portable reloading bench built on a Black & Decker Workmate. That proved a VERY popular do-it-yourself project so we’re showing it again, in case you missed it the first time.


 Cleaning Rod Rack Costs Just $9.99

 A while back your Editor was in New Mexico, on a prairie dog expedition. While in the field, my companions and I used two pairs of


 Howa 1500 HACT 2-Stage Trigger


 22 Creedmoor Ammunition
 Lock‑N‑Load Classic Pro Press
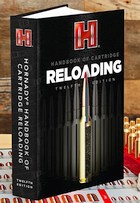 Hornady Handbook of Cartridge Reloading (12th Edition, 2026)
 The folks at


