Can you guess what your next barrel will weigh? In many competition disciplines, “making weight” is a serious concern when putting together a new match rifle. A Light Varmint short-range Benchrest rifle cannot exceed 10.5 pounds including scope. An F-TR rifle is limited to 18 pounds, 2 oz. (8.25 kg) with bipod.
One of the heaviest items on most rifles is the barrel. If your barrel comes in much heavier than expected, it can boost the overall weight of the gun significantly. Then you may have to resort to cutting the barrel, or worse yet, re-barreling, to make weight for your class. In some cases, you can remove material from the stock to save weight, but if that’s not practical, the barrel will need to go on a diet. (As a last resort, you can try fitting a lighter scope.)
Is there a reliable way to predict, in advance, how much a finished barrel will weigh? The answer is “yes”. PAC-NOR Barreling of Brookings, Oregon has created a handy, web-based Barrel Weight Calculator. Just log on to Pac-Nor’s website and the calculator is free to use. Pac-Nor’s Barrel Weight Calculator is pretty sophisticated, with separate data fields for Shank Diameter, Barrel Length, Bore Diameter — even length and number of flutes. Punch in your numbers, and the Barrel Weight Calculator then automatically generates the weight for 16 different “standard” contours.
Calculator Handles Custom Contours
What about custom contours? Well the Pac-Nor Barrel Weight Calculator can handle those as well. The program allows input of eight different dimensional measurements taken along the barrel’s finished length, from breech to muzzle. You can use this “custom contour” feature when calculating the weight of another manufacturer’s barrel that doesn’t match any of Pac-Nor’s “standard” contours.
Caution: Same-Name Contours from Different Makers May Not be Exactly the Same
One key thing to remember when using the Barrel Weight Calculator is that not all “standard” contours are exactly the same, as sold by different barrel-makers. A Medium Palma contour from Pac-Nor may be slightly different dimensionally from a Krieger Medium Palma barrel. When using the Pac-Nor Barrel Weight Calculator to find the weight of a barrel from a different manufacturer, we recommend you get the exact dimensions from your barrel-maker. If these are different that Pac-Nor’s default dimensions, use the “custom contour” calculator fields to enter the true dimensions for your brand of barrel.
Smart Advice — Give Yourself Some Leeway
While Pac-Nor’s Barrel Weight Calculator is very precise (because barrel steel is quite uniform by volume), you will see some small variances in finished weight based on the final chambering process. The length of the threaded section (tenon) will vary from one action type to another. In addition, the size and shape of the chamber can make a difference in barrel weight, even with two barrels of the same nominal caliber. Even the type of crown can make a slight difference in overall weight. This means that the barrel your smith puts on your gun may end up slightly heavier or lighter than the Pac-Nor calculation. That’s not a fault of the program — it’s simply because the program isn’t set up to account for chamber volume or tenon length.
What does this mean? In practical terms — you should give yourself some “wiggle room” in your planned rifle build. Unless you’re able to shave weight from your stock, do NOT spec your gun at one or two ounces under max based on the Pac-Nor calculator output. That said, the Pac-Nor Barrel Weight Calculator is still a very helpful, important tool. When laying out the specs for a rifle in any weight-restricted class, you should always “run the numbers” through a weight calculator such as the one provided by Pac-Nor. This can avoid costly and frustrating problems down the road.
Q: What is the most popular gun book in the history of the planet?
A: That distinction goes to the Shooter’s Bible, which has sold over 7 MILLION copies since it was first published over 80 years ago.
Released in November 2021, the 113th Edition of this respected resource is better than ever. This latest Shooter’s Bible boasts 608 pages with over 270 color photos and more than 1000 black-and-white photos. The new 113th Edition features many new firearms as well as new optics. This paperback book is now just $21.05 on Amazon.
Published annually for more than eighty years, the Shooter’s Bible is one of the most comprehensive firearms reference guides in print. The publishers claim that “nearly every firearms manufacturer in the world” is included. The 113th Edition also contains new and/or enhanced sections on ammunition, optics, and accessories, along with updated handgun and rifle ballistic tables. There are also extensive charts of currently available hunting and match bullets for hand-loaders.
While many shooters are now using the internet to get reloading data and equipment specifications, the Shooter’s Bible remains a valuable resource with a great legacy. As one recent Shooter’s Bible purchaser explains: “While it’s true that much of the information contained in the Shooter’s Bible can be found on the Internet, there are many of us who would first rather relax in our easy chair and page through the book at our leisure. If you find an item that catches your fancy, you can then follow up by going to their Web site.”
Another buyer observed: “This [2020 edition] is proof that, even with all the attacks on our 2nd Amendment right over the years, the industry has persevered and grown. I hope the day never comes when there will no longer be a reason to publish the Shooter’s Bible.”
The Shooter’s Bible contains a vast collection of firearms product information and descriptions. Hundreds of firearms are listed, complete with specifications and photos. Products from nearly all commercial gun makers on the planet are included.
More Great Gun Books From Shooter’s Bible Publishers
Here are three other books from the publishers of the Shooter’s Bible that you may want to add to your library: Guide to Cartridges; Gun Trader’s Guide; and Guide to Firearms Assembly, Disassembly & Cleaning. These are all available in softback print and Kindle (digital) editions:
We are a week into April. That means the spring shooting season is underway in most parts of the country. Before you head to the range for the first time, we recommend you do some basic tasks with your firearms. Here’s some good advice on readying your rifles for the 2022 shooting season.
by Ron Dague, Sinclair International I give my rifles a pre-season check before the shooting season starts. This starts with a general inspection starting with the butt-plate or recoil pad and making sure that all the screws and adjustable parts (on an adjustable butt-plate) move freely up or down and side to side. If you got caught in rain some of these screws and adjustable parts may not move when needed. I disassemble parts as needed and put rust preventative or a light oil and/or grease on threads and sliding parts. On rifles with recoil pads and fixed butt-plates, make sure the screws are tight and that holes in the stock aren’t stripped out. Make sure there are no cracks in the stock and around the butt-plate. If the recoil pad is glued-on, just make sure it hasn’t come loose.
Next I take the action out of the stock and check for cracks and wear marks. I look at the bedding to make sure that oils and cleaning solvents have not damaged the bedding. While the action is out of the stock, I look for any surface rust or dirt/dust in the recoil lug area and magazine well. Clean as needed and repair or re-bed if needed.
Trigger Assembly and Action With the barreled action out of the stock, it is a good time to spray out the trigger with cleaner. I use Ronson oil or lighter fluid. [Editor’s Note: Some trigger-makers advise against using any kind of lubricant, grease or oil — so plain lighter fluid is preferred.] After the trigger is cleaned you may want to check the trigger pull weight. If you don’t feel comfortable doing this, take it to a gun smith and have it checked. It is worth every penny to not have a trigger issue and/or a safety malfunction. I also take the bolt apart and clean the firing pin spring and bolt housing with Gun Scrubber or automotive brake cleaner. Then lube the firing pin-spring and firing pin with light oil. I use Kel Lube and/or Butch’s gun oil. Put a small dab of gun grease on the [bolt locking lugs] and cocking ramp.
I will also spray the outside of the action and barrel and give that a light coating of oil for rust prevention. I clean the action with Sinclair’s action cleaning tool. Don’t forget to clean the bore. Even though you didn’t fire the rifle, this makes sure nothing obstructs your barrel.
Checking Metal Fixtures and Fasteners Next I look at the trigger guard and hinged floor plate and make sure it works as designed. Make sure there are no cracks in the trigger guard from an accidental drop. Check guard screws and /or action screws for tightness and tighten to proper spec. There are torque specs for this, but on wood stocks the wood can crush and this should be checked throughout the year as weather change can affect this. My entire collection of rifles are bedded and I just tighten them just snug with screw driver or Allen wrench. The rimfire rifles have a spec of 55 to 74 inch/lbs and I think would carry over to center fire as well. I would caution you about torque wrenches as you need a good quality wrench, and read the directions on how to use it. You can over torque if not careful. Check the swivel studs and bipod to make sure there tight as well. You may want to take scope off and check the base screws and check the rings.
Test Fire the Rifle After Maintenance
After all cleaning and is done and everything is reassembled, take a few rounds out to the range and test fire to make sure everything works as it should. Don’t forget to run 3-5 rounds through the magazine at least two times for function. I look at this as preventive maintenance on the rifle. If you give it a look over you shouldn’t have any trouble during the rifle matches or hunting trip.
Ron Dague
Certified Reloading Instructor
Certified Range Safety Officer
Email: rond [at] sinclairintl.com
Phone: 800-717-8211
This Article Originally Appeared in Sinclair International’s The Reloading Press.
Richard Franklin’s Step-by-Step Guide to Pillar Bedding
The Art of Stress-Free Stock Bedding
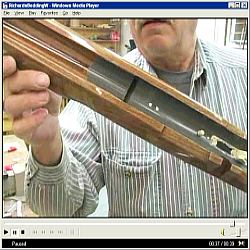
by Richard Franklin Richard Franklin prepared this article for our readers. Richard tells us: “I’m happy to do pillar-bedding work, but this is a job which many shooters can do themselves, with some practice and the right components. I do suggest you practice first on an old ‘beater stock’. When done right, you end up with a perfect fit of receiver to action, with no twisting, stretching, or compression forces being applied to the receiver through mis-alignment. That’s what I mean by ‘stress-free’.”
This article covers all the steps in the process. If you want to see more, Richard has a 200-minute DVD, Stress-Free Pillar Bedding, that shows the entire job–from start to finish–and contains many tips to help you achieve perfect results. Richard shows how to properly relieve the bedding area, how to make pillars, how to set up the barreled action, and how to test your work to ensure it is truly “stress-free”. In the DVD, Richard does a complete pillar bedding job on both a finished custom stock and a Remington stock. You can order the Pillar Bedding DVD by visiting the Instructional Video page on RichardsCustomRifles.com.
[Editor’s Note: This article was first published a decade ago. So, some of the listed bedding materials may have been enhanced slightly, or the product names may have changed. But the procedures described by Richard are still valid and still achieve great results.]
Before You Begin — Some Comments About Inletting
Richard told us: “You can’t do a great bedding job unless you start with really good inletting. Unfortunately, many ‘inletted stocks’ really require quite a lot of work to get the inletting right. You cannot inlet a stock 100% correctly just using a stock duplicator. That’s one reason I do bedding jobs only on the stocks I make. If the inletting isn’t right, you can have a myriad of problems–such as the holes for the action bolts being in the wrong place, or the stock not having enough clearance for the barrel or the trigger hanger. So, BEFORE you start your bedding job, make sure the inletting is really right. Don’t assume the inletting is really complete (and correct) just because the manufacturer claims that to be the case. This applies to both wood and fiberglass stocks.”
Pillars For Bedding
The BAT action featured in this article has three pillars, with the middle pillar sitting under the front of the trigger guard, and the third pillar at the rear of the guard. More typical installations will use two pillars. For either system, the installation procedures are the same.
In Photo 1, you will see part A, the bottom part of the front pillar which we call the “escutcheon”. Part B, which is a 1/4″ X 28 action bolt that is slightly longer than part C which is the top part of the front pillar. The two parts of the front pillar were machined as one piece and then the escutcheon was cut off just below the shoulder that is inside. This shoulder is for the head of the action bolt to tighten up against. I’ve found that a two-piece pillar has many advantages, particularly for hunting stocks where the underside of the stock is angled (i.e. not parallel with bore axis). I make the pillars I use, machining them from cut-off stainless barrel stubs.
Part D is a 1/4″ X 28 hex-head bolt with the head turned down to 1/4″ which permits the insertion of a hex-head driver to tighten and remove the bolt. This headless bolt will be inserted in the rear tang hole of the action and part E, the rear pillar will be placed on it.
STEP ONE — Getting Started
Photo 2 shows tape on recoil lug, pillars bolted in place and putty in voids. Release agent is polished to a very thin layer. The top half of the front pillar (part C) is placed on the action receiver ring and the bolt (part B) is inserted thru the pillar and tightened against the action. This bolt must have a tapered head on the underside so that, when it is tightened, it will center the top half of the front pillar around the action bolt hole. (This is also true for the middle pillar if the action has a middle bolt.)
PHOTO 2
The headless bolt is inserted into the rear tang hole of the action and the rear pillar is slipped down on it. You will notice in Photo 3, below, that the pillars have the hole drilled oversize so that a 1/4″ bolt has a little space around it. (I like to drill the pillars with a .260″ bit inside.)
The above scenario is the placement of the pillars prior to applying the bedding compound, which I call “Mud”. Devcon 10110 is my bedding compound of choice (and the only product I use) as the mud must set up as hard as concrete and most other epoxies will not do this. Also Devcon shrinks very little if at all. My comments on other bedding compounds are in the sidebar below.
STEP TWO — Relieving the Stock Before Bedding Relieving the right amount of wood in the area to be bedded–not too much, not too little–is very important to achieving the best results. You need to create some space for the mud to fill around the action, but you don’t want to alter the inletting too much.
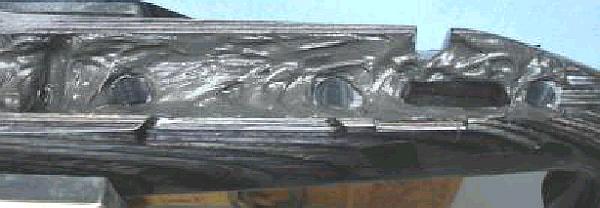
PHOTO 3
Photo 3 shows the wood removed from the inside of the stock bedding area. Remove enough wood everywhere except along the top sides of the stock to allow at least 1/8″ to 3/16″ of room for the mud. Remove 1/4″ of wood behind the recoil lug. I like about .012″ clearance on the top inside edges.
NOTE: Leave a small area of original wood just behind the rear tang bolt hole as this wood will determine the elevation of the bedded action in the stock.
Photo 4 shows the tang area of the stock. Note the elevation wood left at tang. Be sure to leave some original wood for the action tang to sit on. This is very important.
STEP THREE — Wrapping Tape on the Barrel Photo 5 shows the barreled action in the vise. It also shows black electrical tape wrapped around the barrel just behind the front of the stock forearm. Wrap enough tape to hold the front of the barreled action at the proper elevation in the stock.
The idea is that the barreled action does not touch anything except the bit of original “elevation” wood left at the rear tang (behind the pillar) and the forearm resting on the electrical tape. This is very important to obtain 100% stress-free bedding. You want the bore of the barrel to be parallel with the top edge of the stock so wrap just the right amount of tape to ensure this. The tape also centers the barrel in the fore-arm. Done right, the barreled action will be contacting just at two points (tape in front, tang in rear) and the barrel’s bore will be parallel with the top of the fore-arm’s sidewalls.
Comments on Alternative Components and Methods
Bedding Compounds
There are at least a dozen popular products used for rifle bedding. At one time or another, Richard has tried most of them. Devcon 10110 “Plastic Steel® Putty” is the only compound he currently uses and the only product he endorses whole-heartedly. “The Devcon 10110 is expensive, but it is the best bedding product I’ve found. First, it sets up extremely hard. That is very important to the performance and longevity of the bedding job. You want it to get it as hard as concrete. You need it really hard so when you tension the action screws it doesn’t squish down or migrate. Some of the brown stuff other folks use is way too soft. Marine Tex is also too soft. Many products will shrink. Any compound that shrinks is useless in my book. Devcon has absolutely near-zero shrinkage. Acra-Glass I keep in my shop, as it is useful for stock repairs. However I would never bed with Acra-Glass.
Devcon also has just the right consistency — about that of peanut butter. So, it is easy to apply but not runny. It stays in place when I turn the stock upside-down. Devcon is also relatively forgiving to mix–the proportions of the two elements are not super-critical like some other products. I know Marine-Tex can give real problems if you don’t use just the right amount of catalyst. Overall, Devcon does everything you need it to do, and does it exceptionally well. Some other smiths think it’s too expensive–and yes I’ll use $10-$15 worth of Devcon in doing a typical bedding job. But I think the customer deserves the best possible, longest-lasting bedding, and that means Devcon. Among the products I’ve used, Bisonite is my second choice, but I think Devcon will last longer.”
Release Compounds
Richard tells us: “People use all sorts of release compounds and I’ve tried many. I strongly prefer Kiwi shoe polish (neutral color). With the Kiwi, I’ve never had an action stick in the stock. It goes on easy, and you can use a paper towel to polish it very thin and that’s a big benefit. If you have a thin layer of release compound the finished bedding is that much closer to the exact dimensions of the action. I’ve heard of guys using PAM spray. I don’t trust that stuff. The Brownells release compound goes on too thick. Car wax is not a great choice either because it can separate and it gets dusty as it dries. Go with the Kiwi stuff–a little can will last for years. But be sure to use the clear (neutral) kind so you don’t stain your stock or action.”
Clamping and Tension Materials
Read a few articles on pillar bedding and you’ll see many different systems for holding the barreled action to the stock when the bedding compound cures. We’ve seen surgical tubing used, or strips of bicycle inner tube. Some writers have even advocated using mechanical clamps (a bad idea). Richard has tried various tensioning set-ups over the years, and electrical tape is his strong recommendation: “First, let me say it’s crazy to use a C-Clamp or something like that. The clamp will cause a point-load where it attaches and that is just the opposite of what you want.”
Richard has tried many materials: “Surgical tubing I’ve found to be cumbersome to use, and it tends to loosen up during the curing time. Same thing with strips of inner tube. That’s bad news because any loosening or stretching will allow the action to shift. It’s absolutely critical that the action not move one bit while the bedding cures. Once you’ve bedded the action if it dries the wrong way you’ve screwed everything up. Using the electrical tape that isn’t an issue. The tape goes on very tight, doesn’t stretch (if you use enough turns) and I have no fears that the action will shift while curing. Just follow my advice and put a strip of paper towel under the electrical tape so you don’t mar the finish of the barrel or stock.”
Contoured vs. Straight (Flat-top) Pillars
Many factory rifles come with contoured (radiused) pillars, and many gunsmiths prefer to use these. The idea is that the contour provides a better fit with the bottom of round actions. Richard has tried contoured pillars and doesn’t recommend them. He explains: “Most of the contoured pillars don’t really match the contour of the action anyway. And every action is slightly different. Even some of the most favored custom actions aren’t exactly the same from one unit to another. What happens when the contour or curve of the pillar is too narrow is that the action touches just the extended top edges of the pillar (left and right of center). That is not as solid as when the action contacts the center of the pillar where the action screw runs. (And those sharp sides of curved pillars tend to point-load and dig into your action.) Also I feel you get a better match of the Devcon to the action with flat-top pillars. What you want is the bedding compound to cradle the action all the way around. I’ve found this works best with flat-top pillars and a very strong, hard compound like Devcon that doesn’t squish down or shrink.”
STEP FOUR–Applying Release Agent and Plumbers Putty
Failure to apply release agent (and putty) properly is a recipe for disaster. One of the most common mistakes novices make when doing bedding jobs is locking in the action. This happens by not covering enough of the action with release agent, not taping off the lug correctly, and not adding putty to plug any slots or spaces into which the mud can migrate. Remember, you are doing a bedding job, not a glue-in job! When you’ve completed the process, you want to be able to pop the action loose without difficulty.
PHOTO 6 — Showing putty and release agent before polishing, tape on lug.
First, remove the trigger, bolt release and spring, and anything else from the bottom of the action. Then, clean the action and recoil lug area with brake cleaner or parts degreaser. Apply plumbers’ putty to any hole or crevice that you don’t want the mud to get into. Wrap two layers of masking tape on the outside edges of the lug and trim with a razor blade. Do not apply tape to the front or back of the lug. (Apply tape to the front of the lug only if you do not have a way to remove the hardened mud). Let this tape go right around to the top of the action. Wipe the putty smooth with the brake parts cleaner. I highly recommend neutral Kiwi shoe polish as release agent. Apply liberally to the entire action using a Q-tip to get in around the lug (including front and rear of lug), bolt handle slot and loading port edges. Let the shoe polish dry for 10 minutes and then use a paper towel and buff and polish the release agent as thin as possible. You want any release agent to be as thin as possible so as to let the action set as close as possible to your bedding. You also want to apply release agent to the rear (headless) bolt.
STEP FIVE — Installing the Pillars
Now is the time to place the pillars. Screw the top half of the front pillar and middle pillar (if the action has a middle bolt) to the action with the tapered head bolt. Screw in the headless bolt and slip the pillar down around it. Apply release agent to the area of the guard around the rear bolt hole (and to the rear headless bolt). Apply top and bottom and from the inside out. We don’t want the guard stuck to the bedding. (This guard sits on the bolt head that is secures the middle pillar to the action. We need the guard in place to align the action in the stock.)
Install the trigger guard back in place on the stock as the guard is used to align the barreled action in the stock. Now is the time to make a trial run to ensure that everything fits properly. Slip the upside-down stock down over the pillars with the headless bolt coming up through the rear bolt hole in the guard. See Photo 7. Ensure that the stock is resting on two spots only–the tape you’ve wrapped around the barrel, and the little bit of wood you left behind the tang bolt. Ensure there is room everywhere around the action to accept the mud. The barreled action cannot be touching anywhere except the tape and the tang. Not even on the top edges of the stock.
STEP SIX — Applying the Mud
Mix up a generous portion of the Devcon 10110 Mud and apply to the pillars as shown in Photo 8. Do not get mud on top of the bolt head and front pillar(s). Do apply a little mud on top of the rear pillar and if a little gets on the headless bolt that is OK as you should have applied release agent to this bolt. This will properly bed the guard to the rear pillar. The front bolt that holds the front pillar need not have release agent applied to it. Note, as shown in Photo 8, each pillar has a bolt inserted.
PHOTO 8 — Showing mud on the pillars.
You cannot use too much mud as the hydraulic action of pressing the stock down on the barreled action is going to squeeze the mud everywhere it need to go and the excess will be forced out (falling on the floor for you to step in).
PHOTO 9 — Showing mud applied to stock.
Now apply the mud very generously to the stock as shown in Photo 9 above. If I am not bedding any portion of the barrel shank I will only apply a little mud behind the recoil lug area.
STEP SEVEN — Assembly and Compression
Now slip the upside-down stock down over the pillars as you did in the trial run. Ensure the stock is bottomed-out on the tape at the front end. Squeeze slowly, pressing the rear of the stock down and squeeze out the excess mud. After pressing the stock down, the action area should appear as in Photo 10. During the compression stage, stop a few times and use Q-tips to clean off the excess mud that is squeezing out between action and stock.
PHOTO 10 — Rifle right side up, with the mud squeezed out.
Cut a piece of paper towel about two inches wide by the length of the towel. Lay this on the stock 1.5″ in front of the action. Wrap black electrical tape around the stock and barrel, running the tape over the strip of paper towel. (The towel is to protect the stock finish.) Squeeze the stock and action together while taking wraps with the tape. If you have a skinny, pencil-thin barrel don’t apply too much pressure with the tape as the weak barrel can be curved slightly. That can cause the barrel to touch the stock when everything is done (not good). If you have a big, fat barrel don’t worry about deflection. With a heavy contour tube, whatever bend you put in the barrel will spring back when the tape is removed.
STEP EIGHT — Mud Removal and Curing Time
Using Q-tips, clean up very thoroughly around the front pillar and the bolt head. You need to be able to unscrew the bolt to separate the stock from the rifle and you do not want the bedding protruding above the pillar. (The escutcheon still has to have room to fit in there without touching the end of the pillar.) Before turning the rifle right-side-up, reach under with a few Q-tips and clean off the mud hanging there as it may get inside the action.
Turn the rifle right side up in the vise and, using lots of Q-tips, clean all of the mud off of everything. Remove the excess mud every place you can see it. Use a paper towel to wipe the stock as there could be some invisible mud hiding somewhere on the stock or action. After using Q-tips, I sometimes use Butch’s Bore Shine solvent. It does a good job of removing the mud residue (other solvents with ammonia would work well also).
When you’ve cleaned off all the excess mud. It’s time to let the bedding cure. Lie the rifle upside down with the weight on the rear of the action and about where the tape is on the barrel. Let the gun sit for about 8 to 10 hours or overnight. IMPORTANT, you should remove ALL the excess mud around the action before you let the rifle cure for this time period. Photo 11 shows the rifle upside down, but you want to have the excess mud cleaned off before curing.
PHOTO 11 — Position for curing the mud–but excess should be removed first.
IMPORTANT: Avoiding Mechanical Lock During Bedding
One major problem that can arise when novices bed their own stocks is mechanical lock. This occurs when some part of the action or barrel is trapped below the bedding. Effectively, the barreled action becomes anchored in the stock and can be very difficult to remove. Richard says avoiding mechanical lock is not that difficult, but you must be careful: “Locks usually occur because the bedding is applied too far up. Never, and I repeat, never, bed above the centerline of the action (bore axis), or the widest point of the action (whichever is lower). You need to leave the edge of the bedding at least 1/16″ below the centerline of the action and centerline of the bore axis. I normally leave about 1/8th of vertical clearance. If the widest point of the action is BELOW the bore axis, you have to keep the bedding below that. The other thing to watch out for are projections and holes in the sides of the action. All holes must be filled with plumbers’ putty. All projections–anything that sticks out–need to be removed. If some little part or fixture sticks out, even if you tape it over, and it is below the top of the bedding, it can lock the action in.”
STEP NINE — Popping the Barreled Action Loose
After the required curing time, you need to remove the barreled action to check the beading and fit the pillar escutcheons. If you cleaned away all the excess mud and there are no mechanical locks in the bedding, it should not be difficult to pop the stock loose. You can see how this is done in the short Video Clip from my DVD (Right-Click and “Save As” to download). Here is the procedure.
After the mud has set up and hardened, clamp the barrel in a vise with the gun upside down. The vise should camp just ahead of the forearm. Remove the bolt in the front pillar (and middle pillar) and the headless bolt. Remove the trigger guard.
With the left hand, apply upward pressure to the forearm and then with the right hand slap upward on the forearm. You will hear a crack like you might have busted the stock. Not to worry, that is just the bedding popping free. Now wiggle the stock up off the recoil lug as it is the only thing holding the stock down. [Editors Note: Here’s an older video clip that shows Richard “popping” the stock loose from the barreled action. CLICK HERE to download a 6 Meg Windows media file, or click these links for MPEG (2.3 megs), and Real Media (2.3 megs) versions.]
Remove the tape from the barrel and recoil lug and clean up the putty. Wipe the action down with brake parts cleaner. On the stock, remove the squeezed mud that went into the trigger and bolt release area. Relieve the lug area on both sides and the front. Lay the stock back on the barreled action. Be sure to check under the trigger guard to see if any cleanup of mud is required there. Then re-install the guard and insert the rear action bolt just snug (not tight).
STEP TEN — Installing the Pillar Escutcheons
Pillar escutcheons are a nice extra feature I add to my custom rifles. These are stainless, made from barrel stubs. The two-part front pillar is originally machined as one piece. I believe front pillars with the escutcheons (or outer ring) offer advantages over conventional pillars in terms of strength and alignment.
Before you actually install the escutcheons, you need to do some fit testing. Have a trial run at setting the front bolt to the proper length by placing the escutcheon in the hole and screwing in the bolt. Loosen off the back bolt to see if the bolt that is thru the escutcheon is holding the stock firmly in place. Retighten the rear bolt a wee bit.
Apply release agent to the front bolt, being careful to not get it on the escutcheon. Insert an Allen wrench into the head of the bolt so you can hold it easily. Slip the escutcheon over the bolt. Apply mud to the escutcheon and around the bolt. Photo 12 shows how much mud to put on the escutcheon. You want enough so when you tighten the bolt it will force the mud everywhere it needs to go, even though a bit will be squeezed in around the bolt. Photo 13 shows how the escutcheon should look installed, with the bolt tightened. Photo 14 (below right) shows the escutcheon after the mud has been removed–be sure to remove the excess while the Devcon is still soft.
PHOTOS 13 and 14 — Showing escutcheon before (left) and after mud clean-up (right).
Clean up the excess mud with Q-tips and paper towels. You need to do this before the mud hardens. I used Butch’s Bore Shine as a solvent, once I have removed the excess mud with Q-tips and towels. When the escutcheons are cleaned up, you’ve finished working with the mud. Now let the stock lay for another 8 hours or so to allow the escutcheons to become.
After the mud has hardened around the escutcheon clamp the rifle back in the vise. Remove the back tang bolt first then the front bolt that is through the escutcheon. The bolt will be tight in the hole and sometimes may need to be punched out with a punch unless it has threads right to the head in which case it will screw out. Go in the hole with a .260” bit and clean the mud out of the front pillar. Let the bedding harden for a day or two and then torque the bolts with about 35 inch-lbs of torque on the front bolt and maybe 25 on the tang bolt.
The finished result is an even coat of Devcon with no voids, air pockets, fissures, and perfect stress-free support for the action, as shown in Photo 15.
Brownells’ Do-It-Yourself (DIY) video series provides logical, step-by-step installation help for triggers, stocks, and springs. Nine separate videos cover Brownells various DIY Kits. Not sure if you’re up to the project? Just watch each video to see what’s involved. The nine DIY kits are:
This video shows Remington 700 after-market trigger installation:
In the Do-It-Yourself videos, Brownells’ Gun Techs proceed step-by-step, showing you exactly how to install the parts on your gun. Each kit also comes with complete, illustrated instructions you can take to the bench. To learn more, click the links above, or CLICK HERE to visit Brownells’ DIY Kit online page.
They say that a man can never have too much money or too much time. Darrell Jones would add that a man can never have too many BR-based rifles. Darrell had a fleet of BRs, in 22BR, 6mm BR, 6.5 BR, 7 BR, and 30 BR. But he was intrigued by the potential of a rifle in the .257 caliber. Could it shoot as well as a 6mm BR? Could it challenge the more popular calibers in the highly competitive 600-yard benchrest game? Through careful research and component selection, Darrell created a 25 BR rifle that proves the viability of the 25 BR as a competition round. Pushing 115gr high-BC Berger bullets at 2837 fps, Darrell’s 25 BR “Peppermint” won first place in its very first match.
The Barely Bigger BR — Exploring the .25 Caliber Option
Rifle Report by Darrell Jones
I decided to build a 25 BR after several weeks of deliberation and ruling out a .257 Ackley Improved. Part of my dilemma was that I wanted to shoot F-Class competition at 600 yards, and I was unsure about the accuracy potential of the 25 BR. However, I currently have several BRs chambered in 22 BR, 6BR, 6.5 BR, 7 BR, and 30 BR and they all shoot exceptionally well at 600 yards. This lead me to believe a 25 BR should deliver fine accuracy, just like its other BR siblings. Why wouldn’t a 25 BR shoot accurately provided that I built it with the right components? The feasibility saga began. I began searching diligently for custom 25-caliber bullets. Unfortunately, there are not many 25-caliber custom bullet makers. I actually found only two custom bulletsmiths who produce the 25s. I did look at Fowlers and then looked at Bergers. Both Jeff Fowler and Berger made 110-grain flat-base bullets when I was looking. [Editor — this 110gr bullet is no longer listed by Berger]. The Berger 110gr FB bullets (.414 ballistic coefficient) shot very well out of my 12-twist 25-06 Ackley. However, I wanted to shoot a heavier bullet if possible. Berger makes a 25-caliber 115gr VLD boat-tail with a high ballistic coefficient. This needs a 10-twist barrel.
Panda Action, McMillan Stock, Weaver T-36
As you can see, I went with a Panda polished action and a weighted McMillan BR stock painted metallic silver with red candy cane stripes thus the name “Peppermint”. This gun actually does double duty now as a 25 BR and 6 PPC switch barrel. When I want to run the gun as a 6 PPC for short range, I simply screw on the PPC barrel, then swap in a bolt (fitting the PPC bolt face) from another Panda action I own. That’s one advantage of owning custom Kelbly actions! Don’t even think about exchanging bolts between factory guns. Kelbly rings and a Weaver T-36 fixed-power scope handle the optical duties while a Jewell trigger set at one ounce takes care of the firing mechanism.
Chambering for the .25 Caliber BR Wildcat
I wanted a chamber that would let me shoot both the 110s and the 115s. I took some time surfing the net looking for rental reamers that had suitable throat dimensions. I found that Elk Ridge Reamer Rentals had a 25 BR pilot reamer available. I called and Elk Ridge faxed me a reamer diagram that indicated it was designed to tight SAMMI specs. I asked how often was the reamer used and was told “not very often”.
I did want a minimum no-turn neck optimized for Lapua brass. The drawing indicated that the reamer would cut a .281″ neck and a throat of 1.0315″. This was very close to ideal, though I did have to turn two thousandths off the necks of Lapua 6BR brass after I necked it up. I resized using a .277″ bushing and the loaded rounds came out to be .279″. Realizing that this was in the ball park, I decided to go with the Elk Ridge Reamer and build a 25 BR that could shoot 110gr or 115gr bullets. Now the question was where to get a match-grade 25-caliber barrel. I called quite a few of the custom barrel-makers, including BlackStar Barrels in Texas (no longer operating). I have had wonderful success with the BlackStar barrel on my 6BR “Chantilly” — it delivered great accuracy and impressive velocities. Since the 25 BR was so similar, I went with another BlackStar. I ordered a 10-twist, 6-groove, 1.250″-diameter straight-contour tube.
After chambering, the barrel finished at 1.245″ diameter and 27.5″ inches with an 11° crown. I actually had the throat lengthened to accept both Berger 110gr and 115gr bullets. The bases of the FB 110-grainers sit flush with the neck-shoulder junction, when they are seated .010″ into the lands. With the longer 115gr VLDs, the bottom of the bearing surface (i.e. start of boat-tail) is just about even with the neck-shoulder junction.
Accurate Load Development
The barrel broke in easily with just 10 shots, using a “shoot one and clean” process. The load I started with was 31.5 grains of Varget with CCI 450 primers. The Berger 110s and Berger 115s had the same Point of Impact (POI) at 100 yards. However, the 115s impacted two inches higher at 600 yards with the same load. That shows the benefits of a higher BC. Pushed by the CCI 450s and 31.5 grains of Varget, the 115-grainers were running about 2837 FPS. I boosted the load up to 32.0 grains but I noticed primer cratering, so I backed off, settling on 31.5 grains for the 115gr Berger VLD.
Peppermint Wins at 600 Yards
For her debut in competition, I took “Peppermint” to our local 600 yard F-class match. Shooting the Berger 115s with 31.5 grains Varget, she won with a perfect score of 200 with 14 Xs. At my club, we use a SR3 target. The X-Ring measures 3″ in diameter and the 10-Ring measures 7″. At the match there were some very good shooters with top-flight custom rifles in accurate calibers such as 6.5-284 and 22 Dasher. I was very fortunate to come out on top, but I give the credit to Peppermint’s good bench manners and outstanding accuracy.
As you can see from the target, “Peppermint” is a very accurate rifle that has proven herself in competition. It takes a good gun to finish “on top” in her very first match. So far, I’m very happy with the project, and more than satisfied with the accuracy of the 25 BR. This is definitely a worthy cartridge for Egg Shoots, 500m varmint matches, and the 600-yard F-Class game.
BR-Based Cartridge Comparison
CALIBER
22 BR
6mm BR
25 BR
6.5 BR
7 BR
30 BR
Bullet
80gr SMK
107gr SMK
115gr Berger
107gr SMK
130gr SMK
118gr BIB
BC
.420
.527
.522
.420
.391
na
Load Grains
31.0 H4350
30.0 Varget
31.5 Varget
32.0 Varget
34.0 AA2460
34.0 H4198
Barrel Length
27″
27″
27.5″
27.5″
28″
24″
Velocity
3100 fps
2880 fps
2837 fps
2851 fps
2719 fps
2970 fps
Comparing the BR-Based Variants
Now that I have several calibers in the BR cartridge family, (22 BR, 6mm BR, 6.5 BR, 7 BR, and a 30 BR), it is my humble opinion that they each have their own place. A varmint hunter’s dream, the 22 BR can push a bullet faster and more accurately than the 22-250. With an 8-Twist barrel, the 22 BR can send an 80gr SMK to 600 yards with extreme accuracy.
The 6 BR can do it all. The 6mm caliber offers a wide variety of quality bullets suitable for any shooting situation. All the major custom barrel makers produce outstanding 6mm barrels in a full range of twists. Moreover, since the 6 BR cartridge is so popular, there is a great store of knowledge about reloading for the 6 BR. It is easy to find a load that will shoot superbly in any bullet weight.
The 25 BR has proved to be easily tuneable, proficient and not fickle. You can obtain extreme accuracy without great effort in load development. The 115gr Berger offers a good high-BC projectile for this caliber, making the 25 BR a viable alternative to the 6 BR. As I’ve shown, it is competitive with a 6 BR in head to head competition.
Compared to the 25 BR, the 6.5 BR has a small edge in ballistics. However, there are not many light bullet choices available, especially from custom makers. The 123gr Lapua Scenar is an excellent bullet with a .547 stated BC, but it may be a bit heavy for the case capacity.
The 7 BR was designed for silhouette shooting, and it excels at that task. The 7 BR can push a 130 grain bullet fast enough to knock over the steel silhouettes at 500 meters with real consistency.
The 30 BR is nothing less than outstanding. The 30 BR is now the dominant cartridge on the benchrest Score-shooting circuit. It is also highly accurate for group shooting at 200 yards and very capable of winning a 600-yard F-Class match. Barrel life of over 6,000 rounds is realistic.
I like all the “flavors” of BR derived from the 6mm BR Norma case. However, if I could only have one BR in my safe, give me my 8-Twist, 6 BR “Chantilly” and I will be a happy camper. The final point I would make is if a cartridge is stamped BR on the case, it will shoot extremely accurately if you can.
We like Lyman’s Electronic Digital Trigger Pull Gauge, which is faster and more precise than the previous model. The latest Lyman Pull Gauge measures trigger pull weights from 1 ounce to 12 pounds with resolution of 0.1 ounces (2.8 grams). It features an adjustable, 4-position rod which retracts into the gauge body. We think that anyone running match triggers below 2.5 pounds pull weight should have a gauge like this. Among the pull gauges on the market, we think the Lyman unit offers great performance for the price. This gauge has a $67.95 MSRP, but it’s now under $52.00 on Amazon.
Features: More Precise Strain Gauge | Improved Grip Shape | Adjustable Rod Lengths
Lyman’s Digital Trigger Pull Gauge is designed to be the fastest and most accurate trigger pull gauge available. State-of-the-art strain gauge technology allows for repeatable accuracy of 1/10 ounce (2.8 grams). The gauge features a large, easy-to-read LCD display and you can switch from ounces to grams with the push of a button. The gauge can also deliver a pull weight average of the last 10 readings. That’s very helpful, particularly when working with factory triggers that may not be very consistent.
The Lyman Trigger Pull Gauge features a solid, collapsible rod with four locking positions. Being able to adjust length makes it easier to use the gauge with a wide variety of firearms — pistols, rifles, and shotguns. The locking feature prevents the rod from flexing when applying pressure to the trigger. When not in use, the rod conveniently collapses into the gauge body, making the whole unit more compact. The new Trigger Pull Gauge comes in an internally-padded plastic case that can be easily stored in a drawer or on your work bench.
Take a good look at this black-stocked, rimfire benchrest rifle. This just might be the most sophisticated (and accurate) Ruger 10/22 on the planet. This 10/22 was originally acquired as a used “donor gun” for just $98.00. Then its owner Les (aka “Scasa” in our Forum) completely upgraded the rifle from stem to stern. He added a rear lug to the receiver, threaded the receiver, installed a new barrel, and upgraded the trigger. Then he crafted the handsome benchrest stock from wood. He even designed and crafted the barrel tuner AND built the sophisticated shooting rest himself.
Overall, Les imagines he has over 1000 hours of design, fabrication, and fitting in this project. But the hard work paid off — this one-of-a-kind Ruger 10/22 shoots tiny groups. Is this the most accurate 10/22 on the planet? Possibly. But without question, it is the most sophisticated, do-it-yourself Ruger 10/22 project gun ever created.
$98 Ruger 10/22 Transformed into Tack-Driving Bench Gun
Report from Les E. (aka “Scasa” in our Forum)
I long thought I’d someday put an upgraded Ruger 10/22 together but the big hold-up was the receiver. I really wanted a threaded barrel/receiver and a rear lug for two-point mounting. They do make a rear lug that attaches to the rear of some aftermarket receivers but it’s just a little tab that attaches to the back, not what I would call really solid. So one day while hanging out at the local gun store I saw a Ruger 10/22 on the used gun rack for just $98.00. I latched onto it and I had my donor gun. This was an early gun that had the two guide rails for the bolt, walnut stock, and metal (not plastic) furniture.
Finished 10/22 rifle with rifle stock, tuner, and aluminum shooting rest all built by Les.
I then began a complete transformation of the rifle. Little did I know that, by the end of the project, I would put in about 1000 hours of labor. There were several things I wanted to make quite different than Ruger’s original design. First was to add the rear lug. Then get rid of the trigger pins. I also threaded the barrel hole in the receiver to get rid of the wedge. I also wanted to fix the bolt release. Of course that all required a new stock too.
In this video, Les explains the major upgrades he did to the Ruger 10/22:
Interested in this rifle build? Talk about it in our Shooter’s Forum. Rifle owner/builder Les can answer your questions about this Ruger 10/22 in this Forum Thread.
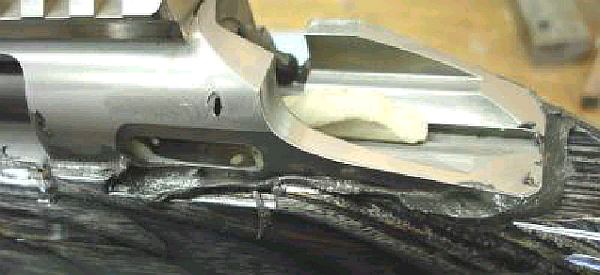
The Ruger 10/22 receiver was threaded to accept a more traditional barrel installation. Below is a conventional 10/22 drop-in barrel. Note that normal barrel is NOT threaded at receiver end, but slides in and then is held in place with a “wedge” locking block.
I made a rear lug that attaches to the back of the Ruger receiver with four, 6-32 screws and glued with JB Weld and filed to match the receiver contour.
Shown above is the completed gun before stock painting. The stock is made from nine pieces of Poplar 1x2s, with lots of sanding and black satin paint. Above is a photo of the stock before painting. As you can see, the laminations were stacked vertically. The rifle sits on a one-piece shooting rest I also built.
Editor: Les designed and crafted this sophisticated shooting rest himself. That’s right — this is a DIY rest! Les told us: “I built the rest from scrap aluminum. The design came from looking at rimfire rests online. Probably the Pappas Rest was the greatest influence. That Pappas rest cost about $1100.00 at the time for a polished one. I have less than a hundred dollars in mine now, but I’ve got a couple WEEKS of work in it. I’ve made two of them, one for my rifles and one for my benchrest pistol. It’s a lot of work to sand and polish, but in the end you have a solid shooting platform. Keep it waxed to preserve the shine.”
Watch Les shoot his fully-transformed and upgraded Ruger 10/22 with rest he built:
Editor: In the above video Les shoots his fully-upgraded Ruger 10/22 from a sophisticated one-piece rest he built himself. You can see how well the rest handles his upgraded Ruger 10/22. Below are the two 5-shot groups shot at 25 yards with this rig in the video. Very impressive! The ammo used was Wolf Match Extra.
More Upgrades — Trigger Pins, Bolt Release and More…
The trigger pins were replaced with 10-32 socket head screws which required threaded bushings to be put in the left side of the receiver and access holes in the right side of the stock. Now the trigger group and bolt can be removed without taking the action out of the stock. This also pulls the receiver sides together reducing bolt clearance. The trigger is shimmed with a piece of shim stock so it can’t be too tight.
There are several “How-Tos” which cover conversion of the manual bolt release to an auto bolt release, but it still requires a little fiddling with the darn thing. So instead of having it pivot on a slot, I welded up the slot and now it’s just a hole. I also welded on some more length and put a little knurled knob on it. With those modifications, it now works perfect.
The trigger housing is factory Ruger acquired at a gun show 25 years ago with Volquartsen hammer and sear. The barrel is a Green Mountain blank turned, threaded, and with a Bentz chamber. I made the barrel tuner. The rifle is fitted with a BSA 36-power scope I bought for $125.00 from the AccurateShooter Forum classifieds. There may be another $250.00 or so in parts and accessories I bought.
Editor’s Commentary — This project started with an old, used $98.00 Ruger 10/22 rifle. Now the transformation is complete. It took Les countless hours, and lots of effort, but he is deservedly proud of the end result. The excellence of the upgraded 10/22 is matched by the sophisticated, unitized aluminum shooting rest Les built. Very impressive design and execution.
So How Does it Shoot? Very Nicely Indeed!
Les reports: “Above is a target with some 3-shot groups while playing with the tuner. Those groups were shot at 25 yards. I figure at that distance I’m testing what the gun will do, not how well I can read the wind, not well and its been really windy. If I can get one clean hole 5 shots I’m pretty happy.”
Les electro-etched the caliber on the barrel. Les told us: “The machine was easy to make and works really well. It’s just a pain getting stencils.”
Do you own or shoot an AR-platform “black rifle”? Then you know these rifles run dirty, and have some unusual maintenance requirements. On the other hand, the AR “Modern Sporting Rifle” is fun and versatile with a vast range of options among buttstocks, barrels, handguards, and grips. You can assemble a simple 16″ barrel .223 Rem rig for home defense, or build a long-barreled 6mm ARC rifle with bag-rider buttstock and high-magnification optic for long range target work. The choice is up to you.
To help with your black rifle journey, here are eight helpful videos from Brownells. These will help ensure your AR rifle cycles reliably and runs longer, with reduced wear. Brownells also explains how to choose the optimal barrel twist rate. CLICK HERE to order AR parts, accessories, and ammo from Brownells.
AR Bolt/Bolt Carrier Lubrication — Smarter Methods
This video shows the proper way to lubricate an AR-15 bolt-carrier assembly. The video identifies the key metal-on-metal friction points where you actually need lubrication: the rails on the underside of the carrier, shiny wear points on top, and just a dab on the cam pin. How much oil/lubricant should you use? The AR-15 is pretty forgiving on that point. Some spots work best with grease, others work best with a lighter oil. Just keep it out of the combustion areas. Those little holes in the carrier are gas vent holes, NOT oil holes!
AR Maintenance — General Cleaning Procedures
Let’s face it, ARs with the original gas system tend to run dirty. You’ll need to regularly clean the bolt carrier and bolt. In addition you should regularly clean the chamber area and the inside of the upper. Also make sure to clean the lower (see video 3:15) and ensure the trigger assembly is properly maintained. This video covers general cleaning and maintenance of AR-platform rifles. We highly recommend that all new AR owners watch this video. NOTE: When cleaning the bolt, don’t forget the extractor recess and ejector recess. The majority of ARs we’ve seen that did not function properly had gunk (lube, carbon, brass shavings) clogging these areas.
AR Barrel Twist Rates — What You Need to Know
AR barrels can be ordered with a variety of twist rates from 1:12″ to 1:7″. Basically, the longer/heavier the bullet you plan to shoot, the faster the twist rate you need. For example, Sierra recommends a 1:7″ twist rate for the 90gr SMK. A 1:12″ could work with the small lightweight bullets up to 55 grains. The 1:9″ barrel will stabilize the light and mid-weight bullets up to about 77 grains. We recommend a 1:8″ or 1:7″ twist rate for the best versatility. You’ll find a detailed discussion of AR twist rates on PewPewTactical.com.
How to Install an AR15 Trigger Assembly
One of the most common AR upgrades done by black rifle owners is swapping out the trigger for a better unit (perhaps a two-stage). Trigger replacements on ARs can be done fairly easily with basic tools. But there are some recommended procedures to ensure the trigger group swap goes easily. You’ll want to have a proper mount to secure the lower, and tools that fit the pin diameters on your lower.
Must-Have Spare Parts for AR-Platform Rifle
With 350,000 views, this is one of the most-watched AR videos on the Brownells YouTube Channel. Brownells Gun Techs Steve and Caleb list key spare parts AR owners should have. Top of the list are bolt gas rings, which wear out through normal use. Also you’ll want a spare extractor spring and pin, because these both can fail. The cotter pin and cam pin can break, but more often they get lost when the Bolt Carrier Group is disassembled for cleaning. Additionally, the large buffer springs wear out with time, so have a spare. Downstairs on the lower receiver, keep spare springs and detents for the pivot and takedown pins. Finally, if you’ve upgraded your trigger, keep the original one as a backup spare.
Checking Headspace on ARs
In this Tech Tip, Brownells gun tech Steve Ostrem walks users step-by-step through the process of checking headspace on their AR-15 rifles, both new and used. It is very important to have proper headspace to ensure proper feeding and extraction, and to ensure good brass longevity (with less risk of dangerous case separation). Starting at 2:10, this video explains how to check headspace with go/no-go gauges and maximum headspace gauge. Ostrem notes: “If you have an AR that closes on a no-go gauge, we recommend taking it to a gunsmith before heading to the range.”
Excessive headspace in AR platform rifles can lead to dangerous case separation.
Setting Up Gas Tube Systems
This Tech Tip examines AR-platform gas systems, and shows how to select the proper length gas tube, and how to configure multiple tube systems if you change your barrel to different lengths. This is worth watching for anyone re-barreling an AR.
Barrel Gas Block Alignment — Key to Reliable Cycling
In this video, Brownells gun tech Steve Ostrem explains surefire methods to align your gas block. The most common problem with AR builds is poor cycling, commonly caused by misalignment between the gas block and the barrel’s gas port.
Good news for owners of 1903/1903A3 Springfields, M1917 Enfields, and M1 Carbines. The CMP eStore sells brand new chambered, Criterion chrome-moly barrels for these M1903/M1903AC rifles for under $200.00. In addition there are M1 Carbine barrels for $229.50. These authentic-profile barrels are made by Criterion Barrels in Richfield, WI, using the button-rifling process. They are “semi-finished” meaning they come chambered and headspaced within .010″ of finished size, with final fitting to be done by a competent gunsmith. The barrels are also externally Parkerized to match the finish of your vintage ’03, Garand, or M1 Carbine. To order, go to the CMP eStore and click the Barrels Link in the upper left.
NOTE: Final assembly and headspacing by a qualified gunsmith is required!
New 1903 barrels by Criterion Barrels, Inc., 4140 chrome moly steel, button rifled, contoured, and finish lapped after contouring. These comply with CMP competition rules and are legal for the 1903 Matches. Parkerized like the original 1903 and chambered .010″ from finish size to be fitted and headspaced when assembled to fit your receiver and bolt dimensions.
New 1903A3 barrels by Criterion Barrels, Inc., 4140 chrome moly steel, button rifled, contoured, and finish lapped after contouring. These comply with CMP competition rules and are legal for the 1903A3 Matches. Parkerized like the original 1903A3 and chambered .010″ from finish size to be fitted and headspaced when assembled to fit your receiver and bolt dimensions.
New M1917 barrels by Criterion Barrels, Inc., 4140 chrome moly steel, button rifled, contoured, and finish lapped after contouring. These comply with CMP competition rules and are legal for the 1903A3 Matches. Parkerized like the original M1917 Parkerized like the original M1917 and chambered .010″ from finish size to be fitted and headspaced when assembled to fit your receiver and bolt dimensions.
New Carbine barrels by Criterion Barrels, 4140 chrome moly Steel, button rifled, contoured, and finish lapped after contouring. Comply with CMP Competition Rules and are legal for the CMP M1 Carbine Matches. Parkerized like the original M1 Carbine and chambered .010 away from finish size to be fitted and head-spaced when assembled to fit your receiver and bolt dimensions. Barrel is .30 Carbine.


 Can you guess what your next barrel will weigh? In many competition disciplines, “making weight” is a serious concern when putting together a new match rifle. A Light Varmint short-range Benchrest rifle cannot exceed 10.5 pounds including scope. An F-TR rifle is limited to 18 pounds, 2 oz. (8.25 kg) with bipod.


 I give my rifles a pre-season check before the shooting season starts. This starts with a general inspection starting with the butt-plate or recoil pad and making sure that all the screws and adjustable parts (on an adjustable butt-plate) move freely up or down and side to side. If you got caught in rain some of these screws and adjustable parts may not move when needed. I disassemble parts as needed and put rust preventative or a light oil and/or grease on threads and sliding parts. On rifles with recoil pads and fixed butt-plates, make sure the screws are tight and that holes in the stock aren’t stripped out. Make sure there are no cracks in the stock and around the butt-plate. If the recoil pad is glued-on, just make sure it hasn’t come loose.
 With the barreled action out of the stock, it is a good time to spray out the trigger with cleaner. I use Ronson oil or lighter fluid. [Editor’s Note: Some trigger-makers advise against using any kind of lubricant, grease or oil — so plain lighter fluid is preferred.] After the trigger is cleaned you may want to check the trigger pull weight. If you don’t feel comfortable doing this, take it to a gun smith and have it checked. It is worth every penny to not have a trigger issue and/or a safety malfunction. I also take the bolt apart and clean the firing pin spring and bolt housing with Gun Scrubber or automotive brake cleaner. Then lube the firing pin-spring and firing pin with light oil. I use Kel Lube and/or Butch’s gun oil. Put a small dab of gun grease on the [bolt locking lugs] and cocking ramp.
 Next I look at the trigger guard and hinged floor plate and make sure it works as designed. Make sure there are no cracks in the trigger guard from an accidental drop. Check guard screws and /or action screws for tightness and tighten to proper spec. There are torque specs for this, but on wood stocks the wood can crush and this should be checked throughout the year as weather change can affect this. My entire collection of rifles are bedded and I just tighten them just snug with screw driver or Allen wrench. The rimfire rifles have a spec of 55 to 74 inch/lbs and I think would carry over to center fire as well. I would caution you about torque wrenches as you need a good quality wrench, and read the directions on how to use it. You can over torque if not careful. Check the swivel studs and bipod to make sure there tight as well. You may want to take scope off and check the base screws and check the rings.

 Richard Franklin prepared this article for our readers. Richard tells us: “I’m happy to do pillar-bedding work, but this is a job which many shooters can do themselves, with some practice and the right components. I do suggest you practice first on an old ‘beater stock’. When done right, you end up with a perfect fit of receiver to action, with no twisting, stretching, or compression forces being applied to the receiver through mis-alignment. That’s what I mean by ‘stress-free’.”
 Pillars For Bedding
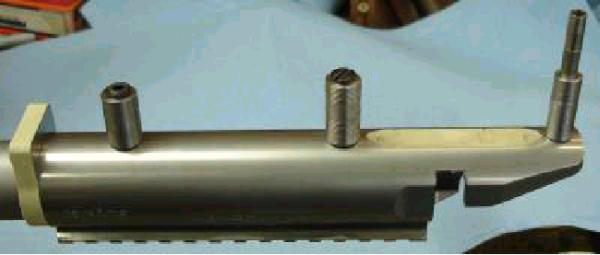

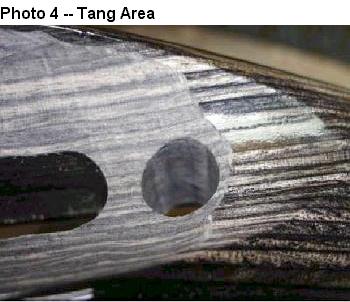 Photo 3 shows the wood removed from the inside of the stock bedding area. Remove enough wood everywhere except along the top sides of the stock to allow at least 1/8″ to 3/16″ of room for the mud. Remove 1/4″ of wood behind the recoil lug. I like about .012″ clearance on the top inside edges.
  The idea is that the barreled action does not touch anything except the bit of original “elevation” wood left at the rear tang (behind the pillar) and the forearm resting on the electrical tape. This is very important to obtain 100% stress-free bedding. You want the bore of the barrel to be parallel with the top edge of the stock so wrap just the right amount of tape to ensure this. The tape also centers the barrel in the fore-arm. Done right, the barreled action will be contacting just at two points (tape in front, tang in rear) and the barrel’s bore will be parallel with the top of the fore-arm’s sidewalls.
 Bedding Compounds
 Contoured vs. Straight (Flat-top) Pillars
 Install the trigger guard back in place on the stock as the guard is used to align the barreled action in the stock. Now is the time to make a trial run to ensure that everything fits properly. Slip the upside-down stock down over the pillars with the headless bolt coming up through the rear bolt hole in the guard. See Photo 7. Ensure that the stock is resting on two spots only–the tape you’ve wrapped around the barrel, and the little bit of wood you left behind the tang bolt. Ensure there is room everywhere around the action to accept the mud. The barreled action cannot be touching anywhere except the tape and the tang. Not even on the top edges of the stock.

 Before you actually install the escutcheons, you need to do some fit testing. Have a trial run at setting the front bolt to the proper length by placing the escutcheon in the hole and screwing in the bolt. Loosen off the back bolt to see if the bolt that is thru the escutcheon is holding the stock firmly in place. Retighten the rear bolt a wee bit.


 I did want a minimum no-turn neck optimized for Lapua brass. The drawing indicated that the reamer would cut a .281″ neck and a throat of 1.0315″. This was very close to ideal, though I did have to turn two thousandths off the necks of Lapua 6BR brass after I necked it up. I resized using a .277″ bushing and the loaded rounds came out to be .279″. Realizing that this was in the ball park, I decided to go with the Elk Ridge Reamer and build a 25 BR that could shoot 110gr or 115gr bullets. Now the question was where to get a match-grade 25-caliber barrel. I called quite a few of the custom barrel-makers, including BlackStar Barrels in Texas (no longer operating). I have had wonderful success with the BlackStar barrel on my 6BR “Chantilly” — it delivered great accuracy and impressive velocities. Since the 25 BR was so similar, I went with another BlackStar. I ordered a 10-twist, 6-groove, 1.250″-diameter straight-contour tube.
 After chambering, the barrel finished at 1.245″ diameter and 27.5″ inches with an 11° crown. I actually had the throat lengthened to accept both Berger 110gr and 115gr bullets. The bases of the FB 110-grainers sit flush with the neck-shoulder junction, when they are seated .010″ into the lands. With the longer 115gr VLDs, the bottom of the bearing surface (i.e. start of boat-tail) is just about even with the neck-shoulder junction.
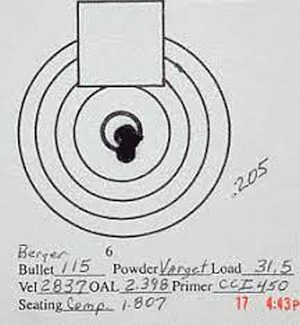 For her debut in competition, I took “Peppermint” to our local 600 yard F-class match. Shooting the Berger 115s with 31.5 grains Varget, she won with a perfect score of 200 with 14 Xs. At my club, we use a SR3 target. The X-Ring measures 3″ in diameter and the 10-Ring measures 7″. At the match there were some very good shooters with top-flight custom rifles in accurate calibers such as 6.5-284 and 22 Dasher. I was very fortunate to come out on top, but I give the credit to Peppermint’s good bench manners and outstanding accuracy.
 Now that I have several calibers in the BR cartridge family, (22 BR, 6mm BR, 6.5 BR, 7 BR, and a 30 BR), it is my humble opinion that they each have their own place. A varmint hunter’s dream, the 22 BR can push a bullet faster and more accurately than the 22-250. With an 8-Twist barrel, the 22 BR can send an 80gr SMK to 600 yards with extreme accuracy.


