This rifle features a massive BAT “L” Round Action, McMillan Beast Stock, 38″ Bartlein 1:7″-twist Barrel, T5 Terminator Muzzle Brake, R.A.D. Recoil Reduction unit, and a customized Cheek Riser. The “Beast” stock name is appropriate — this rifle weighs a massive 38 pounds. Including the T5 brake, the finished barrel, chambered in .375 CheyTac, is 44″ long! All the work was done by Hall-of-Fame shooter and gunsmith Thomas “Speedy” Gonzales, of S.G. Precision LLC in San Antonio, Texas. If you want a rifle like this, Speedy says the lead time is 6-9 months. CONTACT SPEEDY, or call (210) 368-9010, or (972) 672-6630.
Speedy milled vents in the fore-end. He told us “when you’re burning 150+ grains of powder you need all the ventilation you can get to help reduce the barrel heat.”
There are many good brakes out there, then there’s the “TERMINATOR”! — Speedy
The Phoenix Bipod employs a lowering modification.
Krieger Barrels has some great news for Savage rifle owners. This fine cut-rifled barrel-maker, a long-term sponsor of AccurateShooter.com, now offers Pre-Fit (pre-chambered) rifle barrels for Savage actions. With a Krieger pre-chambered barrel, you save time and money — you don’t have to pay a gunsmith hundreds to cut the chamber, and wait weeks (or sometimes months). With the proper GO/NO-GO gauges and barrel nut wrench, most rifle-owners can install their own pre-fit barrel.
SAVAGE PRE-FITS NOW AVAILABLE
Choose from multiple calibers/chamberings and custom contours for large- and small-shank Savage actions. Call Krieger Barrels at (262) 628-8558 to start your order.
On February 26, Krieger announced: “We are happy to announce that we are now taking orders for Pre-Fit Savage barrels for their centerfire bolt action receivers! Many standard cartridges available for both large shank (1-1/8″) and small shank (1-1/6″) actions. You can order our standard contours or come up with a custom contour to fit your needs. Every detail is addressed to make these Pre-Fit Savage barrels the best they can be for your application.”
Pre-Fit Savage barrels start at $515.00 + S&H. Call today to discuss your needs and get a barrel order going! For more information visit KriegerBarrels.com or call Krieger at (262) 628-8558.
Company founder John Krieger hard at work at the Krieger Barrels production facility.
The Berger Southwest Nationals is taking place right now at the Ben Avery Range outside Phoenix, Arizona. At the SWN you’ll see prone rifles and tubeguns for sling shooters, F-TR rifles with fancy bipods, and high-tech F-Open rigs. You might also see a few TubeGuns converted to shoot F-Open off front rests. Yes this is an easy conversion thanks to Gary Eliseo’s clever PickleFork forearm attachment.
Forum Member Killick attached PickleForks to his handsome blue Eliseo R1 TubeGun now chambered in .284 Winchester, a top choice for the F-Open discipline. Killick explains: “Behold! An Eliseo R1 F-Classer. This started out as an R1 Long Range sling rifle (6XC) with a Borden TubeGun action. It is now rebarreled in .284 Win with Gary’s PickleFork fore-end adaptor. Props to Gary Eliseo at Competition Machine LLC.”
Killick adds: “I like how the original fore-end indexes off the back side of the front bag. No need for the front bumper attachment.” Check it out below:
PickleForks are rails that fit to the sides of the tubular fore-end/handguard on Eliseo Chassis systems. This allows you to use a pedestal-style front rest for F-Class competition. It also provides a much more stable platform for load testing, varmint hunting, or any kind of rest-assisted precision shooting. These new PickleForks transform a Tubegun into an ultra-stable, straight-tracking rig when used with a competition-style front rest.
Designer Gary Eliseo explains: “Now you can have the same super low-boreline, long wheelbase and vertical sides of our innovative F1 F-Class chassis system for your tube chassis. The PickleForks attach directly to the sides of the F-Class/Tactical fore-ends, no modifications are required. They are very rigid with no flex or twist and make the rifle track like it’s on rails.” The Eliseo Competition Machine PickleForks are offered for a very reasonable $70.00 per pair, with Cerakote finish. You get two metal units, one for each side of the fore-arm. For more info, visit GotXRing.com or call (928) 649-0742.
This week we return to our 6mmBR.com roots with an article on David Bergen’s slick 24″ Drop-Port Viper. This was one of the first 6BR rifles we featured. David, who hails from Belgium, developed this project over many months, and the gun proved to be a true tack-driver, with the ability to group in the Ones, even with the heavy boat-tail bullets. David talks about the build and his reloading methods while action designer Jerry Stiller provides technical insights into the design features of his Viper action.
It was a long journey looking for the perfect custom action to build my new rifle. I searched the internet and visited various forums. I even re-read all my old Precision Shooting magazines to find what I was looking for. One evening I conferred by telephone with Mr. Jerry Stiller of Stiller’s Actions in Texas. He patiently answered all my questions. That moment I decided that I wanted a Viper Drop-Port action. [Editor: Sadly, the Viper Drop-Port is no longer in production.]
Component Selection At the heart of this gun is a Viper action. This medium-sized action can handle cartridges from a small BR up to a 6.5-284. (Stiller’s smaller Cobra action is for PPC and BRs only.) The Viper is milled from aluminum. This keeps weight down while still allowing Vipers to have a large bedding surface like a Stolle Panda.
At first I was a bit sceptical about the aluminum’s toughness, but Mr. Stiller informed me that the action is the perfect marriage between steel and aluminum. The bolt is hard-chromed and the action body is hard-anodized. This gives it two surfaces that resist wear and make an already-slick action even slicker. Stainless steel is used for all the heavy-stress points including barrel threads, locking lugs, and the rear camming surface. The bolt is made of steel with a very light, small-diameter firing pin to prevent primer piercing with heavy loads. Everything is held very concentric to the bore axis. The Viper is a very smooth action mainly because the design and the precise machining of the camming surfaces. Combined with optimal bolt-lift timing, this gives a smooth action. Stiller also keeps the tolerances very tight on these actions, though they are as fast-handling as any you can buy. The trigger is of course a Jewell BR model.
The rifle is chambered in 6mmBR Norma, my favorite cartridge. I have two HV-contour Shilen match barrels, both with 1 in 8″ twists and finished lengths of 24 inches. The chamber has a .266″ neck so neck-turning is necessary. Freebore is .060″ but combined with a 1.5° throat angle this lets me seat a wide range of bullets from 58 grains up to 107 grains.
The stock is a McMillan Edge with moulded-in gray and black marble swirl. I specified 60% black and dark and light gray both at 20%. I went with the Edge stock because I was always pleased with McMillan products and because it had a very low center of gravity. I wanted the barrels very low in the stock because I think it makes the gun track better.
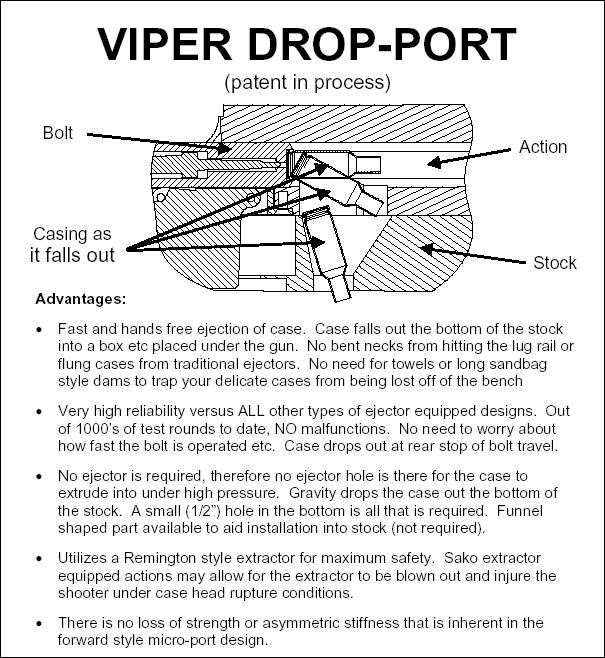
Details of the Drop-Port–with VIDEO! The visible part of the Drop-Port is a cartridge-sized cut-out in the floor of the action. This tapers into a funnel shape that lets the spent case fall nose-first through a single hole in the underside of the stock. The Drop-Port is carefully sized so that empty brass will fall through from gravity but a loaded round won’t. I’ve found that getting a BR case to eject 100% reliably in a standard action is not easy. The round is short and fat so it clears the chamber too early and the ejector pushes the cases out the extractor too fast. This can result in an empty case sitting in your action, no longer held by the extractor. Needless to say, this can slow you down during a stressful competition. When you get a Drop-Port you can forget all those problems.
Failure to eject is NOT going to happen with a Drop-Port. The system just works every time, and it’s FAST. Right-Click on the Media Player image and “Save As” to download a video (6.9 megs) showing me cycling the action during live fire.
One smart feature of the Drop-Port is the extractor location. A Remington extractor is located at the bottom of the bolt. This way the case is supported by the extractor until the front of the case lines up with the cut-out in the action. At that moment the front of the case tilts down and the rim slips out of the extractor. In the stock there is a funnel which collects the case. The case drops out of the rifle through a single small hole in front of the trigger guard.
Building an Accurate Load Tools and Recipes I start with new Lapua cases and after full-length sizing I trim them with a Wilson trimmer. Then I turn the necks for a .264″ neck diameter with a Lapua 105 seated in the brass. After fire-forming I use a “semi-custom” Harrell’s full-length sizing die with bushing. I use a .262 bushing with the moly-coated bullets. This Harrell’s die is the best I ever used — it gives very low run out. [Editor’s Note: Harrell’s stocks a number of dies with various internal dimensions. You send them three fire-formed cases and they’ll pick out a die that fits your brass the best. The cost is very reasonable.] Overall the excellent concentricity I’m seeing with my rounds is a combination of a superb chambering job, a neck-turned Lapua case and the Harrell’s sizing die. The die is supplied with a brass bushing that allows you to measure the amount of sizing you are doing.
For seating I use both a Wilson inline seater (hand die) and a Forster seating die that threads into a press. The latter gets the most use because I find it easier to use. Run out with both is around 0.001″ or better measured on the bullet.
Load development was very easy. I started with Varget and all loads … shot well. Vihtavuori N150 also shot very well with… moly-coated Lapua 105s. To my delight, the light bullets are also shooting very well in the 1:8″ twist. Nosler Ballistic Tips are giving very good results with a case full of N140. I’ve also tried N150, N540 and AA 2520. For all loads I’ve been using CCI BR4. Bullets are seated well into the lands with square marks showing. This gives an overall length around 59 mm (2.32″), depending on the bullet used.
Shooting the Rifle–How It Performs The rifle is very easy to shoot and it is very accurate, but it had some drawbacks in the beginning. First there is the stock. It is designed for bench shooting and on a table it does this very well. I use a Caldwell front rest and a Protektor rear bag. When shooting prone I’ll also use the rest but the cheek weld is not ideal (the Edge was optimized for free recoil shooting from the bench). The rings that are supplied with the action are rather high. I looked around and found some that were lower. This made shooting easier, but I still wasn’t satisfied. The gun was a bit nose-heavy. There is a weight system built into the stock, but it wasn’t enough to bring the gun in balance. I like the balance point to be just in front of the receiver ring. So I cut the rear off the stock and put in a larger tube and turned some weights to put in it. I also made up an aluminum butt plate. Then I installed a Harrell’s brake to cut recoil to a minimum. With these modifications, the rifle is now shooting the way I want. I think the Edge stock is a very good design for benchrest shooting but for prone shooting it has some shortcomings. I think the MBR is a better stock for shooting prone.
Muzzle Brake–Less Recoil, Same Excellent Accuracy After testing the barrel with different loads, I decided to put a brake on one barrel. Most of my guns are muzzle-braked and since I had two virtually identical barrels, I put a Harrell’s brake on one. The barrel had to be threaded to mount the brake and here I was a little concerned–I remembered the advice to “never mess with a winner”. The un-braked barrel was ultra-accurate and I was curious whether the process of fitting the brake might affect the accuracy.
Thankfully, my worries were unfounded. My targets showed no loss of accuracy — there was no evidence that the brake had caused any changes (except as to recoil). I have wondered though, perhaps the brake makes the gun more shootable and in that way compensates for some small accuracy loss that may be there? Whatever the case, the gun shoots just as tight as before, except now it’s a lot more user-friendly with less muzzle hop and less “push” on recoil.
This Rifle Literally Shoots Bug-Holes
And now I come to the end of the story. One day when testing the rifle at 100 meters (with brake installed), I spied a fly on the target. Well now, I thought, here is an interesting “precision shooting” challenge. I put the crosshair on the fly, squeezed the trigger, and the fly was history.
One shot, one kill. Now THAT is impressive precision. If you look closely you’ll see what’s left of Mr. Fly around the bullet hole. Or “bug-hole” as you Americans would say. This kind of performance is a real confidence-booster for the trigger-puller, let me tell you.
The Drop-Port — Simple Yet Advanced
Jerry Stiller tells us: “The drop-port ejects the case out the bottom of the action using only gravity. No ejector plunger is required so the system is as foolproof as anything can be. (A normal spring-loaded ejector creates an uneven load on one side of the case head.) Unlike other ejection systems, micro-ports etc., a Drop-Port doesn’t require tuning or adjusting, and just works. Many top shooters tell us they can cycle rounds faster with a Drop-Port action than with any other design.”
“The engineering of the Viper reflects some key design objectives. I wanted it to be able to fit standard commercially available stocks and have a barrel fit-up that was well known in the industry. I liked the idea of the larger bedding area and higher stiffness of the aluminum actions, so I chose the Panda footprint and barrel tenon for the Viper. I also made some changes to what was available at the time to make the product better. I used a smaller diameter firing pin to eliminate primer piercing, hard anodized all the aluminum parts for corrosion resistance and to make the surface hard and slick. The bolts are also coated for the same reasons.
We’re starting to see barrel tuners employed in more competitive disciplines than ever — from 100 yards to 1000 yards. And even some varmint hunters are employing tuners or tuner/brakes now. This allows them to dial in accuracy with different loads (when shooting hundreds of rounds in a weekend). Here’s a quick over-view of the potential benefits of tuners.
Commentary by Mark Walker, Sierra Bullets Product Development Manager This story originally appeared in the Sierra Bullets Blog. Visit SierraBullets.com.
Some people love tuners and others hate them. I use them on my rifles and I’ve had more than one person ask me why on earth I would put one of those things on my barrel. I’ve even had a national long range champion tell me to unscrew it and throw it into Lake Erie on my next trip to the pits at Camp Perry. However, there are other shooters that swear by them and have many match wins to back it up.
It’s an indisputable fact that tuners do have an effect on a rifle’s accuracy, however how much is somewhat open for debate. The large heavy target barrels that we use for benchrest or F-class may not be affected as much by a tuner as a lighter weight sporter type barrel. Each barrel that I’ve installed a tuner on not only showed improvement in accuracy but also displayed a wider load window. The increased accuracy is because of the ability to adjust the tuner to the load, however I believe the wider load window is due to the added weight of the tuner slowing down the barrel vibrations. These are both very important aspects of having a very accurate rifle.
While better accuracy and a wider load window are two areas of improvement, I believe the most important feature of a tuner is the ability to adjust the tune during the middle of a match. This is especially important during matches where you must load all your ammo earlier and cannot make adjustments to the load during the match. If you happen to miss the load, instead of having to deal with a gun that isn’t shooting you can make an adjustment to the tuner and hopefully improve the accuracy of the rifle.
While I’ve laid out several ways that a tuner can help, there are also a few ways that tuners can cause problems. They add weight so if you are shooting a discipline that has weight limits on the rifle, you may not be able to install a tuner and still make weight. Sometimes, a barrel just doesn’t show improvement with a tuner installed. These are few and far between, but it is something to consider. If you make an adjustment to the tuner in a match, you need to make sure you move it in the right direction. Adjusting a tuner in the wrong direction can cause very large groups. And finally, if they aren’t tightened properly, tuners can come loose during firing which will cause a lot of problems as well.
As you can see, tuners have both positive and negative aspects. In my personal experience, the positives far outweigh the negatives so I will continue to use them on all of my competitive rifles. If you’ve been thinking about installing a tuner, hopefully some of the information that I’ve presented will help you make an informed decision.
In the video below, Forum member (and F-Class ace) Erik Cortina shows how to install a Jewell Benchrest trigger into a Kelbly F-Class Panda action. You could follow the same simple procedure to install a Jewell in a standard Panda action. Kelbly’s sell both standard and long versions of the F-Class Panda action. Both versions feature integral recoil lugs in the front.
To see more detail in this “how-to” video, you can zoom it to full-screen size. Simply click the full-screen icon (4-cornered frame) just to the right of the YouTube logo in the lower right.
Photo by Werner Mehl, www.kurzzeit.com, all rights reserved.
Most serious shooters can tell you the muzzle velocity (MV) of their ammunition, based on measurements taken with a chronograph, or listed from a manufacturer’s data sheet. (Of course, actual speed tests conducted with YOUR gun will be more reliable.)
Bullet RPM = MV X 720/Twist Rate (in inches)
However, if you ask a typical reloader for the rotational rate of his bullet, in revolutions per minute (RPM), chances are he can’t give you an answer.
Knowing the true spin rate or RPM of your bullets is very important. First, spin rate, or RPM, will dramatically affect the performance of a bullet on a game animal. Ask any varminter and he’ll tell you that ultra-high RPM produces more dramatic hits with more “varmint hang time”. Second, RPM is important for bullet integrity. If you spin your bullets too fast, this heats up the jackets and also increases the centrifugal force acting on the jacket, pulling it outward. The combination of heat, friction, and centrifugal force can cause jacket failure and bullet “blow-ups” if you spin your bullets too fast.
Accuracy and RPM
Additionally, bullet RPM is very important for accuracy. Nearly all modern rifles use spin-stablized bullets. The barrel’s rifling imparts spin to the bullet as it passes through the bore. This rotation stabilizes the bullet in flight. Different bullets need different spin rates to perform optimally. Generally speaking, among bullets of the same caliber, longer bullets need more RPM to stabilize than do shorter bullets–often a lot more RPM.
It is generally believed that, for match bullets, best accuracy is achieved at the minimal spin rates that will fully stabilize the particular bullet at the distances where the bullet must perform. That’s why short-range 6PPC benchrest shooters use relatively slow twist rates, such as 1:14″, to stabilize their short, flatbase bullets. They could use “fast” twist rates such as 1:8″, but this delivers more bullet RPM than necessary. Match results have demonstrated conclusively that the slower twist rates produce better accuracy with these bullets.
On the other hand, Research by Bryan Litz of Applied Ballistics has shown that with long, boat-tailed bullets, best accuracy may be achieved with twist rates slightly “faster” than the minimum required for stabilization. The reasons for this are somewhat complex — but it’s something to consider when you buy your next barrel. If, for example, the bullet-maker recommends a 1:8.25″ twist, you might want to get a true 1:8″-twist barrel.
Calculating Bullet RPM from MV and Twist Rate
The lesson here is that you want to use the optimal RPM for each bullet type. So how do you calculate that? Bullet RPM is a function of two factors, barrel twist rate and velocity through the bore. With a given rifling twist rate, the quicker the bullet passes through the rifling, the faster it will be spinning when it leaves the muzzle. To a certain extent, then, if you speed up the bullet, you can use a slower twist rate, and still end up with enough RPM to stabilize the bullet. But you have to know how to calculate RPM so you can maintain sufficient revs.
Bullet RPM Formula
Here is a simple formula for calculating bullet RPM:
MV x (12/twist rate in inches) x 60 = Bullet RPM
Quick Version: MV X 720/Twist Rate = RPM
Example One: In a 1:12″ twist barrel the bullet will make one complete revolution for every 12″ (or 1 foot) it travels through the bore. This makes the RPM calculation very easy. With a velocity of 3000 feet per second (FPS), in a 1:12″ twist barrel, the bullet will spin 3000 revolutions per SECOND (because it is traveling exactly one foot, and thereby making one complete revolution, in 1/3000 of a second). To convert to RPM, simply multiply by 60 since there are 60 seconds in a minute. Thus, at 3000 FPS, a bullet will be spinning at 3000 x 60, or 180,000 RPM, when it leaves the barrel.
Example Two: What about a faster twist rate, say a 1:8″ twist? We know the bullet will be spinning faster than in Example One, but how much faster? Using the formula, this is simple to calculate. Assuming the same MV of 3000 FPS, the bullet makes 12/8 or 1.5 revolutions for each 12″ or one foot it travels in the bore. Accordingly, the RPM is 3000 x (12/8) x 60, or 270,000 RPM.
Implications for Gun Builders and Reloaders
Calculating the RPM based on twist rate and MV gives us some very important information. Number one, we can tailor the load to decrease velocity just enough to avoid jacket failure and bullet blow-up at excessive RPMs. Number two, knowing how to find bullet RPM helps us compare barrels of different twist rates. Once we find that a bullet is stable at a given RPM, that gives us a “target” to meet or exceed in other barrels with a different twist rate. Although there are other important factors to consider, if you speed up the bullet (i.e. increase MV), you MAY be able to run a slower twist-rate barrel, so long as you maintain the requisite RPM for stabilization and other factors contributing to Gyroscopic Stability are present. In fact, you may need somewhat MORE RPM as you increase velocity, because more speed puts more pressure, a destabilizing force, on the nose of the bullet. You need to compensate for that destabilizing force with somewhat more RPM. But, as a general rule, if you increase velocity you CAN decrease twist rate. What’s the benefit? The slower twist-rate barrel may, potentially, be more accurate. And barrel heat and friction may be reduced somewhat.
Just remember that as you reduce twist rate you need to increase velocity, and you may need somewhat MORE RPM than before. (As velocities climb, destabilizing forces increase somewhat, RPM being equal.) There is a formula by Don Miller that can help you calculate how much you can slow down the twist rate as you increase velocity.
That said, we note that bullet-makers provide a recommended twist rate for their bullets. This is the “safe bet” to achieve stabilization with that bullet, and it may also indicate the twist rate at which the bullet shoots best. Though the RPM number alone does not assure gyroscopic stability, an RPM-based calculation can be very useful. We’ve seen real world examples where a bullet that needs an 8-twist barrel at 2800 FPS MV, would stabilize in a 9-twist barrel at 3200 FPS MV. Consider these examples.
MV = 2800 FPS
8-Twist RPM = 2800 x (12/8) x 60 = 252,000 RPM
MV = 3200 FPS
9-Twist RPM = 3200 x (12/9) x 60 = 256,000 RPM
Of course max velocity will be limited by case capacity and pressure. You can’t switch to a slower twist-rate barrel and maintain RPM if you’ve already maxed out your MV. But the Miller Formula can help you select an optimal twist rate if you’re thinking of running the same bullet in a larger case with more potential velocity.
With barrels, one wonders “Can a little more length provide a meaningful velocity gain?” To answer that question, Rifleshooter.com performed an interesting test, cutting a .308 Win barrel from 28″ all the way down to 16.5″. The cuts were made in one-inch intervals with a rotary saw. At each cut length, velocity was measured with a Magnetospeed chronograph. To make the test even more interesting, four different types of .308 Win factory ammunition were chronographed at each barrel length.
Test Barrel Lost 22.7 FPS Per Inch (.308 Win Chambering)
How much velocity do you think was lost, on average, for each 1″ reduction in barrel length? The answer may surprise you. With a barrel reduction from 28″ to 16.5″, the average speed loss of the four types of .308 ammo was 261 fps total. That works out to an average loss of 22.7 fps per inch. This chart shows velocity changes for all four ammo varieties:
Summary of Findings: The average velocity loss per inch, for all four ammo types combined, was 22.7 FPS. By ammo type, the average loss per inch was: 24.6 (Win 147 FMJ), 22.8 (IMI 150 FMJ), 20.9 (Fed GMM 168gr), and 22.5 (Win 180PP).
Interestingly, these numbers jive pretty well with estimates found in reloading manuals. The testers observed: “The Berger Reloading manual says for the 308 Winchester, ‘muzzle velocity will increase (or decrease) by approximately 20 fps per inch from a standard 24″ barrel’.”
How the Test Was Done
The testers described their procedure as follows: “Ballistic data was gathered using a Magnetospeed barrel mounted ballistic chronograph. At each barrel length, the rifle was fired from a front rest with rear bags, with five rounds of each type of ammunition. Average velocity and standard deviation were logged for each round. Since we would be gathering data on 52 different barrel length and ammunition combinations and would not be crowning the barrel after each cut, we decided to eliminate gathering data on group sizes. Once data was gathered for each cartridge at a given barrel length, the rifle was cleared and the bolt was removed. The barrel was cut off using a cold saw. The test protocol was repeated for the next length. Temperature was 47° F.”
CLICK HERE to Read the Rifleshooter.com Test. This includes detailed charts with inch-by-inch velocity numbers, multiple line charts, and complete data sets for each type of ammo. Rifleshooter.com also offers ballistics graphs showing trajectories with different barrel lengths. All in all, this was a very thorough test by the folks at RifleShooter.com.
Much Different Results with 6mmBR and a Longer Barrel
The results from Rifleshooter.com’s .308 barrel cut-down test are quite different than the results we recorded some years ago with a barrel chambered for the 6mmBR cartridge. When we cut our 6mmBR barrel down from 33″ to 28″, we only lost about 8 FPS per inch. Obviously this is a different cartridge type, but also our 6mmBR barrel end length was 5″ longer than Rifleshooter.com’s .308 Win start length. Velocity loss can be more extreme with shorter barrel lengths (and bigger cartridges). Powder burn rates can also make a difference.
The new .224 Valkyrie for AR15-platform rifles has garnered lots of attention lately. That new cartridge has gotten people thinking about the options for an AR shooter beyond the venerable .223 Remington (and 5.56x39mm NATO). While the .224 Valkyrie is good for shooting long heavy bullets (such as Sierra’s new 95gr SMK), there is a simpler, cheaper option for folks who favor “fast and light” — smaller, lower-mass bullets traveling at very high velocities. That option is the 20 Practical, which is simply a .223 Remington necked down to 20 caliber. This little cartridge can launch 40-grainers at over 3900 fps. That’s bookin’. This makes the 20 Practical a great choice for an AR-based varmint rifle.
20 Practical Ultimate Varminter
A decade ago, as a “proof-of-concept”, AccurateShooter.com created a 20 Practical AR15 Ultimate Varminter with a custom 20-caliber upper from Robert Whitley of AR-X Enterprises, LLC. That project rifle was ultra-accurate — every 5-shot group out of the gun was less than the size of a dime. That gun was auctioned off, but Robert Whitley continues to produce custom 20 Practical AR15 uppers. (The 20 Practical cartridge is simply the .223 Rem necked down to 20 caliber — you can use standard .223 brass and load with standard.223 Rem dies. Just swap in a smaller expander and use smaller neck bushings.)
Robert reports that the accuracy of the first 20 Practical AR15 was no fluke. After building six (6) more 20 Practical uppers, he tested them for accuracy and they all shot great. These uppers feature DPMS low-pro receivers with side charging handles. They are fitted with PacNor 1:11″ twist, three-groove stainless barrels.
Robert reports: “We have been making more 20 Practical AR15 uppers and I have to say I am astounded by the accuracy of these things. For shooting little tiny groups out of an AR15 with bullets going 3500+ fps, it’s hard to beat the 20 Practical. Today I test-fired six more uppers, all with 11-twist barrels. Three of the uppers had 24″ barrels, two had 20″ barrels, and one had an 18″ barrel (we call it ‘Stubby’).
In four of these uppers I shot re-sized Winchester brass using 25.3 grains of WC844 powder with Berger 40gr BTHP bullets loaded at 2.225″ OAL (about .015″ off the lands). WC844 is inexpensive military surplus powder that is nearly identical to H335. I tried three different primers and the choice did not seem to matter (CCI BR4, Rem 7 1/2s and Win Small Rifle — the old silver ones). All these four uppers shot great. Here is an animated GIF with targets from uppers #6, 10, and 11. All groups are mag-fed, 5-shot groups shot at 100 yards using a front rest and rear bag.”
Targets Shot with Three Different 20 Practical AR Uppers
For more information visit www.6mmAR.com, or contact Robert Whitley via email: rcw3 [at] erols.com.
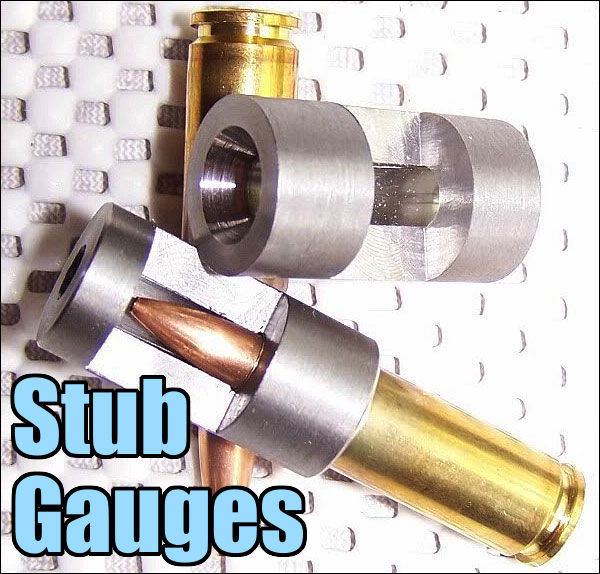
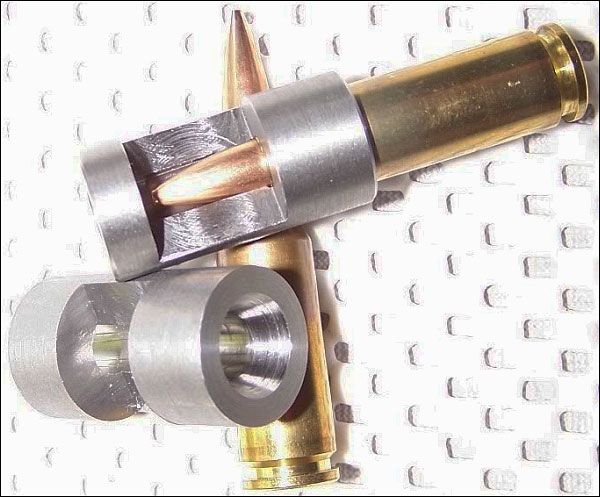
Next time you have a barrel fitted, consider having your gunsmith create a “stub gauge” from a left-over piece of barrel steel (ideally taken from your new barrel blank). The outside diameter isn’t important — the key thing is that the stub gauge is created with the same reamer used to chamber your current barrel, and the stub must have the same bore diameter, with the same land/groove configuration, as the barrel on your rifle. When properly made, a stub gauge gives you an accurate three-dimensional model of the upper section of your chamber and throat. This comes in handy when you need to bump your case shoulders. Just slide a fired case (with spent primer removed) in the stub gauge and measure from base of case to the end of the gauge. Then, after bumping, re-measure to confirm how much you’ve moved the shoulder.
In addition, the stub gauge lets you measure the original length to lands and freebore when your barrel was new. This gives you a baseline to accurately assess how far your throat erodes with use. Of course, as the throat wears, to get true length-to-lands dimension, you need take your measurement using your actual barrel. The barrel stub gauge helps you set the initial bullet seating depth. Seating depth is then adjusted accordingly, based on observed throat erosion, or your preferred seating depth.
Forum member RussT explains: “My gunsmith [makes a stub gauge] for me on every barrel now. I order a barrel an inch longer and that gives him enough material when he cuts off the end to give me a nice case gauge. Though I don’t have him cut that nice-looking window in the side (as shown in photos). That’s a neat option. You can tell how much throat erosion you are getting from when it was new as well. For measuring initial seating depths, this is the most useful item on my loading bench next to calipers. Everyone should have a case gauge made by their smith if you have a new barrel put on.”
Forum member Lawrence H. has stub gauges made with his chamber reamers for each new barrel He has his smith cut a port in the stub steel so Lawrence can actually see how the bullet engages the rifling in a newly-cut chamber. With this “view port”, one can also see how the case-neck fits in the chamber. Lawrence tells us: “My stub gauges are made from my barrels and cut with my chamber reamers. With them I can measure where my bullets are ‘touching the lands’ and shoulder bump dimensions. This is a very simple tool that provides accurate information.” The photos in this article show the stub gauges made for Lawrence by his gunsmith.


 Building an Accurate Load
 Shooting the Rifle–How It Performs
 This Rifle Literally Shoots Bug-Holes


 Implications for Gun Builders and Reloaders


 20 Practical Ultimate Varminter