The Giraud power trimmer indexes off the shoulder of the case. It is costly, but offers high production rates, trimming to length and chamfering in one operation.
The folks at PMA Tool, makers of arbor presses, neck-turning tools, and other case-prep tools, offer some good advice about case trimming on the PMA Tool Blog. Here we reprint a PMA blog post that explains case trimming basics and helps you choose the right case-trimming tool for your needs.
Case Trimming Basics
Trimming the cartridge case to the proper length is a crucial step in case preparation that should not be overlooked or underestimated. The cartridge case or the rifle can be damaged, or even worse you get badly injured. In most instances cases should be trimmed after firing and sizing. Trimming new brass is necessary for a lot of wildcats and can be beneficial in some instances, but by and large, trimming new brass is not necessary for most situations (unless you are neck-turning). Cases should be trimmed after you have sized the case, because the expander ball on the decapping pin can (and will) stretch the neck. Those of us who neck size should get into the habit of trimming after sizing as well. This is a good rule of thumb to go by, and hopefully it will keep you safe during the reloading and shooting process.
There are so many case trimmers out there that work, deciding which one is right for you can be confusing. Even though I have trimmed thousands of cases, using about every method possible, I can’t answer the question of what case trimmer is right for you because of all the variables that may be involved. I can, however shed some light on the subject.
The two most popular designs of trimmers either index (1) off the base or the head of the case, (2) off the shoulder or datum line of the case. There are pros and cons to each and it all depends on what you are willing to live with.
Indexing off the Base (Case Head)
Let’s talk about the first one I have listed, indexing off the base, or the head of the case. The pros to this method are that you can achieve a very accurate over all length and that is after all, what it is all about. The cons to this method are that you can get some variation doing it this way. Let me explain, the base is not always square to the body or can be damaged during firing especially if it is fired through a military style rifle with a very aggressive ejector. These cases should be discarded, but sometimes they can be overlooked. This condition can lead to an over all length that is incorrect. The case head being out of square will be corrected upon firing, however that case will wind up being shorter than the rest of your cases, possibly creating a difference in the neck tension on the bullet. The more you can do to eliminate variables in your reloads the better off you are going to be. This method can also be very slow, and if the user gets careless the result will be a inconsistent over all length.
Indexing off the Shoulder (Datum Line)
The second method I mentioned, trimming off the shoulder or the datum line of the case, has its pros as well. I have found this to be the quickest of the methods and very accurate as well. After the case has been sized through the die the dimensions (particularly the headspace) of the cases are usually very uniform and exact, this allows the case to be trimmed by indexing off the shoulder. This method can be done very quickly, by hand, or by powering either the case, or the trimmer. You also don’t have to worry about the case heads being out of square with the body using this method. Generally the trimming time is cut in half, and this leads to greater focus on the job, without becoming careless.
The PMA Micro-Adjust Case Trimmer indexes case length off of the shoulder of a properly fire-formed and full-length re-sized case. We accomplish this through the use of interchangeable Delrin™ inserts which capture the shoulder and neck of the case. This insert is contained in a spring-loaded tool head that rides on a linear bearing. When the case is captured within the tool head the tool head rotates along with the case, the spring allows for the case to self-align squarely to the cutter and allows you to control the feed rate into the cutter.
— Indexes off shoulder for easy, consistent trim length
— Fully rotating head with bearing for smooth operation keeps cuts square
— Large, ergonomic design fits the hand well
— Sharp carbide cutter for quick, smooth cuts with minimal bur
— Cases captured in Delrin™ (completely non-marring material)
— Spring loaded head allows complete control of rate of feed.
Our trimmer can be used in three ways. The first method utilizes our PMA Tool caseholder drivers and your power screwdriver, drill, case lathe, drill press or lathe. Trimming via this method the case is spun and fed into the trimmer while it is held in your hand. In the second method, the trimmer’s adjustment knob is removed (after adjusting and locking the setting) and the cutting shaft is chucked in a drill, drill press or lathe. Using this method, the case itself is held by hand and fed into the cutter. We’ve found this to be the quickest method to trim.
Summary
The choice is yours to make. I hope that this was some help to you, whether you are looking for your first trimmer or looking to replace the trimmer you have. Just remember to always put safety first and accuracy second, and you will start making little bug holes in no time.
Story Tip by EdLongrange. User Submissions are welcome.
At the request of our readers, we provide select “Deals of the Week”. Every Monday morning we offer our Bargain selections. Here are some of the best deals on firearms, hardware, reloading components, and shooting accessories. Be aware that sale prices are subject to change, and once clearance inventory is sold, it’s gone for good. You snooze you lose.
Here’s a rifle with a smooth three-lug action and good trigger that can take any game in North America. The Browning A-Bolt is justifiably respected as a solid hunting rifle. The 300 Winchester Magnum chambering offers serious hitting power, even at long range. This rifle, with a blued barreled action, normally retails for $600.00+. Now it’s on sale for under $500.00. What’s more Browning will pay the sales tax (up to 8%). That’s right, Browning is currently offering a Sales Tax Rebate for any Browning firearm purchased before April 30, 2016. That will save you forty bucks in states with 8% sales tax.
2. Brownells.com — AR15 Stripped Lower, $59.99
This small pin lower receiver is precision-machined from a 7075 T6 aluminum forging. This versatile, mil-spec lower can be the foundation for rifle builds on 5.56/.223, 6.5mm, 6.8mm, 300 AAC Blackout or other chamberings. Holes, inletting and pin locations have been cut to final dimensions and accept standard AR-15 magazines and components. Right now this Aero Precision lower is on sale at Brownells for just $59.99.
3. Midsouth — Lyman BoreCam Digital Borescope, $222.46
Note: We are repeating this special (first listed last week) because it is the best deal we’ve found on an excellent product in high demand. The Lyman BoreCam is an electro-optical borescope with a digital display. You can record “stills” on a SD card. This is one of the hottest products on the market right now — so hot that it has been back-ordered at most vencdore. But we found some in stock at a great price. Midsouth Shooters Supply now has the BoreCam for $222.46. Grab it while you can at that price. Other online vendors are charging a LOT more (e.g. MidwayUSA price is $259.99).
4. BassPro Shops — Federal .22LR Target Ammo, $4.79/50 Rounds
This Federal Gold Medal Target ammo is MUCH better than common bulk rimfire ammo, yet with this deal, it is only 9.6 cents per round. That’s cheaper than most other .22 LR ammo that’s anywhere near as good. This special is available now from Bass Pro Shops webstore. In addition, Bass Pro is currently offering Free Shipping on orders over $50.00.
Like the RCBS ChargeMaster, this Lyman Gen6 Powder System will automatically dispense and weigh powder charges. This unit features a touch screen, rapid warm-up, anti-static/anti-drift technology, and electronic shielding to resist interference from other electronic devices. It’s a good deal at $205.99.
6. Midsouth — Lyman Bleacher Loading Blocks
Lyman’s new Bleacher Block stepped cartridge holders are great. Use the different levels for sorting brass. Or, migrate the brass from top to bottom as you proceed through case prep stages. Made of durable polymer, Bleacher Blocks are molded in three sizes. The smallest size (with 0.388″-diam holes) fits .223 Rem-size case heads. The middle size (with 0.485″-diam holes) fits .308 Win-size case heads. The biggest Bleacher Block has 0.565″-diameter recesses for magnum-size cases. All three cartridge block sizes hold fifty (50) rounds. Purchase any size for just $5.90 per Block at Midsouth.
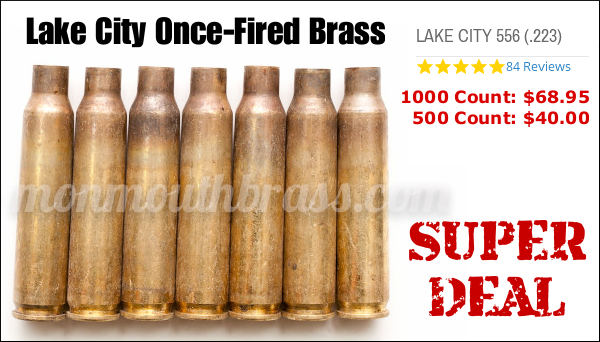
7. Monmouth Reloading — 1000 Lake City 5.56 Cases, $68.95
1000 pieces of Lake City brass for under seventy bucks? Yep, that’s a deal and a half. Monmouth Reloading is selling genuine, once-fired Lake City 5.56x45mm brass, thick-walled and sourced direct from the U.S. Military. Monmouth reports: “Our current stock of Lake City 5.56 looks to be all newer year Lake City head stamp but may contain a small percentage of other NATO headstamps. Lake City is a popular, reliable brass, normally capable of many reloads.” Monmouth includes 1% overage to account for any damaged brass. NOTE: Brass has crimped primers, so the pockets will need to be reamed or swaged prior to reloading.
8. Amazon — Leight MAX NRR33 Earplugs, $7.58 for 50 Pairs.
These Howard Leight NRR33 Max plugs are your Editor’s favorite foam earplugs. Between shooting, motorcycling and mowing lawns, I probably have Max plugs in my ears 2-3 days a week. This is a very good price for a bulk pack of 50 pairs. And if you act soon, you can get free shipping to boot.
Brass jags perform well for their intended purpose — with one hitch. Strong copper solvents can actually leech metal from the jag itself, leaving the tell-tale blue tint on your patches. This “false positive” can be frustrating, and may lead shooters to over-clean their barrels.
Gunslick Nylon Spire-Point Jags
There are now some good alternatives to brass jags. The best may be the Gunslick® Nylon Snap-Lock™ jags shown at right. These never leave a “false positive”. A while back, Larry Bartholome, past USA F-Class Team Captain told us: “The best spear-type jags I have used are the GunSlick black nylon tips. I have used the model 92400 for the last couple years in my 6BR and 6.5-284s. Unlike the white plastic jags, these are strong and there’s no brass to worry about.” You can purchase these nylon jags directly from GunSlick just $1.49 each. At that price, they’re worth a try.
#92400 for 22 through 270 calibers: $1.49
#92421 for 30 through 375/8mm calibers: $1.49
#92423 for 38 through 38/9mm calibers: $1.49
Tipton Nickel-Coated JagsIf you prefer a metal jag, consider the Tipton Nickel-coated Ultra Jags, sold both individually and as a boxed set. We recommend the new-style, 12-Jag Kit from MidwayUSA (Midway item #812503, $16.99). This features an easy-to-use, clear-topped fitted caddy that can lie flat on your bench, or be attached vertically (to save space).All Tipton nickel-plated jags have 8-32 thread, except for the .17 caliber jag which has a 5-40 thread. The vast majority of user reviews have been very positive. A few guys have complained that the nickel-plated Tipton jags run oversize, but we use a .22-caliber jag in our 6mms anyway, so this hasn’t been a problem for us. The 6mm (.243 caliber) nickel-plated jag (MidwayUSA item 259834) costs $4.79.
Another Tipton 12-jag set (photo above right), covering .17 to .45 calibers, including a flip-top carry case, is offered by Midsouth Shooters Supply for $17.62 (Midsouth item 094-500012).
Clear-Coating Your Brass Jags
If you’re reluctant to give up your collection of brass jags (after all they’ve worked pretty well so far), try covering the jag itself with a thin, transparent coating. Forum Member BillPA says: “I give the brass jags a coat of clear lacquer or acrylic; that works for me”. You may need to experiment to find a coating that stands up to your favorite solvent. BillPA says: “The only solvent I’ve found that eats the lacquer off is TM Solution. Butch’s, Shooter’s Choice, or Wipe-Out don’t seem to bother it. Most of the time I use rattle-can clear lacquer”. If you’re feeling creative, you could even color-code your jags by adding tints to the clear-coat.
Wouldn’t it be great if you could quickly and easily adjust shoulder bump during the full-length sizing process, without struggling to move die lock-rings by trial and error (or fiddle with shims). Well you can. The PMA Micro Die Adjuster is a brilliant little device that replaces the lock ring on your FL sizing die. It allows you to move the die up and down in precise, tiny increments. The tool has .001″ index marks, but you can easily set your die between the marks to achieve .0005″ (half-thousandth) adjustments.
To see how the PMA Micro-Die Adjuster works, watch this video by our friend Boyd Allen:
Many of our Forum members now use the PMA Micro Die Adjuster, and they give this specialty tool high praise. Here are actual reviews by Forum members and other verified tool buyers. Read more comments in this AccurateShooter Forum Thread.
PMA Micro Die Adjuster User Reviews
“No more ‘close enough’ for headspace[.] With this tool set-up it’s easy to put headspace exactly where you want it, then repeat it exactly for subsequent batches for the same cartridge.” — JohnF
“I have four of these Micro Adjuster rings and all I can say is that it works and it is repeatable. I bump my brass .0005″-.001″ and this die lock ring will do it without issue.” — TrapperT
“I size brass for four different 6.5×47 rifles (chambered with three different reamers) using a single die, set in the PMA Adjuster. I have to say… I should have bought one sooner. Adjusting it is very quick and repeatable to well under .001.” — /VH
“Great product. Shims used to drive me crazy, put a .002 in and get .0035 of change. With this if you want .0015 set it and that’s what you get.” — John B
“I’ve been using PMA’s lock ring for some time now and find it to be very easy to adjust to within .0005″ on a single piece of brass. Very quick to do as well. One thing I have found is that if you still need that half-thou adjustment I will run the brass once more at the same setting before I make that .0005″ adjustment and 50 percent of the time that does the trick. The marked increments are in .001″ scale so if you go half way in between there’s your half-thousandth.
PMA Micro-Adjuster vs. Shims: With respect to using shims, that requires you to completely remove the die. That gets old rather quickly after having used the PMA adjustable lock ring.” — Patch 700
“I like mine — adjustments are easy and it will adjust very fine. I used to use .001″ shims. Now can adjust my bump as fine as I want.” — Joe139
“The PMA adjuster works just like they say it does and is very simple to use and adjust. I use JLC inserts as well … as nice as they are you’re still hobbled by a click. However with the PMA you can go between what would be clicks. And you can use them … with any die.” — Dusty Stevens
Product Description from PMA Tool
The PMA Tool Micro Die Adjuster (MDA) replaces your existing lock ring and can be used with nearly any 7/8-14 full length sizing die. We successfully used this tool with sizing dies from Redding, RCBS, Hornady, Lee, Harrells Precision and those made from Newlon Precision die blanks. It allows you to easily make adjustments to your “shoulder bump” as fine as .0005″. The engraved marks on the MDA are equal to approximately .001 inches (true adjustment .000992″) of adjustment to the shoulder bump. Splitting the engraved marks is therefore approximately equal to .0005″. The design of the MDA does not allow it to work with the Forster Co-Ax press. Some custom dies for very short cartridges may require the use of an extended shellholder. Micro Die Adjuster shown in use installed on Custom Newlon/Scott 6mm PPC Die and Harrells Precision Compact Press.
Top to bottom – Remington firing pin assembly with ISS, Tubb SpeedLock alloy-composite system without ISS (current versions have dual, opposite-wound springs), and Remington short action firing pin assembly without ISS.
Each Wednesday, the U.S. Army Marksmanship Unit publishes a reloading “how-to” article on the USAMU Facebook page. Last week’s “Handloading Hump Day” article covered mechanical issues and related ignition irregularities that can cause vertical fliers even with good ammunition in an otherwise excellent rifle. We highly recommend you read this article, which offers some important tech tips.
Vertical Dispersion: Mechanical/Ignition Issues?
Poor or inconsistent ignition has long been known to be one of the “usual suspects” when one encounters vertical fliers that just shouldn’t be there. By having a sense of some of the basic principles involved, and a few basic areas to check, the shooter may avoid colsiderable frustration, not to mention time, expensive loading components and barrel wear.
Is your well-built rifle of high-quality components plagued with vertical fliers across more than 1-3 handload combinations? Consider the bedding, crown and scope/sight mounts. Are they correct? If so, then you might check for ignition issues before boldly undertaking an extensive, expensive, and quite possibly fruitless quest for the “magic handload”.
SEEING IS BELIEVING: While the author had been aware for many years that poor ignition should be considered and ruled out when dealing with vertical fliers in an otherwise-excellent rifle, actually seeing the problem and its almost instantaneous cure really drove the lesson home.
He was working with a “dot” rifle – a .22 LR match rifle that really stacked bullets into little piles at 50 yards and beyond. With one lot of ELEY Tenex, it produced consistent “bughole” groups at 50, but with another, selected lot of Tenex, similar groups were regularly ruined by single, vertical fliers that did not appear in other rifles. Rather than spending days burning up expensive, select ammunition looking for “magic lots”, he contacted a well-respected rimfire gunsmith and explained the situation.
Without so much as batting an eye, the highly-experienced ‘smith tore into the rifle’s action, and quickly found the cause(s) of the problem. He discovered a demonstrably weak firing pin spring, plus a chip out of the face of the firing pin where it contacted the cartridge rim.
After replacing and tuning the offending parts, the rifle immediately began shooting tiny, bughole groups with the previously “unacceptable” lot of Tenex. Centerfire rifles can also benefit from ensuring positive, consistent ignition. A wise riflesmith is literally worth his weight in gold!
So, what are some issues we as shooters can inspect in our rifles to help determine if ignition woes could be part of our problem? At the club level, ask yourself if that “experienced” Remington, Winchester 70, or even Springfield-based match bolt gun you’re using is still running its’ original 40-80 year-old factory striker spring? If so, a new replacement is cheap insurance against current or future problems. (And BTW, it might be best to stick to the normal, factory-spec spring weight. A super-powerful spring can cause vertical, just as a weak one one can.) Along with that, a routine check for proper firing-pin protrusion is a quick preventive measure that can rule out potential issues.
Other areas to consider are the centering and consistency of the firing pin’s operation in the bolt. Admittedly, with the increasing use of precision-machined custom actions, this is becoming less an issue every day. Below is the firing pin assembly from a custom BAT action:
However, particularly with factory actions, a very quick and easy check is to remove the bolt, let the firing pin go forward, and look at the firing pin tip through the firing pin hole. Is the tip off-center in the hole, and possibly striking it as it moves forward? Is the hole out-of-round or burred from being struck repeatedly? If so, a trip to the riflesmith is likely in order.
Similarly, machining issues in the bolt/firing pin system can lead to rough and erratic firing pin movement, in which the firing pin drags against an internal surface of the bolt. In high-quality rifles these issues are relatively rare, but not unheard-of, and it takes mere minutes to rule them out. It may be worthwhile to remove the cocking piece/firing pin/spring assembly and look for any unusual gouges, dings, peening, burrs or signs of abnormal wear.
This task is especially easy with Winchester 70s, Springfields, and the similar Mauser 98s, involving little more than the push of a button and unscrewing the cocking piece assembly. This is just one of the many reasons these tried-and-true actions have earned such a loyal following in the field, among hunters who must maintain their rifles away from a shop.
Particularly with older rifles, watch for and remove excess grease (or even Cosmoline!) from both the firing pin assembly and inside the bolt. This can help improve firing pin speed and consistency. Other bolt-action designs may need a take-down tool or other measures.
As part of this inspection, AFTER ENSURING THE RIFLE IS UNLOADED, slowly cock the rifle, dry-fire, and repeat several times. Listen carefully near the action for inconsistency in the sounds it generates. Does the striker falling make the same sound each time? Do you hear or feel grinding upon operation? If so, where?
Be sure to check the operation of the cocking piece (bolt shroud), firing pin within the bolt shroud, the cocking piece cam and the rear of the bolt body where the cocking piece cam operates. As with our examination for abnormal wear marks discussed above, look for marks indicating roughness or a possible need for light polishing. Then, clean and lightly grease the bearing surfaces while you’re at it.
Remington 700 bolt shroud and cocking cam
These are relatively easy checks that shooters can undertake to perform a preliminary inspection on their own. Other mechanical issues can also cause ignition issues, chiefly centered around the action of the trigger, sear and sear spring. If these are suspected, a trip to an experienced, qualified riflesmith for diagnosis is recommended. We hope you find this information helpful! Join us again next week, and in the meantime, enjoy the shooting sports safely!
Midsouth Shooters Supply now carries the full line of shooting and reloading books from Krause Publications at very attractive prices. Looking for reliable reference works on reloading, or a gift for a shooting buddy? You’ll find something worthwhile among the Krause library of gun books, which includes the respected Gun Digest Shooter’s Guides. Match directors also take note — books make great match prizes. Paperback books cost no more than wood plaques but they will provide valuable information for years instead of just gathering dust in a closet. If your club offers training programs, Krause offers many titles that will help new shooters improve their skills.
Here Are Some of our favorite Krause Shooting and Reloading Titles:
Inspect your cases — every time you reload. A tiny flaw could lead to a split neck, case-head separation or worse. The Sierra Blog has a good article this week on case inspection, with many eye-catching examples. Sierra Bullets Ballistic Technician Duane Siercks shows a variety of problem cases and explains the issues he found. Duane states: “Careful case examination is one of the most important safety aspects of the reloading process.”
We recommend that you read the full article. Here are three examples…
Incipient Case-Head Separation
This is a Winchester .308 Win case that has a real issue. This case has a very obvious incipient case head separation in the process of becoming a complete failure.
This is most commonly caused by over-sizing the case causing there to be excess headspace on the case. After a few firings and subsequent re-sizing, this case is just about ready to come completely apart. Proper die adjustment is certainly a requirement here. Of course this case is not safe to reuse.
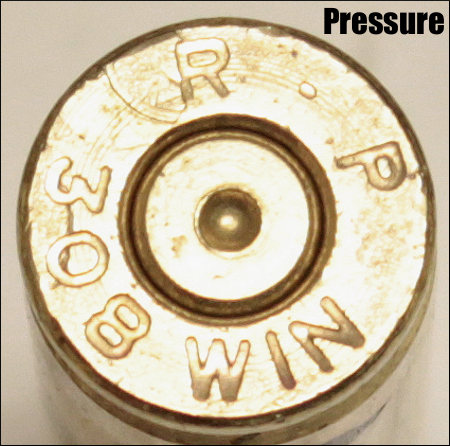
Excessive Pressure (Load Too Hot)
If you will notice in the picture of the case rim, there are two pressure signs to notice. First, look at the primer. It is basically flattened to about the max of what could be considered safe. If this was the only pressure sign noted, I would probably be fine with this load, but would constantly keep an eye on it especially if I was going to use this load in warmer temperatures. This load could easily cross into the “excess pressure” realm very quickly.
There is another sign of pressure that we cannot ignore. If you’ll notice, there is an ejector mark apparent that is located over the “R” of the R-P headstamp. This absolutely tells us that this load would not have been in the safe pressure range. If there were any of these rounds loaded, they should not be fired and should be dis-assembled. This case should not be reloaded.
Split Case-Neck
Here we have an R-P .22-250 case that has died the death. Everything looks fine with this case except the neck is split. This case must be tossed.
A split neck is a normal occurrence that you must watch for. It is caused by work-hardening of the brass. Brass cases get harder with age and use. Brand new cases that are stored for a period of time can become hard enough that they will split like this case within one to two firings. I have had new factory loads do the same thing. Then as we resize and fire these cases repeatedly, they tend to get harder and harder. Eventually they will split. The life of the case can be extended by careful annealing practices. This is an issue that would need to be addressed in an article by itself. Of course this case is no longer usable.
In the classes that I teach, I try to use examples like this to let the students see what they should be looking for. As always, if we can assist you, whether you are new to reloading or very experienced, contact us here at Sierra Bullets by phone at 1-800-223-8799 or by email at sierra [at] sierrabullets.com.
Here’s a great search service that can help you locate hard-to-find ammunition and reloading components — while saving money in the process. Ammoseek.com monitors more than a dozen online vendors — checking current pricing and available inventory, for pistol, rifle, and shotgun ammunition. Need .45 acp ammo for your 1911? Just select “.45 ACP” from the “Quick Seek” list on the right. Likewise you can find .223 Rem and .308 Win Rifle ammo with one click.
Find .22 LR Ammo Quickly
Looking for hard-to-find .22 LR rimfire ammunition? Well AmmoSeek makes it easy — you don’t even have to enter any search words. Simply click on the highlighted links for AmmoSeek’s 22LR Page.
Use Ammoseek.com to Find Reloading Components Too
Ammoseek.com also lets you search for reloading components, including powder, primers, brass, and bullets. This is a huge time-saver. You can instantly check a dozen or more vendors to see if a particular type of powder is in stock. Likewise, you can quickly check for primer availability. If you have a big match coming up and are short on primers — this could solve the problem.
Story Tip by Boyd Allen. We welcome reader submissions.
When we first ran this story a year ago, it spurred a hot debate, with strong opinions on both sides of the issue. Some guys argued vehemently that volumetric powder dispensing was best — citing the experience of short-range benchresters, most of whom still throw their charges. Others say weighing your charges is best, so long as you have a very precise, and very repeatable scale. We know some of the top 1000-yard shooters weigh their charges to the kernel.
The Great Debate: Volume vs. Weight
Most competitive long-range shooters weigh powder charges for their handloads. Some even use ultra-precise magnetic force restoration scales to load to single-kernel tolerances. But is weight-based measuring always the best way to fill a case with powder? Another option is volumetric charging. This method fills a precisely-sized cavity with powder and then dumps the charge into the case. A Harrell’s rotary powder measure works this way, as does the sliding powder filler on a Dillon progressive press.
Lower ES/SD with Precise Weighing
For long-range applications, most people believe that precise weighing of powder charges is the best way to achieve optimal accuracy and low ES/SD. Our testers have definitely seen ES/SD go down when we started weighing charges with a lab-grade force restoration scale. However, those short-range Benchrest guys still do pretty darn well with their thrown charges, at least at 100 and 200 yards.
Our friend Dennis Santiago recently observed something that made him scratch his head and wonder about weighing charges. His AR-15 match rifle shot better with volumetric (cavity-measured) charges than with weighed charges dispensed by an RCBS ChargeMaster. Here’s what he reports:
Cavity vs. Dribble (Dennis Santiago Report) I had the chance to compare nominally identical ammunition loaded two ways. These were all .223 Remington match loads using 77gr Sierra Match Kings over 23.4 grains of Hodgdon Varget. Same gun. However I loaded some ammo with charges dispensed with a Lee cavity-style powder measure while other rounds were loaded with powder weighed/dispensed by an RCBS Chargemaster. The cavity-drop ammo (with powder dropped from the Lee unit) was consistently better than the weighed-charge ammo. I have no idea why…
So, ladies and gentlemen — what do you think? Why did Mr. Santiago’s volumetrically-charged ammo shoot better than ammo filled with weighed charges? What’s your theory? Gary Eliseo suspects that Dennis’s Chargemaster might have been drifting. What do you think? Post your theories in the comments area below.
Estimating Actual Cost per Round by Caliber
This article comes from the USAMU, which provide shooting and reloading tips on its Facebook Page. This week’s USAMU TECH TIP outlines a ballpark-estimate method of calculating the actual cost per round of different calibers. Some applications, and some shooters, by virtue of their high level of competition, require the very best ballistic performance available — “Darn the cost, full speed ahead!
If you are in serious contention to win a major competition, then losing even a single point to inferior ballistic performance could cost you a national title or record. However, this “horsepower” does come at a cost! Some calibers are barrel-burners, and some offer much longer barrel life. Look at this comparison chart:
Estimated Cost Per Round by Cartridge Type
Below are some estimated total expense per round (practice and competition) based on component costs, type used, expected barrel life and a standard, chambered barrel cost of $520.00 across calibers.
5.56x45mm: $0.46/round (barrel life 6,000 rounds)*
6mmBR: $0.81/round (barrel life 2800 rounds)
6XC: $0.97/round (barrel life 2200 rounds)
.308 Win: $0.80/round (barrel life 4500 rounds)
6.5-284: $1.24/round (barrel life 1100 rounds)
*Note the high round count estimate for 5.56x45mm. This is a bit deceptive, as it assumes a period of “lesser accuracy” use. The USAMU says: “Much of the difference you see here between 5.56 and .308 is due to using the 5.56 barrel for 100-200 yard training with less-expensive, 55gr Varmint bullets after its long-range utility is spent”.
Moreover, while some applications require specialized, high-cost components, others do not. And, if the shooter is still relatively new to the sport and hasn’t refined his skill to within the top few percentile of marksmen, a more economical caliber choice can help stretch a limited budget. Translation: More skill per dollar!
In this post, the prices for all items mentioned here were taken from a major component supplier’s current advertisements, and all brass was of top quality, except in the case of 5.56mm. There, 200 top-quality, imported cases were reserved for 600-yard shooting, and the other brass used was once-fired Lake City surplus.
Cartridge cases were assumed to be loaded 10 times each. [Your mileage may vary…] Bullet prices assumed the use of less-expensive, but good-quality match bullets for the bulk of shooting as appropriate.
The cost of top-tier, highly-expensive match bullets was also calculated for a realistic percentage of the shots fired, based on ones’ application. Barrel life by caliber was taken from likely estimates based on experience and good barrel maintenance.
Brass Costs Based on 10 Loads Per Case
Often, handloaders may calculate ammunition cost per round by adding the individual costs of primers, powder charges and projectiles. Many don’t consider the cost of brass, as it is reloaded several times. Here, we’ll consider the cost of enough top-quality brass to wear out a barrel in our given caliber, at 10 loads per case, except as noted above.
Don’t Forget Amortized Barrel Costs
Few shooters factor in the full, true cost of barrel life. Depending on caliber, that can dramatically increase the cost per round. For example, consider a long-range rifle in 6.5/284 caliber. This cartridge performs amazingly well, but at a cost. Ballpark estimated barrel life [in a top-quality barrel] is 1100 rounds. Some wear out faster, some last longer, but this gives a rough idea of what to expect.
Accurate barrels are a joy to use, but they are an expendable resource!
A top-quality barrel plus installation was estimated at about $520.00. At 1100 rounds, barrel life adds $0.47 per round to our total cost. Thus, what had started out as an [components-only estimate, with brass cost] of $0.76/round now totals $1.24 per shot!
Cost Considerations When Choosing a Catridge Type
Some shooters might ask themselves if they could meet their present needs with a more economical caliber. If so, that equates to more practice and matches per available dollar, and more potential skill increase on the available budget.
Each shooter knows his skill level, practice needs, and shooting discipline’s requirements. Some might shoot NRA Service Rifle or Match Rifle using a 5.56mm with a long barrel life. Others might be Match Rifle shooters faced with choosing between, say, a 6mm BR vs. 6XC. A realistic assessment of ones needs, performance-wise, may help guide the shooter toward a caliber that’s most optimized to their needs at the moment.
Admittedly, the factors affecting cost for any individuals circumstances can vary significantly. However, hopefully this will provide one useful method of evaluating one’s training and competition choices, based on their skill, goals and needs.


 Brass jags perform well for their intended purpose — with one hitch. Strong copper solvents can actually leech metal from the jag itself, leaving the tell-tale blue tint on your patches. This “false positive” can be frustrating, and may lead shooters to over-clean their barrels.
 Gunslick Nylon Spire-Point Jags
 Tipton Nickel-Coated JagsIf you prefer a metal jag, consider the


 Is your well-built rifle of high-quality components plagued with vertical fliers across more than 1-3 handload combinations? Consider the bedding, crown and scope/sight mounts. Are they correct? If so, then you might check for ignition issues before boldly undertaking an extensive, expensive, and quite possibly fruitless quest for the “magic handload”.


 The Great Debate: Volume vs. Weight


