What brands are favored by gun guys? Well here are the results of 2015 consumer surveys conducted by Southwick Associates. The surveys asked hunters and shooters to indicate their favorite brands for hunting and shooting product categories. This “Top Brand” list was compiled from 2015 internet-based surveys conducted through HunterSurvey.com and ShooterSurvey.com websites.
In 2015, most frequently purchased brands included:
Top reloading powder brand: Hodgdon
Top reloading bullet brand: Hornady
Top reloading primer brand: CCI
Top rifle ammunition brand: Federal
Top handgun ammunition brand: Winchester
Top shotgun ammunition brand: Winchester
Top blackpowder brand: Pyrodex
Top scopes brand: Leupold
Top binoculars brand: Bushnell
Top GPS device brand: Garmin
Top trail camera brand: Moultrie
Top muzzleloader brand: CVA
Top knife brand: Buck
Top holster/ammo belt brand: Blackhawk
The list above is only a fraction of all hunting and shooting categories tracked by Southwick Associates. Along with many other product categories, Southwick Associates also tracks the percentage of sales occurring across different retail channels, total spending per category, average prices, and demographics for hunters and shooters buying specific products. Additional information tracked includes total days spent hunting and shooting, type of hunting, preferred species and where they go.
Information for many other product categories is available from Southwick Associates, a market research firm specializing in the hunting, shooting, sport=fishing, and outdoor recreation markets. Additional details available include total consumer spending by category, breakouts for caliber and gauge, type of retailer, average retail prices, customer demographics, and more.
Whidden Gunworks makes great sizing and seating dies. The Whidden full-length sizing die with neck bushing is very popular because it allows you to “tune” the neck tension by using different bushings, with larger or smaller inside diameters. In this video, John Whidden explains how to choose a the right bushing size for use with your neck-sizing and full-length sizing bushing dies.
For most applications, John suggest starting with the caliper-measured outside diameter of a loaded cartridge (with your choice of bullet), and then SUBTRACT about three thousandths. For example, if your loaded round mics at .333, then you would want to start with a 0.330 neck bushing. John notes, however, that you may want to experiment with bushings, going down a thousandth and up a thousandth. With thin In addition, as your brass ages and the necks harden, you may want to change your bushing size.
Quick Tip: Try Flipping Your Bushings
You may also want to experiment with “flipping” your neck bushings to alternate the side that first contacts the neck of the case. (One side of the bushing is usually marked with the size, while the other side is unmarked.) So try “number side up” as well as “number side down”. Some folks believe that one side of the bushing may allow a smoother entry, and that this can enhance concentricity. Other people think they can get very slightly more or less neck tension depending on how the bushing is oriented. This is a subtle effect, but it costs nothing to experiment. If one bushing orientation proves better you can mark the “up” side with nail polish so that you can always orient the bushing optimally. NOTE: We have confirmed that some bushings are actually made with a slight taper. In addition, bushings may get distorted slightly when the brand name and size is stamped. Therefore there IS a reason to try both orientations.
Sooner or later you’ll want to clean your rifle brass, even if you aren’t fussy about appearance. You can tumble your cases in a vibratory tumbler with dry media, but that can leave cases with a fine layer of dust, or worse yet, clogged flash holes. As an alternative to tumbling, many shooters are experimenting with ultrasonic case cleaning. Here are three tips to achieve the best results when using ultra-sound to clean your brass:
Try a Commercial Ultrasonic Cleaning Solution
As a companion product to its new ultrasonic cleaning tank, Hornady is selling a citric-acid based One Shot™ Sonic Clean™ Solution, that is claimed to speed up cleaning times, and not leave your brass an odd pinkish color like some “home-brew” solutions. We’ve heard good reports about the One-Shot Solution (cartridge case formula) as well as Citranox®. Both products are economical to use since you dilute them heavily with water. For example, Hornady recommends you mix forty (40) parts water to one part of One Shot Sonic Clean.
Forum member Dave B is a chemist/physicist with decades of experience working with the ultrasound process. Dave tried a variety of solutions and he favors a mix of water and Citranox®. Dave notes: “So far I’ve been very impressed with the Citranox. Once- or twice-fired brass clean up very quickly. The worst cases I tried were 6 Dashers that had been fired ten times with Varget and never cleaned. The worst fouling was in the bottom of the case around the flash hole. They took longer and I used a more concentrated cleaning solution but they did come out clean. The price is reasonable. I paid $35 a gallon and for once- or twice-fired cases I dilute the cleaner 100 to 1. There is much less chemical reaction with the brass than there is with vinegar. No weird colors, just shiny bright. I even used it with hot water, which speeds up the cleaning process. The cleaner is mostly detergents with a little citric acid. Even at a 1:75 ratio my $35 worth of cleaner will make 75 gallons of solution.” The price has gone up a bit since Dave acquired his Citranox, but Amazon.com sells Citranox for $48.00 per gallon.
Another good ultrasonic solution is L&R non-ammoniated Safety Cleaning Solution, sold by Brownells, item #515-000-004. Brownell’s L&R solution is non-toxic and biodegradeable. The strong surfactant in L&R solution helps penetrate the grit so the ultrasonic cavitation can carry the grime away.
De-Gas the Solvent Before Adding Brass
One of our readers, Eddy M. in Glasgow, Scotland writes: “I have read a couple of articles recently about ultrasonic cleaning of cases and not one has mentioned de-gassing the cleaning liquid before starting to clean items. As an engineer who traveled around for ten years servicing ultrasonic tanks I would like to point out that the cleaning liquid when first put into the tank has invisible dissolved air bubbles in it which will absorb ultrasonic energy until the liquid de-gasses. (Ten minutes in a powerful industrial tank — longer in a small hobby tank). You must let the tank run on its own for 20 minutes on the first use of the liquid to allow this to happen. Only after the new liquid or re-introduced liquid has been de-gassed will the tank give good results.”
Apply Dry-Lube Inside Case Necks
Jason Baney has found that Ultrasonic cleaning leaves the inside of the case-necks so “squeaky clean” that there is excess friction when seating bullets. On a fired case that has been cleaned conventionally (no ultra-sound), a thin layer of carbon remains to lubricate the bullet entry and exit. To restore that lubricity in cases cleaned with ultrasound, Jason applies a dry lube to the inside of his case necks. Jason prefers the $10.95 moly dry lube kit from Neconos.com. With this kit, small carbon steel balls transfer moly to the neck when you place your brass nose-down in the container.
We are often asked, “Can you recommend a good reloading book that picks up where the typical reloading manual leaves off — something that goes into more detail about the processes involved.” There is such a book, and it’s fairly recent: Metallic Cartridge Handloading: Pursuit of the Perfect Cartridge, by M.L. (“Mic”) McPherson. Released in 2013, this 425-page book goes into greater depth than McPherson’s popular intro reloading guide, Metallic Cartridge Reloading. McPherson’s latest reloading treatise covers all aspects of the reloading process: the cartridge case; maintaining, improving and loading the case; the seating and reading of primers; the loading of propellant; bullets and the loading of bullets; accurate load development; internal and external ballistics; bullet making and casting; and reloading presses.
With hundreds of photos and illustrations, this book is a good reference for shooters getting started in precision reloading for accuracy. Compared to some other books on reloading procedures, McPherson’s new resource is more up-to-date, so it references more modern reloading tools and techniques. NOTE: This is NOT a reloading manual containing specific load data. Rather, it is a how-to book that covers the process of cartridge reloading from start to finish.
Reviews by actual book buyers: A great resource for handloaders although a little technical for beginners. I have been reloading for 40+ years and picked up some good ideas. — Loren R.
This is a book intended for people who have been reloading for a while. The book contains very detailed information about reloading. — Kaj H.
About the Author, M.L. (“Mic”) McPherson:
Mic McPherson, Technical Editor of Hand Loader’s Digest, is the author of numerous firearms resource books including Metallic Cartridge Reloading and Accurizing the Factory Rifle. He has written scores of articles for leading gun periodicals including Precision Shooting, The Accurate Rifle, Rifle Shooter, and Varmint Hunter Magazine. Mic also served as an Editor of the 8th and 9th Editions of Cartridges of the World.
Take one look at Lyman’s new Bleacher Blocks, and you’ll say “That’s clever, why didn’t anyone think of that before?” These tiered (stepped) cartridge loading trays save space on your bench AND make it easier to select a particular cartridge from a full block. Each row is a different height for convenience.
Here’s what Lyman says about its innovative cartridge block design: “Just as bleachers allow people to see over those in front of them, our new loading blocks allow for easier handling of cases in and out of the loading block. Our stepped design allows you to easily grip a single case without jamming your fingers down into a group of cases like in traditional loading blocks, and allows for a smaller ‘footprint’ on your bench.”
We see many applications for this stepped cartridge holder. Use the different levels for sorting brass. Or, migrate the brass from top to bottom as you proceed through case prep stages. If you are assembling loads with different bullets for load testing, you could arrange the loaded rounds on different levels for easy recognition. (For example put V-Max loaded rounds on the top tier, and Blitz-King loaded rounds on the bottom tier). Or slice a Bleacher Block in the middle to make yourself twin 25-round stepped Cartridge Caddies.
Made of durable polymer, Bleacher Blocks are molded in three sizes to fit a variety of rifle cases. The smallest size (with 0.388″-diameter holes) fits .223 Rem-size case heads. The middle size (with 0.485″-diameter holes) fits .308 Win-size case heads. The biggest Bleacher Block has 0.565″-diameter recesses to accommodate belted magnum-size cases. All three cartridge block sizes hold fifty (50) rounds. Suggested retail price is $7.95 per block and Lyman expects to start shipping later this month.
Product tip from EdLongrange. We welcome reader submissions.
For those who prefer to neck-size their brass (rather than full-length-size), the LEE Collet Die is a popular, inexpensive option. It works by having collet tangs or “fingers” press the neck against a central mandrel. The benefit is that you get a very straight neck, which is sized consistently from top to bottom. Canadian shooter Jerry Teo explains: “LEE Collet Dies produce sized cases with very low runout (measured runout is under .001″ using a Sinclair concentricity gauge). You also don’t get the build-up of brass at the base of the neck, as can happen with bushing neck dies. The neck-shoulder junction stays nice and crisp.”
TIP ONE — Adjusting Tension
LEE Collet dies don’t have a specific mechanical adjustment for neck tension. But you CAN easily modify the die to provide more or less tension. If you want to adjust the neck tension using a Lee Collet die, you can simply chuck the mandrel in a drill and reduce the diameter with some sand-paper (to increase neck tension) or you can order a mandrel the next caliber larger and turn it to whatever diameter you want (the larger the mandrel diameter, the less the neck tension). You can also order custom mandrels from Lee sized to any diameter you want.
Lee also offers Custom Collet Dies, made from two fired cases. Lee offers custom standard collet dies for $78.00 and custom large collet dies for $160.00. CLICK HERE to ORDER.
TIP TWO — Polish and Tune for Easy Case Removal
Some users have complained that their Collet Dies grab the case-neck too firmly, making the case hard to remove. There are solutions to this problem. First inspect the collet fingers and smooth the inner surface up a bit with polishing compound or an extra-fine sanding pad. Second, you can open up the fingers a little bit. LEE recommends that if your Collet Die is sticking, take a steel punch and tap the fingers apart a little bit so that the natural “unloaded” position is wider. Lastly, you should lightly lubricate the outside of the collet fingers (see arrows) before you re-assemble the die. This will ensure they slide smoothly. Also, to prevent the collet fingers from closing too tight, never load up the die with your press without putting a case in place first. Without a case neck between the collet fingers and the mandrel, the collet can clamp itself too tight as you raise the ram.
TIP THREE — Size Twice and Spin Your Case 1/8th Turn
After reaching fully “down” on your press handle, withdraw the case about an inch and manually rotate it about 1/8th (NOT 1/4 or 1/2) turn while still in the shell-holder, then size again. This will place the die’s collet petals on the four “high spots” of the case neck and will result in a rounder, more evenly-sized neck with slightly more bullet tension. This takes only about one second more per case and is well worth the slight extra effort. (We thank reader Stonecreek for this smart tip).
Each Wednesday, the U.S. Army Marksmanship Unit publishes a reloading “how-to” article on the USAMU Facebook page. Yesterday’s post covered primer seating depth. This article offers many useful tips — including a clever way to measure primer seating depth with ordinary jaw-type calipers. Visit the USAMU Facebook page next Wednesday for the next installment.
Primer Seating Depth — Why Uniformity is Important
The first concern is for safety: for that reason, primers should be seated below flush with the case head. One primary cause of “slam fires” (which includes catastrophic failures from firing out of battery) is “high,” or protruding primers. These stand above the case head, are readily felt with simple finger-tip inspection, and may fire when slammed by the bolt face and/or a floating firing pin in feeding.
Here at the USAMU, we ensure our rifle primers generally run -0.003″ to -0.005″ below the case head. Maximum primer depth is -0.006″ and minimum is -0.002″. Upon inspection, any cases with high primers will be corrected before loading. Aside from improving ballistic uniformity, ensuring the primers have proper compression upon seating also helps reduce possible misfires. These can be caused by the firing pin’s expending part of its energy either seating the primer or having to deform the primer cup enough to reach the anvil.
SMART TIP: How to Measure Primer Seating Depth with a Set of Calipers
A zeroed, precision set of standard calipers will also measure primer seating depth. (You don’t really need a custom tool.) Merely close the jaws and place the calipers’ narrow end squarely across the center of the case head/primer pocket. Keeping the narrow end in full contact with the case head, gently open the jaws, and the center bar will extend until it reaches the primer face. Voilà! Primer depth is read on the dial. Taking a few measurements to ensure accuracy and repeatability is recommended until one is familiar with this technique.
Brass and Primer Defects Can Cause Seating-Depth Variances
Factors affecting variance of primer seating depth include brass maker and lot number — all primer pockets are not created equal! Another factor is the primer manufacturer and individual primer lot. We’ve encountered occasional primer lots by top-quality makers that included some primers with slight defects affecting seating. While finely accurate, these primers were out-of-round or had small slivers of cup material protruding which affected primer feeding or seating depth.
Has one’s brass been fired previously? If so, how many times and the pressures involved also affect future primer seating. Obviously, this is another factor in favor of segregating one’s high-accuracy brass by maker, lot number, and number of times fired, if possible.
Measuring Primer Seating Depth with Purpose-Built Gauge
The next question, “How do we measure primer depth?” happily can be answered using tools already owned by most handloaders. [See tip above on how to measure depth with calipers.] At the USAMU, we have the luxury of purpose-built gauges made by the talented machinists of the Custom Firearms Shop. One places the primed case into the gauge, and the dial indicator reads the depth quickly and easily. The indicator is calibrated using a squarely-machined plug that simulates a case head with a perfectly flush-seated primer, easily giving meaningful “minus” or “plus” readings. The gauge is usable with a variety of case head sizes.
Primer Seating with Progressive Presses
Methods of primer seating include hand-seating using either hand held or bench-mounted tools, vs. progressive-press seating. Progressive presses may either seat by “feel,” subjective to each operator, or by using a mechanical “stop” that positively locates primers nearly identically every time. Testing here has shown that we get more uniform seating with the latter type progressive press, than we do with a high-quality bench-mounted tool lacking a positive stop.
Primer stop depth adjustments on our main progressive presses involve turning a punch screw in and out. While the screw is not calibrated, fine “tick” marks added to the top of the press help users gauge/repeat settings by “eye” efficiently with practice. Then, once a sample of primed cases is run to confirm the range and accuracy of depths, the identifying lot number and maker is noted on the press for reference. When it’s necessary to switch brass/primer lots, changes are easy to make and settings are easily repeated when it’s time to switch back.
Are you a 6 PPC shooter who relies on Vihtavuori N133? Or maybe you’re a .45 ACP Bullseye shooter who uses N310 or N320. Or perhaps you favor N150 in your 6mmBR or .308 Winchester. If you are a Vihtavuori powder user (or are considering trying these fine Finnish powders), then check out Vihtavuori’s new FREE mobile App.
The new Vihtavuori Reload App lets you keep track of your favorite reloading recipes, and manage load development. You can log load recipes for as many firearms and cartridge types as you want. The App holds all relevant data — cartridge class, bullet, loads specs. The Vihtavuori Reload App also provides instant access to the latest Vihtavuori Reloading Data as well as other Vihtavuori information. If you want hard copy of your load recipes, just email the recipe(s) to your personal e-mail account and then you can print out the info with a networked printer.
For over 90 years, Vihtavuori has been known for producing high-quality propellants with reliable ballistic performance, long shelf-Life, and a wide selection of burn rates. Vihtavuori powders are manufactured to very high standards, and many world records have been set with Vihtavuori propellants. For more information, visit www.Vihtavuori.com.
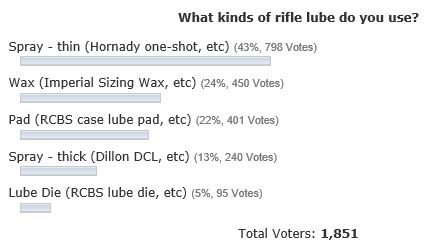
What kind of case lubricant do you use. If you’re like most hand-loaders, you prefer some kind of thin, spray-on lube. Our friend Gavin Gear of UltimateReloader.com surveyed his readers, with the results displayed in the chart below. Thin spray-type lubes took the top spot, followed by waxy-type lubes.* CLICK HERE to Vote in the Case Lube Poll.
Gavin explains: “Over the years, I’ve talked quite a bit about different case lube products and techniques for both rifle and pistol reloading. Depending on your goals, the cartridge being reloaded, and what you have on-hand, your options will typically be honed down to a few ‘best options’. But the more you talk with seasoned reloaders, the more options you’ll discover.”
Synthetic Motor Oil for Special Tasks
One new lubrication option Gavin has tried is synthetic motor oil “I’ve started using another product for rifle case lube: synthetic motor oil. In particular, I’ve been using this oil to ‘prime’ rifle sizing dies when starting a loading session. This priming combined with fresh spray lube (Dillon DCL recently) has been a good combination for .223/5.56 and .308/7.62x51mm loading sessions.
I just pour a bit of synthetic motor oil into the quart jug cap, dip my finger into the cap, and apply about one drop to the outside of the case with my fingers. I then dip the end of a Q-Tip into the oil cap (just a drop applied), and roll the end of the Q-Tip between my fingers. The Q-Tip is then ‘rolled’ inside the case mouth to provide lube for the expander ball. I’m wondering how many thousands of applications I could get out of one quart of motor oil!
*This Editor’s own perference follow this ranking. For regular case-sizing with benchrest cases (and close-fitting dies), I use Ballistol aerosol (active ingredient is mineral oil). Not chalky or gummy, Ballistol is very, very slippery. A thin sheen lubricates extremely well yet wipes off easily. For heavy case-forming duties I use Imperial Die Wax.
Clean and Lube
One advantage of Ballistol is that, wiped on a patch, it will remove carbon residue from case necks. That way you can clean and lube your case in one step before running your case into the Full-length sizing dies. Just spray a little on a cotton patch. After cleaning the case-neck flip the patch over and lube the case body.
You can see scores of new-for-2016 products in the free January digital edition of Shooting Industry magazine. The new product offerings are found in a 28-page feature article starting on page 76 and ending on page 104. In those pages you’ll find new items from leading companies such as: Alliant, Browning, Hodgdon, Hornady, Lyman, Nikon, Ruger, Vortex, and Weaver Optics.
Important New Products
You can also see the new products in Shooting Industry magazine’s regular website, on the New Product Showcase Page. As a teaser, here are three new products from that page — new Alliant Reloder 16 powder, a new Bench-top primer tool from Lee, and a handy Lyman maintenance mat. We are VERY interested in new Reloder 16 propellant. Alliant says RL16 has a burn rate similar to H4350/IMR4350, which would make RL16 ideal for many popular match cartridges.
NEW Product — Alliant Reloder 16 Powder
Alliant Powder Reloder 16 is a propellant that performs consistently across temperature extremes. Its burn rate is slightly faster than Reloder 17’s — well within the 4350 burn speed band. This makes it ideal for traditional hunting cartridges as the .30-06 and .270 Win. It will work as well with 6.5mm target loads and tactical applications where temperature stability is required. The Alliant Powder Reloder 16 contains a de-coppering additive but no toxic DNT or DBP.
NEW Product — Lee Auto Bench Prime
The new Auto Bench Prime from Lee Precision is an easy-to-use bench-mounted priming tool with a large lever that provides good “feel” with plenty of mechanical advantage. The symmetrical design allows for right- or left-hand operation. The Auto Bench Prime includes priming assemblies for large and small primers and a folding tray with a built-in primer-flipping feature. This allows direct filling from large primer boxes. The unit uses special, but inexpensive priming tool shell holders.
NEW Product — Lyman Maintenance Mat
The new Essential Rifle Maintenance Mat from Lyman Products is a smart item that any gun-owner can use. This 10″ x 36″ cleaning/assembly mat features small compartments for tools, parts, and cleaning item. The mat’s firm yet cushioned synthetic rubber surface protects your firearms. The Mainteance Mat’s molded-in compartments keep small parts and screws handy, yet out of the way. The Lyman mat is chemically resistant and cleans up easily.


 Quick Tip: Try Flipping Your Bushings
 Apply Dry-Lube Inside Case Necks


 TIP TWO — Polish and Tune for Easy Case Removal


 Synthetic Motor Oil for Special Tasks


