This article is part of Sinclair Int’l Step-By-Step Reloading Series. Most of the products mentioned in this article are sold through Sinclair’s webstore.
by Roy Hill, Brownells/Sinclair Copywriter
Making your own precision handloads is a meticulous journey with many steps, many important matters to consider, and many sets of measurements to calculate. For those who pursue the perfect group, the highest score, the really long accurate shot, the rewards more than outweigh the effort. Choosing the right cases, deburring the flash holes, making the primer pockets uniform, trimming the cases, and lubricating them are all familiar – and critical – steps along the journey. And now that your brass preparation is complete, you are at last ready to start running the cases through your press and fill them with primers, powder, and bullets. The very first die the brass encounters is the sizing die. You insert the case, work the press’s lever to return the case to its correct pre-fired dimensions – and the journey continues.
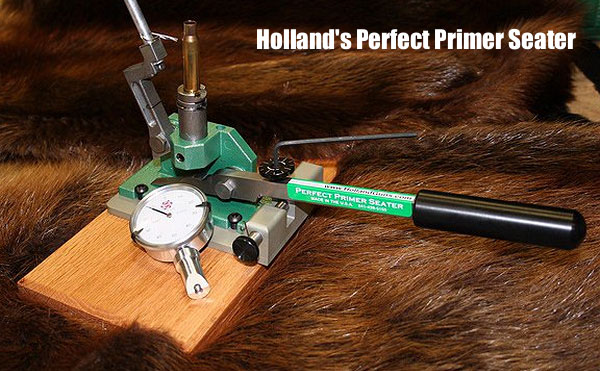
Gunsmith Darrell Holland has invented an interesting upgrade to the RCBS Auto Bench Priming Tool. If your hand starts to hurt after priming dozens of cases with a hand-held, squeeze-type priming tool, you may want to consider Holland’s invention, which he calls the “Perfect Primer Seater” (PPS).
Holland basically has modified the RCBS lever, adding a precise crush control and a means of measuring depth with a gauge. He claims this gives “an EXACT primer seating depth based on primer pocket depth and primer thickness”. With Holland’s PPS, primer seating depth is controlled with a rotating wheel that limits lever travel in precise gradations. You can buy the complete priming system for $215.00, or, if you already own the RCBS Auto Prime tool, you can purchase an adapter kit (with base, arm, adjuster, and gauge etc.) for $120.00. To order, visit Hollandguns.com then click on “Reloading Equipment”.
The $52.99 RCBS Precision MIC is a well-made and useful tool for measuring cartridge headspace and bullet seating depth. The Precision Mic measures from a datum point on the case shoulder to the base. Unfortunately the Precision MIC is not specifically made for the 6mmBR Norma, 22BR, 6XC or 6.5×47 Lapua cases. Don’t despair. Reader Caduceus devised a clever way to adapt a .308 Win Precision Mic for short cases that match the .308 Win in rim diameter and case body diameter. He simply creates a spacer out of a pistol cartridge. He trimmed a 9mm case to 0.511″ and “found this to be a perfect fit which gave a zero micrometer reading when the FL-sized 6BR case was placed in it.” We expect many readers already own a Precision Mic for their .308s. Now you can adapt this tool for the 6BR family of cartridges, for no extra cost. Cut the spacer shorter for the 6.5×47 Lapua and 6-6.5×47 cartridges.
How to Use the Precision Mic with a Spacer Caduceus explains: “I can use the .308 version of the RCBS Precision Mic to compare brass which has been fully sized in my 6BR body die with brass which has been fired in my chamber. With the spacer inserted, FL-resized cases mic 0.000″ at the datum point on the shoulder. Using the same set-up, fire-formed cases measure +0.005″. In other words, my chamber has a headspace of +0.005″ above minimum dimensions. This is fairly typical of a custom rifle set up for switch-barrel use. If I were to FL-resize my brass down to minimum spec each time, this excessive working would shorten its life-cycle and might lead to case head separation. Now that I know the headspace of the chamber, I can substitute the standard shell holder on my press with a Redding +0.004″ competition shell-holder. This ensures that my cases only receive 0.001″ of shoulder set-back.”
Click HERE for a full article explaining how to adapt an RCBS Precision Mic for use with a 6BR. You can do the same thing with a 6XC or 6.5×47 case–just cut the spacer to a shorter length (for an 0.000″ mic reading). Note: You can also use this procedure with an RCBS .243 Winchester Precision Mic.
Forum member Scott S. (Sunbuilder) has built a sweet long-range varminter based on the 6.5×47 Lapua cartridge necked down to 6mm and then improved to 40 degrees, with slightly less body taper. Scott tells us that “improving the case adds about 2.0 grains to the case capacity”. This allows Scott to run the 103-108gr bullets at well over 3100 fps, with no pressure issues. Scott calls his Improved case a “Long Dasher”, a name suggested by Dave Kiff of Pacific Tool & Gauge.
6-6.5×47 Improved Works Well with Many Powders
Scott’s 6-6.5×47 Lapua Improved varmint rifle features a Stiller Diamondback action, Lilja 30″ 8-twist barrel, Richard Franklin stock, and a NightForce 8-32×56 NXS. Scott has had excellent success — his two longest groundhog hits were at 778 and 810 yards. Scott has tested many powders with his 6-6.5×47 wildcat: “I tried several powders (H4350, N160, N560, H4831sc), and primers (CCI 450, BR4, Rem 7 1/2, Fed 205Ms). I got better velocity with H4350, but my barrel likes the N160. I did find a [high-speed] node with H4350. The increased velocity potential of this cartridge is partially due to the slightly increased case capacity. The load I am shooting now is 40.5gr N160, Berger 105gr Match BT, .010″ jam, CCI BR4, .002″ neck tension at 3115 fps. This has an ES under 15 fps, and it will group under 2″ at 500 yards if conditions hold. This ‘Long Dasher’ (6-6.5×47) seems to have a lot of potential (and that’s an understatement).”
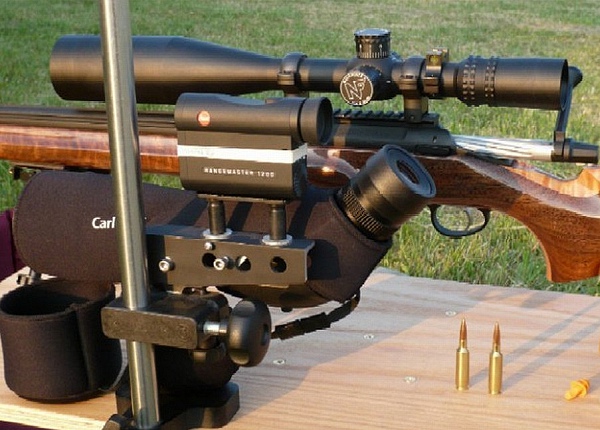
A Better Mount for the Spotter and Rangefinder
Scott designed and fabricated a very slick set-up to hold his Zeiss spotting scope and Leica CRF RangeFinder. He’s built a combo bracket that holds both units rock steady, with a parallel line of sight (same axis and elevation). Smart. Very smart. Scott explains: “I built a mount to connect my rangefinder to my spotting scope. The mount can be adjusted, so the spotting scope and rangefinder are both centered on the same object. The only way I have found to get repeatable long-range readings is to make them from a stable base.” Scott, we think you’ve got a winner here with your innovative and clever design.
Sporter Chronograph Kit includes: Bayonet Sensor, 3.5 foot Data Cable, Remote Display (with Battery), Strap with thumb nut, Two V-block spacers, and compact storage box.
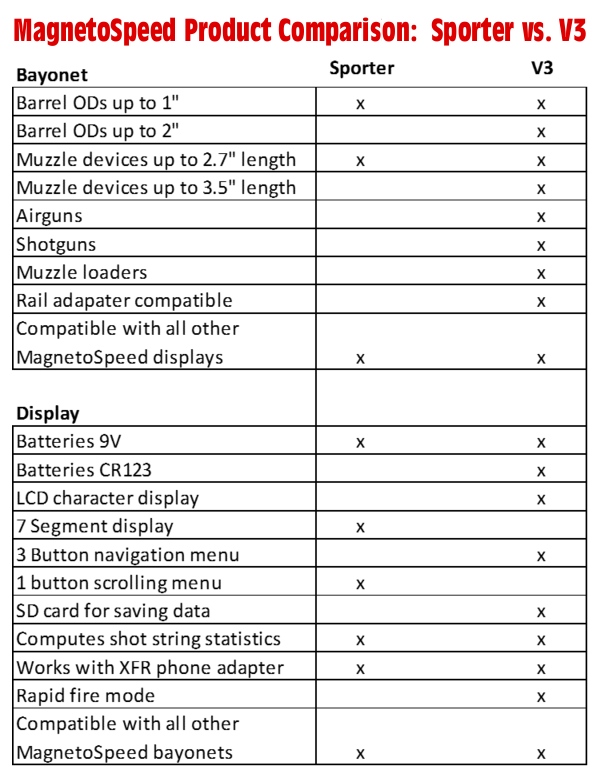
Magnetospeed has just introduced a new bayonet-style chronograph that is less than half the price of previous MagnetoSpeed models. This is big news for shooters who always wanted a MagnetoSpeed but found the $399.00 cost (for V3 model) too pricey. The new Sporter Chronograph will cost just $189.00. It offers most of the features of the more expensive models (see chart below for details) and has a updated sensor. The MagnetoSpeed Sporter chronograph kit was designed to be used on barrels from 1/2 inch up to 1 inch in diameter. In can also accommodate muzzle brakes and flash hiders up to 2.7 inches in length. MagnetoSpeed says its new Sporter is “Ideal for contoured rifle barrels (sporter barrels) and long-barreled revolvers.”
See $189.00 Sporter Chronograph Features Reviewed in Video
MagnetoSpeed Sporter features
Simple, one-button cycling display (shows recent shot velocity and statistics).
Three sensitivity settings for fine-tuning.
Easy access battery compartment, with 9V Battery included.
Integral, quick-attachment system, with metal buckle, nylon strap, screw-in tensioner, and dual V-block spacers (thick and thin).
Bayonet works with Muzzle Brakes and Flash-hiders up to 2.7″ long.
Q: Will the Sporter Chrono work with thicker barrel (i.e. greater than 1″ diameter)?
A: The manufacturer recommends the $399.00 V3 model for thicker barrels. But, wink-wink, if you have a 1.25″ barrel you can get this to work, based on what we’ve seen. If you need to go really fat (up to 2.0″ diameter), get the V3. Magnetospeed also says the V3 is needed for airguns, shotguns, and muzzleloaders.
By Dennis Santiago Competition teaches you things. Compared to loading for benchrest bolt guns, producing ultra-reliable and accurate ammo for tight-chambered, semi-auto .308 target rifles requires a different approach to case prep. Smoothness of operation is much more important in a field course gun. Reliability trumps everything (even case life) for these types of guns.
In the photo below, there’s a Redding small base body die for bumping the shoulder and making sure the case body is at SAAMI minimum. This body die is not just nice to have. It is vital. There are also a full-length sizing die and a Lee Collet neck-sizer in that turret holder. One or the other gets used after the body size die depending on what rifle the ammo will be used in. The semi-auto rounds always go through the full-length sizing die. After that comes trimming and finally cleaning — then loading can begin. The cases are trimmed using a Gracey trimmer so everything’s the same each and every time. I use an RCBS Competition Seater Die to seat the bullets. One nice feature of this RCBS die is the open side slot that allows you to place bullets easily.
It’s a long path methodology but uniformity is accuracy. More important for safety, controlling “stack-up” errors in the system solution is how one achieves reliability. The chamber-hugging philosophies of benchrest bolt guns do not apply well to AR-10s. Like most things, the right answer is context-dependent. Success is about accepting and adapting.
Dennis Talks About Using a Semi-Auto in Tactical Competitions
I have succumbed to the Dark Side — deciding to put an AR-10 together. For tactical competitions you want a bolt gun most of the time but there are times the course of fire favors the use of a semi-auto. I was using an M1A that gives me 0.75 MOA performance but I heard people were getting almost bolt-gun-level, half-MOA accuracy out of their AR-10s — so I wanted to see if that was really achievable. A quarter-MOA difference in accuracy potential may seem tiny in practical terms but it will make a difference in competition. In a match, the difference between 3/4-MOA and 1/2-MOA can alter your hit probability on a small target by 20-30%.
The AR platform also lets you tinker with triggers, stock ergonomics and muzzle brakes that help in managing the dynamics of a long distance shot better. Well I found out you can get the incremental accuracy but there’s more work to do to get the same reliability. Being a curious sort, it’s worth it to me to explore it. It’s a far cry from as-issued M-1 shooting with whatever HXP is handy. This is definitely swimming in the deep end of the pool.
In this video, Forum member Erik Cortina shows how to create a custom modified case for use with the Hornady Lock-N-Load Overall Length Gauge (formerly the Stoney Point Tool). While Hornady sells modified cases for many standard cartridges, if you shoot a wildcat such as the 6mm Dasher or .284 Shehane, you’ll need to create a custom modified case*. And even if you shoot a standard cartridge such as the .308 Winchester you can get more consistent measurements if you make a custom modified case from a piece of brass fired in your chamber.
The process is straight-forward. Take a piece of brass fired in your chamber and full-length size it (with about .002″ shoulder bump). Then you need to drill out the primer pocket. Erik uses a mini-lathe for the operation, but this general process can be done with a drill press or other tools. Erik shows how to do this with a 0.290″ HSS (High Speed Steel) drill bit on a mini-lathe. After drilling the hole comes the tricky part — you need to tap the case with the precise 5/16″ x 36 threads per inch (tpi) right-hand thread that matches the male thread on the O.A.L. Gauge. This 5/16″ x 36 tpi tap is pretty uncommon, but you can order it from Amazon.com if you can’t source it locally.
If you use a mini-lathe, Erik suggests loosening the tailstock slightly, so it can float while cutting the threads. Erik also says: “Make sure you get the tap on pretty tight — it’s going to want to spin.” Erik turns the case at about 100 rpm when tapping the threads. Once the case and tap are rigged, the actual tapping process (see video at 6:00) takes only a few seconds. While the mini-lathe makes the tapping process go more quickly, the threading can also be done with other systems.
TIP: Don’t just make one modified case, make three. That gives you one for your range kit, one for your home reloading bench, plus a spare (since you WILL eventually lose or misplace one).
Here’s the Stuff You Need
5/16″-36 TPI Threading Tap
The required thread is somewhat uncommon. You need a 5/16″ – 36 tpi Right Hand Thread Tap. If you can’t find it locally, Amazon.com carries the correct tap. Erik notes: “The 5/16-36 tpi tap is not a common size. I think Hornady did this on purpose to make it more difficult for the average guy to make his own modified cases.”
0.290″ Drill Bit
Erik uses an 0.290″ HSS “L” drill bit. (This “L” Letter Gauge code designates a 0.290″ diameter bit). A close metric equivalent would be 7.3 mm (0.286″). Erik says: “A 9/32″ drill will also work but it will be harder to run the tap in since the hole will be .281″ instead of .290″ with the Letter Gauge L bit.”
Tips for Using O.A.L. Gauge with Modified Case
We’ve noticed that many folks have trouble getting reliable, consistent results when they first start using the Hornady O.A.L. Gauge (formerly the Stoney Point Tool). We’ve found this is usually because they don’t seat the modified case properly and because they don’t use a gentle, consistent method of advancing the bullet until it just kisses the lands.
Here is our suggested procedure for use the O.A.L. Gauge. Following this method we can typically make three of four measurements (with the same bullet), all within .001″ to .0015″. (Yes, we always measure multiple times.)
1. Clean your chamber so there is no build-up of carbon, debris, or lube. Pay particular attention to the shoulder area.
2. Screw the modified case on to the O.A.L. Gauge. Make sure it is seated firmly (and doesn’t spin loose). Note, you may have to re-tighten the modified case after insertion in the chamber.
3. Place your selected bullet so that the ogive (max bullet diameter) is behind the case mouth. This prevents the bullet from “snagging” as you insert the tool in the action.
4. Insert the O.A.L. Gauge into your chamber smoothly. Push a little until you feel resistance. IMPORTANT — You need to ensure that the shoulder of the modified case is seated firmly against the front of your chamber. You may have to wiggle and twist the tool slightly. If you do not have the modified case seated all the way in, you will NOT get a valid measurement.
5. Advance the bullet slowly. (NOTE: This is the most important aspect for consistency!). Push the rod of the O.A.L. tool gently towards the chamber. DON’T shove it hard! Easy does it. Stop when you feel resistance.
6. IMPORTANT. After gently pushing on the rod, give the end of the rod a couple forward taps with your finger. If your bullet was slightly skewed, it may have stopped too far back. Adding a couple extra taps will fix that. If the bullet moves after the taps, then again push gently on the rod. NOT too much! You just want to push the bullet until it just “kisses” the lands and then stops. Do NOT jam the bullet into the rifling. If you do that you will never get consistent results from one measurement to the next.
* For a $15.00 fee, Hornady will make a custom modified case for you if you send two fired pieces of brass. Send fired cases and $15.00 check to: Hornady Manufacturing, Attn: Modified Cases, 108 S. Apollo St., Alda, NE 68810. More Info HERE.
New for 2015, Redding Reloading Equipment will offer both Standard Full Length and Deluxe Die Sets with the most popular options already included. Branded as Premium Die Sets, these new offerings include a Carbide Expander Button and a Micrometer Adjusting Seat Stem. Redding’s new Black and Gold-boxed Premium Die Sets offer handloaders their most preferred die features in a convenient kit.
Redding recognized that many customers were upgrading their dies in the quest to produce more precise reloads. Accordingly, Redding decided to incorporate the most popular upgrades in the new Premium line. The Carbide Expander Button reduces stress on the case neck and also is free-floating which many believe improves overall concentricity. The Micrometer Adjusting Seat Stem allows for very precise control over bullet seating depth.
The two-die Premium Die Set has a Full Length sizing die and a Seating Die with Micrometer Seat Stem. The three-die, Premium Deluxe Set has those two dies but also adds a Neck Sizing Die. They are available in the most popular calibers offered in the Redding “Series A” calibers. For more info, or to request a copy of the 2015 Redding catalog visit www.redding-reloading.com.
Each Wednesday, the U.S. Army Marksmanship Unit publishes a reloading “how-to” article on the USAMU Facebook page. Today’s “Handloading Hump Day” post covers bore-cleaning, specifically the use of pull-through style bore snakes. Visit the USAMU Facebook page each Wednesday for helpful tips.
Today, we’ll shift from handloading to rifle bore cleaning and maintenance, with information courtesy of the USAMU’s Custom Firearms Shop. We recently had some inquiries about bore cleaning, and this seems a good opportunity to share. After all, even the best handloads won’t yield their full potential in a poorly-cleaned and maintained rifle.
1. BORE SNAKES: MIRACLE REPLACEMENT FOR THE CLEANING ROD?
The experiences of both our firearms test specialist and this writer have given no evidence that proper use of a clean bore-snake will damage a match barrel. Of course, one does not pull the bore-snake at an angle to the crown when removing it — pull it straight out, parallel to the bore’s direction, to prevent crown wear over time.
Bore-snakes are very useful for some applications (primarily a hasty, interim wipe-down). In [my] experience they cannot replace a thorough cleaning with a proper rod and brushes. While the experiment cited here involves rimfire, it may help illustrate. Several years ago, the writer used his new, personal Anschutz to investigate the bore-snake issue. It had been fired ~350 rds with match ammo and had had 3 typical rod/brush cleanings.
Next, starting with a clean bore, the writer fired 300 more rounds without cleaning in order to build up a “worst-case” fouling condition. Afterwards, the writer examined the bore with a Hawkeye bore scope. There was a uniform, grey film down the entire barrel, with some small, intermittent lead build-up at and just forward of the throat.
A new bore-snake was then wet with solvent and pulled through the bore. The Hawkeye revealed that the grey fouling was gone, and much of the visible fouling at the throat was reduced. However, nine more passes with the bore-snake, checking after each with the Hawkeye, revealed no further improvement in cleaning. The writer then cleaned with two wet patches, observed, then one stroke of a new, wet bronze brush, and one wet patch to clean out residue.
The Hawkeye showed a significant reduction in fouling at the throat; it was virtually gone. A second pass with a wet bronze brush and a wet patch removed the remaining fouling. Scrubbing the bore further, checking to see how much fouling was removed, revealed no significant improvement. The reason for this test was to learn what’s needed to get (and keep) this Anschutz clean with minimal cleaning rod use — and thus, minimal risk of bore damage/wear. Leaving fouling in the bore promotes corrosion over time.
Obviously, this applies to a nice, smooth rimfire match barrel, using good, well lubed ammo. It doesn’t apply directly to the use of copper-jacketed bullets, which leave a stubborn fouling all their own. However, it does suggest that while the bore-snake can be helpful and a useful field-expedient, to truly clean a rifle barrel one will still need a good quality rod, bronze brush and solvents. [Editor: Add a good-fitting cleaning rod bore guide
2. SO, WHAT ABOUT BORE SNAKES FOR BARREL BREAK-IN?
The goal of barrel break-in is to fire each shot through a clean barrel, preventing copper buildup and allowing the bullets their best chance at burnishing sharp edges. Thus, it seems this purpose would be best served by one’s usual rods, brushes and rod guides.
Looking for powder? Precision Reloading just received a pretty large shipment of Hodgdon, IMR, and Winchester Powders. This vendor also has popular Accurate, Alliant, Norma, and Vihtavuori Powders in stock. Sorry, no Varget or H4350 arrived, but Precision Reloading does have many popular propellants now. Powders currently IN STOCK at Precision Reloading (as of 9:00 am, 3/12/2015):
Reloading tip: If you currently use Alliant Reloder 15, Norma 203 B is very, very close. It is made by the same manufacturer, in the same plant, with the same burn rate and kernel size. Of course, for safety, you should still start low and work up your load incrementally.


 Caduceus explains: “I can use the .308 version of the RCBS Precision Mic to compare brass which has been fully sized in my 6BR body die with brass which has been fired in my chamber. With the spacer inserted, FL-resized cases mic 0.000″ at the datum point on the shoulder. Using the same set-up, fire-formed cases measure +0.005″. In other words, my chamber has a headspace of +0.005″ above minimum dimensions. This is fairly typical of a custom rifle set up for switch-barrel use. If I were to FL-resize my brass down to minimum spec each time, this excessive working would shorten its life-cycle and might lead to case head separation. Now that I know the headspace of the chamber, I can substitute the standard shell holder on my press with a Redding +0.004″ competition shell-holder. This ensures that my cases only receive 0.001″ of shoulder set-back.”


 Competition teaches you things. Compared to loading for benchrest bolt guns, producing ultra-reliable and accurate ammo for tight-chambered, semi-auto .308 target rifles requires a different approach to case prep. Smoothness of operation is much more important in a field course gun. Reliability trumps everything (even case life) for these types of guns.


 Bore-snakes are very useful for some applications (primarily a hasty, interim wipe-down). In [my] experience they cannot replace a thorough cleaning with a proper rod and brushes. While the experiment cited here involves rimfire, it may help illustrate. Several years ago, the writer used his new, personal Anschutz to investigate the bore-snake issue. It had been fired ~350 rds with match ammo and had had 3 typical rod/brush cleanings.


