The 6.5 Creedmoor cartridge has become extremely popular in the last few years. It is a popular cartridge among PRS and tactical competitors, and has been used successfully by deer hunters and silhouette shooters. Notable major manufacturers such as Ruger and Savage are selling popular rifles chambered for this mid-sized cartridge. The availability of affordable factory rifles chambered in 6.5 Creedmoor further fuels its popularity.
To mark the popularity of the 6.5 Creedmoor, we’ve sourced five videos from YouTube. These videos cover loading for the 6.5 Creedmoor and also test accuracy in both custom and factory rifles. Enjoy this 6.5 Creedmoor Video Fest:
1. Gas Gun Shoot-Out: 6.5 Creedmoor vs. .308 Win
In this TFB TV video, testers put a 6.5 Creedmoor up against a .308 Winchester with AR-10 type rifles. The head-to-head test compares the ballistics, trajectory, recoil, and inherent accuracy of the two popular cartridge types. We can’t call this a definitive test because most 6.5 Creedmoor shooters run bolt-action rifles. The key take-aways are that the 6.5 Creedmoor has significantly less recoil, and a flatter trajectory (at least with typical factory ammo). Still, the video is a good starting point for anyone considering a gas gun in 6.5 Creedmoor.
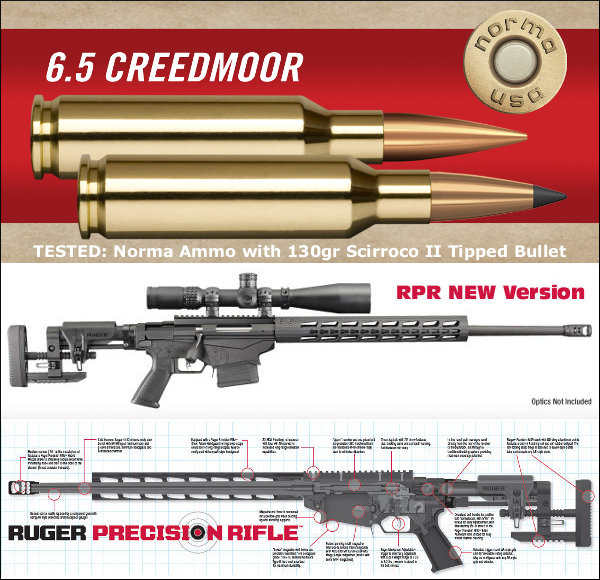
2. Ruger Precision Rifle with Norma 6.5 Creedmoor Ammo
In this video Gavin Gear tests Norma-brand factory ammo in a Ruger Precision Rifle chambered in 6.5 Creedmoor. Gavin reports: “Norma is known for its high-quality brass and ammunition. Recently, I saw that Norma had announced a new addition to their Professional Hunter lineup of ammunition: in 6.5 Creedmoor! I thought I should try some out with the Ruger Precision Rifle. As you saw in the video, this ammunition behaves more like match ammunition.”
3. 6.5 Guys Test Lapua 6.5 Creedmoor Brass in Tactical Rifles
If you have a 6.5 Creedmoor rifle, or are considering getting a gun chambered for this cartridge, we strongly recommend you watch the full 6.5 Guys Video. Ed and Steve spent a lot of time conducting this test, and the video includes helpful summaries of their findings.
4. Reloading for the 6.5 Creedmoor — Gear and Components
If you own a 6.5 Creedmoor rifle, and plan to start hand-loading for the popular cartridge, this video may help you select effective load components. The video examines a wide variety of brass, powder, and bullets options for the cartridge. In addition the reviewer looks at various reloading dies and tools suitable for 6.5 Creedmoor hand-loading.
5. The Springfield Armory M1A — Now Offered in 6.5 Creedmoor
Many folks may not realize that Springfield Armory now makes an M1A chambered in 6.5 Creedmoor. With considerably less recoil, this 6.5 CM version is easier to shoot than the classic 7.62×51 M1A: “Having a 6.5 Creedmoor caliber in the M1A lineup gives long-range shooters more choices with the precision and accuracy they require,” says Springfield Armory CEO Dennis Reese.
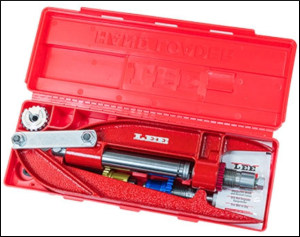
The LEE Breech Lock Hand Press is a useful addition to any reloader’s tool collection. This Hand Press allows you to resize brass or seat bullets while at the range or away from your loading room. No it won’t replace your Co-Ax or Rockchucker, but this is a handy piece of gear. And it’s VERY affordable. The LEE Breech Lock Hand Press (by itself) is $51.99 at MidwayUSA — a great deal. Or, for $72.99 at Midsouth you can get a complete Lee Hand Press Kit including Breech Lock Hand Press, Reloading Die Set, Lock Ring Wrench, Breach Lock Ram Prime, and Storage Box. Choose one of four cartridge types for the provided dies: .223 Remington, 9mm Luger, .38 SPL/.357 Mag, and .45 ACP.
LEE Hand Press Quick-Change Die Functionality
This LEE Press includes the Breech Lock Quick-Change Die Feature, so you can instantly change dies with just a twist of the wrist. One Breech Lock Quick Change Bushing is included. The Breech Lock Hand Press is light and compact. It tips the scale at a mere 1 3/4 pounds and overall product length is 11.5″. Note: the maximum overall length cartridge the LEE Hand Press can accept is 3.650 inches.
While we don’t recommend the Hand Press for major full-length sizing chores, it does a good job seating bullets. This makes it a handy “field expedient” tool when doing load development at the range. For example you can experiment with seating depth by loading a batch of cartridges at home with the bullets deliberately seated long. Then, at the range, you can re-seat the bullets progressively shorter (in a series of rounds), until you find the optimal Cartridge OAL.
LEE’s Hand Press is also great for decapping operations. One verified buyer reports: “I mostly use it for decapping while watching TV, with a universal decapper die. Of course it is also useful for other operations. I wouldn’t love sizing large rifle cases with it, but if you’ve prepped your cases on a bigger press you could comfortably take it to the range for load development, one round at a time, working right there at the line instead of making a bunch of loads at home that you’ll have to disassemble later. It’s smaller and more lightweight than it looks[.]”
Using LEE Hand Press to Load at the Range
To learn more about using the LEE Hand Press in the field with a compact scale, read Reloading Without a Bench on GunsAmerica.com. Author Christopher Mace explains: “Whether you want a better way to do load development, the capability to reload out of your ‘bugout bag’, or you’re short of space but wanting to get into reloading, the LEE Loaders and the LEE Hand Press offer you some options.”
Here’s a helpful hint for hand-loaders from Sierra Bullets. While this article focuses on Sierra’s new Tipped Match-King bullets, the recommended solutions apply to other bullet types as well. The article explains how sharp edges on a seating stem can cause a ring to be pressed into the bullet jacket — especially with compressed loads that resist downward bullet movement. Here Sierra technician Rich Machholz diagnoses the problem and provides a solution.
Solutions for Ring Marks Caused by Seating Stems
by Sierra Bullets Ballistic Technician Rich Machholz
Now that the new Tipped MatchKing® (TMK) bullets are being shipped and shooters are putting them to use I have received several calls regarding marking on the bullet ogive from the seating stem.
The cause can be traced to one of several things. In the .223 and especially with the long, 77 grain TMK seated at 2.250” or even 2.260” most loads of Varget® and Reloder® 15 are compressed loads, sometimes heavily compressed. This puts a great deal of pressure on the bullet through the seating stem. The result of all this pressure is a mark of varying depth and appearance on the ogive of the bullet. [Editor: We have seen this issue with a variety of other bullet types/shapes as well, including non-tipped VLDs. The solution is profiling the internal cone of the seating stem to match your bullet shape.]
Some older seating stems might even bear against the tip of the bullet which can make a slight bulge in the jacket just below the junction of the resin tip and the copper jacket in a compressed load. If this is the case there is not a ready fix other than calling the die manufacturer and requesting a new deeper seating stem.
Polish Your Seating Stem to Remove Sharp Internal Edges
If the seating stem is of proper depth the culprit most generally is a thin sharp edge on the inside taper of the seating stem. This is an easy fix that can be accomplished by chucking a spare 77 grain bullet in your drill, coating it with valve grinding compound or even rubbing compound or in a pinch even tooth paste.* Remove the seating stem assembly from the seating die. Turn the drill on and put the seating stem recess over the spinning bullet with the polishing compound to break or smooth the sharp edge that is making the offending mark. This might take more than one application to get the proper polish depending upon what you use, but the more you polish the better the blend of angles which will [ensure the stem matches the bullet contours, not leaving a sharp ring].
If the above is a little more than you care to tackle you might try very fine emery cloth twisted to a point that can be inserted into the mouth to the seating stem and rotated to polish the inside to eliminate any sharp edges that might be present.
Load Advice for 77gr TMKs in the .223 Rem
And last but certainly not least. Actually, even though we don’t say you need additional data for the TMKs, remember you are dealing with heavily-compressed loads in some cases because of the additional bullet length. Due to the additional length of these new bullets and in the interest of gaining some room in the case you might consider trying a slightly faster extruded powder like BenchMark or the 4895s or an even more dense powder like the spherical H335®, CFE223 or TAC. The extra room will allow for trouble free bullet seating also.
Good luck and remember we are no further away than your telephone: 1-800-223-8799.
Close-up of the Tri-Way Trimmer with clear plastic chip guard removed.
Giraud Tool offers a case trimmer/chamferer device that works with a power drill (or other power source). Giraud’s patented Tri-Way Trimmer is a self-contained unit powered by your drill or motor. Using a sharp carbide blade it will trim your cases to length, deburr, and cut both inside and outside chamfers — all in one pass. That’s pretty impressive for a $120.00 tool that fits in the palm of your hand.
Product Features
1. Fully adjustable for cartridge length (and depth of chamfer).
2. Carbide blade cuts a 15° inside case mouth chamfer and 45° outside chamfer.
3. Case holder supported by sealed ball bearing raceway.
4. Tool includes removable, transparent plastic chip guard.
5. Tool can work in any orientation (vertical, horizontal, or any angle).
The Giraud Tri-Way Trimmer is designed to be powered by a portable hand drill, drill press, or other dedicated rotating power source. The tool indexes off the shoulder of your cases, but the blade adjusts so that cartridge overall length (COAL) can be controlled with precision. Constructed out of 6061-T6 aluminum and 303 stainless steel, the Tri-Way tool should last a lifetime. Note: This tool is not universal. The Tri-Way is dedicated to a single cartridge and “related” cartridges with similar body dimensions. Thus you need a specific tool for each cartridge family. For example, the .308 Win tool will also trim .243 Win, .260 Rem, and 7mm-08.
Do you often load at the range? Or maybe you need to transport loading gear when you travel in your RV. Well here is a smart transport option — a metal box that holds tools, dies, arbor press, case-trimmer, even a ChargeMaster.
Some guys have built their own loading tool-boxes from wood. Other may stuff gear in a couple of plastic range boxes. But clever Chris Covell came up with an even better solution. Chris sourced a handsome, sturdy metal Horse Grooming Box from eBay. Chris reports the multi-feature metal box “works perfectly for reloading. My ChargeMaster is now out of the wind.”
Bullets, Trickler, and Priming Tool on Top
On top, below the hinged metal lid, is a large compartment that holds Covell’s funnels, scales, priming tool, trickler and other vital gear (photo on right). This top compartment is deep enough to handle wide-mouth funnels with no problem.
Slide-Out Drawer with Dividers
Below the top level is a handy sliding drawer with multiple dividers. This is perfect for holding Covell’s inline seating dies, case-neck deburring and chamfering tools, among many other smaller bits and pieces.
In the bottom of the Horse Grooming box is a large compartment that holds bigger gear. In the bottom section, Covell places his RCBS Chargemaster Lite, along with a case-trimming tool, an arbor press, and various other bulky tools. Check it out:
Folks who load at the range need to bring a lot of gear — reloading presses, powder dispensers, scales, funnels, sizing/seating dies, brass prep tools and more. And there may be other important items to transport — such as ammo caddies, LabRadar mounts, over-size rest feet, and even barrel fans. With this metal box you can easily organize (and protect) al that gear. This box was sourced affordably via eBay.
Before you load that new cartridge brass for the first time, run an expander mandrel down the case necks. This will iron out dents and provide more uniform neck tension. Chose a mandrel diameter that provides appropriate neck tension.
Lapua brass is so good that you’ll be tempted to just load and shoot, if you have a “no-turn” chamber. However, some minimal case prep will ensure more uniform neck tension. Keeping your neck tension very uniform allows more consistent bullet seating. That, in turn, usually yields better accuracy, and lower Extreme Spread and Standard Deviation (ES/SD). Lapua brass, particularly 6mmBR, 6.5×47, 6.5 Creedmoor, and .308 Win comes from the factory with tighter-than-optimal necks.
Before you seat bullets, at a minimum, you should inside chamfer the case mouths, after running an expander mandrel down the necks. The expander mandrels from both Sinclair Int’l (Brownells, $14.99 stainless, $24.99 Titanium Nitride coated) and K&M will both leave the necks with enough neck tension (more than .001″) so you can then seat bullets without another operation. We suggest putting a bit of lube on the mandrel before running it down the necks — but remove any lube that gets inside the necks before seating bullets. If you do a lot of loading you may benefit from a Titanium Nitride-coated mandrel.
Both Sinclair and K&M Tools make a die body specifically to hold expander mandrels. The $49.99 Sinclair version fits caliber-specific expander mandrels which measure approximately .001″ less than bullet diameter for each caliber. This is an updated “Gen II” design that completely captures the mandrel within the die so the mandrel cannot pull out. It also has an O-ring in the die cap that allows the mandrel to self-center within the case neck. Brownells offers two sizes of Sinclair die bodies for expander mandrels: .17 -.338 caliber (#749011715 $49.99); and .357 – .50 caliber (#749008843, $49.99). All Generation II dies are machined from stainless steel and the standard diameter 7/8-14 dies include the Sinclair Stainless Steel Split Lock Ring.
Once you run the expander mandrel down the necks of Lapua brass, after you account for brass spring-back, you’ll have about .002″ neck tension*. This will make the process of seating bullets go much more smoothly, and you will also iron out any dents in the case mouths. Once the case mouths are all expanded, and uniformly round, then do your inside neck chamfering/deburring. The same expander mandrels can be used to “neck-up” smaller diameter brass, or prepare brass for neck-turning.
Forum member Mike Crawford adds: “These expanders can also reduce runout from offset seating. Prior to bullet seating, expand the sized necks to force thickness variance outward. With the Sinclair system, the necks will springback fine, and will not be pulled out of center. This leaves plenty of tension, and bullets seated more centered. I do this, even with turned necks, to get improved seating.”
Mandrels vs. Expander Balls on Decapping Rods
If you haven’t acquired an appropriate expander mandrel for your brass, but you DO have a full-length sizing die with an expander ball, this will also function to “iron out” the necks and reduce tension. However, using a die with an expander ball will work the necks more — since you first size them down, then the ball expands them up again. Typically (but not always), run-out is worse when using an expander ball vs. an expander mandrel.
* This .002″ tension is what we have observed with Lapua 6mmBR, 6.5×47, 6.5 Creedmoor, and .308 Win brass. This might vary with much smaller or larger cases, and of course a different brand of brass might yield different results. If you get too little tension with your current mandrel, you can get a smaller-diameter mandrel from 21st Century Innovation, with stainless, Black Nitride, or Titanium nitride versions. The Nitride models have less friction.
Readers who have just recently discovered the Daily Bulletin may not realize that AccurateShooter.com has hundreds of reference articles in our archives. These authoritative articles are divided into multiple categories, so you can easily view stories by topic (such as competition, tactical, rimfire, optics, shooting skills etc.). One of the most popular categories is our Technical Articles Collection. On a handy index page (with thumbnails for every story), you’ll find over 120 articles covering technical and gunsmithing topics. These articles can help you with major projects (such as stock painting), and they can also help you build more accurate ammo. Here are five popular selections from our Technical Articles archive.
Stress-Free Pillar Bedding. Richard Franklin explains how to do a top-quality bedding job, start to finish.
OnTarget Software Review. Our Editors test free software that measures shot groups with great precision. We explain how to use the program and configure advanced features.
Savage Action Tuning. Top F-TR shooter Stan Pate explains how to enhance the performance of your Savage rifle by optimizing the torque settings of the action screws.
Complete Precision Case Prep. Jake Gottfredson covers the complete case prep process, including brass weight sorting, case trimming, primer pocket uniforming, neck-sizing, and, case-neck turning.
Stock Painting Instructions. Step-by-step guide for stock painting by expert Mike Ricklefs. Mike shows both simple coverage and fancy effects.
When your cases become hard to extract, or you feel a stiff bolt lift when removing a cartridge, it’s probably time to full-length size your cases, and “bump” the shoulder back. We generally recommend bumping shoulders each time you reload, after the initial fire-forming. Benchrest and F-Class benchrest shooters, running relatively high pressures, typically full-length size every load cycle, bumping the shoulder .001-.003″. High Power shooters with gas guns generally full-length size every time, and may need to bump the shoulders .003″ or more to ensure reliable feeding and extraction.
Use Shims for Precise Control of Shoulder Bump
Some shooters like to set the “default” position for their full-length die to have an “ample” .003″ or .004″ shoulder bump. When they need less bump, a simple way to reduce the amount of shoulder movement is to use precision shims in .001″ (one-thousandth) increments.
Here are reports from Forum members who use the shims:
“Great product. I have my die lock ring(s) adjusted for the shortest headspace length on my multiple chambers 6BRs and 6PPCs. When needing a longer headspace, I just refer to my notes and add the appropriate shim under the lock ring. Keep it simple.” — F.D. Shuster
Mats Johansson writes: “I’ve been using [shims] since Skip Otto (of BR fame) came out with them. I set up my dies with the .006″ shim, giving me the option of bumping the shoulder a bit more when the brass gets old and hardens while still having room to adjust up for zero headspace, should I have missed the original setup by a thou or two. Hunting rounds can easily be bumped an extra .002-.003″ for positive, no-crush feeding. Being a safety-oriented cheapskate, I couldn’t live without them — they let me reload my cases a gazillion times without dangerous web-stretching. Shims are a must-have, as simple as that.” — Mats Johansson
Sinclair Die Shim Kit — Seven Shims for $14.99
Sinclair Int’l (through Brownells) offers a seven-piece set of Sizing Die Shims that let you adjust the height of your die (and thereby the amount of bump and sizing) in precise .001″ increments. Sinclair explains: “Some handloaders will set their die up to achieve maximum sizing and then progressively use Sinclair Die Shims between the lock ring and the press head to move the die away from the shellholder. Doing this allows you to leave the lock ring in the same position. These shims are available in increments of .001″ and work very well.”
Seven Shims from .003″ to .010″
Sinclair’s $14.99 Die Shim Kit (item 22400) includes seven shims in thicknesses of .003, .004, .005, .006, .007, .008, and .010. For ease of use, shim thickness is indicated by the number of notches cut in the outer edge of each shim. Even without looking you can “count” the notches by feel.
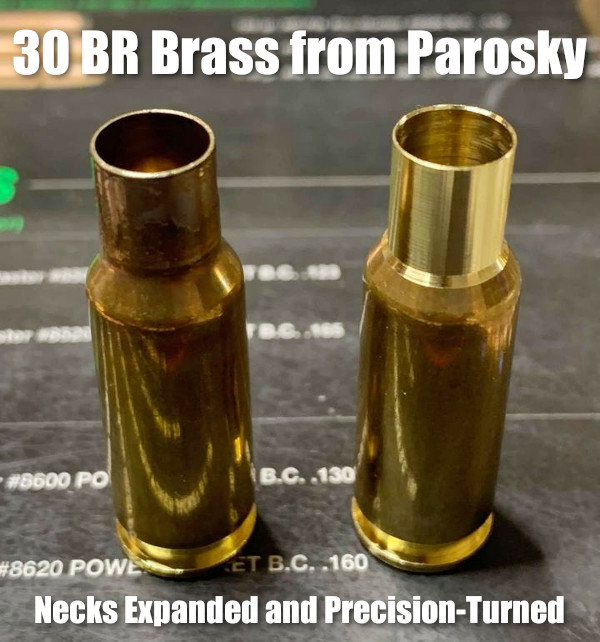
Here’s good news for 30 BR shooters. Paul Parosky, maker of the excellent PRP Custom Bullets, is now offering 30 BR neck-turned brass. This can save you considerable time and effort forming 30 BR cases from Lapua 6mmBR brass. And the neck-turning is superb, again representing time savings (and no tools to buy). You can order this 30 BR brass from PRPbullets.com. If you communicate with the PRP team, Paul may be able to neck-turn to your specific thickness. Paul notes: “Here are necks turned for a 0.330 neck. I’ll try my best to accommodate anyone’s neck dimensions as they wish. Just contact us through our website PRPBullets.com.”
About this Neck-Turning set-up — Paul Parosky notes: “For neck-turning I’m using an old drill press that has been re-worked. The cutter and spindle are all indicated before neck turning to ensure no runout. The RPM is around 520. The lube I use is a mixture of royal and mystery oil.”
Why the 30 BR Dominates 100/200 Benchrest for Score Competition
The 30BR, along with some wildcat variants, remains the dominant cartridge in short-range (100/200) benchrest-for-score competition. The 30BR’s .308″-diameter bullets are larger than the 6mm bullets used by the 6PPC (which rules group BR competition). The bigger 30-Cal diameter has an advantage in touching scoring rings. In addition, the 30 BR is also relatively easy to tune, and barrel life is considerably better than with smaller-caliber benchrest cartridges. For more information, see our AccurateShooter 30 BR Cartridge Guide.
Cases are Expanded, Then Neck-Turned
To produce his 30 BR brass, Parosky first uses a series of expander mandrels. Then he neck-turns with power using a converted drill press. Paul tells us: “This is done the old school way, I use three different tapered expander mandrels, then neck-turn it to the proper neck chamber, then run them up through a FL expander mandrel to ensure necks are straight. Then I clean all the cases.”
Paul Parosky Can Also Neck-Turn 6PPC Brass
Paul Parosky also expands and neck-turns 6PPC cases that are made from parent Lapua .220 Russian cartridge brass. Here, illustrating his 6PPC neck-turning operation, is a Paul Parosky post on the USA Benchrest & Extreme Precision Shooters Facebook page.
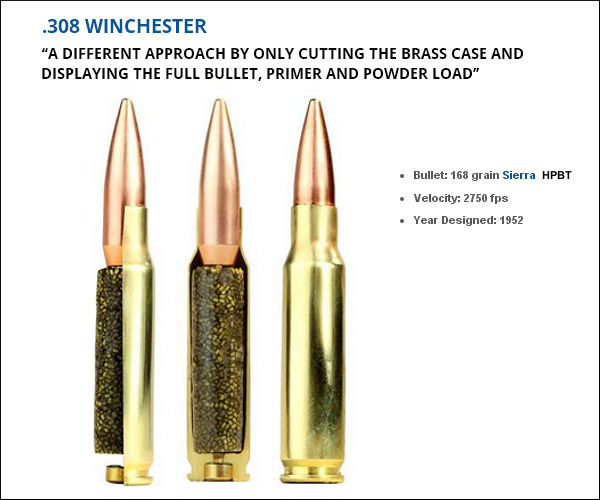
Here’s something you don’t see every day — the inside of loaded cartridges, sliced halfway through. This lets you see how bullet core, jacket, cartridge case, powder, and primer all fit together. Give credit to the folks at FOG Ammunition for creating this interesting series of cut-through ammo images. We show four cartridges here: the .308 Winchester, 9mm Luger, 300 BLK, and .50 BMG. You’ll find two more (the .223 Remington and .45 ACP) on the original FOG Ammo Blog Article.
This .308 Winchester model took on a different approach by only cutting the brass case and displaying the full bullet, primer and powder load. A spec amount of powder was used to create the model powder form. An estimated 10% volume was added during the forming process, along with an undetermined amount of air pockets.
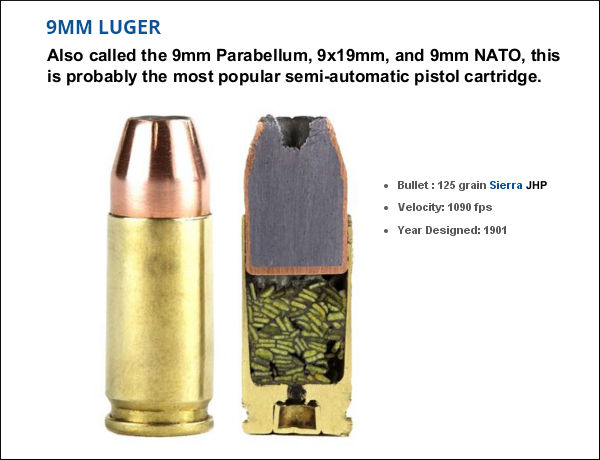
This bisection is a 9mm Luger Jacketed Hollow Point round with flake powder held together with super glue. After this self-defense round was cut by a trained professional the round was polished by hand. This might look like stick powder, but those are in fact flakes stacked up in cross-section. Designed in 1901 by Georg Luger, this popular cartridge is used by civilians, military, and law enforcement.
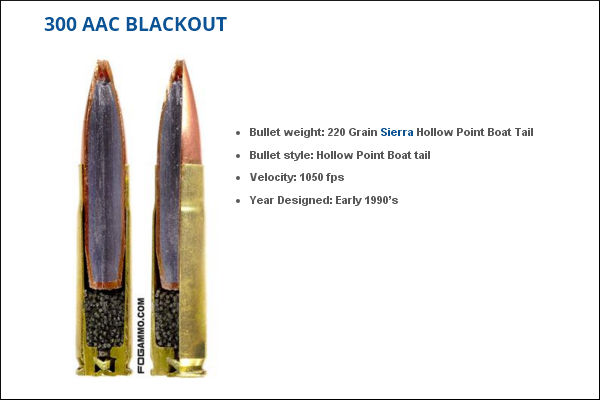
For this model of the .300 AAC Blackout (aka 300 BLK), a Dremel tool was used to create a pie cut within the bullet and brass case. A measured amount of power, roughly 65% of spec charge, was placed inside the case with super glue. This cartridge was originally optimized for subsonic use with a suppressor, so the amount of powder used is small relative to the nominal case capacity. That leaves more room for the relatively large .30-caliber bullet.
Last but definitely not least is the .50 Caliber BMG round (aka .50 Browning Machine Gun). Famed for its wartime use in the M2 Machine gun, the .50 BMG round is also used in civilian Long Range competitions. A typical .50 BMG cartridge holds over 225 grains of powder. That’s almost ten times the amount in a 5.56×45 NATO Round! To demonstrate the size of the .50 BMG, check out that .223 Rem for comparison.


 LEE Hand Press Quick-Change Die Functionality


 Bullets, Trickler, and Priming Tool on Top


 Both Sinclair and K&M Tools make a die body specifically to hold expander mandrels. The $49.99