There is an excellent article about primers on the Shooting Times website. We strongly recommend you read Mysteries And Misconceptions Of The All-Important Primer, written by Allan Jones. Mr. Jones is a bona fide expert — he served as the manager of technical publications for CCI Ammunition and Speer Bullets and Jones authored three editions of the Speer Reloading Manual.
This authoritative Shooting Times article explains the fine points of primer design and construction. Jones also reveals some little-known facts about primers and he corrects common misconceptions. Here are some highlights from the article:
Size Matters
Useful Trivia — even though Small Rifle and Small Pistol primer pockets share the same depth specification, Large Rifle and Large Pistol primers do not. The standard pocket for a Large Pistol primer is somewhat shallower than its Large Rifle counterpart, specifically, 0.008 to 0.009 inch less.
Magnum Primers
There are two ways to make a Magnum primer — either use more of the standard chemical mix to provide a longer-burning flame or change the mix to one with more aggressive burn characteristics. Prior to 1989, CCI used the first option in Magnum Rifle primers. After that, we switched to a mix optimized for spherical propellants that produced a 24% increase in flame temperature and a 16% boost in gas volume.
Foiled Again
Most component primers have a little disk of paper between the anvil and the priming mix. It is called “foil paper” not because it’s made of foil but because it replaces the true metal foil used to seal early percussion caps. The reason this little disk exists is strictly a manufacturing convenience. Wet primer pellets are smaller than the inside diameter of the cup when inserted and must be compacted to achieve their proper diameter and height. Without the foil paper, the wet mix would stick to the compaction pins and jam up the assembly process.
Primer Functionality and Primer Types Compared
This video looks at a variety of primer types from multiple manufacturers, foreign and domestic. The video explains the basics of how primers function, and then explains the key characteristics of standard primers, magnum primers, and mil-spec primers (designed for semi-auto rifles).
UltimateReloader.com offers some of the most thorough firearms and reloading tool tests on the internet. And the Ultimate Reloader YouTube Channel now has over 1000 videos that showcase reloading tools, accurate firearms, precision optics, gunsmithing methods, and top-tier reloading components. For today’s Saturday at the Movies feature, we showcase six great videos recently created by Gavin Gear and his UltimateReloader team, including one with guest host F-Class John. These videos highlight a new Radar Chrono, superb Long-Range Target Camera, the remarkable AMP Annealer, and other interesting topics. Enjoy this our Saturday Video Showcase.
Bix’N Andy Trigger Showcase — Operation, Specs, Testing
Bix’N Andy makes some of the best triggers you can buy, with versions suited for benchrest, F-Class, ELR, PRS/NRL, as well as hunting and varminting. In this October 2024 video, Gavin looks at the features and functionality of a variety of Bix’N Andy triggers. You can purchase these quality triggers from BulletCentral.com at attractive prices starting at $199.00.
New Caldwell VelociRadar Chirp Radar Chronograph (with App)
In this video Gavin Gear tests Caldwell’s new VelociRadar chronograph. This is quite a bit bigger than the Garmin Xero C1 Pro or the new LabRadar LX compact, yet the VelociRadar is still much smaller than the original orange LabRadar. Notably, the VelociRadar uses a different mode of radar (Chirp Radar vs. Doppler) than other chronos. Caldwell states: “The Caldwell VelociRadar Chronograph [has] cutting-edge Chirp radar technology. While most chronographs stop at only providing muzzle velocity the VelociRadar tracks bullets downrange[.] Using these downrange velocity measurements, the VelociRadar calculates true muzzle velocity, the bullet’s ballistic coefficient, and downrange energy.” Here is one viewer’s comment on the Caldwell unit: “Pros: It is smaller than the original LabRadar, but bigger than the new Garmin. Price point is similar. The Caldwell looks more heavy-duty with reinforced corners, and more likely to survive a fall from the bench top. Control buttons are nice and large. Tripod looks better than Garmin. Cons: The display area looks large, but uses a small portion of that area. The data display should be larger.”
If you are considering purchasing a progressive reloading press — you’ve struck gold. Hosted by Gavin Gear of UltimateReloader.com, this remarkable 79-minute video covers a dozen presses from six leading manufacturers: Dillon, Frankford Arsenal, Hornady, Lee, Mark 7 (Lyman), and RCBS. Set aside plenty of time, because there is a wealth of information — the “mother lode” of progressive press coverage. Along with the big comparison video, Gavin has prepared a detailed, 17-page online article which covers all of the presses in the shootout. This Progressive Press comparison has generated 288,000 views on YouTube. Reviewer Gavin Gear demonstrates how each press works and provides data on costs, output rates, capabilities, and accessories so that potential buyers can make informed purchasing decisions.
6mmGT Rifle Complete Rifle Build, Start to Finish
In this video, Gavin builds an impressive 6mmGT (aka 6GT) field rifle start to finish. You can see him chamber the barrel, fit the bottom metal in the stock, and connect the Bix’N Andy trigger to a 416 Stainless Pristine brand Rem 700-footprint action. This is a multi-purpose rifle, build on the light side with a Carbon Six barrel. Gavin notes: “In this video I chamber a Carbon Six barrel and complete the package with a Bix ‘n Andy trigger, Hawkins Rings, and Riton Scope. Will this be the 6GT Lightweight hunting rifle I’ve been asking for?”
We like the 6GT cartridge, both for PRS/NRL competition and varmint work. The 6GT has the low recoil of a 6 Dasher, with good feeding and mag compatibility. With the 6GT, a competitor can push 105gr bullets at 3000+ FPS or run heavier bullets at 2800-2900+ FPS.
“The [6GT] is a more predictable and barrel-friendly cartridge than the 6mm Creedmoor. It can utilize the accurate and forgiving powders of the 6BR, has fantastic accuracy, and due to its shoulder angle and case length, it doesn’t suffer from feeding issues.” — PewPewTactical.com
LongShot Target Camera
Past 400 yards or so, it can be difficult to see bullet holes on paper, even with spotting scopes. That’s why we recommend a high-quality wireless target camera. The best long-range target cameras on the market are produced by Longshot Camera Systems. The Longshot Target Cam provides a live WiFi camera feed. This comes back to your shooting station and you can view the image with a laptop or mobile device. You don’t need internet coverage and no separate tall antennas are required. Simply place the camera unit next to your target and the receiver unit close to your rifle or bench. The Longshot system is completely self-contained. Longshot produces a variety of cameras starting at $199.00 for the LongShot Marksman. We recommend the $899.00 LR-3 unit which works out to two miles! In this video Gavin Gear of UltimateReloader tests the LR-3 at long range. PRODUCT INFO HERE.
Loading 7mm PRC on a Dillon 550C Progressive — F-Class John
This ULtimate Reloader video features F-Class John, a top-tier F-Class competitor who also has a very popular YouTube video channel. In this video John shows how to load the potent 7mm PRC cartridge with a Dillon 550C progressive press. The 7mm PRC is one of the newer short magnum-style cartridges popular with F-Open competitors. With the 7mm PRC you can drive a 180+ gr 7mm bullet at very impressive velocities with a 28″ or longer barrel.
Anschutz 54.18 .22 LR Rifle for Benchrest and Rimfire F-Class
With the high price of centerfire powders, bullets, and brass, everyone should have an accurate .22 LR rimfire rifle for marksmanship training and competition at 25 to 200 yards. In this video, Ultimate Reloader’s Gavin Gear tests the impressive Anschutz 54.18 BR50-U7 match rifle using a quality Sinclair Int’l front rest. Anschutz offers several versions of the 54.18 and BR-50. There are two barreled actions available: 20″ threaded and 25.9″ non-threaded. Gavin tested the 20″ threaded model with the U7 stock. In this video, Gavin tested the trigger with a sophisticated TriggerScan TS-11. The trigger was superbly repeatable at a measured 3.8 ounces. Gavin also did a bore examination, and tested various ammo. In this rifle, Lapua Midas+ ammo produced the smallest groups. FULL STORY HERE.
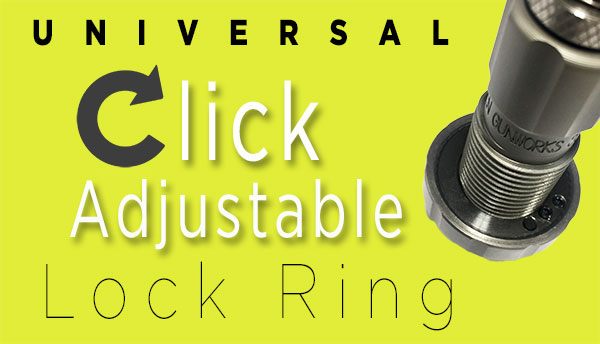
With the Whidden Click-Adjustable Sizer Dies, you can change shoulder bump by .001″ (one-thousandth) with a simple click. Fast. Easy. Precise.
As handloaders have become more aware of shoulder bump and proper adjustment of the sizer die in recent years, there has become a need for an easier way to adjust the sizer die properly. For most folks, with their conventional dies, it takes lengthy trial trial and error to get the shoulder setback correct. Anyone who has done this can attest that it can be a slow and annoying job.
Whidden Gunworks has solved the problem with the innovative Click Adjustable Sizer Die. Patent No: 10,393,488. This die and lock ring work together to give the user a clicking feel to the adjustment just like a high end rifle scope. Each click moves the shoulder bump exactly .001″ so you can easily find the exact shoulder bump that you desire.
The Click Adjustable option is available on Whidden Custom Sizer dies as well (7/8”-14 format dies only)! Included with the Click Adjustable Sizer Die is a Shoulder Bump Gauge. This gauge attaches to standard calipers and allows measurement from the case shoulder to the base. Using the Shoulder Bump Gauge with the Click Adjustable Sizer Die will make the proper sizer die setup easier than ever before.
Click-adjustable die sets are available with both bushing and non-bushing configurations. Along with these complete die sets, Whidden Gunworks offers a separate click-adjustable ring to use with existing dies. Priced at $58.99, the Whidden Click-Adjust Lock Ring represents a modest investment for a major gain in die ease-of-use and precision adjustability.
The Whidden Universal Click Adjustable Lock Ring you can instantly turn your sizer die into a Click Adjustable Die. This ring works with any 7/8 OD sizer of any brand with adjustable shoulder bump. Simple in design, the inner and outer ring can rotate independently of each other. Each click is metered in true 1 thousandths adjustment and has 0.100″ total available travel. These work great with nearly all sizing 7/8 OD sizing dies, and one verified purchaser noted: “Not only are they useful on reloading dies, but it’s the cat’s meow on the Giraud Power Trimmer Case Holders.”
Dillon Users Take Note: The Whidden Click Adjustable Sizing Die will not work with the Dillon 550 or 650 progressive reloading press systems. The Universal Click Adjustable Lock Ring is not compatible with the Dillon floating toolhead.
Sierra Bullets has published load data for the 6mm Creedmoor cartridge, a necked-down version of the popular 6.5 Creedmoor. Sierra has released very comprehensive 6mm Creedmoor load data, covering fifteen (15) different bullets from 55 to 110 grains. NOTE: Hornady-brand brass was used for Sierra’s 6mm Creedmoor load tests, not the newer, stronger Lapua 6.5 CM brass with small primer pockets. Hand-loaders using Lapua 6.5 Creedmoor brass necked to 6mm may have to adjust their loads.
Sierra writes: “As soon as the 6.5 Creedmoor was released in 2007, a 6mm version was being envisioned. After the 6mm Creedmoor demonstrated its worth at 1000 yards it began to catch the attention of Precision Rifle Series (PRS) competitors. The 6mm Creedmoor is a great fit for those looking for an AR platform-friendly cartridge. It delivers velocities very similar to the .243 Win and yet fits the AR10 magazine length[.] The 30-degree shoulder makes this a very efficient case and helps prolong case life as well. The 6mm Creedmoor works well with powders such as H4350, [RE-16], RE-17, and Ramshot Hunter for heavier long-range bullet weights. Slightly faster powders such as RE-15, Win 760, and Vihtavuori N540 work well with lighter weight bullets.”
Sierra Bullets Tested for 6mm Creedmoor Load Data
55gr BlitzKing (#1502)
60gr HP (#1500)
70gr HPBT (#1505)
70gr BlitzKing (#1507)
75gr HP (#1510)
In developing its 6mm Creedmoor load data, Sierra tested a very wide selection of propellants, two dozen overall. For the smaller bullets, fast-burning powders such as Benchmark, H4895, and CFE223 were tested. For the heavier 100+ grain bullets, Sierra tested a selection of medium-burn-rate powders including H4350, Reloder 16, Reloder 17, Varget, and Superformance. Sierra did a very thorough job. We know this information will be welcomed by 6mm Creedmoor shooters.
Don’t know what powder to try first? For the 107-110 grain bullets, if you want best accuracy and low ES/SD, our Forum members recommend Alliant Reloder 16 and Hodgdon H4350. If you are seeking max velocity with the 110-grainer, look at Hodgdon Superformance and Reloder 19.
Here are Sierra’s 6mm Creedmoor Load Data Charts for 90-95 grain bullets plus the 107gr MK and 110gr MK. There are five other tables for other bullet types.
BONUS: PRB 6mm Creedmoor and 6.5 Creedmoor Load Survey
The Precision Rifle Blog compiled Load Data from PRS Competitors, for both 6mm Creedmoor and 6.5 Creedmoor. This is a good place to start. PRB surveyed the match loads for “173 of the top-ranked precision rifle shooters in the country”. One cautionary note: These PRS guys may be loading fairly hot, so work up gradually, 0.3 grains at a time. CLICK HERE.
For years the 6mm PPC (aka 6PPC) cartridge has dominated short-range group benchrest shooting, winning championships and setting records. Traditionally 6PPC cases were formed from Lapua 220 Russian brass. Now there is an exciting alternative — Alpha Munitions 6mm PPC cartridge brass. With a suitable chamber this is ready to load and shoot with no special fire-forming required. (If you have a tight-necked chamber, neck-turning would be needed first.)
If you want to try the Alpha 6mm PPC brass, head over to Bruno Shooters Supply. Right now Bruno’s has a large quantity of Alpha 6mm PPC brass in stock and ready to ship. This brass comes in nice, protective plastic boxes with secure slots for each brass case. Order now at $159.95 for a 100ct box. NOTE: Discounts are offered for quantities of 500+.
On the Alpha Munitions website, you’ll find this information for Alpha 6mm PPC brass with Optimized Case Design OCD technology:
– 100 count boxes ship in custom Alpha Munitions plastic cases with perforated bi-layer foam for protection of cases and loaded ammunition
– Brass has a .060″ flash hole
– Do NOT small base size OCD brass
NOTE: If you shoot mid-range (600-yard) benchrest or F-Open matches, Alpha Munitions also produces 6mm BRA, 6mm Dasher, and 6mm GT brass. Unfortunately all three types are listed as currently out of stock on the Alpha Munitions website.
Before you load that nice new cartridge brass for the first time, run an expander mandrel down the case necks. This will iron out dents and provide more uniform neck tension. Chose a mandrel diameter that provides appropriate neck tension.
Lapua brass is so good that you’ll be tempted to just load and shoot, if you have a “no-turn” chamber. However, some minimal case prep will ensure more uniform neck tension. Keeping your neck tension very uniform allows more consistent bullet seating. That, in turn, usually yields better accuracy, and lower Extreme Spread and Standard Deviation (ES/SD). Lapua brass, particularly 6mmBR, 6.5×47, 6.5 Creedmoor, and .308 Win comes from the factory with tighter-than-optimal necks. Before you seat bullets, at a minimum, you should inside chamfer the case mouths, after running an expander mandrel down the necks. The expander mandrels from both Sinclair Int’l and K&M will both leave the necks with enough neck tension (more than .001″) so you can then seat bullets without another operation. We suggest putting a bit of lube on the mandrel before running it down the necks — but remove any lube that gets inside the necks before seating bullets.
Both Sinclair and K&M Tools make a die body specifically to hold expander mandrels. The Sinclair version, is shown above. This $45.99 unit fits caliber-specific expander mandrels ($10.99) which measure approximately .001″ less than bullet diameter for each caliber. This is an updated “Gen II” design that completely captures the mandrel within the die so the mandrel cannot pull out. It also has an O-ring in the die cap that allows the mandrel to self-center within the case neck. Brownells offers two sizes of Sinclair die bodies for expander mandrels: .17 -.338 Caliber (#749011715 $48.99); and .357 – .50 caliber (#749008843, $48.99). All Generation II dies are machined from stainless steel and the standard diameter 7/8-14 dies include the Sinclair Stainless Steel Split Lock Ring.
Once you run the Sinclair expander mandrel down the necks of Lapua brass, after you account for brass spring-back, you’ll have about .002″ neck tension*. This will make the process of seating bullets go much more smoothly, and you will also iron out any dents in the case mouths. Once the case mouths are all expanded, and uniformly round, then do your inside neck chamfering/deburring. The same expander mandrels can be used to “neck-up” smaller diameter brass, or prepare brass for neck-turning.
Forum member Mike Crawford adds: “These expanders can also reduce runout from offset seating. Prior to bullet seating, expand the sized necks to force thickness variance outward. With the Sinclair system, the necks will springback fine, and will not be pulled out of center. This leaves plenty of tension, and bullets seated more centered. I do this, even with turned necks, to get improved seating.”
Mandrels vs. Expander Balls on Decapping Rods
If you haven’t acquired an appropriate expander mandrel for your brass, but you DO have a full-length sizing die with an expander ball, this will also function to “iron out” the necks and reduce tension. However, using a die with an expander ball will work the necks more — since you first size them down, then the ball expands them up again. Typically (but not always), run-out is worse when using an expander ball vs. an expander mandrel.
* This .002″ tension is what we have observed with Lapua 6mmBR, 6.5×47, 6.5 Creedmoor, and .308 Win brass. This might vary with much smaller or larger cases, and of course a different brand of brass might yield different results. If you get too little tension with your current mandrel, you can get a smaller-diameter mandrel from 21st Century Innovation which offers stainless, Black Nitride, or Titanium nitride versions. The Nitride models have noticeably less friction.
Starline Brass offers a series of videos with helpful reloading tips. Focused primarily on pistol cartridges, these short videos can help anyone get started with metallic cartridge reloading. If you load pistol rounds on a progressive, this video series is particularly helpful. The on-camera host is Hunter Pilant, son of Carroll Pilant of Sierra Bullets.
Preventing Double Charges
Tip: Use a bulky powder that fills your case more than half way with a correct charge. This will overfill the case if it is double-charged, making it very difficult to seat a bullet.
Tumble New Brass Before Loading the First Time
Tip: Tumble new pistol cartridge brass in used media for 30 minutes before loading for the first time. This will add enough graphite (carbon residue) to smooth case entry into dies. You can also lube the case mouths with graphite, or use spray lube.
Powder Through Expander — How to Eliminate Hang-ups
Tip: When loading pistol brass with a progressive press, sometime the powder-through expander is hard to remove, especially with short cases. There are two fixes — first, try deburring the inside of the case mouth on your cases. Second, the radius of the powder through expander plug can be modified to smooth entry and exit (see photo). Starline will do this modification for free.
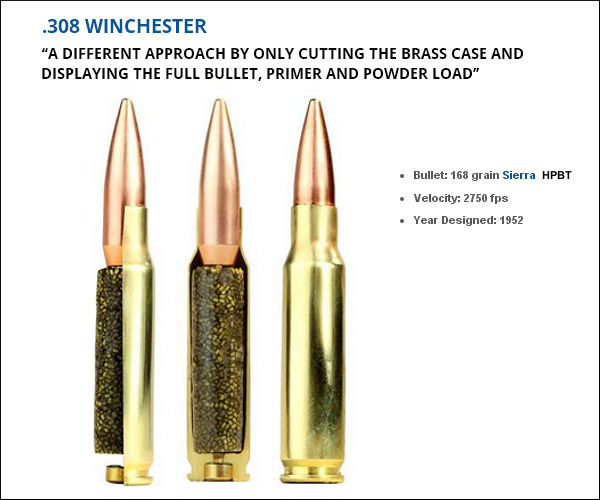
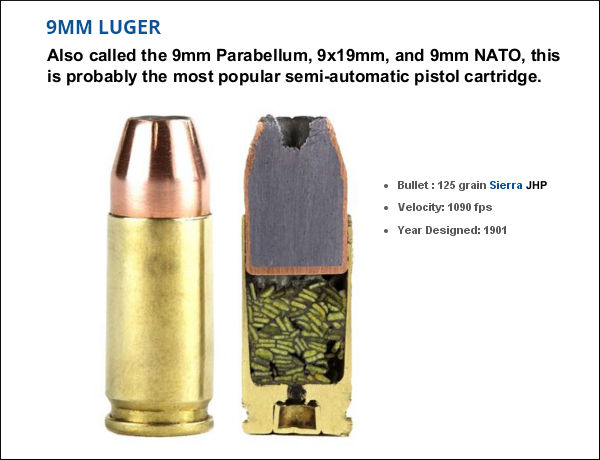
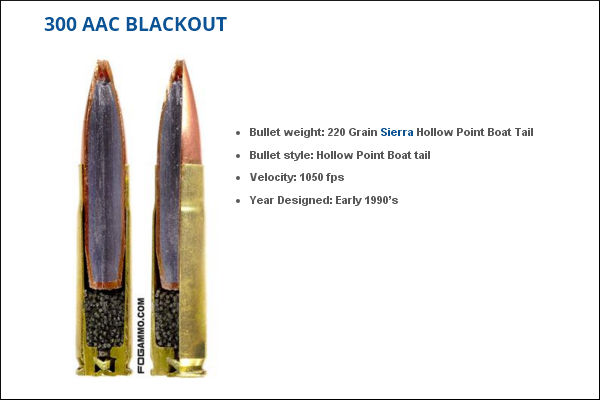
Here’s something you don’t see every day — the inside of loaded cartridges, sliced halfway through. This lets you see how bullet core, jacket, cartridge case, powder, and primer all fit together. Give credit to the folks at FOG Ammunition for creating this interesting series of cut-through ammo images. We show four cartridges here: the .308 Winchester, 9mm Luger, 300 BLK, and .50 BMG. You’ll find two more (the .223 Remington and .45 ACP) on the originalFOG Ammo Blog Article.
This .308 Winchester model took on a different approach by only cutting the brass case and displaying the full bullet, primer and powder load. A spec amount of powder was used to create the model powder form. An estimated 10% volume was added during the forming process, along with an undetermined amount of air pockets.
This bisection is a 9mm Luger Jacketed Hollow Point round with flake powder held together with super glue. After this self-defense round was cut by a trained professional the round was polished by hand. This might look like stick powder, but those are in fact flakes stacked up in cross-section. Designed in 1901 by Georg Luger, this popular cartridge is used by civilians, military, and law enforcement.
For this model of the .300 AAC Blackout (aka 300 BLK), a Dremel tool was used to create a pie cut within the bullet and brass case. A measured amount of power, roughly 65% of spec charge, was placed inside the case with super glue. This cartridge was originally optimized for subsonic use with a suppressor, so the amount of powder used is small relative to the nominal case capacity. That leaves more room for the relatively large .30-caliber bullet.
Last but definitely not least is the .50 Caliber BMG round (aka .50 Browning Machine Gun). Famed for its wartime use in the M2 Machine gun, the .50 BMG round is also used in civilian Long Range competitions. A typical .50 BMG cartridge holds over 225 grains of powder. That’s almost ten times the amount in a 5.56×45 NATO Round! To demonstrate the size of the .50 BMG, check out that .223 Rem for comparison.
Shown are funnel with ultra-long drop tube (which helps get more kernels in the cases), RCBS Chargemaster (in wood box), and Hood Press (similar to Harrell’s Combo press).
Loading at the range remains important in the Benchrest for Group discipline. In a Special Report below, past IBS President Jeff Stover explains how loading methods (and hardware) have evolved over the years. The advent of accurate, affordable electronic powder dispensers, such as the RCBS ChargeMaster and Frankford’s new Intellidropper, have changed the game and made it easier to load efficiently at the range. And quality manual powder measures are fast and can be very consistent, with a little practice. Loading at the range permits competitors to tune their load to the conditions, change seating depths, or even choose different bullets to suit the barrel’s preferences on any given day.
Although pre-loading is not uncommon, most 100/200-yard group shooters usually load at the match, often between relays. The goal is to shoot smaller groups by staying “in tune”. In a game where 5-shot groups “in the 1s and Zeros” is the goal, tuning loads for the conditions helps deliver match-winning accuracy. Nearly all competitors in this short-range discipline shoot the 6mm PPC cartridge, or a PPC variant.
Loading at the Range — Then and Now
In benchrest shooting for group, loading at the range has been de rigueur for decades. In the Score discipline, preloading is usually the custom. The main reason is that, in Score competition, only one Aggregate (warm-up match and five record targets) per day is usually shot. That would be less than 50 shots, assuming a few sighter shots. Also, the 30BR, the dominant Benchrest-for-Score cartridge, is very amenable to pre-loading.
By contrast, the Group discipline includes 21 targets (two warm-ups and twenty record targets) over a weekend, usually shot with 6PPC-chambered rifles. Many times, the 6PPC shooters may tweak their loads through the day given changing atmospheric conditions or simply trying to find the correct tune to “dot up”. This term, “Dot up”, means the shots are essentially going through the same hole, or closely so.
Loading at the range was a bit different when benchrest competition was in its infancy. The 1951 book, Modern Accuracy by Bob Wallack, is the best of the early benchrest books. Copies can be found, from time to time, on eBay or Alibris. It is a fascinating survey of benchrest as it existed more than six decades ago. There’s even coverage of a controversial target that was argued over at the time. In it, there is a photo of Wallack using the rear bumper of a car at the bench to clamp his reloading tools. Things have come a long way compared to the range loading set-ups of modern shooters. Here you can see Bob Wallack way back in 1950:
Modern loading bench set-ups shown in this Special Report belong to top shooters Howie Levy, Bob Hamister, and Kent Harshman.
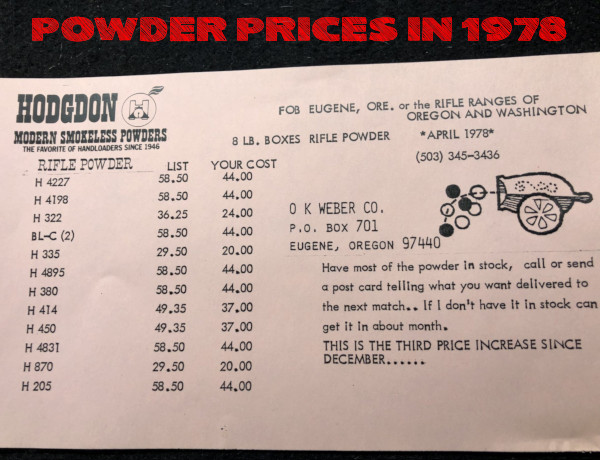
Have inflation (and supply chain shortages) affected the price of powder? You bet. Probably WAY more than you could imagine. Forum member “Two Time HM LR” posted this interesting photo (above) showing Hodgdon 8-lb powder prices from 1978, as sold by O.K. Weber in Oregon. Prices have risen over 1000% since then.
Eight Pounders under $45.00 in 1978
Now the prices — $20 to $44 — may not get your attention at first. But take note that these numbers are for EIGHT pound containers. Yep eight-pounders were all under $45! For example, H4895 was $44 for 8 pounds back in 1978, 45 years ago. And H335 was $20 for eight pounds — that’s just $2.50 per pound!
These days a single pound of a desirable powder such as H4831 might cost $60+ at some stores IF you can find it at all. On Hodgdon’s web site, H4831 powder is priced at $58.99 per pound in April 2024. Using that current $58.99/lb figure, H4831 is now 10.7 times higher than it was in 1978, when H4831 cost $44 for 8 pounds, i.e. $5.50 per pound. [Hodgdon’s current H4831 8-lb price is $403.99, or 9.18 times higher than before.]
Here are some comments from our Forum Members:
“Heck those prices are just about the same as current ones, just a little smaller container now.” — Joe
“I’ve got some H4831 in a can marked ‘WWII Surplus Powder’ with a price tag of $2.75. We’ll never see that again either.” Rick in Oregon
“1978 prices and 2022 income would be nice. Unfortunately that doesn’t work. If you compare prices and income, powder cost about the same. You also have to discount the temporary gouging that we are seeing.” — Tmwinds
“So I used to buy gas for 10 cents per gallon and they’d pump it, check the oil, and clean the windshield.” — Pirate Ammo
One comment suggests that the powder price hike actually tracks general U.S. currency inflation over the last four decades. So perhaps powder price increases are not as bad as they seem, when compared to how all prices have risen since 1978:
“Using H4895 as a comparison basis at $58.50 (list price) in 1978 calculates it to $275 in todays money. Looking at Powder Valley prices it looks like around [$340 in August 2023] for the same item in todays money [a 24% increase in real dollars]. Availability is another issue though and if someone is really needing powder they may well have to pay above suggested retail.” — Drover


Size Matters

 In this video, Gavin builds an impressive 6mmGT (aka 6GT) field rifle start to finish. You can see him chamber the barrel, fit the bottom metal in the stock, and connect the Bix’N Andy trigger to a 416 Stainless Pristine brand Rem 700-footprint action. This is a multi-purpose rifle, build on the light side with a Carbon Six barrel. Gavin notes: “In this video I chamber a Carbon Six barrel and complete the package with a Bix ‘n Andy trigger, Hawkins Rings, and Riton Scope. Will this be the 6GT Lightweight hunting rifle I’ve been asking for?”