The Pew Pew Tactical website has interesting article on rifle and pistol cartridges and bullet types. This contains a large selection of interesting photographs and illustrations. If you load and/or shoot for a wide variety of cartridge types, you’ll find that article well worth reading. It has nearly 50 photographs and more than a dozen short videos. READ FULL Article.
The article also shows all types of pistol bullets, along with a variety of rifle projectiles. It even illustrates multiple types of shotshell cartridges.
The article also explains the basic components of modern cartridges — bullet, case, powder, and primer:
Photo courtesy Ammunitiontogo.com which sells ammo from many leading brands.
Popular Cartridge Types Profiled
The article provides quick summaries of popular ammunition types including 9mm Luger (9x19mm), .357 Magnum, .40 SW, .45 ACP, .223 Rem, and .308 Winchester. The author’s favorite pistol round is the 9mm Luger: “9mm is my personal favorite and if there was a “Goldilocks” round, this would be it. The very first gun I bought was a 9mm. They’re fun at the range. They’re good for defense. It is the standard round for NATO countries and the majority of police forces around the world. It is mild shooting, can vary in weight from 115 to 147 grains, and has varying stopping power based on the type of bullet.”
This Pew-Pew Tactical guide to cartridge types also provides a quick explanation of cartridge ignition — both centerfire and rimfire: “The rimfire’s primer is built into the rim while the centerfire cartridge has the primer in the center. Pro tip — if you can see a circle in the middle…it’s a centerfire cartridge.”
There are two common types of centerfire primers — Boxer and Berdan. This helpful Wikipedia illustration shows how Boxer, Berdan, and rimfire primers ignite the powder in the cartridge:
This centerfire and rimfire ignition animation is by BBODO – Own work, CC BY-SA 3.0 licensed under the Creative Commons Attribution-Share Alike 3.0 license.
by Sierra Bullets Ballistic Technician Philip Mahin for Sierra Bullets Blog
A lot of calls that come into the Sierra Customer Service Center are made by shooters [of retirement age]. Most of the time the shooter used to reload back when they were [younger] and stopped in order to raise a family, pursue a career, or both. Maybe their father or grandfather taught them back in the day and they are looking for an answer to the new whatchamacallit they found on the internet. The point is they are coming back to it because it was fun.
Reloading Can Provide Stress Relief
As a father of three, a husband, a brother, a son and son-in-law, and a friend and neighbor, I get pulled in a lot of directions. In all honesty, reloading and shooting has become a stress relief for me even though I work in the shooting industry.
Sometimes, the shooting gets put on hold for other more important things but there will always be another project or repair to accomplish. There are a lot out there that have found a way to balance the work life, the family life, and the play life. I would like to applaud you on your efforts because it is a hard thing to accomplish.
Remember to take time and relieve that stress. Do something fun, especially if it is shooting that special hand-load you just made.
AccurateShooter Comment — Hand-Loading and the Creative Process
Reloading your own precise ammo can be rewarding in many ways. First it allows you a temporary escape from work pressures, “Honey-Dos”, filing your taxes — whatever. It’s just you and Mr. Rockchucker spending quality time in the loading room. Second, hand-loading is a creative process that engages the mind. During load development, you are like an inventor, selecting a powder charge, choosing the bushing size, experimenting with seating depths, working to perfect your load.
Lastly, the process of hand-loading is rewarding because you are building something start to finish. You begin with components — bullets, brass, and powder, and end up with a finished product that (hopefully) is better than the best factory ammo you could buy. It is enormously satisfying to start with piles of bullets and brass and end up with beautiful hand-loads that can deliver great accuracy.
Whidden Gunworks makes great sizing and seating dies. The Whidden full-length sizing die with neck bushing is very popular because it allows you to “tune” the neck tension by using different bushings, with larger or smaller inside diameters. In this video, John Whidden explains how to choose a the right bushing size for use with your neck-sizing and full-length sizing bushing dies.
For most applications, John suggest starting with the caliper-measured outside diameter of a loaded cartridge (with your choice of bullet), and then SUBTRACT about three thousandths. For example, if your loaded round mics at .333, then you would want to start with a 0.330 neck bushing. John notes, however, that you may want to experiment with bushings, going down a thousandth and up a thousandth. With thin In addition, as your brass ages and the necks harden, you may want to change your bushing size.
Quick Tip: Try Flipping Your Bushings
You may also want to experiment with “flipping” your neck bushings to alternate the side that first contacts the neck of the case. (One side of the bushing is usually marked with the size, while the other side is unmarked.) So try “number side up” as well as “number side down”.
Some folks believe that one side of the bushing may allow a smoother entry, and that this can enhance concentricity. Other people think they can get very slightly more or less neck tension depending on how the bushing is oriented. This is a subtle effect, but it costs nothing to experiment.
If one bushing orientation proves better you can mark the “up” side with nail polish so that you can always orient the bushing optimally. NOTE: We have confirmed that some bushings are actually made with a slight taper. In addition, bushings may get distorted slightly when the brand name and size is stamped. Therefore there IS a reason to try both orientations.
The RCBS Lock-Out Die can also be used with some Dillon and Hornady progressive presses.
If you load pistol or rifle ammo with a progressive press, we strongly recommend you get a Lock-Out Die from RCBS. This unique reloading die will prevent your progressive press from advancing if the dispensed powder charge is more or less than about 0.3 grains too high or too low. The Lock-Out Die really works. Your Editor uses it on his RCBS 2000 progressive press. I can affirm that a Lock-Out Die has “saved my bacon” a half-dozen times over the years when there was an over-charge (which could cause a Kaboom) or a low charge (which could cause a squib load).
The Lock-Out Die works by using a central die detection rod that sets its vertical position based on the height of the powder column in the case. Through an ingenious design, if the powder column height is too low or too high, the rod locks in place as you start to pull the press handle. This halts the press before the ram can lift and the cartridge plate can advance. Unlike a beeping alarm system (which can be ignored or defeated), the Lock-Out Die physically stops the movement of the press ram and prevents a bullet being seated in the “problem” case.
It takes a bit of tweaking to get the Lock-Out Die detection rod setting just right, but once it is correctly positioned, the Lock-Out Die works smoothly in the background. The Lock-Out Die won’t interfere with the loading process unless it detects a high or low charge — and then it positively stops the progressive loading cycle.
While crafted for use in RCBS progressive presses, the RCBS Lock-Out Die can also be used on a Dillon XL Progressive (see video below) or Hornady Lock-N-Load progressive — though it does take up one station which could otherwise be used for a final crimp die (after the seating die). The RCBS 2000 has one more station than a Dillon 550/650, so it’s an ideal platform for using the Lock-Out Die.
Learn More at UltimateReloader.com
On the UltimateReloader.com website, run by our friend Gavin Gear, you’ll find an excellent two-part series on the function and set-up of the RCBS Lock-Out Die. Part One explains how the Lock-Out Die functions, using cut-away illustrations. Part Two shows how to install and adjust the Lock-Out Die on various progressive presses. The Ultimate Reloader video at the top of this article shows setup of the RCBS Lock-Out Die on the Dillon XL-650 progressive press, while the Reloading Bench video below shows the Lock-Out Die on a Hornady LnL progressive.
Close-up view of a sectioned case. This one here was “fixin’ to pop”, observed Glen Zediker.
Here are highlights from an article Glen Zediker wrote for the Midsouth Blog. In that article Glen, who sadly passed away in 2020, focused on cartridge brass. Glen identified the most common failures that appear with brass that has been shot multiple times, or which has been fired at excessive pressures. Glen explained some simple ways to check your cartridge brass to detect “early warning signs” of case failure, particularly case head separation, which can be very dangerous.
How Cases Degrade with Multiple Firings By Glen Zediker
This article explains when, and then how, to check after the progress of changes commencing with the firing on a new case. It’s the “progress of degeneration,” in a way of looking at it because the concern is getting a handle on when enough change in the brass has come about to require attention. Or abandonment. As said then, for me that’s 4 firings. That, as said last time, is when I might see changes that need attention. Also as said, that figure didn’t come out of a hat, but from my own notes in running my competition NRA High Power Rifle loads. [Editor’s Note: With Lapua brass, using moderate loads, in bolt-action rifles, we typically get about 10 good (match-worthy) firings. But if you anneal your Lapua brass, and run modest pressures, Lapua brass can perform well for 20 or more load cycles.]
The areas most affected are the case neck and case head area. Case neck walls get thicker [but] the case head area body walls get thinner. Primer pockets get shallower and larger diameter.
This case shows a cracked neck AND a crack (separation) above the case head. Zediker says it is “rare to see one case with both of the most common failures. [This case] was attacked by an M14.”
Case Head — Causes of Separation and Cracking
When a case is under pressure during firing, the brass, like water, flows where it can, where it’s more free to move. Of course, the chamber steel limits the amount it can expand. The case shoulder blows fully forward and the case base is slammed back against the bolt face. There is, therefore and in effect, a tug on both ends — it gets stretched. The shoulder area is relatively free to expand to conform to the chamber, but the other end, the case head area, is not. Since that’s the area of the case with the thickest walls, it doesn’t expand “out” much at all. What it does is stretch. The “case head area,” as I refer to it here, is the portion of the case above the web, which is just above the taper that leads in to the extractor groove. The “area” extends approximately an eighth-inch up the case body.
Here’s a “pressure ring.” You’ll see this after firing, if you see it. And, if you see it, that case is done. The bright ring indicates excessive stretching, which indicates excessive thinning. If you see a ring circling the case, noticeable because it’s lighter color than the case body, and it’s in this area, I’d say that case is done. And that’s right where a “head separation” occurs. It can crack and also blow slap in two, and that’s the “separation” part of case head separation.
Photo courtesy GS Arizona.
This is a spot to keep close watch on as cases age. It is also the area that is more “protected” by sizing with less case shoulder set-back. That is, pretty much, where the freedom for the stretching movement in this area comes from (the case shoulder creates a gap). If you’re seeing a sign that a head separation [might happen with relatively few firings], chances are the shoulder set-back is excessive, and also… the load pressure level.
Bent Paper Clip Case-Wall Gauge
Editor: You can use a bent paper clip to detect potential case wall problems. Slide the paper clip inside your case to check for thin spots. GS Arizona explains: “This simple little tool (bent paper clip) will let you check the inside of cases before you reload them. The thin spot will be immediately apparent as you run the clip up the inside of the case. If you’re seeing a shiny line on the outside and the clip is really hitting a thin spot inside, it’s time to retire the case.” Photo by GS Arizona.
Monitor Primer Pocket Dimensional Changes
Another case-head-area and pressure-related check is the primer pocket. As said, the primer pocket will get larger in diameter and shallower in depth each firing. As with many such things, the questions are “when” and “how much,” and the main thing, “how much?”
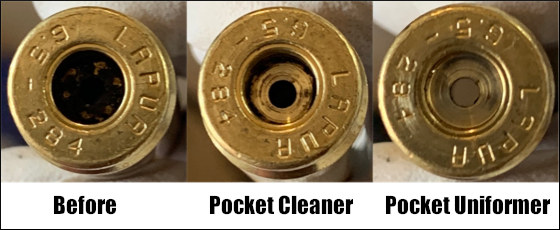
If the pocket gets excessively shallow, and that’s judged by a primer that seats fully but isn’t at least a tick below flush with the case base, there could be function issues. There’s a risk of a “slam-fire” with a semi-auto that uses a floating firing pin, and, if there is actual protrusion, that has the same effect as insufficient headspace. A primer pocket uniformer can reset the depth of a shallowed primer pocket to what it should be, but the real test for me is how easily the next primer seats into it. If it’s significantly less resistance, I’ll say that case is done. Shallower can be refurbished. That’s a primary function of a primer pocket uniformer. Larger diameter, though, can’t be fixed. I’ve mentioned in another article or two that, any more at least, my main gauge of load pressure has become how much primer pocket expansion there’s been.
Do you use bushings to size your case-necks? Are you assuming that your bushings are actually round on the inside, with a hole that’s centered-up properly? Well you may be in for an unpleasant surprise, based on what our friend Jim de Kort recently discovered. Jim was concerned about the run-out on his brass. His cases went into his bushing-equipped FL die pretty straight, but came out of the die with up to .004″ run-out. “What gives?”, Jim wondered. “Could the problem be the bushings themselves?”
To answer that question, Jim decided to examine his bushings. Using an Accuracy One Wheel-drive concentricity gauge, Jim checked out some of his neck bushings. What he discovered may surprise you…
Neck Bushing Flaws Revealed
Trust no one… — Jim de Kort
Jim writes: “I measured the concentricity of my 6BR rounds today. I noticed they went into the neck-bushing equipped full-length sizing die with less than .001″ deviation but came out with .003-.004″. The culprit, it appears, was the bushing itself. Without it the cases stayed within .0005″ to .001″ deviation, so something was happening with the bushing.
One bushing had .00025″ deviation on the outside, yet almost .003″ on the inside, so it is crooked. But even when using a bushing that is within .001″ I still get .003″ runout after sizing. I repeated the same procedure for my 6×47 and got the same results. When using the bushing, concentricity suffers a lot.”
Before we bash the bushing-makers, we must acknowledge that many different things can contribute to excessive run-out and/or mis-alignment of case-necks. We don’t have all the answers here, and Jim would be the first to say that some mysteries remain. Still, these are interesting results that give all precision hand-loaders something to think about.
Jim Borden of Borden Accuracy also offers this tip: “Check the trueness of the face of the die cap. That has more to do with trueness than the bushing. Also check perpendicularity of hole in bushing to top surface. When I was making dies, the cap was made by threading and facing the threaded tenon in same setup.”
Editor’s Comment: Many people have great results with neck-bushing dies, but Jim isn’t the only fellow who has seen some very odd results. I personally employ honed, non-bushing dies for many of my chamberings. These non-bushing dies (with the necks honed for .002-.003″ neck tension) produce extremely straight ammo, with run-out consistently under .0015″.
Product Review by F-Class John
Case preparation is critical for precision reloading. One must trim cases, debur/chamfer case mouths, clean necks, spruce up primer pockets and do other important tasks. Complete case prep can involve many separate processes, each requiring its own tools. With each of those tools comes additional cost as well as the need for more storage and bench space. To make case prep easier, faster, and more convenient Lyman created the Case Prep Xpress (#ad). The Case Prep Xpress, introduced a few years back, combines up to five prep stages into one well-built, stable, versatile unit. Watch this video to see the machine in action:
The Case Prep Xpress features five (5) independently-turning spindles all with the common 8/32 thread. This allows you to attach multiple tools supplied with the unit PLUS many other screw-on prep tools. For our testing we started out using a variety of the 12 included tools and found they cover the majority of case prep tasks. Lyman supplies deburr and chamfer tools, pocket uniformers, reamers and cleaners, as well as an assortment of neck brushes.
The deburr and chamfer tools worked really well, creating beautiful bevels all while leaving a nice flat edge across the top of the neck which is critical for accuracy and brass life. We found the primer pocket cleaning tool did a good job, but for truly clean pockets we recommend using the primer pocket uniforming tool, which very efficiently removes even hard residues.
The benefit of having interchangeable heads is that you can add your own accessories. We like to use a bore brush with bronze wool wrapped around it for use inside our necks. This worked perfectly once we screwed it in. In fact, we couldn’t think of any 8/32-threaded accessory that wouldn’t work well on this machine. Another great design feature is how all the accessories are oriented straight up. This allows for perfect visual alignment of your cases onto the tools which is critical — especially when performing cutting operations such as primer pocket uniforming.
Along with the five power stations there are six female-threaded storage spots on the sides where tools can be placed to ensure they don’t get lost. We like this feature since there will be more than five accessories you want to use and having them easily available is a great feature. You can keep 11 tools right on the machine (5 on top, 6 on the sides). That way you don’t have to dig through storage bins.
The Case Prep Xpress has a removable front bin to hold brass shavings, and there are two circular trays on either side of the bin. In front is a long tray that holds the provided brush. This makes it relatively easy to clean off brass shavings and other debris from case prep processes.
SUMMARY — Versatile Case Prep Xpress Is A Good Value
For the money, Lyman’s Case Prep Xpress is tough to beat. It performs multiple tasks well while being stable and easy-to-use. Yes there are some multi-spindle prep centers that offer variable or fast/slow RPM spindles while the Lyman’s spindles are all fixed RPM. (See, e.g. the RCBS Brass Boss). However those other systems don’t include all the convenient on-board storage of the Case Prep Xpress, and are typically more expensive. The Lyman Case Prep Xpress typically sells for about $199-$209 “street price”. It’s currently on sale for $174.99 on Amazon (#ad). This makes the Lyman Case Prep Xpress a good value — it offers great versatility while saving space and saving money compared to buying five or more separate, powered tools.
As an Amazon affiliate, this site can earn revenues through sales commissions.
For this Saturday Showcase, we feature some top-tier products that have set new standards for quality and effectiveness. First off is the impressive new NEXUS single-stage press from Short Action Customs. Then we feature Bix’N Andy triggers, which have found favor with competitors in many disciplines from short range Benchrest to ELR competition. Now that Jewell triggers are becoming harder to source, Bix’N Andy units will be seen on more rifles than ever. For those who turn case-necks, we feature the remarkable IDOD machine from F-Class Products — simply the best automated neck-turner ever created.
As a bonus we offer two very informative interviews from SHOT Show 2024. The first covers the product line at Bullet Central, while the second reviews the latest and greatest rifle actions from BAT Machine.
Short Action Customs NEXUS Press
Short Action Customs (SAC) has crafted a very impressive and innovative single-stage press. The innovative $875 NEXUS press has impressive design features. The NEXUS Press boasts dual cam-over pucks, which precisely stop the movement of the floating die block. SAC explains: “We wanted to have the Nexus press cam-over independently of the shell holder. Every single cycle of the press, your hard cam-over pucks limits the travel, which gives you the same amount of cam over every single cycle.” The press can adapt to various diameter dies with floating inserts in the top section (see video). The NEXUS also has a floating shell holder system, which is quick change and tool-less. SAC states that this shell holder system “allows .010″ more sizing than all other shell holders on the market”.
Bix’N Andy Triggers
German-made Bix’N Andy triggers, available from BulletCentral.com, are among the very best you can buy. Available in both single-stage and two-stage designs, Bix’N Andy triggers are extremely precise, repeatable, and smooth. The unique internal, friction-reducing roller ball system allows for extremely low reset force, yielding an ultra-crisp let-off. Bix’N Andy triggers can be fitted with a variety of trigger shoes according to shooter preference. Bullet Central is currently the exclusive official USA importer for Bix’N Andy triggers.
Bryan Blake, a very clever machinist and gunsmith, has created an ultra-precise and speedy neck-turning machine. Bryan, who runs Blake Machine, Blake Barrel, and F-Class Products has created a system that uses twin precision cutter tips to turn case necks inside and out quickly and efficiently, with superior precision. This advanced IDOD Neck Turning Machine holds cases securely in a precision-machined spindle attached to an electric motor. Twin blades move precisely during the cutting process, milling the necks inside and out. The turned necks come out perfect every time, with the shoulders trimmed exactly (with doughnut removed) as well.
If you turn hundreds of cases during a shooting season, you may want to buy an IDOD from F-Class Products. The secret to the efficiency of the Blake IDOD is a vibration-free motor, high-mass case-holder, precision OD/ID-adjustable cutter, along with an advanced tracking system that moves the cutter heads towards the case neck (and back again) with absolute, 100% repeatable precision.
Bullet Central — Major Product Lines
This F-Class John video features a lengthy interview with Bullet Central representative Zachery, covering the many products Bullet Central offers. Products featured include Bix’N Andy triggers (0:55 time-mark), Micron Dies (5:20); Dual-Ram Press (8:08); Custom Barrels (12:00); BAT Actions (14:57). During this video Zachery also explains the wide range of rimfire ammo Bullet Central carries.
BAT Machine Actions — Showcasing Different Sizes and Features
This video features the impressive, latest generation BAT Machine actions. The video covers the full range of actions from the smaller SV/DS actions, to Model B, then Model M with integral lug and Picatinny Rail. The BAT representative then explains the features of BAT’s Nuevo actions (2:28 time-mark), which BAT builds for Bullet Central. For ELR and large Magnums BAT makes the model L and Model EXS. You can see all the current BAT actions at BatMachine.com/bat-actions. NOTE: From that page, scroll down and then select your particular discipline, such as Short-Range Benchrest, F-Class, Long-range Benchrest. You can also select repeater actions for hunting and/or PRS/NRL.
Vihtavuori offers an updated, user-friendly reloading data center on its website. This data page works well with all formats — smartphones, tablets, and desktop computers. On this page you can find recommended loads for 80+ cartridge types all in one place. You don’t have to click through multiple web pages.
In addition, the Vihtavuori reloading website has a very handy Burn Rate Chart (see below). While you can get all the load info you need through the website, Vihtavuori also offers a very good FREE reloading Mobile App. Vihtavuori’s online Reloading Center has links to the handy Vihtavuori Reloading App for both Apple and Android devices.
Burn Rate Chart is Online
CLICK HERE to view full-screen Vihtavuori Burn Rate Table.
Vihtavuori offers a comprehensive burn rate chart that lists all Vihtavuori powders for rifles and pistols. This includes Vihtavuori powders in the left column and ranks them with powders from other brands: Norma, RWS, VECTAN, Reload Swiss, IMR, Hodgdon, Accurate, W-W Alliant, and Ramshot. CLICK HERE to see the full-size chart, which can be downloaded in PDF format.
NOTE: The listed powders are displayed in order of approximate burning rate. Vihtavuori cautions: “This list is for reference only and NOT to be used for developing loads.”
Find Optimal Loads with Reloading Data Tool
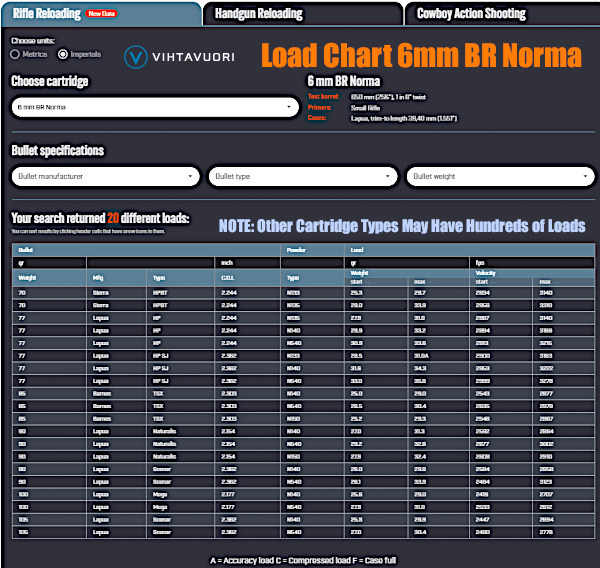
Example of Vihtavuori Load Data for Popular Cartridge
Here are the load results for the 6mm BR Norma (aka “6BR”) cartridge. Vihtavuori has full PDF tables like this for over 80 cartridge types. With the most popular cartridge types, such as .223 Rem, 6.5 Creedmoor, and .308 Winchester, the PDF tables have over 350 entries. In fact the .308 Win table has 641 loads!
Vihtavuori Procedures and Methods for Generating Load Data
Vihtavuori generates hundreds of new reloading data entries every year. But how is the load data actually produced? This video provides insight into how Vihtavuori professionals work with advanced equipment to provide reliable load data for handloaders.
Many shooters prefer to deprime their brass before resizing. That way they can tumble cases or keep primer debris off their main press. To deprime cases before sizing or cleaning you can use a Decapping Die. This pushes out the spent primer without changing the neck or body of a case. Such decapping dies work fine, but they do require the use of a press. Here is a handy alternative — a cool tool that allows you to deprime brass anywhere — no press needed.
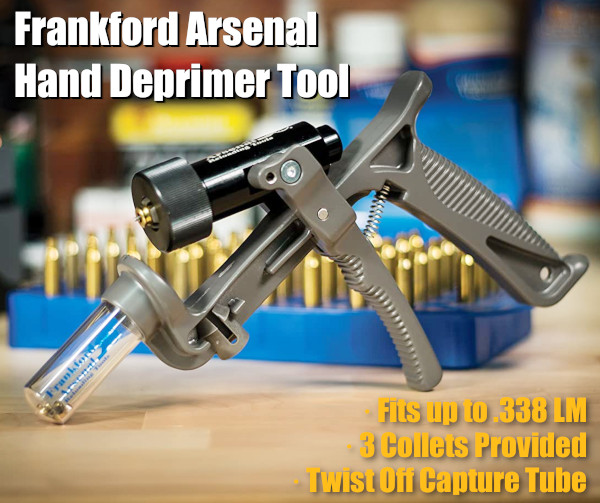
Handheld Primer Removal Tool From Frankford Arsenal
This cleverly-designed Hand Deprimer Tool allows you to deprime cartridge cases without a press. This hand-tool from Frankford Arsenal will deprime brass and capture primers conveniently. You can deprime your cases while watching TV or relaxing in your favorite chair.
This device lets you remove spent primers anywhere — no press needed and all the mess (cups/anvils/residue) stays in the capture chamber. This tool comes works with nearly all common case types up to .338 Lapua Magnum. With good leverage, this tool does the job quickly and efficiently. Forum members have praised this handy tool, but recommend wearing a thick glove if doing more than 100 cases in a session.
How to Adapt Tool for Small Flash Hole Brass
The Frankford Arsenal Deprimer Tool was designed for LARGE flash-hole brass. To deprime brass with small (1.5mm/0.59″) small flash-holes, as found on Lapua .220 Russian and 6mmBR cases, you will need to reduce the pin diameter. Frankford Arsenal currently recommends purchasing a replacement pin and “sanding it down” to the smaller diameter. NOTE: This is NOT difficult — simply spin the stock pin in some sandpaper.
This handy depriming tool is very versatile. With a universal, cylinder-style cartridge-holder, the tool can deprime a wide variety of cartridge types from .20 caliber up to .338 caliber. Three different plastic collets are provided to handle for different diameter cases. Spent primers are captured in a removable spent primer catch tube. Simply twist off the clear catch tube to dump the spent primers. With die-cast metal construction, this tool should last through many thousands of depriming cycles. MSRP is $65.99. Right now it is $47.99 on Amazon with 82% 5-star ratings.
Long-term User Review
One owner of this depriming tool has posted: “I have owned one of these for about eight years and deprimed over 10,000 cases with this tool. I have never had to replace a single part on it. You will have to adjust the return spring every so often, but that is a very easy task. If you are depriming a LOT of brass, the handle can tear up your hand a bit. Solution: Wear a Mechanics Glove. Easy Peasy! You will NOT regret this purchase.”
User Modifications — Grip Padding and High-Volume Capture
Many users recommended putting some kind of padding on the grip and front lever to reduce pressure on the fingers. This can be done with a wrap or a rubber covering. In addition, users have adapted the unit with an attached hose and large primer capture jug. If you depriming hundreds of cases at a time, this hose conversion may make sense.


 Popular Cartridge Types Profiled


 Quick Tip: Try Flipping Your Bushings
 If you load pistol or rifle ammo with a progressive press, we strongly recommend you get a Lock-Out Die from RCBS. This unique reloading die will prevent your progressive press from advancing if the dispensed powder charge is more or less than about 0.3 grains too high or too low. The Lock-Out Die really works. Your Editor uses it on his RCBS 2000 progressive press. I can affirm that a Lock-Out Die has “saved my bacon” a half-dozen times over the years when there was an over-charge (which could cause a Kaboom) or a low charge (which could cause a squib load).