“Shoot Like a Champion”. Bryan Litz, author of Applied Ballistics for Long-Range Shooting, says he often sees notes like this tucked in shooter’s gear (or taped to an ammo box) at matches. What “marksmanship mantras” do you use? Do you have a favorite quote that you keep in mind during competition?
On the Applied Ballistics Facebook Page, Bryan invited other shooters to post the motivating words (and little reminders) they use in competition. Here are some of the best responses:
“Shoot 10s and No One Can Catch You…” — James Crofts
“You Can’t Miss Fast Enough to Win.” — G. Smith
“Forget the last shot. Shoot what you see!” — P. Kelley
“Breathe, relax, you’ve got this, just don’t [mess] up.” — S. Wolf
“It ain’t over ’til the fat lady sings.” — J. McEwen
“Keep calm and shoot V-Bull.” — R. Fortier
“Be still and know that I am God[.]” (PS 46:10) — D.J. Meyer
“Work Hard, Stay Humble.” — J. Snyder
“Shoot with your mind.” — K. Skarphedinsson
“The flags are lying.” — R. Cumbus
“Relax and Breathe.” — T. Fox
“Zero Excuses.” — M. Johnson
“SLOW DOWN!” — T. Shelton
“Aim Small.” — K. Buster
“Don’t Forget the Ammo!” (Taped on Gun Case) — Anonymous
PARTING SHOT: It’s not really a mantra, but Rick Jensen said his favorite quote was by gunsmith Stick Starks: “Them boys drove a long ways to suck”. Rick adds: “I don’t want to be that guy”, i.e. the subject of that remark.
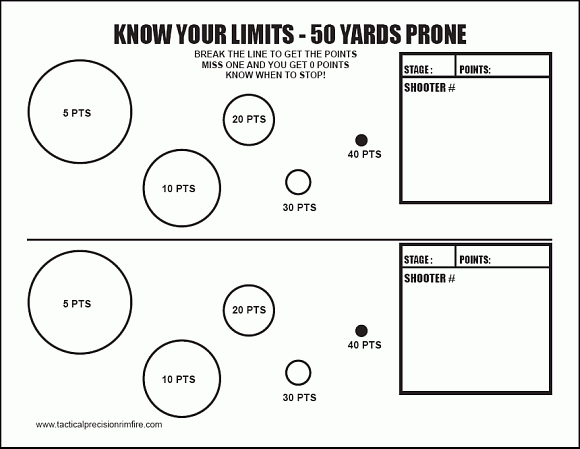
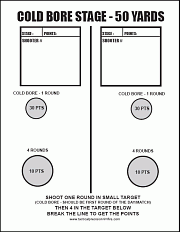
AIM SMALL, MISS SMALL: At 25 yards, this is a fun rimfire plinking target. At longer distances it can be a great training target for precision centerfire shooters.
NRL22 and PRS rimfire competition is hugely popular. And we’re seeing great interest in .22 LR rimfire tactical cross-training. With a rimfire rig, you can practice regularly for a fraction of the cost of centerfire shooting. That way you can build your skill set without breaking the bank. Good rimfire ammo can be had for 12 to 20 cents a round. Compare that to $1.00 (or more) for centerfire handloads and as much as $2.20 per round for factory ammo such as Hornady 6.5 Creedmoor.
To help with rimfire cross-training, here are some of our favorite rimfire tactical targets, all in easy-to-print PDF format. Click each target image to download the FREE target. You’ll find more free targets for load development, precision practice, and fun shooting on our AccurateShooter FREE Targets Page.
Modern Rimfire Tactical Rifle with MPA BA Comp Chassis and Vudoo V-22 action.
Targets for Rimfire Training and Fun Matches
Here’s a rimfire training target with “big to small” target circles. Start with the largest circles, then move to the smaller ones in sequence. This systematic drill provides increasing challenge shot-by-shot. Novices often are quite surprised to see their accuracy improve as they move from bigger to smaller aiming points. That provides positive feedback — always a good thing.
Right Click and “Save as” to download printable PDF versions of target.
This Vortex Nation video features an 80-minute interview with Travis Ishida, one of the original founders of the NRL22 and NRL22-X disciplines. Travis told us that the NRL now runs 7-8 times as many rimfire matches as centerfire matches.
Rimfire Practice Targets
SPECIAL BONUS–Rimfire Tactical Precision Targets
These FREE targets by DesertFrog are offered in Adobe Acrobat format for easy printing. CLICK HERE to download all six targets as a .ZIP archive.
Much of the country is dealing with serious winter weather right now, with snow and very cold temperatures. For many shooting enthusiasts outdoor rifle shooting is replaced by indoor handgun shooting in the winter months. Pistol shooting is fun — that’s reason enough to head to an indoor range. In addition, all CCW permit holders should definitely practice regularly. For many people, indoor shooting can be done in the evening, after work, relatively close to home. Indoor ranges are most convenient for those who live near urban centers, where the biggest threats to public safety currently exist. This article talks about indoor firearms training and the proper procedures you should follow at indoor ranges.
This Video Covers Basic Gun Range Safety Rules and Etiquette
FIVE IMPORTANT SAFETY PROCEDURES for Indoor Ranges
1. Follow the Three Fundamental Rules for Safe Gun Handling
ALWAYS keep the gun pointed in a safe direction. ALWAYS keep your finger off the trigger until ready to shoot. ALWAYS keep the gun unloaded until ready to use.
2. Follow ALL Range Officer Instructions
ROs are the first and final authority on any range and their decisions are generally final. Arguing with a Range Officer may just get you thrown out.
3. Don’t Bother Others or Touch Their Guns
Respect other shooters’ privacy unless a safety issue arises. Do NOT engage other shooters to correct a perceived safety violation unless absolutely necessary – inform the RO instead. NEVER handle or touch another shooter’s firearm without their permission!
4. Know Your Range’s Rules
Review and understand any and all range rules and requirements/expectations. For example, what is the range’s maximum rate of fire? Are you allowed to collect your brass?
5. Know What To Do During a Cease Fire
IMMEDIATELY set down your firearm, pointed downrange, and STEP AWAY from the shooting booth (or bench). Range Officers do not want shooters trying to “secure/unload” their firearms in a cease fire situation — they want the shooters separated from their guns instantly.
BAD RANGE BEHAVIOR — Five Things NOT to Do at the Range
Here are the five worst behaviors we’ve seen at indoor ranges. These behaviors are both dangerous and inconsiderate. Any one of these behaviors can get you permanently banned from an indoor range.
1. Sweeping other individuals after loading a weapon behind the firing line is very bad. All your weapons should be empty until you reach your shooting station.
2. Turning the handgun sideways while trying to clear a malfunction or insert/remove a magazine. This will point the muzzle at a fellow shooter. Or, after shooting a gun, the shooter fails to clear the weapon and then places the gun somewhere near the shooting station with the muzzle in an unsafe position.
3. Reacting unpredictably when firing a high recoil handgun. We’ve seen people take a second shot by accident with the muzzle way off target.
4. Not obeying range commands — in particular continuing to shoot during called cease-fires.
5. Poorly aimed shooting that hits target frames or carriers, causing ricochets.
Double-Up on Hearing Protection When Shooting Indoors
When shooting indoors we recommend quality muffs with earplugs underneath, offering double protection. When inside an enclosed range, with other shooters blasting away right next to you, you really need effective hearing protection. But you also need to hear range commands and be able to communicate. That’s why we recommend electronic muffs with plugs underneath.
For indoor pistol shooting, we like the Howard Leight Impact Pro Muffs. These offer an impressive 30 dB Noise Reduction Rating (NRR). In addition, the electronic functionality allows you to hear all range commands clearly. These muffs are a good value. These are now available for $89.98 on Amazon (#ad). Howard Leight also makes good protective safety eyewear with ANSI Z87.1-2010 (High Impact) rating. These milspec, wrap-around Genesis safety glasses are $17.96 on Amazon (#ad) this week.
One Pistol, Two Barrels, Two Playing Cards — here’s a trick shot we just had to share. The talented Kirsten Joy Weiss does something we’ve never seen before, splitting TWO (2) playing cards with a unique, twin-barreled 1911-style pistol. Watch the video to see Kirsten pull off this double-barreled doozy of a trick, firing two bullets at the same time.
It took a few tries, but Kirsten makes the shot at the 3:14 time-mark:
Kirsten was enthusiastic about this unique trick: “Splitting two cards with two bullets fired at once? The double-barreled 1911 was just begging for a trick shot application. Arsenal Firearm’s 2011 A1 twin-barrel, 1911-style pistol is a heavy monster to wrangle, but a lot of fun to shoot!”
For many riflemen, reading the wind is the toughest challenge in long-range shooting. Wind speeds and directions can change rapidly, mirage can be misleading, and terrain features can cause hard-to-predict effects. To become a competent wind reader, you need range-time and expert mentoring. In the latter department, Frank Galli, founder of Sniper’s Hide, offers a detailed digital resource: Wind Reading Basics for the Tactical Shooter.
Wind Reading Basics is much more than a 47-page eBook — it has charts, instructions for ballistic calculators, and even embedded videos. Galli explains: “We break down the formulas, walk you through using a ballistic computer, and give you all the information in one place. From videos, to useful charts, we make it simple to get started. It’s all about having a plan, and we give you that plan.”
Galli’s Wind Reading Basics, priced at $7.99, can be downloaded from iTunes for iPads, iPhones and iOS compatible devices. Here are sample sections from the eBook (which includes videos):
Sherri Jo Gallagher, the second woman in history to win the NRA High Power National Championship, sports Eye Protection at Camp Perry. The first lady High Power Champion was Sherri’s mother, Nancy Tompkins.
In response to a Bulletin article about Protective Eyewear, one of our Canadian readers posted a personal story. His account demonstrates the importance of wearing eye protection whenever you shoot — no matter what type of firearm you are using — even air rifles. We hope all our readers take this to heart. All too often at rifle matches we see shooters, even some top competitors, risking their vision by failing to wear eye protection.
Eye and Hearing Protection are now MANDATORY for Highpower Rifle competitors and Pistol shooters in all CMP-affiliated matches. The 2020 CMP Highpower Rifle, Pistol, and CMP Games Rulebooks all contain the following rule: “All competitors and competition officials are required to wear appropriate eye and hearing protection when on shooting range firing lines during highpower rifle or pistol firing. All competitors must comply with this requirement before they can participate in a CMP sponsored or sanctioned competition. Competitors are responsible for selecting their eyewear and hearing protection.”
Eye Protection — Lesson Learned by Nicholas from Canada
As a boy on a mixed farm on the plains the first shooting stick I owned was a Red Ryder BB gun. My Dad bought it for me as I showed a keen interest in the shooting and hunting sports. I was about 9 years old at the time.
We had literally thousands of sparrows in our large farm yard and they liked to roost on the steel railings in the barn loft. I took to slowly thinning out their ranks by flashlight at night as these little winged pests settled in the farm buildings.
One evening as I slayed sparrow after sparrow in the barn loft — with about a dozen farm cats following me to consume these easy meals, I fired at another bird centered in my flashlight beam.
However, my aim was a bit low — and the copper pellet hit the steel beam square on. Instantly I felt a sharp pain as the BB bounced back and hit me squarely between the eyes on the bridge of my nose – drawing blood from the partial penetration into the skin. A half inch either way and I’d have lost an eye!
Never, never, never shoot at any target with a steel background with any firearm, even a BB gun – is the hard lesson I learned, and wear the best shooting glasses that money can buy!
PLEASE REMEMBER THAT!!
Editor’s Comment: Among competitive pistol shooters, the use of safety eyewear is universal. You’ll never see Rob Leatham, Julie Golob, or Jerry Miculek competing without eye protection — for good reason. The handgun sports’ governing bodies effectively enforce mandatory eye protection policies. We wish the same could be said for competitive rifle shooting. We often see benchrest, High Power, and F-Class competitors shooting without eye protection. We’ve heard all the excuses, yet none of them trump the safety considerations involved.
We recommend that all shooters and hunters employ eye protection whenever they use firearms or are at a location where live fire is taking place. You only have two eyes. A tiny bullet fragment or ricochet is all it takes to cause permanent blindness in one or both eyes. As rifle shooters, we place our eyes a couple inches away from a combustion chamber operating at pressures up to 70,000 psi. I know quite a few guys who will religiously put on safety glasses when running a lathe or a drill press, yet the same guys won’t use eye protection when shooting their rifles — simply because it is “inconvenient”. That’s nuts. It doesn’t matter is you are a cub scout or a multi-time National Champion — you should wear eye protection.
I will give you a personal example. A year ago I was shooting a 9mm pistol. One of the cartridges had a primer burst outward blowing small particles, some brass, and a piece of the pistol’s extractor right back into my eyes. Thankfully I was wearing good wrap-around safety glasses. No injuries at all. But without those safety glasses, this could have been very serious. I always wear safety glasses with ALL firearms. Shown below is the same kind of primer blow-out I experienced, but with a .270 Win rifle cartridge.
Be wise — protect your eyes. To learn more about eyewear safety standards, and to learn about the latest options in ANSI Z87-certified protective eyewear, read our article on Eye Protection for Shooters.
Do you enjoy shooting pistols for sport, or perhaps you carry a handgun for self-defense? If you’re like most of us, you might benefit from a “refresher course” on the fundamentals of handgun shooting. The NRA has created a useful Infographic that covers important basics of handgun marksmanship — key things such as Sight Alignment, Trigger Control, and Handgun Hold.
Here are the first two (2) lessons. Click the link below to see all SIX (6) training topics: Sight Alignment, Sight Focus, Trigger Control, Breath Control, Hold Control, and Follow-Through.
Video Shows Sight Alignment, Grip, Stance, Trigger Control and More
In this USAMU video, SGT Shane Coley talks about the basics of sight alignment and trigger control. But then SGT Coley talks about other important control factors such as grip, arm position, and body stance. For rapid-fire shooting, you need to have a good arm and body positioning to control recoil and get back on target quickly. This video is a valuable complement to the NRA Infographic because it demonstrates all the important pistol fundamentals during live fire, at the range.
Here’s inspiration for rimfire shooters out there. The video below shows some mighty impressive .22 LR iron sights lever gun shooting by a very talented young lady. In this video, Kirsten performs a classic Annie Oakley trick shot, cutting a playing card in half with a bullet. We hope this display of marksmanship brings a smile to our readers.
Kirsten Joy Weiss is a phenomenal off-hand rifle shooter. Splitting a playing card would be hard enough with a scoped rifle shot from the bench. But Kirsten makes this amazing shot from standing position, shooting over iron sights, with an inexpensive rimfire lever gun. Trust us, that’s not easy. It did take Kirsten three tries, but we’re still impressed.
To accomplish this trick shot, Kirsten’s horizontal aim had to be ultra-precise. A playing card is only 0.25mm thick (about 1/100th of an inch). That leaves almost no room for error.
GIF Animation Shows Bullet Slicing Card in Half:
We know top benchresters can put five shots in one ragged hole at 100 yards, used a scoped rifle sitting on a stable rest. But make those folks stand on their hind legs, hold the rifle, and aim over primitive iron sights, and some of those benchrest aces would be lucky to hit a dinner plate at 100 yards. Kudos to Kirsten for making this great shot.
Most bolt-action rifle shooters work the bolt with their trigger-pulling hand. This is because most rifles sold to right-handed shooters come with right-side bolts, while “lefty” rifles come with left-side bolts. This “standard” configuration requires the shooter to take his dominant, trigger-pulling hand off the stock to cycle the bolt, then re-position his hand on the stock, and “re-claim” the trigger. Often the shooter must lift or move his head to work the bolt, and that also requires him to re-establish his cheek weld after each and every shot. Not good.
This really doesn’t make much sense for precision shooting with fore-end support*. There is a better way. If you leave your trigger hand in position and work the bolt (and feed rounds) with the opposite hand, then you don’t need to shift grip and head position with each shot. All this requires is a weakside-placed bolt, i.e. a left bolt for a right-handed shooter or a right bolt for a left-handed shooter. The video below shows a “Lefty” working a right bolt. Note how efficient this is:
As our friend Boyd Allen explains: “If you think about it, if you are going to work with a factory action where your options are left bolt and left port or right bolt and right port, and you are building a rifle that will only be shot from a rest, using the left/left for a RH shooter or using a right/right for a LH shooter works better than the conventional configuration”.
Shoot Like a Champ and Work the Bolt with Your Weakside Hand
Derek Rodgers is a recent F-TR World Champion, a King of 2 Miles champion, AND is the only person to have won BOTH the U.S. F-Open and the U.S. F-TR National Championships.
And guess what? Derek runs this kind of “opposite” bolt set-up. Yep, Derek shoots right-handed with a left bolt. Though Derek is a right-hander, he shoots with a Left Bolt/Left Port (LBLP) action. He pulls the trigger with his right index finger, while working the left-side bolt with his left (weakside) hand. This allows him to stay in position, and maintain his cheekweld. He places his right hand on the grip, while manipulating the bolt (and feeding rounds) with his non-trigger-pulling hand.
Past F-TR World Champion and Past King of 2 Miles Derek Rodgers
This is the rifle with which Derek won the 2013 F-TR National Championship.
*For true standing, off-hand shooting (whether in competition or on a hunt), a conventional strongside bolt placement makes sense, since the non-dominant arm must support the front of the rifle all the time. When shooting from bipod or rest, it’s a different story.
For load development, some guys shoot 3-shot groups. Other guys shoot 5-shot groups, or even 10-shot strings. But for testing its projectiles, Sierra Bullets takes it to another level entirely. A while back Sierra was testing its .30-Caliber 175gr HPBT MatchKing in the Sierra underground tunnel. The results appear above — a FIVE HUNDRED Round group!
500 Shots Form 0.82 MOA Group at 300m (328 yards)
Sierra’s trigger-pullers sent five full boxes of bullets down-range at a single target. The photo above shows the result of 500 shots taken in a 300 meter test tunnel. The raw group size, edge to edge of the farthest shots, is about 3.13 inches, as shown on the calipers’ metal linear scale. Subtract a .308″ nominal bullet diameter* to get the 2.823″ on the digital readout. So you’re seeing a 2.823″ group at 300 meters (328 yards). One MOA at this distance is 3.435″ so this 500-round group is 2.823 divided by 3.435 or 0.82 MOA (0.8218 MOA to be precise).
This 500-round group was shoot as part of a pressure/velocity test for a commercial customer. The cartridge was .308 Winchester, loaded at 2.800″. The powder was Reloder 15. A 26″ barrel was shot from a return to battery rest. The gun was cleaned every 125 rounds and two foulers shot.
What do you think — could you beat this group from a bench for 500 rounds?
One Facebook poster joked: “500-round group? Everyone knows anything less than 1000-round groups are a waste of time and statistically irrelevant.”
Sierra’s 300 Meter Testing Tunnel
Ever wonder how (and where) Sierra tests its bullets? The answer is underground, in a 300-meter test tunnel located under Sierra’s factory in Sedalia, Missouri. The photo above shows the construction of the tunnel back in May, 1990. Like most bullet manufacturers, Sierra does live-fire bullet testing of its projectiles. Sierra’s 300-meter test range is the longest, manufacturer-owned underground bullet test facility in the world. In years past, Sierra offered free visits to the test tunnel as part of a factory tour.
* Normally, to get an exact group size, you should subtract the TRUE bullet hole size, which is usually smaller than the nominal bullet diameter. E.g. a .308 bullet hole may show on paper as .298 or so. But here, for simplicity, we are subtracting .308″ because we do not have the original target to measure.


 “Shoot Like a Champion”. Bryan Litz, author of Applied Ballistics for Long-Range Shooting, says he often sees notes like this tucked in shooter’s gear (or taped to an ammo box) at matches. What “marksmanship mantras” do you use? Do you have a favorite quote that you keep in mind during competition?


 Much of the country is dealing with serious winter weather right now, with snow and very cold temperatures. For many shooting enthusiasts outdoor rifle shooting is replaced by indoor handgun shooting in the winter months. Pistol shooting is fun — that’s reason enough to head to an indoor range. In addition, all CCW permit holders should definitely practice regularly. For many people, indoor shooting can be done in the evening, after work, relatively close to home. Indoor ranges are most convenient for those who live near urban centers, where the biggest threats to public safety currently exist. This article talks about indoor firearms training and the proper procedures you should follow at indoor ranges.


 In response to a Bulletin article about
 Eye Protection — Lesson Learned
 Editor’s Comment: Among competitive pistol shooters, the use of safety eyewear is universal. You’ll never see Rob Leatham, Julie Golob, or Jerry Miculek competing without eye protection — for good reason. The handgun sports’ governing bodies effectively enforce mandatory eye protection policies. We wish the same could be said for competitive rifle shooting. We often see benchrest, High Power, and F-Class competitors shooting without eye protection. We’ve heard all the excuses, yet none of them trump the safety considerations involved.


