As we release this story, the New Year — January 1, 2026 — is just 22 hours away (East Coast Time). Perhaps you’ve been eagerly awaiting for the big event, getting champagne (and sparklers) to celebrate the New Year. With the election of Donald J. Trump in November 2024, America has seen big changes in 2025 — we’re pleased to see that the current President has restored border security and is protecting Second Amendment rights. To mark the dawning of 2026, with hope for a good year, we expect many folks will open a bottle of champagne. You could pop the cork the traditional way, or read on and learn how to release the celebratory champagne with a rifle shot, as demonstrated by the talented Kirsten Joy Weiss. Click on the above video to see Kirsten release champagne with a rimfire rifle.
A while back at Thorton Winery in Temecula, California, a champagne vintner, we were shown the best way to open a champagne bottle. We were told you should hold the bottle nose up at an angle then rotate the BOTTLE slowly while holding the cork. That works great… but it’s not as stunning as the way sharpshooter Kirsten Joy Weiss opens a bottle of bubbly.
A former competitive smallbore rifle shooter, ace trigger-puller Kirsten Joy Weiss tried a special New Year’s trick shot a few seasons back. In keeping with the festive New Year’s spirit, Kirsten attempted to shoot the cork off a champagne bottle. After a few unsuccessful tries, she managed to hit the cork with at least two shots. But alas the cork did not fly. She actually hit the cork, but it did not release. That was surprising…
Undaunted, Kirsten changed her strategy, aiming for the neck of the bottle. This duplicates the process of “sabering” a champagne bottle — a method of liberating the bubbly by slashing off the end of the neck with a blade. Aiming for the neck of the bottle, Kirsten successfully blew off the top of the bottle. (Apparently, when “sabering” it is actually the pressure within the champagne bottle which does most of the work).
We celebrate a New Year when the clock strikes midnight tonight. As 2025 draws to a close, we all hope 2026 will bring happiness and fulfilment. With that spirit, here are six “fun and games” targets. While each requires good conventional marksmanship skills — hitting a small aiming point — there are other strategies involved, such as playing darts or “making change” by hitting the right combination of coins. Most of us started shooting as kids, just plinking for fun. Here’s an opportunity to be like a kid again — to spend a day at the range just having fun with friends and family members.
Dartboard Target with Colored Rings
This printable Dartboard Shooting Target has the numbers inside the outer dartboard ring to allow a larger target. With this target you can shoot for the center bull, or actually play pub-style dart games, aiming for numbers and particular rings. If you don’t know how to play traditional dart games, visit NiceDarts.com for complete darts rules. One popular game is “Around The World”. The object is to hit the numbered zones, starting with number 1. Then you try for 2, 3, and so on. After hitting all the numbers 1 through 20, then hit the bullseye to win. CLICK HERE for Other Dart Board Color combinations.
Slot Machine Jackpot Target
Enjoy a little Las Vegas-style fun on your next trip to the range. This cool Slot Machine Target has four sets of slot machine patterns each with three rows of three symbols. Connect three in a row to win — and hit the Jackpot! This is one of many colorful, free targets available from Targetz.com.
American Coins Target — Make Change
This unique American Coin Target features actual-sized Eisenhower Dollars, Susan B. Anthony Dollars, and Kennedy Half Dollars in the top row. Below are rows of Quarters, Dimes, Nickels, and Pennies in descending order. NOTE: A U.S. Quarter has a diameter of approximately 1 inch, so it’s One MOA at 100 Yards. NOTE: When printing, select “100%” value and landscape mode — NOT “fit to page”! That will keep the dimensions of the coins accurate. Combining math with marksmanship, this target lets kids practice their math skills while having fun. Choose a money amount (such as $2.57 or $3.73), and “make change” by shooting a combination of coins.
NSSF Billiards Table Target
This Billiards Table Target offers 15 brightly-colored numbered balls with the cue ball at the bottom. Aim for the numbers, shooting 1-15 in sequence, or alternate between stripes and solids. You can also draw an “X” on the white cue ball (or attach a paster), and use that to set your zero. This target is fun for shooting outdoors with rifles at 50 or 100 yards or indoors with pistols.
This billiards target is part of a set of 12 Fun Targets from the NSSF. These were issued a couple seasons back for National Shooting Sports Month, held in August of each year. The other free targets include Golf Links, Bowling Pins, Fireworks, Baseball Diamond, Dutch Windmill, Water Balloons, Light Bulbs, Dartboard, and three Bullseye targets.
Flies in Circles Target
Now you can boast to your buddies that you hit a fly on your target — 16 times. On this target, 16 flies with bright red eyes are arranged in a inside circles, 16 to a page. There are various ways to use the fly targets. Some shoot to hit the head only — so aim for those red eyes. There are 11 other variations of this Fly Target available on the Targets.WS website.
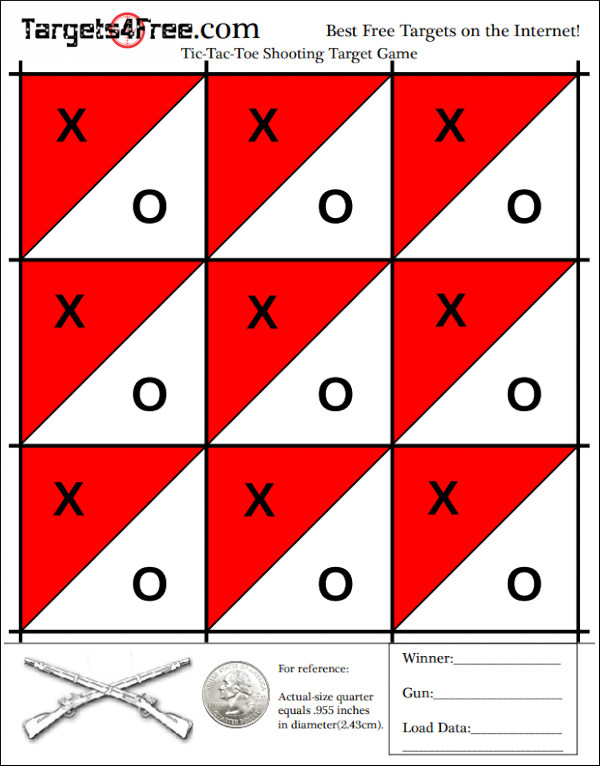
Tic-Tac-Toe Fun Game Target
This Tic-Tac-Toe Shooting Game Target lets you challenge your shooting buddies at the range. One player can shoot the red triangles, while the other shoots the white zones, taking turns. You proceed just like a regular Tic-Tac-Toe game, alternating shots, with the goal of getting three of the same color in a row. This is a fun game for a parent and a young family member. You’ll find other fun targets on Targets4free.com.
Special BONUS — AccurateShooter.com Load Development Target
Our Load Development Target has been used by tens of thousands of shooters. It has proven very popular, since all your load data fits neatly in the boxes under each target. In fact this target is being employed by both rifle-makers (Bergara) and barrel-makers (including Criterion) to test their products. The target was designed for aiming efficiency. The red diamonds have 1/2″ sides and you can align your cross-hairs on the horizontal and vertical lines. It is a clean design that is easy to see even at 200 yards with a 20X scope. NOTE: When we test, we usually crank in a little elevation, setting the point-of-impact higher, so our shots fall in the gray circles. That way you leave the red diamonds intact for precise aiming.
One eye or two? That’s the question that confounds some pistol shooters, particularly during slow fire. When shooting one-handed, some bullseye pistol shooters use a piece of tape or paper on one lens of their shooting glasses to obscure their non-dominant eye. That way they can get a more precise sight picture. However, when shooting two-handed, it’s almost always better to shoot with both eyes open. And if you are doing a “move and shoot” session/match, you’ll surely want to have both eyes open.
Champion pistol shooter Doug Koenig says he always shoots handguns with both eyes open: “To me it’s very simple — I wouldn’t drive my car with one eye closed. I wouldn’t walk around the house with one eye closed. To me, it’s all about your vision, your depth perception.” Doug adds that you definitely need both eyes open to transition quickly from target to target.
With both eyes open you’ll have better depth perception and peripheral vision. You will also be able to transition from target to target more quickly. In a timed, multi-target stage, you’ll want to move your head/eyes to the next target right after you break a shot. You’ll find that you will then reflexively move the handgun on to the new target when you swing your vision on to it. Don’t linger on the target you just shot — move to the next.
Here are two other helpful videos from Doug Koenig and the NSSF:
Sight Alignment and Sight Picture
Trigger Press and Trigger Control
Doug Koenig’s List of Championships:
10-time World Champion
18-time Bianchi Cup winner
2016 NRA World Shooting Champion
More than 70 National Championships
6-time World Action Pistol Championship Winner
3-time World Speed Shooting Champion/Steel Challenge
Watch more excellent, informative Doug Koenig videos on KoenigShooting.com. Doug’s video features include pistol set-up, proper stance and grip, Steel Challenges tips, and even rifle setup, and PRS basics.
Bet you’ve never seen anything like this before — a “double-decker” indoor shooting range. Lotus Gunworks of Jensen Beach, Florida, operates a super-sized twin-level indoor shooting range featuring a two-story-high steel funnel bullet trap. Nicknamed the Lotus 8/11 for the number of steel panels used to create it (eight panels on the bottom slope and 11 panels on the top slope), this version of Action Target’s Total Containment Trap is the first of its kind. “No one has ever seen a range like this before” noted Lotus Gunworks’ Robbie Abell.
Abell came up with the two-story concept when it became clear that the new Lotus building in Jensen Beach was not wide enough for two side-by-side ranges AND a gun store. Necessity was the mother of invention… Lotus wanted at least two ranges, so the only option was to make a double-decker range where both levels shot into the same bullet trap.
Indoor ranges require ventilation to remove potentially hazardous dust and lead particles. The sheer size of the double-decker range presented a unique challenge, but Carey’s Small Arms Range Ventilation installed a system that can completely replace all the range air every 80 seconds.
Other Multi-Level Shooting Ranges
While the Lotus Range may have the first two-story bullet trap, it’s not really the first-ever double-decker indoor shooting range. Other multi-level ranges exist, they just don’t have the giant bullet trap. In fact, some of the multi-level ranges in Europe are bigger and even more sophisticated.
Brünig Indoor facility — Multi-Level Range Underground
Switzerland boats a popular shooting facility built completely underground. The large, deluxe Brünig Indoor facility includes a 300m underground range with multi-level shooting stations.
This video shows centerfire rifle practice on the upper level of one of Brünig Indoor’s shooting tunnels:
Dutch Double-Decker Range
Here’s a Dutch Double-Decker Range. Check out Schietsportvereniging (SSV) Katwijk, a great twin-level range in Holland featuring electronic targets with displays at each shooting station (on both levels):
This winter there has been very cold weather throughout much of the USA. For many marksmen winter indoor training is needed if they want to maintain their shooting skills. Even if you can shoot outdoors all year long in your location, it makes sense for position shooters to work on their rifle holds. The Mantis systems help with that. These advanced smart devices record and plot the movement of your firearm as you aim and then break the shot. There are systems for both dry-fire and live-fire training, starting at $99.99. Considering the cost of bullets these days, and the difficulty of finding primers, it makes sense to increase your dry-fire training.
Mantis X2 for Dry-Fire, $99.99
Built for dry-fire use only, the Mantis X2 ($99.99) provides real-time, shot-by-shot feedback for both pistol and rifle users. You can track multiple training sessions with data-driven insights, and monitor your progress. This unit has earned high user reviews such as: “As a new gun owner the Mantis X is a game changer for me. I have not been able to get to the range during the lockdowns and being able to practice at home [is great].” And another: “Easy to install[.] The App is free and easy to use.”
The Mantis X2 is a good value. The manufacturer states: “There is nothing at this price point that will give you this level of feedback for dry fire.” There are actually four Mantis models: X2 ($99.99), X3 ($169.99), X7 Shotgun ($199.99) and X10 Elite ($249.99). The X3 adds live fire functionality. MORE INFO HERE.
Mantis X10 Elite– Advanced Training System
The advanced Mantis X10 Elite ($249.99) is 50% lighter and 40% smaller than the original Mantis, with three times the battery life and four times the data transfer rate. This new quick-detach X10 system offers all X2 and X3 functions PLUS recoil analysis and software support for all shooting sports (pistol, rifle, shotgun, archery). Collecting thousands of data points per second, the X10 works with dry fire, live fire, airsoft/CO2, and simulated firearm systems.
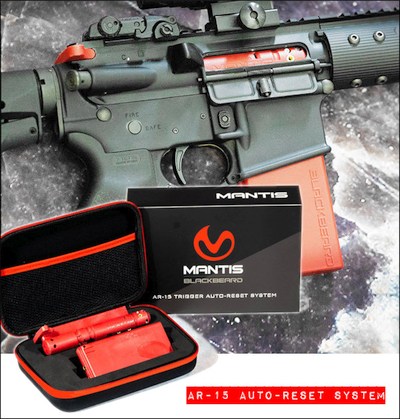
Mantis Blackbeard Trigger Reset System for AR-Platform Rifles
AR service rifle shooters can definitely benefit from the Mantis Blackbeard system, a Bolt Carrier + Magazine replacement that works with your existing trigger.
Using electromechanical wizardry, the $199.00 Blackbeard quickly resets the hammer between each shot, so you can stay in position through multiple practice shots. Installation takes less than a minute — remove the bolt carrier group, drop in the red upper unit, place the red Mantis magazine and you’re good to go. All Blackbeards now support both direct impingement and piston-driven ARs. Guys we know say that a few sessions with this system delivered marked improvement in their service rifle scores.
Mantis X3 for Live-Fire or Dry-Fire, Rifle and Pistol
The Mantis X3 collects thousands of data points per second and analyzes your shooting in real-time. For both pistols and rifles, the X3 works with dry fire and live fire. It will also work with airsoft/CO2/compressed air, and simulated firearm systems. Priced at $169.99, the Mantis X3 mounts to standard universal accessory rails. (No Picatinny rail? Creedmoor Sports sells adapters). The X3 is part of the second generation of Mantis Shooting Performance Systems.
With rain and snowstorms hitting the USA this Christmas week, we know many readers will be sheltering inside to stay warm and dry. Here are some good FREE reading materials to help spend the time indoors.
Google, a company we all know for its internet search service, has undertaken a massive project known as Google Books under which they are scanning and making available millions of out-of-print books with uncertain copyright ownership.
Below you will find a list of books, each with a clickable title link and brief description. The title link will take you to the Google Books page for each book. You can read the entire book online, or you can download it to your computer as a PDF file and save it (or print it). You can also create your own Google Library and save the books there for access from any computer. Most of these books are hundreds of pages long, so consider your paper and toner supply before printing!
The Bullet’s Flight From Powder to Target, Franklin W. Mann, 1909, 384 pages.
This is the original and still widely read and highly regarded book on internal and external ballistics. Dr. Mann was a tireless experimenter and had the resources to pursue his interest with the best equipment available. A close friend of Harry Pope as well as other notable experimenters in the early days of smokeless powder, Mann’s work is thorough and well documented. If you’re interested in ballistics, this is the foundation that you must know in order to understand the ensuing century of work in that field.
Irish Riflemen in America, Sir Arthur Blennerhassett Leech, 1875, 216 pages.
This book chronicles the Irish rifle team’s trip to America in 1874 to compete against the best of America’s riflemen as organized by the Amateur Rifle Club of New York when the fledgling NRA ignored the Irish challenge. The book also includes a great deal of history of Irish target shooting and an account of a hunting trip in the American West by members of the party. Well worth reading.
The American Rifle, Townsend Whelen, 1918, 637 Pages.
Townsend Whelen was — and remains for many of us — the dean of American firearms writers. Here is a man who truly did it all and wrote about it with the authority of experience and the modesty of a true gentleman. Despite his roots in Philadelphia society, Whelen sought outdoor adventure and hard living and he found it; we are all richer for his ability to document it so well. This book, written immediately after (and during) the Great War gives a great insight into the period from a rifleman’s perspective: equipment, reloading, shooting — it’s all here. A long book and worth every page.
Suggestions to Military Riflemen, Townsend Whelen, 1909, 243 pages.
Townsend Whelen’s pre-war book on marksmanship which brought him to national prominence in the military establishment. Whelen, who coached the national championship winning Army rifle team at Sea Girt in 1906, covers all aspects of shooting the Model 1903 rifle, including long-range shooting. There is also an appendix covering the Krag-Jorgensen as it was still used by various state guard units at the time. Positions, sights, zeroing, windage, score books, slow-fire, rapid-fire, long-range, ammunition, vision; it’s all here. Every topic you see covered in a modern book on marksmanship was covered by Whelen in this book. You can’t know where you’re going if you don’t know where you’ve been — this is a “must read” for the serious marksman and student of history.
Modern Rifle Shooting From the American Standpoint, W. G. Hudson, 1903, 155 pp.
Dr. Hudson was one of the leading lights of the early smokeless era (as well as the Schuetzen era), a contemporary and friend of Mann and Pope, Hudson was a tireless investigator of all things related to accuracy. This hard to find book is an introduction to target shooting with a detailed overview of equipment and practices and is well illustrated with many images of top level equipment of the day.
Manual for Rifle Practice: Including Suggestions for Practice at Long Range, George Wood Wingate, 1879, 303 pages.
Wingate was the central figure in the founding of the National Rifle Association of America. Like Whelen’s manual 30 years later, Wingate’s book was adopted as the training manual by many military organizations. An authoritative view of marksmanship instruction in the day of the Trapdoor Springfield, Sharps, Remington Rolling Block, and Peabody military rifles. Includes diagrams and instructions for their care.
How I Became a Crack Shot — With Hints to Beginners, W. Milton Farrow, 1882, 204 pp.
Milton Farrow was one of the top shots of his time. Well-bred and highly educated, modesty was not among Farrow’s virtues. This makes for entertaining reading as he describes his travels and shooting accomplishments. The Hints for Beginners section has advice that remains sound these many years later.
The Gun and its Development, William Wellington Greener, 1907 (8th Ed.) 786 pages.
Originally published in 1881, Greener’s book covers all aspects of the firearms world at that time and this 8th edition has many updates. While much of the text focuses on shotguns, there is a great deal of other material in this massive tome, including coverage of gunpowder and explosived, pistols, rifles, target shooting, rifle clubs and much more of interest to the modern rifleman. Many great period advertisements at the end will make you wish for a time machine!
Cartridge Manufacture, Douglas Thomas Hamilton, 1916, 167 pages.
This book is a well-written, technical presentation of small arms cartridge manufacturing during the Great War. An inside look at all processes at the Frankford Arsenal including case manufacture, bullet manufacture, loading and packaging. A useful historical treatise on the topic.
These book titles were found by our close friend (and ace marksman) German Salazar. Sadly, German passed away unexpectedly in June, 2022 at age 62. German was a great inspiration to this site who helped guide the creation of the AccurateShooter Forum. A brilliant man, expert attorney, and top-tier marksman, German has been sorely missed in the shooting sports world.
Do you know which one of your eyes is dominant? It’s easy to determine eye dominance with a simple exercise. Pick an object about 6-10 feet away (a light switch or door knob works well). Make an “OK” sign with your right hand (see photo) and hold that about 18″ from your face. Now, with both eyes open, look through the circle formed by your thumb and index finger. Center the circle on the object, so you can see the object in the middle.
Now, here’s the important part — while still holding your hand up, centered on the object, first close your right eye. If you don’t see the object anymore, then your right eye is dominant. If you still see the object, then repeat the procedure with the left eye shut and right eye open. If you don’t see the object when your left eye (only) is closed, then you are left-eye dominant.
The digital archives of Shooting Sports USA contain many interesting articles. A while back, Shooting Sports USA featured a “must-read” expert Symposium on Eye Dominance, as it affects both rifle and pistol shooting. No matter whether you have normal dominance (i.e. your dominant eye is on the same side as your dominant hand), or if you have cross-dominance, you’ll benefit by reading this excellent article. The physiology and science of eye dominance is explained by Dr. Norman Wong, a noted optometrist. In addition, expert advice is provided by champion shooters such as David Tubb, Lones Wigger, Dennis DeMille, Julie Golob, Jessie Harrison, and Phil Hemphill. NOTE: If the story doesn’t open at the links, go to the ssusa.org home page first, indicate you are over 18, and then CLICK HERE.
Top Rifle Champions Talk About Eye Dominance:
David Tubb — 11-Time National High Power Champion
I keep both eyes open, always. Some use an opaque blinder in rifle or shotgun shooting. If you close your non-dominant eye, you will not get as good a sight picture. If your aiming eye is not your dominant eye, you have even more of a problem to overcome.
Lones Wigger — World, National and Olympic Champion Rifleman
Shooters should try to use the dominant eye unless the vision is impaired and the non-dominant eye has better vision. You should always shoot with both eyes open since this will allow the shooting eye to function properly.
Dennis DeMille — National Service Rifle Champion
I close my non-shooting eye initially. Once I pick up my sight picture, it’s not something I focus on. For those that use a patch, I recommend that they use something white to block their view, rather than cover the eye.
Bruce Piatt — 2025 World Action Pistol Team Championship — Member of Winning Team CMP-USA
Some shooters, especially those with nearly equal or cross-dominance, will naturally find themselves squinting one eye. When anyone does this, you are also closing your dominant eye to some extent and adding stress to your face.
Forum member 1LessDog calling in coyotes in a cold North Dakota winter landscape.
Forum member DNorton posted: “I live way up north where our white sandy beaches look like this!”
There is a nice thread in our Forum appropriately entitled “Winter Time”. You’ll find some great backcountry images taken by our Forum members. Winter is a special time in the outdoors. Forum member JDP explains: “Winter is the best time to shoot! One of the few of life’s ironies that works in my favor. The range is empty and barrels keep cool, no bugs, no waiting on people, no mirage. Yup, this world needs more thin blooded snow birds. This cool weather is terrible and dangerous, tell your friends! Do people get lonely while shooting or something? It’s the true holiday season in multiple ways.”
These two images come from Forum member Bill K on a winter varmint safari. He posted: “This was Varmint Shooter’s truck [showing the outside temperature] when we set up.” Brrrr… that’s cold.
The above photo is from Forum member 1LessDog, who posted: “The mound behind the Coyote is a Indian burial mound. There are six of them within a half mile of this one. I would really like to know how many coyotes I have shot off the mound. I would guess 4-5 a year over 35 years. It is one of my favorite spots to call from… any time I have a South to Southeast wind[.]”
Forum member Bojo posted images of his hunting trip in Northwestern Pennsylvania last week. Bojo wrote: “It was an early winter for us — temps from low 20s to mid 40s through a week’s swing. Our cold hits hard in January/February.”
The Vortex Blog contains an interesting article featuring recommended gear for a coyote hunting trip in late winter/early spring. This Vortex article covers all the items you’ll need: rifle, optics, shooting sticks, insulated clothing, Laser Rangefinder, game calls, carry packs and more.
In the article intro, Vortex notes: “Winter snow and cold temps don’t get Vortex’s Bill Krivanek down. In fact, quite the opposite. This time of year, he’s fired up about calling coyotes and putting a little fur on the ground. “There’s so much to love about these crafty critters”, said Bill. “They nearly always have the advantage. When you get one to come in to shooting range, you’ve really accomplished something. It’s as exciting as hunting gets.” CLICK HERE to read the FULL Article with a complete description of each item, shown in the lead photo above.
With snow on the ground and sub-freezing temperatures in much of the country, we hope our readers are staying warn indoors with family members this Christmas Eve day. To provide a bit of entertainment we’ve found six videos that combine a holiday theme with the shooting sports.
In this fun video, YouTube host 22plinkster plays a holiday tune on steel plates. Using a Henry Golden Boy .22 LR lever gun, 22plinkster performs a plate-by-plate musical rendition of Jingle Bells. To hit each tuned plate in the right order takes considerable skill and concentration. But we thank 22plinkster for offering this special holiday shooting range concert.
Here we have 22plinkster once again. He wanted to see how many Christmas ornaments could be penetrated by one .22 LR round. To answer that burning question, he lined up 40 plastic Xmas bulbs in a row and then fired a single round of CCI .22 LR Velocitor ammo through the bunch, using his Henry Golden Boy lever action rifle. Did the bullet penetrate a dozen ornaments? Two dozen? What do you think? Watch the video to find out the surprising answer.
From a modest .22 LR rifle we move on to the real big boomers — military canons. This holiday-themed video shows multiple large-bore artillery pieces. The video is accompanied with a background tune based on the classic “12 days of Christmas”. If you’re a fan of military hardware and history, you should enjoy this clever video from the Matsimus YouTube Channel.
Christmas Gifts for Gun Guys and Gals
Need to do some last-minute shopping for your shooting buddies and/or gun-friendly family members? Here are three videos that provide gift recommendations for gun guys and gals. Suggestions include hunting accessories, knives, reloading equipment, and some handsome handguns and rifles. Warning — you may find a few items you end up buying for yourself.
The following article by Tom Alves describes a very practical approach to physical training for those of us who are not as young and spry as we once were. Tom shows us how to give our bodies at least some of the maintenance we give our rifles. While we all realize that our rifles will outlive us, let’s see if we can’t narrow the margin a bit with some personal maintenance that just might help the shooting too!
This article originally appeared in German Salazar’s Rifleman’s Journal, and appears with permission. Sadly, German passed away in 2022. This was a very sad loss of a distinguished-class marksman and a great shooting sports writer. This Editor counted German as a close friend, who helped this site in many ways.
A Suggested Training Approach for Older Shooters
By Tom Alves Most articles and discussions regarding competitive shooting center around equipment. Now and then one will come across an article about physical training such as the USAMU piece on Physical Conditioning for Highpower Shooting. If you break the articles down they often discuss “core strength” and durability. The purpose of this paper is to elaborate on those points with a bit different perspective. Many of the articles you will read in books about position shooting and the one mentioned before are directed more toward the younger generation of shooters in their 20s. If you look down the line at a typical high power match these days you are likely to see quite a few folks who are in their middle 30’s and up. Many people in that age range have had broken bones and wear and tear on their joints so a training program needs to take that into account. For instance, while jogging for an extended period for heart and lung conditioning — often called cardio exercises — may be the recommended approach for younger folks, it may be totally inappropriate for older people. The procedure to repair meniscus tears in knees is one of the most frequently performed operations in this country. Another approach one often sees in training to improve core strength is the use of weight machines which isolate certain muscle groups in their operation. I would like to suggest an alternative approach that not only does not require special equipment but uses the body’s muscles in a coordinated fashion in the same way they are used in our natural movements. So, let’s set down some criteria:
1. The approach has to be low impact to conserve joints.
2. One goal is to improve the strength of the core muscles which are the muscles of our trunk that keep us erect and from where all movements initiate.
3. Along with core strength we need flexibility and full range of motion.
4. We want to improve our lung and heart function so we can have a good flow of oxygen going to our organs and muscles to reduce the rate at which we become fatigued during a competitive event.
Before I continue I believe it is appropriate for the reader to understand that I am a fellow shooter and this is a program I have designed for myself based on considerable reading and experience over a number of years. I am not a medical doctor, a formally trained exercise professional or any other type of specialist in the field. Consequently, this information is offered with the advice that you consult your medical advisor or similar authority before you embark on this or any similar regimen.
I will start with core strength and flexibility. Pilates exercises are resistance exercises that can incorporate the use of resistance bands, light weights and the weight of your body parts in order to strengthen the muscles in the abdomen, back, hips, chest and shoulders. The exercises can be performed alone but I recommend attending classes put on by a certified instructor who will ensure that you perform a balanced routine meaning you work on the front and back and both sides of your trunk. As to flexibility, yoga complements Pilates exercises and they are often taught together. In practical terms yoga strengthens through resistance using the weight of the body and increases flexibility by stretching the various muscle groups in a coordinated fashion. Some yoga exercises also work on balance which is helpful in position shooting and life in general. Again, I suggest attending formal yoga classes since an instructor can help you address such things as a joint misalignment. As an example, my right leg healed improperly after the femur was broken and my right foot splays out putting undue load on my left knee. There are a number of books available on Pilates and yoga and some of them get pretty involved; I leave that to the reader to explore. I will list some reference material at the end of the article that I have found useful.
Finally, heart and lung improvement. In order to exercise the heart and lungs while not abusing the joints, particularly the knees and hips, one has to resort to something other than jogging. Walking, bicycling, elliptical machines and swimming may be alternative methods you’d like to consider. Based on my reading, in order to get the most benefit it is important to exercise so that the pulse rate becomes elevated for periods of time rather than kept at a constant rate. The process I use, called PACE, is promoted by Al Sears, MD, http://www.alsearsmd.com/. It is interval training for the non-athlete. In simple terms one exercises, using whatever equipment one desires, to achieve a heart rate in which you are slightly above your ability to bring enough oxygen into your body to sustain the activity for an extended period. This is similar to wind sprints for a sprinter or a football player. After each episode you must rest until you have achieved recovery, meaning you can catch your breath easily. A series of three sets is recommended which covers a total time of about 20 minutes.
Report from the Author — Yes, Training Helps
As a result of this training program I have experienced increased strength in my legs and trunk, less joint stiffness, lower blood pressure, and lower resting pulse rate. The Pilates/yoga classes are usually attended 2 to 3 times a week and the interval training performed twice a week. [The author was 64 when this was first published. He is now 75, and still shooting Palma and Smallbore prone.]
Before I close I would like to touch briefly on two other related subjects: hydration and visual training. When one is exerting oneself, the body produces perspiration to keep the body’s temperature at an acceptable level. As one perspires the blood gets thicker and the ocular fluid in one’s eyes thickens as well. The heart has to work harder to supply oxygen and nutrients to the body so visual and cognitive functions degrade and fatigue sets in rapidly. Essential chemicals called electrolytes are also carried out of the body with the perspiration. As a result, it is necessary to replace moisture and electrolytes to maintain basic health and a competitive level of performance. If one goes on the Internet there is a multitude of articles on hydration. Due to the kindness of my lead Pilates/yoga instructor, Ms. Annette Garrison, I have a pretty comprehensive article on various aspects of hydration that I have included, http://www.ideafit.com/fitness-library/hyponatremia-other-side-hydration-story , for your information.
Last I want to mention visual performance training. The New Position Rifle Shooting, A How-To Guide for Shooters and Coaches by Bill Pullum and Frank Hanenkrat mentions sports vision training amongst other aspects of vision in competitive shooting. [Used book under $40.00 on Amazon]. If one goes on the Internet you will find training programs directed at golfers, baseball and football players. There is one site that has a demo which, if one looks at it for long, it is obviously very similar to a shooting gallery video game. The training involves rapid recognition and hand-eye coordination. Another source of visual training exercises, along with a wealth of other information, is the book Prone And Long Range Rifle Shooting by Nancy Tompkins.
Hopefully, I have provided some information which will be helpful in improving shooting performance and extending the time you can participate at a competitive level. It is important that you proceed at your own pace. I have pushed myself too hard in the interval training and now have to back off a bit. In closing I would like to thank Annette Garrison and German Salazar for their help, patience and encouragement.
Additional Reference Material
1. Framework by Nicholas A. DiNubile, MD This is required reading for anybody who has suffered an injury like a torn meniscus or has muscular skeletal issues. This is the book that led me to Pilates/yoga
2 P.A.C.E., The Twelve Minute Fitness Revolution by Al Sears, MD The approach I use to interval training. I am sure there are other sources.


 A former competitive smallbore rifle shooter, ace trigger-puller Kirsten Joy Weiss tried a special New Year’s trick shot a few seasons back. In keeping with the festive New Year’s spirit, Kirsten attempted to shoot the cork off a champagne bottle. After a few unsuccessful tries, she managed to hit the cork with at least two shots. But alas the cork did not fly. She actually hit the cork, but it did not release. That was surprising…


 With rain and snowstorms hitting the USA this Christmas week, we know many readers will be sheltering inside to stay warm and dry. Here are some good FREE reading materials to help spend the time indoors.


 Do you know which one of your eyes is dominant? It’s easy to determine eye dominance with a simple exercise. Pick an object about 6-10 feet away (a light switch or door knob works well). Make an “OK” sign with your right hand (see photo) and hold that about 18″ from your face. Now, with both eyes open, look through the circle formed by your thumb and index finger. Center the circle on the object, so you can see the object in the middle.


 Most articles and discussions regarding competitive shooting center around equipment. Now and then one will come across an article about physical training such as the USAMU piece on
 Last I want to mention visual performance training. The


