Do you occasionally get completely unexplained flyers, or have a shot land straight down at 6 O’Clock, right below your point of aim? That could be caused by poor or inconsistent trigger technique. How you pull the trigger can and does affect your accuracy.
Many gun enthusiasts start with pistols. When they later start shooting rifles they may carry over some not-so-good practices acquired from shooting handguns with heavy 4 to 6-pound trigger pulls. You may want to “re-learn” your trigger techniques to get better rifle results.
Shooting Sports USA has a good article on trigger technique that offers many useful tips. That article also has many helpful illustrations, including the one shown above. Another illustration shows different types of trigger shoes (straight vs. curved) and explains how each makes a difference: “With a lightly curved trigger, the shooter’s finger can contact the trigger either high or low according to preference. Higher contact will increase the resistance.” READ ARTICLE HERE.
The article analyzes common errors, such as pulling the trigger with the very tip of the finger rather than the pad of the index finger: “Using the tip of the finger can lead to lateral pressure on the trigger, which throws off the shot.”
The article also explains that you should check your trigger regularly to make sure it is functioning properly and is not out of adjustment: “Just like any other moving part, the trigger can suffer from wear. In such a precise mechanism, tiny amounts of wear can cause major problems.”
The ergonomics of the Eliseo Tubegun allow a nice, straight trigger pull.
Trigger Tips
Six Suggestions for Making your Trigger Control More Consistent.
1. If your triggers are adjustable, set the pull weight appropriate to the discipline. For a hunting rifle, you don’t want an ultra-light trigger pull. For High Power, you may want a two-stage pull, while on a Benchrest rifle you may prefer a very light trigger.
2. If you have a two-stage trigger, experiment with different combinations of First Stage and Second Stage.
3. Have a friend watch you as you pull the trigger, and maybe even take a close-up video as you pull the trigger. This can reveal a variety of flaws.
4. Practice dry-firing to see if flaws in trigger technique are causing gun movement.
5. As an experiment, try pulling the trigger with your middle finger. Ergonomically, the middle finger has a more straight alignment with the tendons in your hand. This exercise can help you identify alignment issues with your index finger.
6. For stocks with adjustable Length of Pull you may want to set the LOP differently for bench shooting vs. prone or F-Class shooting.
Available in both single-stage and two-stage, Bix’N Andy triggers are extremely precise, repeatable and smooth. The unique internal, friction-reducing roller ball system allows for extremely low reset force, yielding an ultra-crisp let-off. Bix’N Andy triggers can be fitted with a variety of trigger shoes according to shooter preference.
Bix’N Andy triggers are available for a variety of actions and there are models for various competition disciplines. These triggers start at $210.00. We like the single-stage for benchrest rifles and the two-stage for Palma rifles and hard-hold competition disciplines.
Today is Thanksgiving, aka “Turkey Day”, a time to enjoy an annual get-together with family and friends. To mark this occasion we offer a collection of interesting videos about turkey hunting plus a FREE Turkey target. Enjoy your Thanksgiving holiday!
GetZoneHunting.com has a vast video library for hunters, with hundreds of helpful videos on all types of hunting. In time for spring turkey season, GetZoneHunting offers a big collection of turkey hunting videos: At the Ranch – Turkey. On that page you’ll find 13 turkey hunting “how-to” videos. Here are links to five GetZone Turkey Hunting videos with valuable information from skilled, experienced hunters.
At the Ranch Turkey Hunting Videos
At the Ranch – Turkey offers solid advice for turkey hunters. These five videos will help you better understand turkey behavior and have success on your hunt. Click any photo to watch the particular video on the GetZone website. (Work Warning — When each GetZone video opens, it may immediately launch an annoying commercial with loud AUDIO!). There are eight more turkey hunting videos on GetZone’s Turkey Hunting HQ Page.
At the Ranch: Shot Placement for Turkeys — CLICK PHOTO to Watch Video
At the Ranch: Turkey Hunting Essentials — CLICK PHOTO to Watch Video
At the Ranch: The Difference Between a Jake and a Tom — CLICK PHOTO to Watch Video
At the Ranch: Early vs. Late Spring Turkey Hunt — CLICK PHOTO to Watch Video
At the Ranch: How to Plan a Turkey Hunt — CLICK PHOTO to Watch Video
Free Printable Turkey Target from AccurateShooter.com
As a special bonus for our readers, here is a free, printable Turkey Target, so you can practice for your turkey hunting adventure, This special Turkey Bullseye Target was created by our friend and Forum member Pascal (aka “DesertFrog”). CLICK HERE for FREE Turkey Target.
Thanksgiving is just 4 days away. What better way to celebrate the occasion than to blast away at some bearded gobblers (of the paper variety). Here’s our Turkey Day target, ready for some family fun. This special Turkey Bullseye Target was created by our friend and Forum member Pascal (aka “DesertFrog”). CLICK HERE for FREE Turkey Target.
Get a Full Set of Animal Targets
For your convenience, we’ve packaged the Turkey Target along with five (5) other varmint/animal-themed targets. These are all offered in .pdf (Adobe Acrobat) format for easy printing.
Hunting season is well underway throughout North America. If you’re planning a hunt, and want to improve your chances of success, you can benefit from today’s Saturday Showcase featuring noted huntress and outdoor video host Kristy Titus. Titus, co-host of the Team Elk TV show, is a certified instructor who has hunted around the globe. She grew up in the outdoors, running pack mules in Oregon with her father.
Successful Hunts with Kristy Titus and Field Dressing Methods
Kristy has her own successful YouTube Channel, Pursue the Wild with Kristy Titus. Here are three popular videos on that channel. Kristy’s field dressing video has amassed over 5.7 million views!
Best of North American Big Game Hunting
Caribou Hunting in the Northwest Territories
Gutless Field Dressing Method
Hunters who are deep in the backcountry may need to quarter the animal for easier field removal and to help cool the meat as quickly as possible. In this video, Kristy Titus shows the step-by-step process of the gutless method. Kristy recommends a good skinning knife such as the Buck Knives Pursuit Series. She also states you should have quality game bags plus a section of Polyethylene Visqueen material which can be purchased at local hardware stores.
Shooting Skills and Tactics for Hunters with Kristy Titus
As part of NRA Women TV, hunting guide Kristy Titus hosts a series of videos that explain important strategies and shooting skills for hunters. In these videos, Kristy demonstrates field positions that can be employed during a hunt. She also explains preparation for a hunt, including fitness training.
Click each link below to watch other Kristy Titus Hunting Videos.
Kristy says: “When it comes to bolt-action rifle fit, there is no ‘one size fits all’. When picking out your rifle [consider options] after the purchase to ensure you are as comfortable as possible.”
by Sierra Bullets Ballistic Technician Gary Prisendorf
Occasionally someone will ask, “Why did I get a flyer that didn’t go in with the rest of my group?” If I had an answer that would stop flyers from happening, I would be rich.
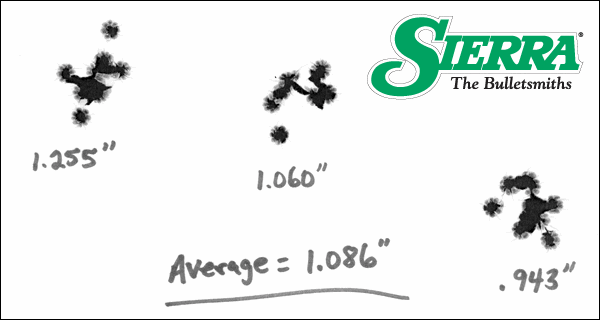
There are many reasons why this can happen. Everything from gripping a forearm differently to variations in the brass casing, the list goes on and on. Most of the time the flyer is usually shooter induced and sometimes what you may think is a flyer, is just part of your group. There are a lot of shooters, that go out and test a load and they may shoot a 3/8” group at 100 yards and think that load is good. But I have seen far too many times that you can shoot another group, same load, same rifle and the next time you may get a 1 ¼” group.
The total opposite can also occur. You may shoot a 1 ¼” group and turn around and follow it with a 1/2″ group without changing anything. If you only shot the one group, you might decide that load wasn’t any good and move on to something else without really knowing what that load was capable of.
To really determine how a particular load is performing we need to shoot multiple groups and take an average of the group sizes to really see what that rifle/load combination is really capable of.
I suggest shooting a minimum of three 5-shot groups and averaging the group sizes before deciding if the load is acceptable or not. Obviously the more rounds you shoot for a group and the more groups that you shoot, you will get a much better representation of what that particular combination can do.
Now I’m not saying to go out and shoot 30 groups with 50 rounds in each group to determine how well your load is shooting. That would be a bit pointless, in some cases it would be time to re-barrel your rifle before your load development was finished.
In most cases, I feel that three to five, 5-shot groups will give you a pretty good representation of how a load will perform in that specific firearm.
Hunting season is underway now across the country. You’ll definitely want to zero your hunting rifle before the hunt, and you need to know how your shots will impact with a cold barrel.
Commonly, hunters won’t have the ability to fire one or two fouling shots before heading out on a hunt. Therefore it’s important that a hunter understands how his rifle shoots with a “cold bore shot”. Both the point of impact (and possibly velocity), may be different with a cold bore than with a barrel that has been warmed and fouled with a series of shots. In this video from the U.S. Army Marksmanship Unit (USAMU), you’ll learn how to determine your cold bore point of impact (POI) for a rifle that just been cleaned, as well as the cold bore POI with a barrel that has already been “fouled in”.
SGT Joe Hein of the USAMU shows how to plot cold bore POI with both a clean bore and a fouled bore. Note that the “cold bore” shot from a fouled barrel was closer to the follow-up shots than the cold bore shot from a clean barrel. This is typical of many factory barrels. SGT Hein provides a simple way to understand your rifle’s cold bore performance. Hein’s advice can keep you from missing that long range shot at that big buck on opening day. A little time spent on the range before that critical first shot will help ensure you have meat in the freezer this season.
Do you find that the crosshairs in your scope get blurry after a while, or that you experience eye strain during a match? This is normal, particularly as you get older. Focusing intensely on your target (through the scope or over iron sights) for an extended period of time can cause eye strain. Thankfully, there are things you can do to reduce eye fatigue. For one — breathe deeper to take in more oxygen. Secondly, give your eyes a break between shots, looking away from the scope or sights.
In our Forum there is an interesting thread about vision and eye fatigue. One Forum member observed: “I have noticed recently that if I linger on the target for too long the crosshairs begin to blur and the whole image gradually darkens as if a cloud passed over the sun. I do wear contacts and wonder if that’s the problem. Anyone else experienced this? — Tommy”
Forum members advised Tommy to relax and breath deep. Increase oxygen intake and also move the eyes off the target for a bit. Closing the eyes briefly between shots can also relieve eye strain. Tommy found this improved the situation.
Keith G. noted: “Make sure you are still breathing… [your condition] sounds similar to the symptoms of holding one’s breath.”
Phil H. explained: “Tom — Our eyes are tremendous oxygen hogs. What you are witnessing is caused by lack of oxygen. When this happens, get off the sights, stare at the grass (most people’s eyes find the color green relaxing), breath, then get back on the rifle. Working on your cardio can help immensely. Worked for me when I shot Palma. Those aperture sights were a bear! The better my cardio got the better and longer I could see. Same thing with scopes. Try it!”
Watercam concurred: “+1 on breathing. Take a long slow deep breath, exhale and break shot. Also make sure you take a moment to look at the horizon without looking through rifle or spotting scope once in a while to fight fatigue. Same thing happens when using iron sights.”
Arizona shooter Scott Harris offered this advice: “To some extent, [blurring vision] happens to anyone staring at something for a long time. I try to keep vision crisp by getting the shot off in a timely fashion or close the eyes briefly to refresh them. Also keep moisturized and protect against wind with wrap-around glasses”.
Breathing Better and Relaxing the Eyes Really Worked…
Tommy, the shooter with the eye problem, said his vision improved after he worked on his breathing and gave his eyes a rest between shots: “Thanks guys. These techniques shrunk my group just a bit and every little bit helps.”
Read more tips on reducing eye fatigue in our Forum Thread: That Vision Thing.
To avoid eye fatigue, take your eyes away from the scope between shots, and look at something nearby (or even close your eyes briefly). Also work on your breathing and don’t hold your breath too long — that robs your system of oxygen.
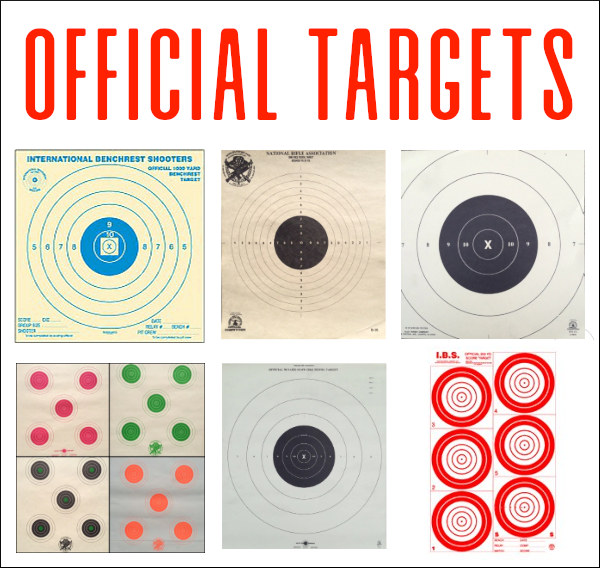
While some shooting disciplines have moved to electronic targets, most shooting matches still use paper targets, which must have precise dimensions for the particular distance and discipline. If you need correctly-sized targets for specific shooting disciplines (such as NRA Smallbore, F-Class, and 1K Benchrest) check out the links in this article. Precise, dimensionally-correct competition targets are produced by a half-dozen specialty printers. In this article we provide links to the leading target sellers, with a chart showing “who’s got what”. Look for your particular discipline and the vendors will be specified.
Sources for Official Shooting Competition Targets:
AccurateShooter.com offers dozens of FREE, printable targets for target practice, load development, and fun shooting. We also offer a few of the most popular NRA Bullseye targets. One or more of these printable targets should work for most training purposes. However, some readers have asked: “Where can we get the real targets… exactly like the ones used in NRA, IBS, and NBRSA shooting matches?”
All these vendors carry nearly all the NRA High Power and Smallbore targets, including the smaller F-Class targets. National Target has the F-Class and High Power targets, including 100-yard reductions of the 200, 300, and 600-yard military targets.
Here are some of the air rifle, smallbore, and High Power targets at Creedmoor Sports:
Orrville Printing currently sells IBS targets for rimfire (50 yard) benchrest, short-range centerfire Benchrest (100, 200, 300 yards), Hunter BR Rifle (100, 200, 300 yards), plus the official 600-yard and 1000-yard IBS targets. National Target Company also has most of the IBS targets. NBRSA short-range, 600-yard, and 1000-yard benchrest targets are available directly from the NBRSA Business Office. Send an email to nbrsa@icloud.com or call (434) 993-9201.
Good Source for Specialty Targets and Target Stands
Need Steel, Cardboard Silhouettes or specialty targets? ALCO Target Company in Duarte, California is the USA’s leading producer of the full spectrum of shooting targets including paper targets, cardboard targets, steel targets, and target stands.
The First Shot, the CMP’s online magazine, features a well-written article on Prone Shooting Technique by SPC Matthew Sigrist of the U.S. Army Marksmanship Unit (USAMU). The article covers all the major points of gun hold and body position: hand position, elbow position, stock weld, buttstock placement, and sling position/tension.
Keep it Steady — The Elements of a Good Prone Position
Part 1 — Building the Position By SPC Matthew Sigrist
Imagine the following scenario: You are at the last stage of fire in the National Trophy Individual Match, firing at the 600 yard line in the prone position and every point matters. What should you reflect on as you prepare to shoot this final string? As your eyes cloud from sweat, you realize that all you have to rely on is your experience and knowledge of the fundamentals.
During the National Trophy Individual Match, you will fire 60 percent of your shots from the prone position. This article will address the fundamentals of a good prone position and help you learn the techniques required to be successful in both the slow and rapid-fire stages of National Match competition.
This article will be divided into two parts. In part one, we will discuss the elements of a good prone position. In part two, we will cover the techniques you will in the rapid-fire and slow-fire stages.
The Fundamentals
The fundamentals are the building blocks of a position. Much like the framework of a house, a correct application of the fundamentals ensures a solid and stable structure. Since each person’s position will depend on their particular body build and shape, there is no “perfect position” that applies to everyone. Experience, practice and knowledge of the correct fundamentals will dictate the best position for you.
There are six key elements of any position. The purpose for these six points is to achieve a solid platform that allows for consistent sight alignment using the least amount of muscle tension.
1. Placement of the Firing Hand (the hand that pulls the trigger)
The firing hand needs to be placed high on the pistol grip. This high hand position will give you better control of the rifle. Combined with a firm grip there will be a reduced amount of hand movement when pulling the trigger. Wrap your thumb over the three fingers on the pistol grip (excluding the trigger finger). This will help isolate the movement of the trigger finger.
2. Placement of the Non-firing Hand (the hand supporting the rifle).
The non-firing hand should grip the handguard or stock in the flat portion of the hand between the thumb and forefinger. The fingers should curl naturally around the stock, but they should not grip it tightly. The position of the hand on the stock will depend on the physical size of the shooter. Generally speaking, taller shooters with longer arms will grip the rifle further out, near the sling swivel, while shorter shooters will need to pull their hand rearward. This is sometimes referred to as “short-stocking” the rifle.
3. Stock Weld
Stock weld is the contact that the face makes with the stock. It is important because it directly effects your sight alignment. Consistent head placement will help you achieve consistent sight alignment. The human head weighs an average of 8 to 10 pounds. The full weight of the head must rest on the stock. In doing this you achieve two things, a relaxed neck and reduced recoil because of the pressure of the head.
4. Placement of the Rifle (the contact that is made in the firing shoulder)
The rifle butt placement needs to be consistent. If this changes between shots, it effects your sight alignment and the effect of recoil. In the prone position the rifle will sit lower in the shoulder compared to other shooting positions. This allows for a more forward head and a lower position as a whole.
5. Position of the Sling
The sling should be high on the arm, above the bicep. This way the sling will have less leverage on the arm so it doesn’t cut off the circulation.
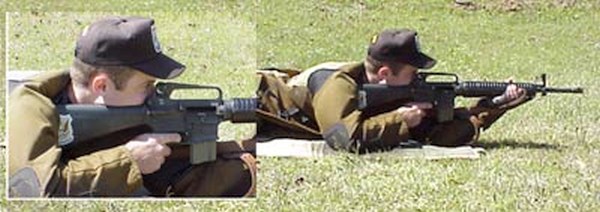
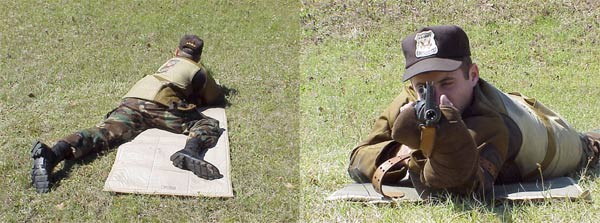
Demonstration of the placement of the firing elbow (left) and non-firing elbows (right).
6. Placement of both the firing, and non-firing elbows
A guideline for non-firing elbow placement is that there should be 1 ½’’ to 2’’ gap between your non-firing arm and the rifle’s magazine. (NOTE: this references the AR-15 service rifle) Your arm should be almost straight up and down; this will transfer the weight directly down the arm and not to the side (see picture above). Think of the firing arm as only a kind of kickstand, it doesn’t support weight it only holds the firing hand in position.
Variations of the Prone Position
There are two main variations of the prone position; open/spread legged, and bent-legged. The two types will be discussed below.
Open/Spread Leg Position
Demonstration of the Open/Spread Leg Position.
The first position is the open/spread legged position. This is when the shooter spreads their legs shoulder width or more apart. This allows for a more forward pressure on the sling and elbows. This position requires a tighter sling and solid elbow placement. The rifle should sit tight in the shoulder. With this position, your body will be farther behind the rifle compared to the bent leg position, allowing for minimum disturbance from recoil.
Bent Leg Position
Demonstration of the Bent Leg Position.
The bent leg position is when the shooter bends the firing side leg up towards the firing hand making the knee at a rough 90 degree angle to the body. The non-firing leg will remain straight and inline with the body. This will take pressure off the lungs and heart minimizing the pulse from the chest as well as easing the pressure on the lungs which will allow for easy breathing and control.
Summary
You now know the fundamentals of a good prone position, as well as the two types most commonly used. Extensive dry-firing will reveal which is the best position for you. If possible, have a friend take pictures of you in position. This will enable you to better diagnose and correct your errors. Remember, a position must be both fundamentally sound and comfortable. Practice frequently to learn your new position and to develop the conditioning required to endure long days on the range.
How accurate can a .45 ACP pistol be, in the hands of an expert marksman? Take a look at that target. This was shot off-hand (no rest) with ONE HAND at FIFTY (50) Yards. That’s TEN shots at 50 yards all inside the 3.36″ 10-Ring with eight shots in the 1.695″ diameter X-Ring.* We bet most folks would have trouble matching that with a scoped rifle shot standing.
Amazing Handgun Accuracy at 50 yards
This remarkable feat of precision pistol shooting — a 100-8X group at 50 yards — was accomplished a few seasons back by PFC Jason Gregoire, a talented young USAMU pistol marksman. And yes, that was done by Jason shooting one-handed!
On its Facebook Page the USAMU posted: “Check out this impressive target by PFC Jason Gregoire of the USAMU Service Pistol Team! This was shot one-handed, with a .45 pistol, and at 50 yards during the Centerfire Match in Columbus, Ohio [on 7/1/2020]. The score was 100-8X. Now that is some marksmanship!”.
How to Improve Your Pistol Skills
Want to improve your bullseye pistol shooting skills? Then watch a series of videos hosted by Brian “Gunny” Zins, a 12-time National Pistol champion, and retired U.S.M.C. Gunnery Sergeant. Here is one the Fundamentals of Bullseye Pistol Shooting videos that Zins produced with the NRA and Shooting Sports USA.
12-time National Pistol Champion Brian Zins Explains Aiming and Trigger Control.
Pistol Competitors (.45 ACP) at 2019 NTT Match at Camp Perry, Ohio.
* This 10-shot group was shot on the NRA B-6 50-yard Pistol Target. Here are the ring dimensions as stated in the NRA Precision Pistol Rules (p. 15):


When Only the Best Will Do…


 Amazing Handgun Accuracy at 50 yards


