I absolutely love using this press stand. I use it with my Forster Co-Ax as well as my Dillon 550. The stand mounts those presses at the right height to minimize fatigue and maximize torque. Some products I merely review and return but this one is a keeper and won’t be leaving my bench anytime soon. — F-Class John
Lyman Universal Press Stand REVIEW
Product Review by F-Class John
Positioning your press at the optimal height is one of the oldest problems in reloading. Most presses sit low off the edge leading to uncomfortable arm strain or inconsistent pressure being applied while using. Lyman has set out to fix that problem with a reasonably-priced ($54.99 at Midsouth) press riser that works with the vast majority of reloading presses. This unit will raise just about any press up off your bench securely, allowing you to working more comfortably from a standing position. This also frees up vital bench space UNDER the press. Unfortunately this press stand is so popular it is back-ordered at most vendors.
I have used a variety of presses over the years. At times I’ve run into issues mounting a press at a level that doesn’t promote arm or hand strain during normal operations. In the past I’ve used blocks of wood or even tried other brands’ proprietary stands. But I had very limited success with those options. Accordingly, I was very excited to give the Lyman Universal Press Stand a chance.
Lyman’s Universal Press Stand comes complete with side plates, two different top plates, and a large collection of mounting hardware. The two top plates are pre-drilled for numerous popular Single Stage or Progressive presses. Helpful diagrams and instructions show which side of the top plate you need to use. The pre-drilled holes accommodate a variety of presses from RCBS, Dillon, Lyman, Redding, and Hornady. But surprisingly, the plates are not pre-configured for the Forster Co-Ax Press.
CLICK to WATCH VIDEO Showing Lyman Universal Press Stand
Setting up the stand was very simple. The two sides bolt to the lower shelf unit at which point you attach the top plate. All the supplied bolts made this a breeze and once everything was snugged down, I was able to place it on my bench where I wanted it and mark the drill holes to mount it. After securing the stand to my bench it was time to mount my press.
Lyman Universal Press Stand with Dillon 550 Press
Adapting Lyman Universal Press Stand for Forster Co-Ax
At the time of testing I was primarily using a Forster Co-Ax press. With no pre-drilled Co-Ax configuration for either Lyman top plate, I decided to customize the blank side of one of the top plates. I opted to position the mounting holes so that the press could sit 100% on top of the mounting plate and not just off one edge. I found this process simple to execute. Mark your drill holes, then drill the plate. This can easily be done with regular drill bits although using a step-bit worked faster and cleaner to help enlarge the holes just a little when I needed some extra clearance.
Lyman Universal Press Stand Is Stable and Strong
Once set-up, I found the stand to be incredibly stable. The design allows for full force to be applied to the press no matter what the operation. Having used this Lyman Press stand regularly over the past few months with both my Co-Ax and a Dillon 550c, I still find myself loving it. The height is perfect and allows me to load as much as I like without straining my arm or getting fatigued. With an attractive price point (under $55.00 street price) and a simple design, I feel this is a great system for those looking for a secure and raised platform for their reloading presses.
The Universal Press Stand comes with two plates. If you have different presses that fit each plate you could easily swap presses just by changing plates while leaving the presses attached. It’s less functional if you have two presses that share one plate and would require removing one press before installing the next one.
Lyman Press Stand Unboxing and Set-Up (KFW Video Review):
Applied Ballistics Founder Bryan Litz and Former USAMU and Team USA coach Emil Praslick III share their wisdom in an informative Guns Magazine Podcast. Along with being a true ballistics guru, Bryan Litz is an outstanding competitive shooter, having won F-TR National Championships, and both Sling and F-TR divisions at the Berger SW Nationals, along with many other matches. Emil is considered one of the world’s great wind-readers and team coaches, having coached 20+ championship teams.
Guns Magazine podcast host Brent Wheat asks Bryan and Emil about multiple topics including: exterior ballistics, bullet design, wind reading, ballistic solvers, BC myths, and more.
Brent reports: “Together, Bryan and Emil understand what happens from the time a bullet leaves the muzzle until it impacts the target, including the atmospheric affects along the way. Grab a pencil, listen in, and get ready to take notes.”
This Long Range Grad School podcast features Berger’s Chief Ballistician, Bryan Litz, and Berger’s Emil Praslick. Both have extensive long range competitive shooting experience, with championship titles (as shooter and/or coach) in a multitude of long range disciplines. CLICK arrow below to start podcast audio:
Emil Praslick (left) confers with Bryan Litz (right) at King of 2 Miles ELR Event.
In this Video Emil Praslick explains his methods for determining wind direction.
Bryan Litz coaching Team USA in Canada using a WIND PLOT.
Bryan Litz at 2011 World Long Range (Palma) Championships in Brisbane, Australia
You may have heard the phrase “blueprinting an action”, but do you know what that really means? Do you know what operations are done to an action during the blueprinting process? To help you understand, gunsmith Bill Marr of RifleShooter.com has created a helpful article showing a Rem 700 blueprinting job start to finish. This article spotlights how the procedures can be done with manual tools. Bill, who runs 782 Custom Gunworks Ltd., can also perform many of these operations with modern automated machinery. In fact, Bill has written a follow-up article on Truing a Rem 700 receiver with a Lathe.
Bill explains: “Blue-printing, or truing a rifle action, ensures the receiver face, threads, lugs, bolt lugs, and bolt face are square to the center line of the receiver.” In Bill’s informative article, Bill shows how he blueprints a Remington 700 short action receiver with .308 Win bolt face. He covers the following procedures step by step:
Action Disassembly
Ream Minor Diameter of Receiver Threads
Square the Receiver Lugs
Square the Face of the Receiver
Lap the Bolt Lugs
Square the Bolt Face
We use the bushings to guide the receiver tap. This chases the threads and ensures they are square.
2. Truing the Receiver Face
Using the receiver facing tool, the front of the receiver is trued. The tool is placed over the tap and turned by hand. We used Do Drill to lubricate it.
3. Lapping the Lugs
The bolt lapping tool screws into the front of the action and applies rearward pressure on the bolt face. A little bit of lapping compound is placed on the front of the receiver lugs. The bolt handle is then raised and lowered repeatedly. Note — it is critical that we do not get any lapping compound on any other surfaces.
4. Truing the Bolt Face
On this bolt, the central part of the bolt face was low. After the truing operation, this Rem 700 bolt face is now completely square to the action.
IMPORTANT: Rifleshooter.com states: “This article highlights our project and is presented for information purposes only. This provides an overview of the process and should not be attempted without the guidance and supervision of an experienced gunsmith“.
To err is human… Sooner or later you’ll probably get a case stuck in a die. This “fix-it” article, which originally appeared in the Western Powders Blog, explains how to remove a firmly stuck cartridge case using an RCBS kit. This isn’t rocket science, but you do want to follow the directions carefully, step-by-step. Visit the Western Powders Blog for other helpful Tech Tips.
Curing the Stuck Case Blues
Sticking a case in the sizer die is a rite of passage for the beginning handloader. If you haven’t done it yet, that’s great, but it probably will eventually happen. When it does, fixing the problem requires a bit of ingenuity or a nice little kit like the one we got from RCBS.
The first step is to clear the de-capping pin from the flash hole. Just unscrew the de-capping assembly to move it as far as possible from the primer pocket and flash hole (photo at right). Don’t try to pull it all the way out. It won’t come. Just unscrew it and open as much space as possible inside the case.
Place the die upside down in the padded jaws of a vise and clamp it firmly into place. Using the supplied #7 bit, drill through the primer pocket. Be careful not to go too deeply inside the cartridge once the hole has opened up. It is important to be aware that the de-capping pin and expander ball are still in there and can be damaged by the bit.
Drill and Tap the Stuck Case
Once the cartridge head has been drilled, a ¼ – 20 is tap is used to cut threads into the pocket. Brass is relatively soft compared to a hardened tap, so no lube is needed for the tapping process. RCBS says that a drill can be used for this step, but it seems like a bit of overkill in a project of this nature. A wrench (photo above right) makes short work of the project.
RCBS supplies a part they call the “Stuck Case Remover Body” for the next step. If you are a do-it-yourselfer and have the bit and tap, this piece is easily replicated by a length of electrical conduit of the proper diameter and some washers. In either case, this tool provides a standoff for the screw that will do the actual pulling.
With an Allen Wrench, Finish the Job
Run the screw through the standoff and into the tapped case head. With a wrench, tighten the screw which hopefully pulls the case free. Once the case is free, clamp the case in a vice and pull it free of the de-capping pin. There is tension here because the sizing ball is oversized to the neck dimension as part of the sizing process. It doesn’t take much force, but be aware there is still this last little hurdle to clear before you get back to loading. Don’t feel bad, everyone does this. Just use more lube next time!
Article find by EdLongrange. We welcome reader submissions.
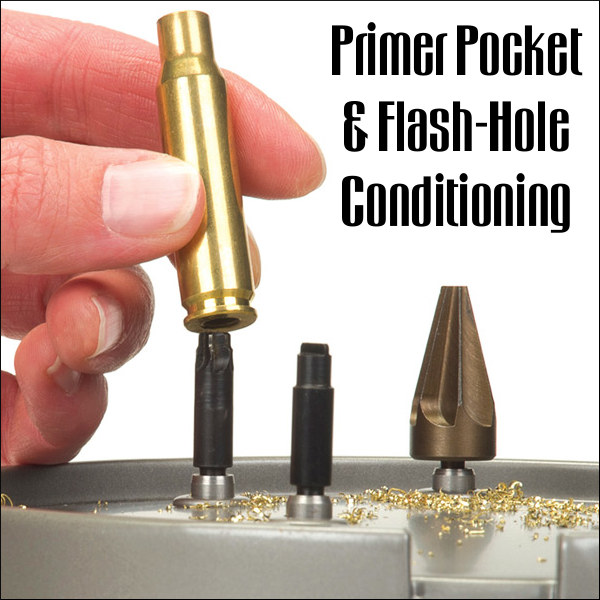
Each Wednesday, the U.S. Army Marksmanship Unit publishes a reloading “how-to” article on the USAMU Facebook page. One “Handloading Hump Day” article covered two basic case prep chores — uniforming primer pockets and deburring flash-holes. Visit the USAMU Facebook page for other tips.
Primer Pocket & Flash-Hole Conditioning
This week, we’ll address a question that frequently arises: “Do you uniform primer pockets and deburr flash-holes?” As we tailor our handloading methods to the specific needs of each instance, the answer, not surprisingly, is “Sometimes!” However, don’t flip that dial just yet, as what determines our approach may be helpful in deciding how to address one’s own techniques. Moreover, we have a buried “Easter Egg” morsel that may bring a chuckle, as well as useful safety information!
Generally, the USAMU Handloading Shop does not uniform primer pockets (PP) or deburr flash holes (FH) of our rifle brass. We’re certainly not against it… Rather, this reflects the very high volume of ammunition we load, the fact that very few cases are ever re-loaded for a second firing, and the types of brass we use. However, as a need is perceived, we DO deburr flash holes. Of interest, we have fired many very small, 1000-yard test groups and aggregates using weight-selected, domestic brass that had not had PPs uniformed or FHs deburred.
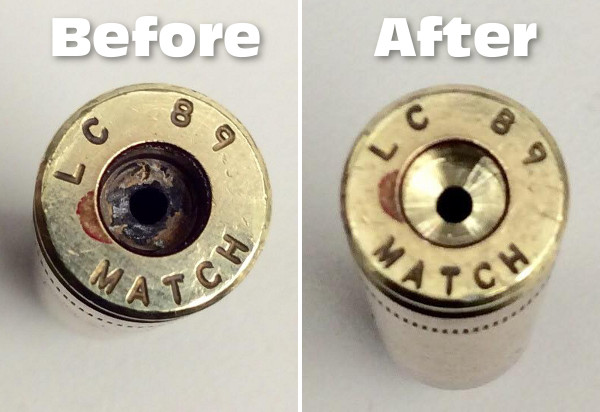
Before and After — On the left is a fired, deprimed 7.62×51 case with primer residue intact. On the right the primer pocket has been uniformed to SAAMI specs. Note the shiny finish at the bottom of the pocket — evidence of the the removal of metal when uniforming the primer pocket.
As to the type cases we use, many thousands of our long-range 5.56mm cases come to us from the arsenal with the primer of our choice pre-installed and staked-in, per usual practice. Obviously, we cannot uniform either FHs or PPs on this live, primed brass. However, after careful sorting, inspection and preparation, we do obtain match-winning results with it.
Shooters who reload their brass several times may decide to uniform PPs and deburr FHs, especially on their “300-yard and beyond” brass. Here, they will use the cases many times, while the uniforming is performed only once. Also, most handloaders only process moderate amounts of brass, compared to our multi-thousand round lots.
Having high quality Long Range (LR) brass helps. Many of the better brass manufacturers [make] their flash holes so that no burrs are created. Still, it does pay to inspect even THESE manufacturer’s products, as occasional slips are inevitable. Very rarely, some of the best makers will have a significant burr in, say, 1 per 1000 or 2000 cases, and it’s worth catching those.
Exceptions can always be found. Recently, we began processing a large lot of match brass from a premier manufacturer. We were startled to find that every case had a significant burr in the FH — something we’d never before seen from this maker. We then broke out the FH deburring tools and went to work.
Some observers have noted that it can be difficult to truly verify the contribution to accuracy of these procedures — particularly when firing from the shoulder, in conditions. Members of this staff, as individual rifle competitors, do often perform these operations on their privately-owned LR rifle brass. One could ascribe this to the old High Power Rifle maxim that “if you think it helps, then it helps.”
However, a World Champion and Olympic Gold/Silver medalist here commented on his own handloading (for International competition, which demands VERY fine accuracy). He noted that he did seem to see a decline in accuracy whenever he did not uniform FHs, deburr FHs and clean primer pockets before each reloading. (One might be tempted to counter that only a truly World Class shooter could reliably detect the difference.) However, with the wisdom of decades experience, our Champion also remarked that “It could have been that I just wasn’t shooting as well that day.”
For those who do opt for these procedures, note that various tool models may have adjustable depth-stops; pay attention to the instructions. Some FH-deburring tools (which enter the case mouth, not the primer pocket) are dependent upon uniform case length for best results.
Above is a flash-hole deburring tool on an RCBS powered case-prep unit. These case prep machines can save a lot of pain and misery, helping one perform various functions quickly and efficiently.
Watch this video to see how a sound suppressor (aka “silencer”, “moderator”, or “can”) is constructed, start to finish. It’s more complicated than you might expect — there are quite a few stages in the process. The video below shows the fabrication of a SilencerCo Octane 45 suppressor:
SilencerCo writes: “What, exactly, goes into making a silencer? It may be more than you’d expect. From cutting metal to chemical baths, to extensive quality control every step of the way, our streamlined process is more than just a few steps. Watch our newest video, HOW IT’S MADE: Octane 45, to catch a glimpse behind SilencerCo’s doors.”
How Loud Are Unsuppressed Rifles?
Firearms Are Loud — 140 dB to 175 dB. ASHA explains: “Almost all firearms create noise that is over the 140-dB level. Exposure to noise greater than 140 dB can permanently damage hearing. A small .22-caliber rifle can produce noise around 140 dB, while big-bore rifles and pistols can produce sound over 175 dB. Firing guns in a place where sounds can reverberate, or bounce off walls and other structures, can make noises louder and increase the risk of hearing loss. Also, adding muzzle brakes or other modifications can make the firearm louder. People who do not wear hearing protection while shooting can suffer a severe hearing loss with as little as one shot[.]” Source: ASHA, Recreational Firearm Noise Exposure.
How Much Does a Good Suppressor Really Reduce Firearm Sound Levels?
That depends on the rifle, the cartridge, and the effectiveness of the suppressor. American Hunter explains: “Suppressors retard the speed of propellant gases from the cartridge that rapidly expand and rush out of the barrel. It’s these gases that produce the loud boom that’s heard for miles. A suppressor’s series of internal baffles slows these gases so they are not all released at once, thereby muffling the sound.” Many good commercial suppressors can achieve 30-35 dB sound suppression. However, Zak Smith of Thunder Beast Arms says: “There are a bunch of manufacturers who publish values that are not reproducible, or use an ad-hoc test instead of a mil-spec test. In many cases we’ve tested the exact same suppressors they’ve advertised with 30-40 dB reductions and found they are actually in the high 20s instead.”
Again, for this reason, we recommend that hunters use ear protection, such as electronic muffs, even when shooting suppressed.
AR-platform rifles are fun and versatile, but the standard, mil-spec triggers leave much to be desired. They tend to be gritty, with creep and heavy pull weight. One of the easiest, most effective AR upgrades is a trigger group swap. An improved fire control group makes a huge difference. There are many aftermarket trigger options for the AR platform rifles. Choose single-stage or two-stage, either standard trigger assembly or unitized “drop-in” trigger, such as those made by Timney or Triggertech.
When upgraded with a precision trigger and match barrel, AR-platform rigs work great in NRA High Power competitions (Photo from NRA Blog, at Camp Perry).
Two-Stage vs. Single-Stage Triggers
Two-stage triggers have two separate movements. The first stage offers a light, spring-loaded pressure that works against the shooter’s pull until stopping at the second stage – this is called “take-up”. If there is no spring pressure, it is known as “slack”. Should the shooter continue to pull the trigger once he’s arrived at the second stage, the mechanism will operate like a single-stage trigger from there until engaging the sear and firing the gun. Some shooters prefer a two-stage trigger because it allows a mental preparation (first stage) before the final decision to “break the shot”.
Single-stage triggers feature no take-up or slack, as they begin engaging the sear as soon as the shooter begins pulling the trigger. Some competitive shooters prefer the two-stage trigger because of the feedback it provides during its first stage, while other shooters, including those using their rifle in tactical scenarios, may want the surety of a single-stage trigger, ready to engage and fire once their finger is inside the trigger guard. Regardless of preference, a good trigger will feature minimal creep and should be free of grittiness, providing a smooth, even break.
Drop-In Trigger Assembly vs. Standard Trigger Group
Once you decide between a single-stage or two-stage trigger, you can choose between standard and drop-in trigger groups. Standard trigger groups feature all the fire control group parts separated, and need to be pieced together and installed much like a mil-spec trigger, while drop-in trigger are pre-assembled and contained within a casing that simply drops in to the receiver and accepts the pins, hence the name.
After-Market Trigger Comparison
Some shooters prefer drop-in triggers due to the ease of installation, while others opt for standard groups so they can access the components individually for cleaning adjustment or replacement. If one piece of a drop-in trigger fails, you’ll need to either replace the entire unit or send it to the manufacturer for repair, whereas you may be able to simply replace the broken component of a standard trigger without needing a whole new trigger set.
Trigger Terminology — “Creep”, “Stacking”, “Overtravel”
“Creep” or “travel” is the distance the trigger moves between the end of take-up and when the trigger breaks to fire the fun. Too much creep can affect accuracy, but no creep can be unsafe, as the shooter may not be prepared to fire. “Stacking” occurs when the trigger weight actually increases during travel — this shouldn’t happen. Lastly, “overtravel” is the distance the trigger continues moving back after the gun fires.
This article is based on a longer story in the NRA Blog.
In school districts in many states, public schools remain closed due to concerns over COVID-19. That means kids are home, and in the Northern States with snow on the ground, those kids are stuck inside all day long. With more gun owners at home with their kids for extended periods, firearms safety is more important than ever. Given that fact, the NSSF reminds gun owners to keep their guns locked up so they cannot be accessed by children.
The National Shooting Sports Foundation (NSSF) and its partners urge gun owners to keep firearm safety a top priority and are making safety resources widely available as gun and ammunition sales increase, especially among first-time firearm purchasers.
“During this stressful time and with children spending more time at home, the firearm industry reminds gun owners that protecting yourself and your family includes making sure your firearms are stored securely when not in use”, said Joe Bartozzi, NSSF President and CEO. “The last thing any firearm owner wants is to have their gun fall into the wrong hands, particularly those of a child or someone at risk of harming themselves.”
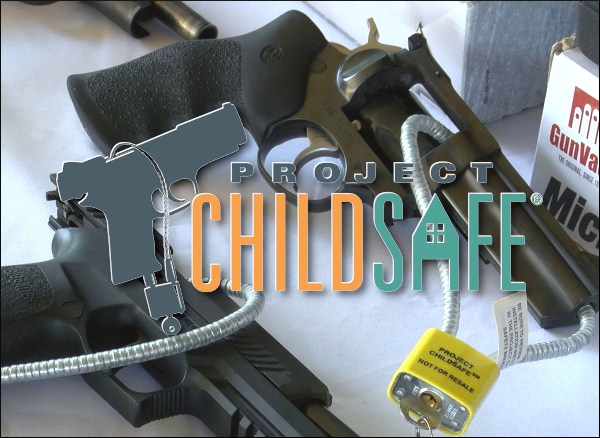
For anyone considering buying a gun, Project ChildSafe’s Road To Responsible Firearm OwnershipMany Paths to Firearm Safety video series helps gun owners determine the best safe storage device for their home/lifestyle. You also view the Safe Storage Options chart.
NSSF encourages gun owners and non-gun owners to use the firearm safety resources available on its Project ChildSafe website. These include the McGruff Gun Safety videos for young children and this educational video explaining how to discuss gun safety with children:
“More parents are assuming the role of educators in their homes, so it’s a good to time have a talk with your kids about gun safety, even if you don’t own a gun”, Bartozzi said. “If you do own a firearm, be sure your family understands the safety rules regarding firearms in your home, and always store guns responsibly when not in use.”
Gun guys are always shipping stuff around the country — whether it’s a barrel to be chambered, or a scope that needs to go back for warranty repair. Or maybe you’ve sold some bullets or reloading dies you no longer need. To ensure your precious packages get to their destination in one piece, it’s important to take precautions when boxing up your items. And by all means insure packages for full value — even if your packaging is perfect, there is always the possibility that your shipment might be lost altogether. Sadly, that can happen, no matter which carrier you choose: Fedex, UPS, or the U.S. Postal Service (USPS). Here are some tips for shipping gun stuff — we explain how to pack items properly and how to minimize the risk of loss.
Tips for Shippers
Dennis Haffner from McGowen Precision Barrels offers some advice on how to avoid damage when shipping gun parts or other valuable or heavy items. Dennis explains:
“First, I started double-packing the contents and in many cases double-boxing. I spend a fortune on heavy-reinforced shipping tape. If the contents are loosely packed, the package is going to get crushed. On real important items or delicate items, wrap the content in plastic and spray the inside void areas with non-expanding foam. They make shipping foam just for this. This method really works. Since I started paying more attention to packaging, I have just about wiped out my issues with all three companies (Fedex, UPS, USPS). Yes, I hate doing it, but in the long run for us, it’s cheaper.
Bullet shipments are the worst — a shipment of 500+ bullets can destroy a cardboard box. I have ordered bullets from individuals who put them in baggies and filled the remainder of the box with foam peanuts. That is not going to work. Any piece of metal, including a die, will puncture a cardboard box, or destroy a padded envelope. Just look at the tracking information and imagine your package bouncing around in the back of the shipping truck, probably under many other packages. My advice is to NEVER use padded envelopes. Barrel nuts or recoil lugs will most likely never make it.
ORM-D items are required to be shipped in heavily-reinforced, double-walled containers. The packages still get a little damage, but the contents usually survive.
How do shipments get damaged? Consider this — one of the shipping companies this year flipped (overturned) one of our new CNC machines (which rendered it useless). Maybe your small packages were in the same delivery truck as my CNC machine. I wonder how many little boxes were crushed underneath it.
As for USPS flat rate boxes — you would not believe what people try to stuff in these boxes. USPS finally put a weight limit on the boxes — they had to. I sometimes take my delicate items packed in an envelope or small box. I spray foam in a larger flat rate box and insert the smaller package, then fill the remainder of the void with foam. It works, and part usually arrives undamaged.”
Shipping Rifle Barrels (PVC Tube and Tennis Ball Method)
A new match-grade barrel can cost $350 or more, and it might take six months (or more) to replace it, given the current wait time with top barrel-makers. So, you don’t want your nice new tube to get damaged in transit. Forum Member Chuck L. (aka “M-61″) offers these tips for shipping rifle barrels:
“Packing a barrel can be a problem. Here’s a shipping method that won’t stop lost shipments but so far has stopped damage. Get a PVC pipe (of size appropriate to your barrel) with fitted caps for each end. Attach a cap to one end. Tape the barrel threads and tape over the muzzle. Then drop one standard tennis ball into the pipe. Place barrel in pipe. Next add whatever peanuts or foam you can jam in to support the barrel on the sides. Then place a second tennis ball into the opposite end of the PVC pipe. (So now you have a tennis ball on either end of your barrel.) With everything secure inside, attach the upper cap and tape it down securely. With this packing procedure, when the carrier launches the pipe like a javelin, at least the barrel will not come through like a spear and be gone. Label the pipe with very large address labels so no one suspects it’s just garbage laying around. This procedure may seem ridiculous but it has worked for me. Oh and definitely get insurance. If your item is insured, the shippers will look harder to find it.”
Editor’s Note: Fedex also makes a triangular-profile cardboard shipping box. This 38″ x 6″ x 6″ x 6″ Fedex Tube (designed for blueprints and posters) is free for the asking. For most barrels, there should be enough clearance to hold your PVC tube (with barrel packed inside tube). However, don’t ship the barrel inside the cardboard box by itself. Cap and pad the ends and bubble wrap it heavily, or better yet, use the PVC tube method described above, with the PVC tube inside the box.
Hoppe’s has added new videos to its “How to Clean” Series, which provides step-by-step cleaning instructions for some of today’s most popular firearms. The 15-part video series can be seen on YouTube, Hoppes.com, and Hoppe’s Facebook page. There are now 15 Hoppe’s How-to-Clean videos hosted on Youtube and the Hoppes website.
Ruger 10-22
Ruger LCP II
Ruger PC Carbine
Ruger Vaquero
Savage 555
Savage MSR-15
Smith & Wesson Model 36
Smith & Wesson M&P Shield
Springfield 1911 A1
Winchester Model 70
Developed to provide effective, yet easy-to-follow cleaning instructions for a variety of different firearms, the Hoppe’s video series is a very helpful resource for first time gun owners. The “How to Clean” series also serves as a valuable refresher course for any firearms enthusiast. In the videos, host Luke Williams (Outdoors By Luke), covers recommended cleaning procedures for numerous popular rifles, pistols and shotguns. Below we link four videos from the series: Remington 700, MSR-15, Mossberg 500, and Smith & Wesson M&P Shield.
How to Clean Remington 700 Rifle
IMPORTANT NOTE: Here at AccurateShooter.com, with our custom match rifles, we may use different methods than shown above. Our preferred cleaning procedures may employ both different tools and different cleaning solvents/supplies. For example we like to use Wipe-Out foaming bore cleaner with two applications while the barrel is still warm. With every new barrel, we recommend cleaning conservatively until you learn what works best for your particular barrel and shooting style. Long strings of rapid-fire shooting can create tough barrel-fouling issues that may not arise when shooting slow-fire and cleaning every 40-50 rounds. In addition, some powder types foul much worse than others.
How to Clean AR-Platform Savage MSR-15 Rifle
How to Clean Mossberg 500 Shotgun
How to Clean Smith & Wesson M&P Shield Pistol
These Videos Are Particularly Useful for New Gun Owners
“As the industry welcomes more first time firearms owners than ever before, the need to provide helpful cleaning instructions has never been greater”, said Eliza Graves, Sr. Brand Manager for Hoppe’s. “Through our instructional video series, longtime and novice gun owners alike can easily find helpful tips that will keep their firearms running like new”.


 Sticking a case in the sizer die is a rite of passage for the beginning handloader. If you haven’t done it yet, that’s great, but it probably will eventually happen. When it does, fixing the problem requires a bit of ingenuity or a nice little kit like the one we got from RCBS.


 Gun guys are always shipping stuff around the country — whether it’s a barrel to be chambered, or a scope that needs to go back for warranty repair. Or maybe you’ve sold some bullets or reloading dies you no longer need. To ensure your precious packages get to their destination in one piece, it’s important to take precautions when boxing up your items. And by all means insure packages for full value — even if your packaging is perfect, there is always the possibility that your shipment might be lost altogether. Sadly, that can happen, no matter which carrier you choose: Fedex, UPS, or the U.S. Postal Service (USPS). Here are some tips for shipping gun stuff — we explain how to pack items properly and how to minimize the risk of loss.
 “First, I started double-packing the contents and in many cases double-boxing. I spend a fortune on heavy-reinforced shipping tape. If the contents are loosely packed, the package is going to get crushed. On real important items or delicate items, wrap the content in plastic and spray the inside void areas with non-expanding foam. They make shipping foam just for this. This method really works. Since I started paying more attention to packaging, I have just about wiped out my issues with all three companies (Fedex, UPS, USPS). Yes, I hate doing it, but in the long run for us, it’s cheaper.
 How do shipments get damaged? Consider this — one of the shipping companies this year flipped (overturned) one of our new CNC machines (which rendered it useless). Maybe your small packages were in the same delivery truck as my CNC machine. I wonder how many little boxes were crushed underneath it.
 “Packing a barrel can be a problem. Here’s a shipping method that won’t stop lost shipments but so far has stopped damage. Get a PVC pipe (of size appropriate to your barrel) with fitted caps for each end. Attach a cap to one end. Tape the barrel threads and tape over the muzzle. Then drop one standard tennis ball into the pipe. Place barrel in pipe. Next add whatever peanuts or foam you can jam in to support the barrel on the sides. Then place a second tennis ball into the opposite end of the PVC pipe. (So now you have a tennis ball on either end of your barrel.) With everything secure inside, attach the upper cap and tape it down securely. With this packing procedure, when the carrier launches the pipe like a javelin, at least the barrel will not come through like a spear and be gone. Label the pipe with very large address labels so no one suspects it’s just garbage laying around. This procedure may seem ridiculous but it has worked for me. Oh and definitely get insurance. If your item is insured, the shippers will look harder to find it.”


