Kestrel wind and weather meters are often regarded as the best on the market — for good reason. Here are a series of three videos by F-Class John that show how the Kestrel 5700 with Elite Ballistics works with Applied Ballistics APP software and Link connection.
This Part I Video starts with a basic Kestrel Anemometer (blue case, 00:00-00:40) wind meter. Then reviewer F-Class John looks at the “smart” Kestrel 5700 with Elite Ballistics. John explains the many features of the Kestrel 5700 and how it holds a powerful ballistics calculator in the convenient, easy-to-tote Kestrel package. With Elite Ballistics, once you enter data about your bullets, velocity, zero, and rifle, the Kestrel can calculate come-ups and wind corrections. If you don’t yet own a Kestrel, we highly recommend you watch this series of videos that explains advanced Kestrel features in detail.
This Part II Video shows the key features of the advanced software APP used by the Kestrel 5700 unit with Elite Ballistics. The Kestrel 5700 can “talk” to a mobile device that runs the Applied Ballistics software APP that contains bullet databases and allows you to enter key information such as muzzle velocity, bullet BC, zero distance, velocity, wind, and environmental factors (altitude, temperature etc.). There are also gun-specific factors such as scope height over bore and barrel twist rate. The video also explains how “range cards” are created and how to view them with your Elite Ballistics-enabled Kestrel. John notes: “The APP is great because you don’t have to fiddle with the Kestrel’s buttons. It’s much easier to enter data and change settings with the APP.”
This Part III video shows how to determine true wind direction by aligning the SIDE of the unit into the wind. You essentially want to set the unit 90 degrees to the wind direction so the impeller runs as slowly as possible. Then, after you set your target distance (See 3:03), the unit can give you precise come-ups for your intended target (10.28 MOA for 559 yards here). The Kestrel then calculates the cross-wind correction as well (See 3:12).
DISCLAIMER: This video and description contains affiliate links, which means that if you click on one of the product links, the video author may receive a small commission. This helps support F-Class John’s YouTube channel and allows him to continue to make videos like this.
Craters may look interesting on the moon, but you don’t want to see them on your primers. Certain mechanical issues that cause primer craters can also cause primer piercing — a serious safety problem that needs to be addressed. If you have a gun that is cratering primers (even at moderate pressure levels), there is a solution that works with many rifles — send your bolt to Greg Tannel to have the firing pin hole bushed.
Shooters who convert factory actions to run 6BRs, 6PPCs or other high-pressure cartridges should consider having the firing pin bushed. These modern cartridges like to run at high pressures. When running stout loads, you can get cratering caused by primer flow around the firing pin hole in the bolt face. The reason is a little complicated, but basically the larger the hole, the less hydraulic pressure is required to crater the primer.
A limited amount of cratering is normally not a big issue, but you can reduce the problem significantly by having a smith fit a bushing in the firing pin hole. In addition to reduced cratering, bushing the firing pin often produces more consistent ignition.
This is a highly recommended procedure that our editors have had done to their own rifles. Greg Tannel (Gre-Tan Rifles) is an expert at this procedure, and he does excellent work on a wide variety of bolts. Current price for a bushing job, which includes turning the firing pin to .062″, is $92.00, or $100.00 with USPS Priority Mail return shipping.
If you have a factory rifle, a bushed firing pin is the way to go if you are shooting the high-pressure cartridges such as 6PPC, 6BR, 6-6.5×47 and 6.5×47. This is one of the most cost-effective and beneficial upgrades you can do to your factory rifle. For more info on the Firing Pin Bushing process, visit GreTanRifles.com, or email greg [at] gretanrifles.com. After clicking the link for GreTanRifles.com, Click on “Services” > “Shop Services” and you’ll see a listing for “Bush Firing Pin Hole & Turn Pin”. CLICK that Box.
Firing Pin Hole Bushing by Greg Tannel
Work Done: Bush firing pin hole and turn pin
Functions: Fixes your cratering and piercing problems
Price: $92.00 + $8.00 return shipping Total Price: $100.00
Actions for which Bushing is Offered: Remington, Winchester, Savage multi-piece pin, Sako, Kimber, Nesika, Stiller, BAT Machine, Kelbly, Lawton, Surgeon, Borden, Wichita, Hall, Ruger, Howa, Weatherby, Dakota, Pacific Tool, Phoenix, and Defiant bolt action rifle or pistol.
Actions for which Bushing is NOT Available: Case hardened receivers, ARs, Accuracy International (AI), Barnard, Big Horn, Cooper, Desert Tactical Arms, Kimber, Rosenthal, New Savage single piece pin, Rim fires, Falling block, Break open, Lever, Pump rifles, 1903-A3, CZ, Mauser.
How to send your bolt in to be bushed:
Send your bolt and firing pin assembly via snail mail, priority mail, or UPS. Please do not use FEDEX as it sometimes has delivery delays.Include your name, phone number, and return shipping address, and a note as to what you want done. Pack your bolt carefully and ship to: Gre’-Tan Rifles, 24005 Hwy. 13, Rifle CO 81650.
Due to the high volume of work, turn-around time for bolt bushing jobs can be 12 weeks (though it usually is faster). Customers can pay by check, money order, or credit card. For more information visit GretanRifles.com.
High-Tech Rimfire Rigs
If you watched the smallbore position and prone shooters at the 2016 Brazil Olympic Games, you couldn’t help but notice the exotic rifles competitors were shooting. There were wood stocks, metal stocks, factory-built rifles, and customized specials. One of the more popular smallbore rifles used at the Olympics and World Cup competition has been the Anschütz model 1913 “Super Match”, fitted with the 1918 “Precise” Alumnium stock. Anschutz does have a newer 2013 model, but this 1913 remains quite popular. The Anschütz model 1913 rifle boasts remarkable adjustability to suit the 3-Position game. The wide range of adjustments allow the the rifle to be customized for the shooter, and modified to best suit each position: prone, kneeling/sitting, and standing.
Customizable rifles like this Anschütz 1913 Super Match “can make a real difference in a shooter’s performance,” explained Jessie McClain of the NRA Competitive Shooting Division. “I went from a decent shooter to making the varsity shooting team my freshman year because of the rifle.” A key feature is the fully adjustable stock, which she called the Porsche of the shooting world. Fully adjustable from the butt plate to the check piece to the hand stop and risers and bolt knobs, the aluminum stock is fully customizable to the athlete … which can be a huge advantage. “Every person is different … a customizable rifle fits anyone. A rifle team can purchase four of these and field a shooting team for years.”
The Modern Anschütz Position Rifle
Smallbore match rifle makers are using modern materials in response to the need for greater adjustability (and enhanced accuracy). One of the most popular designs is the Anschütz model 1913 position rifle with a “1918 ALU Precise” brushed aluminum stock. This looks like it has been crafted in an aircraft plant.
The Anschütz 1913 Precise — Prone Shooting with Ace Marksman
In this 7-minute video, you can see details of an Anschütz 1913 Super Match Rifle (ALU Precise 1918 stock) for the first two minutes. Then the video shows the rifle being shot from prone, viewed from multiple angles (right, left, overhead, front). Watch at the 5:15 time-mark to see how the marksman steadies his rifle for the shot. This video offers good details of feeding and prone holding.
NEXT Generation — the Anschütz Model 2013
This video shows the latest-generation Anschütz model 2013 match rifle with aluminum 2018 stock being used in a benchrest match with riflescope. Note that the 2013 action is slab-sided and silver, rather than cylindrical and blued like the older model 1913. You’ll see good close-ups of the shooter working the action and feeding rounds. Watch closely and you can see the take-up, trigger pull and firing at 00:32 and 00:57 time-marks.
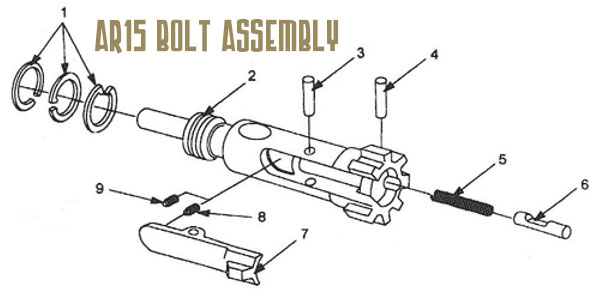
AR-platform rifles can be maintenance-intensive beasts. But some AR owners make the situation worse by not regularly cleaning important small parts, or by using too much oily/greasy lubricants in the wrong places. A properly maintained and lubricated AR15 can shoot hundreds of rounds (between cleanings) without a problem. If you learn where (and where not) to apply lubricant, you’ll find that your AR will run more reliably and the task of cleaning the bolt and bolt carrier will be less of a burden.
Here is a good video that explains AR-15 Cleaning and Maintenance. In this 30-minute NSSF video, Gunsite Academy instructor and gunsmith Cory Trapp discusses the proper way to clean and maintain the AR-15 carbine. Very knowledgeable, Trapp provides rock-solid advice for AR owners. Along with cleaning procedures, this video explains how to inspect key components and how to function-test your AR before each shooting session.
If you want to keep your black rifle running smoothly and reliably, you must clean it regularly and follow the correct maintenance procedures. Here’s another good video that explains how to properly disassemble and clean AR-platform rifles.
Take-Down and Full Cleaning of AR15 by Jerry Miculek
Here ace shooter Jerry Miculek takes down and cleans an AR-platform rifle belonging to his daughter Lena. This is a good video because Lena’s rifle was “run hard and packed up dirty” so you can see where carbon and grease build up. This 35-minute video is very thorough. Jerry is one of the nation’s top action carbine shooters, so listen carefully to his advice on cleaning and lubrication.
As posted in the Calguns.net a few years back, there was a nasty out-of-battery firing incident involving a BOHICA Arms .510 DTC AR15 upper. The cause of the out-of-battery firing is not certain but it appears that the ammo was not sized properly and the firing pin may have been stuck in the extended position. As a result, the round went off before the bolt was closed with the lugs seated. In the process, the bolt handle broke off, as the bolt retracted violently, actually ending up outside the bolt raceway.
The shooter was badly injured, with broken bones and ligament damage to his left hand and tissue damage to his right hand. The shooter was holding the rifle with his left hand near the front of the chamber where a gas vent was located. Gas and shrapnel existed the vent hole causing the severe injuries to the left hand.
From range reports, it appears that the shooter had been struggling to chamber previous rounds, and was having trouble closing the bolt. After talking with one of the rangemasters, a poster on AR15.com reported: “The guy was using new reloads that weren’t exactly fitting well into his chamber. [The shooter] was slamming the bolt handle with his palm trying to get the cases to lock in. The guy was also slamming the bolt forward full force from the rearmost position back and forth trying to ram the cases into chamber in an attempt to squeeze the rounds in so the bolt could close. Finally, on one of the attempts … the possibly stuck firing pin rams into the primer and explodes the round when he slams the bolt forward (zero lug engagement hence the KB) and shooter puts himself into a world of hurt.”
Lessons Learned — Don’t Try to Force Oversize Ammo into a Chamber
By all reports, the shooter’s ammo wasn’t fitting his chamber properly. In an effort to force the ammo into the chamber, he worked the bolt with excessive force. That MAY have caused the firing pin to extend or the hammer to fall without the trigger being pulled. One theory is that the trigger system may have been modified, allowing the hammer to fall from the force of slamming the bolt forward. Others have speculated that the firing pin may have failed to retract because the bolt handle was over-torqued — a safety issue listed in the BOHICA manual.
Whatever caused the out-of-battery firing, it appears that improperly-sized ammo (or a poorly-cut chamber) was the root cause of the problems. If you go to a range and find your bolt does not close easily over the ammo — STOP SHOOTING — don’t try to force the issue. Disaster may result. To paraphrase Johnnie Cochran: “If the ammo doesn’t fit, it’s time to quit”.
Photos by Wildcard, originally posted on Calguns.net.
Every serious competitor needs a good spotting scope support. Spotting scopes are not just for iron sights shooters. Even if you have a powerful riflescope, the spotting scope, typically set at 15-25X magnification, lets you observe wind flags, mirage, and other shooters’ targets. If you are looking for a high-quality, made-in-USA support for your spotter, consider the Polecat V2 system from Creedmoor Sports. Our friend Gavin Gear of UltimateReloader.com recently posted this video review:
Creedmoor Sports has offered excellent products for competitive shooters for decades. The Made-in-USA Polecat V2 system is updated version of Creedmoor’s best-selling spotting scope stand. After collecting feedback from shooters across many disciplines for several years, the designers brought some major advances to this scope stand. First, no pretension are adjustments needed. Horizontal and vertical resistance is controlled by the knurled tightening knob. Second, the Polecat boasts a pre-aligned Delrin clamp so you don’t have to spin the clamp to align with the rods during stand assembly. You can order a Polecat V2 with 3/4″-diameter rod for $296.95 or get the 1″-diameter rod version for $364.95.
Either version can be used for both left-handed and right-handed shooters, with about 5″ standoff from the center of the stand to the scope’s centerline. Polecat V2 packages include head, stop collar, one extension rod, and base. Additional aluminum rods are available to extend height.
Polecat V2 Key Features
— Adjustable head (spotting scope mounts to head)
— Bump stop (protects spotting scope from accidental knock if dropped)
— Base with three fold-out legs
— Leveling adjustment for uneven ground (one leg can be adjusted downward, faced in downhill direction)
— Zero play (slop), giving you the ability to quickly and easily make adjustments
— One-handed operation/adjustment
— 1/4″-20 standard spotting scope thread
— The scope may be positioned above or below the scope head
More and more folks are using Burris Signature Rings these days. These unique rings feature polymer inserts. That allows you to pre-load some elevation in your scope set-up, or you can center-up the windage. Additionally, the polymer inserts hold your scope securely without leaving marks on the tube. And many folks believe Signature rings may offer advantages for benchrest competition. Rodney Wagner shot the then-smallest 600-yard group in history using Burris Signature Zee Rings (“Zee” denotes the Weaver-rail model). James O’Hara set multiple IBS 1000-yard records using Burris Signature Zee Rings. James will tell you he thinks “all his guns seem to shoot best with these rings”.
Records Have Been Set with Signature Zee Rings
Are Signature Zees good enough for competition? Absolutely. Some folks scoff at these Burris rings, given their low price ($36.40 for 1″ Sig Zees at Midsouth). But consider this, in 2013 Rodney Wagner shot a world record 0.336″ 5-shot group using Signature Zee Rings on his IBS Light Gun. That still stands as an IBS Light Gun 600-yard record, though in 2018 Bart Sauter nailed a 0.311″ Heavy Gun group at 600. Here’s a photo of Rodney showing the record-setting rifle, outfitted with Signature Zee 30mm rings.
Vendors Have Burris Signature Rings in Stock Now
Various models of Burris Signature Rings are available currently from many vendors. NOTE: You may have to check with more than one seller to get the exact size, height, and model you prefer. But right now these vendors have pretty good selections of Signature Zees, including the popular 30mm High and Extra High models. If you check all three sellers, you’ll probably find what you need.
Midsouth has a good inventory of Burris Signature Zee Rings in stock now:
NOAA photo of flooding after Hurricane Floyd in 1999. The Colt Python Revolver once belonged to Elvis Presley (Rock Island Auction).
Firearms owners who have seen their guns and stored ammunition submerged by flood waters in storm-wracked areas are probably wondering if their firearms and ammunition can be salvaged and safely used. To answer these questions, the NSSF and the Sporting Arms and Ammunition Manufacturers’ Institute (SAAMI®) created two documents outlining the proper response to submersion of guns and ammo. If you’ve got wet guns and/or ammo, download these two PDF files and read them carefully.
The SAAMI document “Guidance on Firearms That Have Been Submerged or Exposed to Extensive Amounts of Water” points out two major concerns about firearms that have been exposed to water: parts susceptible to moisture and rust damage such as metal parts, wood stocks and grips, and optics; and, secondly, infiltration of the action, barrel and safety systems by grit, silt and other foreign debris.
#1 Always unload firearms before beginning any treatment process.
It’s important to limit moisture and corrosion damage to the component parts of the firearm. This can be accomplished by disassembling the component parts and using up to two coats of a moisture-displacing lubricant such as Hoppes #9 MDL or WD-40 to clean and stabilize the parts while, importantly, following the product’s directions so as not to damage, for instance, plastic or synthetic parts. Another tip is to allow wood stocks and grips to air-dry and not be force dried by exposure to heat.
The document emphasizes that once the firearm has been thoroughly dried, consideration must be given to having the firearm inspected and serviced by the manufacturer, an authorized service center, or a qualified gunsmith before putting the firearm back in service.
Dealing with Ammunition That Was Submerged
Bottom Line, if your ammo has been submerged — DON’T USE IT. SAAMI explains why…
To help firearms owners determine what to do with ammunition that has been affected by water and moisture, SAAMI offers another helpful document, “Guidance on Ammunition That Has Been Submerged in Water.” This document covers differences in moisture resistance between centerfire, rimfire and shotshell ammunition, and potential hazards associated with “drying out” cartridges, including possible deterioration and damage to cartridges due to drying methods.
Another serious hazard that could result from using compromised ammunition is the potential for a bore obstruction due to partial ignition of either the priming compound or the propellant powder charge, or both. Firing a subsequent round through an obstructed barrel can result in bodily injury, death and property damage.
SAAMI provides the following cautionary conclusion: “It would be impossible to ascertain for certain the extent of the deteriorating affect, if any, the water may have had on each individual cartridge. Therefore, the safe answer is that no attempt be made to salvage or use submerged ammunition. The ammunition should be disposed of in a safe and responsible manner. Contact your local law enforcement agency for disposal instructions in your area.”
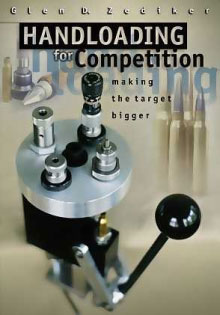
Forum member Danny Reever and this Editor have discussed how novice reloaders can struggle with the fine points of reloading, making errors in seating depth, neck-bushing choice, or sizing their cases. We agreed that a good resource covering more than “Reloading Basics” is sorely needed. Danny reminded me that Glen Zediker’s excellent Handloading for Competition book has been available since 2002. Danny says this may still be the best guide in print for those getting started in precision reloading, though the book is not without flaws.
Danny observed: “I consider this still the best book out there on the subject. I’ve bought a lot of other books only to be sorely disappointed after spending $30-$40 of my hard-earned cash. This book is not one of those! I’ve read and re-read Zediker’s treatise at least four times and refer to it often for advice while reloading. My number one suggestion for those who buy the book is to sit down with a highlighter and read it cover to cover. It’s well-written with a bit of humor and it is not boring.”
Extremely comprehensive, Zediker’s book covers nearly all of the key factors involved in accurate reloading: case sorting, brass prep, load development, neck-sizing, full-length sizing, bushing selection/use, tool selection, priming, powder measurement, and bullet seating. The book also explains how to test and evaluate your ammo, and how to monitor and interpret pressure signs.
There are many “must-read” sections in Zediker’s book, according to Danny: “The section beginning on page 161 dealing with concentricity (and how to achieve it) is excellent. Likewise the Load Limits section discussing pressures offers very valuable advice and info. You should also read Zediker’s commentaries about load testing, powders (burn characteristics etc.), and the effects of temperature.”
Zediker has conveniently provided a detailed summary of his book on the web, complete with table of contents, sample pages (PDF format), and dozens of illustrations. Shown above is just one small section that covers ejectors.
Overall, we recommend Glen Zediker’s Handloading for Competition, though the book definitely could use some updating. Danny says: “Plunk down the [money] and buy this book, you won’t be sorry.” Zediker’s book is available from Amazon.com ($34.99), Midsouth Shooters ($33.49), and Zediker Publishing ($36.95).
Ace tactical shooter and gunsmith Jim See of Elite Accuracy LLC recently tested a Frankford Arsenal rotary brass tumbler. Like the older Thumbler’s Tumblers, this can tumble your cases in a liquid solution. The wet-tumbling process worked very well Jim reports. Posting on Facebook, Jim noted: “I was super impressed with the Frankford Arsenal rotary tumbler and cleaning packs they sent me. I ran 350 pieces of brass for one hour. They now look great.” Jim appreciated not having to deal with dry tumbling media, such as crushed walnut shells. Dry media produces dust and can leave residues or clog flash-holes.
Interestingly, Jim recommends you try wet-tumbling WITHOUT using stainless media. At least give it a try. Tumbling without media simplifies the process and you don’t have to worry about pins stuck in flash-holes or case-necks*. Jim reports: “Stainless steel pins come with the Frankford kit, but mine hit the trash right out of the box. There is no need to clean the inside of your cases 100% and that’s all the pins add to the equation. The brass bumping brass with hot water and Frankford’s liquid cleaner works great all by itself.” One wag stated: “That’s great to hear. Stainless steel pins are a PITA.”
Other Facebook posters concurred with Jim’s evaluation of the Frankford Arsenal Rotary Tumbler:
“I’ve had one for a couple years, and it works well. I usually run about 250-300 Dasher cases at once in it. But I use the pins because I’m OCD about clean brass.” — David W.
“I’ve had one for a year and a half and it definitely works with or without pins.” — Luke C.
“I got one about six months ago and have yet to use any SS media. I just use some dawn, distilled water, and Lemi Shine®. Turns nasty 5.56 range brass bright and shiny.” — Brian D.
“I don’t use the pins either and use a combination of Dawn soap and Lemi Shine.” — Jon N.G.
This video shows how to assemble and operate the Frankford rotary tumbler. NOTE That Jim See does NOT feel that it is necessary to use stainless media.
How to Dry Your Brass — Hair Dryer Vs. Machine
The downside of wet tumbling is that you end up with a pile of wet brass at the end of the cleaning cycle. There are many ways to dry brass, from drying in the sun to using a kitchen oven (be careful not to “overcook” your brass). One Facebook poster asked Jim: “What is your drying method for wet brass, and how long does it take?”
Jim See replied: “To start I just drain off the dirty water, and rinse the brass with clean hot water. Then I roll the brass on a towel for 30 seconds and put the brass in a one-gallon bucket. Next I insert a hair dryer in the bucket (with the brass) and let it run for about 5 minutes. With this procedure, the drying process for me is done in less than 10 minutes.”
Jack Lanhart has another method: “I use a food dehydrator. It takes 30 to 45 minutes.”
For those who don’t want to mess with towels and hair dryers, Frankford Arsenal offers a matching Platinum Series Case Dryer that simplifies the process of drying brass. Lyman also makes an excellent Cyclone Case Dryer. Both drying machines cost about $60.00 and both have multiple levels so you can separate different types of cartridge brass. Lyman states that “The forced heated air circulation of the Cyclone will dry your brass inside and out within an hour or two, with no unsightly water spots.” The Lyman dryer can also be used for ultrasonically-cleaned gun parts.
*The Frankford Rotary tumbler does include media separators if you choose to use the provided pins or other media. CLICK HERE for diagram showing how to use media separators.


 Craters may look interesting on the moon, but you don’t want to see them on your primers. Certain mechanical issues that cause primer craters can also cause primer piercing — a serious safety problem that needs to be addressed. If you have a gun that is cratering primers (even at moderate pressure levels), there is a solution that works with many rifles — send your bolt to
  Firing Pin Hole Bushing by Greg Tannel
 High-Tech Rimfire Rigs


 More and more folks are using Burris Signature Rings these days. These unique rings feature polymer inserts. That allows you to pre-load some elevation in your scope set-up, or you can center-up the windage. Additionally, the polymer inserts hold your scope securely without leaving marks on the tube. And many folks believe Signature rings may offer advantages for benchrest competition. Rodney Wagner shot the then-smallest 600-yard group in history using Burris Signature Zee Rings (“Zee” denotes the Weaver-rail model). James O’Hara set multiple IBS 1000-yard records using Burris Signature Zee Rings. James will tell you he thinks “all his guns seem to shoot best with these rings”.


 Forum member Danny Reever and this Editor have discussed how novice reloaders can struggle with the fine points of reloading, making errors in seating depth, neck-bushing choice, or sizing their cases. We agreed that a good resource covering more than “Reloading Basics” is sorely needed. Danny reminded me that Glen Zediker’s excellent


