If you load pistol or rifle ammo with a progressive press, we strongly recommend you get a Lock-Out Die from RCBS. This unique reloading die will prevent your progressive press from advancing if the dispensed powder charge is more or less than about 0.3 grains too high or too low. The Lock-Out Die really works. Your Editor uses it on his RCBS 2000 progressive press. I can affirm that a Lock-Out Die has “saved my bacon” a half-dozen times over the years when there was an over-charge (which could cause a Kaboom) or a low charge (which could cause a squib load).
The Lock-Out Die works by using a central die detection rod that sets its vertical position based on the height of the powder column in the case. Through an ingenious design, if the powder column height is too low or too high, the rod locks in place as you start to pull the press handle. This halts the press before the ram can lift and the cartridge plate can advance. Unlike a beeping alarm system (which can be ignored or defeated), the Lock-Out Die physically stops the movement of the press ram and prevents a bullet being seated in the “problem” case.
It takes a bit of tweaking to get the Lock-Out Die detection rod setting just right, but once it is correctly positioned, the Lock-Out Die works smoothly in the background. The Lock-Out Die won’t interfere with the loading process unless it detects a high or low charge — and then it positively stops the progressive loading cycle.
While crafted for use in RCBS progressive presses, the RCBS Lock-Out Die can also be used on a Dillon XL Progressive (see video below) or Hornady Lock-N-Load progressive — though it does take up one station which could otherwise be used for a final crimp die (after the seating die). The RCBS 2000 has one more station than a Dillon 550/650, so it’s an ideal platform for using the Lock-Out Die.
Learn More at UltimateReloader.com
On the UltimateReloader.com website, run by our friend Gavin, you’ll find an excellent two-part series on the function and set-up of the RCBS Lock-Out Die. Part One explains how the Lock-Out Die functions, using cut-away illustrations. Part Two shows how to install and adjust the Lock-Out Die on various progressive presses. The video below shows setup of the RCBS Lock-Out Die on the Dillon XL-650 progressive press.
Do you find that the crosshairs in your scope get blurry after a while, or that you experience eye strain during a match? This is normal, particularly as you get older. Focusing intensely on your target (through the scope or over iron sights) for an extended period of time can cause eye strain. Thankfully, there are things you can do to reduce eye fatigue. For one — breathe deeper to take in more oxygen. Secondly, give your eyes a break between shots, looking away from the scope or sights.
In our Forum there is an interesting thread about vision and eye fatigue. One Forum member observed: “I have noticed recently that if I linger on the target for too long the crosshairs begin to blur and the whole image gradually darkens as if a cloud passed over the sun. I do wear contacts and wonder if that’s the problem. Anyone else experienced this? — Tommy”
Forum members advised Tommy to relax and breath deep. Increase oxygen intake and also move the eyes off the target for a bit. Closing the eyes briefly between shots can also relieve eye strain. Tommy found this improved the situation.
Keith G. noted: “Make sure you are still breathing… [your condition] sounds similar to the symptoms of holding one’s breath.”
Phil H. explained: “Tom — Our eyes are tremendous oxygen hogs. What you are witnessing is caused by lack of oxygen. When this happens, get off the sights, stare at the grass (most people’s eyes find the color green relaxing), breath, then get back on the rifle. Working on your cardio can help immensely. Worked for me when I shot Palma. Those aperture sights were a bear! The better my cardio got the better and longer I could see. Same thing with scopes. Try it!”
Watercam concurred: “+1 on breathing. Take a long slow deep breath, exhale and break shot. Also make sure you take a moment to look at the horizon without looking through rifle or spotting scope once in a while to fight fatigue. Same thing happens when using iron sights.”
Arizona shooter Scott Harris offered this advice: “To some extent, [blurring vision] happens to anyone staring at something for a long time. I try to keep vision crisp by getting the shot off in a timely fashion or close the eyes briefly to refresh them. Also keep moisturized and protect against wind with wrap-around glasses”.
Breathing Better and Relaxing the Eyes Really Worked…
Tommy, the shooter with the eye problem, said his vision improved after he worked on his breathing and gave his eyes a rest between shots: “Thanks guys. These techniques shrunk my group just a bit and every little bit helps.”
Read more tips on reducing eye fatigue in our Forum Thread: That Vision Thing.
To avoid eye fatigue, take your eyes away from the scope between shots, and look at something nearby (or even close your eyes briefly). Also work on your breathing and don’t hold your breath too long — that robs your system of oxygen.
If you’ve ever used a Harris Swivel Bipod, you know that, without tools, it is difficult to put enough tension on the swivel locking knob to really lock the unit solid. And, if you do manage to get the knob really tight (perhaps by using pliers), it is difficult to loosen with fingers alone.
That was why Terry Cross and the folks at KMW Long Range Solutions invented the Pod-Loc™. This system replaces the knurled swivel tension knob with a push-button adjustable handle. Using the handle you can easily set the swivel tension at any level from loose to “rock solid”. And you can release tension to adjust the bipod to different terrain just as easily. The genuine KMW Pod-Loc™ retails for $33.99 at Brownells.com.
How to Build Your Own Bipod Swivel Locking System
While we use genuine KMW Pod-Locs on our rifles, readers on a tight budget, or who have a large collection of bipod-equipped rifles, can economize by putting together their own swivel locking systems from off-the-shelf components. You can buy suitable levers from www.T-Nuts.com. This vendor offers a variety of appropriate handles, ranging in price from $7.70 to $10.00. So, by sourcing the parts, you can outfit four bipods with swivel adjusters for the cost of one Pod-Loc.
We recommend the Nylon/Stainless BPL/NS model ($7.70), but you may prefer the all-metal BPL-ZS ($8.50), or the shorter BPL-Micro model ($8.25). The compact Micro lock does not protrude past the body of the bipod, yet is still easily grasped. T-Nuts supplies one 3/16″ spacer with most of its bipod handles. T-Nuts handles are also available with a metric M6x1.0 thread for use with imported bipods such as Outers and Rockport.
Installation is Easy — With the Right Socket
To install a swivel locking system, first you’ll need a 1/4″ socket to remove the keeper nut from the threaded pivot rod. (During this process, you’ll need to keep pressure on the pivot rod retaining pin on the opposite side of the bipod.) Don’t try to remove the keeper nut with pliers or an open-end wrench. You really need the correct socket. Once that keeper nut is removed, then unscrew the knurled tension knob/ring. This is attached to the same threaded shaft as the keeper nut but you should be able to remove it without tools.
After the knurled tension ring is off, it is easy to put your handle on the bipod. First slip the 3/16″ spacer over the threaded pivot rod. Keeping finger pressure on the pivot rod retaining pin (on reverse side), then spin on the T-Nuts handle. Rotate the handle inwards until it firmly locks the bipod swivel mechanism. By pushing the button in the head of the handle, you can swing the handle left or right to set its position without altering the swivel tension.
Lapua Re-Opens Ohio Rimfire Performance Center Capstone Precision Group has announced the re-opening of the Lapua Rimfire Performance Center (LRPC) at the Cardinal Shooting Center in Marengo, Ohio. Due to Covid-19 restrictions enacted in Ohio, the LRPC has been closed since March 23, 2020.
Patterned after the world-renowned Lapua Performance Center in Germany, both the Cardinal and existing location in Mesa, AZ give shooters the opportunity to test various types, and lots of Lapua ammunition, under tightly controlled conditions. Fully instrumented, with state of the art Meyton/Bollman electronic targeting systems, the centers offer the unique ability to test ammunition at both 50 and 100 meters, simultaneously with a single string.
Testing Resumes Monday May 4, 2020 | Customer Visits Begin May 11, 2020
Beginning May 4, 2020, Lapua will test customer rifles that are shipped to the LRPC. The following Monday, May 11, 2020, the Performance Center will open for customers with appointments to bring their firearms on site with safety restrictions in place.
“We’re extremely excited to re-open our second Performance Center, and the safety of our customers is our first priority. We have placed safety measures in place to keep our customers safe while we provide them with world class service”, said Adam Braverman, Director of Sales and Marketing.
Luke Johnson, Rimfire Test Center Manager, stated, “Lapua’s Second Performance Center in the United States will provide increased opportunity for competitors to find some of the highest quality rimfire match ammunition. We are eager to have our customers see our new facility, and are taking precautions to keep them and our employees safe.”
Customers interested in testing at the new Lapua Rimfire Performance Center, may call (480) 695-0744, email rimfiretesteast@capstonepg.com , or fill out an appointment request at www.capstonepg.com/rpc/.
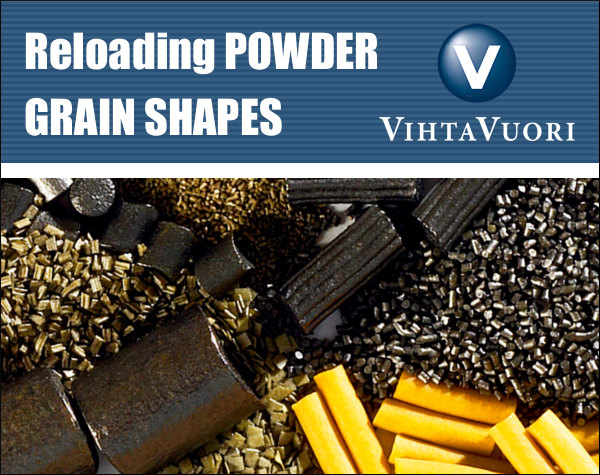
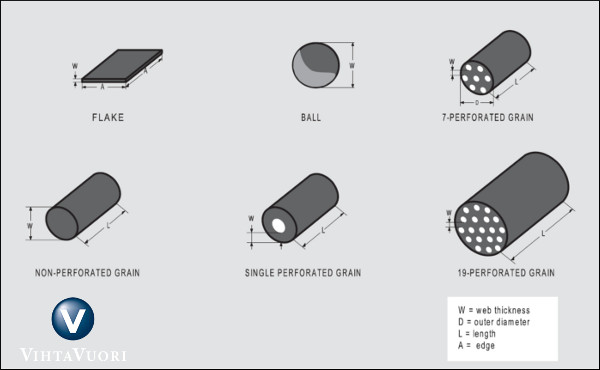
The shape of powder grains has a profound effect on the performance of the powder charge, as it concerns both pressure and velocity. There are multiple powder shapes including flake, ball, and extruded or “stick” (both solid and perforated).
All Vihtavuori reloading powders are of the cylindrical, single-perforated extruded stick type. The differences in burning rate between the powders depend on the size of the grain, the wall thickness of the cylinder, the surface coating and the composition. Cylindrical extruded powders can also have multi-perforated grains. The most common types are the 7- and 19-perforated varieties. A multi-perforated powder grain is naturally of a much larger size than one with a single perforation, and is typically used for large caliber ammunition.
Other types of powder grain shapes include sphere or ball, and flake. The ball grains are typically used in automatic firearms but also in rifles and handguns. The ball grain is less costly to produce, as it is not pressed into shape like cylindrical grains. Flake shaped grains are typically used in shotgun loadings.
Web thickness in gunpowder terminology means the minimum distance that the combustion zones can travel within the powder grain without encountering each other. In spherical powders, this distance is the diameter of the “ball”; in flake powder it is the thickness of the flake; and in multi-perforated extruded powders it is the minimum distance (i.e. wall thickness) between the perforations.
The burning rate of powder composed of grains without any perforations or surface treatment is related to the surface area of the grain available for burning at any given pressure level. The change in the surface area that is burning during combustion is described by a so-called form function. If the surface area increases, the form function does likewise and its behavior is termed progressive. If the form function decreases, its behavior is said to be degressive. If the flame area remains constant throughout the combustion process, we describe it as “neutral” behavior.
The cylindrical, perforated powders are progressive; the burning rate increases as the surface area increases, and the pressure builds up slower, increasing until it reaches its peak and then collapses. Flake and ball grains are degressive; the total powder surface area and pressure are at their peak at ignition, decreasing as the combustion progresses.
So how does the shape affect pressure and muzzle velocity? In general, it can be said that powder that burns progressively achieves a desired muzzle velocity at lower maximum pressure than a powder that burns neutrally, not to mention a degressive powder. As grain size increases, the maximum pressure moves towards the muzzle, also increasing muzzle blast. Muzzle velocity and pressure can be adjusted by means of the amount of powder or loading density, i.e. the relationship between the powder mass and the volume available to it. As the loading density increases, maximum pressure grows.
We created this custom target in 5 minutes using PrintTargets.net. If you like it, DOWNLOAD HERE.
AccurateShooter.com has a HUGE collection of FREE downloadable PDF targets. We offer a very wide range of target designs: Load Development Grids, NRA Bullseye targets, Official-Size BR targets, Realistic Varmint Targets, Silhouette Shapes, Fun Plinking Targets, and even specialized tactical training targets. If our collection of free targets isn’t enough, or if you want to create a new kind of target — you’re in luck. The Australian-based interactive website, PrintTargets.net, allows you to create your own customized, printable PDF targets. Shown below are just a few of the target designs you can create in minutes:
CLICK Graphic to Create Your Own Targets.
Just follow the step-by-step instructions to set paper size, layout, bullseye color, line thickness, number of rings and diameter. You can even add Score Numbers to your target rings. PrintTargets.net is easy and fun to use. It’s much faster to create targets this way than to try to draw a series of circles with PowerPoint or MS Paint.
Power-User Tip: PrintTargets.net even offers a handy diamond-grid calibration diagram that you can add to your custom target designs. You’ll find the calibration grid as option #15 when you design your target — just scroll all the way down the PrintTargets.com home page.
Ever wondered what pistol, rifle, and shotgun ammo really looks like on the inside? Well, thanks to two clever friends, you can NOW see exactly what’s on the inside. Bernard Martinage and David Swanson, fellow NRA-certified firearms instructors, have created a new kind of training tool — cutaway ammo samples. The two men call their line of cutaways, AmVIEWnition. The sliced cartridges and shotshells are employed as visual/tactile training aids. These cutaways help new shooters understand ammo components and how cartridges and shotshells are engineered.
Bernard told the NRA Blog: “In order to make teaching easier and increase trainee comprehension, I simply decided to cut bullets lengthwise and show them [students] what’s inside. It certainly sped up their understanding and it was cool to look at! I always liked inventing and creating things that solved problems or made life easier. So, doing it with firearm training was no different.” To learn more about the history of AmVIEWnition, read the NRA Blog’s Interview with Bernard Martinage.
Bernard Martinage (L) and David Swanson (R) are the inventors of AmVIEWnition products — cutaway ammo samples for training.
Bernard and David also produce Barrel Cutaways and “Solo-Blast” 3-D Ballistics Models of projectile wound channels. Visit www.AmVIEWnition.com to see these products as well as the full line of pistol, rifle, and shotgun AmVIEWnition cutaways.
Many short-range Benchresters have thought about converting their 6 PPC to shoot a 30BR for score matches, or a Dasher for mid-range (or even 1000-yard) games. That way you have a rifle that does double duty, giving you the most bang for your buck. Though an action with a PPC bolt won’t normally work with 30BR/6BR/Dasher cases with their larger .308-class rim (0.4728″ diameter), there is a pretty easy solution that allows you to cycle these bigger cartridges with a 6PPC-style bolt (designed to fit .220 Russian rims).
“Rebating case rims … lets you shoot a 30BR in score matches using your PPC action. All you need is a new barrel. This saves buying another bolt, receiver, or rifle.” — Butch Lambert
Butch Lambert of ShadeTree Engineering provided this tip. Butch notes that many 6 PPC benchrest group shooters also enjoy shooting in score matches. But to be really competitive in the BR for score game, that means shooting a 30BR, which has a wider, .308-class rim (0.4728″ diameter). Likewise, if you want to compete in 600-yard registered BR events or in varmint matches, you probably want to run a bigger case, such as the 6BR, 6mm Dasher, or 6-6.5×47. Those cartridges also have the larger 0.4728″ rims.
Cutting Head for Rebating Rims
To convert a PPC-boltface action to shoot the bigger cases you can spend a ton of money and buy a new bolt. That can cost hundreds of dollars. The simpler solution is to turn down the diameter of the larger cases on a lathe. Butch explains: “We’ve seen plenty of interest in rebating case rims. This lets you shoot a 30BR in score matches using your PPC action. All you need is a new barrel. This saves buying another bolt, receiver, or rifle if you have a PPC boltface. Anyone who has access to a lathe can do this job pretty easily. Yesterday I turned 150 case in about an hour.” At right is the lathe form tool Butch uses to rebate the case rims.
Kelbly makes outstanding actions, including the Stolle Pandas. In the past 20 years, Pandas have probably won more benchrest matches than any other action (though BATs and Bordens are increasingly in the winning circle). Recently gunsmith Alex Wheeler of Wheeler Accuracy worked his magic on an aluminum Panda, optimizing the “ignition timing” of the action. This involves many small mods to bolt, camming surfaces, trigger, and firing pin: “The whole cam helix and detent shelf is re-cut. The firing pin and cocking piece are modified as well.” When executed properly, Ignition Timing has a number of benefits, including a smoother bolt opening/closing, improved firing pin fall, and enhanced accuracy (though the accuracy improvements can be subtle).
BEFORE Action Timing — Stiff and Clunky
Alex reports: “Normally Panda actions have plenty of firing pin fall. For one reason or another this one was very low. Before timing, firing pin fall was .210 with a Bix’N Andy (BNA) trigger. After trigger timing firing pin fall is .244 with zero cock on close.” Here is how the action functioned before timing work:
CLICK Photo to start VIDEO
Alex notes: “As you can see, after the cocking piece rides out of the detent notch it thenfalls to the trigger and is then re-cocked. This is normal on most un-timed actions.”
AFTER Action Timing — Smooth and Refined
Alex explains the modifications he made for this Panda action: “Moving the trigger back adds cock on close. The whole cam helix and detent shelf is re-cut. The firing pin and cocking piece are modified as well. I do love a timed Panda. In fact, I like aluminum actions, I think there is something to them. But yes, I also recommend Borden as my first choice.’
CLICK Photo to start VIDEO
Fix for Right-Bolt Actions Only
After seeing these videos on Facebook, one poster asked: “I do like my Panda but this is exactly why I bought a Borden action and I love it. It’s good to know you can make a Panda better. Alex, can you time a left bolt Panda?”
Alex replied: “No, the tooling I built is all for right hand actions sorry….”
Here’s a simple task you can do that will give your seater die a more perfect fit to your match bullets. You can lap the inside of the seater stem so that it matches the exact profile of the bullet. This spreads out the seating force over a larger area of the bullet jacket. That allows smoother, more consistent seating, without putting dents, creases, or sharp rings in your bullets.
This process is demonstrated here by our friend Erik Cortina of Team Lapua-Brux-Borden. Erik, one of the nation’s top F-Class shooters and a skilled machinist, explains: “Here I’m lapping my new seater die stem with lapping compound. I chuck up a bullet in the lathe and lap the inside of the seating stem. I put lapping compound on the bullet and also in the stem. You can do the same with a hand drill and bore paste. You can see in the piture below how much contact area the stem has on the bullet after being lapped. This bullet is a Berger 7mm 180-grain Hybrid. ”
It can be helpful but it’s not necessary to make your seating stem an exact match to a bullet, particularly if you’re loading hunting or varmint rounds. But it is helpful to do some mild internal stem polishing. This should eliminate any ring (or dent) that forms on the bullet jacket during seating.
Sharp edges on a seating stem can cause a ring to be pressed into the bullet jacket — especially with compressed loads that resist downward bullet movement.
Q2: Is there any down-side to the process?
Not really. However, if you shoot many different bullet types for a particular cartridge, you may not want to conform the stem aggressively to one particular bullet design. Lightly lap the inside of the stem to remove burrs/sharp edges but leave it at that. A light lap will prevent a ring forming when seating bullets.


 If you load pistol or rifle ammo with a progressive press, we strongly recommend you get a Lock-Out Die from RCBS. This unique reloading die will prevent your progressive press from advancing if the dispensed powder charge is more or less than about 0.3 grains too high or too low. The Lock-Out Die really works. Your Editor uses it on his RCBS 2000 progressive press. I can affirm that a Lock-Out Die has “saved my bacon” a half-dozen times over the years when there was an over-charge (which could cause a Kaboom) or a low charge (which could cause a squib load).
 It takes a bit of tweaking to get the Lock-Out Die detection rod setting just right, but once it is correctly positioned, the Lock-Out Die works smoothly in the background. The Lock-Out Die won’t interfere with the loading process unless it detects a high or low charge — and then it positively stops the progressive loading cycle.


 If you’ve ever used a Harris Swivel Bipod, you know that, without tools, it is difficult to put enough tension on the swivel locking knob to really lock the unit solid. And, if you do manage to get the knob really tight (perhaps by using pliers), it is difficult to loosen with fingers alone.