Well folks, it’s July 6th already — the means we’re moving into “peak heat” summer conditions. It’s vitally important to keep your ammo at “normal” temps during the hot summer months. Even if you use “temp-insensitive” powders, studies suggest that pressures can still rise dramatically when the entire cartridge gets hot, possibly because of primer heating. It’s smart to keep your loaded ammo in an insulated storage unit, possibly with a Blue Ice Cool Pak if you expect it to get quite hot. Don’t leave your ammo in the car or truck — temps can exceed 140° in a vehicle parked in the sun.
To learn more about how ambient temperature (and primer choice) affect pressures (and hence velocities) you should read the article Pressure Factors: How Temperature, Powder, and Primer Affect Pressure by Denton Bramwell. In that article, the author uses a pressure trace instrument to analyze how temperature affects ammo performance. Bramwell’s tests yielded some fascinating results.
For example, barrel temperature was a key factor: “Both barrel temperature and powder temperature are important variables, and they are not the same variable. If you fail to take barrel temperature into account while doing pressure testing, your test results will be very significantly affected. The effect of barrel temperature is around 204 PSI per F° for the Varget load. If you’re not controlling barrel temperature, you about as well might not bother controlling powder temperature, either. In the cases investigated, barrel temperature is a much stronger variable than powder temperature.”
Powder Heat Sensitivity Comparison Test
Our friend Cal Zant of the Precision Rifle Blog recently published a fascinating comparison test of four powders: Hodgdon H4350, Hodgdon Varget, IMR 4451, and IMR 4166. The first two are Hodgdon Extreme powders, while the latter two are part of IMR’s Enduron line of propellants.
The testers measured the velocity of the powders over a wide temperature range, from 25° F to 140° F. Hodgdon H4350 proved to be the most temp stable of the four powders tested.
Berger Twist-Rate Stability Calculator
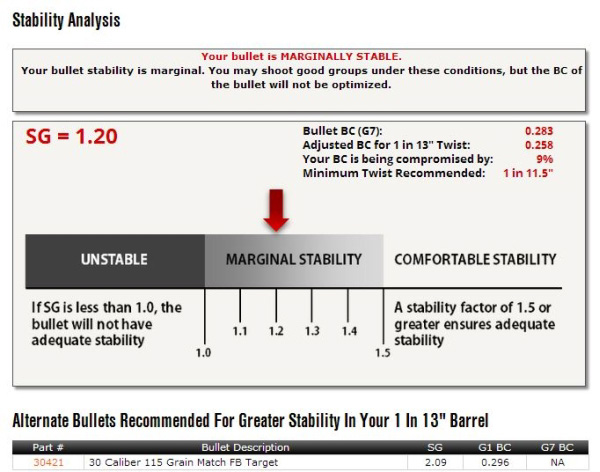
On the Berger Bullets website you’ll find a handy Twist-Rate Stability Calculator that predicts your gyroscopic stability factor (SG) based on mulitiple variables: velocity, bullet length, bullet weight, barrel twist rate, ambient temperature, and altitude. This cool tool tells you if your chosen bullet will really stabilize in your barrel.
How to Use Berger’s Twist Rate Calculator
Using the Twist Rate Calculator is simple. Just enter the bullet DIAMETER (e.g. .264), bullet WEIGHT (in grains), and bullet overall LENGTH (in inches). On its website, Berger conveniently provides this info for all its bullet types. For other brands, we suggest you weigh three examples of your chosen bullet, and also measure the length on three samples. Then use the average weight and length of the three. To calculate bullet stability, simply enter your bullet data (along with observed Muzzle Velocity, outside Temperature, and Altitude) and click “Calculate SG”. Try different twist rate numbers (and recalculate) until you get an SG value of 1.4 (or higher).
Gyroscopic Stability (SG) and Twist Rate
Berger’s Twist Rate Calculator provides a predicted stability value called “SG” (for “Gyroscopic Stability”). This indicates the Gyroscopic Stability applied to the bullet by spin. This number is derived from the basic equation: SG = (rigidity of the spinning mass)/(overturning aerodynamic torque).
If you have an SG under 1.0, your bullet is predicted not to stabilize. If you have between 1.0 and 1.1 SG, your bullet may or may not stabilize. If you have an SG greater than 1.1, your bullet should stabilize under optimal conditions, but stabilization might not be adequate when temperature, altitude, or other variables are less-than-optimal. That’s why Berger normally recommends at least 1.5 SG to get out of the “Marginal Stability” zone.
In his book Applied Ballistics For Long-Range Shooting, Bryan Litz (Berger Ballistician) recommends at least a 1.4 SG rating when selecting a barrel twist for a particular bullet. This gives you a safety margin for shooting under various conditions, such as higher or lower altitudes or temperatures.
Story idea from EdLongrange. We welcome reader submissions.
Can you guess what your next barrel will weigh? In many competition disciplines, “making weight” is a serious concern when putting together a new match rifle. A Light Varmint short-range Benchrest rifle cannot exceed 10.5 pounds including scope. An F-TR rifle is limited to 18 pounds, 2 oz. (8.25 kg) with bipod.
One of the heaviest items on most rifles is the barrel. If your barrel comes in much heavier than expected, it can boost the overall weight of the gun significantly. Then you may have to resort to cutting the barrel, or worse yet, re-barreling, to make weight for your class. In some cases, you can remove material from the stock to save weight, but if that’s not practical, the barrel will need to go on a diet. (As a last resort, you can try fitting a lighter scope.)
Is there a reliable way to predict, in advance, how much a finished barrel will weigh? The answer is “yes”. PAC-NOR Barreling of Brookings, Oregon has created a handy, web-based Barrel Weight Calculator. Just log on to Pac-Nor’s website and the calculator is free to use. Pac-Nor’s Barrel Weight Calculator is pretty sophisticated, with separate data fields for Shank Diameter, Barrel Length, Bore Diameter — even length and number of flutes. Punch in your numbers, and the Barrel Weight Calculator then automatically generates the weight for 16 different “standard” contours.
Calculator Handles Custom Contours
What about custom contours? Well the Pac-Nor Barrel Weight Calculator can handle those as well. The program allows input of eight different dimensional measurements taken along the barrel’s finished length, from breech to muzzle. You can use this “custom contour” feature when calculating the weight of another manufacturer’s barrel that doesn’t match any of Pac-Nor’s “standard” contours.
Caution: Same-Name Contours from Different Makers May Not be Exactly the Same
One final thing to remember when using the Barrel Weight Calculator is that not all “standard” contours are exactly the same, as produced by different barrel-makers. A Medium Palma contour from Pac-Nor may be slightly different dimensionally from a Krieger Medium Palma barrel. When using the Pac-Nor Barrel Weight Calculator to “spec out” the weight of a barrel from a different manufacturer, we recommend you get the exact dimensions from your barrel-maker. If these are different that Pac-Nor’s default dimensions, use the “custom contour” calculator fields to enter the true specs for your brand of barrel.
Smart Advice — Give Yourself Some Leeway
While Pac-Nor’s Barrel Weight Calculator is very precise (because barrel steel is quite uniform by volume), you will see some small variances in finished weight based on the final chambering process. The length of the threaded section (tenon) will vary from one action type to another. In addition, the size and shape of the chamber can make a difference in barrel weight, even with two barrels of the same nominal caliber. Even the type of crown can make a slight difference in overall weight. This means that the barrel your smith puts on your gun may end up slightly heavier or lighter than the Pac-Nor calculation. That’s not a fault of the program — it’s simply because the program isn’t set up to account for chamber volume or tenon length.
What does this mean? In practical terms — you should give yourself some “wiggle room” in your planned rifle build. Unless you’re able to shave weight from your stock, do NOT spec your gun at one or two ounces under max based on the Pac-Nor calculator output. That said, the Pac-Nor Barrel Weight Calculator is still a very helpful, important tool. When laying out the specs for a rifle in any weight-restricted class, you should always “run the numbers” through a weight calculator such as the one provided by Pac-Nor. This can avoid costly and frustrating problems down the road.
Credit Edlongrange for finding the Pac-Nor Calculator
Coalinga Range in California. At dawn we could clearly see 7mm and .30 Cal bullet holes at 1000 yards.
While attending the CA Long Range Championship a few seasons back, we had the opportunity to test the performance of a high-magnification (63X) spotting scope in near-ideal conditions (maybe the best I’ve ever witnessed). On the event’s last day we arrived at 5:45 am, literally as the sun was cresting the horizon. I quickly deployed our Pentax PF-100ED spotting scope, fitted with a Pentax SMC-XW 10mm fixed-power eyepiece. When used with the 100mm Pentax scope, this 10mm eyepiece yields 63X magnification. Befitting its $359.00 price, this eyepiece is extremely clear and sharp.
At the crack of dawn, viewing conditions were ideal. No mist, no mirage, no wind. The first thing this Editor noticed was that I could see metal nail heads on the target boards. That was astonishing. As soon as the first practice targets went up, to my surprise, I could see 6.5mm, 7mm, and 30-caliber bullet holes in the white at 1000 yards. No lie…
That’s right, I could see bullet holes at 1000. I know many of you folks may not believe that, but there was no mistaking when I saw a 7mm bullet cut the white line separating the Nine Ring and Eight Ring on the target in view. (I was watching that target as the shot was fired and saw the shot-hole form). And when I looked at the 30-cal targets, the bullet holes in the white were quite visible. In these perfect conditions I could also make out 3/8″ bolt heads on the target frames.
The Human Factor
When viewing the bullet holes, I was using my left naked eye (no safety glasses or magnification). I also had a contact lens in my right eye (needed for distance vision). To my surprise, while I could see the bullet holes without much difficulty with my left eye, things were fuzzier and slightly more blurry with the right eye, even when I re-focused the scope.
Then I invited 3 or 4 shooters to look through the scope. One younger guy, with good eyes, said immediately: “Yeah, I can see the holes — right there at 4 o’clock and seven o’clock. Wow.” Some older guys, who were wearing glasses, could not see the holes at all, no matter what we did to the scope’s main focus and diopter adjustment.
The lesson here — if you have to wear glasses or corrective contact lenses, just that extra bit of optical interference may make a difference in what you can see through the scope. Basically anything that goes between the scope eyepiece and your eyeball can degrade the image somewhat. So… you may be better off removing your glasses if you can still obtain good focus sharpness using the diopter adjustment and focus ring. I did the left vs. right eye test a half dozen times, and I could definitely see small features at 1000 yards with my naked eye that I could not see with my right eye fitted with a contact lens. (I did have to re-focus the scope for each eye, since one had a corrective lens while the other did not.)
Mirage Degrades Image Sharpness and Resolution
The “magic light” prevailed for only an hour or so, and then we started to get some mirage. As soon as the mirage appeared I was no longer able to see raw bullet holes, though I could still easily see black pasters on the black bulls. When the mirage started, the sharpness of the visible image degraded a huge amount. Where I could see bullet holes at dawn, by mid-morning I could barely read the numbers on the scoring rings. Lesson: If you want to test the ulimate resolution of your optics, you need perfect conditions.
Chromatic Aberration Revealed
As the light got brighter and the mirage increased I started to see blue and red fringing at the edges of the spotting disk and the large numerals. This was quite noticeable. On one side of the bright, white spotting disc you could see a dark red edge, while on the other side there was a blue edge (harder to see but still present).
The photo below was taken through the Pentax spotter lens using a point and shoot camera held up to the eyepiece. The sharpness of the Pentax was actually much better than this photo shows, but the through-the-lens image does clearly reveal the red and blue fringing. This fringing is caused by chromatic aberration — the failure of a lens to focus all colors to the same point. Chromatic aberration, most visible at high magnification, causes different wavelengths of light to have differing focal lengths (see diagram). Chromatic aberration manifests itself as “fringes” of color along boundaries that separate dark and bright parts of the image, because each color in the optical spectrum cannot be focused at a single common point on the optical axis. Keep in mind that the Pentax does have “ED” or low-dispersion glass, so the effect would be even more dramatic with a cheaper spotting scope.
If you wonder why top-of-the-line spotting scopes (such as the $3558.00 Swarovski ATS-80 ) cost so much, the answer is that they will deliver even LESS chromatic aberration at long range and high magnification. With their exotic apochromatic (APO), ultra-low-dispersion glass, a few ultra-high-end spotting scopes can deliver an image without the color edging you see in the photo above.
The Pentax PF-100ED is a heck of a spotting scope. Any scope that can resolve bullet holes at 1000 yards is impressive. But if you want the ultimate in optical performance, with minimal chromatic aberration, you may need to step up to something like the 88mm Kowa Prominar TSN-88A with Flourite Crystal lenses ($3999.00 with eyepiece), or the 82mm Leica APO-Televid ($3649.95 with 25-50X eyepiece).
EDITOR’s NOTE: The purpose of this report is to show what is possible… in IDEAL conditions. With this Pentax 100mm, as well as a Swarovski 80mm, we have often been able to resolve 6mm bullet holes at 600 yards. But again, that performance requires really good viewing conditions. By 10:00 am at my range, even with the 100mm Pentax at 75 power, seeing 6mm bullet holes is “iffy” at best. So don’t go out and mortgage the house to buy a $4000 optic with the hope that you’ll be able to spot your shots at 1000 yards. If conditions are anything less than perfect, you’ll be lucky to see bullet holes at 500 yards. The real solution for very long-range spotting is to set up a remote target cam that broadcasts a video picture to a screen at your shooting station.
You never want your barrels to get too hot, which can happen more quickly in summertime. Accuracy suffers when barrels over-heat, and excessive heat is not good for barrel life. So how do you monitor your barrel’s temperature? You can check if the barrel is “warm to the touch” — but that method is not particularly precise. There is a better way — using temperature-sensitive strips. McMaster.com (an industrial supply house) offers stick-on temp strips with values from 86° F to 140° F. A pack of ten (10) of these strips (item 59535K13) costs $12.16 — so figure it’ll cost you about $1.20 per barrel for strips. That’s cheap insurance for your precious barrels. For best barrel life, try to stay under 120 degrees F.
Forum member Nomad47 says: “I have temperature strips (bought at McMaster-Carr) on all my barrels. I try not to shoot when the barrel gets to 122 degrees or higher[.]” Here are photos of the McMaster-Carr temp strips on Nomad47’s customized Savage.
Bad things can happen if your barrel gets too hot. First, with some barrels, the point of impact (POI) will shift or “walk” as the barrel heats up excessively. Second, even if the POI doesn’t change, the groups can open up dramatically when the barrel gets too hot. Third, if the barrel is very hot, the chamber will transfer heat to your loaded cartridge, which can lead to pressure issues. Finally, there’s considerable evidence that hot barrels wear out faster. This is a very real concern, particularly for varmint shooters who may shoot hundreds of rounds in a day. For this reason, many varminters switch among various guns, never letting a particular barrel get too hot.
Neconos.com offers Bar-L Temp Strips that visually display heat readings from 86 to 140 degrees. Think of these strips as compact, unbreakable thermometers. With adhesive backing, they can also be used to monitor barrel heating. Put a strip on the side of the barrel and the barrel’s temp will be indicated by a stripe that changes from black to green. There is also a “general purpose” strip that reads to 196 degrees (bottom row). The Benchrest strip (86F to 140F) is in the middle. Bar-L temp strips cost $9.00, or $25.00 for a 3-pack.
Here’s something all shooters need — a smartphone App that calculates bullet-hole group sizes from your own photos. The Ballistic-X App is simple to use. Take a photo of your target, set some values (such as bullet diameter and distance to target), then use the touchscreen to place circles around each hole. The App will calculate group size (in MOA or Mils), distance to point of aim, and provide all the info in an overlay. Then click “save” to record your group for posterity!
This App works well, is relatively easy to set-up, and costs just $7.99. It is available for both Android devices and iOS (Apple) devices. There are other ways to measure group sizes from target images, such as the excellent On-Target program, which we have used for years. However On-Target requires a software installation on a Windows platform desktop or laptop. Ballistic-X is a simple, easy-to-install App with versions for both Android and iOS (Apple) Mobile devices.
The Ballistic-X App has a relatively easy-to-use interface. Of course you can choose either MOA or Milrad group values, and Inch or Metric dimensions. There are various labeling options that provide useful info for Load Development. There is even an ATZ (Adjustment To Zero) feature for adjusting your turrets.
How to Use Ballistic-X App
1. Select Photo Source — Choose Camera to take new photo or get image from Photo Library.
2. Set Reference Values — Select Bullet Diameter and enter Distance to Target.
3. Establish Scale on Image — Mark two points on target photo to set scale. For example, if the target has a 1″-square grid lines, mark two points on grid for 1″ distance.
4. Mark Point Of Aim — Put the central X on the aim point.
5. Designate Shot Locations — Place the green circles around each shot.
6. Finalize Data Display — Position Overlay, select size/color options, and export file.
Android Options — Range Buddy FREE App
Along with Ballistic-X, there is another Mobile App, Range Buddy, that also measures shot groups. Range Buddy is currently offered for Android devices only. It is FREE, but has adverts. Range Buddy isn’t bad, but users complained about the program crashing, and there are compatibility issues with newer phones. We recommend you pay $7.99 and stick with Ballistic-X.
Yes, folks, it’s officially summer now. This year’s Solstice, considered the official start of summer, transpired Friday, June 21, at 5:54 AM EDT. We hope you have fun this summer with friends and family. To help ensure those summer adventures remain safe and trouble-free, the CTD Shooters’ Log has prepared a helpful Essential Summer Survival Guide. This is worth reading before you venture away from civilization.
Here are some highlights of the article with links for MORE INFO:
First Aid Kits for Campers
You should never venture outside without a first aid kit close at hand. While exploring the outdoors, all types of accidents can occur—from cuts, scrapes, and burns to broken limbs and severe allergic reactions.
Basic Survival Skills
Basic survival skills are a necessity if you plan to spend any amount of time outdoors. These five tips, plus a how-to on what to pack in a lightweight, basic survival kit will help if you are ever stuck, lost, stranded or injured in the field.
How to Treat Burns
Fireworks, barbeques and campfires — in the summer we are frequently around fire, which increases our chance of getting burned. A first-degree burn is most likely home treatable, while a third degree burn requires immediate medical attention. Learn how to spot the differences between minor and severe burns.
Want to shoot better scores at your next match? Here’s a smart, inexpensive do-it-yourself project from the good folks at Criterion Barrels. For less than one dollar in materials, in just a few minutes you can create a handy, effective mirage shield, custom-fitted to your favorite rifle.
All precision shooters should be familiar with mirage, a form of optical distortion caused primarily by variations in air temperature. Savvy shooters will use mirage as a valuable tool when gauging wind speed and direction. Natural mirage is unavoidable, but there are many techniques designed to limit its influence in long-range marksmanship.
A form of mirage can be produced by the barrel itself. Heat rising from the barrel may distort sight picture through your optics, leading to erratic results. Mirage caused by barrel heat can be reduced dramatically by a simple, light-weight mirage shield.
How to Make a Mirage Shield
A mirage shield is an extremely cost-effective way to eliminate a commonly-encountered problem. Making your own mirage shield is easy. Using old venetian blind strips and common household materials and tools, you can construct your own mirage shield for under one dollar.
Materials Required:
1. Vertical PVC Venetian blind panel
2. Three 1”x1” pieces adhesive-backed Velcro
3. Ruler or tape measure
4. Scissors or box cutter
5. Pencil or marker
1. Measure the distance from the end of the receiver or rail to the crown of the barrel.
2. Using a pencil and ruler, measure the same distance and mark an even line across the blind.
3. Cut across the line using scissors or a box cutter, shortening the blind to the required length. (Remember, measure twice, cut once!)
4. Expose the adhesive backing on the loop side of the Velcro. Center and apply the Velcro strips on the barrel at regular intervals.
5. Expose the adhesive backing of the fuzzy side of the Velcro.
6. Place the blind on the upper side of the barrel. Apply downward pressure. Once the Velcro has secured itself to the barrel, separate the two sides. Proceed to mold both sides of the Velcro to fit the contour of their respective surfaces.
7. Reaffix the blind. Barrel related mirage is now a thing of the past!
NOTE: You can attach the Velcro on the opposite side of the blind if you want the blind to curve upwards. Some folks thinks that aids barrel cooling — it’s worth a try.
How to Remove and Re-Attach the Mirage Shield
Removal of your mirage shield is accomplished by simply removing the blind. You can un-install the Velcro by pulling off the strips and then gently removing any adhesive residue left behind using an appropriate solvent. (Simple cooking oil may do the job.) Caution: With fine, high-polish blued barrels, test any solvent on a non-visible section of the barrel. Before storing the gun, re-oil the barrel to remove active solvents and residual fingerprints.
Do you have some ammo that got loaded incorrectly, perhaps with the wrong powder? Then you’ll want to disassemble the ammo for safety’s sake. You can use an impact puller to do this task, but if you have more than a dozen rounds or so, you may prefer to use a collet-style bullet puller. These work very quickly and positively, making quick work of big jobs. The efficiency of the collet-style puller is worth the investment if you frequently disassemble ammo. These devices retail for under $25.00 (collets sold separately). Normally, you’ll need a specific collet for each bullet diameter. But collets are not that costly, so this isn’t a big deal, particularly if you only load a few calibers, such as .223, 6mm, and .308.
Hornady and RCBS use different mechanisms to tighten the collet around the bullet. On Hornady’s Cam-Lock Bullet Puller, a lever-arm on the top of the bullet puller serves to tighten the collet around the bullet. Simply rotate the lever from the vertical to the horizontal position to grab the bullet. Lower the ram to remove the case. The bullet will drop out when you return the lever arm to the vertical position. This is demonstrated in the video below:
Hornady Cam-Lock Bullet Puller Demonstrated
Collet bullet-pullers resemble a loading die with a lever or handle on the top. They screw into a standard reloading press. Hornady and RCBS both make collet-style bullet pullers. They use the same basic principle — the device tightens a collet around the bullet, and then the bullet is separated from the case by lowering the press ram. NOTE: Collet pullers may leave small marks on your bullets, unlike impact (kinetic) pullers.*
Like the Hornady tool, the RCBS Bullet Puller employs a collet to grab the bullet. However, the RCBS tool tightens the collet in a different way. The head of the RCBS tool is threaded internally. By rotating the lever arm clockwise in a horizontal circle you squeeze the collet around the bullet. To remove the bullet, after lowering the press ram, simply spin the lever arm back in the opposite direction. The use of the RCBS tool is demonstrated in this video:
RCBS Collet Bullet Puller Demonstrated:
WARNING: When removing bullets from loaded cartridges, always make sure there are no obstructions or debris in your shell-holder or under the loaded round. NEVER engage a primer seating accessory on your press when working with loaded rounds. You can cause a round to discharge by contacting the primer! Also, we recommend you keep your head and torso away from the bullet puller tool at all times.
*By contrast, impact pullers rarely mark bullets, particularly if you put a little bit of foam or paper wadding in the closed end of your impact puller. When dismantling loaded rounds, powder kernels can get trapped in the wadding, so you should remove and replace the wadding before changing to cartridges loaded with a different powder type (assuming you intend to save the powder).
Do you occasionally get completely unexplained flyers, or have a shot land straight down at 6 O’Clock, right below your point of aim? That could be caused by poor or inconsistent trigger technique. How you pull the trigger can and does affect your accuracy.
Many gun enthusiasts start with pistols. When they later start shooting rifles they may carry over some not-so-good practices acquired from shooting handguns with heavy 4 to 6-pound trigger pulls. You may want to “re-learn” your trigger techniques to get better rifle results.
Shooting Sports USA has a good article on trigger technique that offers many useful tips. That article also has many helpful illustrations, including the one shown above. Another illustration shows different types of trigger shoes (straight vs. curved) and explains how each makes a difference: “With a lightly curved trigger, the shooter’s finger can contact the trigger either high or low according to preference. Higher contact will increase the resistance.” READ ARTICLE HERE.
The article analyzes common errors, such as pulling the trigger with the very tip of the finger rather than the pad of the index finger: “Using the tip of the finger can lead to lateral pressure on the trigger, which throws off the shot.”
The article also explains that you should check your trigger regularly to make sure it is functioning properly and is not out of adjustment: “Just like any other moving part, the trigger can suffer from wear. In such a precise mechanism, tiny amounts of wear can cause major problems.”
The ergonomics of the Eliseo Tubegun allow a nice, straight trigger pull.
Trigger Tips
Six Suggestions for Making your Trigger Control More Consistent.
1. If your triggers are adjustable, set the pull weight appropriate to the discipline. For a hunting rifle, you don’t want an ultra-light trigger pull. For High Power, you may want a two-stage pull, while on a Benchrest rifle you may prefer a very light trigger.
2. If you have a two-stage trigger, experiment with different combinations of First Stage and Second Stage.
3. Have a friend watch you as you pull the trigger, and maybe even take a close-up video as you pull the trigger. This can reveal a variety of flaws.
4. Practice dry-firing to see if flaws in trigger technique are causing gun movement.
5. As an experiment, try pulling the trigger with your middle finger. Ergonomically, the middle finger has a more straight alignment with the tendons in your hand. This exercise can help you identify alignment issues with your index finger.
6. For stocks with adjustable Length of Pull you may want to set the LOP differently for bench shooting vs. prone or F-Class shooting.
The Bix’N Andy trigger is one of the very best you can buy. It can be fitted with a variety of trigger shoes according to shooter preference.


 To learn more about how ambient temperature (and primer choice) affect pressures (and hence velocities) you should read the article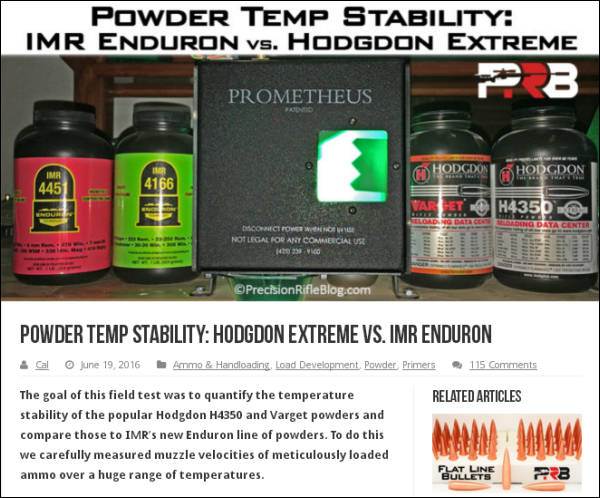



 Can you guess what your next barrel will weigh? In many competition disciplines, “making weight” is a serious concern when putting together a new match rifle. A Light Varmint short-range Benchrest rifle cannot exceed 10.5 pounds including scope. An F-TR rifle is limited to 18 pounds, 2 oz. (8.25 kg) with bipod.

 While attending the CA Long Range Championship a few seasons back, we had the opportunity to test the performance of a high-magnification (63X) spotting scope in near-ideal conditions (maybe the best I’ve ever witnessed). On the event’s last day we arrived at 5:45 am, literally as the sun was cresting the horizon. I quickly deployed our Pentax PF-100ED spotting scope, fitted with a Pentax SMC-XW 10mm fixed-power eyepiece. When used with the 100mm Pentax scope, this 10mm eyepiece yields 63X magnification. Befitting its $359.00 price, this eyepiece is extremely clear and sharp.
 Then I invited 3 or 4 shooters to look through the scope. One younger guy, with good eyes, said immediately: “Yeah, I can see the holes — right there at 4 o’clock and seven o’clock. Wow.” Some older guys, who were wearing glasses, could not see the holes at all, no matter what we did to the scope’s main focus and diopter adjustment.
 Chromatic Aberration Revealed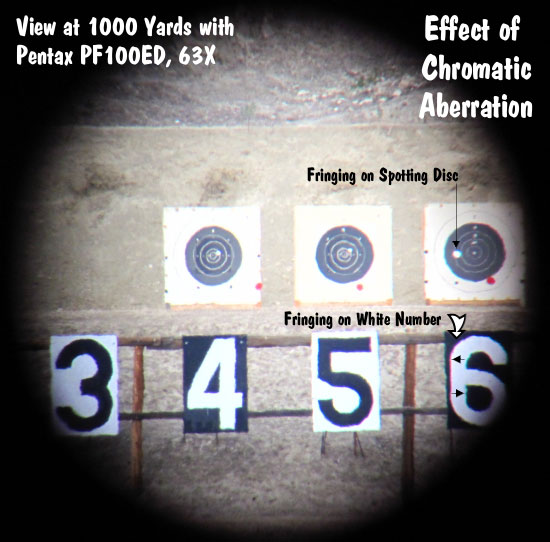




 Like the Hornady tool, the


