When it comes to long-range optics, some folks can’t have too much magnification. At 500 yards and beyond, when the air’s misty or the mirage is thick, you can’t always use extreme magnification. But, when the conditions are excellent, it’s nice to have 50X magnification (or more) on tap. You can always “crank it back down”.
Higher magnification (when conditions are good), can help you see your bullet holes at long range, and that makes it easier to judge your hold-offs and keep your group centered.
In addition, there’s no doubt that high magnification lets you aim more precisely, no matter what the distance. Even at 100 and 200 yards, short-range benchresters are using 40X, 50X, and even 60X power scopes. This allows you to position your cross-hairs with extreme precision — something you need when you’re trying to put multiple shots through the same hole.
Raising the Optics Bar
How much power is usable? A few years back, folks said you can’t use more than 45X or so at long range. Well, as modern optics have evolved, now guys are buying scopes with even more magnification — way more. There are practical limits of course — with a 56 to 60mm front objective, the exit pupil of a 60X or higher-power scope will be very tiny, making head orientation ultra-critical. Any many scopes get darker as you bump up the magnification.
Despite the exit pupil and brightness issues, shooters are demanding “more power” these days and the scope manufacturers are providing new products with ever-greater magnification levels. Right now, the most powerful conventional riflescope you can buy is the March X-Series 8-80x56mm scope. Featuring a 34mm main tube and 56mm objective lens, this offers a true 10-times zoom ratio and up to 80X magnification. This scope has minimal distortion thanks to high-quality ED lenses designed in-house by Deon Optical, which also machines the main tube from one solid piece of billet aluminum.
MORE INFO: Learn more about the March 8-80x56mm at MarchScopes.com
To demonstrate the capabilities of high-magnification March scopes, Aussie Stuart Elliot has created a cool through-the-lens video with the March 8-80x56mm scope set at 80-power (See 0:30 timeline). Along with being one of Australia’s top benchrest shooters, Stuart runs BRT Shooters Supply, dealer for March Scopes in Australia. In the video below you can see the March 8-80X focused on a target at 1000 yards (910m). For best resolution, watch this video in fullscreen, 720p mode.
Look through the Lens of 80-power March Scope at Target 1000 Yards Away
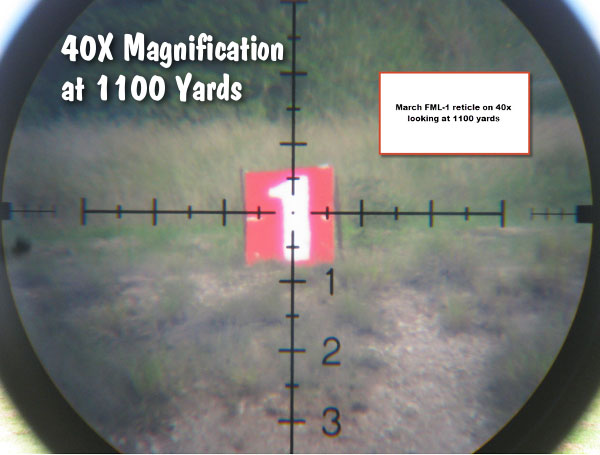
Through-the-Lens Views at 40X and 80X at 1100 Yards
To reveal the difference between 40X and 80X magnification, here are two through-the-lens still images taken with March scopes sighting to 1100 yards. The top photo is at 80X magnification, looking through the March 8-80x56mm. The lower photo is at 40X magnification viewed through a 5-50x56mm March X-Series scope. You can see there is a big difference in perceived target size! Click on the “Larger Image” button to see full-screen version at 80X.
Video Find by Boyd Allen. We welcome reader submissions.
Photo by Werner Mehl, www.kurzzeit.com, all rights reserved.
Most serious shooters can tell you the muzzle velocity (MV) of their ammunition, based on measurements taken with a chronograph, or listed from a manufacturer’s data sheet. (Of course, actual speed tests conducted with YOUR gun will be more reliable.)
Bullet RPM = MV X 720/Twist Rate (in inches)
However, if you ask a typical reloader for the rotational rate of his bullet, in revolutions per minute (RPM), chances are he can’t give you an answer.
Knowing the true spin rate or RPM of your bullets is very important. First, spin rate, or RPM, will dramatically affect the performance of a bullet on a game animal. Ask any varminter and he’ll tell you that ultra-high RPM produces more dramatic hits with more “varmint hang time”. Second, RPM is important for bullet integrity. If you spin your bullets too fast, this heats up the jackets and also increases the centrifugal force acting on the jacket, pulling it outward. The combination of heat, friction, and centrifugal force can cause jacket failure and bullet “blow-ups” if you spin your bullets too fast.
Accuracy and RPM
Additionally, bullet RPM is very important for accuracy. Nearly all modern rifles use spin-stablized bullets. The barrel’s rifling imparts spin to the bullet as it passes through the bore. This rotation stabilizes the bullet in flight. Different bullets need different spin rates to perform optimally. Generally speaking, among bullets of the same caliber, longer bullets need more RPM to stabilize than do shorter bullets–often a lot more RPM.
It is generally believed that, for match bullets, best accuracy is achieved at the minimal spin rates that will fully stabilize the particular bullet at the distances where the bullet must perform. That’s why short-range 6PPC benchrest shooters use relatively slow twist rates, such as 1:14″, to stabilize their short, flatbase bullets. They could use “fast” twist rates such as 1:8″, but this delivers more bullet RPM than necessary. Match results have demonstrated conclusively that the slower twist rates produce better accuracy with these bullets.
On the other hand, Research by Bryan Litz of Applied Ballistics has shown that with long, boat-tailed bullets, best accuracy may be achieved with twist rates slightly “faster” than the minimum required for stabilization. The reasons for this are somewhat complex — but it’s something to consider when you buy your next barrel. If, for example, the bullet-maker recommends a 1:8.25″ twist, you might want to get a true 1:8″-twist barrel.
Calculating Bullet RPM from MV and Twist Rate
The lesson here is that you want to use the optimal RPM for each bullet type. So how do you calculate that? Bullet RPM is a function of two factors, barrel twist rate and velocity through the bore. With a given rifling twist rate, the quicker the bullet passes through the rifling, the faster it will be spinning when it leaves the muzzle. To a certain extent, then, if you speed up the bullet, you can use a slower twist rate, and still end up with enough RPM to stabilize the bullet. But you have to know how to calculate RPM so you can maintain sufficient revs.
Bullet RPM Formula
Here is a simple formula for calculating bullet RPM:
MV x (12/twist rate in inches) x 60 = Bullet RPM
Quick Version: MV X 720/Twist Rate = RPM
Example One: In a 1:12″ twist barrel the bullet will make one complete revolution for every 12″ (or 1 foot) it travels through the bore. This makes the RPM calculation very easy. With a velocity of 3000 feet per second (FPS), in a 1:12″ twist barrel, the bullet will spin 3000 revolutions per SECOND (because it is traveling exactly one foot, and thereby making one complete revolution, in 1/3000 of a second). To convert to RPM, simply multiply by 60 since there are 60 seconds in a minute. Thus, at 3000 FPS, a bullet will be spinning at 3000 x 60, or 180,000 RPM, when it leaves the barrel.
Example Two: What about a faster twist rate, say a 1:8″ twist? We know the bullet will be spinning faster than in Example One, but how much faster? Using the formula, this is simple to calculate. Assuming the same MV of 3000 FPS, the bullet makes 12/8 or 1.5 revolutions for each 12″ or one foot it travels in the bore. Accordingly, the RPM is 3000 x (12/8) x 60, or 270,000 RPM.
Implications for Gun Builders and Reloaders
Calculating the RPM based on twist rate and MV gives us some very important information. Number one, we can tailor the load to decrease velocity just enough to avoid jacket failure and bullet blow-up at excessive RPMs. Number two, knowing how to find bullet RPM helps us compare barrels of different twist rates. Once we find that a bullet is stable at a given RPM, that gives us a “target” to meet or exceed in other barrels with a different twist rate. Although there are other important factors to consider, if you speed up the bullet (i.e. increase MV), you MAY be able to run a slower twist-rate barrel, so long as you maintain the requisite RPM for stabilization and other factors contributing to Gyroscopic Stability are present. In fact, you may need somewhat MORE RPM as you increase velocity, because more speed puts more pressure, a destabilizing force, on the nose of the bullet. You need to compensate for that destabilizing force with somewhat more RPM. But, as a general rule, if you increase velocity you CAN decrease twist rate. What’s the benefit? The slower twist-rate barrel may, potentially, be more accurate. And barrel heat and friction may be reduced somewhat.
Just remember that as you reduce twist rate you need to increase velocity, and you may need somewhat MORE RPM than before. (As velocities climb, destabilizing forces increase somewhat, RPM being equal.) There is a formula by Don Miller that can help you calculate how much you can slow down the twist rate as you increase velocity.
That said, we note that bullet-makers provide a recommended twist rate for their bullets. This is the “safe bet” to achieve stabilization with that bullet, and it may also indicate the twist rate at which the bullet shoots best. Though the RPM number alone does not assure gyroscopic stability, an RPM-based calculation can be very useful. We’ve seen real world examples where a bullet that needs an 8-twist barrel at 2800 FPS MV, would stabilize in a 9-twist barrel at 3200 FPS MV. Consider these examples.
MV = 2800 FPS
8-Twist RPM = 2800 x (12/8) x 60 = 252,000 RPM
MV = 3200 FPS
9-Twist RPM = 3200 x (12/9) x 60 = 256,000 RPM
Of course max velocity will be limited by case capacity and pressure. You can’t switch to a slower twist-rate barrel and maintain RPM if you’ve already maxed out your MV. But the Miller Formula can help you select an optimal twist rate if you’re thinking of running the same bullet in a larger case with more potential velocity.
Hodgdon and IMR powders, including H4198, Varget, H4350, and IMR 4451, are some of the most successful propellants used by competitive shooters. If you want to find solid, reliable load data for these and other Hodgdon and IMR powders, we recommend you go right to the source — visit the Hodgdon/IMR Reloading Data Center, at www.HodgdonReloading.com. There you’ll find the latest, updated load recipes for pistol, rifle, and shotgun reloaders.
In the Data Center, you’ll find thousands of load recipes for pistol, rifle, and shotgun. Rifle shooters will find dozens of loads for their favorite Hodgdon, IMR, and Winchester powders such as H4198, Varget, H4350, and IMR 8208 XBR. And Hodgdon’s Reloading Center is now faster and easier to use. Navigation is simplified and the whole interface is more user-friendly.
Precise Search Results for your Cartridge and Favorite Powders
The online Reloading Data Center allows you to get precise search results for any listed cartridge. You can select your preferred powders and bullets. After choosing a cartridge, you can pre-select specific bullet weights and powder types. That quickly delivers just the information you want and need. You won’t have to scroll through scores of entries for bullets or powders you don’t use.
Data Center Works Well with Mobile Devices
Mobile users will notice Reloading Center is very “user-friendly” for smart-phone and tablet users. Controls have been optimized for touch-screens, and buttons are large and easy to use. Likewise the results are displayed in a large, easy-to read format.
Hodgdon tip from EdLongrange. We welcome reader submissions.
In this video, Forum member Erik Cortina shows how to create a custom modified case for use with the Hornady Lock-N-Load Overall Length Gauge (formerly the Stoney Point Tool). While Hornady sells modified cases for many standard cartridges, if you shoot a wildcat such as the 6mm Dasher or .284 Shehane, you’ll need to create a custom modified case*. And even if you shoot a standard cartridge such as the .308 Winchester you can get more consistent measurements if you make a custom modified case from a piece of brass fired in your chamber.
The process is straight-forward. Take a piece of brass fired in your chamber and full-length size it (with about .002″ shoulder bump). Then you need to drill out the primer pocket. Erik uses a mini-lathe for the operation, but this general process can be done with a drill press or other tools. Erik shows how to do this with a 0.290″ HSS (High Speed Steel) drill bit on a mini-lathe. After drilling the hole comes the tricky part — you need to tap the case with the precise 5/16″ x 36 threads per inch (tpi) right-hand thread that matches the male thread on the O.A.L. Gauge. This 5/16″ x 36 tpi tap is pretty uncommon, but you can order it from Amazon.com if you can’t source it locally.
If you use a mini-lathe, Erik suggests loosening the tailstock slightly, so it can float while cutting the threads. Erik also says: “Make sure you get the tap on pretty tight — it’s going to want to spin.” Erik turns the case at about 100 rpm when tapping the threads. Once the case and tap are rigged, the actual tapping process (see video at 6:00) takes only a few seconds. While the mini-lathe makes the tapping process go more quickly, the threading can also be done with other systems.
TIP: Don’t just make one modified case, make three. That gives you one for your range kit, one for your home reloading bench, plus a spare (since you WILL eventually lose or misplace one).
Here’s the Stuff You Need
5/16″-36 TPI Threading Tap
The required thread is somewhat uncommon. You need a 5/16″ – 36 tpi Right Hand Thread Tap. If you can’t find it locally, Amazon.com carries the correct tap. Erik notes: “The 5/16-36 tpi tap is not a common size. I think Hornady did this on purpose to make it more difficult for the average guy to make his own modified cases.”
0.290″ Drill Bit
Erik uses an 0.290″ HSS “L” drill bit. (This “L” Letter Gauge code designates a 0.290″ diameter bit). A close metric equivalent would be 7.3 mm (0.286″). Erik says: “A 9/32″ drill will also work but it will be harder to run the tap in since the hole will be .281″ instead of .290″ with the Letter Gauge L bit.”
Tips for Using O.A.L. Gauge with Modified Case
We’ve noticed that many folks have trouble getting reliable, consistent results when they first start using the Hornady O.A.L. Gauge (formerly the Stoney Point Tool). We’ve found this is usually because they don’t seat the modified case properly and because they don’t use a gentle, consistent method of advancing the bullet until it just kisses the lands.
Here is our suggested procedure for use the O.A.L. Gauge. Following this method we can typically make three of four measurements (with the same bullet), all within .001″ to .0015″. (Yes, we always measure multiple times.)
1. Clean your chamber so there is no build-up of carbon, debris, or lube. Pay particular attention to the shoulder area.
2. Screw the modified case on to the O.A.L. Gauge. Make sure it is seated firmly (and doesn’t spin loose). Note, you may have to re-tighten the modified case after insertion in the chamber.
3. Place your selected bullet so that the ogive (max bullet diameter) is behind the case mouth. This prevents the bullet from “snagging” as you insert the tool in the action.
4. Insert the O.A.L. Gauge into your chamber smoothly. Push a little until you feel resistance. IMPORTANT — You need to ensure that the shoulder of the modified case is seated firmly against the front of your chamber. You may have to wiggle and twist the tool slightly. If you do not have the modified case seated all the way in, you will NOT get a valid measurement.
5. Advance the bullet slowly. (NOTE: This is the most important aspect for consistency!). Push the rod of the O.A.L. tool gently towards the chamber. DON’T shove it hard! Easy does it. Stop when you feel resistance.
6. IMPORTANT. After gently pushing on the rod, give the end of the rod a couple forward taps with your finger. If your bullet was slightly skewed, it may have stopped too far back. Adding a couple extra taps will fix that. If the bullet moves after the taps, then again push gently on the rod. NOT too much! You just want to push the bullet until it just “kisses” the lands and then stops. Do NOT jam the bullet into the rifling. If you do that you will never get consistent results from one measurement to the next.
* For a $15.00 fee, Hornady will make a custom modified case for you if you send two fired pieces of brass. Send two fired cases and $15.00 check to: Hornady Manufacturing, Attn: Modified Cases, 108 S. Apollo St., Alda, NE 68810. More Info HERE.
Some years ago, the folks at TargetWorkz published a a handy set of plans for a 48-inch tall self-supporting target stand. This makes a great do-it-yourself project. To create a sturdy, self-supporting target frame, all you need are some 2x4s, 1x2x48 furring strips, plus fasteners. The target holder, which supports an 18×24 inch cardboard target backer, separates from the base for easy transport.
Note: There is no cross-piece shown in the plan, but we do recommend putting wood crosspieces at the top of the target stand and about 18″ up from the bottom. This will make the frame more rigid, and will allow the frame to work even if the cardboard is badly “shot up”. Use a T-square to set the crosspieces before attaching them with screws.
Alternative Target Stand May from ABS or PVC Pipe
If you like this kind of project, but want to build a frame that is taller, yet can break down into sections, we also have an article showing you how to build a nice frame with inexpensive ABS or PVC tubing. VIEW ABS/PVC Tubing Target Frame Plans.
Here’s a “must-read” article for .22 LR rimfire shooters. The recently-released October 2018 issue of Shooting Sports USA (SSUSA) includes a great article with data on thirty-one (31) different types of popular .22 LR rimfire ammunition. The line-up includes low-speed, standard, and Hi-Velocity types, plus choices for plinking, varminting, and target applications. Brands tested include: Aguila, American Eagle, CCI, Federal, Fiocchi, Lapua, Remington, and Winchester. The slowest ammo, CCI Quiet-22 Lead RN, clocked 727 FPS. The fastest ammo, CCI Short-Range Green Lead-Free HP, ran 1735 FPS, more than twice as fast as the Quiet-22.
For each ammo type, SSUSA lists the bullet weight, velocity (FPS), and average of two, 5-shot groups at fifty yards. The most accurate ammo was Lapua Center-X LRN, with a 0.37″ average 50-yard group size. Second best was Lapua X-ACT LRN at 0.42″. Ammo was tested from a bench with a Cooper Model 57-M rifle fitted with 3-9x33mm Leupold VX-2 scope. The ammo offerings were grouped into three categories: (1) Varmints/Small Game; (2) Target; and (3) Plinking. (See ammo tables below.)
Click for larger page-view.
Different types of .22 LR (Long Rifle) rimfire ammo have different applications. Subsonic ammo, typically, is best for 25m to 50m target work with precision rimfire rigs. Hi-Velocity .22 LR ammo provides a flatter trajectory for longer ranges. SSUSA explains: “The array of .22 LR loads… turns a person’s head every which way. Subsonic target loads are the key to decisive accuracy on targets, while hyper-velocity cartridges provide striking bullet expansion on small varmints. In between, standard and high-velocity .22 LRs are loadrf with a variety of bullet weights and styles for everything from small-game hunting to plinking[.]” READ Full SSUSA .22 LR Rimfire Ammo Story.
When it comes to reloading hardware, some guys have to have the best of the best, regardless of cost. For those guys, K&M Precision has introduced an impressive new variable-speed, multi-station case prep center. This is quite a step up from other variable-speed case prep devices.*
K&M offers two versions, one with a single spindle (tool driver) running 50-200 rpm, and another modular design that can have up to six (6) spindles, running from 50 to 533 rpm. This Ferrari of case prep centers costs $2395.00 with all six spindles, with lesser prices for fewer spindles (e.g. $1795 with three spindles). The basic 50-200 rpm one-spindle machine costs $695.00. That’s still a pretty sizable investment. But for some guys, price is no object.
Watch Video to see six-spindle machine in action. Being able to adjust the speed within a broad rpm range really is a big deal. You can go slow when needed, then instantly bump up the rpm when you need to do other tasks at a higher rate. Cutting vs. brushing work best at different speeds.
The K&M Benchtop Case Prep Machine is an industrial-grade unit that features an industrial DC brushless motor for constant torque control over a speed range from 50 to 533 rpm (or 50-200 rpm for basic model). The speed can be quickly changed by simply rotating the dial switch and pressing to enter the speed. Watch the video to see the speed control in action. Models are available from one- to six-spindle configurations. The driven spindles feature a unique collet design that accepts ¼” hex shank tools that are oriented horizontally for natural ergonomics. Collet and idler spindles ride on oil-impregnated bronze bearings for smooth operation. You can use K&M-made tools or drive other types of tools using a ¼” hex tool shank adapter with either 8-32 or 3/8-24 threads. Each model has a spring-loaded spindle lock pin to hold the spindle position while setting tools or loading/unloading cartridges into the power adapter.
All machines come with quality hard case with foam, chip pan, chip brush, 1/4” hex drive adapter for 8-32 and 1/4” hex drive adapter for 3/8-24.
Product tip from EdLongRange. We welcome reader submissions.
* Lyman will soon introduce the Case Trim Xpress a single-head case trimmer with speed control for the trimmer head. RCBS offers a 6-station Case Prep Center, with variable speeds, controlled by a rheostat. Four of the six heads run up to 350 rpm, while the two high-speed heads run up to 550 rpm.
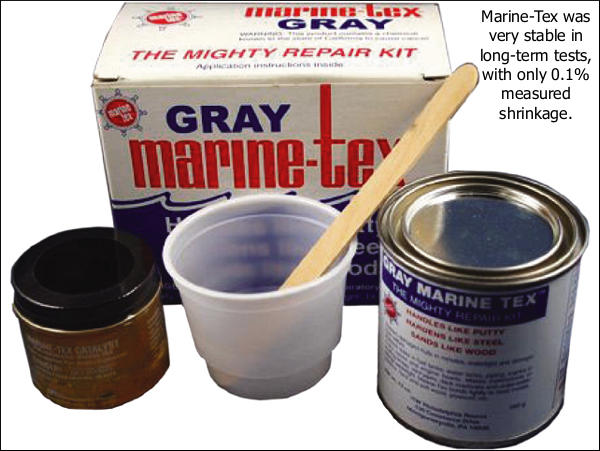
A customer of well-known gunsmith (and Hall-of-Fame shooter) Thomas “Speedy” Gonzalez recently asked Speedy about bedding compounds. Speedy offered some interesting advice based on long-term testing of various materials. Speedy favors Marine-Tex because it is very stable over time, while other materials can shrink up to 6% dimensionally. A good bedding job should be a perfect fit to your barreled action. If the bedding material shrinks over time, that is NOT a good thing….
Speedy’s customer asked: “I know you’re not a Devcon man in regards to bedding compounds but I respect your input in such matters and my question is this in regard to aluminum actions. If Devcon was considered, for an aluminum action, would you prefer aluminum compound formula or steel formula? I personally prefer Devcon steel and Marine-Tex for steel receivers but my experience with aluminum is limited. Also do you have a release agent preference that works better with aluminum?”
Speedy answered: “My only preference of one epoxy over another is their stability over time. My buddy who works for the Texas State Weights and Measures Department had me cast several of the most common types of epoxies used for bedding into 1.000″ machined blocks. After one year of being kept in a controlled climate and measured for shrinkage monthly, the Marine Tex shrunk only 1/10th of 1% (i.e. 0.1%) whereas almost all the others (including Devcon Steel formula, Devcon Aluminum formula…) shrunk 3% to 6%. The only other compounds that matched the Marine Tex were Araldite 1253 and Araldite 2014, with the latter being quite expensive for daily use.”
Speedy added: “The Marine Tex Grey has no atomized metal in its makeup even though it appears that it does. This can be proven by the use of a strong neodymium magnet. What is humorous to me is that people don’t like aluminum yet will bed their actions atop aluminum pillars that have twice the coefficient of expansion (COE) of steel. Like Devcon, it is what people have always done and used. Thus [they] perpetuate the same old stuff. That’s my two cents’ worth. But as I tell everyone, ‘I’ll tell you what I know or do, but it’s not my job to convince anyone to do it my way’.”
Release Agents — Try Shoe Polish
Regarding release agents, Speedy stated: “I use Kiwi Neutral or Tan shoe polish. This works great and you can find it anywhere. Do NOT use the black or brown as it will stick.”
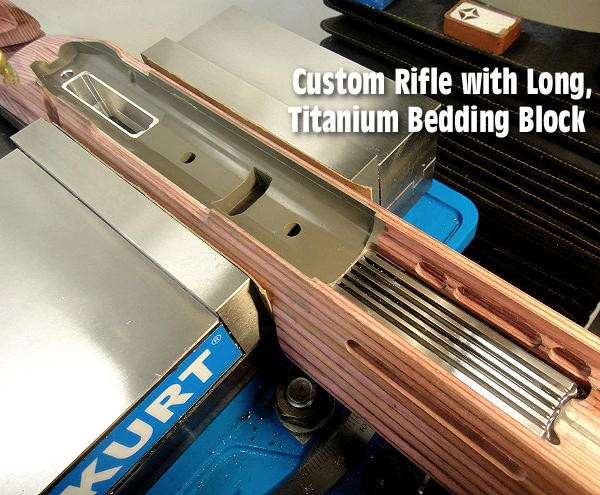
View More Photos of Speedy Inletting and Bedding Job CLICK HERE to see an interesting bedding job done by Speedy using a custom titanium bedding block. Speedy notes, “The stock was a raw blank requiring full inletting for the action to fit properly plus the titanium block. All the loading ports, bolt handle cut, bolt stop, and trigger guard cuts were done with diamond tooling to eliminate fraying and/or delamination of the wood.” You’ll find more projects by Speedy on his Facebook Page. Speedy is in San Antonio, Texas now, and accepting new projects with his company S.G. Rifles LLC.
Posted on June 21, 2017 by Sierra Bullets Written by Sierra Bullets Ballistic Technician Gary Prisendorf
I recently purchased 1,000 rounds of once-fired 5.56 LC brass that was fully processed and ready to load. The brass had been wet tumbled, using stainless steel pins and looked great inside and out, including the primer pockets.
I had always used a vibrating tumbler with either corn cob or walnut media and I always thought my brass looked pretty good until I saw what the wet tumbling and pin combination did.
Being the budget minded reloader that I am, I started looking for a cheap way to wet tumble my brass using stainless steel pins. Harbor Freight had recently opened a store nearby and I had received coupons in the mail, one of the coupons was 20% off any one item.
So I headed for the Harbor Freight store and after roaming around for 20 minutes or so I found a dual drum rotary rock tumbler for $55.00 and thought it would do just fine for what I was planning. The drums are rather small and only have a 3 pound maximum load limit each, but I figured that was big enough for around 150 .223 cases or maybe 300 9MM cases at a time.
I pulled the wrinkled up coupon out of my pocket, paid, and walked out with my new $47.00 brass cleaning machine. I didn’t have any stainless steel pins and couldn’t find any locally. At our local hardware store I picked up some brass plated ½” finishing brads that I thought might work until I could get some pins ordered.
I bought two small packages of the finishing brads (1.75 oz.), for $1.69 each then headed to my local Walmart to pick up some Dawn dish soap (.99 cents) and a bottle of Lemi Shine ($3.27). I had read online that is what a lot of people use for cleaning their brass.
I bought two small packages of the finishing brads (1.75 oz.), for $1.69 each then headed to my local Walmart to pick up some Dawn dish soap (.99 cents) and a bottle of Lemi Shine ($3.27). I had read online that is what a lot of people use for cleaning their brass.
When I got home, I started depriming .223 brass for my new toy, I mean brass tumbler. I deprimed 100 cases, put 50 in each drum, dropped a package of brads in each one, filled them ¾ of the way with water, gave each drum a small squirt of Dawn dish soap and a tablespoon of Lemi Shine. I sealed up the drums and fired up the tumbler.
After an hour and a half, I just couldn’t stand it any longer and had to see the results. The water was filthy but the cases were super clean, I couldn’t be happier. For a total investment of around $55.00, I can now get my cases looking almost new.
Here are the before and after pictures of my first run of brass:
I have since ordered two pounds of stainless steel pins, I put one pound in each drum. To be honest the brass really doesn’t look any better, but the pins don’t seem to get stuck inside of the cases near as bad as the brass-plated brads did.
Tip: Make sure to inspect your cases and look inside each case to ensure all of the brads/pins are removed.
Just lay the brass and brads/pins out on a towel and let them dry. Mine were dry after about 12 hours.
If you want your cases to look like new without breaking the bank, give it a try. You can’t clean 1000 at a time like the $200.00 tumbling machines that are made for specifically for brass, but this is a much cheaper alternative and the results speak for themselves. — Gary Prisendorf, Sierra Bullets
EDITOR: Actually you can get a machine for a whole lot less than $200.00! See the next paragraph.
Lyman Cylone Rotary Tumbler with Factory Rebate
Sierra’s Technician got his rotary tumbler and brass media for $55.00. For eighty bucks more that you can get a much better, higher-capacity system from Lyman. The Lyman Cyclone Rotary Tumbler features a large, polymer drum that holds up to 1000 .223 Rem cases. The kit includes media separation trays, plus five pounds of correct STAINLESS media. The Lyman Cyclone system costs $139.39 delivered from Amazon.
Yep you can get a complete Lyman Cyclone system WITH stainless media for under $140.00. To be honest we think that’s money well spent, compared to the “El Cheapo” Harbor Freight unit. The Lyman will run six times as many .223 Rem cases, be easier to operate, AND get the job done faster. We suspect long-term durability will be better with the Lyman tumbler as well.
At long range, small bullet holes are much easier to see “in the white” than in the black center of the normal High Power target. When you’re practicing at long range using a scoped rifle, one way to enhance your ability to see your bullet holes is to print a “negative” version of the regulation bullseye target so that your black center is now white.
How do you create a “negative” of a target image? Many image programs, including the FREE Irfanview software, have a “Negative” function in the pull-down menu. If you don’t see a “Negative” menu option in your program, look for a “substitute colors” option. Many printers also have a “reverse colors” function. If you can’t find a solution with your computer or printer, just take a normal bullseye target to a copy shop, and the staff can easily print you a set of targets with white centers in black fields.
Forum member Watercam has a Pentax PF-80ED spotting scope that allows him to see 6mm bullet holes in the white at 600 yards. However, 6mm holes in the black are only visible out to 400 yards or so. Accordingly, Watercam uses a modified “reversed” black-to-white target for 600-yard practice. Watercam explains: “[Using the Pentax] With my 6mm and limited mirage I see defined, 6mm holes in the white out to 600. In the black, however, I can see bullets holes at about 400. I now use reverse-color targets for training without a pit partner at the 600-yard line.”
The Hi-Viz Solution — Day-Glo Pasters
If you’re not concerned with official scoring rings, you can use an all-white target with a bright, fluorescent target dot in the middle. A 2″- or 3″-diameter stick-on target dot is highly visible at 600 yards. Birchwood Casey Target Spots® assortment #33928-TSA offers neon orange target dots in 1″, 2″, and 3″ diameters.
TARGET TIP — Use Chart Paper
For practice backers for the Day-GLo pasters at long distance, use Flip Chart Paper (aka Easel Pads) marked with graph lines at 1″ intervals. Available either regular or self-stick, one sheet can hold 4-8 pasters and the white paper allows for easy spotting of the holes and quick estimation of group size. Get Flip Chart Paper at Amazon.com, Staples, or Office Depot.
Brits Use White-Field Target for F-Class
In the UK, some ranges are now using a “reverse-style” target with a mostly white area. Laurie Holland says this allows shooters to see shots much more easily. Laurie reports: “Here’s a photo of the 500/600 yard F-Class match target we use in PSSA comps at Diggle Ranges with club members Chris Hull (L) and Terry Mann (R). We now use this target form at all ranges up to 1K for F-Class, and, yes you can often see your hits at 600 yards on the target before the markers pull it. Regards from England — Laurie”.


 When it comes to long-range optics, some folks can’t have too much magnification. At 500 yards and beyond, when the air’s misty or the mirage is thick, you can’t always use extreme magnification. But, when the conditions are excellent, it’s nice to have 50X magnification (or more) on tap. You can always “crank it back down”.


 Implications for Gun Builders and Reloaders
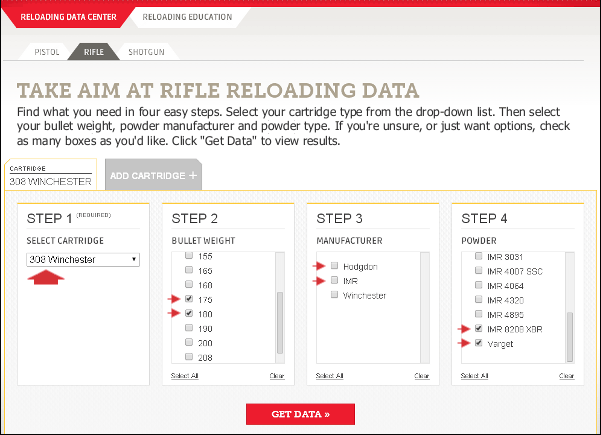


 Forum member Watercam has a Pentax PF-80ED spotting scope that allows him to see 6mm bullet holes in the white at 600 yards. However, 6mm holes in the black are only visible out to 400 yards or so. Accordingly, Watercam uses a modified “reversed” black-to-white target for 600-yard practice. Watercam explains: “[Using the Pentax] With my 6mm and limited mirage I see defined, 6mm holes in the white out to 600. In the black, however, I can see bullets holes at about 400. I now use reverse-color targets for training without a pit partner at the 600-yard line.”


