Emil Praslick III is widely recognized as one of the greatest wind wizards on the planet — a master at identifying wind value and direction, and predicting wind cycles. As coach of the USAMU and top civilian teams, Emil has helped win many high-level championships. In the three videos we feature today, Emil, who works with Capstone Precision Group (Berger, Lapua, SK, Vihtavuori) and Team Applied Ballistics, explains how to determine wind direction and velocity using a variety of indicators. Praslick, now retired from the U.S. Army, was an 18-time National and 2-time World Champion coach with the USAMU.
Video ONE: Wind Theory Basics — Understanding “Wind Values”
In this video from UltimateReloader.com, Emil explains the basics of modern wind theory. To properly understand the effect of the wind you need to know both the velocity of the wind and its angle. The combination of those variables translates to the wind value. Emil also explains that the wind value may not be constant — it can cycle both in speed and velocity. Emil also explains some of the environmental conditions such as mirage that can reveal wind conditions.
Video TWO: Determining the Direction of the Wind
Key Point in Video — Find the Boil
Emil explains how to determine wind direction using optic. The method is to use spotting scope, riflescope, or binoculars to look for the “Boil” — the condition in mirage when the light waves rising straight up. The wind will generate that straight-up, vertical boil in your optics when it is blowing directly at you, or directly from your rear. To identify this, traverse your scope or optics until you see the boil running straight up. When you see that vertical boil, the direction your optic is pointing is aligned with the wind flow (either blowing towards you or from directly behind you).
Video THREE: The No Wind Zero Setting
In this second video, Emil defines the “No-Wind Zero”, and explains why competitive shooters must understand the no-wind zero and have their sights or optics set for a no-wind zero starting point before heading to a match. In order to hit your target, after determining wind speed and direction, says Emil, “you have to have your scope setting dialed to ‘no wind zero’ first.”
Coach of Champions — Emil Praslick III
SFC Emil Praslick III, (U.S. Army, retired) works with Berger Bullets and Applied Ballistics. Emil served as the Head Coach of the U.S. National Long Range Rifle Team and Head Coach of the USAMU for several years. Teams coached by Emil have won 33 Inter-Service Rifle Championships. On top of that, teams he coached set 18 National records and 2 World Records. Overall, in the role of coach, Praslick can be credited with the most team wins of any coach in U.S. Military history.
Try a club match this summer! Every summer weekend hundreds of local club “fun matches” are conducted around the country. And the first official day of summer — the Summer Solstice — is June 20, 2025, just 9 days away. That means local summer weekend fun matches will be held at ranges across the country. So load some ammo, get your rifle, and have some fun.
One of the good things about club shoots is that you don’t have to spend a fortune on equipment to have fun. But we’ve seen that many club shooters handicap themselves with a few common equipment oversights or lack of attention to detail while reloading. Here are SIX TIPS that can help you avoid these common mistakes, and build more accurate ammo for your club matches.
1. Align Front Rest and Rear Bag
We see many shooters whose rear bag is angled left or right relative to the bore axis. This can happen when you rush your set-up. But even if you set the gun up carefully, the rear bag can twist due to recoil or the way your arm contacts the bag. After every shot, make sure your rear bag is aligned properly (this is especially important for bag squeezers who may actually pull the bag out of alignment as they squeeze).
Forum member ArtB adds: “To align my front rest and rear bag with the target, I use an old golf club shaft. I run it from my front rest stop through a line that crosses over my speed screw and into the slot between the two ears. I stand behind that set-up and make sure I see a straight line pointing at the target. I also have a piece of tape that I’ve placed on the golf shaft that indicates how far the back end of the rear bag should be placed from the front rest stop.”
2. Avoid Contact Interference
We see three common kinds of contact or mechanical interference that can really hurt accuracy. First, if your stock has front and/or rear sling swivels make sure these do NOT contact the front or rear bags at any point of the gun’s travel. When a sling swivel digs into the front bag that can cause a shot to pop high or low. To avoid this, reposition the rifle so the swivels don’t contact the bags or simply remove the swivels before your match. Second, watch out for the rear of the stock grip area. Make sure this is not resting on the bag as you fire and that it can’t come back to contact the bag during recoil. That lip or edge at the bottom of the grip can cause problems when it contacts the rear bag. Third, watch out for the stud or arm on the front rest that limits forward stock travel. With some rests this is high enough that it can actually contact the barrel. We encountered one shooter recently who was complaining about “vertical flyers” during his match. It turns out his barrel was actually hitting the front stop! With most front rests you can either lower the stop or twist the arm to the left or right so it won’t contact the barrel.
3. Weigh Your Charges — Every One
This may sound obvious, but many folks still rely on a powder measure. Yes we know that most short-range BR shooters throw their charges without weighing, but if you’re going to pre-load for a club match there is no reason NOT to weigh your charges. You may be surprised at how inconsistent your powder measure actually is. One of our testers was recently throwing H4198 charges from a mechanical measure for his 30BR. Each charge was then weighed twice with a Denver Instrument lab scale. Our tester found that thrown charges varied by up to 0.7 grains! And that’s with a premium measure.
4. Measure Your Loaded Ammo — After Bullet Seating
Even if you’ve checked your brass and bullets prior to assembling your ammo, we recommend that you weigh your loaded rounds and measure them from base of case to bullet ogive using a comparator. If you find a round that is “way off” in weight or more than .005″ off your intended base to ogive length, set it aside and use that round for a fouler. (Note: if the weight is off by more than 6 or 7 grains you may want to disassemble the round and check your powder charge.) With premium, pre-sorted bullets, we’ve found that we can keep 95% of loaded rounds within a range of .002″, measuring from base (of case) to ogive. Now, with some lots of bullets, you just can’t keep things within .002″, but you should still measure each loaded match round to ensure you don’t have some cases that are way too short or way too long.
5. Check Your Fasteners
Before a match you need to double-check your scope rings or iron sight mounts to ensure everything is tight. Likewise, you should check the tension on the screws/bolts that hold the action in place. Even with a low-recoiling rimfire rifle, action screws or scope rings can come loose during normal shooting.
6. Make a Checklist and Pack the Night Before
Ever drive 50 miles to a match then discover you have the wrong ammo or that you forgot your bolt? Well, mistakes like that happen to the best of us. You can avoid these oversights (and reduce stress at matches) by making a checklist of all the stuff you need. Organize your firearms, range kit, ammo box, and shooting accessories the night before the match. And, like a good Boy Scout, “be prepared”. Bring a jacket and hat if it might be cold. If you have windflags, bring them (even if you’re not sure the rules allow them). Bring spare batteries, and it’s wise to bring a spare rifle and ammo for it. If you have just one gun, a simple mechanical breakdown (such as a broken firing pin) can ruin your whole weekend.
Precision Benchrest and F-Class shooters favor premium brass from Lapua, Norma, Peterson, or RWS. (Lake City also makes quality brass in military calibers.) Premium brass delivers better accuracy, more consistent velocities, and longer life. Shooters understand the importance of good brass, but many of us have no idea how cartridge cases are actually made. Here’s how it’s done.
The process starts with a brass disk stamped from strips of metal. Then, through a series of stages, the brass is extruded or drawn into a cylindrical shape. In the extrusion process the brass is squeezed through a die under tremendous pressure. This is repeated two or three times typically. In the more traditional “draw” process, the case is progressively stretched longer, in 3 to 5 stages, using a series of high-pressure rams forcing the brass into a form die. While extrusion may be more common today, RWS, which makes some of the most uniform brass in the world, still uses the draw process: “It starts with cup drawing after the bands have been punched out. RWS cases are drawn in three ‘stages’ and after each draw they are annealed, pickled, rinsed and subjected to further quality improvement measures. This achieves specific hardening of the brass cases and increases their resistance to extraordinary stresses.” FYI, Lapua also uses a traditional draw process to manufacture most of its cartridge brass (although Lapua employs some proprietary steps that are different from RWS’s methods).
After the cases are extruded or drawn to max length, the cases are trimmed and the neck/shoulder are formed. Then the extractor groove (on rimless cases) is formed or machined, and the primer pocket is created in the base. One way to form the primer pocket is to use a hardened steel plug called a “bunter”. In the photos below you see the stages for forming a 20mm cannon case (courtesy OldAmmo.com), along with bunters used for Lake City rifle brass. This illustrates the draw process (as opposed to extrusion). The process of draw-forming rifle brass is that same as for this 20mm shell, just on a smaller scale.
River Valley Ordnance explains: “When a case is being made, it is drawn to its final draw length, with the diameter being slightly smaller than needed. At this point in its life, the head of the draw is slightly rounded, and there are no provisions for a primer. So the final drawn cases are trimmed to length, then run into the head bunter. A punch, ground to the intended contours for the inside of the case, pushes the draw into a cylindrical die and holds it in place while another punch rams into the case from the other end, mashing the bottom flat. That secondary ram holds the headstamp bunter punch.
This video employs DEFORM-2D software to show the draw process for brass casings.
The headstamp bunter punch has a protrusion on the end to make the primer pocket, and has raised lettering around the face to form the headstamp writing. This is, of course, all a mirror image of the finished case head. Small cases, such as 5.56×45, can be headed with a single strike. Larger cases, like 7.62×51 and 50 BMG, need to be struck once to form a dent for the primer pocket, then a second strike to finish the pocket, flatten the head, and imprint the writing. This second strike works the brass to harden it so it will support the pressure of firing.”
Thanks to Guy Hildebrand, of the Cartridge Collectors’ Exchange, OldAmmo.com, for providing this 20mm Draw Set photo. Bunter photo from River Valley Ordnance.
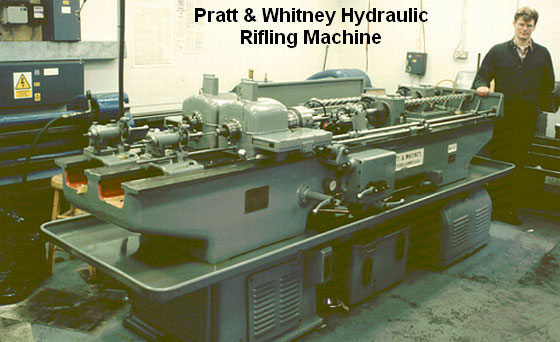
This video shows the process of cut-rifled barrel-making by Krieger Barrels, one of the world’s best barrel manufacturers. Krieger cut-rifled barrels have set numerous world records and are favored by many top shooters. The video show the huge, complex machines used — bore-drilling equipment and hydraulic riflers. You can also see how barrels are contoured, polished, and inspected.
For anyone interested in accurate rifles, this is absolutely a “must-watch” video. Watch blanks being cryogenically treated, then drilled and lathe-turned. Next comes the big stuff — the massive rifling machines that single-point-cut the rifling in a precise, time-consuming process. Following that you can see barrels being contoured, polished, and inspected (with air gauge and bore-scope). There is even a sequence showing chambers being cut.
Click Arrow to Watch Krieger Barrels Video:
Here is a time-line of the important barrel-making processes shown in the video. You may want to use the “Pause” button, or repeat some segments to get a better look at particular operations. The numbers on the left represent playback minutes and seconds.
Krieger Barrel-Making Processes Shown in Video:
00:24 – Cryogenic treatment of steel blanks
00:38 – Pre-contour Barrels on CNC lathe
01:14 – Drilling Barrels
01:28 – Finish Turning on CNC lathe
01:40 – Reaming
01:50 – Cut Rifling
02:12 – Hand Lapping
02:25 – Cut Rifling
“At the start of World War Two, Pratt & Whitney developed a new, ‘B’ series of hydraulically-powered rifling machines, which were in fact two machines on the same bed. They weighed in at three tons and required the concrete floors now generally seen in workshops by this time. Very few of these hydraulic machines subsequently became available on the surplus market and now it is these machines which are sought after and used by barrel makers like John Krieger and ‘Boots’ Obermeyer. In fact, there are probably less of the ‘B’ series hydraulic riflers around today than of the older ‘Sine Bar’ universal riflers.” — Geoffrey Kolbe, Border Barrels.
Brownells is a well-known retailer of guns, gun parts, tools, accessories, ammo, and pretty much everything gun-related. What you may not know is that Brownells has a very active video production department that releases new “how-to” and product information videos every week. These videos offer helpful advice on gun cleaning/maintenance, reloading, as well as selecting/assembling components for various kinds of rifles. And every week Brownells serves up a new products video. There now over 3000 videos on the Brownells YouTube Channel, which is truly a remarkable resource.
Here are seven of our favorite videos from Brownells. There’s a helpful guide to scope installation, a guide to using the OAL tool properly, and a good video on building a rifle with a Howa barreled action. There’s a helpful video on air travel with rifles, and all gun owners should watch the video on ammunition storage.
Scope-Mounting — Common Mistakes to Avoid
Always be careful when mounting a rifle scope. This isn’t a super-complex or highly technical task, but there are ways you can mess it up. This video explains common pitfalls to avoid when mounting a scope.
1. Make sure the rings don’t touch ANY part of the turret housing, objective bell, or eyepiece.
2. Be certain the scope rings are tightly clamped to the scope base. Grasp the scope with one hand and the rifle with the other, then ensure there is no play.
3. Make sure there’s clearance between the objective bell and the rifle. No part of the scope should touch the rifle itself.
4. NEVER over-tighten the scope rings. You can actually crush the scope tube and damage the optic beyond repair. Stick to the torque specs!
Affordable Precision Rifle Build with Howa 1500 Barreled Action
In this video, Caleb from Brownells walks through a step-by-step build of an affordable precision rifle using a Howa 1500 barreled action, MDT stock, and Vortex optic — putting together a highly capable long-range setup for under $1,200. The video covers key components and shows the assembly tools needed (4:38). The video explains how to build a reliable, accurate bolt gun on a budget, with honest insight into gear selection and assembly techniques. From the stock and trigger to rings, base, and scope setup, this video is a very helpful guide for anyone looking to build an affordable precision rifle. Installation of the Howa 1500 barreled action into the MDT stock is shown in detail at 6:00 minute mark.
How to Use Hornady OAL Tool and Hornady Bullet Comparator
Gun Tech Steve Ostrem explains how to properly use Hornady’s Overall Length Gauge to determine length-to-land precisely. The OAL Gauge uses a “Modified Case” that threads onto the tool and holds a bullet. Push on the back of the gauge until you feel the bullet just touch the rifling. (We do this gently at first, tapping the rod a couple time to ensure the bullet is aligned correctly). Once you’ve got the length, then use the tool with a comparator on your calipers to get the length-to-lands. NOTE: We recommend taking the measurement 3-4 times in a row to get a reliable number. With a little practice your should be able to get repeatable measurements within .0015″.
How to Store Ammunition Safely and Securely
This is one of the most popular Brownells videos — with over 2.5 million views. Here’s the deal — ammunition WILL keep for a long time if you store it properly. DO store ammunition in a cool, dry place that doesn’t have wide temperature swings. Temperature cycling will also degrade primers and powder. Put it in airtight ammo cans to keep out the moisture. Tupperware containers will work too. Brownells also recommends putting moisture-absorbing silica packs in your ammo containers. DON’T just keep ammo in factory cardboard factory boxes stacked in the basement, attic, or garage (especially on the floor). Factory ammo boxes can absorb moisture which can degrade primers and corrode the brass cases. Yes, sealed military ammo will usually handle this kind of storage for quite a while, but it’s still not wise.
Air Travel with Firearms — Key Regulations You Must Follow
You can travel on commercial airlines with firearms. But you must follow the TSA regulations, and your particular airline’s rules. First, make sure your guns are UNLOADED before your leave home. Guns need to be carried in proper hard-sided cases that cannot be pried open. Be prepared to unlock the case if the TSA wants to inspect what’s inside. TSA agents can cut the locks if they need to open the case but can’t locate you. If you use special TSA-approved locks, TSA agents have master keys that let them open the case without destroying your locks. You CAN transport up to 11 pounds of ammunition — with restrictions explained in the video.
Cleaning Advice for .22 LR Rimfire Rifles
Gun Techs Steve Ostrem and Caleb Savant debunk some myths about cleaning .22 LR barrels. One myth is that cleaning will harm the accuracy of a .22 LR barrel. Caleb thinks this myth is the result of people cleaning a barrel from the muzzle and damaging the muzzle crown, which CAN diminish accuracy. If it’s done right, cleaning won’t damage the bore. However, you certainly do NOT have to clean your 22 LR’s bore every time you go to the range. But DO clean the action every time you shoot the rifle, especially on a semi-auto. What about shooting a lot of lead bullets? Won’t that lead up the bore? The guys give us the straight skinny on lead fouling, too. When you see your .22 LR rifle’s groups opening up, you may want to consider cleaning.
Must-Have Spare Parts for AR-Platform Rifles
In this video, two knowledgeable gun techs answer the question: “What spare parts should I keep on hand for my AR-15?” On the list are: Gas Rings, Buffer Spring, Extractor Spring and Pin. NOTE: You may want to try the one-piece spiral gas ring rather than the standard rings which require alignment. The cotter pin and cam pin can also easily get lost when the Bolt Carrier Group is disassembled for cleaning. On the lower receiver you’ll want spare springs and detents for the pivot/takedown pins. If you’re using lighter-power springs, keep standard-power spares on hand. If your rifle stops working, swap in the factory-spec springs to find out if the problem is the gun or your ammo. Also, if you have upgraded your trigger, always keep the original trigger as a backup.
This article is Copyright 2023 AccurateShooter.com. Reproduction on any other website gives rise to monetary damages.
Over the years, the U.S. Army Marksmanship Unit (USAMU) published a series of reloading articles on its Facebook Page. In this article, the second in a 3-part series, the USAMU covers the process of loading competition pistol ammunition. The authors focus on two key elements — the taper crimp and the quality/uniformity of the original brass. If you shoot pistol competitively, or just want to maximize the accuracy of your handguns, read this article. The taper crimp tips are very important.
Loading Accurate Competition Pistol Ammunition — Part 2 of 3
One often-overlooked aspect of handloading highly-accurate pistol ammunition is the amount of taper crimp used, and its effect on accuracy. (NOTE: this article pertains to loading for semi-autos — revolver crimp techniques involve some quite different issues.) Briefly, different amounts of taper crimp are used with various handloads to obtain best accuracy. The amount is based on bullet weight, powder burn rate and charge, plus other factors such as case neck tension. During machine-rest testing of experimental Service Pistol ammunition, many variables are examined. Among these, our Shop often varies a load’s crimp in degrees of 0.001″ when re-testing for finest accuracy.
How to Measure Taper Crimp on Pistol Cartridges
One question that often arises is, “How do I measure the taper crimp I’m putting on my cartridges?” Using the narrow part of one’s dial caliper jaws, carefully measure the case diameter at the exact edge of the case mouth on a loaded cartridge. It’s important to take several measurements to ensure consistency. Also, be sure to measure at several places around the case mouth, as case wall thickness can vary. After measuring 2-3 cartridges with a given crimp setting, one can be confident of the true dimension and that it can be repeated later, if needed.
However, for good results, one must use brass from one maker due to variances in case wall thickness. For example, the same degree of crimp that imparts a measurement of 0.471″ with Brand X brass may result in 0.469″ with Brand Y. Thus, for best accuracy, using brass from the same manufacturer is important — particularly for 50-yard Slow Fire. In a perfect world, it is better still to use brass from one lot number if possible. With the popularity of progressive presses using interchangeable tool heads, keeping separate tool heads adjusted for each load helps maximize uniformity between ammunition lots.
Brass Uniformity and Accuracy
Brass is important to pistol accuracy. While accurate ammunition can be loaded using brass of mixed parentage, that is not conducive to finest results, particularly at 50 yards. It is important for the serious competitor to pay attention to his brass – even if only for the 50-yard “Slow Fire” portions of “Bullseye” matches and practice. By segregating brass as described above, and additionally keeping track of the number of times a given batch of cases has been fired, one can ensure case neck tension and case length are at their most uniform.
Given the large volumes of ammunition consumed by active pistol competitors, using inexpensive, mixed surplus brass for practice, particularly at the “short line” (25 yards), is understandable. In NRA Outdoor Pistol (“Bullseye”), the 10-ring is relatively generous — especially for a well-trained shooter with an accurate pistol and load. However, for the “long line” (50 yards), purchasing and segregating a lot of high-quality brass to be used strictly for slow-fire is a wise idea. To keep track of your brass on the line, use a unique headstamp marking with 1 or 2 colors of marking pen ink.
Uniform Cartridge Overall Length is Important
Cartridge case Overall Length (OAL) uniformity as it comes from the factory is important to achieving utmost accuracy. More uniform case lengths (best measured after sizing) contribute to greater consistency of crimp, neck tension, ignition/burn of powder charge, headspace (rimless cartridges), etc. Cartridge case-length consistency varies noticeably by maker and, with lesser manufacturers, also from lot to lot. Some manufacturers are more consistent in their dimensions than others, and also in the hardness/ductility of their brass. Similarly, pay attention to primer brands, powder lot numbers, etc.
Consider Using a Lock-Out Die with Progressive Presses
When reloading pistol ammo with a Progressive press, we strongly recommend the use of a lock-out die, or other system that can detect double charges or low charges. If your progressive is manually advanced, the possibility of a double charge is very real — and that can have disastrous consequences.
On UltimateReloader.com website you’ll find an excellent two-part series on the function and set-up of the RCBS Lock-Out Die. This die prevents loading if a high or low powder charge is detected. The video below shows setup of the RCBS Lock-Out Die on the Dillon XL-650 progressive press.
Summer is almost here (Summer Solstice is June 20, 2025). That means many of our readers will be on the road traveling to matches or holiday destinations. LawShield, America’s largest provider of Legal Defense for Self Defense® coverage, offers a National Travel Guide for Gun Owners and state-specific Travel Guides for Gun Owners. These guides feature practical information for people traveling through nearly every state in the USA.
State-Specific Travel Guides — Access for FREE
State-specific Travel Guides and a National Travel Guide for Gun Owners can be accessed for FREE on the the U.S. LawShield website. For planning future travel, bookmark Resources.uslawshield.com/travel-guide.
According to Kirk Evans, President of U.S. LawShield, “Because there are so many details for people to understand before they leave home, we developed state-specific guides to help folks stay on the right side of the law. Take the time to learn the laws before hitting the road because they are not the same everywhere. Don’t wait until after the fact to plan for your guns when preparing for your trip.”
Travel Guide for Gun Owners Topics:
Permits/licenses recognized by specific states
State laws you should know, including vehicle carry, duty to notify law enforcement, and open and concealed carry laws
Where you can legally carry your gun
Federal laws you should know
Carrying in National Parks
Transfer of firearms
Traveling from state to state and the Safe Passage provision
Flying with a firearm, including TSA requirement warnings and how to pack ammunition
Driving with a firearm
Two Knowledgeable Attorneys Explain State Law Issues When Traveling
In this video U.S. LawShield Independent Program Attorneys Richard Hayes and Emily Taylor provide essential information for traveling with firearms. Discussion includes essential information needed to stay safe and responsible while traveling with firearms.
Know the Laws of Every State You Travel Through
“There is no standardization of gun laws within the 50 individual states, so even if a state recognizes your handgun license or permit, they may have additional restrictions on certain types of firearms, magazines, or ammunition,” said Evans. “In some states, it’s illegal for a non-resident to possess a firearm in the passenger compartment of their vehicle. And, because you are subject to a state’s laws when you are in that state, if you break their laws, you could be committing a crime — whether you think you intentionally broke the law or not,” he added.
“Remember, not knowing the law is not a valid defense,” stated Evans. “Use our Travel Guide for Gun Owners for whatever state you’re traveling through, and learn which states honor your carry license or permit before you go.”
Here’s a simple task you can do that will give your seater die a more perfect fit to your match bullets. You can lap the inside of the seater stem so that it matches the exact profile of the bullet. This spreads out the seating force over a larger area of the bullet jacket. That allows smoother, more consistent seating, without putting dents, creases, or sharp rings in your bullets.
This process is demonstrated here by our friend Erik Cortina of Team Lapua-Brux-Borden. Erik, one of the nation’s top F-Class shooters and a skilled machinist, explains: “Here I’m lapping my new seater die stem with lapping compound. I chuck up a bullet in the lathe and lap the inside of the seating stem. I put lapping compound on the bullet and also in the stem. You can do the same with a hand drill and bore paste. You can see in the piture below how much contact area the stem has on the bullet after being lapped. This bullet is a Berger 7mm 180-grain Hybrid. ”
It can be helpful but it’s not necessary to make your seating stem an exact match to a bullet, particularly if you’re loading hunting or varmint rounds. But it is helpful to do some mild internal stem polishing. This should eliminate any ring (or dent) that forms on the bullet jacket during seating.
Sharp edges on a seating stem can cause a ring to be pressed into the bullet jacket — especially with compressed loads that resist downward bullet movement.
Q2: Is there any down-side to the process?
Not really. However, if you shoot many different bullet types for a particular cartridge, you may not want to conform the stem aggressively to one particular bullet design. Lightly lap the inside of the stem to remove burrs/sharp edges but leave it at that. A light lap will prevent a ring forming when seating bullets.
Photos and Facebook post by Tactical Rifle Shooters
Yet another .300 Blackout disaster. Unfortunately, that .300 Blackout cartridge can fit in a .223 Rem chamber. Shooting a .308-caliber bullet in .223 bore is a recipe for disaster.
The .300 AAC Blackout aka “300 BLK”, is a compact 30-caliber cartridge designed to work in AR-15 rifles. It has a shorter cartridge case to accommodate the bigger 30-caliber bullet while still fitting in a standard AR-15 magazine. Unfortunately, that’s the danger. A careless shooter can toss a .300 Blackout cartridge in with .223 Rem rounds without noting. And because the case-head size is the same as the .223 Rem (5.56×45) the rifle’s bolt assembly will happily chamber and fire the .300 BLK round. Problem is, that forces a .308 diameter bullet down an undersized .223-caliber bore. Not good!
This images were provided by Tactical Rifle Shooters on Facebook. The message was clear: “Don’t try to run 300 Blackout in your .223/5.56mm. It won’t end well. The problem is identical rifles and identical magazines but different calibers.”
Image from Accurate Shooter Forum. Cutaway shows the jammed .30-Cal bullet:
For those who MUST have a .300 Blackout, here are some things you can do:
1. Use different colored magazines for .300 Blackout vs. .223 Rem.
2. Fit all your uppers with caliber-labeled ejection port covers.
3. Mark .223 Rem upper handguards with the caliber in bright paint.
4. Mark all .300 BLK Rounds with heavy black marker.
Comments by Folks Who Viewed these .300 Blackout Disaster Photos:
“The .300 Blackout is simply a badly-designed round. A properly-designed round would have had a feature in the shape that would have prevented cross loading in the first place.” — D. Santiago
“I almost made that mistake… I had a magazine of 300 BLK inserted in my .223/5.56 all night. Fortunately, I never pulled the trigger. Once I realized the mistake, I almost got ill. [After that incident] I no longer own a 300 BLK.” — B. Welch
“Happened to me hog hunting from a helo. Gun exploded in my face.” — B. Hood
“Fire-forming projectiles [is] so wrong in centerfire!” — M. Stres
“Had some dude come into the store the other day wanting .300 Blackout ammo to shoot in his 5.56 AR. It took 15 minutes of explaining for him to understand you got to have a .300 Blackout Upper!” — R. Williams
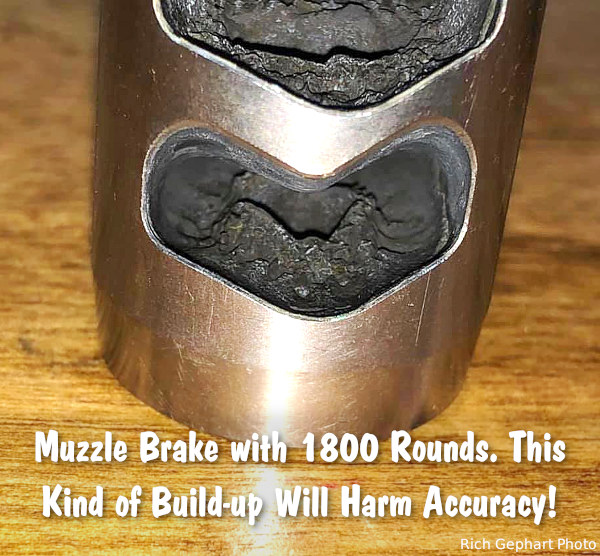
Many hunters and precision rifle competitors use muzzle brakes because these ported devices reduce felt recoil significantly. That make s real difference getting back on target for quick follow-up shots. While many rifle owners appreciate the benefits of muzzle brakes, they may also neglect their brakes, allowing hard carbon and powder residue to build up. Not good. You should regularly clean your muzzle brake to remove fouling and carbon build-up.
As Mark Edgreen posted: “Carbon build up on the crown and in the brake is a recipe for poor accuracy.” And another gunsmith reported that customers complained about guns that “shot out way too early” but they only needed to have the brakes cleaned.
Gunsmith and PRS/NRL competitor Jim See recently reminded his Facebook Fans about the importance of cleaning muzzle brakes: “How many times do I have to say it? You need to maintain your rifles. Clean your muzzle brakes people!”. Jim, who runs Elite Accuracy LLC, notes that hard carbon build-up in brakes can definitely harm accuracy. Look at this example:
Muzzle Brake Cleaning Methods
There are various methods for cleaning a brake, we list a variety of techniques, but we would start with NON-corrosive ultrasound. You’ll want to remove the muzzle device before doing these tasks.
1. Use Ultrasonic Cleaning Machine with cleaning solution. This may be the most efficient method: “I place my brake in the ultrasonic cleaner. Shiney as new.” (Jim Moseley).
2. Spray with commercial Carb Cleaner and brush. Then apply anti-corrosion coating.
3. Soak in half hydrogen peroxide and half vinegar. Suggestion: “Let sit over night and carbon melts off. Brush remaining carbon off, rinse and put the brake back on.” Apply anti-corrosive before mounting.
4. Soak in 50/50 solution of water and white vinegar and brush. (Be sure to apply anti-corrosion coating, such as Eezox, after soaking).
5. Tumble in liquid solution with stainless pins. Comment: “Comes out slightly faded, but perfectly clean on stainless, non-painted brakes though.” Warning — do NOT do this with threaded brakes — tumbling could affect threads of screw-on brakes. Also, tumbling can harm painted or Cerakote finishes.
Gunsmithing Tip: By fitting the muzzle brake so that the barrel crown is slightly forward, it is easier to wipe carbon fouling off the end of the barrel. See photo:


 1. Align Front Rest and Rear Bag
 5. Check Your Fasteners
 Precision Benchrest and F-Class shooters favor premium brass from


 The headstamp bunter punch has a protrusion on the end to make the primer pocket, and has raised lettering around the face to form the headstamp writing. This is, of course, all a mirror image of the finished case head. Small cases, such as 5.56×45, can be headed with a single strike. Larger cases, like 7.62×51 and 50 BMG, need to be struck once to form a dent for the primer pocket, then a second strike to finish the pocket, flatten the head, and imprint the writing. This second strike works the brass to harden it so it will support the pressure of firing.”


 The
The