A fire in the home is always to be feared. And a fire in your reloading room can be disastrous. Near your reloading bench you probably have flammable solvents, and maybe gunpowder. What would happen if an electrical fire started in your reloading room? Would you be alerted? Do you have a proper fire extinguisher at hand?
Here’s a true story from Forum Member Joe O. (aka “Joecob”) that provides a valuable safety lesson. After Joe started up his old tumbler, an internal connector worked loose, causing an arc which started a fire in his basement reloading area. Luckily Joe had a functioning smoke detector, and a fire extinguisher.
Very few of us would worry about fire when we plug in a tumbler or other AC-powered reloading tool. But there is always the possibility of a malfunction and a fire. Quick thinking (and a handy extinguisher) prevented serious damage to Joe’s reloading room and house — but things could have been worse (much worse), had Joe not responded quickly.
Fire in the Reloading Room — Report by Joecob
The day before ‘Sandy’ hit I was cleaning brass the way I always have. I set the vibratory tumbler on the back of my reloading bench in the basement. I loaded the media hopper with 40 fired empty brass cases (and walnut media), plugged the cord in, turned the tumbler on and went back upstairs to watch TV. I could hear the tumbler running in the background.
About half an hour later I heard the basement smoke alarm go off. I ran downstairs. Flames were licking from the melting plastic of the tumbler.
I grabbed the nearby ABC cannister extinguisher and squirted out the fire and soaked the charred bench areas with water. Good thing I had the extinguisher! And I was glad I religiously store powder and primers properly — away from the bench (and everything else).
What caused the fire? It looks like an internal AC connector finally vibrated loose enough to arc and ignite the plastic. WHEH! I had been using that thing for 25 years the same way without mishap. Guess I should have known to periodically check the guts of a thing that plugs in and vibrates for a living?
Today I went out and bought a new even bigger ‘Pro’ ABC extinguisher, plus a dual-detector smoke alarm, and an ultrasonic cleaner. That experience was scarier than the storm. I hope this true account might help someone else to avoid a bad experience.
In his account, Joe refers to an “ABC” cannister fire extinguisher. The “ABC” refers to the fire classification rating: Class A (trash, wood, and paper), Class B (liquids and gases), and Class C (energized electrical equipment) fires. There are many brands of ABC-rated extinguishers.
The sturdy, rechargeable Kidde Pro 210 Fire Extinguisher (SKU 21005779) contains four pounds of a multipurpose monoammonium phosphate dry chemical extinguishing agent. It has a discharge time of 13 to 15 seconds, a discharge range of 10 to 15 feet, and an operating pressure of 100 PSI. The seamless aluminum cylinder measures 4.5 inches in diameter and 15.7 inches tall. The Kidde 210 has a 6-year warranty. This is $41.79 on Amazon (#ad), 40% off the $69.99 MSRP price.
Chart created with Ammoguide’s Visual Comparison Tool. Visit Ammoguide.com to learn more.
One of our forum members was looking for a very accurate, mid-sized 6.5mm cartridge for target working and coyote hunting. There are many great options including the 6.5 Grendel, 6.5×47 Lapua, 6.5 Creedmoor, and Remington .260 (a 6.5-08). If you are considering the 6.5×47 you should read our 6.5×47 Cartridge Guide authored by the 6.5 Guys. This and other 6.5mm cartridges are covered in this introduction to 6.5 mm cartridges prepared by Eben Brown, President of Eabco.com.
Quick Guide to 6.5mm Cartridges
by Eben Brown, EABCO.com, (E. Arthur Brown Co. Inc.)
The current popularity of 6.5mm cartridges in the USA has been a long time in coming. I won’t go into my opinions on why it took so long to catch on. The important thing is that it finally HAS caught on and we’re now so fortunate to have a wide selection of 6.5mm cartridges to choose from!
6.5mm Grendel – Developed by Alexander Arms for the AR15 and military M4 family of rifles. The Grendel fits the dimensional and functional requirements of these rifles while delivering better lethality and downrange performance. [Editor: The little 6.5 Grendel delivers a lot of performance from a small package. This is one of the most accurate cartridge options for the AR15 platform.]
6.5mm BRM – Developed by E. Arthur Brown Company to give “Big Game Performance to Small Framed Rifles” — namely our Model 97D Rifle, TC Contender, and TC Encore. Velocities of 2400-2500 fps with 140gr bullets puts it just under the original 6.5×55 Swede performance.
6.5mm x 47 Lapua – Developed by Lapua specifically for international 300m shooting competitions (with some interest in long-range benchrest as well). Case capacity, body taper, shoulder angle, and small rifle primer are all features requested by top international shooters. You can expect velocities of 2500-2600+ with 140 gr bullets.
6.5mm Creedmoor – Developed by Hornady and Creedmoor Sports, the 6.5mm Creedmoor is designed for efficiency and function. Its shape reaches high velocities while maintaining standard .308 Winchester pressures and its overall length fits well with .308 Win length magazines. You can expect velocities of 2600-2700+ fps with 140gr bullets. [Editor: Yep, we know some PRS guys are loading hotter than that in bolt guns. We recommend you try the 120-130 grain bullets also with this cartridge. That may put you in a better accuracy node.]
This video reviews 6.5 Creedmoor Cartridge Brass options:
.260 Remington – Developed by Remington to compete with the 6.5mmx55 Swedish Mauser that was (finally) gaining popularity in 1996. By necking down the 7mm-08 Remington to 6.5mm (.264 cal), the .260 Remington was created. It fit the same short-action [receivers] that fit .308 Win, .243 Win, 7mm-08 Rem, etc. You can expect velocities of 2600-2700 fps with 140gr bullets in the 260 .Remington.
[Editor’s Note: In the .260 Rem, try the Lapua 120gr Scenar-Ls and/or Berger 130gr VLDs for great accuracy and impressive speeds over 2950 fps.]
6.5mm x 55 Swedish Mauser – This was the cartridge that started the 6.5mm craze in the USA. It is famous for having mild recoil, deadly lethality on even the biggest game animals, and superb accuracy potential. Original ballistics were in the 2500 fps range with 140gr bullets. Nowadays handloaders get 2600-2700+ fps.
[Editor’s Note: Tor from Scandinavia offers this bit of 6.5x55mm history: “Contrary to common belief, the 6.5×55 was not developed by Mauser, but was constructed by a joint Norwegian and Swedish military commission in 1891 and introduced as the standard military cartridge in both countries in 1894. Sweden chose to use the cartridge in a Mauser-based rifle, while Norway used the cartridge in the Krag rifles. This led to two different cartridges the 6.5×55 Krag and 6.5×55 Mauser — the only real difference being safe operating pressure.”]
6.5-284 Norma — This comes from necking the .284 Winchester down to .264 caliber. Norma standardized it for commercial ammo sales. The 6.5mm-284 was very popular for F-Class competition and High Power at 1,000 yards. However, many F-Class competitors have switched to the straight .284 Win for improved barrel life. 6.5-284 velocities run 3000-3100+ fps with 140gr bullets.
.264 Winchester Magnum – Developed by Winchester back in 1959, the .264 Win Mag never really caught on and may have delayed the ultimate acceptance of 6.5mm cartridges by US shooters (in my opinion). It missed the whole point and original advantage of 6.5 mm cartridges.
The Original 6.5mm Advantage
The special needs of long-range competition have skewed things a little. However the original advantages of 6.5mm cartridges — how deadly the 6.5mms are on game animals, how little recoil they produce, and how easy they are to shoot well — still hold true today.
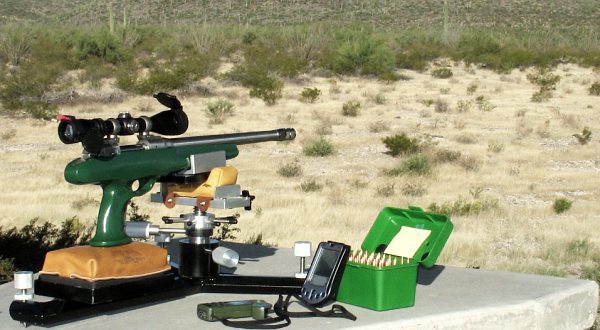
Here’s something you’ve probably never seen before — a single-shot, bolt-action pistol chambered for the 6mmBR Norma cartridge (aka 6BR). Featured as one of our Guns of the Week a while back, this Green Machine is a Savage Striker upgraded by Chuck G. from Arizona, a self-described “Savage Maniac”. This impressive bolt-action pistol has shown exceptional accuracy.
Chuck transformed this Savage Striker single-shot from a ho-hum .308 into a reliable half-MOA precision 6BR that can run with accurized rifles all the way out to impressively long ranges. Here we provide highlights from our original article. Click the link below to read our full Savage Striker article, which is three times longer than this story, and has more photos, plus videos and a detailed load development section.
The Striker Project — Pursuit of Precision, by Chuck G.
I didn’t even know Savage Strikers existed until I saw one for sale on Gunbroker.com. I snagged it with a $400 bid. My idea was to build an accurate, long-range pistol on a pauper’s budget. As purchased, the Striker had a .308 barrel with an unknown round count, the standard center-grip, black synthetic stock, an odd two-piece custom brake, and an old Burris 4X pistol scope in a Conetrol 2-piece ring set. The trigger was very heavy, 6-8 lbs I’d estimate, with a lot of take-up and over-travel.
Initial Disappointments — Too Much Recoil, Poor Accuracy
My initial attempts to get the Striker to shoot well at even 100 yards were disappointing. I was never able to get better than a 3″, 5-shot group at 100. Not what I was looking for. Being used to benchrest triggers, the pull on this one was hard for me to manage. The gun would roll around on any type of front rest I had, and from a cement bench on a bipod it would jump about 18 inches up and sideways with every round. Not being used to this type of gun, I found the recoil and muzzle blast to be unsettling. It was hard not to flinch. I started off using my 1K .308 rifle load, 175 SMKs over 44 grains of Varget. That probably would have knocked the hell out of a deer, but it wasn’t much fun to shoot from the bench.
New Caliber, New Barrel — Way Better Accuracy!
I decided to rebuild the Striker in a caliber that would be more fun to shoot. 6mmBR was an obvious choice for all the usual reasons–good brass, wide choice of match bullets, easy to load, low recoil, very accurate, and relatively cheap to shoot. As part of a SavageShooters.com group buy, I ordered a 15″, SS match grade, 3-groove, heavy varmint contour, 10-twist barrel from Pac-Nor. To set the freebore, I provided Pac-Nor with a dummy case with an 88gr LD Berger bullet seated to use as a guide. Total delivered price was $340 chambered and threaded for a muzzle brake from JP Rifles.
This image below features a target created by the founder of AccurateShooter.com and 6mmBR.com. You can CLICK HERE to visit our target page with this and many other free targets.
When I bought it, the Striker, with factory .308 barrel, shot 3″ groups at 100. Now, with a Pac-Nor 6BR Match barrel, 3″ fore-arm plate, upgraded trigger, 24X scope, and match bullets, the gun consistently groups 1/2″ or better at 100 yards. What a transformation!”
Striker Project — Mission Accomplished
With further load development and bench practice, the gun is showing even more accuracy potential. Using a 24X target scope, the Striker has delivered 5-shot groups in the 3s and 4s during recent range visits. All in all, I’m very satisfied with the project. I ended up with an accurate, fun-to-shoot gun for under $1,000 including scope, paint, and bedding materials.
Stock Modifications
While waiting for the barrel I started working on the stock. As virtually no aftermarket stocks were readily available for the center-grip Striker, I decided to rebuild the standard black synthetic stock. The grip fit my hand poorly so I worked it over with a Dremel tool and sandpaper, built up the grip with Bondo, filled in some holes and bedded the action using Devcon Plastic Steel. This was my very first attempt at these tasks so progress was slow. Once I had re-shaped the stock, I sprayed five coats of “John Deere” green topped by several coats of auto clear. It came out surprisingly well considering I had never painted a stock before. I had originally planned to build up the fore-end to 3″ wide using Bondo but later decided to just use a Sinclair Benchrest Adapter that I had on hand.
Chuck notes: “I’m really pleased with the C & J one-piece Rest. It’s solid, heavy, and well-designed. There is no real need for a windage top; small adjustments are easily made by slightly shifting the pistol butt. Elevation adjustments are positive and once the pistol is set up on this rest NOTHING moves.”
Bryan Litz and The Science of Accuracy Academy have released a Podcast with vital information for all handloaders. This Podcast examines the effects of humidity variances on powder. Bryan notes: “If you want to know how much this can matter, we’re talking up to 200 fps difference for the same load of H4350 in 6.5 Creedmoor” at opposite extremes of humidity.
Bryan adds that “Most shooters don’t realize what a big deal this can be — it overshadows many of our efforts to make consistent velocity and hit targets. This can happen in loaded rounds not just for hand loading where you expose powder to ambient humidity. This is especially important for hunters considering the range of environments hunting ammo goes through.”
Subscriptions for Applied Ballistics The Science of Accuracy Academy Podcasts
If you like this podcast, and want to learn more from Brian Litz and his Applied Ballistics team, you can order a subscription to the Academy. Priced at $9.95/mo, this subscription will allow you to access all podcasts, exclusive videos, learning resources, and bullet data sheets.
If you are evaluating a firearm for self-defense use, you should consider three main factors: Reliability, Functionality (sights, trigger, ergonomics), and Effectiveness (ability to halt/neutralize threats). Regarding effectiveness, you need to consider what happens when the projectiles from your firearm reach the target. That involves penetration and terminal ballistics.
A 12ga shotgun is very effective inside 20 yards, with less risk of over-penetration* vs. a centerfire rifle.
You’ve probably heard the term “Terminal Ballistics”. But do you really know what this refers to? Fundamentally, “Terminal Ballistics” describes the behavior of a projectile as it strikes, enters, and penetrates a target. Terminal Ballistics, then, can be said to describe projectile behavior in a target including the transfer of kinetic energy. Contrast this with “External Ballistics” which, generally speaking, describes and predicts how projectiles travel in flight. One way to look at this is that External Ballistics covers bullet behavior before impact, while terminal ballistics covers bullet behavior after impact.
The study of Terminal Ballistics is important for hunters, because it can predict how pellets, bullets, and slugs can perform on game. This NRA Firearm Science video illustrates Terminal Ballistics basics, defining key terms such as Impact Crater, Temporary Cavity, and Primary Cavity.
External Ballistics, also called “exterior ballistics”, is the part of ballistics that deals with the behavior of a non-powered projectile in flight.
Terminal Ballistics, a sub-field of ballistics, is the study of the behavior and effects of a projectile when it hits its target.
*This Shooting Illustrated article discusses over-penetration risks with a variety of cartridge types. “A bullet passing through a threat and continuing with the potential to cause unintentional damage to a bystander or object is a situation commonly described as over-penetration.”
You can do your own experimental calculations using JBM Online Ballistics (free to use). Here is an extreme example, with two printouts (generated with Point Blank software), one showing bullet trajectory at sea level (0′ altitude) and one at 20,000 feet. For demonstration sake, we assigned a low 0.2 BC to the bullet, with a velocity of 3000 fps.
One of our readers asked “What effect does altitude have on the flight of a bullet?” The simplistic answer is that, at higher altitudes, the air is thinner (lower density), so there is less drag on the bullet. This means that the amount of bullet drop is less at any given flight distance from the muzzle. Since the force of gravity is essentially constant on the earth’s surface (for practical purposes), the bullet’s downward acceleration doesn’t change, but a bullet launched at a higher altitude is able to fly slightly farther (in the thinner air) for every increment of downward movement. Effectively, the bullet behaves as if it has a higher ballistic coefficient.
Forum member Milanuk explains that the key factor is not altitude, but rather air pressure. Milanuk writes:
“In basic terms, as your altitude increases, the density of the air the bullet must travel through decreases, thereby reducing the drag on the bullet. Generally, the higher the altitude, the less the bullet will drop. For example, I shoot at a couple ranges here in the Pacific Northwest. Both are at 1000′ ASL or less. I’ll need about 29-30 MOA to get from 100 yard to 1000 yards with a Berger 155gr VLD @ 2960fps. By contrast, in Raton, NM, located at 6600′ ASL, I’ll only need about 24-25 MOA to do the same. That’s a significant difference.
Note that it is the barometric pressure that really matters, not simply the nominal altitude. The barometric pressure will indicate the reduced pressure from a higher altitude, but it will also show you the pressure changes as a front moves in, etc. which can play havoc w/ your calculated come-ups. Most altimeters are simply barometers that read in feet instead of inches of mercury.”
As Milanuk states, it is NOT altitude per se, but the LOCAL barometric pressure (sometimes called “station pressure”) that is key. The two atmospheric conditions that most effect bullet flight are air temperature, and barometric pressure. Normally, humidity has a negligible effect.
It’s important to remember that the barometric pressure reported on the radio (or internet) may be stated as a sea level equivalency. So in Denver (at 6,000 feet amsl), if the local pressure is 24″, the radio will report the barometric pressure to be 30″. If you do high altitude shooting at long range, bring along a Kestrel, or remember to mentally correct the radio station’s pressure, by 1″ per 1,000 feet.”
Let’s say you’ve purchased a new scope, and the spec-sheet indicates it is calibrated for quarter-MOA clicks. One MOA is 1.047″ inches at 100 yards, so you figure that’s how far your point of impact (POI) will move with four clicks. Well, unfortunately, you may be wrong. You can’t necessarily rely on what the manufacturer says. Production tolerances being what they are, you should test your scope to determine how much movement it actually delivers with each click of the turret. It may move a quarter-MOA, or maybe a quarter-inch, or maybe something else entirely. (Likewise scopes advertised as having 1/8-MOA clicks may deliver more or less than 1 actual MOA for 8 clicks.)
Reader Lindy explains how to check your clicks: “First, make sure the rifle is not loaded. Take a 40″ or longer carpenter’s ruler, and put a very visible mark (such as the center of an orange Shoot’N’C dot), at 37.7 inches. (On mine, I placed two dots side by side every 5 inches, so I could quickly count the dots.) Mount the ruler vertically (zero at top) exactly 100 yards away, carefully measured.
Place the rifle in a good hold on sandbags or other rest. With your hundred-yard zero on the rifle, using max magnification, carefully aim your center crosshairs at the top of the ruler (zero end-point). Have an assistant crank on 36 (indicated) MOA (i.e. 144 clicks), being careful not to move the rifle. (You really do need a helper, it’s very difficult to keep the rifle motionless if you crank the knobs yourself.) With each click, the reticle will move a bit down toward the bottom of the ruler. Note where the center crosshairs rest when your helper is done clicking. If the scope is accurately calibrated, it should be right at that 37.7 inch mark. If not, record where 144 clicks puts you on the ruler, to figure out what your actual click value is. (Repeat this several times as necessary, to get a “rock-solid”, repeatable value.) You now know, for that scope, how much each click actually moves the reticle at 100 yards–and, of course, that will scale proportionally at longer distances. This optical method is better than shooting, because you don’t have the uncertainly associated with determining a group center.
Using this method, I discovered that my Leupold 6.5-20X50 M1 has click values that are calibrated in what I called ‘Shooter’s MOA’, rather than true MOA. That is to say, 4 clicks moved POI 1.000″, rather than 1.047″ (true MOA). That’s about a 5% error.
I’ve tested bunches of scopes, and lots have click values which are significantly off what the manufacturer has advertised. You can’t rely on printed specifications–each scope is different. Until you check your particular scope, you can’t be sure how much it really moves with each click.
I’ve found the true click value varies not only by manufacturer, but by model and individual unit. My Leupold 3.5-10 M3LR was dead on. So was my U.S.O. SN-3 with an H25 reticle, but other SN-3s have been off, and so is my Leupold 6.5-20X50M1. So, check ‘em all, is my policy.”
From the Expert: “…Very good and important article, especially from a ballistics point of view. If a ballistics program predicts 30 MOA of drop at 1000 yards for example, and you dial 30 MOA on your scope and hit high or low, it’s easy to begin questioning BCs, MVs, and everything else under the sun. In my experience, more than 50% of the time error in trajectory prediction at long range is actually scope adjustment error. For serious long range shooting, the test described in this article is a MUST!” — Bryan Litz, Applied Ballistics LLC.
Bryan also uses a Tall Target Test to determine true click values. CLICK HERE to read a detailed, explanatory article about Litz’s Tall Target Test.
This article, as published in AccurateShooter.com, contains copyrighted content. It shall not be republished in whole or in part without advanced permission in writing. The act of republishing constitutes legal consent to licensing fees.
Here’s a simple solution for lumpy front sandbags. Cut a small block the width of your fore-end and place that in the front bag between matches. You can tap it down firmly with a rubber mallet.
The block will keep the front bag nice and square, without bunching up in the center. That will help your rifle track straight and true. Rick Beginski uses wood (see photo), while our friend John Southwick uses a small block of metal. The metal block might work a little better, but the wood version is easier to make with simple tools. Shown above is a slick Delrin block with a built-in bubble level used with a quality J.J. Loh front rest. Using a good block on your front bag helps ensure that the actual top surface of your front bag is level, as distinct from the front rest assembly.
Jim Borden, the very knowledgeable owner of Borden Accuracy, provided an interesting historical insight about barrel fitting and the term “blueprinting”. Jim has posted on his Borden Accuracy Facebook page an explanation of the term “blueprinting” as it originally was used with respect to barrel/shoulder/lug fitting.
Barrel/Shoulder Fit and Blue-Printing
Jim told us: “Something often overlooked on barrel installation is the shoulder fit. Many are so overly obsessed with doing a crank-on fit of threads that the shoulder contact is overlooked. Full, solid barrel shoulder to recoil lug or action face is critical to optimum accuracy and precision.
Many years ago part of the ‘blueprinting’ of an action was the use of Prussian blue to ‘blueprint’ lug fit, thread fit, and barrel shoulder fit. It was a colloquial expression that had nothing to do referring to a blueprint or drawing of the action.” Bet you didn’t know that!
About the photo below, Jim noted: “the fuzzy look on the threads is a liberal coating of Never-Seez thread lubricant.”
Look carefully to see the Prussian Blue applied to the barrel shoulder, plus Never Seez on threads.
The USAMU has published a “how-to” article about bullet sorting. While many of us may sort bullets by base-to-ogive length (and/or weight), the USAMU story explores the “how and why” of sorting bullets by Overall Length (OAL). Read the article highlights below, and make your own decision as to whether OAL sorting is worth the time and effort. Bryan Litz of Applied Ballistics says that sorting by OAL is not a bad idea, but base-to-ogive bullet sorting probably represents a better investment of your time.
Bullet Sorting by Overall Length
We’d like to share a specialized handloading technique which we’ve long found beneficial to our long-range (600 yards and beyond) accuracy. Sorting of bullets for extreme long range (LR) accuracy is not difficult to do, but some background in theory is needed.
Here at USAMU’s Handloading Shop, we only sort individual bullets for the most demanding Long-Range applications and important competitions. Only the most accurate rifles and shooters can fully exploit the benefits of this technique. The basic sorting process involves measuring the Overall Length (OAL) of the bullets, and grouping them in 0.001″ increments. It’s not unusual to find lots of match bullets that vary as much as 0.015″-0.020″ in length throughout the lot, although lots with much less variation are seen as well. Even in bullet lots with 0.015″ OAL variation, the bullet base-to-ogive length will show much less variation. Hence, our basic sort is by bullet OAL. One obvious benefit of sorting is easily seen in the attached photo. The few bullets that are VERY different from the average are culled out, reducing probable fliers.
How does one know what OAL increments to use when sorting? The answer is simple. As each lot of bullets is unique in its OAL distribution, it’s best to sample your bullet lot and see how they are distributed. In the attached photo, you will see a set of loading trays with a strip of masking tape running along the bottom. Each vertical row of holes is numbered in 0.001″ increments corresponding to the bullets’ OAL. A digital caliper makes this task much easier. As each bullet is measured, it is placed in the line of holes for its’ OAL, and gradually, a roughly bell-shaped curve begins to form.
Note that near the center, bullets are much more plentiful than near the edges. At the extreme edges, there are a few that differ markedly from the average, and these make great chronograph or sighting-in fodder. We recommend using a sample of 200 bullets from your lot, and 300 is even better. Some bullet lots are very consistent, with a tall, narrow band of highly-uniform bullets clustered together over just a few thousandths spread. Other lots will show a long, relatively flat curve (less uniform), and you may also see curves with 2 or more “spikes” separated by several 0.001″ OAL increments.
Bullet Sorting — OAL vs. Base-to-Ogive vs. Weight
Expert advice from Bryan Litz, Applied Ballistics
I’m often asked what is a the best measure to sort bullets by, and the answer (to this and many other questions in ballistics) is: it depends.
Choosing to sort by overall length (OAL), base to ogive (BTO), bearing surface, weight, etc. can get overwhelming. Shooters typically look for something they can measure, which shows a variation and sort by that. It’s common for dimensional variations to correlate. For example, bullets which are longer in OAL are typically also shorter in BTO, and have longer noses. All these are symptoms of a bullet that was pushed a little further into the pointing die, or possibly had more than average lube while being swaged. So in essence, if you sort by BTO, you’re measuring one symptom which can indicate a pattern in the bullets shape.
So, the question still stands — what should you measure? You’ll always see more variation in OAL than BTO, so it’s easier to sort by OAL. But sometimes the bullet tips can be jagged and have small burrs which can be misleading. Measuring BTO will result in a lower spread, but is a more direct measure of bullet uniformity.
Then there’s the question of; how much variation is too much, or, how many bins should you sort into? Shooters who see 0.025” variation in BTO may choose to sort into 5 bins of 0.005”. But if you have only 0.005” variation in the box, you’ll still sort into 5 bins of 0.001”. What’s correct? You have to shoot to know. Live fire testing will answer more questions, and answer them more decisively than any amount of discussion on the subject. The test I recommend is to identify bullets on the extreme short end of the spectrum, and some on the extreme long end. Load at least 10 rounds of each, and take turns shooting 5-shot groups with them. If there is a difference, it will be evident. The results of the testing will answer your question of: should I sort based on X, Y, or Z?”
You can read more discussions on this and other similar subjects in our Accurateshooter.com Shooters’ Forum. Here’s a link to a thread discussing bullet sorting: Bullet Sorting Thread


 A fire in the home is always to be feared. And a fire in your reloading room can be disastrous. Near your reloading bench you probably have flammable solvents, and maybe gunpowder. What would happen if an electrical fire started in your reloading room? Would you be alerted? Do you have a proper fire extinguisher at hand?
I grabbed the nearby ABC cannister extinguisher and squirted out the fire and soaked the charred bench areas with water. Good thing I had the extinguisher! And I was glad I religiously store powder and primers properly — away from the bench (and everything else).
 In his account, Joe refers to an “ABC” cannister fire extinguisher. The “ABC” refers to the fire classification rating: Class A (trash, wood, and paper), Class B (liquids and gases), and Class C (energized electrical equipment) fires. There are many brands of ABC-rated extinguishers.

 .260 Remington – Developed by Remington to compete with the 6.5mmx55 Swedish Mauser that was (finally) gaining popularity in 1996. By necking down the 7mm-08 Remington to 6.5mm (.264 cal), the .260 Remington was created. It fit the same short-action [receivers] that fit .308 Win, .243 Win, 7mm-08 Rem, etc. You can expect velocities of 2600-2700 fps with 140gr bullets in the 260 .Remington.

 Here’s something you’ve probably never seen before — a single-shot, bolt-action pistol chambered for the 6mmBR Norma cartridge (aka 6BR). Featured as one of our






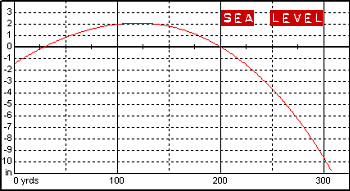

 One of our readers asked “What effect does altitude have on the flight of a bullet?” The simplistic answer is that, at higher altitudes, the air is thinner (lower density), so there is less drag on the bullet. This means that the amount of bullet drop is less at any given flight distance from the muzzle. Since the force of gravity is essentially constant on the earth’s surface (for practical purposes), the bullet’s downward acceleration doesn’t change, but a bullet launched at a higher altitude is able to fly slightly farther (in the thinner air) for every increment of downward movement. Effectively, the bullet behaves as if it has a higher ballistic coefficient.
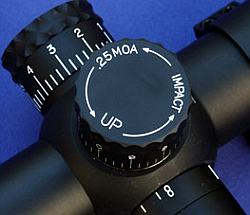 Reader Lindy explains how to check your clicks: “First, make sure the rifle is not loaded. Take a 40″ or longer carpenter’s ruler, and put a very visible mark (such as the center of an orange Shoot’N’C dot), at 37.7 inches. (On mine, I placed two dots side by side every 5 inches, so I could quickly count the dots.) Mount the ruler vertically (zero at top) exactly 100 yards away, carefully measured.

 Here’s a simple solution for lumpy front sandbags. Cut a small block the width of your fore-end and place that in the front bag between matches. You can tap it down firmly with a rubber mallet.
 Barrel/Shoulder Fit and Blue-Printing


