Most of us own a .223 Rem rifle. Now, thanks to our friends at Rifleshooter.com we can assess exactly how velocity changes with barrel length for this popular cartridge.
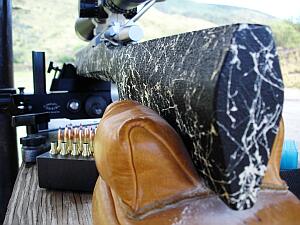
Rifleshooter.com performed an interesting test, cutting the barrel of a .223 Rem rifle from 26″ all the way down to 16.5″. The cuts were made in one-inch intervals with a rotary saw. At each cut length, velocity was measured with a Magnetospeed chronograph. To make the test even more interesting, four different types of .223 Rem/5.56 ammo were chron’d at each barrel length. The Rifleshooter.com team that conducts these tests has a full-service gun shop, 782 Custom Gunworks — visit 782guns.com.
Test Barrel Lost 25.34 FPS Per Inch (.223 Rem Chambering)
How much velocity do you think was lost, on average, for each 1″ reduction in barrel length? The answer may surprise you. The average speed loss of the four types of .223/5.56 ammo, with a 9.5″ shortening of barrel length, was 240.75 fps total (from start to finish). That works out to an average loss of 25.34 fps per inch.
5.56/.223 Barrel Cut-Down Speed Test 26″ to 16.5″
Start FPS at 26″
End FPS at 16.5″
Total Loss
Average Loss Per Inch
UMC .223 55gr
3182*
2968
214
22.5 FPS
Federal M193 55gr
3431
3187
244
25.7 FPS
Win m855 62gr
3280
2992
288
30.3 FPS
Blk Hills .223 68gr
2849
2632
217
22.8 FPS
*There may have been an error. The 25″ velocity was higher at 3221 fps.
Rifleshooter.com observed: “Cutting the barrel from 26″ to 16.5″ resulted in a velocity reduction of 214 ft/sec with the UMC 223 55-grain cartridge, 244 ft/sec with the Federal M-193 cartridge, 288 ft/sec with the Winchester M855 cartridge and 217 ft/sec with the Back Hills 223 68-grain match cartridge.”
How the Test Was Done
The testers described their procedure as follows: “Ballistic data was gathered using a Magnetospeed barrel-mounted ballistic chronograph. At each barrel length, the rifle was fired from a front rest with rear bags, with five rounds of each type of ammunition. Average velocity and standard deviation were logged for each round. Once data was gathered for each cartridge at a given barrel length, the rifle was cleared and the bolt was removed. The barrel was cut off using a cold saw. The test protocol was repeated for the next length. Temperature was 45.7° F.”
See More Barrel Cut-Down Tests on Rifleshooter.com
Rifleshooter.com has performed barrel cut-down tests for many other calibers/chamberings including 6mm Creedmoor, .308 Winchester, and .338 Lapua Magnum. See these test results at Rifleshooter.com.
Much Different Results with 6mmBR and a Longer Barrel
The results from Rifleshooter.com’s .223/5.56 test are quite different than the results we recorded some years ago with a barrel chambered for the 6mmBR cartridge. When we cut our 6mmBR barrel down from 33″ to 28″ we only lost about 8 FPS per inch. Obviously this is a different cartridge type, but also our 6mmBR barrel end length was longer than Rifleshooter.com’s .223 Rem start length. Velocity loss may be more extreme with shorter barrel lengths. And, of course, different cartridge types and powder/bullet combinations will yield different results.
Nobody wants to fumble around in a dark gun safe. Here’s a very affordable product that will illuminate your safe automatically when you open the door. These magnetic motion-detecting light bars (with 10 LEDs) can be placed on the sidewalls and shelves of your gun safe. As soon as you open the door, the light bars illuminate brightly. When you close the safe door, the LED light bars shut off, saving battery power.
Let there be light. Here’s a great accessory for your gun safe. This “smart” LED lamp turns itself on when you open the door, and off when you close the door. There’s a built-in magnet so you can easily attach the light to the inner walls or “ceiling” of your gun safe. It works, it’’s handy, and it’s inexpensive — just $20.99 for THREE (3) light bars. There is also an Amazon 10% Off coupon currently.
Each motion-sensing light bar has 10 LEDs and can provide 12+ hours of light with four AAA batteries (not included). Very versatile, these motion-sensor lamps can also be used in closets, car trunks, trailers, basements, storage sheds — anywhere you need light. This is an “Amazon’s Choice” for motion-sensor lighting.
Motion-Sensing Light Bar With Three Pivoting LED Heads
If you prefer a motion-sensing light system with a black body and dome-type LED lights, consider the Mind&Action Motion-activated Gunsafe Light. This provides “instant-on” motion-sensor activated LED illumination with three rotating light heads, which pivot independently. The unit can be mounted via provided magnetic mounting plate or Velcro-type panels. This $22.99 light system has earned 84% 4- and 5-Star ratings. The one downside is that it can be tricky to replace the batteries with the Velcro in place.
A while back, the Precision Rifle Blog conducted a fascinating study of Muzzle Brakes. PRB figured out a way to show the actual “blast pattern” of gasses ejecting from the ports of muzzle brakes. The result was a fascinating (and eye-catching) series of images revealing the distinctive gas outflows of 20+ different types of muzzle brakes. If you are considering buying and installing a muzzle brake on your rifle, you should definitely review this important PRB Muzzle Brake Test.
For a prone shooter, particularly on dusty, dirty or sandy ground, muzzle blast is a major bummer. Muzzle blast can be very disturbing — not just for the trigger-puller but for persons on either side of the gun as well. Some muzzle brakes send a huge shockwave back towards the shooter, and others send blast towards the ground, kicking dirt and debris into the prone shooter’s face. If there was a way to illustrate those factors — shockwave and debris — that might help shooters select one brake design over another.
Cal Zant at PrecisionRifleBlog.com applied a unique blend of creativity and resourcefulness to try to answer that question for 20+ muzzle brakes. Using high-speed photography and household products, he captured the blast pattern of 20+ different brake designs for easy side-by-side comparison. Can you figure out how Cal managed to show muzzle brake blasts so clearly? His “hi-viz” solution, revealed in the article, is very clever. See the eye-opening results for 20+ brakes, with illustrative photos, by visiting the Precision Rifle Blog Muzzle Brake Ground Signature Test Page.
This discussion of rear bag designs and fill levels may offer some new insights for many readers. By “tuning” your rear bag you can reduce hop on shot-firing and help your rifle track better. All that can translate to better scores, particularly with large-caliber rifles.
Tuning Your Rear Sand Bags
Over the years, noted gunsmith and a Benchrest Hall-of-Fame inductee Thomas ‘Speedy’ Gonzalez has learned a few things about “tuning” rear sandbags for best performance. On his Facebook page, Speedy recently discussed how sand bag fill levels (hard vs. soft) can affect accuracy. Speedy says you don’t want to have both your front and rear sandbags filled up ultra-hard. One or the other bag needs to have some “give” to provide a shock-absorbing function (and prevent stock jump). And you want to tune your fill arrangements to match your shooting style. Free recoil shooters may need a different fill levels than bag squeezers (who a softer bag but harder ears).
SAND BAGS & HOW TO FILL THEMby Speedy Gonzalez
I was asked several times by competitors at the S.O.A. Matches and F-Class Nationals as to how I fill my sand bags for benchrest competition. Here is a copy of a reply I gave several years ago:
Back in the old days, Pat McMillan told me: “You can not have two bags filled so hard that you gun bounces on them in the process of firing round at your target, especially if you have a rig with a very flexible stock. The bags must be set up in a manner for them to absorb the initial shock of the firing pin moving forward and igniting the primer.
Then [they must] maintain their shape and absorb the second shock wave as well the rearward thrust and torque of the rifle. What happens to the rifle when this is not done? Well let me tell you. The rifles have a very bad tendency to jump and roll in the bags. This causes many of those wild, lost shots that one can’t explain.”
Here’s some Good General Advice for Bag Set-up:
1. You should not have TWO hard bags [i.e. both front AND rear] in your set-up.
2. Heavy sand magnifies these phenomena.
3. If you are a bag squeezer, pack ears hard and leave bag pliable enough to squeeze for the movement required. You may pack front bag as hard as rules permit.
4. Free recoil shooters pack both bags firm, but not so hard as to allow stock jump. Especially if you have a stock with a very flexible forearm.
5. We use play-ground sand, also know as silica sand. I sift mine to get any large impurities out then mix it with 25% to 50% with Harts parakeet gravel to the desired hardness that I am looking for. The bird gravel keeps the sand from packing itself into that solid as a brick state.
Speaking of bricks — another thing that happens when shooters employ that heavy zircon sand is the ears form a low spot under them from recoil and then tend to rock back and forth with the rifle causing many low shots to crop up. Edgewood makes an Edgewood/Speedy rear bag specially reinforced under the ears to eliminate this scenario.
Shown below are the latest SEB Bigfoot Bags. Note that the bags sit perfectly flat — there is no bulge on the bottom even though the bags are “packed to the brim with sand”.
General Thoughts about Bag Construction and Ear Materials
I do not like the solid double-stitched leather bottoms. While this seems like a good idea, I see more shooters have problems because of them. They tend to slide around the bench and or slide with the rifle on recoil. The standard Protektor with Cordura rabbit ears and an Otto ring bag with a Cordura front would be what I would suggest to the new shooter or one of the Edgewood / Speedy rear bags, these mimic the “Donut” and feature a ring of leather around the bottom circumference that keep the bottom from rocking on the bench or ground[.]
One last note –If you use the Cordura bags, keep them sprayed with a good silicon spray or “Rain-Ex”. This keeps them from getting sticky. — Speedy
In this 54-minute video interview, Ken Clemens, co-owner of Brux Barrels, is interviewed by F-Class ace Erik Cortina for the Cortina Precision YouTube Channel. A lot of ground is covered, with many fascinating insights into barrel-making revealed. Watch and learn:
Interview with Ken Clemens, Co-owner of Brux Barrels
If you are involved in competitive shooting, and especially if you compete in F-Class or long-range benchrest, we recommend you take the time to watch this interview, perhaps in a couple of sessions because it runs for a lengthy 54 minutes. Ken Clemens explains the important procedures that go into making match-grade, cut-rifled barrels. Ken also explains some factors to consider when choosing a barrel-maker and specifying length, contour, land/groove configuration, and twist rates.
About BRUX Barrel-Making Methods
Brux starts with 4150 chrome-moly or 416R stainless steel double-stress-relieved bar stock — the best available. Barrels are bored with the Barnes gun drill, and reamed with an industry-standard Pratt & Whitney reamer. Brux uses solid carbide cutter hooks and employs special methods to achieve best results.
After the bore-cutting process is complete, each barrel is hand-lapped to high-precision standards. Multi-point inspections and meticulous hand processes (not possible in mass production) ensure extremely high quality. The Brux website says: “If there is the slightest deviation in surface finish or tolerance, the barrel is discarded.”
BRUX Specializes in Cut-Rifled Gun Barrels
Brux produces custom cut-rifled barrels, precision-crafted by professionals with extensive experience in both machine tools and competitive shooting. While Brux earned its reputation building great barrels for F-Class, benchrest, and long range competition, Brux also crafts hunting barrels. Brux states: “Hunters, big game and varmint, can benefit from the accuracy and dependability of a custom barrel made to your specifications.”
BRUX Barrels’ Owners Are Competitive Shooters
Brux owners and machinists are shooters themselves. So they understand how important a truly top-quality barrel can be. Everything else about a rifle can be great, but you need a superb barrel to win at the highest level. Owners Ken Clemens (pictured above) and Norm Brux are both seasoned shooters with years of experience using their own products.
Made in the USA — About the Home of Brux Barrels
The Wisconsin River Valley near Lodi has a storied history of hunting and shooting. The glacier spared many granite escarpments, leaving secluded glens and a topography rich in soil and wildlife habitat, which attracted families with old-world values and skills. Many of their descendants turned raw steel and iron into the tools necessary for farming – and some evolved to precision tooling and making gun barrels.
Wisconsin River Valley near Ferry Bluff State Natural Area.
If you read our lengthy article on Ultrasonic Case Cleaning by Jason Baney, you’ve seen the remarkable results that can be achieved with this method, as shown by the photo above. Ultrasonic cleaning has many advantages over traditional tumbling methods of case cleaning. There is no dust or media residue to remove from the brass, and when done right, the cases come out clean and shiny, inside and out, even the primer pockets.
In its Benchtalk Archives, Brownell’s has an excellent article discussing Ultrasonic Case Cleaning. Brownell’s staff compares results, with measured dwell times from 5 to 75 minutes, using both Mpro-7 and HCS 200 cleaning solutions. Tests are performed with once-fired and 5X-fired Tactical 20 (Tac20) cases, as well as once-fired .260 Rem Cases. The article also compares the results from ultrasonic cleaning vs. tumbling in walnut media. Below are Brownell’s results for Tac20 cases with the HCS 200 (non-acidic solution). Go to Brownell’s article for MPro7 results and Rem 260 results.
HCS 200 Cleaning Solution Test
Procedure — Solution was de-gassed for 15 minutes, then 63 Tac20 cases were placed in a single layer, in stainless steel mesh basket. The temperature of the starting solution was 102° F. When the cases were removed the temperature was 110° F.
Once-Fired Tactical Twenty Cases (HCS 200) — Observations 5 minutes: The exterior of the cases are not significantly brighter/cleaner. The primer pockets and case interiors are still dirty. 10 minutes: Exterior of the cases are brighter. 70% of the cases show some degree of cleaning of the primer pockets. Little difference seen inside the case, but case mouths are cleaner. 15 minutes: Case brightness is about the same. Still only 70% of the primer pockets are clean, but a larger portion of each is cleaner. A Q-tip swabbed inside the cases shows that carbon/powder residues are loosening up. 20 minutes: Case exteriors are brightening up. 80-85% of the primer pockets are about 90% clean. The insides of the cases and case mouths are cleaner. 25 minutes: Cases are brighter/cleaner than even new brass. 80-85% of the cases have almost completely clean primer pockets. The inside of the cases are 80-90% clean. 30 minutes: The insides of the cases and case mouths appear to be completely clean. 87% of the primer pockets are virtually 100% clean. 13% of the cases had stubborn primer pocket residue that could not be completely removed. 60 minutes: Eight cases (13%) were placed in the tank for another 30 minutes to try to remove the remaining residue in their primer pockets. Six out of the eight cases were completely clean.
Five-Times Fired Tac20 Cases — Observations 30 minutes: Based on the above observations, I didn’t begin to observe these 5-time fired cases until after 30 minutes: The exterior cases are bright/clean. Brighter than new cases. The primer pockets on 75% of the cases are 75% clean. The remaining cases had primer pockets that were only 25% clean. The inside of the cases appear to be clean. 65 minutes: 25% of the primer pockets were 95% clean, 25% of the primer pockets were 90% clean, 25% of the primer pockets were 85% clean; and 25% were 80% clean. 75 minutes: 75% of the primer pockets were 90% clean.
How Does Ultrasonic Cleaning Work? The Brownell’s Benchtalk article explains: “Ultrasonic cleaning uses high-frequency sound waves (generally between 20-80 kHz) to remove a variety of contaminants from objects immersed in a liquid. The result of these high-frequency sound waves is a process called cavitation. These high frequency bursts of ultrasonic energy produce a three-dimensional wave of alternating positive and negative pressure areas as the sound wave passes through the solution. During negative pressure, microscopic cavitation bubbles form and will continue to grown until they reach resonant size. As the positive sound wave passes, the pressure rises rapidly and implodes these tiny bubbles. Before these minuscule bubbles implode they store a tremendous amount of energy. These bubbles can be as hot as 10,000 degrees and have as much as 50,000 lbs per square inch of pressure. This sounds alarming, but you have to remember that these bubbles are microscopic in nature and pose no harm to anything, unless you are a carbon /powder residue deposit on a cartridge case!
When this cavitation bubble implodes near your brass case, it transforms the bubble into a jet about 1/10th of its size. This jet of energy can travel as fast as 400 km/hour. At 43 kHz, as is the frequency for our L & R HCS 200 ultrasonic cleaner, this is happening 43,000 times per second. This micro-burst of extreme energy is responsible for removing contaminants from the surface of your cartridge brass. Ultrasonic cleaning can reach into crevices and inaccessible areas and remove surface debris that can’t be cleaned by any other process.”
Lapua, producer of premium-quality bullets, brass, and ammo, has released a very impressive new mobile App for hunters. The FREE Lapua Hunt App is available now for Android and iOS (Apple) smartphones and tablets. This Hunt App can be downloaded for FREE via Google Play and the Apple iOS iStore.
The App provides ballistics plus mapping and weather reporting. Lapua Hunt really combines the features of other popular hunting Apps with a very sophisticated 6DOF ballistics programs. Lapua Hunt incorporates the product data and advanced ballistics calculator from the excellent Lapua Ballistics App. Lapua states: “Lapua Hunt is the new digital solver for hunters that appreciate ethical hunting, accuracy, and safety. Add your own rifle and reticle, select the best ammo and game category, and you are ready to enjoy your hunting success harvesting game of all sizes.” The basic Hunt App is FREE with all essential functionality. However, additional bonus features are offered for “In-App” purchase.
In Lapua Hunt’s basic calculator view, you can log the wind speed and direction (red needle in the circle), the shooting angle, and the distance to target/prey. In addition, you can easily log weather information including temperature, air pressure, and relative humidity (enter manually or get info from nearby weather station). Additional paid features allow cartography/map view, and the ability to setup a hunting team.
Key Features of Lapua Hunt App
– Utilizes 6DOF, the most accurate ballistics calculation method*
– Includes the latest Lapua cartridge and bullet information
– Maximum target distance 300 meters / 320 yards
– Choose metric or imperial values
– Several result outputs available depending on your needs: map, numerical, reticle, and table views
– Create your own teams and see the location of members on the map
– Compass helps to set the wind direction
– Measure distances in map view**
– Get the weather parameters from nearest weather station
– Safety elements: map view, own location, team member location, compass, maximum and current range for selected ammo
* 6DOF tracks both the pitch, yaw and roll as well as the up/down, left/right, and forwards/backwards movement of the bullet.
** In the map view, it is also possible to measure distances, verify the current and optimal maximum range and sweep area, and view the current and forecasted scent direction in the area.
Create and maintain your own profiles for Game, Rifle, Cartridges:
– Select game category
– Create profiles for your hunting rifles, with scope/reticle info, and ammunition types
– Define custom cartridges (calculations based on G1 or G7 BC and Siacci method)
– Access and share your data from multiple devices.
The Lapua Ballistics App is available for Android and iOS smart phones and mobile devices free of charge. For more info, visit www.lapua.com/support/lapua-hunt-app.
Bonus Feature Set Available as In-App purchases
Basic Hunter: All free features + the ability to create custom cartridges. Basic Hunter+: All free features + the ability to create custom cartridges, plus Ballistic map view. Advanced Hunter: All free features + the ability to create custom cartridges; Ballistic map and Advanced map views; 5 day wind direction. Pro Hunter: All free features + the ability to create custom cartridges; Ballistic map and Advanced map views; 5 day wind direction; Teams feature.
Do you have some ammo that got loaded incorrectly, perhaps with the wrong powder? Then you’ll want to disassemble the ammo for safety’s sake. You can use an impact puller to do this task, but if you have more than a dozen rounds or so, you may prefer to use a collet-style bullet puller. These work very quickly and positively, making quick work of big jobs. The efficiency of the collet-style puller is worth the investment if you frequently disassemble ammo. These devices retail for under $35.00 (collets sold separately). Normally, you’ll need a specific collet for each bullet diameter. But collets are not that costly, so this isn’t a big deal, particularly if you only load a few calibers, such as .223, 6mm, and .308.
Hornady and RCBS use different mechanisms to tighten the collet around the bullet. On the red lever Hornady Cam-Lock Bullet Puller, a lever-arm on the top of the bullet puller serves to tighten the collet around the bullet. Simply rotate the lever from the vertical to the horizontal position to grab the bullet. Lower the ram to remove the case. The bullet will drop out when you return the lever arm to the vertical position. This is demonstrated in the video below:
Hornady Cam-Lock Bullet Puller Demonstrated
Collet bullet-pullers resemble a loading die with a lever or handle on the top. They screw into a standard reloading press. Hornady and RCBS both make collet-style bullet pullers. They use the same basic principle — the device tightens a collet around the bullet, and then the bullet is separated from the case by lowering the press ram. NOTE: Collet pullers may leave small marks on your bullets, unlike impact (kinetic) pullers.*
Like the Hornady tool, the RCBS Bullet Puller employs a collet to grab the bullet. However, the RCBS tool tightens the collet in a different way. The head of the RCBS tool is threaded internally. By rotating the lever arm clockwise in a horizontal circle you squeeze the collet around the bullet. To remove the bullet, after lowering the press ram, simply spin the lever arm back in the opposite direction. The use of the RCBS tool is demonstrated in these two videos:
RCBS Collet Bullet Puller Demonstrated:
WARNING: When removing bullets from loaded cartridges, always make sure there are no obstructions or debris in your shell-holder or under the loaded round. NEVER engage a primer seating accessory on your press when working with loaded rounds. You can cause a round to discharge by contacting the primer! Also, we recommend you keep your head and torso away from the bullet puller tool at all times.
*By contrast, impact pullers rarely mark bullets, particularly if you put a little bit of foam or paper wadding in the closed end of your impact puller. When dismantling loaded rounds, powder kernels can get trapped in the wadding, so you should remove and replace the wadding before changing to cartridges loaded with a different powder type (assuming you intend to save the powder).
For many years, the Swarovski Optik website featured a blog with interesting technical articles. (Unfortunately some of these articles have been taken offline.) In the “On Target” series of blog stories, Swarovski provided a handy explanation of how optics systems work, with exploded diagrams of rifle scopes, spotting scopes, and binoculars. We’ve reproduced the key diagrams here. CLICK HERE for Swarovski On Target Archive.
Scope Terminology Focusing Lens
The focusing lens is an adjustable lens inside the optical system for focusing the image at different distances…. In the case of rifle scopes, apart from focusing, the focusing lens also facilitates parallax compensation.
Objective Lens
The objective lens is the optical system’s front lens group facing the object and operates like a converging lens. Its purpose is to display an image which, at the image plane, appears upside down, laterally transposed and reduced, and which is subsequently displayed correctly again by the reversal system.
Diopter Adjustment
For rifle scopes, the reticle can be focused using the diopter adjustment on the eyepiece, thereby correcting any visual impairment. [Editor’s Note: Movable eyepiece diopter adjustment is not offered on all rifle scopes. It is a useful feature on Swarovski and other premium scopes. This allows shooters who need eyeglasses to get a sharply focus image even without wearing corrective lenses. Of course shooters should always wear ANSI-certified eye protection. With the diopter, folks who need correction can use inexpensive, non-Rx safety eyewear instead of expensive prescription safety glasses.]
Reversal System
The purpose of the reversal system is to reverse the image by means of prisms in binoculars and telescopes, and lenses in rifle scopes….The lens reversal system is needed in rifle scopes to control the variable magnification and move the exit pupil[.]
Resource tip by EdLongRange. We welcome reader submissions.
Here’s a very cool 3D Animation showing pistol rounds being chambered and fired in a semi-auto handgun. Computer-generated graphics provide a look inside the cartridge at the moment of ignition as the primer fires and the flame front moves through the ignited powder. It’s really kind of mesmerizing. If you’ve every wondered just what happens inside your cartridges the moment that firing pin strikes, then watch this video. It has racked up 6.1 million views on YouTube with over 48,000 likes.
Watch Video to See Handgun Ammo Being Chambered and Fired:
Mute Enabled — Click Speaker Icon to Hear Audio. Firing Sequence Starts at 1:28.
This animated video from German ammo-maker GECO (part of the Swiss RUAG group of companies) reveals the inside of a pistol cartridge, showing jacket, lead core, case, powder and primer. Employing advanced 3D rendering and computer graphics, the video shows an X-ray view of ammo being loaded in a handgun, feeding from a magazine.
Then it really gets interesting. At 1:28 – 1:50 you’ll see the firing pin strike the primer cup, the primer’s hot jet streaming through the flash-hole, and the powder igniting. Finally you can see the bullet as it moves down the barrel and spins its way to a target. This is a very nicely-produced video. If you’ve ever wondered what happens inside a cartridge when you pull the trigger, this video shows all. They say “a picture’s worth a thousand words”… well a 3D video is even better.


 Back in the old days, Pat McMillan told me: “You can not have two bags filled so hard that you gun bounces on them in the process of firing round at your target, especially if you have a rig with a very flexible stock. The bags must be set up in a manner for them to absorb the initial shock of the firing pin moving forward and igniting the primer.


 If you read our lengthy article on
 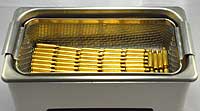 The Brownell’s Benchtalk article explains: “Ultrasonic cleaning uses high-frequency sound waves (generally between 20-80 kHz) to remove a variety of contaminants from objects immersed in a liquid. The result of these high-frequency sound waves is a process called cavitation. These high frequency bursts of ultrasonic energy produce a three-dimensional wave of alternating positive and negative pressure areas as the sound wave passes through the solution. During negative pressure, microscopic cavitation bubbles form and will continue to grown until they reach resonant size. As the positive sound wave passes, the pressure rises rapidly and implodes these tiny bubbles. Before these minuscule bubbles implode they store a tremendous amount of energy. These bubbles can be as hot as 10,000 degrees and have as much as 50,000 lbs per square inch of pressure. This sounds alarming, but you have to remember that these bubbles are microscopic in nature and pose no harm to anything, unless you are a carbon /powder residue deposit on a cartridge case!
 When this cavitation bubble implodes near your brass case, it transforms the bubble into a jet about 1/10th of its size. This jet of energy can travel as fast as 400 km/hour. At 43 kHz, as is the frequency for our L & R HCS 200 ultrasonic cleaner, this is happening 43,000 times per second. This micro-burst of extreme energy is responsible for removing contaminants from the surface of your cartridge brass. Ultrasonic cleaning can reach into crevices and inaccessible areas and remove surface debris that can’t be cleaned by any other process.”


 Like the Hornady tool, the


 This animated video from German ammo-maker


