Many of our readers use AR-type rifles for Service Rifle matches, varmint hunting, 3-Gun competition, or defensive use. AR-platform rifles can be configured in a multitude of ways to suit the application. But if you plan to put together your own purpose-built AR rifle, how do you get started?
For AR Do-It-Yourselfers, we suggest reading the late Glen Zediker’s book, the Competitive AR-15 Builders Guide. Following on Zediker’s The Competitive AR15: Ultimate Technical Guide, the Builders Guide provides step-by-step instructions that will help non-professional “home builders” assemble a competitive match or varmint rifle. This book isn’t for everyone — you need some basic gun assembly experience and an aptitude for tools. But the Competitive AR-15 Builders’ Guide provides a complete list of the tools you’ll need for the job, and Zediker outlines all the procedures to build an AR-15 from start to finish.
One of our Forum members who purchased the AR-15 Builders Guide confirms it is a great resource: “Much like any of the books Mr. Zediker puts out this one is well thought-out and is a no nonsense approach to AR building. I can not stress how helpful this book is from beginner to expert level.”
Along with assembly methods, this book covers parts selection and preparation, not just hammers and pins. Creedmoor Sports explains: “Knowing how to get what you want, and be happy with the result, is truly the focus of this book. Doing it yourself gives you a huge advantage. The build will honestly have been done right, and you’ll know it! Little problems will have been fixed, function and performance enhancements will have been made, and the result is you’ll have a custom-grade rifle without paying custom-builder prices.” Other good resources for AR projects is Gunsmithing the AR: The Bench Manual, and the Building Your AR from Scratch DVD.
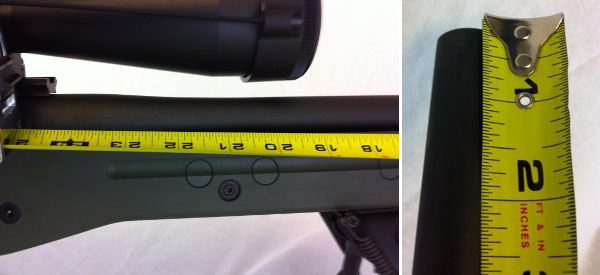
Above is a sectioned barrel showing an 80gr Sierra that was fired in a .223 bolt action with a cleaning rod in the bore. Both the bullet and the rod are still in the bore.
A Negligent Shooter Gets Lucky
“Here we have a story so filled with negligent acts that I can only marvel that the shooter survived the experience. The photo and narrative were provided by the gunsmith who took in the repair job, my comments are in italics. It’s worth reading, we can’t get enough safety warnings in our hobby.” — GS Arizona, Rifleman’s Journal
Description of Incident (with Commentary)
The shooter had a stuck case in his .223 chamber. The stuck case was actually a loaded round that didn’t fire. It wouldn’t extract because it was a .222 case that got mixed in with his .223 brass. [He had loaded the wrong brass.] I saw the loaded round with an 80gr bullet in it and a light primer strike. Negligent Act #1: Wrong brass was mixed in with the brass being reloaded.
The shooter removed the stuck case with a 3-piece aluminum rod. Negligent Act #2: Hammering out a loaded round with a cleaning rod. People have been killed doing this as the round can fire and drive the cleaning rod right into you. I remember one such incident about 5 years ago, the shooter was pounding out a stuck round, the cleaning rod went right through him, he didn’t survive.
The shooter didn’t notice only two segments of the cleaning rod came out when he removed it. Negligent Act #3: If you put anything at all down the barrel of a rifle you’d better make darn sure you got it all out before doing anything else!
He then chambered another round and fired it. Negligent act #4: If you’ve had a barrel obstruction of any kind, and if you’ve put something in the barrel, look through the barrel before proceeding! Within the past two years I know of an incident in which a benchrest shooter was killed in exactly this manner. The pressure built up and the rifle bolt came out of the receiver and into his chest.
The shooter is ‘OK’, but did not escape unscathed. He said there was a huge explosion and after regaining his senses found he was bleeding heavily from his forehead. The blood was thick enough that it ran in his eyes and he couldn’t see. In his words “I thought I was going to die”.
He has what looks like a pretty deep cut about an inch long on the side of his head, right in line with his right eye starting where the eye socket turns out to the side of the skull. And no telling what he’s got in the way of brass particles embedded in his forehead.
He was shooting on private property, and was alone when this happened. Negligent Act #5: Don’t shoot alone! Accidents happen, this is just one more example. If we could predict accidents, we wouldn’t have them. Always shoot with at least one other person.
He managed to get the bleeding stopped, or at least under control, packed his car and drove himself home without seeking immediate medical attention. Negligent Act #6: This one could have cost him his life after being lucky enough to survive the incident. There’s no way to know what’s happened just after an incident like this. He should have been at a hospital getting checked for shrapnel in the head.
The rod and slug could not be driven out. Since the barrel had a high round count there was no point in trying to salvage it. Note that the aluminum rod is expanded to a tight fit in the bore for the first couple inches. The base of the bullet is a little over 2″ from the mouth of the chamber.
What we’ve seen here is negligence and an absolute indifference to the established rules of safe reloading and gun handling, from start to finish, capped off with the shooter’s foolish avoidance of medical treatment. This shooter is lucky to be alive, but he’s surely used up all his luck. Don’t assume you’ll be so fortunate.
This article originally appeared in the Rifleman’s Journal website, which is no longer available.
Have you tried IMR Enduron powders yet (IMR 4166, 4451, 4955, 7977, and/or 8133)? We’ve been impressed with what we’ve seen. IMR’s line of Enduron extruded powders offer excellent temp stability, reduced copper fouling, and good load density for many popular cartridges (such as .223 Rem, 6mmBR, .308 Win, .30-06, 300 WSM to name a few). Some of our Forum members have reported excellent results with IMR 4166 in the 6mmBR, Dasher, 6.5×47 Lapua and .308 Win. One member wrote: “in my 6.5×47… 4166 gives speeds and accuracy pretty much exactly the same as Varget.” And other shooters have observed reduced copper fouling with Enduron series powders, so IMR’s Enduron anti-fouling chemistry does seem to work.
IMR now offers five (5) Enduron powders: IMR 4166, IMR 4451, IMR 4955, IMR 7977, and IMR 8133. Shooters looking for good alternatives to hard-to-find extruded powders should definitely check out the Enduron line-up. Precision shooters will find an Enduron option well-suited to most popular precision cartridge types. For example, IMR 4166 is a good replacement for Hodgdon Varget (commonly used in the .223 Rem, 6mmBR and .308 Win), while IMR 4955 is a fine substitute for H4831 (favored by F-Open shooters for the .284 Win and 7mm WSM cartridges).
The Enduron Line-Up of Five Powders
IMR now offers five Enduron powders that cover a broad range of burn rates. They are suitable for a wide variety of cartridges, from small varmint cartridges all the way up to the .338 Lapua Magnum.
IMR 4166 possesses the fastest burn rate in the Enduron lineup. It is the perfect burn speed for cartridges such as .308 Win, 7.62mm NATO, 22-250 Rem and 257 Roberts. A versatile, match-grade propellant, IMR 4166 is comparable to Hodgdon® Varget.
IMR 4451 is a mid-range burn speed powder, ideally suited for cartridges such as .270 Winchester, .30-06 and 300 Winchester Short Magnum. This powder is comparable to Hodgdon H4350.
IMR 4955 is a medium burn speed powder, falling in between IMR 4451 and IMR 7977 in burn speed. It provides top performance in big game cartridges such as 25-06, 280 Remington and 300 Winchester Magnum. This powder is comparable to Hodgdon H4831.
IMR 7977 is a slower burn rate in the Enduron family. Loading density is perfect for magnums. This is a true magnum propellant yielding outstanding performance in .300 Winchester Magnum, 7mm Remington Magnum and .338 Lapua Magnum. IMR 7977 is comparable to Hodgdon H1000.
IMR 8133 IMR Enduron 8133 is the slowest burn rate in the Enduron family. Loading density is perfect for the very large magnums, including the 6.5mm and 7mm magnums. This is a true magnum propellant yielding outstanding performance in 6.5-300 Weatherby, .264 Win Mag, 28 Nosler and .300 Rem Ultra Mag, among other cartridges.
IMR Enduron Technology powders are sold in one-pound (1 lb) and eight-pound (8-lb) containers through quality retailers including Graf & Sons, Midsouth, and Powder Valley. Check frequently for current availability as these will sell out quickly after arrival. Also check your local sporting goods dealers for recent powder shipments.
Story by Paula Crenshaw
We like air rifles both for fun shooting and for competition. However, so many options are now available that is easy to get overwhelmed with the choices. Thankfully, there is a good book that helps air rifle shooters make informed decisions about air guns and accessories. Steve Markwith’s comprehensive resource, Air Rifles: A Buyer’s and Shooter’s Guide offers a wealth of useful information. This 154-page book is now available for $12.95 (paperback) or $9.95 (Kindle).
“This is a very informative book explaining the ins and outs of air rifles, their capabilities and limitations. I highly recommend this book to anyone considering purchasing an air rifle for marksmanship practice or small game hunting.” – L. Stanek, Verified Amazon Reviewer
Read Free Sample Chapters Online
If you go to Amazon.com and click on the cover of this book, you can view a FREE preview with extensive samples from many chapters. The book covers all the most important types of air rifle systems, both pre-charged pneumatics and other self-charging guns. Markwith reviews the wide variety of pellets available, offering suggestions for particular applications. You’ll also find a useful discussion of Airgun Power, Range, and Accuracy. This will help you pick the right air rifle.
Markwith explains the many attractions of airguns. They are not considered firearms (in most jurisdictions) so they can be purchased at local shops or mail-order outlets without FFL fees or background checks. You’ll find a huge online selection of airguns at PyramydAir.com that can ship direct to you — no FFL required. Air rifles are also quiet and very inexpensive to shoot. While .177 and .22 caliber air rifles are most common, there are also larger-caliber airguns offered for hunting or special applications.
Pyramyd Air has dozens of helpful videos about air rifles and air pistols.
In the video below, Forum member (and F-Class ace) Erik Cortina shows how to install a Jewell Benchrest trigger into a Kelbly F-Class Panda action. You could follow the same simple procedure to install a Jewell in a standard Panda action. Kelbly’s sells both standard and long versions of the F-Class Panda action. Both versions feature integral recoil lugs in the front.
To see more detail in this “how-to” video, you can zoom it to full-screen size. Simply click the full-screen icon (4-cornered frame) just to the right of the YouTube logo in the lower right.
Want to shoot better scores at your next match? Here’s a smart, inexpensive do-it-yourself project from the good folks at Criterion Barrels. For less than a dollar or two in materials, in just a few minutes you can create a handy, effective mirage shield, custom-fitted to your favorite rifle.
All precision shooters should be familiar with mirage, a form of optical distortion caused primarily by variations in air temperature. Savvy shooters will use mirage as a valuable tool when gauging wind speed and direction. Natural mirage is unavoidable, but there are many techniques designed to limit its influence in long-range marksmanship.
A form of mirage can be produced by the barrel itself. Heat rising from the barrel may distort sight picture through your optics, leading to erratic results. Mirage caused by barrel heat can be reduced dramatically by a simple, light-weight mirage shield.
How to Make a Mirage Shield
A mirage shield is an extremely cost-effective way to eliminate a commonly-encountered problem. Making your own mirage shield is easy. Using old venetian blind strips and common household materials and tools, you can construct your own mirage shield for under one dollar.
Materials Required:
1. Vertical PVC Venetian blind panel
2. Three 1”x1” pieces adhesive-backed Velcro
3. Ruler or tape measure
4. Scissors or box cutter
5. Pencil or marker
1. Measure the distance from the end of the receiver or rail to the crown of the barrel.
2. Using a pencil and ruler, measure the same distance and mark an even line across the blind.
3. Cut across the line using scissors or a box cutter, shortening the blind to the required length. (Remember, measure twice, cut once!)
4. Expose the adhesive backing on the loop side of the Velcro. Center and apply the Velcro strips on the barrel at regular intervals.
5. Expose the adhesive backing of the fuzzy side of the Velcro.
6. Place the blind on the upper side of the barrel. Apply downward pressure. Once the Velcro has secured itself to the barrel, separate the two sides. Proceed to mold both sides of the Velcro to fit the contour of their respective surfaces.
7. Reaffix the blind. Barrel related mirage is now a thing of the past!
NOTE: You can attach the Velcro on the opposite side of the blind if you want the blind to curve upwards. Some folks thinks that aids barrel cooling — it’s worth a try.
How to Remove and Re-Attach the Mirage Shield
Removal of your mirage shield is accomplished by simply removing the blind. You can un-install the Velcro by pulling off the strips and then gently removing any adhesive residue left behind using an appropriate solvent. (Simple cooking oil may do the job.) Caution: With fine, high-polish blued barrels, test any solvent on a non-visible section of the barrel. Before storing the gun, re-oil the barrel to remove active solvents and residual fingerprints.
We have all been there — you place a piece of tumbled brass in the shell-holder of your press, raise it into the die, and suddenly it is like somebody hit the brakes. The case is stuck in the die. Your first instinct is to reverse it out. You crank on the handle, and BANG! The rim rips off the case head and you are looking at a piece of brass stuck in the die.
A stuck case is one of the boo-boos that all of us reloaders have faced from time to time. If proper lubrication is applied, then it should not be a problem. No matter if you are a seasoned reloader or new to it, this situation can happen. Take your time, use the proper procedures, and you will be back in business in no time! This article explains how to avoid stuck cases (through proper lubrication) and how to use a stuck case removal system.
What Causes Stuck Cases
One of the first common mistakes reloaders face is the stuck case. It can be caused by too much or too little lube. Too much and a vacuum can be formed causing the case to become suctioned into the die. Too little lube and friction is the culprit. So what is the cure? There is no exact cure, but the best lube that we have found so far is just a dab of Imperial Sizing Die Wax on your fingers and applied in a thin coat on the body of the case, not the shoulder or neck. Too much of this wax can cause the vacuum effect, or can eventually load your die up with gobs of residue. If it is applied to the shoulder area, or the leftover wax moves up into the shoulder region of the die, you will see dents or dimples in the shoulder. [AccurateShooter.com Editor’s Note: For normal full-length sizing of small cases such as 220 Russian/PPC, 6mmBR, 6.5 Grendel, or 6.5×47 Lapua we recommend Ballistol (aerosol) lube. It is very slippery, goes on very thin, and does not gum up the die.]
A great way to ensure that your dies are clean is to use a simple chamber mop with a dab of your favorite solvent on it and clean out the die. Be sure all of the solvent is out after cleaning by spraying the die out with Quickscrub III or use a clean chamber mop. If you are storing your dies, you can apply a thin coat of a good oil to protect the steel such as TM oil or Starrett M1 Spray.
This video shows how to use an RCBS Stuck Case Removal Kit:
Using a Stuck Case Removal Kit
If you do stick a case in your die there are a few good stuck case removal kits available. Each one works in a similar fashion. I have found the Hornady kit very effective and easy to use. [Editor: Forster, Lyman, and RCBS also make good kits for removing a case stuck in a die.]
Basically what you do is remove the die from the press. Unscrew the decapping assembly and pull it out as far as you can. You then need to drill/tap threads into the stuck case head (this is why it is suggested to unscrew the decapping assembly as far as you can to get it clear of the drill bits). Once this is done screw the die back into the press. You then install the included shellholder attachment on the shellholder ram, and thread it into the case via a small wrench. With some elbow grease you can reverse the stuck case out of the die with the leverage of the press, and not damage the die.
However if the case is stuck… REALLY stuck, you may pull out the threads on the case and you are still left with a stuck case in the die without any way to pull it out. If the case is really difficult to remove even with the use of a stuck case removal kit, do not try to be Hercules with the press ram. Here is a trick that may work. Take the die with the stuck case and place it in your freezer for a couple of hours. Then repeat the removal with the cold die. The freezing temperatures may cause the brass to contract, and make removal easier. If this does not work it is recommended to send it to the die manufacturer. They will be able to remove the case without damaging the die.
Another fix if you can remove the decapping assembly completely is to use a tap hammer and a punch or small wooden dowel to knock the stuck case out. This isn’t the best way since it is very possible that you will damage the die internally or externally on the threads, or both. Send the die to the manufacturer to have this done properly. You will be happier in the long run.
This article appears courtesy Sinclair International. It first appeared in Sinclair’s Reloading Press Blog.
Why You CANNOT Rely on the MV Printed on the Ammo Box!
When figuring out your come-ups with a ballistics solver or drop chart it’s “mission critical” to have an accurate muzzle velocity (MV). When shooting factory ammo, it’s tempting to use the manufacturer-provided MV which may be printed on the package. That’s not such a great idea says Bryan Litz of Applied Ballistics. Don’t rely on the MV on the box, Bryan advises — you should take out your chrono and run your own velocity tests. There are a number of reasons why the MV values on ammo packaging may be inaccurate. Below is a discussion of factory ammo MV from the Applied Ballistics Facebook Page.
Five Reasons You Cannot Trust the Velocity on a Box of Ammo:
1. You have no idea about the rifle used for the MV test.
2. You have no idea what atmospheric conditions were during testing, and yes it matters a lot.
3. You have no idea of the SD for the factory ammo, and how the manufacturer derived the MV from that SD. (Marketing plays a role here).
4. You have no idea of the precision and quality of chronograph(s) used for velocity testing.
5. You have no idea if the manufacturer used the raw velocity, or back-calculated the MV. The BC used to back track that data is also unknown.
1. The factory test rifle and your rifle are not the same. Aside from having a different chamber, and possibly barrel length some other things are important too like the barrel twist rate, and how much wear was in the barrel. Was it just recently cleaned, has it ever been cleaned? You simply don’t know anything about the rifle used in testing.
2. Temperature and Humidity conditions may be quite different (than during testing). Temperature has a physical effect on powder, which changes how it burns. Couple this with the fact that different powders can vary in temp-stability quite a bit. You just don’t know what the conditions at the time of testing were. Also a lot of factory ammunition is loaded with powder that is meter friendly. Meter friendly can often times be ball powder, which is less temperature stable than stick powder often times.
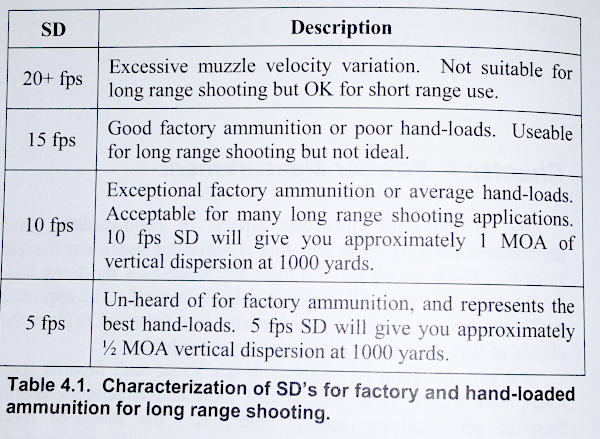
3. The ammo’s Standard Deviation (SD) is unknown. You will often notice that while MV is often listed on ammo packages, Standard Deviation (normally) is not. It is not uncommon for factory ammunition to have an SD of 18 or higher. Sometimes as high as 40+. As such is the nature of metering powder. With marketing in mind, did they pick the high, low, or average end of the SD? We really don’t know. You won’t either until you test it for yourself. For hand-loaded ammo, to be considered around 10 fps or less. Having a high SD is often the nature of metered powder and factory loads. The image below is from Modern Advancements in Long Range Shooting: Volume II.
4. You don’t know how MV was measured. What chronograph system did the manufacturer use, and how did they back track to a muzzle velocity? A chronograph does not measure true velocity at the muzzle; it simply measures velocity at the location it is sitting. So you need to back-calculate the distance from the chrono to the end of the barrel. This calculation requires a semi-accurate BC. So whose BC was used to back track to the muzzle or did the manufacturer even do that? Did they simply print the numbers displayed by the chronograph? What kind of chronograph setup did they use? We know from our Lab Testing that not all chronographs are created equal. Without knowing what chronograph was used, you have no idea the quality of the measurement. See: Applied Ballistics Chronograph Chapter Excerpt.
5. The MV data may not be current. Does the manufacturer update that data for every lot? Or is it the same data from years ago? Some manufacturers rarely if ever re-test and update information. Some update it every lot (ABM Ammo is actually tested every single lot for 1% consistency). Without knowing this information, you could be using data for years ago.
CONCLUSION: Never use the printed MV off a box of ammo as anything more than a starting point, there are too many factors to account for. You must always either test for the MV with a chronograph, or use carefully obtained, live fire data. When you are using a Ballistic Solver such as the AB Apps or Devices integrated with AB, you need to know the MV to an accuracy down to 5 fps. The more reliable the MV number, the better your ballistics solutions.
Some custom barrel makers are now honing barrels (after drilling) to improve bore diameter uniformity, smooth the interior finish, and reduce barrel lapping times. For years, large-scale manufacturers of hammer-forged barrels have employed honing. Now the process is being used by smaller, “boutique” barrel-makers. This article explains how and why barrel honing is done. Take the time to watch the video. For anyone with an interest in barrel-making, this video from Sunnen Products Co. is an eye-opener.
Barrel Honing Process Demonstrated (Worth Watching!):
For custom barrel makers, honing is a time-saver and cost cutter. A few minutes on a honing machine can cut lapping times in half, leaving a cross-hatched surface finish in single or low double-digit Ra. Honing is the same process used to make diesel fuel injectors with bore roundness and straightness controlled to fractions of a micron (<0.000040"), with surface finish Ra ≤0.15 µm (6 µin).
A key manufacturing process used for hammer-forged barrels is now getting attention from the makers of custom button-rifled barrels. This process is precision bore-honing. Honing produces a high-quality bore surface fast, which is critical to hammer forging. (Why is honing so important with hammer forging? Surface finish is the one feature of the barrel that cannot be controlled in hammer forging. Surface imperfections in a barrel blank tend to be amplified as the blank is formed on the rifling mandrel. And if the bore is chromed afterwards, imperfections in the surface finish become even more obvious.)
Honing dramatically improves bore diameter size uniformity and accuracy, surface finish and roundness throughout the length of the barrel. It can certainly be used in place of a pre-rifling lap. The chief difference between a lapped and honed bore is the direction of the finish lines in the bore. Honing leaves fine spiraling crosshatch lines, while a lap leaves lines going longitudinally in the bore. After rifling the manufacturer can remove the crosshatch finish with a quick lap if desired. Honing is fast, accurate, and can be automated. Its surface quality and geometry can duplicate lapping, except for the longitudinal lines of the lapped finish.
In 2015 Frank Green of Bartlein Barrels told us: “We worked with Sunnen and we did all the initial testing on the prototype machine for them. The machine works great! We ordered and received … a new manufactured machine with the changes we wanted on it and [subsequently] ordered a second one.”
The Sunnen hone secures the barrel blank in a 3-jaw chuck, with honing oil pumped into one end while the tool works from the opposite end. Sunnen’s specialized Long Bore Tool uses metal-bond diamond or CBN superabrasives to quickly remove reamer marks, waviness, tight spots and other imperfections left by upstream processes.
Sunnen states that: “Honing is an ideal replacement for hand-lapping barrel blanks before rifling. It quickly removes reamer scratches and surface waviness without labor-intensive hand lapping. By producing a consistent bore diameter (±0.0001″ or less), parallelism, roundness and surface finish end to end, honing yields more consistent performance from rifling buttons and cutters, resulting in a constant groove depth. The ideal bore geometry reduces distortion of the bullet shape.”
Computer-Controlled Bore-Honing
Honing can be done with great precision through the use of advanced, computer-controlled honing machines. Sunnen Products Company offers an advanced machine for .17 to .50-caliber barrels (see control panel below). The spindles on this machine can correct bore size imperfections so small only an air gauge can measure them. The consistency this allows improves bore uniformity, which, in turn, produces more accurate barrels for the precision market.
Sunnen Products Company is the world’s largest vertically-integrated manufacturer of honing systems, tooling, abrasives, coolants, and gauging for precision bore-sizing and finishing. Sunnen’s customers include manufacturers of diesel and gas engines, aerospace components, hydraulic components, oil field equipment, and gun/cannon barrels. Sunnen employs more than 600 people worldwide.
Brownells’ Do-It-Yourself (DIY) video series provides logical, step-by-step installation help for triggers, stocks, and springs. Nine separate videos cover Brownells various DIY Kits. Not sure if you’re up to the project? Just watch each video to see what’s involved. The nine DIY kits are:
This video shows Remington 700 after-market trigger installation:
In the Do-It-Yourself videos, Brownells’ Gun Techs proceed step-by-step, showing you exactly how to install the parts on your gun. Each kit also comes with complete, illustrated instructions you can take to the bench. To learn more, click the links above, or CLICK HERE to visit Brownells’ DIY Kit online page.


 Many of our readers use AR-type rifles for Service Rifle matches, varmint hunting, 3-Gun competition, or defensive use. AR-platform rifles can be configured in a multitude of ways to suit the application. But if you plan to put together your own purpose-built AR rifle, how do you get started?


 A stuck case is one of the boo-boos that all of us reloaders have faced from time to time. If proper lubrication is applied, then it should not be a problem. No matter if you are a seasoned reloader or new to it, this situation can happen. Take your time, use the proper procedures, and you will be back in business in no time! This article explains how to avoid stuck cases (through proper lubrication) and how to use a stuck case removal system.