This article covers the basics of safe gun storage and firearms handling. It provides important guidelines — particularly useful for new gun owners. We start with a Firearm Storage and Safety Assessment Quiz. This walks gun owners through questions related to safe handling and storage of firearms. After that you’ll find guidelines for safe gun storage and transport. Bottom line, we recommend all firearms be properly secured when not is use. There are a wide variety of gun safes and gun storage systems.
This past week, Hollywood actor Alec Baldwin killed his cinematographer on a movie set (and wounded another person). Had Baldwin followed these Four Basic Rules of Gun Safety, the tragic death would not have occurred. This just proves that anyone using a firearm should ALWAYS follow these rules.
Readers who have just recently discovered the Daily Bulletin may not realize that AccurateShooter.com has hundreds of reference articles in our archives. These authoritative articles are divided into mutiple categories, so you can easily view stories by topic (such as competition, tactical, rimfire, optics, shooting skills etc.). One of the most popular categories is our Technical Articles Collection. On a handy index page (with thumbnails for every story), you’ll find over 120 articles covering technical and gunsmithing topics. These articles can help you with major projects (such as stock painting), and they can also help you build more accurate ammo. Here are five popular selections from our Technical Articles archive.
Stress-Free Pillar Bedding. Richard Franklin explains how to do a top-quality bedding job, start to finish.
OnTarget Software Review. Our Editors test free software that measures shot groups with great precision. We explain how to use the program and configure advanced features.
Savage Action Tuning. Top F-TR shooter Stan Pate explains how to enhance the performance of your Savage rifle by optimizing the torque settings of the action screws.
Complete Precision Case Prep. Jake Gottfredson covers the complete case prep process, including brass weight sorting, case trimming, primer pocket uniforming, neck-sizing, and, case-neck turning.
Stock Painting Instructions. Step-by-step guide for stock painting by expert Mike Ricklefs. Mike shows both simple coverage and fancy effects.
KEY FEATURES: Ballistics Solver, GPS Tagging, Weather Forecast, Field Notes with Photos
Hunters, here’s a great FREE mobile APP for both Apple and Android systems. The ZEISS Hunting App offers many practical functions: full-featured ballistics calculator, field notes with photo archive, compass function, GPS tagging for documentation of hunting experiences, and a detailed weather forecast service. The Hunting App is offered as a FREE download for Android and iOS (iPhone/iPad) mobile devices.
Three Minute Video Explains Zeiss Hunting App Features:
The Zeiss Hunting App integrates multiple useful features — ballistics solver, compass, GPS tagging, hunt history. The “Field Notes” function can record a wide variety of info — you can save photos, record your shots and hits, log animal sightings during the hunt, and even plot game locations on a map. Zeiss explains: “This allows users to optimally record events, the game population in the hunting territory, and their own hunting experiences.” Shots can be tagged via GPS through the shooter’s and the target’s position, and then displayed on a map. The Field Notes hunt diary shows all entries in chronological order.
Full-Featured Ballistics Solver
The integrated ballistic calculator allows hunters to easily customize the settings to suit their favorite cartridges. You can enter your own data, or choose bullet/cartridge info from a database containing over 7000 ammunition types from a variety of manufacturers. The ballistics solver can be programmed for for current weather conditions (temp/humidity), and the angle (inclination) of the shot.
Weather Functions
The weather tool offers a Five-Day Forecast, and you can choose multiple locations. In addition to the current location, users can also display the weather for their hunting areas of choice. The weather forecast includes temperature, precipitation, wind direction, wind speed, humidity, and air pressure. (Note: For precise ballistics solutions, you must input the ACTUAL conditions at your shooting location).
This video explains how to define a hunting zone and set GPS location tags on the map:
Hunt Log and Photos
The Field Notes function can do many things. You can log all your shots and hits, and you can plot game sightings during the hunt. Events can be augmented with photos and GPS data. With the Field Notes mapping function, you can even locate game populations in the hunting territory. A compass and automatic night mode round off the list of smart features.
NRA publication Shooting Sports USA (SSUSA) has thousands of articles online, all free for the reading. Many of these stories have been written by top competitors, including National and Olympic Champions. You will find SSUSA articles spotlighted every week on the NRA Competitive Shooting Facebook page. We recommend you bookmark that page as a valuable resource. Here are four notable SSUSA articles that have been featured on Facebook this month. Go to SSUSA.org to see even more current articles, with new content every day.
Here is an insightful, fairly lengthy 1850-word article about the phenomenon we call mirage. The article explains how and why mirage appears, how it can best be monitored, and how mirage can indicate both wind velocity and direction. Top competitors follow the adage “Mirage is your friend”, because mirage can often be the most important indicator of wind variables — sometimes even more important than wind flags. “The mirage is more sensitive than the flags since it has less inertia and momentum”, wrote Desmond T. Burke, in his book, Canadian Bisley Shooting, an Art and a Science.
Well worth reading, this SSUSA article talks about the properties of mirage. Here is a sample:
“Mirage — can make all the difference between a shot landing squarely in the X-ring or being victimized by an undetected downrange breeze. The true power of mirage is found in its ability to betray the subtlest of breezes downrange. Its fluid movement… can not only provide wind direction, but speed as well.
Typically, the ability to detect mirage is maximized on warm, sunny and sultry days. Expect mirage to be most pronounced in mid-morning or early afternoon, although it ignores these rules with regularity[.]
Mirage is extremely powerful at identifying winds of less than 12 mph, particularly those gentle breezes subtle enough to not even bother moving the flags.
When there is no wind, or a gentle head or tail wind, mirage will appear to be ‘bubbling’ directly up from the ground. Many call this ‘boiling’, and it is probably the easiest of all to detect.
As a general rule of thumb, when wind speed increases, overall height of the waves produced by the mirage is reduced. Large peaks and valleys in the waves mean that particular mirage is being driven by a very slight breeze. Conversely, crest size is reduced with wind speed, making it harder and harder to detect, until the mirage disappears entirely at somewhere around 12 miles per hour. In other words, the taller mirage’s waves appear, the slower the breeze.”
Authored by the late Glen Zediker, this article covers barrel break-in procedures. It is particularly useful for dealing with factory barrels. We CAUTION readers — with outstanding, hand-lapped custom barrels from top barrel-makers, you may want to do very little break-in — clean sparingly and keep barrel heat low. Do NOT use abrasives aggressively. On our Krieger and Brux barrels, we simply wet-patched every 2-3 rounds for 20 rounds and the barrels shot superbly from the start with minimal fouling. But for factory barrels, a moderate break-in process may prove beneficial.
Zediker explains: “Lesser, lower-cost barrels are going to have more pronounced … imperfections within the bore[.] These imperfections are largely tool marks resulting from the drilling and rifling processes. And if it’s a semi-automatic, like an AR-15, there might be a burr where the gas port was drilled. The goal of break-in is to knock down these imperfections, thereby smoothing the interior surface.”
As one who has experienced a cartridge case-head blow-out with a 9mm pistol, this Editor is very conscious of the risks involved and the damage a blow-out can do to the pistol, to the magazine, and (worst of all) to the shooter. Even with new brass, the possibility of a case failure is always present. And even if the case remains intact, we’ve seen primer failures that create a dangerous jet back towards the pistol shooter. That’s why shooters should always employ protective eyewear whenever they shoot.
We love our wheelguns, but there’s no doubt that forcing cone damage can occur, particularly with hot loads and if your cylinder-to-barrel gap is excessive. This article explains how to inspect your revolvers, and how to mitigate the likelihood of forcing cone damage. The article also explains how to clean your revolvers properly. This is very important to avoid build-up of lead and powder residues.
“A bullet launched at a higher altitude is able to fly slightly farther (in the thinner air) for every increment of downward movement. Effectively, the bullet behaves as if it has a higher ballistic coefficient.”
It’s hunting season, and a good friend is heading to the high country of Colorado next week to pursue elk. He recently zeroed his rifle in California, at a range just a few hundred feet Above Mean Sea Level (AMSL). He wondered if the higher altitude in Colorado could alter his ballistics. The answer is a definite yes. However the good news is that free ballistics calculators can help you plot reliable drop charts for various shooting locations, high or low.
The question has been posed: “What effect does altitude have on the flight of a bullet?” The simplistic answer is that, at higher altitudes, the air is thinner (lower density), so there is less drag on the bullet. This means that the amount of bullet drop is less at any given flight distance from the muzzle. Since the force of gravity is essentially constant on the earth’s surface (for practical purposes), the bullet’s downward acceleration doesn’t change, but a bullet launched at a higher altitude is able to fly slightly farther (in the thinner air) for every increment of downward movement. Effectively, at higher altitudes, the bullet behaves as if it has a higher ballistic coefficient.
Forum member Milanuk explains that the key factor is not altitude, but rather air pressure. Milanuk writes:
“In basic terms, as your altitude increases, the density of the air the bullet must travel through decreases, thereby reducing the drag on the bullet. Generally, the higher the altitude, the less the bullet will drop. For example, I shoot at a couple ranges here in the Pacific Northwest. Both are at 1000′ AMSL (Above Mean Sea Level) or less. I’ll need about 29-30 MOA to get from 100 yards to 1000 yards with a Berger 155gr VLD at 2960 fps. By contrast, in Raton, NM, located at 6600′ AMSL, I’ll only need about 24-25 MOA to do the same. That’s a significant difference.
Note that it is the barometric pressure that really matters, not simply the nominal altitude. The barometric pressure will indicate the reduced pressure from a higher altitude, but it will also show you the pressure changes as a front moves in, etc. which can play havoc w/ your calculated come-ups. Most altimeters are simply barometers that read in feet instead of inches of mercury.”
As Milanuk states, it is NOT altitude per se, but the LOCAL barometric pressure (sometimes called “station pressure”) that is key. The two atmospheric conditions that most effect bullet flight are air temperature, and barometric pressure. Normally, humidity has a negligible effect. It’s important to remember that the barometric pressure reported on the radio (or internet) may be stated as a sea level equivalency. So in Denver (at 6,000 feet AMSL), if the local pressure is 24″, the radio will report the barometric pressure to be 30″. If you do high altitude shooting at long range, bring along a Kestrel, or remember to mentally correct the radio station’s pressure, by 1″ per 1,000 feet.
Trajectory of Bullet fired at Sea Level
Trajectory of Bullet fired at 20,000 feet
You can do your own experimental calculations using JBM Online Ballistics (free to use). Here is an extreme example, with two printouts (generated with Point Blank software), one showing bullet trajectory at sea level (0′ altitude) and one at 20,000 feet. For demonstration sake, we assigned a low 0.2 BC to the bullet, with a velocity of 3000 fps.
To learn more about all aspects of Exterior Ballistics, Hornady has a useful discussion of External Ballistics including the effects of altitude and temperature. To dig deeper, Sierra Bullets has a comprehensive Exterior Ballistics Resource Page with multiple sections from the Sierra Manual (4th and 5th Editions), including:
Example from Section 3.0: “When a bullet flies through the air, two types of forces act on the bullet to determine its path (trajectory) through the air. The first is gravitational force; the other is aerodynamics. Several kinds of aerodynamic forces act on a bullet: drag, lift, side forces, Magnus force, spin damping force, pitch damping force, and Magnus cross force. The most important of these aerodynamic forces is drag. All the others are very small in comparison when the bullet is spin-stabilized.”
Think you need a relatively long case-neck for good accuracy? Think again. Stan Ware broke all the rules with his radical Wolfpup cartridge, proving that a near-no-neck design can deliver match-winning accuracy. Read on to learn how the Wolfpup works…
Retired gunsmith Stan Ware is a talented shooter who’s not afraid to think “outside the box”. Stan competes in both Hunter Benchrest (HBR) and Varmint for Score (VFS) disciplines. In his quest to build the ultimate Hunter Benchrest cartridge, Stan created the radical “Wolfpup” wildcat, based on a 6mmBR parent case. Noting the dominance of 30 BRs in VFS matches, Stan wondered if a stretched 30 BR could work in HBR competition. The challenge was case capacity. Under HBR rules the cartridge must hold at least 45.0 grains of water, equal to the capacity of the classic 30/30 case.
To get the requisite HBR case capacity, Stan figured he needed to boost the volume of a 30 BR case significantly, so he would have to move the shoulder forward — a lot. He did this by running a 30 BR reamer deeper and deeper, test-firing brass along the way. After three reamer passes, he ended up with the capacity he needed (the Wolfpup holds 45.3 grains of water). But then he looked at the finished product — a case with almost no neck, and he wondered “how could this possibly work?”.
From Trashbin to Winner’s Circle
Ware’s prototype Wolfpup ended up so short-necked, so unlike any “normal” cartridge, that Stan figured it was “dead on arrival”. Stan told us: “I said ‘this ain’t going to work’ and I threw the brass in the trash can. Honest. But later I thought I better shoot it and see what it does.” There was one problem — Stan didn’t have a seating die. He noticed the short neck provided a bit of tension after fire-forming, so he literally seated some bullets, BIB 118s and 125s, with his fingers. For powder he used H4198 and started with 35 grains, one grain more than a 30 BR load. Stan then did a pressure work-up: “I actually went up to 41.0 grains and didn’t have a sticky bolt. I ended up at 37.9 grains of Hodgdon 4198 — that gave 3150 fps, where the sweet spot is.” (Later testing revealed a second accuracy node at about 3020 fps, using 36.4 grains of H4198).
Stan’s radical short-necked Wolfpup shot great from the get-go. Once he found the right velocity node, the gun shot in the ones and zeros with both 7-ogive and 10-ogive bullets, both 118s and 125s. The Wolfpup proved easy to tune — it’s not finicky at all. And it’s a winner. Stan began shooting the Wolfpup in 2006 in both VFS and HBR matches and the ‘Pup’ started winning matches right away. In 2007, Stan won the Wisconsin State VFS Championship shooting the Wolfpup. In June 2010 at a Webster City, Iowa VFS match, Stan won the Grand Agg and posted high X-Count for the match, while placing first at 100 yards and second at 200 yards. How’s that for a cartridge that almost ended up in the trash bin?
Does Stan deserve an award for “most innovative benchrest cartridge design”? Stan chuckles at that notion: “I’m not a hero, not a genius. I really didn’t do anything. The fun part is thinking outside the box — for me anyway. Shooting is an age-old process of experimentation. You never learn it all.”
Why Does It Work?
How can such a radical case design perform so well? “That’s a good question,” Stan admitted. He then explained: “The 30 BR is inherently accurate, so I figured something based on the 30 BR should be accurate too. My personal belief is that the short neck doesn’t hurt you. Plus if the throat in the barrel is straight, the bullet can self-align. If the chamber is good, the bullet will self-center in the throat. In a regular case there’s not much room to do that, so a bullet can start off-center, and you don’t get the same results every time. A bullet in a conventional case is stopped from self-centering by the stiffer neck, particularly in a tight-clearance BR gun.”
Reloading the .30 Wolfpup
Stan’s Wolfpup chamber has a neck dimension of 0.330″. He turns his necks for a 0.327″ loaded round. Bullets are jammed .020″ forward of first contact with the lands. When he closes the bolt it pushes the bullet back in the case — almost a soft seat. Stan notes: “To start with I normally bump the shoulder .0005-.001″ so they go in easy. Just by doing that I get a little neck tension. I also use a bushing. Right now I’m running a .322, but it’s not particularly sensitive. I’ve tried one-thousandths increments up to a .325 bushing and couldn’t tell a lot of difference.” For bullet seating, Stan uses a Wilson 30 BR seater die into which he ran the chamber reamer. This gives perfect case fit during seating operations.
About the Illustrated Gunstock
You’ll notice Stan’s stock contains scenes from Vietnam and a quotation. Here’s the story. A Vietnam combat veteran, Stan served “in-country” with the Army’s 509th Non-Divisional Combat Unit (out of Fort Riley) from 1965-1966. Shortly before he left Vietnam, Stan went to a shop to have a souvenir lighter engraved. He asked the vendor for an appropriate inscription. The shop’s metal-worker engraved: “War is a tragedy. It takes mans’ best to do mans’ worst.” That message, along with the combat scenes, were hand-painted on Stan’s rifle by his wife Susan, a talented artist. She spent more than 20 hours painting the rifle stock.
A high-end, full custom Benchrest, F-Class, or PRS rifle can cost upwards of $5000.00. Some top-tier competition and tactical scopes (March, Kahles, Schmidt & Bender) cost $2500-$3600 by themselves. If you’re transporting multiple custom rifles with premium scopes to the range, you could easily be hauling $20,000 worth of scoped guns. Bring along a Co-Axial rest, spotting scope, rangefinder, Kestrel, and LabRadar chronograph, and that could push the total closer to $25,000+. Think about that — your guns and gear could be worth way more than your vehicle!
How do you safeguard a big-money collection of guns (without driving around in a Brinks armored truck)? One of the best storage systems available is the Truck-Vault, built in Washington state. Truck-vaults are custom-fitted, locking storage cabinets that fit in a Pick-up truck bed, SUV, or station wagon. Various designs are available, including a waterproof “Extreme Series.” Both single-drawer and multi-draw layouts are offered with lengths up to 60″ overall, and top-load capacity of 2000 pounds. A variety of interior configurations are available.
For transporting scoped match rifles, we suggest Truck-Vault’s “Magnum Line”, which has two drawers with 10.5″ of vertical clearance. This offers two primary sliding compartments (on roller casters), plus smaller storage boxes where you can keep valuable gear securely out of sight.
Truck-Vault Video Showing Break-In Attempt
Truck-Vaults carry a big price-tag. One-drawer SUV models start at around $1100.00, but you can pay over $2000.00 for a unit with all the bells and whistles. Balance that cost against the value of the all firearms and accessories you are transporting. If you spend much time on the road with a pricey collection of guns, optics, and accessories, a Truck-Vault may be a wise investment. This editor first saw a Truck-Vault on a Chevy Suburban belonging to an Arizona gunsmith who does a lot of work for the military. It was not unusual for him to haul $50,000 worth of Class III weapons. For him, the Truck-Vault was an essential security feature. For more info, visit TruckVault.com or call (800) 967-8107.
Teslong Borescopes Update — WiFi and Rigid Rod Versions Product Report by F-Class John
Not more than a few months after the Teslong corded borescope hit the market to massive applause they’ve released a cordless WiFi-enabled corded version as well as a rigid rod model — two new models with important new features/functionality. When I originally reviewed the Teslong borescope I was blown away with the value, clarity, and ease of use. SEE Review HERE. That original Teslong really was a game changer in the borescope market. The large number of forum threads springing up since the Teslong release shows that that digital borescopes have finally found a large and enthusiastic customer base.
IMPORTANT: Guys — Watch the Videos!!! John does a great job showing the set-up and use of these Borescopes. You really need to WATCH THE VIDEOS! They show much more than we can illustrate with still images.
NOTE: Teslong Borescopes (Standard, Rigid, WiFi, Screen-Equipped) can also be ordered from the Teslong Webstore. If you can’t find what you want on Amazon, go to Teslong.com.
WiFi Teslong Works with SmartPhones and Tablets
Despite all the love people have shown for the original, plug-in Teslong borescope, one common complaint was that it could not be used with smartphones or small tablets. With that in mind, Teslong surprised the market with the release of a cordless WiFi version that works with just about any device that has a WiFi connection. The new WiFi unit, which is in very high demand, costs around $75, just $25 more than the original plug-in version. NOTE –YES this WiFi unit DOES work with both iOS (Apple) and Android smartphones and tablets. However, you may wish to try a couple different Apps.
WATCH Teslong WiFi Borescope Video Review
To use the WiFi Teslong, simply download Teslong’s viewer App, turn the unit on and connect to the Teslong WiFi in your device settings. While it does take a couple steps to connect each time, you are rewarded with a cordless version that can be used at home or the range equally well. Watch the video and you can see how the Wifi unit is set up and how it is used to inspect both a barrel and a sizing die. Do watch the video — it explains all. Along with live video feed, the WiFi control handle has a button to record still images.
Important — some guys had initial problems getting the WiFi image to display on their smartphones but that was normally just a software configuration issue. If you are patient, and follow the instructions, you should be fine. Some older guys had to enlist the aid of a 10-year-old grandkid. Note, as of 1/29/2020, the WiFi Version is temporarily out of stock on Amazon, but it can be ordered for $74.99 from the Teslong Webstore.
New Teslong Rigid Rod Borescope
Along with the WiFi version, Teslong has also released a borescope with the lens mounted on the end of a rigid metal shaft — a configuration similar to classic optical borescopes such as the Hawkeye. This new “shafty” Teslong has the same electro-optical sensors, connectors, and adjustable light as the original Teslong. However, this new rigid rig now uses a solid rod instead of a flexible cable. Having a solid rod makes using the unit much easier since you’re not fighting the cable. The rod also makes rotating the unit inside the bore more intuitive as it lacks the cable spring back of the flexible version.
Located on the borescope is an inch scale allowing the user to easily to measure how far into the bore they’ve gone for easy identification of any issues later. The whole unit comes in a nice heavy-duty cardboard tube that makes it easy to store and I can see it lasting as long as the unit itself.
WATCH Teslong Rigid Borescope Video Review
Why choose the rigid Teslong? Importantly, the lack of a tethered cord allows you to rotate the unit more easily inside the barrel. Compared to the original corded Teslong, I did find that running the rigid borescope down the barrel without the mirror provided a larger view. That may be beneficial to some users. Overall, the optical clarity and definition remain excellent — certainly on par with the original unit.
General Teslong Borescope User Tips
The new Wifi and Rigid Teslong borescope share some basic features with the original plug-in, corded Teslong. All three devices feature a mirror on the end that screws on and has a jam nut to keep it in place and can be adjusted for focal length based on the caliber and they’re now including several extras in case of damage or loss. While they’ve always been good about replacing them free of charge there is a wait time, so the inclusion of extras is a nice bonus.
SUMMARY — Both WiFi and Rigid Teslong Borescopes Perform Well, Are Great Values
Overall these two new units are great additions to Teslong’s lineup giving users two great units to choose from. While most folks may gravitate to the WiFi version, I think there’s room for all three models (WiFi, Corded Plug-in, Rigid Plug-in).
Many people may find the corded or rigid versions more practical for around the house where they don’t necessarily need the cordless version and don’t want to worry about keeping it charged all the time. For any range use or out of town matches the WiFi with its smaller footprint and ability to work with any electronic device will probably make more sense and will help justify the additional cost. In the end, the amazing thing is that no matter which version you choose you’ll have a great borescope that will help improve your shooting.
The Sporting Arms and Ammunition Manufacturers’ Institute (SAAMI), has released two new online reference tables. These resources clarify the interchangeability of certain ammunition in a specified firearm chamber, and identify the names of equivalent and historical cartridges.
SAMMI states: “These documents are important for firearm safety because they … identify what ammunition can be safely shot in firearms, whether it is an alternate cartridge in a specified firearm chamber or a known equivalent historical name for a cartridge.”
“These important documents … provide guidance to both industry professionals and the firearm-owning community. They emphasize important safety and technical information regarding the proper matching of ammunition and firearms, and what precautions must be taken”, stated Joe Bartozzi, SAAMI President/CEO.
New Resource Content (Click Charts to view PDF Files)
Generally Accepted Firearms and Ammunition Interchangeability — This document lists generally accepted alternate firearm/ammunition combinations which will generally allow for the safe firing of an alternate cartridge in a specified firearm chamber. There is also information on shotshell interchangeability and commercial vs. military standards.
NOTE: Beyond historical cartridge names that are in common use, there are a very few firearm/ammunition combinations which will generally allow for the safe firing of an alternate cartridge in a specified firearm chamber. CLICK HERE for SAAMI’s listing of those cartridges/chambers.
You can never be too safe when hand-loading your own ammunition. This helpful Brownells video outlines the Seven Fundamental Reloading Safety Tips. This is important information for novice hand-loaders and a good refresher for those with reloading experience!
Summary of the Seven Safety Tips:
1. Store your reloading supplies in a safe and dry location, away from children and away from any possible source of ignition. It is also smart to keep your powder and primers separate.
2. Get and use respected reloading manuals, especially for new cartridges. Start low and work up slowly while watching for warning signs of pressure and/or case fatigue.
3. Locate your reloading activity where you will not be distracted. If you get interrupted, stop. (Distractions will eventually lead to mistakes.)
4. Do NOT mix powders. Keep your powders clearly marked and dated. You can use masking tape to write the date on the container.
5. If you load the same cartridge type for different firearms, make sure your ammo headspaces properly in each gun.
6. Check cases frequently. Look for split necks, case head separation or other signs of fatigue and excessive pressure.
7. If reloading military brass, be aware that case capacity is usually reduced, and initial loads should be at least 10-15% lower than published data.
Here are some other tips that will help your avoid making costly mistakes (such as using the wrong powder, or undercharging a case):
Powder Type — Always double-check the label on your powder containers. After placing powder in the powder measure, put a piece of tape on the measure with the powder type written on it. Some guys write the powder type on a card and place that right in the hopper.
Scale Drift — Electronic balances can drift. If you are using a digital powder scale, calibrate the scale with a test weight every 50 rounds or so.
Case Fill — If you throw more than one charge at a time, look INSIDE every case before seating a bullet. Squib charges can be dangerous if you don’t notice them before firing the next round.
Progressive Presses — When using a progressive press, consider using an RCBS Lock-Out Die. This will detect a low charge and stop the machine. These dies will work with RCBS, Hornady, and Dillon progressives.


 The question has been posed: “What effect does altitude have on the flight of a bullet?” The simplistic answer is that, at higher altitudes, the air is thinner (lower density), so there is less drag on the bullet. This means that the amount of bullet drop is less at any given flight distance from the muzzle. Since the force of gravity is essentially constant on the earth’s surface (for practical purposes), the bullet’s downward acceleration doesn’t change, but a bullet launched at a higher altitude is able to fly slightly farther (in the thinner air) for every increment of downward movement. Effectively, at higher altitudes, the bullet behaves as if it has a higher ballistic coefficient.
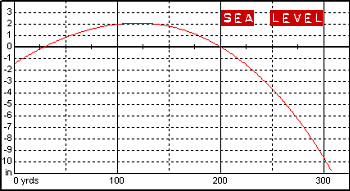


 Retired gunsmith Stan Ware is a talented shooter who’s not afraid to think “outside the box”. Stan competes in both Hunter Benchrest (HBR) and Varmint for Score (VFS) disciplines. In his quest to build the ultimate Hunter Benchrest cartridge, Stan created the radical “Wolfpup” wildcat, based on a 6mmBR parent case. Noting the dominance of 30 BRs in VFS matches, Stan wondered if a stretched 30 BR could work in HBR competition. The challenge was case capacity. Under HBR rules the cartridge must hold at least 45.0 grains of water, equal to the capacity of the classic 30/30 case.
 From Trashbin to Winner’s Circle
 Why Does It Work?


 How do you safeguard a big-money collection of guns (without driving around in a Brinks armored truck)? One of the best storage systems available is the Truck-Vault, built in Washington state. Truck-vaults are custom-fitted, locking storage cabinets that fit in a Pick-up truck bed, SUV, or station wagon. Various designs are available, including a waterproof “Extreme Series.” Both single-drawer and multi-draw layouts are offered with lengths up to 60″ overall, and top-load capacity of 2000 pounds. A variety of interior configurations are available.


