The Hornady Handbook of Cartridge Reloading is now available in Mobile App form. Hornady has released FREE Mobile Apps for Android and iOS (Apple) Mobile Devices. You get a lot of information for free. However, most of the actual load data is surcharged. You can buy all current load data for $19.99, or use the “à la carte” option to purchase load data for 99 cents each per cartridge type.
For example, if you wanted .223 Rem, .284 Win, .308 Win, you’d pay $2.97 (3 x $0.99). Frankly, we’d just use the FREE information available from the Hodgdon and Vihtavuori online Reloading Centers. But we understand some folks will prefer the convenience of an App with a wide variety of powder brands all in one place. Hornady’s full data collection covers hundreds of cartridges — .17 Hornet to 50 BMG (for rifle) and .22 Hornet to .500 S&W (for pistol). Folks say the App is easy to navigate and simple to use. For more information, visit Hornady.com/reloadingapp.
What you get for free — Included with the FREE APP are hundreds of pages of reloading information including rifle and handgun bullet guides, the basics of reloading, tips and techniques plus limited free data on newer cartridge releases such as .224 Valkyrie, 6mm Creedmoor, 6.5 PRC, 300 PRC and more.
The App features over 200 cartridge types with a variety of loads using Hornady bullets, including A-Tip Match, ELD Match and ELD-X. Velocity and powder charts are included with each cartridge for easy reference. The database includes popular established powders plus new powders such as Power Pro 2000 MR, IMR 4451 and 7977, CFE Pistol, BE-86, Reloder 23, 26, 33 and 50, Accurate LT-30 and 32. Popular powders such as Reloder 17, Superformance, and LeverEvolution® have also been expanded.
Included with the free download are hundreds of pages of reloading information, bullet guides, tips and techniques plus limited free data on recent offerings such as 6mm Creedmoor, 6.5 PRC, and 300 PRC. Beyond that, reloaders must pay for load data on particular cartridges. Reloading data is available for download in three ways: Á la carte ($0.99 per cartridge type), Full Data Purchase for App ($19.99), or Annual Subscription ($19.99/year recurring).
Subscription Option — If you pay $19.99 per year you get full access to Hornady Handbook of Cartridge Reloading 11th Edition data, plus new data Hornady develops for the 12th Edition. You’ll receive App notifications of the new data as Hornady releases it.
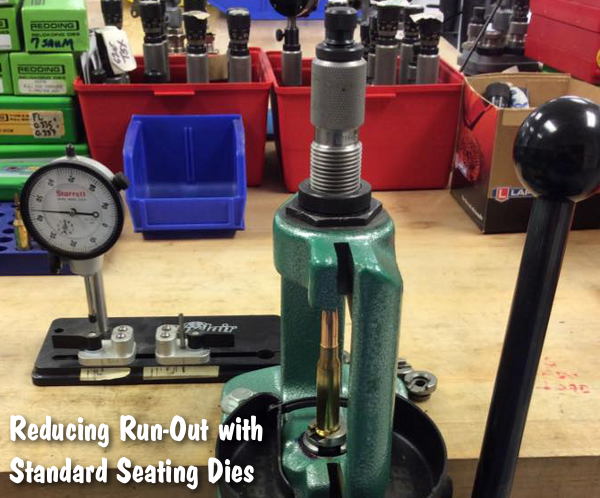
The U.S. Army Marksmanship Unit (USAMU) regularly publishes reloading “how-to” articles on the USAMU Facebook page. This USAMU article, the second in a series on improving concentricity, has many useful tips. If you use standard (non-micrometer) seating dies when loading some cartridge types, this article is worth reading. And visit the USAMU Facebook page for other tips on handloading and marksmanship.
Once again, it’s time for USAMU’s “Handloading Hump-Day!” Last week, we addressed achieving very good loaded-cartridge concentricity (AKA “TIR”, or Total Indicator Runout) using standard, “hunting grade” reloading dies.
We explained how to set up the Full-Length Size die to float slightly when correctly adjusted for desired case headspace. We also cited a study in which this method loaded ammunition straighter than a set of [higher grade] match dies from the same maker. [One of the keys to reducing TIR with both sets of dies was using a rubber O-ring below the locking ring to allow the die to float slightly. READ Full-Length Sizing Die TIP HERE.]
Now, we’ll set up a standard seating die to minimize TIR — the other half of the two-die equation. As before, we’ll use a single-stage press since most new handloaders will have one. A high-quality runout gauge is essential for obtaining consistent, accurate results.
Having sized, primed and charged our brass, the next step is bullet seating. Many approaches are possible; one that works well follows. When setting up a standard seating die, insert a sized, trimmed case into the shell-holder and fully raise the press ram. Next, back the seating stem out and screw the die down until the internal crimping shoulder touches the case mouth.
Back the die out one-quarter turn from this setting to prevent cartridge crimping. Next, lower the press ram and remove the case. Place a piece of flat steel on the shellholder and carefully raise the ram. Place tension on the die bottom with the flat steel on the shellholder. This helps center the die in the press threads. Check this by gently moving the die until it is well-centered. Keeping light tension on the die via the press ram, secure the die lock ring.
If one were using a micrometer-type seating die, the next step would be simple: run a charged case with bullet on top into the die and screw the seating stem down to obtain correct cartridge OAL.
However, with standard dies, an additional step can be helpful. When the die has a loosely-threaded seating stem, set the correct seating depth but don’t tighten the stem’s lock nut. Leave a loaded cartridge fully raised into the die to center the seating stem. Then, secure the stem’s lock nut. Next, load sample cartridges and check them to verify good concentricity.
One can also experiment with variations such as letting the seating stem float slightly in the die to self-center, while keeping correct OAL. The runout gauge will show any effects of changes upon concentricity. However, the first method has produced excellent, practical results as evidenced by the experiment cited previously. These results (TIR Study 2) will reproduced below for the reader’s convenience.
TIR Study 2: Standard vs. Match Seating Dies
50 rds of .308 Match Ammo loaded using carefully-adjusted standard dies, vs. 50 using expensive “Match” dies from the same maker.
Standard dies, TIR:
0.000” — 0.001” = 52%;
0.001”– 0.002” = 40%;
0.002”– 0.003” = 8%. None greater than 0.003”.
AccurateShooter Comment: This shows that, with careful adjustment, the cheaper, standard dies achieved results that were as good (or better) than the more expensive “Match” Dies.
These tips are intended to help shooters obtain the best results from inexpensive, standard loading dies. Especially when using cases previously fired in a concentric chamber, as was done above, top-quality match dies and brass can easily yield ammo with virtually *no* runout, given careful handloading.
Real Avid has introduced a new, specialized gun vise with notable features and unmatched versatility. Read Avid states that its new Master Gun Vise is the “first real bench vise made exclusively for guns and gun tools.” This vise articulates and swivels easily so you can place your gun/barreled action in different orientations without ever removing it from the vise. The supplied, reversible Gun-Fit jaw sleeves will adapt to a variety of stock/forearm styles — from ARs to fancy wood shotguns. The special Torq-Lok pin provides additional locking power to secure the angle/orientation of the vise jaws when working on heavy rifles or barreled actions.
Master Gun Vise: Build, Repair, Clean, and Customize Your Guns
The base of the vise features an articulating ball and socket joint with the adjustable Speed-Cam Lever that applies pressure to the joint allowing the vise and gun to be positioned in any orientation the user desires. An additional Torq-Lok pin is ready for heavy torque applications. This removable pin intersects the ball and socket joint locking it into the base. The locking pin can be inserted every 90 degrees with the vise in either the vertical or horizontal position. That ball joint lets you set the jaws at various angles, to make work easier. For example you can tilt your gun to a muzzle-down position for easier cleaning. SEE Video above.
Early testers of this new DIY Gun Vise were impressed: “We did a soft launch on this product a couple weeks ago and were amazed at the vast number of military [users], gun manufacturers, and law enforcement agencies that were jumping to get this new vise. These are people who work on and build guns for a living and the benefits were apparent to them immediately. That really confirmed for us we had created something revolutionary”. — Chris Witte, Real Avid Mktg. Director.
Respected gunwriter Tom McHale reviewed the Master Gun Vise for American Handgunner magazine: “I use this setup more than anything as an extra pair of hands … the Real Avid Master Gun Vise is, bar none, the handiest tool on my bench. It’s great for cleaning, repairing, tinkering, installing, inspecting, assembling and disassembling. Heck, you can even use it to mount optics with the precision leveling knob.”
Accu-Level Knob Allows Rapid, Precise Angular Adjustments — Great for Scope Mounting
The Master Gun Vise include an innovative Accu-Level leveling knob. This allows the vise to be tilted 3 degrees to either side (6° total) for making micro-adjustments when leveling guns for optics mounting. This precise leveling can be accomplished without having to reposition the firearm in the clamps.
The vise also comes with reversible Gun-Fit sleeves that can be easily installed or uninstalled with pins that lock them in place. One side features a high-density foam pad providing a compression fit to firmly grip cosmetic surfaces. While the other side is a rigid nylon with grooves to secure gun parts, picatinny and Arca Swiss rails, barrels, silencers and more.
Special Accessories for AR-Platform Rifles
Real Avid has some special accessories for working on AR-15s and AR-10s. Sold separately, the adjustable Smart-Fit AR15 Lower Vise Block and the Lug-Lok Upper Vise Block (available in two versions, AR15 and AR10) integrate seamlessly with the vise jaws and firmly lock into place. The Lug-Lok eliminates jaw slippage when applying heavy torque to AR barrel nuts and muzzle devices.
Hunting season is underway now in many states. That means it’s time to inspect all your hunting gear, including your scope set-up. If you have a new optic, you’ll want to get it mounted correctly on your current rig. And if you have a new hunting rifle, you’ll need to mount the properly rings and install the riflescope so that you have the correct eye relief.
A proper scope installation involves more than just tensioning a set of rings — you need to consider the proper eye relief and head position, and it should be leveled correctly. This video shows a simple, quick method to mount a scope. The method assumes that the reticle (cross-hairs) are square without the turret. You’ll want to confirm that with a plumb line hanging straight down, a procedure you can do indoors.
In this NSSF video, Ryan Cleckner shows how to set up a scope on a hunting or tactical rifle. Ryan, a former U.S. Army Sniper Instructor, notes that many hunters spend a small fortune on equipment, but fail to set up their rifle to use the optics optimally. Cleckner likens this to someone who owns an expensive sports car, but never adjusts the seat or the mirrors.
Ryan notes that you want your head and neck to be able to rest naturally on the stock, without straining. You head should rest comfortably on the stock. If you have to consciously lift your head off the stock to see through the scope, then your set-up isn’t correct. Likewise, You shouldn’t have to push your head forward or pull it back to see a clear image through the scope. If you need to strain forward or pull back to get correct eye relief, then the scope’s fore/aft position in the rings needs to be altered. Watch the full video for more tips.
Tips on Mounting Your Scope and Adjusting Your Comb Height:
1. Normally, you want your scope mounted as low as possible, while allowing sufficient clearance for the front objective. (NOTE: Benchrest shooters may prefer a high mount for a variety of reasons.)
2. Once the scope height is set, you need to get your head to the correct level. This may require adding an accessory cheekpad, or raising the comb height if your rifle has an adjustable cheekpiece.
3. Start with the rifle in the position you use most often (standing, kneeling, or prone). If you shoot mostly prone, you need to get down on the ground. Close your eyes, and let you head rest naturally on the stock. Then open your eyes, and see if you are too low or too high. You may need to use a cheekpad to get your head higher on the stock.
4. If your scope has a flat on the bottom of the turret housing, this will help you level your scope. Just find a flat piece of metal that slides easily between the bottom of the scope and the rail. Slide that metal piece under the scope and then tilt it up so the flat on the bottom of the scope aligns parallel with the flats on the rail. Watch the video at 8:40 to see how this is done.
Sierra Bullets has published load data for the 6mm Creedmoor cartridge, a necked-down version of the popular 6.5 Creedmoor. Sierra has released very comprehensive 6mm Creedmoor load data, covering fifteen (15) different bullets from 55 to 110 grains. NOTE: Hornady-brand brass was used for Sierra’s 6mm Creedmoor load tests, not the newer, superior Lapua 6mm Creedmoor brass with small primer pockets. Hand-loaders using the stronger Lapua 6mm Creedmoor brass may want to to adjust their loads.
Sierra writes: “As soon as the 6.5 Creedmoor was released in 2007, a 6mm version was being envisioned. After the 6mm Creedmoor demonstrated its worth at 1000 yards it began to catch the attention of Precision Rifle Series (PRS) competitors. The 6mm Creedmoor is a great fit for those looking for an AR platform-friendly cartridge. It delivers velocities very similar to the .243 Win and yet fits the AR10 magazine length[.] The 30-degree shoulder makes this a very efficient case and helps prolong case life as well. The 6mm Creedmoor works well with powders such as H4350, [RE-16], RE-17, and Ramshot Hunter for heavier long-range bullet weights. Slightly faster powders such as RE-15, Win 760, and Vihtavuori N540 work well with lighter weight bullets.”
Sierra Bullets Tested for 6mm Creedmoor Load Data
55gr BlitzKing (#1502)
60gr HP (#1500)
70gr HPBT (#1505)
70gr BlitzKing (#1507)
75gr HP (#1510)
In developing its 6mm Creedmoor load data, Sierra tested a very wide selection of propellants, two dozen overall. For the smaller bullets, fast-burning powders such as Benchmark, H4895, and CFE223 were tested. For the heavier 100+ grain bullets, Sierra tested a selection of medium-burn-rate powders including H4350, Reloder 16, Reloder 17, Varget, and Superformance. Sierra did a very thorough job. We know this information will be welcomed by 6mm Creedmoor shooters.
Don’t know what powder to try first? For the 107-110 grain bullets, if you want best accuracy and low ES/SD, our Forum members recommend Alliant Reloder 16 and Hodgdon H4350. If you are seeking max velocity with the 110-grainer, look at Hodgdon Superformance and Reloder 19.
Here are Sierra’s 6mm Creedmoor Load Data Charts for 90-95 grain bullets plus the 107gr MK and 110gr MK. There are five other tables for other bullet types.
BONUS: PRB 6mm Creedmoor and 6.5 Creedmoor Load Survey
The Precision Rifle Blog compiled Load Data from PRS Competitors, for both 6mm Creedmoor and 6.5 Creedmoor. This is a good place to start. PRB surveyed the match loads for “173 of the top-ranked precision rifle shooters in the country”. One cautionary note: These PRS guys may be loading fairly hot, so work up gradually, 0.3 grains at a time. CLICK HERE.
Today, September 25, 2021, is National Hunting and Fishing Day (NHFD). We’re proud to recognize how important hunting is for millions of Americans — as a source of food for families and as an important connection with nature and the outdoors. The NFHD website has helpful resources for hunters, and in this article we provide links for Where to Hunt, How to get Hunting Licenses, and Hunter Education.
This month we hope some of our readers can take new shooters afield and introduce them to hunting. Many hunters receive their first introduction to hunting from family or friends as a tradition passed down from generation to generation. There are over 9.2 million hunters in the United States. Join the millions of dedicated hunters to enjoy a fulfilling experience in the outdoors.
To have a successful hunt you must first get to areas where game thrives. Finding the right places to hunt is essential. The NSSF offers a nationwide Where-to-Hunt database of hunting areas. You can click on a particular state, then specify the specicies you wish to hunt. This is a very useful resource.
In most states, when hunting game animals, you’ll need a hunting license and/or zone permit. The Federal Fish & Wildlife Service has state-by-state listing for hunting licenses on FWS.gov. Click the box below to learn how to get hunting licenses in your region.
For all hunters, whether they have mentors to guide them or not, the most important first step into the woods begins with a state-certified hunter education course. Click the box below to see hunting education opportunities around the nation.
Game Resources — To learn more about different game species, click these NSSF links:
To help you prepare for a fall hunt, here is a free, printable Deer Practice target. Hone your skills on a trio of bucks with a red bullseye centered on the animals. You can print the targets in black and white, but they look best in color. Right-click the image below to download a FREE printable PDF file.
It’s hunting season now. Need a scope for your hunting rifle? Or are you looking to upgrade the optic on your benchrest or F-Class rig? Or maybe you are thinking of getting started in the tactical shooting game (PRS/NRL/NRL22) and want a FFP scope with hold-off reticle. Whatever your optics needs, we’ve found a way you can save big buck$. ScopeList.com is running major sales right now for leading optics makers: Swarovkski/Kahles, Schmidt & Bender, Nightforce, Zeiss, Leica, Vortex, Steiner, Trijicon, Leupold, and more. In addition, ScopeList has special clearance inventory at huge discounts.
Click the boxes below for the best ScopeList Deals on major optics brands. A variety of products are on sale including riflescopes, spotting scopes, laser rangefinders, binoculars, Red Dot optics and more.
In this article we cover a better barrel cooler you can build yourself for under $15. This uses a high-speed inflator fan sold on Amazon, along with a piece of temp-stable tubing. Forum member (and popular YouTube host) F-Class John devised this system. He found it cools his barrels in less than half the time of some other products. And the system can also serve as an Empty Chamber Indicator (ECI).
Barrel coolers perform an important function — reducing barrel operating temperatures. This can definitely help preserve barrel life and help maintain good accuracy in competition. In addition, keeping barrels cool can reduce the chances of excess chamber pressure, an important safety concern.
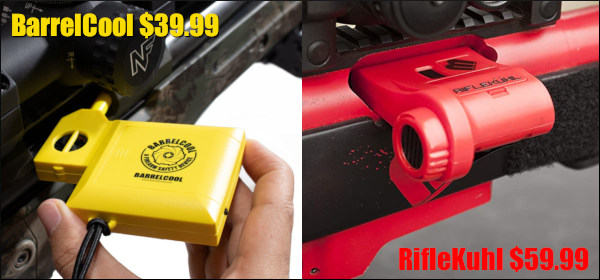
There are a variety of commercially-available barrel cooling systems. There are external fans, as well as internal, slip-in systems than can do double duty as an Empty Chamber Indicator (ECI). You can get the original yellow $39.99 BarrelCool or the red $59.99 RifleKuhl from Magnetospeeed. Both are good products. But F-Class John came up with a system that works even better — one you can build for a fraction of the cost of those yellow or red fans.
Build Your Own Barrel Cooler for Under $15
This system is easy to put together. Order a $11.99 YIVAR pump from Amazon. This is a small, high-output pump designed to inflate air mattresses. Then get some high-temp-rated tubing from a local supply shop. Then trim the case-head off an old piece of brass. Taper the end of the tube a bit and fit it in the case. NOTE: Use of the fitted case is optional. Having the case provides a nice fit in your chamber. But the system works pretty well just with the tubing and Yivar air pump.
In his .284 Win barrel, the Yivar pump system blows air at 10+ mph out the muzzle. F-Class John says that is “about three times the velocity of other systems”. The Yivar pump “holds about 45 minutes of charge” so he can use it for 15 minutes after each of three strings in a match. And then it can be recharged from a USB-compatible battery pack at the range. John notes the fan continues to blow about the same speed for the full 45-minute charge duration.
Key Benefits of this system
1. Faster Cooling
2. Low Cost (under $15)
3. Longer run time on battery
4. Fan battery is USB rechargeable
5. Finally a use for that worn-out brass
John confirmed the effectiveness of his barrel cooler using a stick-on temperature tape placed on the barrel. This showed that his fan system cooled the barreled in less than HALF the time as the plastic commercial fan systems. In addition, his run time was excellent, and the Yivar’s built-in Lithium-Ion battery is fully rechargeable so he never has to buy expensive batteries.
What are the downsides? Not many. The fan IS somewhat noisy — watch video at 4:04-4:28 time mark to hear the fan. F-Class John notes, however, that the Yivar fan is about 4 decibels (dB) quieter than a Magnetospeed RifleKuhl, so the Yivar’s noise is not that bad.
Here are comments from YouTube viewers who like F-Class John’s invention:
Finally something affordable! It’s compact and can be recharged at the range. I have room for this but not all the other gadgets you show. And a poor pensioner like my self can afford it! Thanks for the tip.
Ingenious and awesome idea! I bought one as soon as I saw this. I’ve been thinking about getting a cooler when I’m testing my loads. Thanks!
Brilliant… Brilliant… Brilliant! I have been deferring buying a barrel cooler for years now on account of wanting to spend my toy fund budget on other things. Considering how cheap it is to build, there is no excuse to not make one now.
Fan with Plain Hose Also Works Well (No Brass Case Cutting/Fitting Required)
F-Class John likes the custom fit he achieves with the hose inserted into a piece of modified brass. However he notes that the system also works well with no brass at all — i.e. just hose and fan. If you have a small diameter chamber, this may actually work better. Simply put the hose on the fan, trim/taper the forward hose end to fit and you are good to go.
F-Class John explains: “The heavy duty tubing and the motor works just fine without a brass case. The hose can sit in the chamber by itself. Obviously not every brass case will easily allow for you to put it on the end of the tube. For many people simply using the tube (without brass) may be the simpler option.”
Do you enjoy shooting pistols for sport, or perhaps you carry a handgun for self-defense? If you’re like most of us, you might benefit from a “refresher course” on the fundamentals of handgun shooting. The NRA has created a useful Infographic that covers important basics of handgun marksmanship — key things such as Sight Alignment and Trigger Control. Here are the first four (4) lessons. Click the link below to see all SIX (6) training topics: Sight Alignment, Sight Focus, Trigger Control, Breath Control, Hold Control, and Follow-Through.
In recent years, airgun manufacturers have come out with increasingly potent air rifles capable of shooting hefty projectiles at serious velocities. Some of these new air rifles pack serious punch, making them viable for certain game hunting purposes. Did you know that hunting with an airgun is legal in most states?
This Video Shows Squirrel Hunting with Air Rifles in the UK
Interactive Airgun Hunting Map from Pyramyd Air
In conjunction with the Airgun Sporting Association (ASA), Pyramyd Air has compiled state-specific rules and regulations for airgun hunting. These are displayed on an interactive map. The Airgun Hunting Map allows users to choose a type of game they want to hunt, or select a state and get complete and up-to-date information on the local airgun hunting laws. This map shows the states where it is legal to hunt with airguns, and also lists state restrictions on huntable species (each state is different). The resource lists 100+ species — everything from squirrels to elk and everything in between.
Airgun hunting by state: Simply click on the state, and it will list all the species that are allowed to be hunted in that state. Airgun hunting by specific game: Choose any state, and click on the species name you want, and it will highlight all the states where that particular species can be legally hunted.
The interactive map has 8 categories: Big Game, Small Game, Furbearers, Nuisance Species, Exotic Species, Upland Bird, Predator Species, Waterfowl. To see the states which approve a particular category, click the applicable category on the Pyramyd Air Hunting Map.
Shown below are the results for Big Game and Small Game Species.
IMPORTANT: You MUST click on the state where you are planning to hunt, and see the specific species allowed for airgun hunting. Just because a state shows RED for “Big Game” does NOT necessarily mean you can hunt deer or elk or even groundhogs!
Read this again!! Each state has a specific list of game animals permitted to be hunted with an Air Rifle. You absolutely MUST look at the individual list for the particular State! For example, though California appears as a Big Game-approved red state, you may NOT hunt deer or feral hogs there with an air rifle. Only these species may be hunted with airguns in CA: Aoudad Sheep, Coyote, Jackrabbit, Opossum, Pigeons, Quail, Rabbit, Skunk, Squirrel, Sparrow, Starlings, Turkey, Weasel.
In other states, the list of allowed species is VERY different. So, you MUST check the list for the state where you will hunt!! To access the list, go to the Pyramyd Air Hunting Map Page and click on the particular STATE.
IMPORTANT: Because of the ever changing laws, use the Pyramyd Interactive Hunting Map as a guide, but always consult with your local state authorities to be sure there are no recent state changes impacting hunting laws and regulations in that particular state!


 In this NSSF video, Ryan Cleckner shows how to set up a scope on a hunting or tactical rifle. Ryan, a former U.S. Army Sniper Instructor, notes that many hunters spend a small fortune on equipment, but fail to set up their rifle to use the optics optimally. Cleckner likens this to someone who owns an expensive sports car, but never adjusts the seat or the mirrors.


 Key Benefits of this system


