Today’s precision shooter is connected. He or she is likely to bring a number of electronic items to the range, such as a smartphone, tablet computer, Kestrel, LabRadar chronograph, and more. These digital devices all require electricity to operate. Unfortunately, most ranges don’t include convenient charging stations for your gadgets. Therefore you need to bring battery back-up. Here are three good options, with storage capacities from 10200 mAh to 42000 mAh. The first unit is fully weather-proof, so it is good for hunters and tactical shooters exposed to the elements. The largest power pack, with AC outlet, is quite versatile and works well on car-camping trips.
1. FosPower 10200 mAh Waterproof Charger, $29.99
When you’re at the range or on a hunt, it’s smart to have a USB-output battery pack for smart phone, target-cam monitor, even a LabRadar. There are many battery packs available, but most are fairly fragile, with exposed ports. This “ruggedized” FosPower 10200 mAh charger is different. It is waterproof, dust-proof, and shock-proof. (IP67 certified: dust and water resistance for up to 3ft/1m for 30 minutes under water.) It can handle all that a PRS competitor or hunter can dish out. It even has a handy LED light. Right now it’s priced at $29.99 with FREE Shipping for Prime members.
2. EasyAcc 20000 mAh Battery Pack with Fast Charging, $42.99
If you want to charge multiple devices, such as a tablet and a LabRadar, you need serious capacity. The EasyAcc 20000 mAh battery pack can charge up to four devices simultaneously. Notably, this $42.99 Battery Pack charges faster than most other 20K packs. It has two power input ports, allowing it to fully charge in 6-7 hours. (We have another 20000 mAh battery unit that takes over 16 hours to fully charge!). This unit will charge an iPhone 7 six times, a Samsung S8 four times or an iPad Mini two times. Note, 78% of Amazon purchasers rated this unit Five Stars (with 13% Four-Star reviews).
3. Jackery 240Wh USB, 110v AC, 12v DC Power Station, $199.99
Many folks have asked us “How can I use a laptop, chronograph, or electronic powder dispenser that requires 110 volt AC power when I’m at the range?” Sure you can take power from your car’s 12 volt cigarette lighter jack, but you’ll still need a very long cable and a 12 volt to 110 volt step-up transformer. If you run a cable from the parking lot to the bench or shooting bay you’ll have to leave a window open in your vehicle and fellow shooters can trip over the long cord.
A better solution is to get a portable, combo USB + 110 volt + 12 volt power unit. This versatile 240Wh Jackery Power Station will drive a 110v device, 12v units, PLUS charge a USB tablet and cellphone, all at the same time. You can run a LabRadar for DAYS with this advanced Lithium Ion power-pack. It will also power CPAP machines and other 12v devices. One nice feature is rapid charging. Before your range session or camping trip, plug this into the wall. It will get fully charged in about 3.5 hours from a 110v outlet. Also this unit can recharge from a paired Jackery solar panel ($179.99 sold separately, see below). By itself (without solar panel) the Jackery portable power source is $199.99 on Amazon. See Jackery Product Store.
Hunting season is starting soon. We know many readers have acquired a new hunting rifles, or perhaps are using new ammo or a new optic. If you’ve got new gear, you’ll want to sight-in and zero your hunting rig properly. Here’s how…
Here’s a simple procedure that lets you get a solid zero in just four shots. Of course you probably want to fire a few more rounds to confirm your zero before you head off to your hunting grounds, but this will let you get on-target with a minimum amount of time and ammo expended. (This assumes your scope is securely mounted, and the bases are not drastically out of alignment.)
QUICK-TIP: The Key to this procedure is Dialing to Shot One Point of Impact (POI). Re-aim at center of target after SHOT ONE. Then with the rifle motionless, use the turrets to put the middle of the cross-hair (reticle) on the first shot location. Be sure NOT to move your rifle while clicking.
1. First, remove the bolt and boresight the rifle. Adjust the position of the rifle so that, looking through the bore, you can see the center of the target with your eyes. Secure the rifle in the rests to maintain its position as boresighted. Then, without moving the rifle, center the reticle. That should get you on paper. With the rifle solidly secured in front and rear rests or sandbags, aim at the center of a target placed at your zeroing distance (50 or 100 yards). Confirm there are no obstructions in the barrel! Then load and fire SHOT ONE. Then, return the gun to the exact position it was when you pulled the trigger, with the cross-hair centered on the target as before.
2. Locate, in the scope, where your first bullet landed on the target. Now, while you grip the rifle firmly so it doesn’t move, have a friend adjust the turrets on your scope. While you look through the scope, have your friend turn the windage and elevation turrets until the cross-hairs, as viewed through the scope, bisect the first bullet hole on the target. Use the turrets to move the center of the reticle to the actual position of shot number one. IMPORTANT: Dial the crosshairs to the hole — don’t move the rifle.
3. After you’ve adjusted the turrets, now re-aim the rifle so the cross-hairs are, once again, positioned on the target center. Keep the rifle firmly supported by your rest or sandbag. Take the SECOND SHOT. You should find that the bullet now strikes in the center of the target.
4. Take a THIRD SHOT with the cross-hairs aligned in the center of the target to confirm your zero. Make minor modifications to the windage and elevation as necessary.
5. Finally, shoot the rifle from a field rest (shooting sticks, bipod, or rucksack) as you would use when actually hunting. Confirm, with SHOT FOUR, that your zero is unchanged. You may need to make slight adjustments. Some rifles, particularly those with flexy fore-arms, exhibit a different POI (point of impact) when fired from a bipod or ruck vs. a sandbag rest.
Don’t Rush the Process
One more important point comes from reader Bruce: “DO NOT rush the procedure. Hunting rifles need a cold zero. When you go for a walk in the weeds for that freezer-filler with a hat-rack your FIRST (and likely ONLY) shot will be from a COLD barrel. Bambi is not going to hang around while you fire warming shots”.
This Video Shows the Process Described Above:
Fouling Shots and Cold Bore Condition
If you recently cleaned your rifle, you may want to fire two or three fouling shots before you start this procedure. But keep in mind that you want to duplicate the typical cold bore conditions that you’ll experience during the hunt. If you set your zero after three fouling shots, then make sure the bore is in a similar condition when you actually go out hunting.
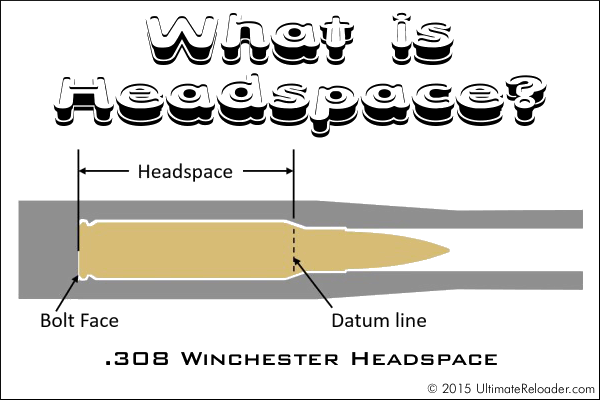
This illustration shows headspace measurement for the popular .308 Winchester cartridge, which headspaces on the shoulder. Image copyright 2015 Ultimate Reloader.
In this Brownells Tech Tip Video, Brownells gun tech Steve Ostrem explains what headspace is and why it’s one of the most critical measurements for nearly all firearms. Even if you’re an experienced rifle shooter, it’s worth watching this video to refresh your understanding of headspace measurements, and the correct use of “GO” and “NO-GO” gauges.
Headspace Definition
In firearms, headspace is the distance measured from the part of the chamber that stops forward motion of the cartridge (the datum reference) to the face of the bolt. Different cartridges have their datum lines in different positions in relation to the cartridge. For example, 5.56x45mm NATO ammunition headspaces off the shoulder of the cartridge, whereas .303 British headspaces off the forward rim of the cartridge. If the headspace is too short, ammunition that is in specification may not chamber correctly. If headspace is too large, the ammunition may not fit as intended or designed and the cartridge case may rupture, possibly damaging the firearm and injuring the shooter. (Source: Wikipedia)
Problems Caused by Too Much Headspace
Excessive headspace issues can include: light primer strikes, failure to fire, bulged/blown cases, case separations, split shoulders, or unseated primers after firing. Case ruptures caused by excessive headspace can lead to catastrophic failures causing serious injury. That is why headspace is such an important measurement.
Problems Cause by Too Little Headspace
Insufficent (or excessively tight) headspace can prevent the firearm from going into battery, resulting in failure to fire or deformation of the cartridge case. Various feeding and functioning problems can be caused by cases with too little headspace, even if a round can be chambered (with effort).
Headspace Gauges
Headspace is measured with a set of two headspace gauges: a “Go” gauge, and a “No-Go” gauge. Headspace gauges resemble the cartridges for the chambers they are designed to headspace, and are typically made of heat-treated tool steel. Both a “Go” and a “No-Go” gauge are required for a gunsmith to headspace a firearm properly. A third gauge, the “Field” gauge, is used (as the name implies) in the field to indicate the absolute maximum safe headspace. This gauge is used because, over time, the bolt and receiver will wear, the bolt and lugs compress, and the receiver may stretch, all causing the headspace to gradually increase from the “factory specs” measured by the “Go” and “No-Go” gauges. A bolt that closes on “No-Go” but not on “Field” is close to being unsafe to fire, and may malfunction on cartridges that are slightly out of spec. (Source: Wikipedia)
To learn more, read Brownell’s article Headspace Gauges and How to Use Them. Among other things, this explains the relative lengths of “Go”, “No-Go”, and “Field” gauges. The “Field” is actually the longest: “The GO gauge corresponds to the SAAMI minimum chamber length, while the FIELD gauge usually matches the maximum chamber depth, or slightly less. NO-GO gauges are an intermediate length between minimum and maximum, that, technically, is a voluntary dimension. A firearm that closes on a NO-GO gauge and does not close on a FIELD gauge may not give good accuracy and may have very short cartridge case life from the ammunition re-loader’s standpoint.”
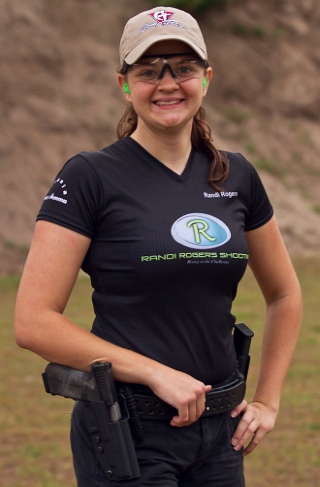
Randi Rogers is one of best female action shooters in the world. Randi has captured over 60 World and National Titles in seven different shooting disciplines for pistol, shotgun, and rifle. From her early wins in the world of Cowboy Action Shooting, to bringing home a Gold Medal from the 2011 IPSC World Shot in Greece, Randi is a winner. Competing as ‘Holy Terror’, Randi has won the ladies’ division at the SASS Cowboy Action World Championships so many times, they might as well retire the Ladies’ Trophy with her name on it. Randi, who started shooting at age 11, now competes in several disciplines including Cowboy Action Shooting, USPSA, Steel Challenge, IDPA, IPSC, and NRA Action Pistol. When Randi is not on the road or in the office (where she serves as Comp-Tac’s Marketing/Sales Manager), there’s a good chance you’ll find Randi on the range preparing for the next match. In this article from RandiRogersShooting.com, Randi talks about the “mental game” and how she gets ready for a big match.
Preparing Mentally for a Shooting Competitionby Randi Rogers
As I head to [a major match] I have a lot of tasks to complete. One of the most important [tasks] is preparing mentally. For an experienced shooter, the mental part of shooting is more important than knowing how to pull a trigger. The mind is an amazing thing and if you/it believes something, your mind will override all the skills you have. Example: if you think that you are bad at throwing a ball you will throw the ball badly.
Over the years I have formed a few techniques to help myself with my mental game:
1. Make Peace with your Current Skills. When I get on the plane is when my mental preperation really starts. This is when I decide that I am ready to shoot, confident in my skills and can achive the goals I set for myself. From this point forward I make peace with my shooting and tell myself that if I follow my plan I will achive my goals. There is no longer any time for me to become a better shooter.
2. Set a Goal and a Plan. When I attend a shooting competition I have a goal in mind and a plan for how I want to get there. This varies on what shooting sport it is. I may have the goal that I want to place in the top half of the shooters in my division. In order to achieve that goal I may have decided that I need to concentrate on accuracy. When you set goals and plans they need to reflect all of the work you have been doing. For instance, it does not make sense to say “I will win everything” if you haven’t practiced in four years. It is important to set achievable but still challenging goals.
3. Stay Positive! Whenever you set goals or “talk” to yourself mentally it is important to stay away from negative commands and negative words. I don’t tell myself “Don’t Miss,” because this is a negative command. It is like telling a child “Don’t spill the milk.” What are they going to do? Spill the milk.
4. Stick to the Plan. As I get ready and start competing in the match sometimes my mental voice goes haywire saying things like, “that wasn’t fast enough,” “that was a huge mistake,” “look how fast they are,” “they are going to beat you” and so on. It is hard but you have to banish these thoughts. You can’t change your plan now, there is nothing that you can do to suddenly become a better shooter. Instead think of your goal and plan and repeat it to yourself over and over again. For instance, “I am going to finish in the top half of my division and I am going to shoot accurately.”
As I head into a major competition my mental plan is to [remember] “Sights” and “Stay Aggressive.” I want to make sure I am remembering to look at my sights and shoot accurately, but I also want to make sure that I am not getting lazy. I need to move and shoot as fast as possible while still making my hits. As for my goal, I will keep that a secret for now.
5. Work on your Weak Points On her Facebook Page, Randi posted: “Fun fact — when I first started shooting, my left hand was so weak that the gun would jam up every single shot. So my grandfather made me shoot for a week straight with nothing but support hand. To this day I never sweat support hand stages even if they are limited!”
Have a great next match and remember Rise to the Challenge! — Randi Rogers, Team Ruger
Watch Randi Speed Through a Cowboy Action Competition Stage
There is an excellent article about primers on the Shooting Times website. We strongly recommend you read Mysteries And Misconceptions Of The All-Important Primer, written by Allan Jones. Mr. Jones is a bona fide expert — he served as the manager of technical publications for CCI Ammunition and Speer Bullets and Jones authored three editions of the Speer Reloading Manual.
This authoritative Shooting Times article explains the fine points of primer design and construction. Jones also reveals some little-known facts about primers and he corrects common misconceptions. Here are some highlights from the article:
Size Matters
Useful Trivia — even though Small Rifle and Small Pistol primer pockets share the same depth specification, Large Rifle and Large Pistol primers do not. The standard pocket for a Large Pistol primer is somewhat shallower than its Large Rifle counterpart, specifically, 0.008 to 0.009 inch less.
Magnum Primers
There are two ways to make a Magnum primer — either use more of the standard chemical mix to provide a longer-burning flame or change the mix to one with more aggressive burn characteristics. Prior to 1989, CCI used the first option in Magnum Rifle primers. After that, we switched to a mix optimized for spherical propellants that produced a 24% increase in flame temperature and a 16% boost in gas volume.
Foiled Again
Most component primers have a little disk of paper between the anvil and the priming mix. It is called “foil paper” not because it’s made of foil but because it replaces the true metal foil used to seal early percussion caps. The reason this little disk exists is strictly a manufacturing convenience. Wet primer pellets are smaller than the inside diameter of the cup when inserted and must be compacted to achieve their proper diameter and height. Without the foil paper, the wet mix would stick to the compaction pins and jam up the assembly process.
The popular BarrelCool is a compact barrel-cooling device that also serves as an empty-chamber safety flag. A small, battery-powered fan drives cooling air through the barrel’s bore. Yes it really works — manufacturer-provided data shows that BarrelCool significantly reduces the time it takes to cool down a hot barrel. Look at the chart above to see what to expect.
In the past, folks have tried various methods to cool barrels: water flushed through the bore, CO2 tanks, even battery-operated fish pumps. BarrelCool is a simpler, less costly, and much handier solution. Priced at $39.99, this small device can definitely save you time at the range. Potentially it can save you money by extending barrel life. To see how Barrelcool works, watch th videos below that show the BarrelCool units in both bolt-action and AR-type rifles.
BarrelCool Range Reports from Forum Members
Forum members have been impress with the BarrelCool device. Member Comrade Terry said: “At the range, I spend a good bit of time waiting for the barrel to cool between shot strings. I fired my usual 50 rounds today, and (though it was 85° today) I was able to leave the range 30-40 minutes earlier than usual thanks to the BarrelCool. I like it!” Another Forum member, J-Rod, reports “Did some load development on my new rifle. This used to take forever due to the barrel heating up outside in full sun (90° ambient). I’d say this little gem cut about two hours off my normal shooting time. I got home early and the wife was happy — what’s that worth?”
How and Why BarrelCool Was Invented
BarrelCool originated from the idea that cease-fire periods would be a great time to cool a barrel. During cease-fires, most ranges and matches require empty chamber flags in the gun so that the range officer and everyone on the firing line can see visually that the gun is in a safe condition. The BarrelCool does double duty — cooling the barrel while serving as an empty-chamber indicator.
BarrelCool inventor Bryan Sumoba explains: “Previous barrel-cooling methods required additional steps such as running patches down the bore, or a fan that gets in the way of a required empty-chamber flag. BarrelCool now allows the shooter to cool the barrel while having the empty-chamber flag in the firearm.”
Sumoba says BarrelCool significantly shortens the time needed to cool down a hot barrel: “In controlled testing, it took about half the time to cool the barrel from 140 degrees F to 100 degrees F. Our customers also report significant reductions in the time it takes to cool down a hot barrel. At an F-Class match in Sacramento, one shooter fired 25 shots out of his 7mm RSAUM and got the barrel to the point where it was too hot to touch. We placed BarrelCool in his firearm and within 30 minutes, the barrel was back to near-ambient temperature.”
Using three (3) CR123A batteries, a BarrelCool unit can operate for 7-10+ hours. BarrelCool fits both AR-style rifles as well as most bolt action rifles. The Hi-Viz yellow color stands out on the firing line and BarrelCool is small enough to fit in most range or gun bags. Manufactured in the USA, Barrelcool can benefit competition, precision, or recreational shooters who need to cool down their barrels more rapidly, while displaying “safe condition” on the firing line. For more information, or to order for $34.99, visit www.barrelcool.com.
BATTERY TIP: We recommend rechargeable CR123A batteries for use in the BarrelCool. These can last many seasaons and can be charged at home or in a vehicle. Keep a spare set in your range bag. A 4-pack of C123A Lithium Batteries with USB recharger unit is $29.99 on Amazon
Take a look at that unusual target below. We bet you’ve never seen one of these before. It’s a 50-Yard Sighting Target for the M1 Garand (and other .30-06 Springfield vintage military rifles). It’s designed to allow a rifleman to confirm his zeros for multiple yardages all the way out to 1000 yards. But importantly, he can establish those zeros at a very “short” shooting facility, since the target is positioned at a mere 50 yards.
Here’s how it works. The target is placed at fifty (50) yards. You start at the bottom, aiming at the black circle. Then check your come-up table and work your way up, clicking step-by-step to the various horizontal lines set for 200, 300, 500, 600 and 1000 yards. This is NOT “spray and pray” — you need to have a pretty good idea of the clicks you need, based on your ammo’s ballistics. This target is calibrated for the U.S. Military M72 Ball Ammo. The targets are available from Champion’s Choice ($0.75 each) or from Creedmoor Sports (12 for $5.95).
Kevin Thomas used this target to get zeroed for a D-Day Anniversary Match at the Talladega Marksmanship Park a few seasons back. Kevin used the target for both his M1 Garand as well as his M1903A1 Springfield, both chambered for the .30-06 Springfield cartridge.
Zeroing at a Short Distance — How to Use the 50-Yard Sighting Target, by Kevin Thomas
As part of my preparation for the Garand Match at the CMP’s Talladega Marksmanship Park, I needed to zero my new M1 Garand, but I was crunched for time. I didn’t have time to get to my normal range and confirm zeros at actual yardages. But a 50-yard zero target came to the rescue. Made for M1s using the M72 National Match ammo, the target allows the shooter to establish fairly good zeros at 200, 300, 500, 600 and 1,000 yards if you’ve got access to a 50-yard range.
I have no idea when these 50-yard Sighting Targets were first developed, but they’ve been around for at least as long as I’ve been involved in this game (longer than I care to admit). It consists of a tall target, with a smallish black bullseye located at the bottom center. The bullseye is an aiming point only. Extending through the top of the target is a vertical line that runs directly up the center, to nearly the top of the paper. Across this, there are intersecting horizontal lines that are marked 200, 300, 500, 600 and 1,000.
The target was designed for the M1 Garand rifle using then-issued M72 National Match ammunition. This ammo launched a 173gr FMJBT bullet at approximately 2,640 FPS. It was a good load in its day, supersonic out to the 1,000-yard line. While that ammo is fairly scarce these days, this isn’t a problem for the handloader. My standard match load for the M1 Garand utilizes the 175gr Lapua Scenar HPBT, and delivers remarkably similar ballistic performance. Thus my normal Garand load translates nicely to this 50-yard target. Yes, this is by design. No point in reinventing the wheel when Lake City has already established what works!
In use, the shooter sets the target up at a measured 50 yards, and (this is critical) checks the vertical line with a plumb bob or a carpenter’s level, to ensure that it is absolutely vertical. Once the target is set, the rifle is fired and the group noted. From there, it is a simple matter of zeroing it normally to bring the groups into alignment with the vertical line, at the elevation needed for a particular range. Once your group is hammering the intersection of the vertical line and the horizontal line marked “200”, you have established your 200-yard zero for that rifle. Record the number of clicks, and you’re good to go. Raise the impacts up to coincide with the line marked “300” and you now have a 300-yard zero as well. And so on, right up the target. Record those settings in your data book, and you’re ready to go to the range at the full distances. If done carefully, you may be in the X-Ring, but at the very least, you’ll be well-centered and ready to get some hard dope recorded for future shoots.
The same target can also be used with an M14/M1A, at least at the shorter distances. The ballistics of the M118 and the current M118LR are similar enough that this will get you on target at the full distances, probably requiring just a half MOA or so change from the 50 yard zero you recorded. Same bullets, moving at a slightly more sedate 2,550 fps, you’ll be in the ballpark at least.
Here’s something all shooters need — a smartphone App that calculates bullet-hole group sizes from your own photos. The Ballistic-X App is simple to use. Take a photo of your target, set some values (such as bullet diameter and distance to target), then use the touchscreen to place circles around each hole. The App will calculate group size (in MOA or Mils), distance to point of aim, and provide all the info in an overlay. Then click “save” to record your group for posterity!
This App works well, is relatively easy to set-up, and costs just $7.99. It is available for both Android devices and iOS (Apple) devices. There are other ways to measure group sizes from target images, such as the excellent On-Target program, which we have used for years. However On-Target requires a software installation on a Windows platform desktop or laptop. Ballistic-X is a simple, easy-to-install App with versions for both Android and iOS (Apple) Mobile devices.
The Ballistic-X App has a relatively easy-to-use interface. Of course you can choose either MOA or Milrad group values, and Inch or Metric dimensions. There are various labeling options that provide useful info for Load Development. There is even an ATZ (Adjustment To Zero) feature for adjusting your turrets.
How to Use Ballistic-X App
1. Select Photo Source — Choose Camera to take new photo or get image from Photo Library.
2. Set Reference Values — Select Bullet Diameter and enter Distance to Target.
3. Establish Scale on Image — Mark two points on target photo to set scale. For example, if the target has a 1″-square grid lines, mark two points on grid for 1″ distance.
4. Mark Point Of Aim — Put the central X on the aim point.
5. Designate Shot Locations — Place the green circles around each shot.
6. Finalize Data Display — Position Overlay, select size/color options, and export file.
Android Options — Range Buddy FREE App
Along with Ballistic-X, there is another Mobile App, Range Buddy, that also measures shot groups. Range Buddy is currently offered for Android devices only. It is FREE, but has adverts. Range Buddy isn’t bad, but users complained about the program crashing, and there are compatibility issues with newer phones. We recommend you pay $7.99 and stick with Ballistic-X.
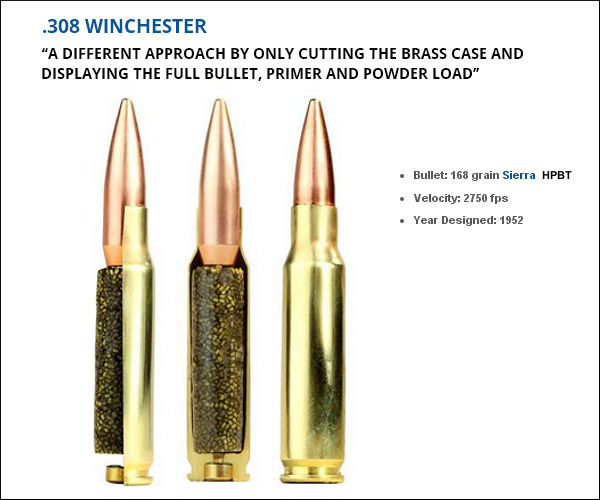
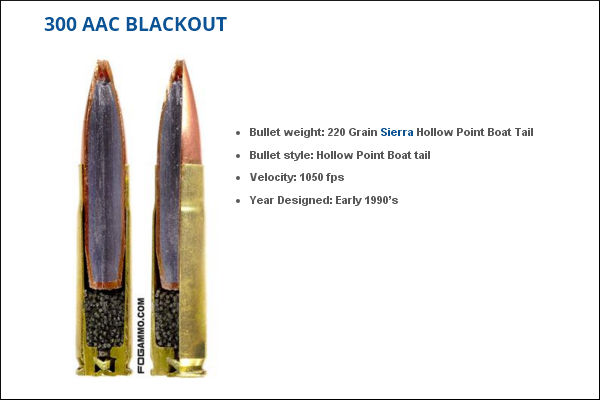
Here’s something you don’t see every day — the inside of loaded cartridges, sliced halfway through. This lets you see how bullet core, jacket, cartridge case, powder, and primer all fit together. Give credit to the folks at FOG Ammunition for creating this interesting series of cut-through ammo images. We show four cartridges here: the .308 Winchester, 9mm Luger, 300 BLK, and .50 BMG. You’ll find two more (the .223 Remington and .45 ACP) at www.FogAmmo.com.
This .308 Winchester model took on a different approach by only cutting the brass case and displaying the full bullet, primer and powder load. A spec amount of powder was used to create the model powder form. An estimated 10% volume was added during the forming process, along with an undetermined amount of air pockets.
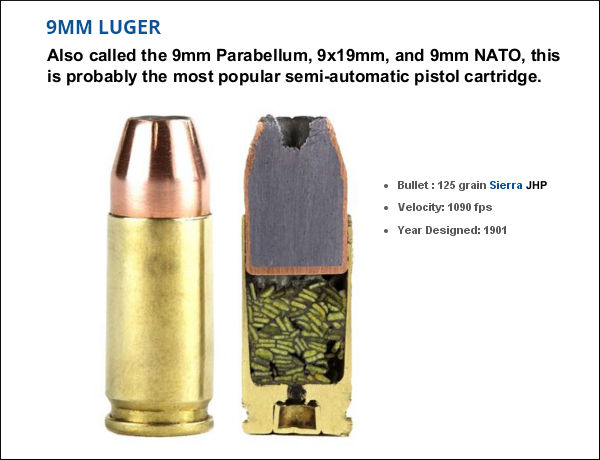
This bisection is a 9mm Luger Jacketed Hollow Point round with flake powder held together with super glue. After this self-defense round was cut by a trained professional the round was polished by hand. This might look like stick powder, but those are in fact flakes stacked up in cross-section. Designed in 1901 by Georg Luger, this popular cartridge is used by civilians, military, and law enforcement.
For this model of the .300 AAC Blackout (aka 300 BLK), a Dremel tool was used to create a pie cut within the bullet and brass case. A measured amount of power, roughly 65% of spec charge, was placed inside the case with super glue. This cartridge was originally optimized for subsonic use with a suppressor, so the amount of powder used is small relative to the nominal case capacity. That leaves more room for the relatively large .30-caliber bullet.
Last but definitely not least is the .50 Caliber BMG round (aka .50 Browning Machine Gun). Famed for its wartime use in the M2 Machine gun, the .50 BMG round is also used in civilian Long Range competitions. A typical .50 BMG cartridge holds over 225 grains of powder. That’s almost ten times the amount in a 5.56×45 NATO Round! To demonstrate the size of the .50 BMG, check out that .223 Rem for comparison.
Can you form a wildcat cartridge such as the 6 Dasher without expending primer, powders, and bullets? Absolutely. Using the hydro-forming method you can form improved cases in your workshop with no firing whatsoever, so there is no wear on your precious barrel. Watch this video to see how it’s done:
6 Dasher Case Hydro-Forming Demonstration:
Forum member Wes J. (aka P1ZombieKiller) has produced a helpful video showing how to form Dasher cases use the Hornady Hydraulic forming die kit. This includes a two-part die (body and piston), and a special shell holder. To form the case, you insert a primer in your virgin brass, top the case off with with a fluid (water or alcohol), then run the case up into the Hydro-forming die. A few stout whacks with a hammer and your case is 95% formed.
This same procedure can be accomplished with a Whidden Gunworks 6mm Dasher hydraulic form die. We like the Whidden hydro-forming die for its production quality and consistent results. This Whidden system works great according to our Forum members.
Hydro-Forming Procedure Step-by-Step:
1. Insert spent primer in new 6mmBR brass case.
2. Fill with water or alcohol (Wes prefers alcohol).
3. Wipe excess fluid off case.
4. Place case in special Hornady shell-holder (no primer hole).
5. Run case up into Hydraulic forming die.
6. Smack top piston of forming die 3-4 times with rubber mallet or dead-blow hammer.
7. Inspect case, re-fill and repeat if necessary.
8. Drain alcohol (or water) into container.
9. Remove primer (and save for re-use).
10. Blow-dry formed case. Inspect and measure formed case.
Wes achieves very uniform cartridge OALs with this method. He measured ten (10) hydro-formed 6 Dasher cases and got these results: two @ 1.536″; 2 @ 1.537″; and 6 @ 1.538″.
Three or Four Whacks Produces a 95%-Formed Case
With a Whidden or Hornady hydro-forming die, hydraulic pressure does the job of blowing out the shoulders of your improved case. The process is relatively simple. Place a spent primer in the bottom of a new piece of brass. Fill the case with water, and then slip it into a special Hornady shell-holder with no hole in the middle. Then you run the case up into the forming die. Now comes the fun part. You gently insert a plunger (hydraulic ram) from the top, and give it three or four stiff whacks with a mallet (or better yet, a dead-blow hammer). Remove the plunger and you have a 95% formed case, ready to load.
Special Shell-Holder
Hornady supplies a shell holder made specifically for the hydro die; there’s no hole in the bottom of it. Just insert a spent primer into the primer pocket and you’re ready to go. The spent primer, combined with the solid shell holder, keeps the water from seeping out of the primer pocket. The primer pushes out a little bit during this process, but it’s impossible for it to come out because of the way the shell holder is designed. The shell holder has a grove which allows the case to slide out of the shell holder even when the primer protrudes a bit.


 Headspace Gauges

 2. Set a Goal and a Plan. When I attend a shooting competition I have a goal in mind and a plan for how I want to get there. This varies on what shooting sport it is. I may have the goal that I want to place in the top half of the shooters in my division. In order to achieve that goal I may have decided that I need to concentrate on accuracy. When you set goals and plans they need to reflect all of the work you have been doing. For instance, it does not make sense to say “I will win everything” if you haven’t practiced in four years. It is important to set achievable but still challenging goals.
 As I head into a major competition my mental plan is to [remember] “Sights” and “Stay Aggressive.” I want to make sure I am remembering to look at my sights and shoot accurately, but I also want to make sure that I am not getting lazy. I need to move and shoot as fast as possible while still making my hits. As for my goal, I will keep that a secret for now.


 Hydro-Forming Procedure Step-by-Step:
 Special Shell-Holder


