Do you need a quality, affordable lower for your next black gun build? Here’s one of the best deals we’d found. Palmetto State Armory (PSA) now has stripped AR15 lowers for just $49.99. With this lower as the core, you can build up your AR for any discipline you choose: 3-Gun rifle, competition service rifle, varmint rifle, or even “race gun” for the popular PRS Gas Gun Series (see below).
These forged PSA lowers are quality-made using 7075-T6 Aluminum. Finish is Black Hardcoat Anodized per MIL-8625 Type 3 class 2.
PRS Gas Gun Series — What You Need to Know
PRS Gas Gun Series Basics — How to Get Involved
Capitalizing on the success of the bolt-gun competitions, the PRS runs a Gas Gun series for semi-auto rifles such as AR15s and AR10s. The inaugural 2017 PRS Gas Gun Series competition took place February 17-19, 2017 at the CORE Shooting Solutions range in Baker, Florida. Now there are PRS Gas Gun Matches around the country.
PRS Gas Gun Series Rules
For the new PRS “Gasser” Competition, the PRS developed rules on gun types, scoring, match timing, penalties, safety and other key topics. CLICK HERE for Full PRS Gas Gun Series Rules.
Open Division: The Open Division rifles will not exceed a caliber of .30 or a velocity of 3,200 fps. A match DQ will result any rounds over the speed limit of 3,200 fps (+/- 32 fps for environmental factors and equipment discrepancies). Match Officials may request at any point during a match that a competitor fire their rifle through chronograph. If the bullet exceeds the 3,200 fps speed limit, the shooter will receive an automatic match DQ.
Tactical Light Division: Intended to allow competitors the opportunity tocompete using traditional military and law enforcement caliber. This promotes Active Duty military and law enforcement competitors use of their Service and Department-issued rifles. Tactical Light Division rifles are restricted to 5.56 NATO/.223 Remington calibers only. Bullet weight cannot exceed 77 grains and muzzle velocity cannot exceed 3,000 fps.
SSUSA: What will be the format of the PRS Gas Gun Series matches?
Wiseman: The matches will be a two-day format with 8 to 10 stages per day. There are three Divisions: Tactical Light for 5.56x45mm NATO/.223 Rem. rifles; Tactical Heavy for 7.62x51mm NATO/.308 Win.; and Open for everything else up to .30 cal. The maximum distance will be 800 yards.
SSUSA: What guns do you expect to be popular?
Wiseman: In the Open Division, I expect to see a lot of 6.5 Creedmoors for two main reasons; it’s an inherently accurate cartridge and Hornady makes great ammo for the folks that aren’t into reloading. I think the Tactical Light Division will probably be the most popular. It is hard to say specifically what rifles will be the most popular but there are a few AR companies that are known for the accuracy. Armalite, GA Precision, LaRue and Seekins will all be very popular rifles in this Series. I think we will continue to see high-end optics with 5X to 6X zoom range on the rifles. Bushnell, Kahles, Leupold, Nightforce and Vortex will continue to be the most popular.
AR-platform rifles are fun and versatile, but the standard, mil-spec triggers leave much to be desired. They tend to be gritty, with creep and heavy pull weight. One of the easiest, most effective AR upgrades is a trigger group swap. An improved fire control group makes a huge difference. There are many aftermarket trigger options for the AR platform rifles. Choose single-stage or two-stage, either standard trigger assembly or unitized “drop-in” trigger, such as those made by Timney or Triggertech.
When upgraded with a precision trigger and match barrel, AR-platform rigs work great in NRA High Power competitions (Photo from NRA Blog, at Camp Perry).
Two-Stage vs. Single-Stage Triggers
Two-stage triggers have two separate movements. The first stage offers a light, spring-loaded pressure that works against the shooter’s pull until stopping at the second stage – this is called “take-up”. If there is no spring pressure, it is known as “slack”. Should the shooter continue to pull the trigger once he’s arrived at the second stage, the mechanism will operate like a single-stage trigger from there until engaging the sear and firing the gun. Good trigger reset requires the shooter to keep pressure on the trigger, even during reset, to minimize movement of the muzzle.
Single-stage triggers feature no take-up or slack, as they begin engaging the sear as soon as the shooter begins pulling the trigger. Some competitive shooters prefer the two-stage trigger because of the feedback it provides during its first stage, while other shooters, including those using their rifle in tactical scenarios, may want the surety of a single-stage trigger, ready to engage and fire once their finger is inside the trigger guard. Regardless of preference, a good trigger will feature minimal creep and should be free of grittiness, providing a smooth, even break.
Drop-In Trigger Assembly vs. Standard Trigger Group
Once you decide between a single-stage or two-stage trigger, you can choose between standard and drop-in trigger groups. Standard trigger groups feature all the fire control group parts separated, and need to be pieced together and installed much like a mil-spec trigger, while drop-in trigger are pre-assembled and contained within a casing that simply drops in to the receiver and accepts the pins, hence the name.
After-Market Trigger Comparison
Some shooters prefer drop-in triggers due to the ease of installation, while others opt for standard groups so they can access the components individually for cleaning adjustment or replacement. If one piece of a drop-in trigger fails, you’ll need to either replace the entire unit or send it to the manufacturer for repair, whereas you may be able to simply replace the broken component of a standard trigger without needing a whole new trigger set.
Trigger Terminology — “Creep”, “Stacking”, “Overtravel”
“Creep” or “travel” is the distance the trigger moves between the end of take-up and when the trigger breaks to fire the fun. Too much creep can affect accuracy, but no creep can be unsafe, as the shooter may not be prepared to fire. “Stacking” occurs when the trigger weight actually increases during travel — this shouldn’t happen. Lastly, “overtravel” is the distance the trigger continues moving back after the gun fires.
This article is based on a longer story in the NRA Blog.
This shocking photo of destroyed AR-15 bits and pieces was posted on Facebook by William Walter, a firearms instructor. William said this was “The worst AR-15 blow-up I have ever seen. The case head literally atomized …you can see the brass residue on the parts. The bolt was split in two also.”
There’s nothing inherently wrong with AR-platform rifles (well, except that they run dirty). Over the past six decades Eugene Stoner’s semi-automatic design has proven its merits in military and civilian applications. You may not know, but the original AR from 1955 was a .30-caliber. The Armalite AR-10 shot the 7.62×51 cartridge. Later, at the request of the U.S. Military, Armalite created a smaller version that became the M16/AR15. The rest was history. Now there are millions of AR “black rifles” in the hands of soldiers and sportsmen.
With so many ARs in circulation, it’s no surprise that some get used by folks who don’t know how to hand-load or otherwise fail to follow safe gun practices. The AR is actually a pretty sturdy rifle, but when it’s fed bad ammo, or abused, bad things can happen. Very bad things… commonly known as Kabooms.
The American Shooting Journal (ASJ) has compiled a set of particularly extreme AR Kabooms. Compiling the “evidence” from various web sites, ASJ has published nine (9) of the most Unbelievable AR-15 Fails. Here are two of the worst “AR-15 Fails”. CLICK HERE to see them all.
Nothing but busted parts after this catastrophic Kaboom…
Notice the bolt is still stuck in the barrel extension … with the rest of the gun in pieces.
Another view of this sad blow-up…
These catastrophic AR failures are eye-openers, that’s for sure. ASJ cautions: “Any weapon can fail if given the wrong ammunition, faulty reloads or a plugged barrel. Always be aware of what can happen at anytime if you fail to follow common sense and gun safety rules.”
ASJ Sources: Photobucket, Armory Blog, Pinterest, Northeastern Arms, Eric Nestor
Let’s face it, AR-platform rifles run dirty, at least compared to typical bolt-action rifles. The AR15 works by piping gas from the barrel back into the bolt carrier, causing the bolt to unlock and the carrier to move the bolt backward. The “exhaust gas” from the barrel contains soot and carbon. The carbon will form hard deposits on the bolt. In addition, the carbon can combine with lube on the bolt carrier to make a nasty, paste-like sludge. This can be particularly problematic when the black paste pollutes the ejector and extractor recess.
This Editor has inspected dozens of ARs over the years. Other than mag-related malfunctions, the most common cause of AR cycling problems I found was oily gunk in the extractor and ejector areas. Many AR owners overlook these critical areas. Look at an AR that hasn’t been cleaned properly and you’ll probably find black gunk (and small brass shavings) in the ejector and extractor recesses.
If you want to keep your black rifle running smoothly and reliably, you must clean it regularly and follow the correct maintenance procedures. Here are three videos that explain how to properly disassemble and clean AR-platform rifles.
Take-Down and Full Cleaning of AR15 by Jerry Miculek
Here ace shooter Jerry Miculek takes down and cleans an AR-platform rifle belonging to his daughter Lena. This is a good video because Lena’s rifle was “run hard and packed up dirty” so you can see where carbon and grease build up. This 35-minute video is very thorough. Jerry is one of the nation’s top action carbine shooters, so listen carefully to his advice on cleaning and lubrication.
How to Clean Your AR-Platform Rifle
This is a good basic video that shows the take-down and cleaning procedure for a typical AR15. It uses some fast-motion sequences to speed up the story. Check out this video if you don’t have the time to sit through the Miculek video above.
Cleaning and Lubricating AR15 Bolt Carrier Group
This video offers very specific advice on the bolt carrier group, which receives the dirty gas directly from the barrel. Be sure to check the extractor and ejector recesses. That’s where old lube, brass shavings, and carbon accumulate. Follow the directions in this video for lubrication, and don’t over-lubricate the bolt carrier — that will only capture more carbon.
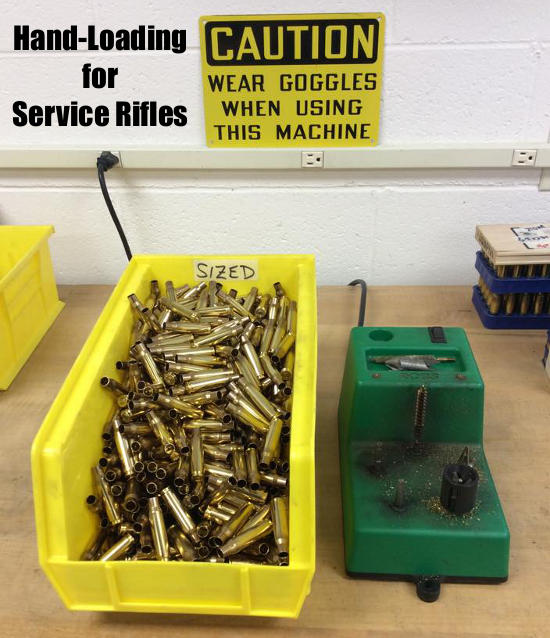
The U.S. Army Marksmanship Unit (USAMU) has published a great series of reloading “how-to” articles on its Facebook Page. This post covers key factors to consider when loading ammunition for Match Rifles and Service Rifles, with a particular focus on self-loading “gas guns”. Visit the USAMU Facebook Page each Wednesday for other, helpful “Handloading Hump-Day” tips.
We offer some “cardinal rules” to help new gas-gun handloaders with safety and efficiency. These address both Match Rifle and Service Rifle versions of the AR15, M1 Garand, M1A, and M110. However, they can also improve safe reloading for many other auto-loaders such as M1 Carbines, FALs, SIGs, etc. The author distilled these principles many years ago to help focus on the essential aspects of these rifles.
RULE ONE: Service Rifles Are Not Benchrest Rifles
Gas-guns require a relatively loose fit between ammunition and chamber (vs. bolt actions) for safe, smooth operation. Many techniques, such as neck sizing and keeping cartridge headspace quite tight, are popular in the extreme bolt gun accuracy realm. However, they are of little value with Service Rifles, and some could even be hazardous. Before adopting a specialized technique, seriously consider whether it is appropriate and beneficial in a gas-gun.
RULE TWO: Never Compromise Safety to Obtain Accuracy
Example: If choosing a brand of great, but ultra-sensitive match primers offers possibly better accuracy at the risk of slam-fires in your design of rifle, don’t do it! You are issued exactly two eyes and ten fingers (best-case scenario). Risking them trying to squeeze 0.25 MOA better accuracy out of an M1A, etc. simply isn’t worth it.
RULE THREE: Tailor the Precision to Your Individual Skill and Your Rifle’s Potential
This has been addressed here before, but bears repeating for newcomers. If you are struggling to break out of the Marksman Class, or using a CMP M1 “As-Issued,” then laboriously turning the necks of your 600-yard brass is a waste of time. Your scores will improve much faster by practicing or dry-firing. On the other hand, if the reigning champions anxiously check your scores each time you fire an event, a little neck-turning might not be so far-fetched.
Verifying Load Improvements — Accuracy hand-loading involves a wide variety of techniques, ranging from basic to rather precise. Carefully select those which offer a good return on investment for your time and labor. In doubt? Do a classic pilot study. Prepare ammo for at least three or four ten-shot groups with your new technique, vs. the same with your standard ammo. Then, pick a calm day and test the ammo as carefully as possible at its full distance (e.g. 200, 300, or 600 yards) to verify a significant improvement. A little testing can save much labor!
RULE FOUR: Be Your Own Efficiency Expert
Serious Service Rifle shooters generally think of ammunition in terms of thousands of rounds, not “boxes”, or even “hundreds”. Analyze, and WRITE DOWN each step in your reloading process. Count the number of times each case is handled. Then, see if any operations can be dropped or changed without reducing safety or accuracy. Eliminating just two operations saves 2000 steps per 1000 rounds loaded. Conversely, carefully consider any measurable benefits before adding a step to your routine.
RULE FIVE: In Searching for Greater Accuracy with Efficiency, Look for System Changes
For example, instead of marking your 300-yard rounds individually to differentiate them from your 200-yard ammo, would a simple change in primers work? If accuracy is maintained, using brass-colored primers for 200 and silver for 300 provides an indelible indicator and eliminates a step! Similarly, rather than spending hours selecting GI surplus brass for weight and neck uniformity, consider splurging on some known, high-quality imported match brass for your 600-yard loads. Results should be excellent, time is saved, and given limited shooting at 600 yards, brass life should be long.
RULE SIX: Check All Your Primers Before Packaging Your Loaded Ammo
This seems simple and even intuitive. However, many slam-fires (which were much more common when M1s and M1As were the standard) are due, at least in part, to “high” primers. Primers should be seated below flush with the case head. The USAMU has addressed this at length in a previous column, but each round should be checked for properly-seated primers before they are packaged for use.
Sierra Bullets has just released load data for the 6.5 Grendel, a popular cartridge that works equally well in bolt guns and AR15-platform gas guns. Sierra published comprehensive 6.5 Grendel load data, covering 19 powders and eight (8) different bullets from 85 to 130 grains. NOTE: Hornady-brand brass (see below) was used for Sierra’s 6.5 Grendel tests, not the stronger Lapua 6.5 Grendel brass. Hand-loaders using Lapua 6.5 Grendel brass may need to adjust their loads. Also Winchester WSR primers were used. We imagine most precision hand-loaders will prefer CCI or Federal primers.
Sierra Bullets Tested for 6.5 Grendel Load Data
85gr HP (#1700)
100gr HP (#1710)
107gr HPBT (#1715)
In developing its 6.5 Grendel load data, Sierra tested a very wide selection of propellants, 19 in all. For the 85gr to 100gr varmint bullets, modern powders such as XMR 2230, Power Pro Varmint, and Ramshot TAC offered the best velocity in the 24″ test barrel. For the heavier 120gr to 130gr match bullets, Sierra tested a selection of powders. Highest velocities came with Power Pro Varmint and TAC. If you’re looking for best accuracy, consider the slower burn-rate powders such as IMR 8208 XBR and Varget — but you’ll sacrifice some speed. Overall, Sierra’s latest 6.5 Grendel load data is an excellent addition to the 6.5 Grendel knowledge base. Thanks Sierra!
Here are Sierra’s 6.5 Grendel Load Data Charts for Sierra’s 123gr HPBT, 130gr HPBT, and 130gr TMK. There are a five other tables for lighter-weight Sierra bullets.
History of the 6.5 Grendel Cartridge
The 6.5 Grendel originated as a 6mm PPC necked up to 6.5 mm. After Alexander Arms relinquished the “6.5 Grendel” Trademark, the 6.5 Grendel was standardized as an official SAAMI cartridge. It has become popular with target shooters and hunters alike because it is accurate, efficient, and offers modest recoil. Good for small to medium game, the 6.5 Grendel is becoming a popular chambering in lightweight hunting rifles, such as the Howa Mini Action Model. It is one of the most accurate cartridges you can shoot in the AR-15 platform.
Here’s an interesting project — using a second-hand barrel to upgrade an AR15. Our friend Erik Cortina decided to make his AR15, originally chambered in 6.8 SPC, into a 6.5 Grendel. Erik acquired a “pre-owned” 6.5-06 match barrel through our Shooters’ Forum. Erik inspected the barrel with a bore-scope and confirmed it was in good shape after the first few inches (past the chamber).
The 6.5-06 barrel had more than enough length, so he trimmed off the chamber end, then contoured the barrel to fit his AR15. This is a smart way to upgrade a gun without spending $350 or more on a brand new barrel.
In the first video, Erik explains the process of converting his 6.8 SPC AR15 into a 6.5 Grendel: “I take the upper completely apart and pull barrel off which will be used to take dimensions for new barrel. The new barrel will be turned from an old competition heavy barrel. All the barrel reaming will be done using JGS reamers. I will also use JGS reamers to make a seating and F/L sizing die.”
In the second video, Erik contours the “pre-owned” barrel to fit his AR. He uses an old bolt-action 6.5-06 competition barrel and cuts it to 17″ long and contours it to fit his AR-15. The barrel is turned down on a manual lathe to .750″ outside diameter for the majority of its length in order to fit the gas system barrel block that is made for a .750″ barrel. After contouring, the barrel will be threaded and chambered.
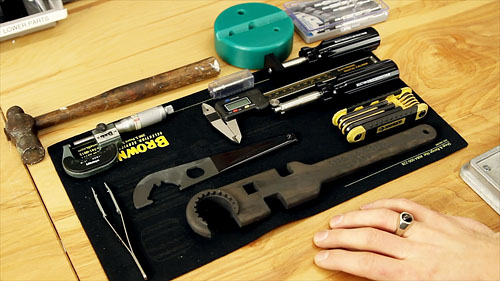
Here are the main tools you’ll need to assemble an AR-platform rifle
Planning to put together an AR-platform rifle? Or are you looking to upgrade your AR with a new barrel, stock, or trigger group? Then you should check out the AR-15 Rifle Build DVD from our friends at UltimateReloader.com. This DVD covers all the details of a custom build, using high-resolution video sequences, and helpful supporting graphics.
In this DVD, Gavin Gear guides you through the entire process including selecting components, acquiring and using the necessary tools, assembly steps and details for each component, and even mounting a scope. Building an AR-15 can be overwhelming, but with the right guidance and help it’s not difficult and can be very rewarding. With this DVD you’ll be able to build your AR-15 with confidence.
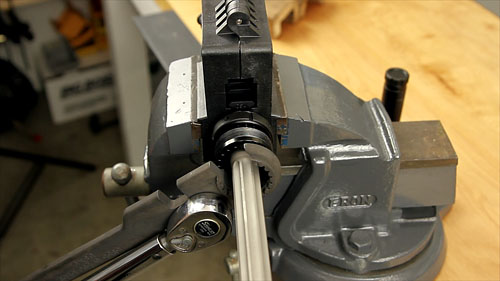
Upper: Barrel / Gas Block / Gas Tube
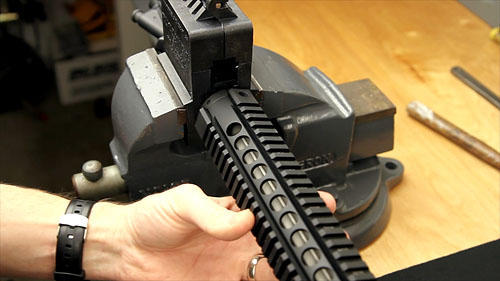
Upper: Handguard Installation
UltimateReloader.com’s AR-15 Build DVD is available just $9.90 (plus $3.80 shipping/handling). This DVD can pay for itself many times over by showing you how to do your own gunsmithing (and get quality AR components at attractive prices).
See Parts Installed in See-Through AR-15 Lower
This isn’t part of UltimateReloader.com DVD, but this YouTube video shows how to install the AR trigger group and other parts in an AR-15 lower. A transparent, see-through Tennessee Arms Company lower receiver was chosen to make it easier to see how the parts are installed.
This shocking photo of destroyed AR-15 bits and pieces was posted on Facebook by William Walter, a firearms instructor. William said this was “The worst AR-15 blow-up I have ever seen. Has anyone else seen one this bad?” It is indeed catastrophic. Seeing the above image, our friend Grant Ubl wrote: “that is most definitely THE most FUBAR’d AR15 that I have ever seen”.
Luckily the shooter sustained only minor injuries — nothing worse than a broken finger tip. But his AR-15 is certainly toast. The lower was polymer. Note the past tense. According to Walter: “It was a polymer lower and polymer magazine. Pieces of both were distributed up to 25 feet from the bench he was firing from.”
The cause of the Kaboom is somewhat mysterious. The Kaboom occurred on the 4th round fired — the first three went OK, and there is NO evidence of a squib load (i.e. no bulge in barrel). This was definitely NOT a .300 BLK round in a .223 Rem Chamber. William Walter suspects that pistol powder may be involved, but that has not been confirmed.
First thing I suspected was bore obstruction, but there wasn’t any sign of it. The case head literally atomized…you can see the brass residue on the parts. The bolt was split in two also. This was number four fired during load testing. The previous three were fine…no high pressure signs on the primer. — William Walter
One Facebook poster noted: “We had one similar here in PA about 14 years ago. The guy used Winchester 231 instead of Winchester 748 and ended up with a pile of parts very similar looking. The rifle went Kaboom on his first sighter in offhand and no one was injured surprisingly. The carrier looked like someone cut it down the middle with a torch very similarly to this picture. It also cut the bottom of the carrier and all three pieces look like a peeled banana.”
Walter stated that here: “[The shooter] had fired four rounds of the same load. He was shooting Win 748…24 grains with a 77 Sierra. I will reserve my theory until after we discuss as to not steer the conversation.
On reading that, Dennis Santiago posted: “Did you mean WW 748? That’s on the fast side powder for a .223 meant for lighter bullets. 24 grains with a long bullet like a Sierra 77 would be way too much.”
Walter noted that there was a possibility of some pistol powder getting into the catridge that detonated: “[The shooter] said he does load pistol and this was first time loading rifle. He said he used his 650 powder measure, but also a funnel and trickler.” Considering that, one poster suggested that maybe pistol powder was still left in the bottom of the powder measure.
It will be interesting to determine what exactly happened here. The remaining rounds from the same loading session will be pulled down and analyzed. A discussion of this incident appears on the Precision Shooting Journal Facebook Page.
Question to our readers: What do you think was the probable cause of this catastrophic Kaboom?
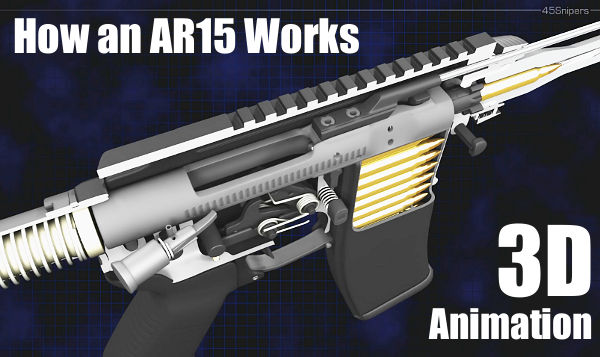
Ever wondered how the parts inside an AR15 work together? Just exactly how does the reciprocating bolt carrier feed rounds from the magazine? How do the elements in the trigger group work and reset after each shot? How does the gas system bleed gas from the barrel and operate the bolt carrier? These and other questions are answered in this eye-opening video from 45Snipers. Using “cutaway” 3D computer animation, this 5-minute video shows all features of an AR15 inside and out. This fascinating firearms animation allows the viewer to look inside the upper and lower receivers, into the bolt carrier, chamber, barrel, and magazine.
This video starts off slow and has annoying background music, but it is well worth watching if you own or shoot any AR-platform rifle. It illustrates all the key operations during the charging, loading, firing, and ejection processes. The cutaway animation shows how rounds are stripped from the magazine and then chambered. It then shows how every part of the trigger group works, and how the firing pin strikes the primer. You can even watch the bullet move down the barrel before the empty shell casing is removed from the chamber and tossed out the ejection port. Here are sample frames from the video:
Video find by Grant Ubl. We welcome reader submissions.