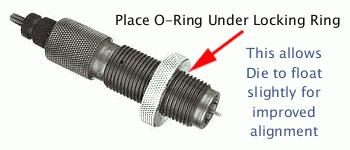
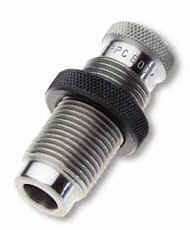
Here’s an inexpensive procedure that can help you load straighter ammo, with slightly better measured concentricity (i.e. less run-out) on the case necks and bullets. Simply use a Rubber O-Ring on the underside of the die locking ring. This allows the die to self-align itself (slightly) to the case that is being sized. Without the O-Ring, if the flat surface on the top of your press is not perfectly square with the thread axis, your die can end up slightly off-angle. This happens when the bottom of the locking ring butts up tight against the top of the press. The O-Ring allows the die to float slightly, and that may, in turn, reduce the amount of run-out induced during case sizing.
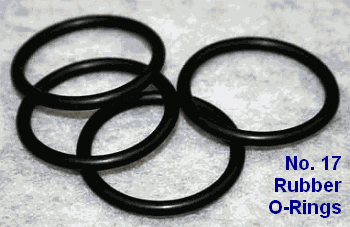
Top prone shooter GSArizona, who sadly passed in 2022, tried this trick and said it works: “Go to your local hardware store and get a #17 O-Ring (that’s the designation at Ace Hardware, don’t know if its universal). Slip the O-Ring on the die and re-adjust the lock ring so that the O-Ring is slightly compressed when the die is at the correct height. Size and measure a few more cases. You will probably see a slight improvement in neck concentricity as the die can now float a bit as the case enters and leaves it. This isn’t going to be a dramatic improvement, but it’s a positive one.”
We want to stress that adding O-Rings to sizing dies may help some reloaders, but we don’t offer this as a panacea. Try it — if using the O-Ring reduces measured runout that’s great. If it doesn’t, you’ve only spent a few pennies to experiment.
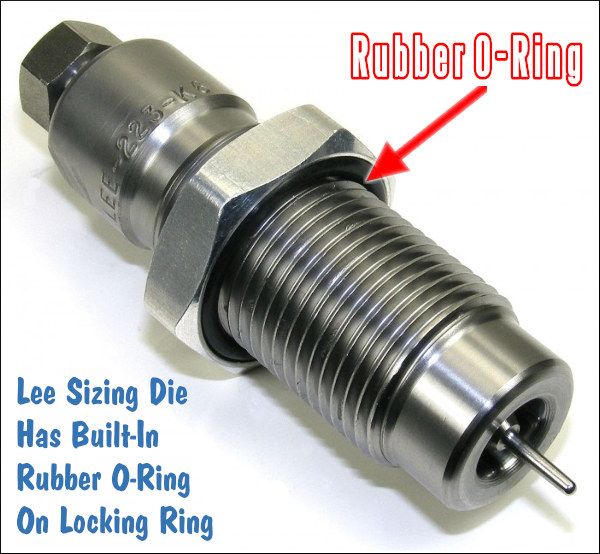
Lee Precision makes die lock rings with built-in O-Rings. Lee’s distinctive lock ring design allows the same kind of self-alignment, which is good. However, Lee lock rings don’t clamp in place on the die threads, so they can move when you insert or remove the dies — and that can throw off your die setting slightly. By using an O-Ring under a conventional die lock ring (that can be locked in place), you get the advantages of the Lee design, without the risk of the lock ring moving.
Here’s an inexpensive procedure that can help you load straighter ammo, with slightly better measured concentricity (i.e. less run-out) on the case necks and bullets. Simply use a Rubber O-Ring on the underside of the die locking ring. This allows the die to self-align itself (slightly) to the case that is being sized. Without the O-Ring, if the flat surface on the top of your press is not perfectly square with the thread axis, your die can end up slightly off-angle. This happens when the bottom of the locking ring butts up tight against the top of the press. The O-Ring allows the die to float slightly, and that may, in turn, reduce the amount of run-out induced during case sizing.
Top prone shooter GSArizona, who sadly passed in 2022, tried this trick and said it works: “Go to your local hardware store and get a #17 O-Ring (that’s the designation at Ace Hardware, don’t know if its universal). Slip the O-Ring on the die and re-adjust the lock ring so that the O-Ring is slightly compressed when the die is at the correct height. Size and measure a few more cases. You will probably see a slight improvement in neck concentricity as the die can now float a bit as the case enters and leaves it. This isn’t going to be a dramatic improvement, but it’s a positive one.”
We want to stress that adding O-Rings to sizing dies may help some reloaders, but we don’t offer this as a panacea. Try it — if using the O-Ring reduces measured runout that’s great. If it doesn’t, you’ve only spent a few pennies to experiment.
Lee Precision makes die lock rings with built-in O-Rings. Lee’s distinctive lock ring design allows the same kind of self-alignment, which is good. However, Lee lock rings don’t clamp in place on the die threads, so they can move when you insert or remove the dies — and that can throw off your die setting slightly. By using an O-Ring under a conventional die lock ring (that can be locked in place), you get the advantages of the Lee design, without the risk of the lock ring moving.
Here’s an inexpensive procedure that can help you load straighter ammo, with slightly better measured concentricity (i.e. less run-out) on the case necks and bullets. Simply use a Rubber O-Ring on the underside of the die locking ring. This allows the die to self-align itself (slightly) to the case that is being sized. Without the O-Ring, if the flat surface on the top of your press is not perfectly square with the thread axis, your die can end up slightly off-angle. This happens when the bottom of the locking ring butts up tight against the top of the press. The O-Ring allows the die to float slightly, and that may, in turn, reduce the amount of run-out induced during case sizing.
Top prone shooter GSArizona, who sadly passed last year, tried this trick and said it works: “Go to your local hardware store and get a #17 O-Ring (that’s the designation at Ace Hardware, don’t know if its universal). Slip the O-Ring on the die and re-adjust the lock ring so that the O-Ring is slightly compressed when the die is at the correct height. Size and measure a few more cases. You will probably see a slight improvement in neck concentricity as the die can now float a bit as the case enters and leaves it. This isn’t going to be a dramatic improvement, but it’s a positive one.”
We want to stress that adding O-Rings to sizing dies may help some reloaders, but we don’t offer this as a panacea. Try it — if using the O-Ring reduces measured runout that’s great. If it doesn’t, you’ve only spent a few pennies to experiment.
Lee Precision makes die lock rings with built-in O-Rings. Lee’s distinctive lock ring design allows the same kind of self-alignment, which is good. However, Lee lock rings don’t clamp in place on the die threads, so they can move when you insert or remove the dies — and that can throw off your die setting slightly. By using an O-Ring under a conventional die lock ring (that can be locked in place), you get the advantages of the Lee design, without the risk of the lock ring moving.
Here’s an inexpensive procedure that can help you load straighter ammo, with slightly better measured concentricity (i.e. less run-out) on the case necks and bullets. Simply use a Rubber O-Ring on the underside of the die locking ring. This allows the die to self-align itself (slightly) to the case that is being sized. Without the O-Ring, if the flat surface on the top of your press is not perfectly square with the thread axis, your die can end up slightly off-angle. This happens when the bottom of the locking ring butts up tight against the top of the press. The O-Ring allows the die to float slightly, and that may, in turn, reduce the amount of run-out induced during case sizing.
Top prone shooter GSArizona has tried this trick and he says it works: “Go to your local hardware store and get a #17 O-Ring (that’s the designation at Ace Hardware, don’t know if its universal). Slip the O-Ring on the die and re-adjust the lock ring so that the O-Ring is slightly compressed when the die is at the correct height. Size and measure a few more cases. You will probably see a slight improvement in neck concentricity as the die can now float a bit as the case enters and leaves it. This isn’t going to be a dramatic improvement, but it’s a positive one.”
We want to stress that adding O-Rings to sizing dies may help some reloaders, but we don’t offer this as a panacea. Try it — if using the O-Ring reduces measured runout that’s great. If it doesn’t, you’ve only spent a few pennies to experiment.
Lee Precision makes die lock rings with built-in O-Rings. Lee’s distinctive lock ring design allows the same kind of self-alignment, which is good. However, Lee lock rings don’t clamp in place on the die threads, so they can move when you insert or remove the dies — and that can throw off your die setting slightly. By using an O-Ring under a conventional die lock ring (that can be locked in place), you get the advantages of the Lee design, without the risk of the lock ring moving.
Tired of messing around with neck bushings? Is there a simpler (and potentially better) solution for controlling case neck tension? Yes there is — the precision honed non-bushing die.
You can purchase a Forster non-bushing Full-length sizing die for many popular cartridge types for under $50.00. Then you can send that die to Forster, and Forster will custom-hone the neck for a $24 fee (includes return shipping). When done right, the honed FL die can load ultra-straight ammo with the precise next tension you prefer for your brass and bullet choice.
Alternative to Bushings — Honed Full-Length dies
Conventional, non-bushing full-length sizing dies can create ultra-accurate ammo with very low run-out. For some applications, we prefer a non-bushing FL die over a bushing die — so long as the neck tension is correct. But many FL dies have an undersized neck diameter so you end up with excess neck tension, and you work the brass excessively. Forster offers a simple, inexpensive solution — honing the neck diameter to whatever size you want*.
If you purchase a Forster non-bushing, full-length sizing die, Forster will hone the neck dimension to your specs for $24.00 including return shipping. This way you can have a FL die that provides the right amount of tension for your particular load. (The max amount of diameter change Forster can do is about .008″) Forster dies are relatively inexpensive so you can afford to have a couple of FL dies with necks honed to different diameters — such as 0.266″ and 0.267″ for a no-turn 6mmBR. The die itself is fairly inexpensive — currently Precision Reloading charges $44.54 for a Forster 6mmBR FL sizing die (Forster Part #018121).
Forster FL dies, necks honed to .265″, .266″, and .267″.
Steve Rasmussen of IowaHighPower.com gave this a try. In fact, he had three dies made — each with a different neck dimension. Here’s his report: “My original Forster 6BR FL die sized the necks down a lot [to about 0.260″]. I sent my die in and asked if they could supply two more FL dies (for three total) to have the necks honed to 0.265″, 0.266″, and 0.267″.” In addition to the purchase cost of two more FL-sizing dies, Steve paid $36 ($12 per die) for the three dies to be honed.
Steve’s honed dies produced very straight loaded ammo:
“Brass springback after sizing is running 1 to 1.3 thousandths. My loaded rounds are running 0.2697-0.2699 using [older Gold Box Lapua brass]. So far the dies are working well. I sized 80 cases with the 0.266″ necked die. The shoulder is running 0.4582″ and 0.300″ up from the base is 0.4684". I spun 20 of ‘em and 16 had a runout of one thousandth (0.001) and the other 4 at 1.5 thousandths (0.0015).”
We custom hone the inside neck diameter by using a diamond stoning process. We enlarge the inside diameter to your specification to prevent over-sizing of the case neck due to thick neck walls. You may require this service for multiple reasons: 1) If you use some brands of brass cases which have thicker neck walls. 2) If you do not intend to outside neck turn case necks that have thickened after repeated firings. Please specify desired inside neck diameter. Note: 1) No more than .008″ stock removal from your existing die neck diameter is possible. 2) Honing is done in increments of one half thousandth of an inch (.0005″), meaning that your specified inside diameter must be either.XXX0″ or .XXX5″. FEES: $24.00, includes shipping within continental U.S. (lower 48 states). Please allow 1-3 weeks
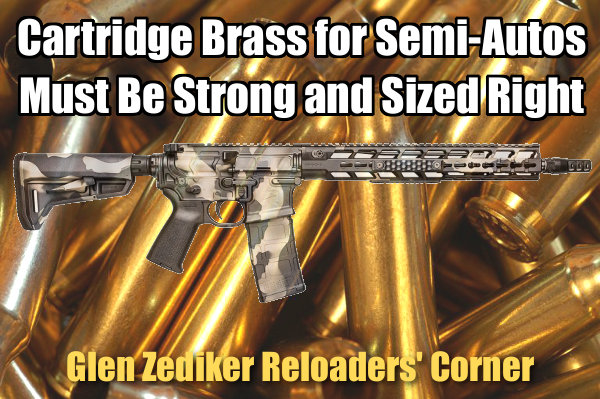
Here are highlights from an article Glen Zediker wrote for the Midsouth Blog. In this article Glen focuses on cartridge brass for semi-auto rifles, AR-platform guns in particular. Glen notes that semi-autos are tougher on brass than bolt-action rifles, so you need strong, durable brass, that has been full-length sized. And you need to be careful about neck tension, and primers. The article starts with Glen’s recommendations for tough, hard brass, and then includes the points outlined below.
ONE: Full Length-Size Cases with Adequate Shoulder Set-Back
This is a huge source of debate… amongst my readers, but, since now I’m strictly speaking of semi-auto needs I doubt there will be much dissent: full-length resize all cases! Most cases from most semi-autos will emerge with a pretty well-blown case shoulder [taming down an excessively functioning gas system can reduce this]. Make double-sure you’re sizing the cases down to at least 0.003 clearance. If you don’t there are safety and function problems ahead.
TWO: USE Sufficient Neck Tension
The case neck [must be] reduced an adequate amount to retain the bullet. There should be a minimum net difference of 0.003 inches (three-thousandths) between sized outside case neck diameter and loaded round outside case neck diameter. [Editor — that means at least three thou of “grip”.] Reason: don’t take a chance of inadvertent bullet movement during the recoil and feeding cycles. That movement can be back or forward! It’s easily possible for a bullet to jump ahead when the inertia from the bolt carrier assembly chambers the next round.
THREE: Use Tough Primers
Choose a tough primer! There’s a floating firing pin on an AR15 (M1A also) that is supposed to be held in check but that system doesn’t always work! If you load and extract a round and see a little dimple in the primer, that’s from the firing pin tapping off of it (again, created by inertia of bolt closing). A combination of a high primer and a sensitive primer cup assembly can create a “slam-fire”. Brands? CCI has some mil-spec primers that work well, and I’ve had great success with Remington 7-1/2. Some of the well-respected “match” primers are a little thin. The CCI and Remington also hold up well to the (sometimes) greater firing forces working on the primer (again, from the quick unlocking).
And, finally, make double-sure that each and every primer is seated to below flush with the case head! That’s true for any firearm (because it also means that the primer is fully seated) but imperative for safety in a semi-auto. This is especially an issue for those who use a progressive-type loading press.
Harrell’s Precision sells “semi-custom” full-length bushing dies for the PPC and 6BR chamberings. While the Harrell brothers do not cut the die to spec, they carry a large selection of dies made with slightly different internal dimensions. When you send in your fired brass, the Harrells choose a die from inventory with just the right amount of sizing (diameter reduction) at the top and bottom of the case. Given the quality, and precise fit, Harrell’s full-length dies are a good value at $75.00 plus shipping.
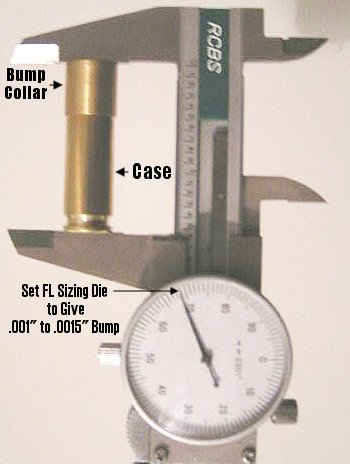
Bump Measuring Collar
The Harrell brothers provide a nice bonus item with each full-length die — a neat, little shoulder bump measuring device as shown in the photo at right. Hornady/Stoney Point sells a stand-alone tool that does the same job, but the Harrell’s bump collar is simpler and faster. To measure your shoulder bump, simply place the Harrell’s bump collar over the front of your deprimed case (before sizing) and measure the OAL with your calipers. Then size the case in your full-length die, replace the collar and repeat the measurement. You want to set your die so the shoulder moves back about .001″ to .0015″ for most applications. (With semi-auto guns you may want more bump.)
Each Wednesday, the U.S. Army Marksmanship Unit publishes a reloading “how-to” article on the USAMU Facebook page. Recently the USAMU’s reloading gurus looked at the subject of case lubrication. Tasked with producing thousands of rounds of ammo for team members, the USAMU’s reloading staff has developed very efficient procedures for lubricating large quantities of cases. This article reveals the USAMU’s clever “big-batch” lube methods. For other hand-loading tips, visit the USAMU Facebook page next Wednesday for the next installment.
Rapid, High-Volume Case Lubrication
Today’s topic covers methods for quickly applying spray lube to cartridge cases prior to sizing. A typical order for this shop may be 25,000 rounds, so [speeding up] the lubrication process can be a real time-saver. While your ammunition lots probably aren’t this large, the efficient methods discussed here may help save a considerable amount of time over your handloading career. Our case lubrication rates range from 1500-1600 cases per hour, to 2400-2500 cases per hour, depending on caliber.
This shop uses virgin brass, whereas most home handloaders use fired brass, which necessitates some small changes at times. These will be discussed as they arise. Begin with fired brass that has been tumbled clean.
Ensure as much tumbling media as possible is removed from the brass, as when it gets into a size die, it can dent cases significantly. This is a good time to round out dents in the case mouths using a tapered tool to prevent damage from the decapping stem.
First, dump the clean cases into a large box or reloading bin. Shake the bin back and forth so that many cases are oriented with the mouths up. Next, pick up as many cases as is convenient with the mouths “up”, from natural clusters of correctly-oriented cases. With 7.62mm-size cases, this is usually 3-4, and with 5.56mm cases, this can be up to 8-10. Place the cases into the rack slots, mouth-up. Doing this in groups rather than singly saves considerable time. Once these clusters have been depleted, it will be time to re-shake the bin to orient more cases “up.”.
This photo shows a case lubrication rack made by a USAMU staffer.
Naturally, adjust the spacing to best fit the calibers you reload. We have found this size … convenient for handling through the various phases of case lubrication/transfer to progressive case feeders for processing. Note that the 1/2-inch angle does not cover much of the critical case area at the base, just forward of the extractor groove, where most re-sizing force will be exerted. As the USAMU uses virgin brass, less lubrication is required for our brass than would be needed for Full Length (FL) sizing of previously-fired brass.
NOTE: The amount applied using our rack is easily enough for our purpose. If using fired brass, be sure to adequately lube this base area to avoid having cases stick in the full-length sizing die.
Using a spray lube, coat the cases adequately, but not excessively, from all sides. Be sure to get some lube into the case mouths/necks, in order to reduce expander ball drag and case stretching/headspace changes. The spray lube this shop uses does not harm primers or powder, and does not require tumbling to remove after lubing.*
Take a close look at the photo above. The USAMU shop uses a common kitchen turntable, which allows the rack to be rotated easily. We place this in a custom-made box which prevents over-spray on to floors and walls.
Angled Box Method for Smaller Cases to be Neck-Sized
A refinement of the above method which especially speeds processing of 5.56x45mm cases is as follows. A small cardboard box which holds about 100 cases is fitted with an angled “floor” secured by tape. With the smaller 5.56mm cases, usually about 8-10 cases per handful can be picked up, already correctly-oriented, and placed into the box together. This prevents having to place them into the rack slots, saving time.
HOWEVER, note that this does not allow nearly as much lube access to the case bodies as does the rack. For our purposes — neck-sizing and setting neck tension on new brass, this works well. If using this procedure with fired brass, take steps to ensure adequate lube to prevent stuck cases.
As always, we hope this will help our fellow handloaders. Good luck, and good shooting!
*A two-part test performed here involved spraying primed cases heavily, while getting more lube into the case mouth/body than even a careless handloader would likely apply. The second part of the test involved literally spraying considerable quantities of the lube directly into the cases, drenching the primers. After a several-day wait to allow the lube to penetrate the primers, they were then fired in a test barrel. All fired normally; no unusual reports were noted. This bolstered confidence that normal amounts of the lube would not adversely affect our ammunition, and we have been pleased with the results over several years.
Wouldn’t it be great if you could quickly and easily adjust shoulder bump during the full-length sizing process, without struggling to move die lock-rings by trial and error (or fiddle with shims). Well you can. The PMA Micro Die Adjuster is a brilliant little device that replaces the lock ring on your FL sizing die. It allows you to move the die up and down in precise, tiny increments. The tool has .001″ index marks, but you can easily set your die between the marks to achieve .0005″ (half-thousandth) adjustments.
To see how the PMA Micro-Die Adjuster works, watch this video by our friend Boyd Allen:
Many of our Forum members now use the PMA Micro Die Adjuster, and they give this specialty tool high praise. Here are actual reviews by Forum members and other verified tool buyers. Read more comments in this AccurateShooter Forum Thread.
PMA Micro Die Adjuster User Reviews
“No more ‘close enough’ for headspace[.] With this tool set-up it’s easy to put headspace exactly where you want it, then repeat it exactly for subsequent batches for the same cartridge.” — JohnF
“I have four of these Micro Adjuster rings and all I can say is that it works and it is repeatable. I bump my brass .0005″-.001″ and this die lock ring will do it without issue.” — TrapperT
“I size brass for four different 6.5×47 rifles (chambered with three different reamers) using a single die, set in the PMA Adjuster. I have to say… I should have bought one sooner. Adjusting it is very quick and repeatable to well under .001.” — /VH
“Great product. Shims used to drive me crazy, put a .002 in and get .0035 of change. With this if you want .0015 set it and that’s what you get.” — John B
“I’ve been using PMA’s lock ring for some time now and find it to be very easy to adjust to within .0005″ on a single piece of brass. Very quick to do as well. One thing I have found is that if you still need that half-thou adjustment I will run the brass once more at the same setting before I make that .0005″ adjustment and 50 percent of the time that does the trick. The marked increments are in .001″ scale so if you go half way in between there’s your half-thousandth.
PMA Micro-Adjuster vs. Shims: With respect to using shims, that requires you to completely remove the die. That gets old rather quickly after having used the PMA adjustable lock ring.” — Patch 700
“I like mine — adjustments are easy and it will adjust very fine. I used to use .001″ shims. Now can adjust my bump as fine as I want.” — Joe139
“The PMA adjuster works just like they say it does and is very simple to use and adjust. I use JLC inserts as well … as nice as they are you’re still hobbled by a click. However with the PMA you can go between what would be clicks. And you can use them … with any die.” — Dusty Stevens
Product Description from PMA Tool
The PMA Tool Micro Die Adjuster (MDA) replaces your existing lock ring and can be used with nearly any 7/8-14 full length sizing die. We successfully used this tool with sizing dies from Redding, RCBS, Hornady, Lee, Harrells Precision and those made from Newlon Precision die blanks. It allows you to easily make adjustments to your “shoulder bump” as fine as .0005″. The engraved marks on the MDA are equal to approximately .001 inches (true adjustment .000992″) of adjustment to the shoulder bump. Splitting the engraved marks is therefore approximately equal to .0005″. The design of the MDA does not allow it to work with the Forster Co-Ax press. Some custom dies for very short cartridges may require the use of an extended shellholder. Micro Die Adjuster shown in use installed on Custom Newlon/Scott 6mm PPC Die and Harrells Precision Compact Press.
Some of our readers have questioned how to set up their body dies or full-length sizing dies. Specifically, AFTER sizing, they wonder how much resistance they should feel when closing their bolt.
Forum member Preacher explains:
“A little resistance is a good, when it’s time for a big hammer it’s bad…. Keep your full-length die set up to just bump the shoulder back when they get a little too tight going into the chamber, and you’ll be good to go.”
To quantify what Preacher says, for starters, we suggest setting your body die, or full-length sizing die, to have .0015″ of “bump”. NOTE: This assumes that your die is a good match to your chamber. If your sizing or body die is too big at the base you could push the shoulder back .003″ and still have “sticky case” syndrome. Also, the .0015″ spec is for bolt guns. For AR15s you need to bump the shoulder of your cases .003″ – .005″, for enhanced reliability. For those who have never worked with a body die, bump die, or Full-length sizing die, to increase bump, you loosen lock-ring and screw the die in further (move die down relative to shell-holder). A small amount (just a few degrees) of die rotation can make a difference. To reduce bump you screw the die out (move die up). Re-set lock-ring to match changes in die up/down position.
That .0015″ is a good starting point, but some shooters prefer to refine this by feel. Forum member Chuckhunter notes: “To get a better feel, remove the firing pin from your bolt. This will give you the actual feel of the case without the resistance of the firing pin spring. I always do this when setting up my FL dies by feel. I lock the die in when there is just the very slightest resistance on the bolt and I mean very slight.” Chino69 concurs: “Remove the firing pin to get the proper feel. With no brass in the chamber, the bolt handle should drop down into its recess from the full-open position. Now insert a piece of fire-formed brass with the primer removed. The bolt handle should go to the mid-closed position, requiring an assist to cam home. Do this several times to familiarize yourself with the feel. This is how you want your dies to size your brass, to achieve minimal headspace and a nearly glove-like fit in your chamber.”
We caution that, no matter how well you have developed a “feel” for bolt-closing resistance, once you’ve worked out your die setting, you should always measure the actual amount of shoulder bump to ensure that you are not pushing the shoulder too far back. This is an important safety check. You can measure this using a comparator that attaches to your caliper jaws, or alternatively, use a sized pistol case with the primer removed. See Poor Man’s Headspace Gauge.


 Bump Measuring Collar


 To quantify what Preacher says, for starters, we suggest setting your body die, or full-length sizing die, to have .0015″ of “bump”. NOTE: This assumes that your die is a good match to your chamber. If your sizing or body die is too big at the base you could push the shoulder back .003″ and still have “sticky case” syndrome. Also, the .0015″ spec is for bolt guns. For AR15s you need to bump the shoulder of your cases .003″ – .005″, for enhanced reliability. For those who have never worked with a body die, bump die, or Full-length sizing die, to increase bump, you loosen lock-ring and screw the die in further (move die down relative to shell-holder). A small amount (just a few degrees) of die rotation can make a difference. To reduce bump you screw the die out (move die up). Re-set lock-ring to match changes in die up/down position.


