Before you load that nice new cartridge brass for the first time, run an expander mandrel down the case necks. This will iron out dents and provide more uniform neck tension. Chose a mandrel diameter that provides appropriate neck tension.
Lapua brass is so good that you’ll be tempted to just load and shoot, if you have a “no-turn” chamber. However, some minimal case prep will ensure more uniform neck tension. Keeping your neck tension very uniform allows more consistent bullet seating. That, in turn, usually yields better accuracy, and lower Extreme Spread and Standard Deviation (ES/SD). Lapua brass, particularly 6mmBR, 6.5×47, 6.5 Creedmoor, and .308 Win comes from the factory with tighter-than-optimal necks. Before you seat bullets, at a minimum, you should inside chamfer the case mouths, after running an expander mandrel down the necks. The expander mandrels from both Sinclair Int’l and K&M will both leave the necks with enough neck tension (more than .001″) so you can then seat bullets without another operation. We suggest putting a bit of lube on the mandrel before running it down the necks — but remove any lube that gets inside the necks before seating bullets.
Both Sinclair and K&M Tools make a die body specifically to hold expander mandrels. The Sinclair version, is shown above. This $45.99 unit fits caliber-specific expander mandrels ($10.99) which measure approximately .001″ less than bullet diameter for each caliber. This is an updated “Gen II” design that completely captures the mandrel within the die so the mandrel cannot pull out. It also has an O-ring in the die cap that allows the mandrel to self-center within the case neck. Brownells offers two sizes of Sinclair die bodies for expander mandrels: .17 -.338 Caliber (#749011715 $48.99); and .357 – .50 caliber (#749008843, $48.99). All Generation II dies are machined from stainless steel and the standard diameter 7/8-14 dies include the Sinclair Stainless Steel Split Lock Ring.
Once you run the Sinclair expander mandrel down the necks of Lapua brass, after you account for brass spring-back, you’ll have about .002″ neck tension*. This will make the process of seating bullets go much more smoothly, and you will also iron out any dents in the case mouths. Once the case mouths are all expanded, and uniformly round, then do your inside neck chamfering/deburring. The same expander mandrels can be used to “neck-up” smaller diameter brass, or prepare brass for neck-turning.
Forum member Mike Crawford adds: “These expanders can also reduce runout from offset seating. Prior to bullet seating, expand the sized necks to force thickness variance outward. With the Sinclair system, the necks will springback fine, and will not be pulled out of center. This leaves plenty of tension, and bullets seated more centered. I do this, even with turned necks, to get improved seating.”
Mandrels vs. Expander Balls on Decapping Rods
If you haven’t acquired an appropriate expander mandrel for your brass, but you DO have a full-length sizing die with an expander ball, this will also function to “iron out” the necks and reduce tension. However, using a die with an expander ball will work the necks more — since you first size them down, then the ball expands them up again. Typically (but not always), run-out is worse when using an expander ball vs. an expander mandrel.
* This .002″ tension is what we have observed with Lapua 6mmBR, 6.5×47, 6.5 Creedmoor, and .308 Win brass. This might vary with much smaller or larger cases, and of course a different brand of brass might yield different results. If you get too little tension with your current mandrel, you can get a smaller-diameter mandrel from 21st Century Innovation which offers stainless, Black Nitride, or Titanium nitride versions. The Nitride models have noticeably less friction.
Before you load that nice new cartridge brass for the first time, run an expander mandrel down the case necks. This will iron out dents and provide more uniform neck tension. Chose a mandrel diameter that provides appropriate neck tension.
Lapua brass is so good that you’ll be tempted to just load and shoot, if you have a “no-turn” chamber. However, some minimal case prep will ensure more uniform neck tension. Keeping your neck tension very uniform allows more consistent bullet seating. That, in turn, usually yields better accuracy, and lower Extreme Spread and Standard Deviation (ES/SD). Lapua brass, particularly 6mmBR, 6.5×47, 6.5 Creedmoor, and .308 Win comes from the factory with tighter-than-optimal necks. Before you seat bullets, at a minimum, you should inside chamfer the case mouths, after running an expander mandrel down the necks. The expander mandrels from both Sinclair Int’l and K&M will both leave the necks with enough neck tension (more than .001″) so you can then seat bullets without another operation. We suggest putting a bit of lube on the mandrel before running it down the necks — but remove any lube that gets inside the necks before seating bullets.
Both Sinclair and K&M Tools make a die body specifically to hold expander mandrels. The Sinclair version, is shown above. This $32.99 unit fits caliber-specific expander mandrels ($9.99) which measure approximately .001″ less than bullet diameter for each caliber. This is an updated “Gen II” design that completely captures the mandrel within the die so the mandrel cannot pull out. It also has an O-ring in the die cap that allows the mandrel to self-center within the case neck. Sinclair now offers three sizes of die bodies for expander mandrels: .17 -.338 Caliber (#749-011-715WS $32.99); .357 – .50 caliber (#749-008-843WS, $32.99), and a special .50 Cal die body for large-diameter 50 BMG presses (#749-009-163WS, $39.99). All Generation II dies are machined from stainless steel and the standard diameter 7/8-14 dies include the Sinclair Stainless Steel Split Lock Ring.
Once you run the Sinclair expander mandrel down the necks of Lapua brass, after you account for brass spring-back, you’ll have about .002″ neck tension*. This will make the process of seating bullets go much more smoothly, and you will also iron out any dents in the case mouths. Once the case mouths are all expanded, and uniformly round, then do your inside neck chamfering/deburring. The same expander mandrels can be used to “neck-up” smaller diameter brass, or prepare brass for neck-turning.
Forum member Mike Crawford adds: “These expanders can also reduce runout from offset seating. Prior to bullet seating, expand the sized necks to force thickness variance outward. With the Sinclair system, the necks will springback fine, and will not be pulled out of center. This leaves plenty of tension, and bullets seated more centered. I do this, even with turned necks, to get improved seating.”
Mandrels vs. Expander Balls on Decapping Rods
If you haven’t acquired an appropriate expander mandrel for your brass, but you DO have a full-length sizing die with an expander ball, this will also function to “iron out” the necks and reduce tension. However, using a die with an expander ball will work the necks more — since you first size them down, then the ball expands them up again. Typically (but not always), run-out is worse when using an expander ball vs. an expander mandrel.
* This .002″ tension is what we have observed with Lapua 6mmBR, 6.5×47, 6.5 Creedmoor, and .308 Win brass. This might vary with much smaller or larger cases, and of course a different brand of brass might yield different results. If you get too little tension with your current mandrel, you can get a smaller-diameter mandrel from 21st Century Shooting. 21st Century even offers low-friction Titanium Nitride-coated mandrels.
You can benefit from these precision mandrels, trust us…
Controlling cartridge neck tension is a critical aspect of accurate reloading. A very small change in the amount of grip on the bullet can actually have a noticeable effect on accuracy (and group size). You can tune neck tension with different size bushings used with FL-sizing or neck-sizing dies. You can also adjust neck “grip” by annealing your brass, or turning your necks for reduced neck-wall thickness.
But perhaps the most precise way to tune neck grip on the bullet is to use Precision Expander Mandrels. Many top shooters size their case necks down pretty far with a full-length sizing die then use a precision neck mandrel as a final step. This expands the neck back to the precisely-desired neck diameter. Because you are working from the “inside out”, variances in neck-wall thickness become less important. This also ensures you have a perfectly-round internal neck geometry for seating your bullet. (Yes, unfortunately some neck bushings are not perfectly round inside.)
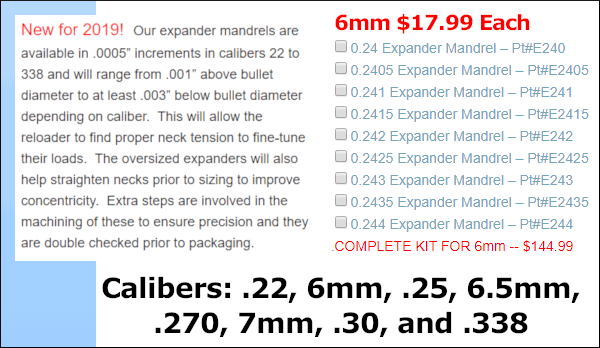
For guys who want ultra-precise control over neck tension (and “grip” on the bullet), 21st Century Shooting now offers Precision Expander Mandrels in .0005 (one-half thousandth) increments. These will be available for most popular match calibers including: .224, 6mm, .25, 6.5mm, .270, 7mm, .308, and .338 calibers. These mandrels cost $17.99 each, or you can get a complete set of nine mandrels in .0005 increments (for one caliber) for $144.99. Listed below are the nine 6mm mandrels:
John Perkins, owner of 21st Century tells us: “Finally! We have our expander mandrels up and ready to order on our website here: http://www.xxicsi.com/expander-mandrels.html.” This is a big deal. James Crofts, past National F-TR Champion, says “WooHoo — great news!”
To get best results with these precision mandrels, John recommends using the 21st Century Expander Die Body, part #904. Watch video for set-up tips:
John adds: “We are still in the midst of turning all of these so some calibers will ship when they are completed. Should have them all done by end of next week or so! Thanks for your patience while we got these set up and in process!”
This image shows a barrel in the process of hammer forging. Watch this operation starting at 1:15 in the video linked below.
You have probably heard the term “hammer-forged barrel”. But do you know how the cold hammer-forging process works? In this interesting video from Ruger, you can see the full barrel making process, including cold hammer-forging on a massive machine. Watch long rods of steel barrel material get cut to length, then drilled. After that Ruger uses CNC machines to contour the barrels before hammer forging.
Anyone with an interest in barrel-making should watch this video:
As the barrel is cold hammer-forged, a giant machine literally pounds the barrel from all sides around an internal carbide mandrel, which forms the rifling inside the bore. The actual hammer-forging is illustrated starting at 1:15 in this video. Through the process of cold-working the barrel around the mandrel, the barrel ends up with a longer length, a smaller outside diameter, and a higher hardness.
Before hammer forging, the barrels are deep-hole drilled, four at a time, with a bit that is slightly larger diameter than the caliber planned for the barrel.
Following the drilling, the barrel rod is placed in CNC machines to be turned down to the correct outside shape and size and both ends are trimmed.
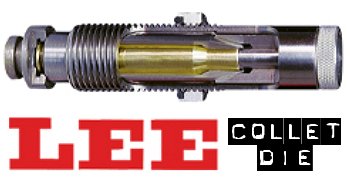
For those who prefer to neck-size their brass (rather than full-length-size), the LEE Collet Die is a popular, inexpensive option. It works by having collet tangs or “fingers” press the neck against a central mandrel. The benefit is that you get a very straight neck, which is sized consistently from top to bottom. Canadian shooter Jerry Teo explains: “LEE Collet Dies produce sized cases with very low runout (measured runout is under .001″ using a Sinclair concentricity gauge). You also don’t get the build-up of brass at the base of the neck, as can happen with bushing neck dies. The neck-shoulder junction stays nice and crisp.”
TIP ONE — Adjusting Tension
LEE Collet dies don’t have a specific mechanical adjustment for neck tension. But you CAN easily modify the die to provide more or less tension. If you want to adjust the neck tension using a Lee Collet die, you can simply chuck the mandrel in a drill and reduce the diameter with some sand-paper (to increase neck tension) or you can order a mandrel the next caliber larger and turn it to whatever diameter you want (the larger the mandrel diameter, the less the neck tension). You can also order custom mandrels from Lee sized to any diameter you want.
Lee also offers Custom Collet Dies, made from two fired cases. Lee offers custom standard collet dies for $78.00 and custom large collet dies for $160.00. CLICK HERE to ORDER.
TIP TWO — Polish and Tune for Easy Case Removal
Some users have complained that their Collet Dies grab the case-neck too firmly, making the case hard to remove. There are solutions to this problem. First inspect the collet fingers and smooth the inner surface up a bit with polishing compound or an extra-fine sanding pad. Second, you can open up the fingers a little bit. LEE recommends that if your Collet Die is sticking, take a steel punch and tap the fingers apart a little bit so that the natural “unloaded” position is wider. Lastly, you should lightly lubricate the outside of the collet fingers (see arrows) before you re-assemble the die. This will ensure they slide smoothly. Also, to prevent the collet fingers from closing too tight, never load up the die with your press without putting a case in place first. Without a case neck between the collet fingers and the mandrel, the collet can clamp itself too tight as you raise the ram.
TIP THREE — Size Twice and Spin Your Case 1/8th Turn
After reaching fully “down” on your press handle, withdraw the case about an inch and manually rotate it about 1/8th (NOT 1/4 or 1/2) turn while still in the shell-holder, then size again. This will place the die’s collet petals on the four “high spots” of the case neck and will result in a rounder, more evenly-sized neck with slightly more bullet tension. This takes only about one second more per case and is well worth the slight extra effort. (We thank reader Stonecreek for this smart tip).
If you have ever turned a large quantity of case-necks using power assist, you know that a carbide mandrel can make the job go easier, with better end results. In our experience, when using carbide mandrels (as opposed to ordinary steel), the cases move more smoothly with less heat build-up. Pat Reagin of PMA Tool explains why carbide neck-turning mandrels work better:
Carbide offers several advantages over conventional steel and stainless steel when making any tooling, specifically neck-turning mandrels:
Dimensional Stability — Carbide maintains its dimensions indefinitely during heating and cooling. This eliminates the need to allow the mandrel time to cool every few cases.
Coefficient of Friction and Wear-Resistance — Carbide exhibits a low coefficient of friction value as compared to all steels and wears up to 100 times longer. This reduces (but does not eliminate) the amount of lubricant required.
Galling Resistance — Carbide has exceptional resistance to galling and welding at the surface. This basically eliminates the chance of getting a case stuck on a mandrel due to insufficient lubrication.
Given the benefits of carbide neck-turner mandrels, you may be asking “where can I get one?” Sinclair Int’l offers carbide mandrels for Sinclair neck-turners for $49.99, in a full range of calibers: 17, 20, 22, 6mm, 25, 6.5mm, 270, 30, and 338.
$49.95 Carbide Mandrels from PMA Tool
PMA Tools now also offers carbide mandrels in a full variety of sizes. At $49.95 each, PMA’s carbide mandrels are priced competitively with Sinclair’s mandrels. PMA offers carbide mandrels in .17, .20, .22, 6mm, 6.5mm, 7mm and .30-caliber. These will work with Sinclair Int’l and 21st Century neck-turners, as well as PMA neck-turners. PMA tells us: “We now have carbide neck-turning mandrels in stock. These mandrels are made with high-tech CNC grinding-machinery, and should give you excellent results. We hope to be add other larger-caliber carbide mandrels to our lineup in the future.”
K&M Precision Shooting Products has a very handy tool few hand-loaders know about. This brilliantly simple device lets you actually SEE your case necks as you expand them. This tool can benefit anyone who necks-up brass or who uses an expander to smooth out necks (or reduce tension) before loading.
K&M Expand Mandrel Window Riser
This is a simple threaded extension placed between your expander die body (K&M Expand Iron) and the top of your press. It carries the expander mandrel higher, above the press, and has a cut-out view port so you can see the mandrel as it passes through the neck. Smart, eh? This provides visual feedback during the process of expanding your brass. The patent-pending view riser costs $20.00. Will it expand necks faster, or reduce run-out? We doubt it, but we still would like to have one, if only to eyeball the mandrel to control the neck-entry rate more consistently from case to case.
Installation: Thread the Expand Mandrel Window Riser into the top of your loading press, then thread the K&M Expand-Iron (Expander Die Body) fully into the top of the window riser and adjust each so you can stroke out the press completely without driving the case mouth into the press adapter. This allows you to view the expanding operation which is typically blind under the press. The riser also eliminates the need for the stop screw in the expander mandrel. LINK: Expand Window Riser Instructions (PDF).
On our main AccurateShooter.com site, you’ll find a good article by G. Salazar on the Basics of Neck Turning. If you’re new to the neck-turning game, or are just looking for good tips on improving your neck-turning procedures, you should read German’s article. Below we offer some highlights and photos from the article, but you’ll need to read the whole story to view all the illustrations and follow all the procedures step by step.
Why Should You Consider Neck Turning?
Let’s assume that your rifle doesn’t have a tight neck chamber that requires neck turning; if you have a tight neck chamber, of course, the answer to the question is “because you have to”. For the rest of us, and that includes the vast majority of Highpower shooters, neck turning isn’t a requirement, but it can be a useful way to bring your ammunition a small but meaningful step closer to that pot of gold at the end of the rainbow: perfection. I’m not talking about a theoretical improvement, but a real one, an improvement that lies in equalizing and optimizing the neck tension of your loaded rounds. Inconsistent neck tension is a real contributor to increased muzzle velocity variance which itself is a significant factor in increased elevation dispersion at long range. So there’s our basic reason for neck turning: to equalize and optimize neck tension in order to reduce elevation dispersion.
The Tools of the Trade
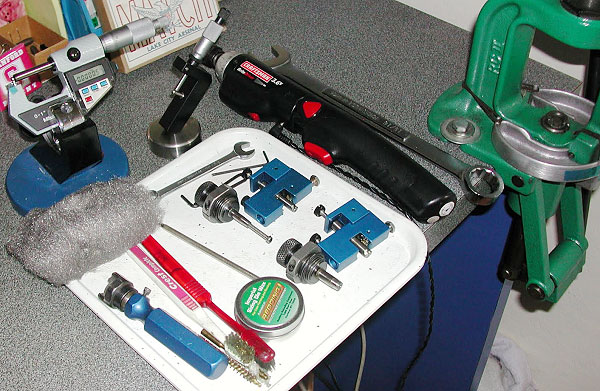
Here you see everything I use and a bit more. The press, a cordless screwdriver (always plugged in, turning is tough on the old battery), a couple of K&M neck turners (one set up for 6mm, the other for .30 caliber) an expander for each size, some Imperial lube, an old toothbrush or two to keep the cutter clean, a handle with a caseholder (for those emergencies when the screwdriver dies and there’s just one more case to go!), steel wool and a tubing micrometer finish the list of tools. Hey, I left the dial calipers out of the picture! They’re always handy, keep them around, but they are useless for measuring neck thickness, so don’t try. I usually use an Optivisor magnifier while I turn necks, very handy for a clear view of what’s happening on the neck.
Expanding the Neck
Put some lube on the inside of the case neck and run it into the expander. Really, this isn’t hard. I prefer to expand each case immediately before turning it as opposed to expanding all the cases and then turning them. Brass is somewhat springy and will tend to go back toward its original size; therefore, by expanding and turning immediately, you are more likely to have all cases fit the mandrel with the same degree of tightness and to get a more consistent depth of cut.
Cutter Adjustment for Cut Depth and Length
All the tools I’ve seen have pretty good adjustment instructions. The only thing they don’t tell you is that you should have five to ten spare cases to get it right initially. Anything of the right diameter will do while you learn, for instance, just use that cheap surplus .308 brass to do initial setup and save the precious .30-06 for when you know what you’re doing. Be patient and make your adjustments slowly; you’ll need to set the cutter for thickness as well as length of cut (just into the shoulder). The depth of cut (brass thickness) takes a bit of fiddling, the length of the cut is generally easy to set.
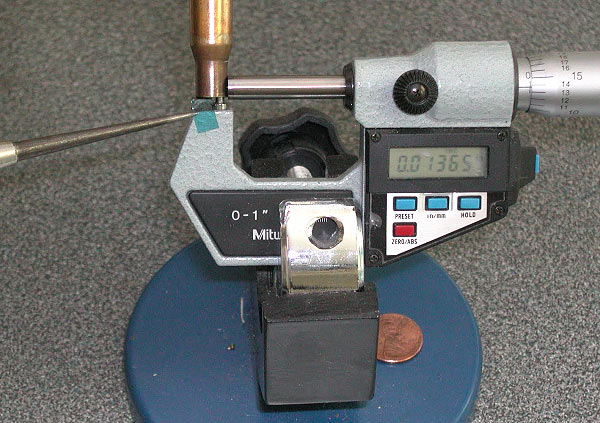
The Finished Product — A Perfectly Uniform Neck
If you read the whole article, and follow the procedures using quality tools, you should get very good results — with a little practice. To demonstrate, here’s an example of my finished, neck-turned brass. You’ll see there is a perfect, 0.0125″ thick neck. It’s very uniform around the circumference, usually I only see 1 or 2 ten-thousandths variance. Now, with the necks uniformed like this, we can select the bushing size that will give us our preferred neck tension and experiment with various levels of tension, secure in the knowledge that all of the cases will actually have the desired neck tension.
Lapua brass is so good that you’ll be tempted to just load and shoot, if you have a “no-turn” chamber. However, some minimal case prep will ensure more uniform neck tension. Keeping your neck tension very uniform allows more consistent bullet seating. That, in turn, usually yields better accuracy, and lower Extreme Spread and Standard Deviation (ES/SD). Lapua brass, particularly 6BR, 6.5×47, .243 Win and .308 Win comes from the factory with tighter-than-optimal necks. Before you seat bullets, at a minimum, you should inside chamfer the case mouths, after running an expander mandrel down the necks. The expander mandrels from both Sinclair Int’l and K&M will both leave the necks with enough neck tension (more than .001″) so you can then seat bullets without another operation. Put a bit of lube on the mandrel before running it down the necks — but remove any lube that gets inside the necks before seating bullets.
Both Sinclair and K&M Tools make a die body specifically to hold expander mandrels. The Sinclair version, is shown above. This $24.99 unit fits caliber-specific expander mandrels ($9.95) which measure approximately .001″ less than bullet diameter for each caliber. This is an updated “Gen II” design that completely captures the mandrel within the die so the mandrel cannot pull out. It also has an O-ring in the die cap that allows the mandrel to self-center within the case neck. Sinclair now offers three sizes of die bodies for expander mandrels: .17 -.310 Caliber (#849-011-715WS); .357 – .50 caliber (#749-008-843WS), and a special .50 Cal die body for large-diameter 50 BMG presses (#749-009-163WS, $49.99). All Generation II dies are machined from stainless steel and the standard diameter 7/8-14 dies include the Sinclair Stainless Steel Split Lock Ring.
Once you run the Sinclair expander mandrel down the necks of Lapua brass, after you account for brass spring-back, you’ll have about .002″ neck tension. This will make the process of seating bullets go much more smoothly, and you will also iron out any dents in the case mouths. Once the case mouths are all expanded, and uniformly round, then do your inside neck chamfering/deburring. The same expander mandrels can be used to “neck-up” smaller diameter brass, or prepare brass for neck-turning.
Forum member Mike Crawford adds: “These expanders can also reduce runout from offset seating. Prior to bullet seating, expand the sized necks to force thickness variance outward. With the Sinclair system, the necks will springback fine, and will not be pulled out of center. This leaves plenty of tension, and bullets seated more centered. I do this, even with turned necks, to get improved seating.”
Mandrels vs. Expander Balls on Decapping Rods
If you haven’t acquired an appropriate expander mandrel for your brass, but you DO have a full-length sizing die with an expander ball, this will also function to “iron out” the necks and reduce tension. However, using a die with an expander ball will work the necks more — since you first size them down, then the ball expands them up again. Typically (but not always), run-out is worse when using an expander ball vs. an expander mandrel.
Responding to customer requests, PMA Tool is now offering carbide expander mandrels in popular calibers. These carbide mandrels are listed as .22, .24, .26, .28, and .30 calibers, but they are sized for popular chamberings in .223, .243 (6mm), .264 (6.5mm), .284 (7mm), and .308 (7.62mm). PMA’s new carbide expander mandrels will cost $56.95 per item.
PMA’s tool-makers tell us: “Over the past several months we have received many requests to make expanding mandrels from carbide. Due to this popular demand we are now offering expanding mandrels from carbide. Carbide reduces galling and scratching both on the inside of the case neck and the mandrel itself. We still recommend the use of lubricant when expanding case necks to make the operation easier. These mandrels are ground from a 3/8” solid carbide blank and sized properly to expand case necks, preparing them for neck-turning. They can also be used to iron out dings and flat spots on new brass not destined to be neck turned, preparing them for loading and bullet seating.”
PMA Dual Taper Non-Carbide Expanders are Just $8.95
PMA also makes regular steel expander mandrels at a much lower price — $8.95. These regular Expanding Mandrels are designed to fit both the 21st Century Shooting and Sinclair Expander Dies. PMA states: “Our mandrels are longer than other expanding mandrels and feature a special dual taper which expands both on the up and down stroke of the press to more uniformly expand and straighten case necks.” These regular expanders are offered for all popular calibers, from .17 all the way to .338.
PMA Specialized Necking-Up Mandrels for 30 BR and 6 PPC
Last but not least, PMA makes specialized “long-taper” expanders designed to expand 6mmBR brass to 30 BR brass, or expand 220 Russian brass to 6mm (for the 6 PPC). Priced at $9.95, these handy, effective tools make it easy to neck-up your brass for 30BR or 6 PPC.
PMA explains: “So you want to make 30BR brass quick? Here’s the mandrel for you. A while back, while forming some 30BR brass for a customer’s rifle we noticed that after necking 6mm up to 30cal the neck fit on the turning mandrel was a lot tighter than we wanted. Regardless of how many steps we took to get there we had to run the case necks over the final expander repeatedly to get the fit right. After that experience we decided to set out and make a mandrel with optimum taper and diameter to neck 6mm up to 30 caliber in one step. We think is the best way to expand the necks of 6BR Lapua brass [for the 30 BR]. Remember to always use plenty of lubricant when necking.”
Product Tip from EdLongrange. We welcome reader submissions.


 TIP TWO — Polish and Tune for Easy Case Removal
 $49.95 Carbide Mandrels from PMA Tool