We’ve all encountered those boastful guys at the range — you know, the ones who say their factory rifle will shoot “dime-sized groups all day long.” Well maybe they were actually telling the truth — it all depends on the size of the ten-cent piece. With the huge dime shown above, we think we could shoot “dime-sized groups all day long” — even with a pistol. After seeing this, one reader commented: “That’s great. So this means my groups are only around Quarter-sized!”
Credit Forum member DKhunt14 who started a thread with this humorous image in our Shooters’ Forum. Other Forum members gave examples of similar accuracy claims they’ve heard:
I ran into a local tactical guru a few years ago that topped any story I’ve ever heard yet. He claimed he could shoot a quarter-inch group every time at 300 yards — like no problem whatsoever. — IMMike
I had a guy tell me he dropped a doe at 420 yards with a M1 carbine, open sights. Never took a step. I’ll bet he also shot those dime-sized groups!– DJ Porter
Seems like we could substitute 1000-yard prairie dog (other small varmint) hits for dime-sized groups. They both happen “all day long”. — Dsandfort
Many folks come into my shop… and feel compelled to regale me with their life history with firearms. Head-shooting squirrels at 100 yards with a .22 short and iron sights, deer dropped at 500 yards with a .35 Rem, ground hogs taken with one shot across vast distances, etc. — and it would appear that every former SEAL, Marine or SF sniper lives in the general area. My Dad used to tell me that sometimes you just have to smile and nod a lot. Not always, but a lot.
I’m not a huge fan of Bass Pro Shop, but I DO appreciate Bass Pro’s motto: “Welcome hunters, fishermen and other liars.” Human nature can be so entertaining. — JLT
GET Your Own Giant DIME
By the way, if you want your own jumbo dime, Amazon offers 3″-diameter Roosevelt dimes for $9.34. These would be good for range accuracy challenges. You could tell a buddy you can “put five shots on a dime at 200 yards”. Then whip out this slightly oversize 3-incher and see his face.
These could also serve as “gag prizes” at club shooting matches — giveaways for folks who want to say they shot a group at 200 or 300 yards that could be “covered with a dime” … a 3″ dime that is!
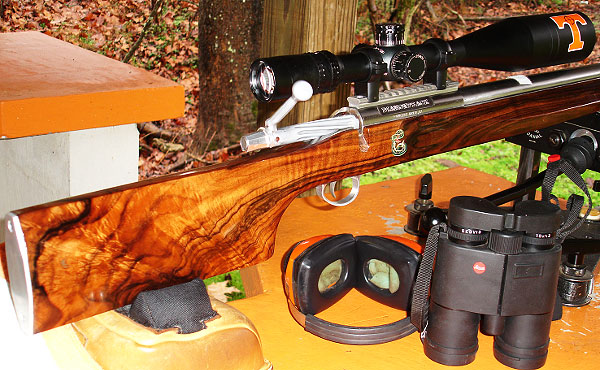
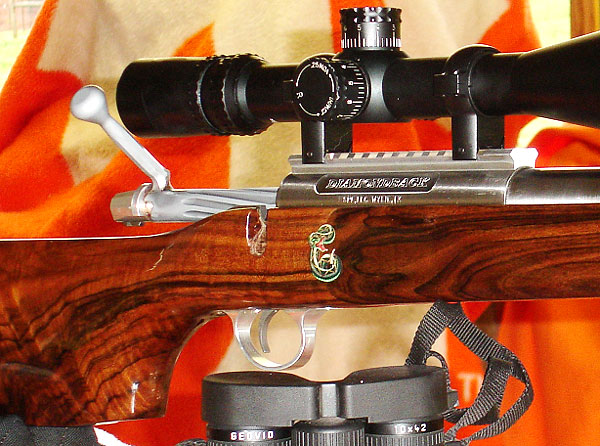
Shooting Prairie Dogs at extreme long range takes some highly specialized equipment. Forum Member VolDoc and his friends have taken long-range varminting to a whole new level. With his Savage-based, Hart-barreled 20 BR, VolDoc managed a verified 1,032-yard Prairie Dog kill, possibly the longest recorded with a .20-Caliber rifle. But that’s just part of VolDoc’s impressive precision varminting arsenal. Here we showcase three of VolDoc’s accurate rigs: his stunning English Walnut Diamondback 6BR/Dasher, his Nesika-actioned “Orange Crush” Dasher, and the 1K Prairie Dog-slaying 20 BR Savage.
Diamondback Switch-Barrel Rifle Specifications
The action is a Stiller Diamondback, drop-port. The custom stock is similar to a Shehane ST-1000, but crafted from 40-year-old English Walnut. [Editor’s note: the wood on this gun is gorgeous!] There are three barrels for the gun with three different chamberings: 6BR Brux 1:8″-twist HV; 6BRX Krieger 1:8″-twist HV, and 6mm Dasher Krieger 1:8.5″ twist fluted straight contour (no taper). The scope is a Nightforce 12-42x56mm, with 2DD reticle.
Comments: This rifle is a good study in comparison of the three different chamberings. On the same rifle platform (same stock and action), each of these barrels had killed prairie dogs over 1,000 yards. So if someone asks which is best, a 6BR, or 6BRX, or 6 Dasher, VolDoc says they are all effective. The improved cartridges will deliver higher velocities, which can be an advantage. On the other hand it is simpler to load 6mmBR brass right out of the box, and it’s easy to find an accurate load for the 6mmBR (see photo).
Nesika 6mmBR/Dasher Rifle Specifications
VolDoc’s “Big Orange Crush” rifle has a stainless Nesika ‘J’ action, with 2 oz. Jewell trigger, in a painted fiberglass Shehane ST-1000 stock. Originally a 6BR, the gun is now chambered as a 6mm Dasher with a .271 no-turn neck. The barrel is a 1:12″-twist Krieger fited with Vais muzzle brake. On top is a NightForce NXS 12-42x56mm scope with double-dot reticle. The double-dot gives precise aiming and lower dot can be used as an aming point, when you need a few more MOA of elevation in the field.
Comments: Big Orange Crush shoots 87gr V-Maxs into bugholes at 3,400 fps. VolDoc’s load with the 87s is very stout, more than 32 grains of Vihtavuori N-135 with Wolf SRM primers. Cases are full-length sized, with an 0.266″ bushing for the necks.
This 3400 fps load with the 87gr V-Maxs has accounted for hundreds of Prairie Dogs killed from 97 yards to 1,050 yards. The 87gr V-Max at this speed literally picks Prairie Dogs up and throws them 10 feet vertically and laterally. VolDoc reports: “The barrel now has more than 3,000 rounds down the tube and exhibits little throat fire-cracking and no loss of accuracy. I can’t explain why, it just hasn’t deteriorated yet. This rifle is my best-ever ‘go-to’ Prairie Dog rifle.”
Savage 20 BR Rifle Specifications
The action is a Savage Dual Port, with an aftermarket Sharp Shooter Supply (SSS) 4 oz. Evolution trigger. The stock is a modified Savage factory unit that has been pillar-bedded. The factory barrel was replaced with a 28″ Hart stainless, 1:9″ twist barrel fitted with a Rayhill muzzle brake. The gun is chambered in 20 BR with a 0.235″ no-turn neck. Kevin Rayhill did the smithing. To provide enough elevation to shoot at 1,000 yards plus, Ray fitted a +20 MOA Bench Source scope base. This +20 rail is very well-crafted, and made especially for the Savage Model 12.
Comments: VolDoc reports: “When I got the Savage back from Kevin Rayhill, it still had my 6 BR factory barrel on it, as I use it to compete in Factory-class regional matches. I put on the new 20 BR Hart barrel Kevin had chambered and quickly put in a full day of load development using the 55gr Bergers (0.381 G1 BC) and the 40gr V-Maxs. Both proved very easy to tune and I soon had my loads. My 55gr Berger load with runs about 3590 fps. Varget was very accurate with the 55s (see load dev. targets below).
The mild recoil of the 20 BR, along with a very good muzzle break (Rayhill’s design) enables me to spot every hit or miss myself. Kevin also re-contoured the underside of the Savage stock so it tracks straight back on recoil, also making seeing hits easier.”
The 20 Caliber 1000-Yard Prairie Dog Quest
Making the 1032-Yard Shot with a 20 BR by Dr. John S. (aka “VolDoc”)
This article covers my recent successful quest for a 20-caliber varmint kill past 1,000 yards. This may be a first — I couldn’t find anyone else with a confirmed 20-Cal Prairie Dog kill at 1000+. I started a thread on the Varmint section of the AccurateShooter.com Forum about building a 20 BR capable of 1,000-yard Minute of Prairie Dog accuracy and many said 20 Cal bullets just could not do it. Some came to my defense and said those that doubted had never studied the ballistics of the 20BR with the new Berger 55gr bullets now available. Well, folks, I can tell you, hitting a Prairie Dog at 1000 yards isn’t easy — but it IS possible. Here’s how it was done….
Gale-Force Winds and High Temps
After arriving at our Prairie Dog Ranch in Colorado, I soon realized my quest was going to be especially difficult because we had continual 40+ mph winds and 100° heat every day. We had a special place where Birdog and I had made many 1,000-yard+ kills in years past, so I knew the ideal location but needed a small window of opportunity either early morning or late afternoon. Based on past experience, I knew I needed about 21 MOA from my 100-yard zero to get to 1,000 yards. On the first day of the Safari, I shot the 20 BR in the 45 mph brutal winds and heat of 97°. But after about 20 shots, I connected on a dog and lifted him about three feet high. Well, that’s a start.
Winds Subside — Here’s Our Chance …
On the second day of our shoot, I had listened to the early weather forecast, so I knew that there was to be a brief period of light winds early in the morning. We were out on the Colorado prairie at daylight and the conditions were perfect. The sunrise was at my back and we had about a 10 mph tailwind. I looked through my Leica Geovid Rangefinder Binos and the Prairie Dogs were out for breakfast. I quickly ranged the targets and found a group at about 1,050 yards. The technique is to find the dogs, range them, click-up according to your ballistic chart and shoot.
My first shot was very, very close. I added about four clicks up and a couple of clicks left for windage and let another go. That shot threw dirt all over, but the dog didn’t even flinch. This is another good point to remember about long-range Prairie Dog hunting. To be successful, the dogs can’t be too skittish, because if they have been shot at even a few times, they will go down and stay down. So, you should have an agreement with those in your party as to where each member is going to be shooting and respect this boundary. Drive-by shooting style is OK if that’s your thing, it’s just not mine.
Hitting the Mark — Dead Dog at 1032 Yards
On the fourth shot, I saw the dog go belly up and kick its final throws. My quest for the 20-Caliber 1,000-yard Prairie Dog had become a reality. We confirmed the distance with our lasers at 1,032 yards. Our technique for retrieving a dead dog at that range is worth mentioning. When I killed that dog, I left it in the crosshairs of my Nightforce scope. My shooting buddy kept looking through the scope (of my gun) and guided me to the deceased dog using Motorola walkie-talkies. When I got to the dog I was jubilant. I marked it with my tripod and orange jacket, and we took some pictures. (See view through scope photo below). The 55gr Bergers require a center mass hit as they will not expand, especially at that range. I centered this dog in the head — his BAD LUCK, my GOOD.
After making the 1,032-yard kill, I shot many many other Prairie Dogs with the Savage 20 BR using the 40gr V-Maxs. The dog flights were spectacular — red mist and helicopters, counter-clockwise or clockwise on demand. I killed at least five at over 500 yards. I will not use the 55 Bergers on Prairie Dogs again since the quest is over. I will use the 40gr V-Maxs and 39gr Sierra BlitzKings for next trip’s 20 BR fodder.
We’ve all encountered those boastful guys at the range — you know, the ones who say their factory rifle will shoot “dime-sized groups all day long.” Well maybe they were actually telling the truth — it all depends on the size of the ten-cent piece. With the huge dime shown above, we think we could shoot “dime-sized groups all day long” — even with a pistol. After seeing this, one reader commented: “That’s great. So this means my groups are only around Quarter-sized!”
Credit Forum member DKhunt14 who started a thread with this humorous image in our Shooters’ Forum. Other Forum members gave examples of similar accuracy claims they’ve heard:
I ran into a local tactical guru a few years ago that topped any story I’ve ever heard yet. He claimed he could shoot a quarter-inch group every time at 300 yards — like no problem whatsoever. — IMMike
I had a guy tell me he dropped a doe at 420 yards with a M1 carbine, open sights. Never took a step. I’ll bet he also shot those dime-sized groups!– DJ Porter
Seems like we could substitute 1000-yard prairie dog (other small varmint) hits for dime-sized groups. They both happen “all day long”. — Dsandfort
Many folks come into my shop… and feel compelled to regale me with their life history with firearms. Head-shooting squirrels at 100 yards with a .22 short and iron sights, deer dropped at 500 yards with a .35 Rem, ground hogs taken with one shot across vast distances, etc. — and it would appear that every former SEAL, Marine or SF sniper lives in the general area. My Dad used to tell me that sometimes you just have to smile and nod a lot. Not always, but a lot.
I’m not a huge fan of Bass Pro Shop, but I DO appreciate Bass Pro’s motto: “Welcome hunters, fishermen and other liars.” Human nature can be so entertaining. — JLT
GET Your Own Giant DIME
By the way, if you want your own jumbo dime, Amazon.com offers 3″-diameter Roosevelt dimes for about eight bucks. These would be good for range accuracy challenges. You could tell a buddy you can “put five shots on a dime at 200 yards”. Then whip out this slightly oversize 3-incher and see his face.
These could also serve as “gag prizes” at club shooting matches — giveaways for folks who want to say they shot a group at 200 or 300 yards that could be “covered with a dime” … a 3″ dime that is!
The next time a shooter comes up to you at the range, and says: “My rifle shoots one-third MOA all day long”, challenge him to put a first-round hit on a 1/2 MOA plate at 1000 yards. There’s a difference between shooting small groups at close range (Precision) and “on-target” Accuracy at long range.
Article by Applied Ballistics, LLC
Just how much better is a 0.5 MOA rifle vs. a 1 MOA rifle? Is it worth chasing quarter-MOA if you have half-MOA rifle? This is an important question. If you look across Facebook you will find scores of shooters posting 1/3-MOA or 1/4-MOA shot groups [usually at 100 yards]. Some of those guys are spending countless hours trying to chase that golden quarter-MOA group.
Don’t take this statement the wrong way, having a good, consistent rifle is a key to success. But accuracy is extremely important to long range shooting. Having a precision (0.5 MOA) rifle, but not having put the time in to practice accuracy (hitting a 0.5 MOA plate first shot at 1000 yards) is counter-productive. [Editor: By this, we mean that you can have a rifle capable of shooting small groups at 100 yards, but you won’t see that gun’s full potential unless you can practice and perfect the skills of long-range shooting. Successful long range shooting demands more than precision alone.]
What if, your goal was to produce 5-shot, sub-half-MOA groups at 1000 yards instead of 100 yards? Think about how much more you would be including in the learning process, especially that all-important factor: managing the wind! Here is a good article that talks about Precision vs. Accuracy: Hitting Targets at Long Range.
This is not intended to say that precision is not important; rather it is intended to show that balance is important. You can use WEZ to do your own studies on this very subject, and it might be surprising to the shooter just how much you don’t gain by chasing precision over accuracy. Two books which cover this subject really well are Accuracy and Precision for Long Range Shooting and Modern Advancements in Long Range Shooting Vol 2.
Here’s a stunning combination of Precision (small group) WITH accuracy (centered on target). Yep that’s ten shots at 1000 yards, all in the middle of the target:
Video Demonstrates Amazing 1000-Yard Accuracy AND Precision
Watch the video. You can see the group form up, shot by shot. It’s pretty amazing. Scott’s first shot (at the 45-second mark of the video) was right in the X-Ring, and four of Scott’s first five shots were Xs. That’s drilling them!
Comments
“Accuracy with precision is the route for me. It is not an either/or game. If I have a precision rifle (0.25 MOA or less) and I practice to be accurate, then high scores will be the result — Jim Borden
“I would agree for PRS, hunting, and to a certain extent F-Class. However, for 1000-yard IBS benchrest competition, 0.5 MOA groups in good conditions will almost always loose the relay.” — James B
“Another thought is that [at 1000 yards] a 1 MOA gun with single-digit standard deviations [may] out shoot a 0.5 MOA rifle with standard deviations of 20+ fps.” — Beard Owens
“Both… you need both: Accuracy AND Precision. I competed in varmint matches — we shot small silhouettes at 600 yards. I started with a factory .260 Rem rifle that was 0.8 MOA on a good day. I typically hit 8-9 of 20 targets, but rarely nailed the small chickens — which had a hit zone just 4″ in diameter. I then started using a semi-custom 6mmBR rifle that could reliably deliver 1/4 MOA at 100 yards (honest). My hit count on the silhouettes zoomed to 15-18, and suddenly the chickens were going down. In that game — small targets at 600 yards — there was no substitute for precision.” — Paul McM
Top to bottom – Remington firing pin assembly with ISS, Tubb SpeedLock alloy-composite system without ISS (current versions have dual, opposite-wound springs), and Remington short action firing pin assembly without ISS.
The U.S. Army Marksmanship Unit regularly publishes technical articles on the USAMU Facebook page. One informative USAMU article covered mechanical issues and related ignition irregularities that can cause vertical fliers even with good ammunition in an otherwise excellent rifle. We highly recommend you read this article, which offers some important tech tips.
Vertical Dispersion: Mechanical/Ignition Issues?
Poor or inconsistent ignition has long been known to be one of the “usual suspects” when one encounters vertical fliers that just shouldn’t be there. By having a sense of some of the basic principles involved, and a few basic areas to check, the shooter may avoid colsiderable frustration, not to mention time, expensive loading components and barrel wear.
Is your well-built rifle of high-quality components plagued with vertical fliers across more than 1-3 handload combinations? Consider the bedding, crown and scope/sight mounts. Are they correct? If so, then you might check for ignition issues before boldly undertaking an extensive, expensive, and quite possibly fruitless quest for the “magic handload”.
SEEING IS BELIEVING: While the author had been aware for many years that poor ignition should be considered and ruled out when dealing with vertical fliers in an otherwise-excellent rifle, actually seeing the problem and its almost instantaneous cure really drove the lesson home.
He was working with a “dot” rifle – a .22 LR match rifle that really stacked bullets into little piles at 50 yards and beyond. With one lot of ELEY Tenex, it produced consistent “bughole” groups at 50, but with another, selected lot of Tenex, similar groups were regularly ruined by single, vertical fliers that did not appear in other rifles. Rather than spending days burning up expensive, select ammunition looking for “magic lots”, he contacted a well-respected rimfire gunsmith and explained the situation.
Without so much as batting an eye, the highly-experienced ‘smith tore into the rifle’s action, and quickly found the cause(s) of the problem. He discovered a demonstrably weak firing pin spring, plus a chip out of the face of the firing pin where it contacted the cartridge rim.
After replacing and tuning the offending parts, the rifle immediately began shooting tiny, bughole groups with the previously “unacceptable” lot of Tenex. Centerfire rifles can also benefit from ensuring positive, consistent ignition. A wise riflesmith is literally worth his weight in gold!
So, what are some issues we as shooters can inspect in our rifles to help determine if ignition woes could be part of our problem? At the club level, ask yourself if that “experienced” Remington, Winchester 70, or even Springfield-based match bolt gun you’re using is still running its’ original 40-80 year-old factory striker spring? If so, a new replacement is cheap insurance against current or future problems. (And BTW, it might be best to stick to the normal, factory-spec spring weight. A super-powerful spring can cause vertical, just as a weak one one can.) Along with that, a routine check for proper firing-pin protrusion is a quick preventive measure that can rule out potential issues.
Other areas to consider are the centering and consistency of the firing pin’s operation in the bolt. Admittedly, with the increasing use of precision-machined custom actions, this is becoming less an issue every day. Below is the firing pin assembly from a custom BAT action:
However, particularly with factory actions, a very quick and easy check is to remove the bolt, let the firing pin go forward, and look at the firing pin tip through the firing pin hole. Is the tip off-center in the hole, and possibly striking it as it moves forward? Is the hole out-of-round or burred from being struck repeatedly? If so, a trip to the riflesmith is likely in order.
Similarly, machining issues in the bolt/firing pin system can lead to rough and erratic firing pin movement, in which the firing pin drags against an internal surface of the bolt. In high-quality rifles these issues are relatively rare, but not unheard-of, and it takes mere minutes to rule them out. It may be worthwhile to remove the cocking piece/firing pin/spring assembly and look for any unusual gouges, dings, peening, burrs or signs of abnormal wear.
This task is especially easy with Winchester 70s, Springfields, and the similar Mauser 98s, involving little more than the push of a button and unscrewing the cocking piece assembly. This is just one of the many reasons these tried-and-true actions have earned such a loyal following in the field, among hunters who must maintain their rifles away from a shop.
Particularly with older rifles, watch for and remove excess grease (or even Cosmoline!) from both the firing pin assembly and inside the bolt. This can help improve firing pin speed and consistency. Other bolt-action designs may need a take-down tool or other measures.
As part of this inspection, AFTER ENSURING THE RIFLE IS UNLOADED, slowly cock the rifle, dry-fire, and repeat several times. Listen carefully near the action for inconsistency in the sounds it generates. Does the striker falling make the same sound each time? Do you hear or feel grinding upon operation? If so, where?
Be sure to check the operation of the cocking piece (bolt shroud), firing pin within the bolt shroud, the cocking piece cam and the rear of the bolt body where the cocking piece cam operates. As with our examination for abnormal wear marks discussed above, look for marks indicating roughness or a possible need for light polishing. Then, clean and lightly grease the bearing surfaces while you’re at it.
Remington 700 bolt shroud and cocking cam
These are relatively easy checks that shooters can undertake to perform a preliminary inspection on their own. Other mechanical issues can also cause ignition issues, chiefly centered around the action of the trigger, sear and sear spring. If these are suspected, a trip to an experienced, qualified riflesmith for diagnosis is recommended. We hope you find this information helpful! Join us again next week, and in the meantime, enjoy the shooting sports safely!
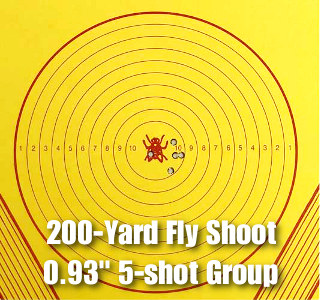
Australian John Lavaring recently shot a group at 200 yards that would make most centerfire shooters proud. The five-shot group, with all shots in the center 10-ring, measured just 0.93 inches. That works out to 0.44 MOA at 200 — mighty impressive for a .22 LR. Recorded at a Rimfire Fly Shoot benchrest event in Canberra, Australia, this 200-yard target set two new Australian SSAA National records! John was using ELEY Tenex ammunition.
Congratulations to John Lavaring for a spectacular demonstration of how well a rimfire rig can shoot — even at 200 yards. We rarely shoot our .22 LR rifles past 50 meters. Maybe it’s time to start a Rimfire ELR series, with targets at 200 or even 300 yards. What do you think of the Rimfire ELR idea? Leave comments below.
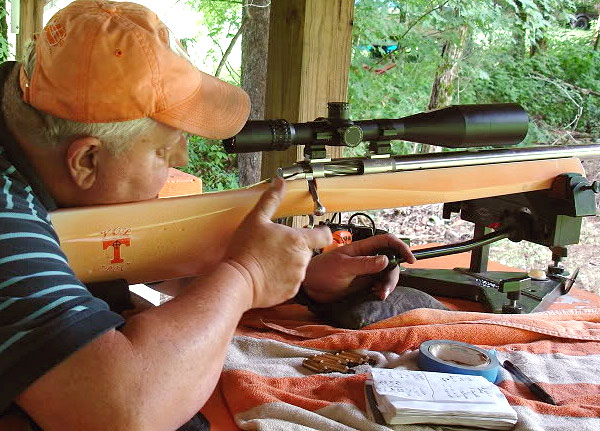
Anschutz 54 Benchrest Rig
The rifle was a Anchutz model 54 Match in a custom benchrest stock. John’s record-setting rig features a barrel block, which you can see forward of the action. Scope is a Bausch & Lomb BR model. We don’t have the round count on Lavaring’s barrel, but good rimfire benchrest rifles can often get 10,000 rounds (or more) of accurate life.
Rimfire Ballistics at 200 Yards
Some folks may be wondering about .22 LR ballistics at 200 yards. Well, with a 25-yard zero, the 200-yard drop for John’s 40gr Tenex ammo is 54 inches, assuming 0.145 G1 BC and 1085 fps muzzle velocity per ELEY website. And at 200 yards, a 10 mph crosswind will push that little bullet 15.3 inches! We’re told the winds were pretty tricky when Lavary shot his record group. This makes his achievement all the more impressive — we have to admire John’s wind-reading ability.
This ELEY ammo has proven to be exceptionally accurate. Here is a short video showing TEN rounds of Tenex shot from a machine rest with target at 50 meters.
This impressive 15-round group was shot by Jim See of Elite Accuracy.
Different shooting disciplines demand different levels of precision/accuracy. In the rapid-fire 3-Gun game, you could probably “clean” most stages with a 2-MOA rifle. By contrast, in the short-range group benchrest game, to compete with the best, you’ll need a rifle that shoots in the “ones” (i.e. 0.1-0.19 MOA) in perfect conditions. In 1000-yard F-Class competition, the top shooters want a rifle that will hold one-third-MOA of vertical at that distance.
What is your standard of accuracy? How good is “good enough”. Jim See, a skilled gunsmith and successful PRS competitor, has answered that question for his tactical discipline. For the kind of matches Jim shoots, he likes to have a rifle that will hold half-MOA for five (5) shots, 3/4-MOA for 15 shots, and 1 MOA for twenty shots. Remarkably, Jim’s rifle can do that with factory ammo. Above is an impressive 15-shot group shot with .260 Remington Federal Premium Ammo.
“I say it all the time, my loads need to print 5 under 1/2″, 10 under 3/4″, and 20 under 1″. It’s simple, if a hot barrel will keep 20 rounds fired in succession under my standard it will be a good barrel and load for Precision Match Shooting. Federal Premium Gold Metal Match .260 with Sierra bullets made the cut for me today. 15 consecutive shots under 3/4 MOA.” –Jim See
It’s said that you “can never have too much accuracy”, but there are acceptable standards for each discipline, and they’re not the same. A 100/200 yard Benchrest shooter will be sorely disappointed with a rifle/ammo set-up that can only deliver half-MOA. On the other hand, a PRS competitor like Jim See can achieve great success with a lesser degree of precision. This means you can save time and money. You can run your barrels longer between cleanings, and you don’t have to go “full OCD” when loading your ammo. The PRS shooter does not need to weigh-sort primers, or load powder to single-kernel standards. Proof is the performance. Jim See recently took third place at the Spearpoint Shootout, and he has been a podium finisher at other events. Learn more about Jim’s gunsmithing and training operations at EliteAccuracy.com.
Download This Load Development Target
Jim’s target seemed a bit familiar. AccurateShooter.com created this Diamond and Dot Target a few years back. On each aiming point, there are high-contrast black horizontal and vertical lines for aligning your cross-hairs. The gray circle lets you see the bullet impacts above, without obliterating the red diamond, which is quite useful for precise aiming (we put fine cross-hairs on the points of the diamond). This target sheet includes data entry tables below each of the three aim points. There are many other free targets out there, but this format is very popular. We’re pleased to see Jim using it. You can download this and dozens of other FREE Targets from the AccurateShooter.com Target Page.
Top to bottom – Remington firing pin assembly with ISS, Tubb SpeedLock alloy-composite system without ISS (current versions have dual, opposite-wound springs), and Remington short action firing pin assembly without ISS.
Each Wednesday, the U.S. Army Marksmanship Unit publishes a reloading “how-to” article on the USAMU Facebook page. Last week’s “Handloading Hump Day” article covered mechanical issues and related ignition irregularities that can cause vertical fliers even with good ammunition in an otherwise excellent rifle. We highly recommend you read this article, which offers some important tech tips.
Vertical Dispersion: Mechanical/Ignition Issues?
Poor or inconsistent ignition has long been known to be one of the “usual suspects” when one encounters vertical fliers that just shouldn’t be there. By having a sense of some of the basic principles involved, and a few basic areas to check, the shooter may avoid colsiderable frustration, not to mention time, expensive loading components and barrel wear.
Is your well-built rifle of high-quality components plagued with vertical fliers across more than 1-3 handload combinations? Consider the bedding, crown and scope/sight mounts. Are they correct? If so, then you might check for ignition issues before boldly undertaking an extensive, expensive, and quite possibly fruitless quest for the “magic handload”.
SEEING IS BELIEVING: While the author had been aware for many years that poor ignition should be considered and ruled out when dealing with vertical fliers in an otherwise-excellent rifle, actually seeing the problem and its almost instantaneous cure really drove the lesson home.
He was working with a “dot” rifle – a .22 LR match rifle that really stacked bullets into little piles at 50 yards and beyond. With one lot of ELEY Tenex, it produced consistent “bughole” groups at 50, but with another, selected lot of Tenex, similar groups were regularly ruined by single, vertical fliers that did not appear in other rifles. Rather than spending days burning up expensive, select ammunition looking for “magic lots”, he contacted a well-respected rimfire gunsmith and explained the situation.
Without so much as batting an eye, the highly-experienced ‘smith tore into the rifle’s action, and quickly found the cause(s) of the problem. He discovered a demonstrably weak firing pin spring, plus a chip out of the face of the firing pin where it contacted the cartridge rim.
After replacing and tuning the offending parts, the rifle immediately began shooting tiny, bughole groups with the previously “unacceptable” lot of Tenex. Centerfire rifles can also benefit from ensuring positive, consistent ignition. A wise riflesmith is literally worth his weight in gold!
So, what are some issues we as shooters can inspect in our rifles to help determine if ignition woes could be part of our problem? At the club level, ask yourself if that “experienced” Remington, Winchester 70, or even Springfield-based match bolt gun you’re using is still running its’ original 40-80 year-old factory striker spring? If so, a new replacement is cheap insurance against current or future problems. (And BTW, it might be best to stick to the normal, factory-spec spring weight. A super-powerful spring can cause vertical, just as a weak one one can.) Along with that, a routine check for proper firing-pin protrusion is a quick preventive measure that can rule out potential issues.
Other areas to consider are the centering and consistency of the firing pin’s operation in the bolt. Admittedly, with the increasing use of precision-machined custom actions, this is becoming less an issue every day. Below is the firing pin assembly from a custom BAT action:
However, particularly with factory actions, a very quick and easy check is to remove the bolt, let the firing pin go forward, and look at the firing pin tip through the firing pin hole. Is the tip off-center in the hole, and possibly striking it as it moves forward? Is the hole out-of-round or burred from being struck repeatedly? If so, a trip to the riflesmith is likely in order.
Similarly, machining issues in the bolt/firing pin system can lead to rough and erratic firing pin movement, in which the firing pin drags against an internal surface of the bolt. In high-quality rifles these issues are relatively rare, but not unheard-of, and it takes mere minutes to rule them out. It may be worthwhile to remove the cocking piece/firing pin/spring assembly and look for any unusual gouges, dings, peening, burrs or signs of abnormal wear.
This task is especially easy with Winchester 70s, Springfields, and the similar Mauser 98s, involving little more than the push of a button and unscrewing the cocking piece assembly. This is just one of the many reasons these tried-and-true actions have earned such a loyal following in the field, among hunters who must maintain their rifles away from a shop.
Particularly with older rifles, watch for and remove excess grease (or even Cosmoline!) from both the firing pin assembly and inside the bolt. This can help improve firing pin speed and consistency. Other bolt-action designs may need a take-down tool or other measures.
As part of this inspection, AFTER ENSURING THE RIFLE IS UNLOADED, slowly cock the rifle, dry-fire, and repeat several times. Listen carefully near the action for inconsistency in the sounds it generates. Does the striker falling make the same sound each time? Do you hear or feel grinding upon operation? If so, where?
Be sure to check the operation of the cocking piece (bolt shroud), firing pin within the bolt shroud, the cocking piece cam and the rear of the bolt body where the cocking piece cam operates. As with our examination for abnormal wear marks discussed above, look for marks indicating roughness or a possible need for light polishing. Then, clean and lightly grease the bearing surfaces while you’re at it.
Remington 700 bolt shroud and cocking cam
These are relatively easy checks that shooters can undertake to perform a preliminary inspection on their own. Other mechanical issues can also cause ignition issues, chiefly centered around the action of the trigger, sear and sear spring. If these are suspected, a trip to an experienced, qualified riflesmith for diagnosis is recommended. We hope you find this information helpful! Join us again next week, and in the meantime, enjoy the shooting sports safely!
Sinclair Internationalhas released an interesting article about Case Concentricity* and bullet “run-out”. This instructional article by Bob Kohl explains the reasons brass can exhibit poor concentricity, and why high bullet run-out can be detrimental to accuracy.
Concentricity, Bullet Alignment, and Accuracyby Bob Kohl
The purpose of loading your own ammo is to minimize all the variables that can affect accuracy and can be controlled with proper and conscientious handloading. Concentricity and bullet run-out are important when you’re loading for accuracy. Ideally, it’s important to strive to make each round the same as the one before it and the one after it. It’s a simple issue of uniformity.
Forum member Cody H. (aka “Willys46″) provided this report on his new Russo-stocked 6-6.5×47 Rifle.
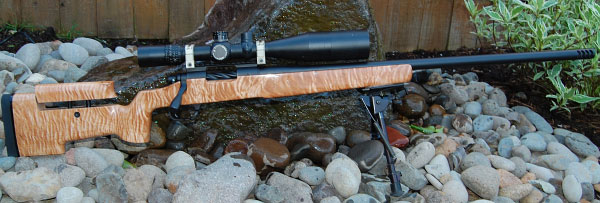
Joel Russo out of Harrisburg, PA is taking modern technology and new stock designs and mating them with Old World materials and craftsmanship. The result: rifles that shoot true and look seriously sharp. Russo got his start making laminated wood stocks for budget-minded tactical rifle shooters with his popular A5-L design. Motivated by his passion for woodworking and a mindset for detail, Russo has shifted his focus from the run-of-the-mill laminates to create shootable works of art in some of the most highly figured, beautiful, exotic and domestic woods. Russo has come to feel that if he as a craftsman is going to spend precious time creating something out of wood, it should be for something worthy of his personal investment.
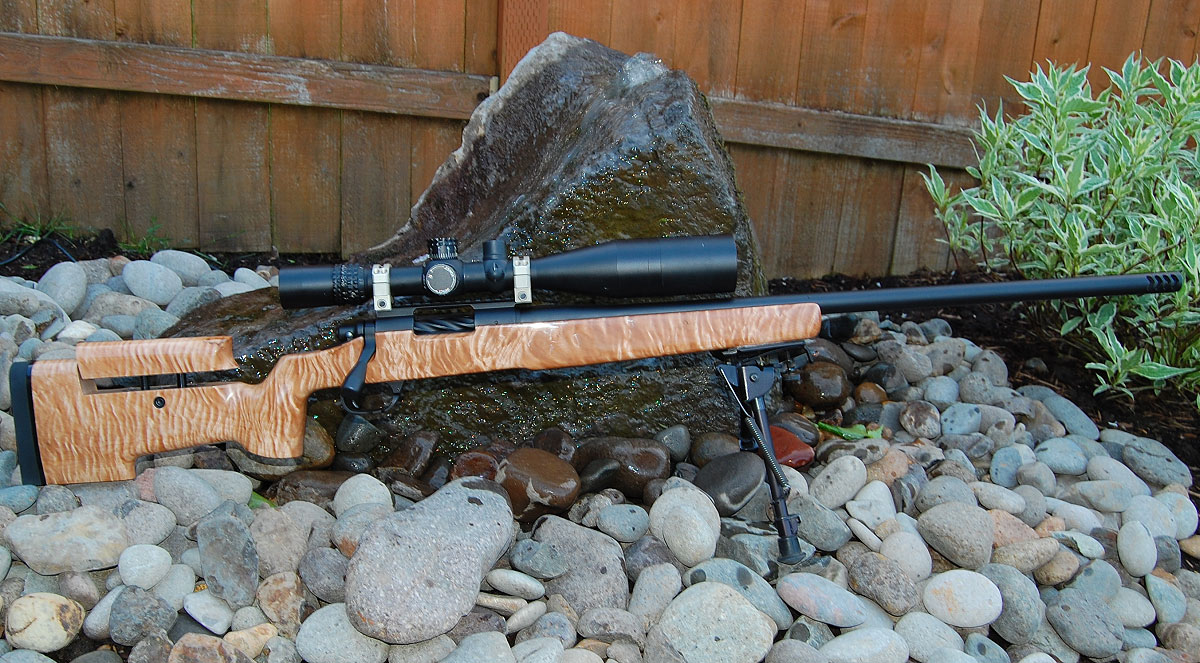
Take, for example, a recent Russo stock that started its life as a highly figured piece of Curly Maple harvested in the Pacific Northwest. After CNC inletting, profiling, pillar- and glass-bedding, the stock was meticulously finished to showcase the wood’s beauty. This stunning stock was commissioned for my new 6-6.5×47 Precision Field Rifle [Editor: it’s just too pretty to be labeled ‘tactical’]. Have a look….
Rifle Specifications: Remington 700 short action with R&D Precision bottom metal. Bartlein Barrel (Sendero Contour). Joel Russo Stock in A3-5 pattern (A5 buttstock with A3 fore-end). Barrel chambering/fitting (6-6.5X47 Lapua) by Steve Kostanich.
How does it shoot? Cody reports: “I’ve had the rifle two weeks, and sent about 200 rounds down range so far. I could not be happier with the performance of the whole package. The 6-6.5×47 Lapua chambering really makes it a pleasure to shoot with its low recoil and accuracy potential. With the fitted muzzle brake, recoil is minimal. The ballistics of 105gr Berger hybrids at 3100 fps make the wind at 600 yards very manageable. As for the stock, the slimmer fore-end holds the bipod much nicer than my old A5L. The lighter weight also makes it more maneuverable in different shooting positions.”
NOTE: Hi-Rez Gallery images may take some time to load. Be patient — it’s worth the wait.
Cody Talks About His Rifle and Joel Russo’s Work
Click Play Button to Hear Audio
Like any artist, Russo carefully considers where to begin. Deciding where the stock will be cut out of the wood blank can take days. He must determine where the forend and pistol grip will lay to be sure the true beauty of the wood will transfer to the stock design. After Russo cuts the rough pattern out of the blank, it’s off to the CNC mill for barrel and action inletting. The stock is almost completely inletted but still in the rough; enough material remains for Russo to hand-blend the wood and metal for that all-important fit and finish. Then it’s off to the duplicator, which cuts out the stock in the specified pattern.
With inletting completed, the action is pillar- and glass-bedded, then readied for final shaping. The tang/pistol grip area demands careful work for a perfect look and feel. It takes hours with files and rasps to get everything just right. Once material is removed it’s a done deal so patience with the tools is a must. Russo is a very painstaking woodworker, and as an artisan and champion shooter himself, he wants the tang to melt into the pistol grip for the perfect look and feel.
Once the major wood removal is complete, Russo begins surface sanding. To make the finish come out smooth and flat, a sanding block is a must. With the density change in figured wood, some sections will be softer and so material is removed more quickly, making for a very wavy finish. When Russo is satisfied with the final sanding he starts the finishing process.
Russo generally does a hand-rubbed TUNG Oil finish. Since this stock is for a tactical competition rifle, and I wanted to preserve the natural blond color of the Maple, a clear coat finish was in order. In all fairness the maple would look even better with a darker oil finish, which allows the deep grain and figure to come out, creating an almost 3-D effect. A hand rubbed oil finish can take months to be applied properly. The shorter application time was another advantage for this particular build.
Clear coat maintains the original color of the wood while being comparatively easy to apply with basic paint-spraying tools. If you scratch the surface, it’s a simple matter to buff it out just like you would a car door ding. After a numerous coats are applied then it is wet-sanded just like the finish on a classic hot rod. The finer the sandpaper grit, the shiner the finish. For the maple stock project, a higher-than-typical gloss finish was selected because the wood kept looking better the shiner it got. Want it shinier? All you have to do is invest a little more time in sanding and polishing. Sometimes Russo works his way to 6000 grit sandpaper.
Walk-Around Video Showing Beautiful Wood
After final wet-sanding of the clear-coat, the finished stock is one even a millionaire would be proud to shoot. With the advent of fiberglass composite materials and assembly-line production methods, there are fewer true craftsmen like Joel who can start with a block of wood and some metal and create a complete rifle. So it’s refreshing that wood artisans like Russo are keeping alive the craftsman tradition. To see more examples of Joel Russo’s work, visit www.RussoRifleStocks.com.


 Making the 1032-Yard Shot with a 20 BR

 Hitting the Mark — Dead Dog at 1032 Yards


 Is your well-built rifle of high-quality components plagued with vertical fliers across more than 1-3 handload combinations? Consider the bedding, crown and scope/sight mounts. Are they correct? If so, then you might check for ignition issues before boldly undertaking an extensive, expensive, and quite possibly fruitless quest for the “magic handload”.


 Anschutz 54 Benchrest Rig