Want to learn the basics of position shooting? Then you should check out an article by Gary Anderson, DCM Emeritus, in On the Mark digital magazine (Summer 2014, pp. 6-13). This article covers all the key elements: body position (prone, sitting, standing), sling use/adjustment, sight picture, aiming process, and trigger control. While this 8-page article was specifically written for Rimfire Sporter shooters, the techniques described by Anderson apply to all types of position shooting, whether you shoot air rifles, smallbore rifles, or centerfire rifles.
Here’s what Anderson says about aiming — how to keep your sights steady and get them centered on the middle of the target:
Trigger Contact and Center As soon as aiming at the target begins, the index finger must move from the trigger-guard to contact the trigger. It is important to get initial pressure on the trigger as soon as aiming begins. Then the shooter must focus on the sight picture and centering the sight picture movements over the aiming point. No one, not even champion shooters, can hold the aligned sights perfectly still. The sights are going to move a little bit or a lot, depending on the shooter’s skill level. The secret is to center those sight picture movements over the aiming point on the target (see trace illustration) before pulling the trigger.
When the sight picture movements on the target are centered, the last step in firing the shot is to add… smooth pressure on the trigger until the shot breaks.
Anderson also discusses the 5 Basics of Shot Technique:
BONUS: Olympic Gold Medalist Jamie Gray
Here’s an interesting video about three-position shooting. Produced by GOnra Media, this video demonstrates rifle hold and body alignment for prone, standing, sitting, and kneeling positions. Olympic Gold Medalist Jamie Gray demonstrates the proper stance and position of arms and legs for each of the positions. Ideally, in all of the shooting positions, the shooter takes advantage of skeletal support. The shooter should align the bones of his/her arms and legs to provide a solid foundation. A shooter’s legs and arms form vertical planes helping the body remain stable in the shooting position.
Most bolt-action rifle shooters work the bolt with their trigger-pulling hand. This is because most rifles sold to right-handed shooters come with right-side bolts, while “lefty” rifles come with left-side bolts. This “standard” configuration requires the shooter to take his dominant, trigger-pulling hand off the stock to cycle the bolt, then re-position his hand on the stock, and “re-claim” the trigger. Often the shooter must lift or move his head to work the bolt, and that also requires him to re-establish his cheek weld after each and every shot. Not good.
This really doesn’t make much sense for precision shooting with fore-end support*. There is a better way. If you leave your trigger hand in position and work the bolt (and feed rounds) with the opposite hand, then you don’t need to shift grip and head position with each shot. All this requires is a weakside-placed bolt, i.e. a left bolt for a right-handed shooter or a right bolt for a left-handed shooter. The video below shows a “Lefty” working a right bolt. Note how efficient this is:
As our friend Boyd Allen explains: “If you think about it, if you are going to work with a factory action where your options are left bolt and left port or right bolt and right port, and you are building a rifle that will only be shot from a rest, using the left/left for a RH shooter or using a right/right for a LH shooter works better than the conventional configuration”.
Shoot Like a Champ and Work the Bolt with Your Weakside Hand
Derek Rodgers is a recent F-TR World Champion, a King of 2 Miles champion, AND is the only person to have won BOTH the U.S. F-Open and the U.S. F-TR National Championships.
And guess what? Derek runs this kind of “opposite” bolt set-up. Yep, Derek shoots right-handed with a left bolt. Though Derek is a right-hander, he shoots with a Left Bolt/Left Port (LBLP) action. He pulls the trigger with his right index finger, while working the left-side bolt with his left (weakside) hand. This allows him to stay in position, and maintain his cheekweld. He places his right hand on the grip, while manipulating the bolt (and feeding rounds) with his non-trigger-pulling hand.
Past F-TR World Champion and Past King of 2 Miles Derek Rodgers
This is the rifle with which Derek won the 2013 F-TR National Championship.
*For true standing, off-hand shooting (whether in competition or on a hunt), a conventional strongside bolt placement makes sense, since the non-dominant arm must support the front of the rifle all the time. When shooting from bipod or rest, it’s a different story.
In this video, former Army Ranger sniper team leader Ryan Cleckner explains how proper head and scope position is a critical component to accurate shooting. Ryan finds that some shooters place the scope too far forward or too far rearward. If the scope is too far back you may have issues with eye relief and stock reach to shoulder. If it is too far forward, you may have cheek-weld problems or get neck strain. Cleckner cautions: “When you are in a good prone position, you don’t want any strain in your neck muscles or back.”
In the video, Cleckner offers a simple method to check your scope position:
“To see if your scope is set up properly … close your eyes, lay your head on your gun, get completely comfortable, and only when you are set-up, then open your eyes. If you can’t see clearly through your scope, CHANGE something [such as comb height or scope position]”.
“When you open your eyes, if you see some scope shadow [i.e. the black ring around the edge of the scope picture], figure out which way you need to move your head to get rid of that shadow, and then make adjustments to either your position, the rifle, or the scope.”
“Very often you’ll open your eyes and realize you need to move further back or further forward. Instead of moving your position [or head], move the scope and get it set up properly.”
Tip on Viewing Your Reticle:
Cleckner: “Sometimes it can be difficult to focus between the target and the reticle, even with the parallax adjusted properly. I recommend you focus only on the reticle. Just like the front sight on a rifle or a handgun, that reticle is what you can control, and it’s what matters. Focus on a crisp, clear reticle, in a stable platform, and all that’s left is trigger control.”
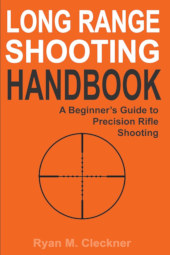
Long Range Shooting Handbook — A Good Resource Cleckner’s Long Range Shooting Handbook covers a wide range of topics important for precision marksmanship — both shooting skills and technical matters. You can view Sample Chapters from Ryan’s Book on Amazon.com. Cleckner’s book is designed as an intro to key concepts such as MOA vs. Mils, External Ballistics, and Environmental Effects. Included are personal tips and advice based on Cleckner’s years of experience as a sniper instructor and special operations sniper.
The Long Range Shooting Handbook is divided into three main categories: What It Is/How It Works, Fundamentals, and How to Use It. “What It Is/How It Works” covers equipment, terminology, and basic principles. “Fundamentals” covers the theory of long range shooting. “How to Use It” gives practical advice on implementing what you’ve learned, so you can progress as a skilled, long range shooter.
Ryan Cleckner was a special operations sniper (1/75 RGR) and he served as a U.S. Army sniper instructor. Currently he works as a firearms industry executive and practicing firearms attorney.
Shooting Sports USA (SSUSA) offers a wide selection of informative articles on marksmanship techniques. If you shoot prone, “hard-holding”, you know how important proper positioning and technique can be. There is a SSUSA article that every prone shooter should read — whether you shoot air rifle, smallbore, or High Power. Compiled wtih the help of some of the country’s best prone marksmen, this article, How to Master Prone Shooting, provides a step-by-step guide to perfecting your prone position technique.
How to Master Prone Shooting — SSUSA by NRA Staff
The prone position is the most precise of the rifle shooting positions. It is used in many different shooting events at distances as close as 5 meters and as far away as 1,000 yards, and beyond that in long-range disciplines such as PRS and NRL. Prone shooting is very popular among shooters whose training time is limited, because it does not require as much practice. Age has little effect on a shooter’s ability to do well in prone; many older shooters are able to continue competing successfully in prone matches.
Here is a sample, listing STEP ONE, the basics of the prone position:
Step One: Study the Position
The prone position is steady because it is low, which gives a wide base of support to help keep the rifle still. Below are the key features of the prone position.
1. Straight line form left hand through left arm, side and leg.
2. Head tipped down comfortably.
3. Right hand grips rifle lightly.
4. Body lies behind rifle. Angle to rifle is 10 to 20 degrees.
5. Right knee bent slightly, toe pointing out.
6. Rifle lies on heel of left hand, fingers relaxed.
7. Left elbow rests to left of rifle.
8. Sling (if present) supports weight of rifle. Left arm relaxed.
9. Body rests slightly more on left side.
10. Left leg straight, toe pointing inward or straight back.
There are FIVE MORE STEPS described in detail with specific actions to perform, in the FULL Article. For example, in STEP FOUR (Sling Adjustment), the article explains: “Put the sling high on the arm and tighten the sling keeper. Wrap the arm around the sling so that the sling comes across the left hand and forearm.”
Want to learn the basics of position shooting? Then you should check out an article by Gary Anderson, DCM Emeritus, in On the Mark digital magazine (Summer 2014, pp. 6-13). This article covers all the key elements: body position (prone, sitting, standing), sling use/adjustment, sight picture, aiming process, and trigger control. While this 8-page article was specifically written for Rimfire Sporter shooters, the techniques described by Anderson apply to all types of position shooting, whether you shoot air rifles, smallbore rifles, or centerfire rifles.
Here’s what Anderson says about aiming — how to keep your sights steady and get them centered on the middle of the target:
Trigger Contact and Center As soon as aiming at the target begins, the index finger must move from the trigger-guard to contact the trigger. It is important to get initial pressure on the trigger as soon as aiming begins. Then the shooter must focus on the sight picture and centering the sight picture movements over the aiming point. No one, not even champion shooters, can hold the aligned sights perfectly still. The sights are going to move a little bit or a lot, depending on the shooter’s skill level. The secret is to center those sight picture movements over the aiming point on the target (see trace illustration) before pulling the trigger.
When the sight picture movements on the target are centered, the last step in firing the shot is to add… smooth pressure on the trigger until the shot breaks.
Anderson also discusses the 5 Basics of Shot Technique:
BONUS: Olympic Gold Medalist Jamie Gray
Here’s an interesting video about three-position shooting. Produced by GOnra Media, this video demonstrates rifle hold and body alignment for prone, standing, sitting, and kneeling positions. Olympic Gold Medalist Jamie Gray demonstrates the proper stance and position of arms and legs for each of the positions. Ideally, in all of the shooting positions, the shooter takes advantage of skeletal support. The shooter should align the bones of his/her arms and legs to provide a solid foundation. A shooter’s legs and arms form vertical planes helping the body remain stable in the shooting position.
Most bolt-action rifle shooters work the bolt with their trigger-pulling hand. This is because most rifles sold to right-handed shooters come with right-side bolts, while “lefty” rifles come with left-side bolts. This “standard” configuration requires the shooter to take his dominant, trigger-pulling hand off the stock to cycle the bolt, then re-position his hand on the stock, and “re-claim” the trigger. Often the shooter must lift or move his head to work the bolt, and that also requires him to re-establish his cheek weld after each and every shot. Not good.
This really doesn’t make much sense for precision shooting with fore-end support*. There is a better way. If you leave your trigger hand in position and work the bolt (and feed rounds) with the opposite hand, then you don’t need to shift grip and head position with each shot. All this requires is a weakside-placed bolt, i.e. a left bolt for a right-handed shooter or a right bolt for a left-handed shooter. The video below shows a “Lefty” working a right bolt. Note how efficient this is:
As our friend Boyd Allen explains: “If you think about it, if you are going to work with a factory action where your options are left bolt and left port or right bolt and right port, and you are building a rifle that will only be shot from a rest, using the left/left for a RH shooter or using a right/right for a LH shooter works better than the conventional configuration”.
Shoot Like a Champ and Work the Bolt with Your Weakside Hand
Derek Rodgers is a recent F-TR World Champion, a King of 2 Miles champion, AND is the only person to have won BOTH the U.S. F-Open and the U.S. F-TR National Championships.
And guess what? Derek runs this kind of “opposite” bolt set-up. Yep, Derek shoots right-handed with a left bolt. Though Derek is a right-hander, he shoots with a Left Bolt/Left Port (LBLP) action. He pulls the trigger with his right index finger, while working the left-side bolt with his left (weakside) hand. This allows him to stay in position, and maintain his cheekweld. He places his right hand on the grip, while manipulating the bolt (and feeding rounds) with his non-trigger-pulling hand.
Past F-TR World Champion and Past King of 2 Miles Derek Rodgers
This is the rifle with which Derek won the 2013 F-TR National Championship.
*For true standing, off-hand shooting (whether in competition or on a hunt), a conventional strongside bolt placement makes sense, since the non-dominant arm must support the front of the rifle all the time. When shooting from bipod or rest, it’s a different story.
The prone position demonstrated by two talented Service Rifle shooters. At top is SFC Brandon Green, multi-time High Power National Champion. Below is Tony Chow, a gifted match shooter. NOTE: Current Service Rifle rules allow the use of optics up to 4.5X.
Jay Christopherson, 2024 and 2020 Southwest Nationals F-Open Champion, is one of the nation’s best F-Class shooters. When shooting F-Class, Jay uses a SEB Mini front rest and a large rear sandbag to support his big 22-lb F-Open rifle. Though he loves F-Class, Jay has also been interested in Service Rifle competition where no external supports are allowed. You hold the rifle with your arms and a sling. Some Service Rifle competitions involve three position (Standing, kneeling/sitting, and prone), while others are prone only. Even in the prone position, the sling is a vital accessory.
Jay dramatically improved his Service Rifle “hard-holding” technique by enlisting the help of Emil Praslick III, former U.S. Army Marksmanship Unit (USAMU) rifle coach. Emil’s guidance and advice resulted in an immediate increase in Jay’s scores on target, as recorded by his ShotMarker electronic target system. Jay noted: “These targets show the difference between hacking it on your own, and spending an hour with someone who knows what they are doing and can tell you that you are doing it wrong.” These targets show Jay’s “before and after” Service Rifle results shooting slung up prone at 600 yards:
Service Rifle, Prone with Sling at 600 Yards
Here is Jay’s target BEFORE training with Emil Praslick — a 194-3X with lots of vertical.
And here is Jay’s improved target AFTER putting Praslick’s advice to work — impressive 199-8X with significantly less vertical.
You can see on this second target much improved vertical. All 20 shots were in a vertical range much smaller than the vertical height of the 10-Ring. Had shot 16 not gone wide left, this would have been a 200. Shot 16 was OUT of the 10-Ring to the left, but note that vertically it has almost perfect elevation.
Jay stated: “I was pretty amazed at not only the difference on the target, but how much difference the changes Emil suggested made to how my hold felt. The entire feel was different and a ton less stress in my neck and arms compared to what I was feeling before. I was actually feeling pretty good about that 194 yesterday, because I hadn’t slung up in two years and that was my highest score (by one point) after doing some load fixing. But having someone explain what you are doing wrong and why makes a world of difference.
Want to learn the basics of position shooting? Then you should check out an article by Gary Anderson, DCM Emeritus, in On the Mark digital magazine (Summer 2014, pp. 6-13). This article covers all the key elements: body position (prone, sitting, standing), sling use/adjustment, sight picture, aiming process, and trigger control. While this 8-page article was specifically written for Rimfire Sporter shooters, the techniques described by Anderson apply to all types of position shooting, whether you shoot air rifles, smallbore rifles, or centerfire rifles.
Here’s what Anderson says about aiming — how to keep your sights steady and get them centered on the middle of the target:
Trigger Contact and Center As soon as aiming at the target begins, the index finger must move from the trigger-guard to contact the trigger. It is important to get initial pressure on the trigger as soon as aiming begins. Then the shooter must focus on the sight picture and centering the sight picture movements over the aiming point. No one, not even champion shooters, can hold the aligned sights perfectly still. The sights are going to move a little bit or a lot, depending on the shooter’s skill level. The secret is to center those sight picture movements over the aiming point on the target (see trace illustration) before pulling the trigger.
When the sight picture movements on the target are centered, the last step in firing the shot is to add… smooth pressure on the trigger until the shot breaks.
Anderson also discusses the 5 Basics of Shot Technique:
BONUS: Olympic Gold Medalist Jamie Gray
Here’s an interesting video about three-position shooting. Produced by GOnra Media, this video demonstrates rifle hold and body alignment for prone, standing, sitting, and kneeling positions. Olympic Gold Medalist Jamie Gray demonstrates the proper stance and position of arms and legs for each of the positions. Ideally, in all of the shooting positions, the shooter takes advantage of skeletal support. The shooter should align the bones of his/her arms and legs to provide a solid foundation. A shooter’s legs and arms form vertical planes helping the body remain stable in the shooting position.
Most bolt-action rifle shooters work the bolt with their trigger-pulling hand. This is because most rifles sold to right-handed shooters come with right-side bolts, while “lefty” rifles come with left-side bolts. This “standard” configuration requires the shooter to take his dominant, trigger-pulling hand off the stock to cycle the bolt, then re-position his hand on the stock, and “re-claim” the trigger. Often the shooter must lift or move his head to work the bolt, and that also requires him to re-establish his cheek weld after each and every shot. Not good.
This really doesn’t make much sense for precision shooting with fore-end support*. There is a better way. If you leave your trigger hand in position and work the bolt (and feed rounds) with the opposite hand, then you don’t need to shift grip and head position with each shot. All this requires is a weakside-placed bolt, i.e. a left bolt for a right-handed shooter or a right bolt for a left-handed shooter. The video below shows a “Lefty” working a right bolt. Note how efficient this is:
As our friend Boyd Allen explains: “If you think about it, if you are going to work with a factory action where your options are left bolt and left port or right bolt and right port, and you are building a rifle that will only be shot from a rest, using the left/left for a RH shooter or using a right/right for a LH shooter works better than the conventional configuration”.
Shoot Like a Champ and Work the Bolt with Your Weakside Hand
Derek Rodgers is a recent F-TR World Champion, a King of 2 Miles champion, AND is the only person to have won BOTH the U.S. F-Open and the U.S. F-TR National Championships.
And guess what? Derek runs this kind of “opposite” bolt set-up. Yep, Derek shoots right-handed with a left bolt. Though Derek is a right-hander, he shoots with a Left Bolt/Left Port (LBLP) action. He pulls the trigger with his right index finger, while working the left-side bolt with his left (weakside) hand. This allows him to stay in position, and maintain his cheekweld. He places his right hand on the grip, while manipulating the bolt (and feeding rounds) with his non-trigger-pulling hand.
Recent F-TR World Champion and King of 2 Miles Derek Rodgers
This is the rifle with which Derek won the 2013 F-TR National Championship.
*For true standing, off-hand shooting (whether in competition or on a hunt), a conventional strongside bolt placement makes sense, since the non-dominant arm must support the front of the rifle all the time. When shooting from bipod or rest, it’s a different story.


As soon as aiming at the target begins, the index finger must move from the trigger-guard to contact the trigger. It is important to get initial pressure on the trigger as soon as aiming begins. Then the shooter must focus on the sight picture and centering the sight picture movements over the aiming point. No one, not even champion shooters, can hold the aligned sights perfectly still. The sights are going to move a little bit or a lot, depending on the shooter’s skill level. The secret is to center those sight picture movements over the aiming point on the target (see trace illustration) before pulling the trigger.


 As soon as aiming at the target begins, the index finger must move from the trigger-guard to contact the trigger. It is important to get initial pressure on the trigger as soon as aiming begins. Then the shooter must focus on the sight picture and centering the sight picture movements over the aiming point. No one, not even champion shooters, can hold the aligned sights perfectly still. The sights are going to move a little bit or a lot, depending on the shooter’s skill level. The secret is to center those sight picture movements over the aiming point on the target (see trace illustration) before pulling the trigger.


