If you will be flying with firearms this summer, here are six videos you should watch before you travel. You need to familiarize yourself with current Federal Regulations on gun transport before you get anywhere near an airport. Thankfully, the Transportation Security Administration (TSA) has an official INFO page that states the important requirements for airline passengers traveling with firearms and/or ammunition.
You’ll want to visit the TSA Firearms and Ammunition webpage, and read it start to finish. In addition, before your trip, you should check the regulations of the airline(s) with which you will fly. Some airlines have special requirements, such as weight restrictions.
We have two other key tips: 1) WEIGH Your Guns and ammo (as packed) BEFORE you get to the airport — so you comply with all airline flight limits without being surcharged; 2) Carry a printed copy of TSA and airline baggage regulations pertaining to firearms — this can help when dealing with airline personnel.
TSA offers this general advice: “You may transport unloaded firearms in a locked, hard-sided container as checked baggage only. Declare the firearm and/or ammunition to the airline when checking your bag at the ticket counter. The container must completely secure the firearm from being accessed. Locked cases that can be easily opened are not permitted. Be aware that the container the firearm was in when purchased may not adequately secure the firearm when it is transported in checked baggage.”
Traveling by Air with Firearms — Advice from Legal Expert
This is a good video by a very knowledgeable attorney. Washington Gun Law President William Kirk goes over everything you need to know in order to fly safely, and legally, with a firearm if you travel domestically. Kirk states: “While many believe this is a complicated formula of various state laws, in actuality TSA regulations govern all travel domestically with a firearm. There are very specific rules which must be followed in order to do this correctly.”
Colion Noir — Air Travel with Packed Firearms
Popular YouTube host and lawyer Colion Noir has created a good video that shares important points about traveling with firearms. Colion says: “Don’t risk making costly mistakes — get informed and ensure your firearm journey is hassle-free and lawful.” In this video, Colion covers these key points:
1. Bag Check: Learn the crucial pre-flight checklist to avoid any unwanted surprises at the TSA checkpoint.
2. Airline Check: Discover the differences in airline policies and ensure a smooth journey by reviewing your chosen carrier’s firearm guidelines.
3. Law Check: Stay on the right side of the law by understanding the gun regulations in every state you’ll visit during your trip.
4. The Gun Case: Explore the essential details about the TSA-required hard-sided lockable case and find out which one is my top choice.
5. Ammo Transport: Learn the correct way to transport ammunition separately from your firearm, all while staying within the weight limit.
Step-By-Step Guide to Gun Transport — Good Tips
This 18-minute Spiritus Systems video provides some very valuable practical tips for gun owners traveling by air. The host explains what to look for in a rifle case and locking system. He also explains how to pack the rifle and gear efficiently and how to label and track your gun/ammo cases. If you’re new to airline travel with guns, this video is worth watching start to finish. Here are highlights are listed by video times:
00:01 Introduction and Regulations
00:51 Storage Container Options
2:50 Type of Lock You Should Use
6:25 Tape Tip
7:16 Contact Information, and Labeling Your Bag
8:07 Firearm Considerations / Configuration
10:03 Documents
12:30 Tracking Your Bag
13:20 Packing Your Ammo
16:00 Prepping Your Magazines
How to Efficiently Pack Your Rifles and Gear
Our friend F-Class John often travels by air to major F-Class matches (most recently to the V2 Finale in Texas). John has learned how to transport valuable match rifles and optics most efficiently and economically. In these two videos F-Class John shows how to pack your rifles and equipment, and how to employ carry-on bags to secure optics and other non-regulated equipment.
TSA Video about Airline Travel with Guns and/or Ammo
This is the latest official TSA video covering gun/ammo transport via airlines. When packing for a flight be sure to start with an empty bag (make sure there are no forgotten gun parts or ammo inside before you pack). If you’re planning to travel with a firearm, follow the tips in this video and remember that you may NEVER bring a firearm in your carry-on bag. Also make sure you are not “packing” when entering the airport even if you have a CCW permit. TSA.gov Firearms/Ammo Transport INFO Page.
Official TSA Guidelines for Airline Travel with Firearms and Ammo
When traveling, comply with the laws concerning possession of firearms as they vary by local, state, and international governments.* Declare each firearm each time you present it for transport as checked baggage. Ask your airline about limitations or fees that may apply.
Firearms must be unloaded and locked in a hard-sided container and transported as checked baggage only. As defined by 49 CFR 1540.5 a loaded firearm has a live round of ammunition, or any component thereof, in the chamber or cylinder or in a magazine inserted in the firearm. For civil enforcement purposes, TSA also considers a firearm to be loaded when both the firearm and ammunition are accessible to the passenger.
Only the passenger should retain the key or combination to the lock unless TSA personnel request the key to open the firearm container to ensure compliance with TSA regulations. You may use any brand or type of lock to secure your firearm case, including TSA-recognized locks.
Bringing an unloaded firearm with accessible ammunition to the security checkpoint carries the same civil penalty/fine as bringing a loaded firearm to the checkpoint. You may find information on civil penalties at the Civil Enforcement page.
Firearm parts, including magazines, clips, bolts and firing pins, are prohibited in carry-on baggage, but may be transported in checked baggage. Replica firearms, including firearm replicas that are toys, may be transported in checked baggage only.
Rifle scopes are permitted in carry-on and checked baggage.
TSA Guidelines for Transporting Ammunition on Flights
Ammunition is prohibited in carry-on baggage, but may be transported in checked baggage. NOTE: Check with your airline for quantity limits for ammunition.
Firearm magazines and ammunition clips, whether loaded or empty, must be securely boxed or included within a hard-sided case containing an unloaded firearm. Read the requirements governing the transport of ammunition in checked baggage as defined by 49 CFR 175.10 (a)(8).
Small arms ammunition (up to .75 caliber and shotgun shells of any gauge) must be packaged in a fiber (such as cardboard), wood, plastic, or metal box specifically designed to carry ammunition and declared to your airline.
Ammunition may be transported in the same hard-sided, locked case as a firearm if it has been packed as described above. You cannot use firearm magazines or clips for packing ammunition unless they completely enclose the ammunition. Firearm magazines and ammunition clips, whether loaded or empty, must be boxed or included within a hard-sided, locked case.
*INTERNATIONAL: If you are traveling internationally with a firearm in checked baggage, please check the U.S. Customs and Border Protection website for information and requirements prior to travel.
We enjoy shooting steel targets with rifle, pistols, and shotguns. Hitting a steel target provides instant gratification with a loud “ping” and possible movement. You can shoot small, low-cost reactive steel targets with rimfire guns at short range. Or get the stronger high-grade AR500 steel targets for centerfire shooting at 50 yards and beyond. We’ve enjoyed varmint matches with steel targets placed at 100-yard intervals from 200 to 700 yards.
Action pistol and rifle matches are typically conducted with steel targets, some that spin, and others that may even be set on moving tracks. Dueling trees are another popular type of steel targets. These have multiple plates that swing horizontally from side to side. For long-range rifles, self-resetting targets are popular. These typically have a tombstone-style steel plate set with a spring-loaded base. When hit, the target goes down, but then pops back up again after a few seconds.
Dustin Ellermann’s Steel Target Playground
In this video, popular Top Shot champion Dustin Ellerman shows his entire Steel Target facility with dozens of targets. This range has one of the most diverse collections of steel targets in any single location.
Know Your Limits Portable Steel Targets
Know Your Limits (KYL) target sets typically provide a series of swinging targets of multiple sizes, running from larger to smaller. This provides increasing challenge with each shot. This Guns and Guitars Channel video showcases two portable KYL target sets you can easily transport in your car/truck. The host states: “I love how portable and easy to set up it is, I love how many targets you get… and most importantly, I love that Shooting Targets 7 offer the best price for AR500 steel targets on the internet.”
Ten Good Steel Target Offerings — Product Reviews
This 8-minute video shows steel targets in various sizes from multiple vendors/manufacturers. This is a good starter video if you are looking to purchase your first steel targets. The video covers a wide selection of shapes, sizes, and metal ratings. In order, the featured steel targets and target accessories are:
Highwild 6″ x 3/8″ Steel Target Set
Hotop Shooting Target Pipe Hang Hooks
Do-All Outdoors Steel Shooting Target
HD Targets AR500 Steel Shooting Targets
Do-All Outdoors Steel Auto-Reset Spinner Target
Do-It-Yourself REBAR Target Stands — Very Low Cost
This Guns and Guitars Channel Video shows how to make making the CHEAP and sturdy target stands from REBAR. The host says: “These things are basically bullet-proof and would probably stand up against a charging rhino. You can build these stands using a 10-foot length of 1/2″ rebar from your local hardware store. Bending it is not super easy, but it can be done without a rebar bender, just watch the video!”
If you are thinking of crafting your own target, you may also want to watch a good Tactical Rifleman channel video about building a range on your own property. The host notes: “There is so much more to it than just pushing up a berm and buying some steel targets. Med plan, legal restrictions, drainage, targetry, and 50 other things should be planned out BEFORE you start digging. CLICK HERE for “How to Build Make Your Own Shooting Range” video.
Steel Target Arrangements for Action Shooting Matches
This video from Tactical Hyve shows a variety of steel targets used in action shooting scenarios. The host is a knowledgeable gear analyst and a very good shooter. If you are looking to get started in action pistol disciplines this is a good video to watch.
Steel Target and Target Stand Varieties
This video reviews the key features and functions of a variety of steel targets — from large torso silhouettes to reactive dueling trees. The video also reviews various target stands and supports. This is worth watching if you are considering buying steel targets for your shooting club or home range.
Shooting Steel Targets Safely — Tips from Hickok45
In this video, YouTube host Hickok45 offers valuable safety tips on shooting steel targets, based on his 30+ years of steel shooting experience. This guy knows his stuff — as proven by the fact that he now has over 7.6 million subscribers to his Hickok45 YouTube channel.
TOP SHOT: The steel targets in the top photo are part of the extensive facility operated by Big Daddy Hoffman 1911. See more on his popular YouTube Channel, now with 315,000 subscribers.
If you will be flying with firearms this summer, here are six videos you should watch before you travel. You need to familiarize yourself with current Federal Regulations on gun transport before you get anywhere near an airport. Thankfully, the Transportation Security Administration (TSA) has an official INFO page that states the important requirements for airline passengers traveling with firearms and/or ammunition.
You’ll want to visit the TSA Firearms and Ammunition webpage, and read it start to finish. In addition, before your trip, you should check the regulations of the airline(s) with which you will fly. Some airlines have special requirements, such as weight restrictions.
We have two other key tips: 1) WEIGH Your Guns and ammo (as packed) BEFORE you get to the airport — so you comply with all airline flight limits without being surcharged; 2) Carry a printed copy of TSA and airline baggage regulations pertaining to firearms — this can help when dealing with airline personnel.
TSA offers this general advice: “You may transport unloaded firearms in a locked, hard-sided container as checked baggage only. Declare the firearm and/or ammunition to the airline when checking your bag at the ticket counter. The container must completely secure the firearm from being accessed. Locked cases that can be easily opened are not permitted. Be aware that the container the firearm was in when purchased may not adequately secure the firearm when it is transported in checked baggage.”
Traveling by Air with Firearms — Advice from Legal Expert
This is a good video by a very knowledgeable attorney. Washington Gun Law President William Kirk goes over everything you need to know in order to fly safely, and legally, with a firearm if you travel domestically. Kirk states: “While many believe this is a complicated formula of various state laws, in actuality TSA regulations govern all travel domestically with a firearm. There are very specific rules which must be followed in order to do this correctly.”
Colion Noir — Air Travel with Packed Firearms
Popular YouTube host and lawyer Colion Noir has created a good video that shares important points about traveling with firearms. Colion says: “Don’t risk making costly mistakes — get informed and ensure your firearm journey is hassle-free and lawful.” In this video, Colion covers these key points:
1. Bag Check: Learn the crucial pre-flight checklist to avoid any unwanted surprises at the TSA checkpoint.
2. Airline Check: Discover the differences in airline policies and ensure a smooth journey by reviewing your chosen carrier’s firearm guidelines.
3. Law Check: Stay on the right side of the law by understanding the gun regulations in every state you’ll visit during your trip.
4. The Gun Case: Explore the essential details about the TSA-required hard-sided lockable case and find out which one is my top choice.
5. Ammo Transport: Learn the correct way to transport ammunition separately from your firearm, all while staying within the weight limit.
Step-By-Step Guide to Gun Transport — Good Tips
This 18-minute Spiritus Systems video provides some very valuable practical tips for gun owners traveling by air. The host explains what to look for in a rifle case and locking system. He also explains how to pack the rifle and gear efficiently and how to label and track your gun/ammo cases. If you’re new to airline travel with guns, this video is worth watching start to finish. Here are highlights are listed by video times:
00:01 Introduction and Regulations
00:51 Storage Container Options
2:50 Type of Lock You Should Use
6:25 Tape Tip
7:16 Contact Information, and Labeling Your Bag
8:07 Firearm Considerations / Configuration
10:03 Documents
12:30 Tracking Your Bag
13:20 Packing Your Ammo
16:00 Prepping Your Magazines
How to Efficiently Pack Your Rifles and Gear
Our friend F-Class John often travels by air to major F-Class matches (most recently to the V2 Finale in Texas). John has learned how to transport valuable match rifles and optics most efficiently and economically. In these two videos F-Class John shows how to pack your rifles and equipment, and how to employ carry-on bags to secure optics and other non-regulated equipment.
TSA Video about Airline Travel with Guns and/or Ammo
This is the latest official TSA video covering gun/ammo transport via airlines. When packing for a flight be sure to start with an empty bag (make sure there are no forgotten gun parts or ammo inside before you pack). If you’re planning to travel with a firearm, follow the tips in this video and remember that you may NEVER bring a firearm in your carry-on bag. Also make sure you are not “packing” when entering the airport even if you have a CCW permit. TSA.gov Firearms/Ammo Transport INFO Page.
Official TSA Guidelines for Airline Travel with Firearms and Ammo
When traveling, comply with the laws concerning possession of firearms as they vary by local, state, and international governments.* Declare each firearm each time you present it for transport as checked baggage. Ask your airline about limitations or fees that may apply.
Firearms must be unloaded and locked in a hard-sided container and transported as checked baggage only. As defined by 49 CFR 1540.5 a loaded firearm has a live round of ammunition, or any component thereof, in the chamber or cylinder or in a magazine inserted in the firearm. For civil enforcement purposes, TSA also considers a firearm to be loaded when both the firearm and ammunition are accessible to the passenger.
Only the passenger should retain the key or combination to the lock unless TSA personnel request the key to open the firearm container to ensure compliance with TSA regulations. You may use any brand or type of lock to secure your firearm case, including TSA-recognized locks.
Bringing an unloaded firearm with accessible ammunition to the security checkpoint carries the same civil penalty/fine as bringing a loaded firearm to the checkpoint. You may find information on civil penalties at the Civil Enforcement page.
Firearm parts, including magazines, clips, bolts and firing pins, are prohibited in carry-on baggage, but may be transported in checked baggage. Replica firearms, including firearm replicas that are toys, may be transported in checked baggage only.
Rifle scopes are permitted in carry-on and checked baggage.
TSA Guidelines for Transporting Ammunition on Flights
Ammunition is prohibited in carry-on baggage, but may be transported in checked baggage. NOTE: Check with your airline for quantity limits for ammunition.
Firearm magazines and ammunition clips, whether loaded or empty, must be securely boxed or included within a hard-sided case containing an unloaded firearm. Read the requirements governing the transport of ammunition in checked baggage as defined by 49 CFR 175.10 (a)(8).
Small arms ammunition (up to .75 caliber and shotgun shells of any gauge) must be packaged in a fiber (such as cardboard), wood, plastic, or metal box specifically designed to carry ammunition and declared to your airline.
Ammunition may be transported in the same hard-sided, locked case as a firearm if it has been packed as described above. You cannot use firearm magazines or clips for packing ammunition unless they completely enclose the ammunition. Firearm magazines and ammunition clips, whether loaded or empty, must be boxed or included within a hard-sided, locked case.
*INTERNATIONAL: If you are traveling internationally with a firearm in checked baggage, please check the U.S. Customs and Border Protection website for information and requirements prior to travel.
Spring Groundhog Hunting — Fun and Challenging
Springtime is the right time for groundhog hunting in the Northeast USA. Groundhog hunting is both fun and challenging. In today’s Saturday Showcase, we feature three videos showing successful groundhog hunts. Then there is a video about checking your equipment and verifying your varmint rifle zero.
We’ve even included a good video offering cooking tips for groundhog/woodchuck.* Yes groundhog meat can be quite savory — used in stews, sandwiches, or tacos. Last but not least we’ve included a section on groundhog shooting matches. These are fun matches with paper and/or steel groundhog targets.
Groundhog Hunt Report — Successful Stalk and Shoot
Here’s a great Realtree.com video showing successful groundhog hunts. This covers the process of spotting and tracking groundhogs on farmlands. Woodchucks are sensitive creatures that get easily spooked. This video shows that groundhog hunters need patience and skill, plus an accurate rifle.
Groundhog Hunting on the Family Farm with .17 HMR
In this video, the host employs his CZ 457 rifle chambered in .17 HMR to hunt groundhogs on his farm. The video provides a hunter’s POV with excellent Scope-Cam footage. This young shooter has 280 videos on his popular Blocketh Outdoors Channel including videos showing how to stalk groundhogs successfully. These critters go to ground quickly if they see or hear the hunter. NOTE: The lead photo for this Saturday Showcase comes from another Blocketh Outdoors groundhog video.
Groundhog Killshot Compilation Video
Here’s a classic “killshot” video showing multiple hits on groundhogs. If you want to see how a well-aimed varmint bullet can flip, spin, and elevate a groundhog, this video will keep you entertained. While we like explosive hits on prairie dogs, it may be better to use a solid, non-expanding bullet if you plan to harvest the groundhog (aka woodchuck) meat.
Groundhog Hunting — Importance of Confirming Your Zero
This AR15 Hunter channel video covers getting ready for spring groundhog season. This is a helpful video that shows how to confirm your zero on your varmint rifle. If you have an AR-platform Modern Sporting Rifle, this video is worth watching.
If you don’t have groundhogs in your part of the USA, don’t fret. You can still have fun hunting smaller varmints such as ground squirrels and Prairie Dogs. Here’s a good video covering P-dog hunts with a suppressed .223 Rem AR. The video covers recommended equipment including bipod, tripod, and optics.
Groundhog Matches — Fun Shooting at Paper and Steel ‘Hogs
Along with actual groundhog hunting, many shooters like to shoot paper and/or steel groundhogs in club groundhog competitions. These are fun matches that you can shoot with a variety of rifles. Our first choice would be a 22 BR for ranges out to 450 yards or a 6 BRA if targets are farther out. One popular match in the Northeast is the St. Thomas Ground hog shoot in Pennsylvania (see below).
At clubs across the country, varmint fun shoots (also known as “groundhog matches”) are becoming more popular every year. In these matches, usually shot from the bench, you engage paper targets, clay pigeons, steel “critter” silhouettes, or some combination of paper and reactive targets. Shooters like these matches because you can shoot a wide variety of rifles, you don’t have to spend a fortune to be competitive, and there is fun for the whole family. Rules are inclusive — you won’t be turned away because your rifle is two ounces overweight. A large percentage of the match fees usually go back to shooters in the form of cash prizes. And the level of camaraderie is high.
St. Thomas Groundhog Shoot, Report by Jonathan Trivette
Nestled at the base of a mountain in south-central Pennsylvania is the St. Thomas Sportsmen’s Association. On a cool Saturday morning you’ll find some of the area’s best shooters at the monthly Groundhog Match. The match attracts shooters from Virginia, Maryland, West Virginia, and of course Pennsylvania.
It may not be the longest-yardage match in the area, but it can be the one of the toughest. The range is sloped up the mountain a little so the winds can be very tricky. Often times the three wind flags at 200, 300, and 400 yards will all be blowing in different directions.
* “Groundhog” and “Woodchuck” are simply two different names for the same animal. Both terms have been used in the English language since the 1600s. In many places, the terms are used interchangeably, but “groundhog” is now increasingly more common in the USA.
Today we showcase six YouTube videos that explain basic reloading processes. This article focuses on the .45 ACP cartridge because this a very good choice for hand-loaders getting started. The .45 ACP is one of the easier cartridges to reload, because it has a large case diameter and large primer pocket, and because it operates at relatively low pressures (compared to rifle rounds).
We recommend that new reloaders consider starting with the .45 ACP cartridge. There are many reasons why the .45 ACP is a good choice for those just getting started in hand-loading:
1. The case is fairly short but has a relatively large diameter (and minimal taper), so it is easy to see inside the case. That helps you quickly check powder levels.
2. Many good powders (for the .45 ACP) will fill the case over 60%, so you will have an obvious overflow if you double-charge by accident.
3. The .45 ACP round runs at relatively low pressures, but delivers excellent accuracy.
4. Good .45 ACP brass lasts a long time, is easy to size, and is good for many reloads.
5. Along with 1911s, there are fine .45 ACP revolvers that shoot the round with moon clips.
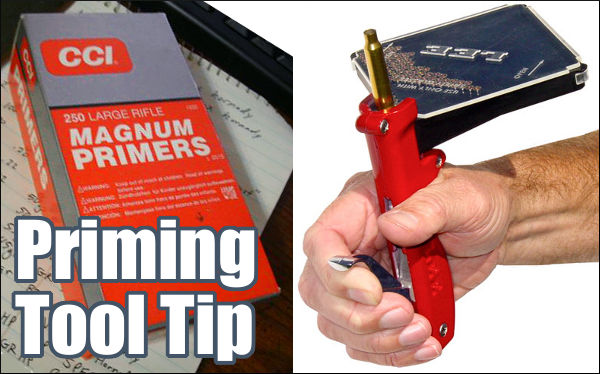
6. The vast majority of .45 ACP brass uses large pistol primers (although there ARE some small primer pocket varieties*). We find that large primers are easier to pick up and handle if you are using a single primer tool.
The .45 ACP (Automatic Colt Pistol) cartridge is a rimless straight-walled handgun cartridge originally developed in 1904 by John Moses Browning for use in his prototype Colt semi-automatic pistol. After successful military trials, it was adopted as the standard chambering for Colt’s M1911 pistol.
For reloading, there are many good powder choices. We recommend Vihtavuori N320. This is very accurate and burns cleaner than some otherwise good powders, such as Accurate (AA) No. 5 and Unique.
Basic Reloading for the .45 ACP Cartridge
This is the most-viewed .45 ACP reloading video on YouTube. It is directed primarily for the novice or prospective reloader. It covers the basic processes: case inspection, cleaning, trimming, sizing, priming, powder filling, bullet seating, and crimping. The video creator notes: “Trimming pistol/revolver brass is optional and usually not necessary. it was included because that is what I did when I first began reloading, before I found out that handgun brass does not stretch as much as bottleneck rifle brass.”
How To Reload .45 ACP — Basic Tutorial for Newer Reloaders
This is a detailed 20-minute video that shows the reloading process start to finish. The video shows how to clean the cases, deprime, and check them before loading.
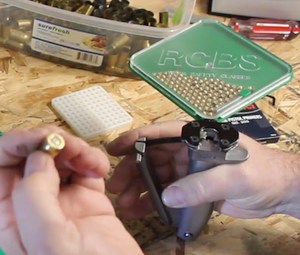
In this video the cases are sized and bullets seated using a single-stage RCBS press. The cases are primed using an RCBS hand-priming tool which keeps multiple primers in a tray (see 8:55 time-mark). For efficiency, we recommend seating with a hand tool (or bench-mounted tool) vs. seating primers using the priming system on the press itself. The hand seating tool also gives you a better “feel” for setting the primers.
How To Reload .45 ACP Start to Finish on a Progressive Press
This is a detailed 19-minute video that shows the reloading process start to finish, along with an bit of history on the .45 ACP cartridge. The video begins with case cleaning using a tumbler. The cartridges are loaded with Hodgdon CFE pistol powder, Federal primers, and 230gr plated bullet. Equipment used in the video are: Hornady LnL progressive press, Hornady Carbide die set and taper crimp die, RCBS 505 balance scale, and harbor freight wet tumbler. While we like the efficiency of a progressive press, we recommend that novice hand-loader begin with a single stage or turret press. We recommend a powder that fills the .45 ACP case pretty full. That reduces the risk of double-charging.
Safety First When Loading All Cartridges
Along with the first two instructional videos above, we include two important videos focused on reloading safety. In the first video, UltimateReloader’s Gavin Gear explains how to check your cartridge during the loading process to eliminate squib loads and other defects. In the second video, Starline Brass tech Hunter Pilant explains how to avoid double charges.
Load .45 ACP Safely — Avoid Squib Loads and Overcharges
You need to check the powder level of EVERY round you load. Do this visually BEFORE seating a bullet. (Or, with a progressive press, use a lock-out die that monitors powder levels). This is very important because a squib load (with little or no powder) can leave a bullet lodged in the barrel. A subsequent full, live round can cause a Kaboom with dire consequences.
Preventing Double Charges — Use a Case-filling Powder with .45 ACP
IMPORTANT TIP: Use a bulky powder that fills your case more than half way with a correct charge. “This will over-fill the case if it is double-charged, making it impossible to load. This is one safeguard that can keep you from making a big [mistake]” (Hunter Pilant, Starline). A bulky powder with high fill level will also be easier to see inside the case.
Good Powder Choices for the .45 ACP Cartridge
We know that many of our readers own .45 ACP handguns and load for this extremely accurate “classic” cartridge. When selecting a powder for the .45 ACP, there are many good options. All the major powder manufacturers make propellants with appropriate density and burn rate characteristics for the .45 ACP. Popular choices include: AA #5 (Accurate Powder); Bullseye (Alliant); Clays, HP-38, and Titegroup (Hodgdon); VV N310 and N320 (Vihtavuori); and WW 231 and WST (Winchester). We’ve tried all those powders in a variety of .45 ACP handguns. When we consider all the factors that make for a good pistol powder, we think Vihtavuori N320 is one of the best available propellants for the .45 ACP.
Vihtavuori N320 is very accurate, it meters well, and it burns clean, with minimal smoke and flash. If you haven’t tried VV N320 yet, you should.
Pros and Cons of Different Powders for the .45 ACP
This Editor has personally tried out eight or more different powders for the .45 ACP. Bullseye works but it is very dirty (both smoke out the barrel and sooty powder fouling on case). Though it otherwise burns clean, Titegroup leaves a singular (and nasty) high-temp flame streak on your brass that is hard to remove. AA #5 is a good choice for progressive press newbies as you use more powder so a double charge will (usually) be obvious. I like AA #5 but N320 was more accurate. Clays burns clean but some powder measures struggle with flake powders like this. WW 231 offered excellent accuracy and metered well, but it kicked out sparks with little pieces of carbon that would hit me in the face.
The Progressive Option — Loading .45 ACP on the Dillon 550B
Once you have mastered the basics of reloading for the .45 ACP, if you require large quantities of ammo, you may want to consider getting a progressive press. Progressive presses can significantly increase your ammo output, but there are also important safety considerations. You need to be careful about powder levels and priming. In this video, Gavin Gear explains how to reload safely with a Dillon 550B progressive press. The equivalent current model is the Dillon 550C.
.45 ACP Ammunition Loading Guide — Nosler Data
If you “roll your own” .45 ACP cartridges, there are many good powder choices. Our favorites are Vihtavuori N320, AA No. 5, and Hodgdon TiteGroup, but there are many other good choices. You’ll find these three recommended powders (plus many others) in the .45 ACP Load Data Charts from Nosler. Shown below are the Nosler Guides for 185gr bullets and 230gr bullets. Click each image below to access printable PDF files.
Click for PDF File
Click for PDF File
* However, be aware that CCI and other companies are now manufacturing .45 ACP brass with SMALL PRIMER POCKETS. Whenever you get new brass, be sure so check ALL the cases for primer size, and segregate large and small in two groups. Attempting to push a large primer into a small primer hole can lead to jams, or worse, dangerous detonation. Be CAREFUL!
Seating primers is a key part of the reloading process. You need to seat primers consistently to achieve best accuracy. There are many different tools offered for seating primers, both hand-held and bench-mounted. Deluxe premium hand-held seaters may hold just a single primer, while a variety of handheld units employ trays to hold more primers. With bench-mounted primer seaters there are a variety of feeding systems — vertical tubes, angled trays, and even a strip feeder — the APS system pioneered by RCBS.
Today’s Saturday at the Movies feature covers a variety of primer seater options, from low-cost hand tools to the $600.00 Primal Rights unit. We also cover the innovative Lee Automated Case Primer (ACP) system which even feeds your brass, increasing your processing rate.
Forster Co-Ax Bench-Mounted Priming Tool
The Forster Co-Ax® Primer Seater is a trusted bench-mounted priming tool that works very well. Set the jaws for a particular rim size, load the tube, and you’re ready to seat primers. The tool has good “feel” plus plenty of leverage. Forster says that the tool’s “unique design allows the operator to eliminate all slop when working with a specific cartridge, translating into perfect seating, reliable ignition, and reduced misfires.” This Forster tool requires no separate shell holders. The spring-loaded jaws close to securely grip most modern rifle and pistol cases with a rim thickness of .045″ to .072″. And Forster provides a primer flipper tray that makes it easy to load the provided small and large tubes. If you shoot a large variety of cartridge types with various rim sizes, this Forster Co-Ax primer seater is a good choice.
Primal Rights Competition Priming Seater (CPS) Review
If there is a Ferrari of priming tools, it has to be the Primal Rights Competition Primer Seater (CPS). This impressive bench-mounted tool allows very precise control over primer seating depth. A vertical tube holds primers ready for insertion. The action is smooth and precise. Seating depth control is as good as you can get. That precise, repeatable control, and the tool’s smooth operation, are the tool’s major selling points. Video reviewer F-Class John believes that Primal Rights machine is definitely the best priming tool on the market, though it may not be for everyone given its premium $600.00 price.
Frankford Arsenal Perfect Priming Tool
Our friend Jim See of Elite Accuracy LLC has tested the depth-adjustable hand priming tool from Frankford Arsenal. This product, called the Platinum Series Perfect Seat Hand Primer, has some unique features. Primer seating depth can be adjusted with a handy wheel in the tool’s center handgrip. Each “click” of the wheel moves the primer post .001″ (one one-thousandth of an inch). Additionally, the design of the case-holder allows quick and easy removal of a primed case. The unit ships with a full set of shell-holders to match all types of cases. Like many other hand priming units, the primers are loaded into a flip tray that attaches to the head of the tool.
Accuracy Variances and Priming Tool Types
The above video compares the performance of the Frankford Arsensal adjustable priming tool with a Sinclair Int’l hand priming tool — a unit used for many years by top benchrest shooters.
LEE Auto Bench Priming Tool
Gavin Gear of UltimateReloader.com has reviewed Lee Precision’s new lever-operated, bench-mounted priming tool. The Lee Auto Bench Prime features a hopper-style primer feeder set at an angle. Gavin likes the tool, reporting that primers feed well and seat fully with very little effort. And switching from large to small primer size (or vice-versa) is quick and easy. Overall, Gavin says the Lee Auto Bench Prime has earned a place in his reloading room: “The Lee Auto Bench Prime is easier to use than a hand priming tool, and more efficient.”
How the Lee Auto Bench Prime Performs
Gavin had three important “take-aways” from his initial loading sessions with the Lee Auto Bench Prime:
1. I was surprised by the low effort needed to prime cases — it’s pretty amazing.
2. You can quickly and easily install shellholders and change primer sizes.
3. The folding primer tray works very well. It’s a great setup from my testing so far.
Are there any negatives with the tool? Gavin noted that, in the course of loading 100+ rounds, once or twice he had to tap the triangular tray to get the primer to feed: “That’s not a big deal, and may smooth out with time”.
RCBS APS Strip Priming System — Bench Tool and Strip Loader
RCBS pioneered an innovative priming system that held primers in handy horizontal strips. This video shows primers being placed in strips, and then cases being primed using an RCBS bench-mounted APS strip-priming system. Many years ago, this Editor acquired an RCBS Pro 2000 progressive press, which employed the APS strip priming system. Primers were held in strips which could be easily connected for continuous feeding — no tubes to load! I liked the system so much I then acquired an APS hand priming tool (photo right), an APS bench-mounted tool, and an APS strip priming tool that fits on a single stage press. I loaded many thousands of rounds successfully with the APS system with not one inverted primer ever. I still use the APS hand primer tool to prime most of my rifle rounds.
Unfortunately, RCBS has discontinued sales of most APS priming tools, but you can still get primers pre-packaged in APS strips, and you can still buy the Strip Loader tool for placing primers into strips.
BONUS Video — K&M Primer Pocket Correction Tool
K&M offers a handy tool for optimizing primer pocket depth. K&M’s Primer Pocket Correction Tool uses a carbide cutter with a preset depth, allowing consistent depth squaring of the primer pocket bottom. Designed with a drive shank to be used with your cordless screwdriver and/or a K&M handle, these tools are available in four types: Small Rifle/Pistol; Large Pistol; Large Rifle; and .50 BMG.
Priming Tool Tip — Check Your Primer Seater for Wear
From time to time, we all encounter a primer that doesn’t go off. It’s normal to attribute the problem to a bad primer. But sometimes there are other explanations. George S., one of our Forum members, experienced a couple failures to fire, but he learned that the issue was his priming TOOL, not his primers. Here’s what George told us. There’s a lesson to be learned:
“I had issues with CCI 450s when I had my first 6BR barreled. I had probably three or four out of 20 rounds that failed to fire. the primers were dented but didn’t fire. I called CCI since I had bought a case of them. The tech was decent enough but had the audacity to tell me I was not seating the primers all the way in the pocket. I proceeded to let him know I had been reloading longer than he had been alive and I knew how to seat a primer.
Turns out that I did and I didn’t! I was using the RCBS primer tool I had used for years and the primers felt just fine to me. I finally decided to check the tool and since I had a new one I took the seating pins out and measured them. The seating pin on the tool I had been using for years was shorter by a few thousandths! I then used the pin from the new primer tool and darned if the primers that didn’t seat down to the bottom of the cup.
Over time the 1911 design has evolved into many variants, including the modern “race gun” used in rapid-fire pistol competitions. Show above is an STI DVC Open model fitted with a C-More sight, and front compensator. It is chambered for the .38 Super.
This article has good tips on pistol marksmanship (grip and trigger control). In addition we offer resources on how to upgrade and accessorize 1911-type handguns.
How to Grip a 1911 Handgun Properly
World Champion pistol ace (and 18-time Bianchi Cup winner) Doug Koenig demonstrates how to grip a handgun. While the fundamentals are demonstrated on a 1911 pistol they are effective for establishing a proper grip on any handgun.
Trigger Press and Trigger Control
In this video Champion shooter Doug Koenig talks about key techniques that apply to all pistol marksmanship — not just speed shooting “on the clock”. With any handgun, Doug explains, you should focus on consistent trigger control. You want to avoid yanking the trigger or anticipating recoil.
How to Accessorize Your 1911
The Brownells YouTube Channel has a series of videos showing how to accessorize a 1911. The videos show procedures for upgrading the magazine release, slide release, hammer, guide rod, mainspring housing, and grips. There are also good videos on barrel replacement and drop-in trigger group installation. If you want to upgrade your 1911, these videos are worth watching. Below are links to three of these 1911 videos.
Hunting season is coming soon. For hunters that means many hours may be spent searching for animals through spotting scopes and binoculars — “glassing” for game. And when the hunter does find a good buck or doe, he’ll need to know the animal’s precise distance, so that demands a good laser rangefinder. Being carried in the field, the scopes on hunting rifles need to be tough and durable, and every hunting scope should have excellent low-light performance. And when the hunter finally takes his shot, his scope better be properly zeroed. Today’s Saturday showcase spotlights Hunting Optics. We offer eight great videos that help you select the right riflescope, spotting scope, rangefinder, and binoculars for your next hunt.
Here’s a good video by an avid hunter who treks in remote, mountainous zones. The host has learned what works… and what’s worth the weight to carry: “I’ve found that the combination of 10×42 binoculars and a 27–60x80mm spotting scope is the sweet spot for mountain hunting. This pairing balances weight with reach, allowing me to keep moving but also reach out and see well-hidden animals. In some cases, I will make use of an 18×56 binocular, but this is reserved for non-backpack hunts. With 25 years of mountain hunting experience, I can whole-heartedly recommend my preferred binocular pair as a fantastic and versatile set-up for northern mountain hunts at the very least.”
Ultimate Spotter Test — 19 Spotting Scopes Reviewed
The producers of this remarkable 19-product spotting scope comparison state: “If you are looking at choosing the best spotting scope for hunting… you are in the right place! We tested these 19 spotting scopes to find the best compact spotting scope, best 65mm spotting scope, and best 85mm spotting scope out there. We also wanted to find the best values on the market, and I think we definitely did that. While we certainly couldn’t test them ALL, we were able to put together this incredible lineup of some of the best spotting scopes out there to help you find what is going to work for your specific needs.”
First Focal Plane vs. Second Focal Plane Scopes
For the last century, Second Focal Plane (SFP) scopes have been most common on hunting rifles. Now there are an increasing number of First Focal Plane (FFP) optics favored by hunters. The main reason is that the reticle mark values (in Mils or MOA) are constant relative to the target size at all magnification levels. That is handy for hold-offs and hold-overs. On the other hand, a SFP scope maintains a constant reticle size and line thickness at all zoom values. For most hunting shots, taken inside 300 yards, that really should be fine. Many hunters feel they can spot their prey more easily without a busy reticle that obscures small details at higher magnification. This video explains the pros and cons of both reticle types. The final decision is up to you — much will depend on the terrain you hunt and the distances you shoot.
The Complete Optics Selection for For Deer Hunting
In this video, Vortex optics techs explain the optics package deer hunters will want to take into the field. Along with a good medium-power zoom riflescope, you’ll want binoculars and (probably) a spotting scope. You’ll also want a Laser Rangefinder (LRF) or laser-equipped binoculars. As the team points out, the LRF is not just to range your prey right before you take a shot. A top-quality LRF can range a reflective object as far as 1500 yards away. That helps you decide whether you want to hike a mile to reach that buck you see way out on the next ridge.
MOA vs. MIL — What You Need to Know
These days, scope manufacturers offer a wide selection of both MIL (Milliradian) and MOA (Minute-of-Angle) based optics. We do think that MOA is still predominant in the lighter-weight, lower-cost (sub-$500) scopes marketed for hunters. There are pros and cons for both angular measurement systems. One MIL is 3.6″ at 100 yards, while one MOA is 1.047″ at 100 yards. If you grew up thinking in inches, a 1/4-MOA click-value hunting scope might work best. If you shoot PRS or have other MIL scopes you may prefer a MIL-value optic for your hunting rifle. Both choices will do the job.
Comparison of Eight Laser Rangefinders
The Backfire team purchased eight rangefinders and tested them in the field. Most of the products are under $500. This is a good review if you are looking for a compact LRF at a moderate price. Looking at performance for the price, for the hunting market, the reviewers favored the Leupold RX-1600 and the waterproof Vortex Ranger 1800. COMMENTARY: If you can afford it, we recommend that serious hunters consider top-end laser rangefinder-equipped binoculars such as the ZEISS Victory RF and Leica Geovid.
How to Zero Your Hunting Rifle Efficiently
Last but not least, here’s a great video from Vortex that shows you how to quickly and efficiently sight-in and zero your hunting rifle before heading out into the field. This video explains a simple procedure that lets you get a solid zero in just three shots. Of course you probably want to fire a few more rounds to confirm your zero before you head off to your hunting grounds, but this will let you get on-target with a minimum amount of time and ammo expended. This helpful video has over 3 million views on YouTube!
Fouling Shots and Cold Bore Condition
If you recently cleaned your rifle, you may want to fire two or three fouling shots before you start this procedure. But keep in mind that you want to duplicate the typical cold bore conditions that you’ll experience during the hunt. If you set your zero after three fouling shots, then make sure the bore is in a similar condition when you actually go out hunting.
Video Reviews Selected by Brandon Green
For this week’s Saturday Showcase, we present seven videos featuring modern Electronic Target Systems. These videos were selected by Brandon Green, one of America’s greatest marksmen. Recent winner of the legendary King’s Prize in the UK, Brandon is a three-time National High Power Champion, and a National Long-Range Champion. Brandon has chosen these videos to illustrate how electronic target systems work, and so viewers can optimize their performance when working with e-Targets, both for live fire and dry-fire training. The first four videos cover electronic live-fire systems for rifles. The second three videos cover dry-fire systems for pistols that can be used indoors.
Electronic Targets for Rifles
Shotmarker Target Unboxing, Overview and Set-Up
The convenience of electronic targets offers the competitive marksman or enthusiast the ability to train and gather data without having to enlist help. These systems allow the shooter to set up a target at any distance where the projectile is supersonic and collect vital data. This system allows you to see impacts on target, get retained velocities, and measure group sizes with remarkable accuracy provided the target frame is square, rigid, and calibrated properly. This 14-minute Ultimate Reloader video will cover the unboxing of the system as well as discussing the capabilities, setup, and calibration for proper use. This ShotMarker unit retails at $799.00 USD. LINK: ShotMarker Product Page.
Long Shot LR-3 Long Range Target Camera
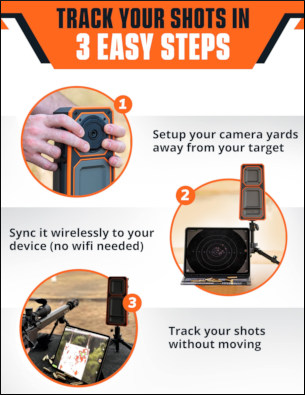
With the versatility of shooting steel or paper targets at distance, the camera style target systems can bring undeniable convenience to your range sessions. These systems can give you both the visual indication of shot placement on target and group sizes right on your phone or tablet.
This video covers unboxing, compatibility, and functionality of the Long Shot LR-3 target camera system with a live fire demo that shows image quality and speed. This impressive system can work out to 2 miles and syncs directly to your device. No range WiFi is required. This Longshot LR-3 Target Camera System is on sale for $899.99 USD.
If you typically shoot inside 1000 yards there are less expensive Long Shot devices. The Ranger+ 1K system is $404.00, The Marksman 300-yard UHD (ultra-high definition) is $449.00, and the Range 100-yard unit is just $224.00. LINK: LongShot Camera Options.
Caldwell Ballistic Precision LR Target Camera System
The Caldwell camera system appears to work similarly to the Long Shot system while coming in at a bit of a reduced cost. This video will cover unboxing, setup, and capabilities as well as a live fire demo that shows video quality and speed. This unit retails at $604.99 USD. LINK: Caldwell Camera System.
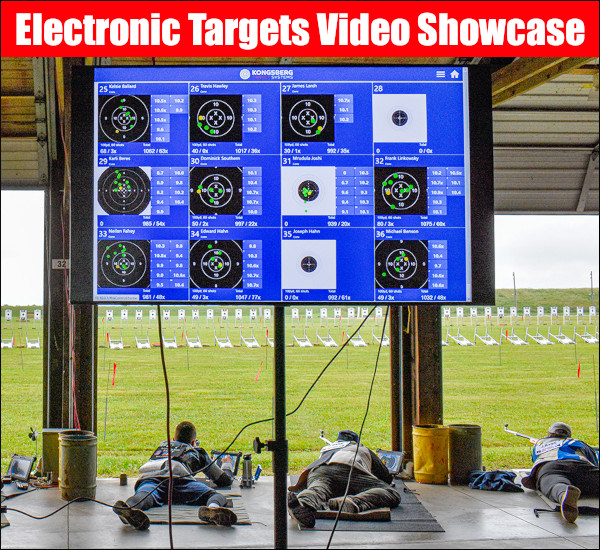
Kongsberg Electronic Targets for CMP
The CMP’s outdoor electronic targets at Camp Perry employ Kongsberg Target System (KTS) technology. The system includes monitors at each firing point that instantly display shot scores. The mobile version of the KTS system, which has been featured at CMP Travel Games events and the National Matches highpower series for many years, was used at the 2025 National Matches this summer. The advanced Kongsberg eTarget system at the National Matches will includes the KTS Shooter’s Journal, which keeps a log of each individual’s shots/scores on the firing line. LINK: Kongsberg Target System Products.
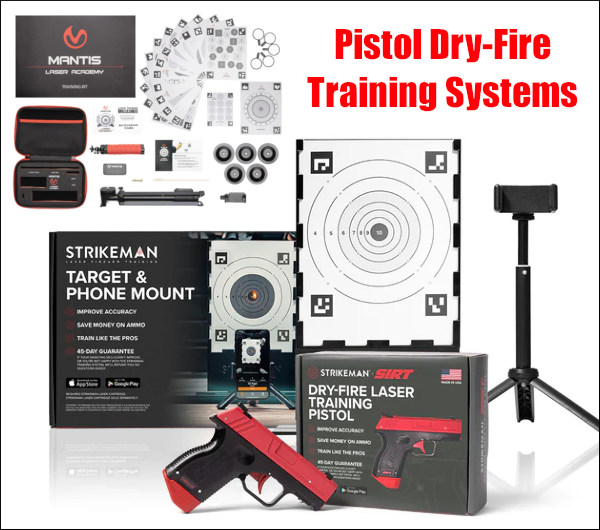
Pistol Dry-Fire Training Systems
Strikeman Laser Firearm Training System
The Strikeman Laser Training System is another dryfire training aid that allows the user to choose calibrated targets and get instant feedback with the training App on their smartphone. This video covers the unboxing, setup, and demonstration of the system. This unit is sold for $124.98 on the Strikeman website. LINK: Strikeman Pistol Training System.
Mantis Laser Academy Training System
The Mantis Laser Academy is a complete dryfire training system that allows the user to train indoors with the added benefit of getting feedback of shot placement, score on target and split times between shots. This system allows you train on numerous calibrated targets and offers several training drills with the app. You can also adjust your offset if you’re running an optic such as an RMR on your pistol. This kit is sold for $159.00 USD on the Mantis website. LINK: Mantis Laser Academy Kit.
Laser Ammo i-MTTS Target Training System
Laser Ammo’s i-MTTS training system is an interactive training system that allows the shooter to set up a complete indoor training range with various target sizes and shapes. This system allows the user to program drills, group targets together, and track splits with elapsed time. This video will cover the target system, setup, programming and drill demonstrations. This unit starts at $99.95 for a single target or $395.00 for the 5-in-1 combo pack on the Laser Ammo website. LINK: Laser Ammo i-MTTS Target System.
The model 1911 pistol, designed by John Moses Browning, is an American classic. Originally manufactured as .45 ACP military pistols, modern 1911s have evolved to be superb competition pistols, and carry pistols. With a Single-Action-Only (SAO) configuration, the 1911 design is different than most modern pistols. You must have the hammer cocked to fire a 1911 — like a single-action revolver. But the positive side of the Single-Action design is than modern 1911 pistols enjoy superb triggers with very positive release and fast reset. There is a reason the 1911 design is the basis for so many modern competition pistols.
In today’s Saturday at the Movies feature, we showcase videos that cover the history, design, and function of 1911-type pistols. We also include videos that explain how to field-strip a 1911 and how to accessorize/upgrade 1911 pistols.
Operation of 1911 Pistol with 3D Animations
Here are two excellent videos that show how a classic 1911-type pistol functions. 3D computer graphics animation offers a X-Ray view inside the pistol, showing how cartridges feed and how the slide cycles during the firing process.
How to Field-Strip and Re-Assemble a 1911 Pistol
There are a few tricks to field-stripping a 1911-type pistols, and it helps to have a couple specialized tools. This helpful TFB-TV (The Firearm Blog) video shows the process of disassembling a 1911 pistol from start to finish, and notes components that require lubrication or special attention.
History of the Classic Model 1911 Pistol
The model of 1911 pistol is an American classic with a long and illustrious history. These two videos cover the interesting origins of the 1911 pistol, and explain how J.M. Browning designed the remarkable 1911 pistol which became the iconic American sidearm of the U.S. Military, the longest-serving pistol in American military history.
A fascinating article by Rock Island Armory covers the complete evolution of the 1911 pistol, including its earlier prototype variants, starting with the model of 1905. SEE: Road to the 1911 Article (with Model 1905, 1907, 1909, and 1910 prototypes).
Over time the 1911 design has evolved into many variants, including the modern “race gun” used in rapid-fire pistol competitions. Here is an STI DVC Open model fitted with a C-More sight, and front compensator.
Pistol Shooting Skills Demonstrated with 1911
How to Grip a 1911 Handgun Properly
World Champion pistol ace (and 18-time Bianchi Cup winner) Doug Koenig demonstrates how to grip a handgun. While the fundamentals are demonstrated on a 1911 pistol they are effective for establishing a proper grip on any handgun.
Trigger Press and Trigger Control
In this video Champion shooter Doug Koenig talks about key techniques that apply to all pistol marksmanship — not just speed shooting “on the clock”. With any handgun, Doug explains, you should focus on consistent trigger control. You want to avoid yanking the trigger or anticipating recoil.
How to Accessorize Your 1911
The Brownells YouTube Channel has a series of videos showing how to accessorize a 1911. The videos show procedures for upgrading the magazine release, slide release, hammer, guide rod, mainspring housing, and grips. There are also good videos on barrel replacement and drop-in trigger group installation. If you want to upgrade your 1911, these videos are worth watching. Below are links to three of these 1911 videos.


 When traveling, comply with the laws concerning possession of firearms as they vary by local, state, and international governments.* Declare each firearm each time you present it for transport as checked baggage. Ask your airline about limitations or fees that may apply.

 Spring Groundhog Hunting — Fun and Challenging
 Along with actual groundhog hunting, many shooters like to shoot paper and/or steel groundhogs in club groundhog competitions. These are fun matches that you can shoot with a variety of rifles. Our first choice would be a 22 BR for ranges out to 450 yards or a 6 BRA if targets are farther out. One popular match in the Northeast is the St. Thomas Ground hog shoot in Pennsylvania (see below).


 This is a detailed 20-minute video that shows the reloading process start to finish. The video shows how to clean the cases, deprime, and check them before loading.
 We know that many of our readers own .45 ACP handguns and load for this extremely accurate “classic” cartridge. When selecting a powder for the .45 ACP, there are many good options. All the major powder manufacturers make propellants with appropriate density and burn rate characteristics for the .45 ACP. Popular choices include: AA #5 (Accurate Powder); Bullseye (Alliant); Clays, HP-38, and Titegroup (Hodgdon); VV N310 and N320 (Vihtavuori); and WW 231 and WST (Winchester). We’ve tried all those powders in a variety of .45 ACP handguns. When we consider all the factors that make for a good pistol powder, we think Vihtavuori N320 is one of the best available propellants for the .45 ACP.


 RCBS pioneered an innovative priming system that held primers in handy horizontal strips. This video shows primers being placed in strips, and then cases being primed using an RCBS bench-mounted APS strip-priming system. Many years ago, this Editor acquired an RCBS Pro 2000 progressive press, which employed the APS strip priming system. Primers were held in strips which could be easily connected for continuous feeding — no tubes to load! I liked the system so much I then acquired an APS hand priming tool (photo right), an APS bench-mounted tool, and an APS strip priming tool that fits on a single stage press. I loaded many thousands of rounds successfully with the APS system with not one inverted primer ever. I still use the APS hand primer tool to prime most of my rifle rounds.


 With the versatility of shooting steel or paper targets at distance, the camera style target systems can bring undeniable convenience to your range sessions. These systems can give you both the visual indication of shot placement on target and group sizes right on your phone or tablet.