Sinclair Internationalhas released an interesting article about Case Concentricity* and bullet “run-out”. This instructional article by Bob Kohl explains the reasons brass can exhibit poor concentricity, and why high bullet run-out can be detrimental to accuracy.
Concentricity, Bullet Alignment, and Accuracyby Bob Kohl
The purpose of loading your own ammo is to minimize all the variables that can affect accuracy and can be controlled with proper and conscientious handloading. Concentricity and bullet run-out are important when you’re loading for accuracy. Ideally, it’s important to strive to make each round the same as the one before it and the one after it. It’s a simple issue of uniformity.
The reason shooters work with tools and gauges to measure and control concentricity is simple: to make sure the bullet starts down the bore consistently in line with the bore. If the case isn’t properly concentric and the bullet isn’t properly aligned down the center of the bore, the bullet will enter the rifling inconsistently. While the bore might force the bullet to align itself with the bore (but normally it doesn’t), the bullet may be damaged or overstressed in the process – if it even it corrects itself in transit. These are issues we strive to remedy by handloading, to maintain the best standard possible for accurate ammunition.
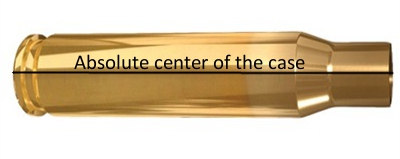
The term “concentricity” is derived from “concentric circle”. In simple terms it’s the issue of having the outside of the cartridge in a concentric circle around the center. That goes from case head and center of the flash hole, to the tip of the bullet.
Factors Affecting Concentricity
The point of using this term is to identify a series of issues that affect accurate ammunition. Ideally this would work best with a straight-walled case; but since most rifle cartridge cases are tapered, it equates to the smallest cross section that can be measured point by point to verify the concentric circle around the center. For the examples below, I’m working with .308 Winchester ammo.
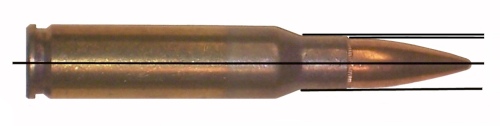
Figure 1: The cartridge.
Figure 2: Centerline axis of the case, extending from flash hole to case mouth.
The case walls have to be in perfect alignment with the center, or axis, of that case, even if it’s measured at a thousandth of an inch per segment (in a tapered case).
Figure 3: Case body in alignment with its axis, or centerline, even in a tapered case.
The case neck must also be in alignment with its axis. By not doing so you can have erratic bullet entry into the bore. The case neck wall itself should be as uniform as possible in alignment and in thickness (see the M80 7.62x51mm NATO cartridge in Figure 5) and brass can change its alignment and shape. It’s why we expand the case neck or while some folks ream the inside of the neck and then turn the outside for consistent thickness, which affects the tension on the bullet when seated.
Figure 4: Neck in alignment with center of the case axis.
Figure 5: Variations in case neck wall thickness, especially on some military brass, can cause an offset of the bullet in its alignment. This is an M80 ball round. Note the distinct difference of the neck walls.
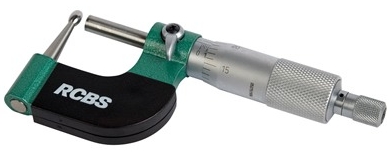
Having a ball micrometer on hand helps, especially with military brass like 7.62x51mm in a semi-auto rifle, where there are limits as to how thin you want the neck walls to be. In the case of 7.62 ball brass you want to keep the wall to .0145″.
Figure 6: A ball micrometer like this RCBS tool (#100-010-268) can measure case neck thickness.
Turning the outside of the neck wall is important with .308 military cases regardless of whether you expand or ream the neck walls. There are several outside neck turning tools from Forster, Hornady, Sinclair, and others. I’ve been using classic Forster case trimming (#100-203-301) and neck turning (#749-012-890) tools for 40 years.
Bullet Run-Out
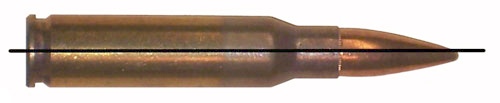
The cartridge, after being loaded, still needs to be in alignment with the center of the case axis. Figure 7 shows a bad example of this, a round of M80 ball. A tilted bullet is measured for what’s known as bullet “run-out”.
Figure 7: An M80 round with the bullet tilted and not aligned with the axis. This will be a flyer!
Run-out can be affected by several things: (1) improperly indexing your case while sizing, which includes not using the proper shell holder, especially while using a normal expander ball on the sizing die (it also can stretch the brass). (2) The head of a turret press can flex; and (3) improper or sloppy bullet seating. This is also relevant when it comes to using a progressive press when trying to load accuracy ammo.
Mid Tompkins came up with a simple solution for better bullet seating years ago. Seat your bullet half way into the case, back off the seater die and rotate the case 180 degrees before you finish seating the bullet. It cuts down on run-out problems, especially with military brass. You also want to gently ream the inside of the neck mouth to keep from having any brass mar the surface of the bullet jacket and make proper seating easier. A tilted bullet often means a flyer.
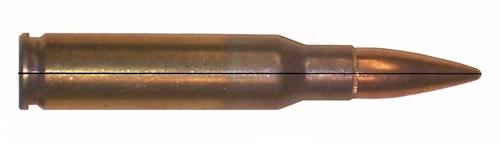
Figure 8: Proper alignment from the center of the case head to the tip of the bullet.
(NOTE: This links to a Web Archive version of the original Sinclair Int’l article.)
*Actually some folks would say that if we are talking about things being off-center or out-of-round, we are actually talking about “eccentricity”. But the tools we use are called “Concentricity Gauges” and Concentricity is the term most commonly used when discussing this subject.
A while back, Sinclair International’s Reloading Press Blog featured a “round-table” discussion of reloading techniques. Sinclair’s team of tech staffers were asked: “What do you feel is the one-most crucial step in precision reloading?”
Here are their responses (along with comments from our Editors):
Phil Hoham: “I feel that when working up a load do not go too high or too low in your powder charge. Stay away from ‘suggested loads’ you hear at the range, or on the internet. Always be sure to use a published reloading manual that presents not only minimums and maximums, but also pressure, velocity, and a proper range of powders used. Do not get distracted in the reloading process, and remain focused at all times during each step involved.”
AccurateShooter.com: Some loads presented on the Internet are OK as a starting point, but it is absolutely critical to understand that pressure maximums will vary considerably from one rifle to another (of the same chambering). For example, one 6mmBR rifle shooting 105gr bullets can max out with 30.0 grains of Varget powder, while another rifle, with the same chamber dimensions, but a different barrel, could tolerate (and perform better) with half a grain more powder. You need to adjust recommended loads to your particular rifle and barrel.
Pete Petros: “This could be a very broad topic, but if I were to pick one, it would be making sure to pay close attention, and weigh each and every powder charge to ensure that each load is exact and consistent. This is important not only for accuracy, but also for safety reasons.”
AccurateShooter.com: If you’re shooting beyond 200 yards, it is critical to weigh your loads with an accurate scale or automated system such as the AutoTrickler V3/V4. Loads that are uniform (within a few kernels) will exhibit lower Extreme Spread and Standard Deviation. And remember, even if you stick with the same powder, when you get a new powder lot, you may have to adjust your load quite a bit. For example, .308 Palma shooters have learned they may need to adjust Varget loads by up to a full grain from one lot of Varget to the next.
Ron Dague: “I feel that the most important step(s) in reloading for accuracy are in the initial case prep. Uniforming the primer pocket to the same depth to ensure consistency in primer seating is a crucial step. Additionally de-burring the flash holes, each in the same way to clean up and chamfer the inside is important. It ensures that the ignition from the primer is uniform and flows out in the same consistent pattern. Doing so will create uniform powder ignition and tighten up your velocity Extreme Spread.”
AccurateShooter.com: With some brands of brass, primer pocket uniforming and flash-hole deburring is useful. However, with the best Lapua, Norma, and RWS brass it may be unnecessary, or worse, counter-productive. So long as your Lapua brass flash-holes are not obstructed or smaller than spec, it may be best to leave them alone. This is particularly true with the small flash holes in 220 Russian, 6BR, and 6.5×47 cases. MOST of the flash-hole reaming tools on the market have cutting bits that vary in size because of manufacturing tolerances. We’ve found tools with an advertised diameter of .0625″ (1/16″) that actually cut an 0.068″ hole. In addition, we are wary of flash-hole deburring tools that cut an aggressive inside chamfer on the flash-holes. The reason is that it is very difficult to control the amount of chamfer precisely, even with tools that have a depth stop.
Rod Green: “I feel that bullet seating is the most important step. If you had focused on making sure all prior steps (case prep, powder charge, etc.) of the process have been carefully taken to ensure uniformity, bullet seating is the last step, and can mean all the difference in the world in terms of consistency. Making sure that the bullet is seated to the same depth each time, and time is taken to ensure that true aligned seating can make the load.”
Bob Blaine: “I agree with Rod. I strongly feel that consistent bullet seating depth is the most important step in creating the most accurate hand loads. I have seen the results in both my bench and long range rifles. Taking the time to ensure exactness in the seating process is by far, the number one most important step in my book.”
AccurateShooter.com: Agreed. When loading match ammo, after bullet seating, we check every loaded round for base of case to ogive length. If it varies by more than 3 thousandths, that round is segregated or we attempt to re-seat the bullet. We measure base of case to bullet ogive with a comparator mounted on one jaw of our calipers. You may have to pre-sort your bullets to hold the case-base to ogive measurement (of loaded rounds) within .003″.
Sinclair International has created a series of instructional videos illustrating the basics of metallic cartridge reloading. The 8-Part series starts with reloading basics and provides step-by-step, how-to instructions that will help new reloaders get started. Detailed, animated illustrations show you what happens inside the chamber when shooting, and inside the dies during each step of reloading. The videos can be viewed on Sinclair International’s YouTube channel. Shown below is the first video in the series:
Each of the Sinclair videos is hosted by then Sinclair Int’l President Bill Gravatt (now with Creedmoor Sports). Bill doesn’t just show you “how”, he tells you “why”. The how-to segments cover case inspection, proper die set up, case sizing, primer installation, powder measuring, bullet seating, crimping, and even goes into the record keeping needed for the handloader. “We wanted to give shooters who haven’t reloaded a look at all the advantages of creating your own ammo and how easy it is to get started,” said Gravatt, “without telling them they had to have any certain brand or type of equipment to do the job.”
The Eight Video Topics Are:
Part 1 — Intro to Video Series
Part 2 — Intro to Reloading Safety
Part 3 — Metallic Cartridge Components
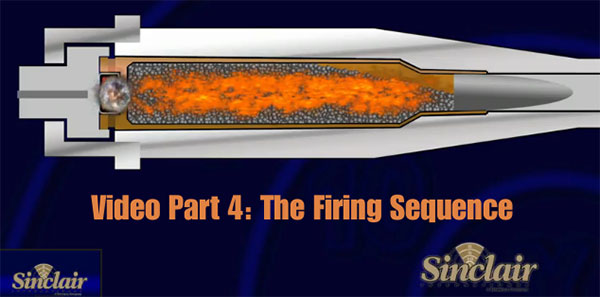
Part 4 — The Firing Sequence
Part 5 — Tools for Reloading
Part 6 — Loading Bottle-Neck Cartridges (2 videos)
Part 7 — Loading Straight Wall Cartridges
Part 8 — Reloading Series Conclusion
Reloading Tools
Shown below is Part 5 of the video series, covering the tools used for precision reloading.
We also strongly recommend the Part 4 Video to readers who are getting started in reloading. This “How Things Work” segment covers the sequence of events inside the chamber (and barrel) when the cartridge is fired. The video includes helpful graphics that show what happens to the primer, powder, cartridge, and bullet when the round is fired. The video also illustrates “headspace” and explains how this can change after firing. We think this video answers many common questions and will help reloaders understand the forces at work on their brass during the firing process.
This article is part of Sinclair Int’l Step-By-Step Reloading Series. Most of the products mentioned in this article are sold through Brownells.com.
by Roy Hill, Brownells/Sinclair Copywriter
Making your own precision handloads is a meticulous journey with many steps, many important matters to consider, and many sets of measurements to calculate. For those who pursue the perfect group, the highest score, the really long accurate shot, the rewards more than outweigh the effort. Choosing the right cases, deburring the flash holes, making the primer pockets uniform, trimming the cases, and lubricating them are all familiar – and critical – steps along the journey. And now that your brass preparation is complete, you are at last ready to start running the cases through your press and fill them with primers, powder, and bullets. The very first die the brass encounters is the sizing die. You insert the case, work the press’s lever to return the case to its correct pre-fired dimensions – and the journey continues.
There are three types of sizing dies to think about: neck, full-length, and small base. All three have specific benefits and potential drawbacks, and you should choose the type of die you use by thinking very carefully about what kind of shooting you plan to do with your handloads. No matter which type you select, most sizing dies will also punch out the old spent primer with some sort of decapper assembly that uses a hardened steel rod. Many types of sizing dies use an expander ball inside the die to make sure the neck of the case will accommodate a bullet after being sized. With some size dies, the expanders are easily removable and interchangeable, letting you get exactly the neck tension you want. When sizing cases (neck of full-length), rifle cases always need lube.
Neck-Sizing Dies Neck-sizing dies resize only the neck of the case. The benefit of sizing only the neck is that the brass is “worked” very little, reducing the amount of changes to the brss. [We recommend full-length sizing for all applications after the first couple of firings, and semi-auto brass should be full-length sized every time!] Sinclair recommends that neck-sized-only cartridges should not be used any in other rifle besides the one they were originally fired from [unless they are also FL-sized], or in any action other than a bolt-action.
Full-Length Sizing Dies
Full-length sizing dies resize the full length of the case, not just the neck. Full-length sizing helps create handloads that will function in any rifle, not just the one from which the cases were originally fired. The potential downside of full-length sizing is that it may shorten case life because it works the brass more than neck sizing. But it’s possible to “tune” today’s full-length sizing dies so they barely work the brass at all, as this article by Sinclair Reloading Tech Ron Dague shows.
Illustration Shows How a Full-Length Sizing Die Works
Another way to reap the benefits of full-length sizing is to use Redding’s full-length bushing dies, which size the full length of the case but use a system of interchangeable bushings that enable you give the case neck the bare minimum of resizing needed. To see how finely adjustable bushing dies are, and how they resize the case while fully supported, CLICK HERE for Video. The neck bushing helps you precisely control the neck tension to help increase the consistency and accuracy of your handloads.
Small Base Dies
A Small Base Die is another type of full-length sizing die, but one that is typically used when reloading for semi-automatic rifles, like the AR-15, M14, or AR-style .308 rifles. (It may also work well for bolt guns that need extra sizing on the lower section of the case.) A small base die works exactly like a full-length sizing die, only it compresses the brass just a bit more, usually about .001″ more, and may even push the case shoulder back just a hair. Small base dies give that extra bit of compression to the brass to help make sure the case will properly extract from a semi-automatic firearm. The upside is that you get handloads that should work flawlessly in your semi-automatic. The downside is case life may be shortened as compared to brass used only in one bolt-action rifle, because the brass is worked more.
Shoulder Bump Gauges
A handy tool for setting up your full-length sizing dies as close as possible to your rifle’s chamber is a shoulder bump gauge. The bump gauge lets you resize the case as little as possible, to extend case life and help your handloads fit your rifle almost like a neck-sized only die. You use deprimed cases fired in your rifle and bump gauge inserts to help you set up the die so it resizes the case only about .001″ to .004″, depending on what type of rifle you’re shooting.
Video shows how to use a shoulder bump gauge to set up your full-length dies
Article Find by EdLongrange. We welcome reader submissions
Shiny brass — it may not shoot more accurately, but it does make you feel better about your hand-loaded ammo. While it’s not necessary to get brass “bright and shiny” after every firing, it is a good idea to clean powder residue, grime, and grit off your brass before you run cases into sizing dies. There are many ways to clean cartridge cases. A quick wipe with solvent on a patch may suffice for recently-shot cases. Older brass with baked-on carbon may require lengthy tumbling. Ultrasonic cleaning is another popular option that gets your brass clean inside and out.
Sinclair International has a series of helpful videos on brass cleaning. These short “how-to” videos, hosted by Bill Gravatt, former head honcho at Sinclair Int’l and Creedmoor Sports, cover the various processes you can use — tumbling, ultrasonic cleaning, chemical cleaning, and cleaning by hand.
Video ONE — Cleaning Brass in Vibratory or Rotary Tumbler
TIP: Brass that has recently been shot will clean more easily than brass that has been sitting many days or weeks. If your tumbling media is fresh the job should be done in an hour or less. It’s your choice whether to tumble with primers removed or with primers still in the cases. If you choose to tumble with primers out, we suggest you deprime with a depriming die, rather that put dirty brass into your sizing die. Some people like to add a teaspoon of liquid polish to the media. This does work, cutting tumble time, and making your brass more shiny. However, if you add liquid polish, do that BEFORE you add the brass and let the tumbler run for a 15 minutes to get the polish completely mixed into the media. Otherwise you can else up with gooey gunk inside your cases — a very bad thing.
Video TWO — Ultrasonic Case Cleaning
TIP: There are many different types of solutions you can use. Soapy water suffices for some folks, particularly if you add a little Lemi-Shine. The Hornady and Lyman solutions work well, and can be used multiple times, provided you strain the solution to remove dirt and grit after cleaning sessions. Many ultrasonic cleaning machines have timers. Experiment with dwell time to see how long you need to immerse your brass. A very small amount of Ballistol in the solution will help lubricate your necks on the inside. This can make bullet seating go more smoothly, with more consistent neck tension.
Video THREE — Chemical Cleaners (Soaking without Ultrasound)
TIP: After using chemical cleaners, such as the Iosso solution, you need to water-rinse your brass thoroughly. A kitchen strainer helps with this (see video at 0:20). Also, don’t forget your brass in the chemical solution — follow the manufacturers recommendations and don’t exceed the recommended dwell time. Chemical cleaners work surprisingly well to remove grease and grime, and the solution can be re-used multiple times. However, if you want your cases to look bright and shiny (like new brass), you will probably have to tumble. [Editor: A very effective new chemical cleaner is the Brass Monkey product from the makers of Wipe-Out and Carb-Out. Add a teaspoon to a gallon of water then soak your brass for 20-30 minutes. It really works — the cases clean up dramatically].
Video FOUR — Manual Cleaning (By Hand)
TIP: Keep some oversize patches in your range kit. At the end of your shooting sessions, wipe off your fired brass with a patch dampened with a mild, non-corrosive solvent (once again Ballistol works well). Before the carbon sets up on your brass it is very easy to remove. For tougher jobs, you can use 0000 Steel Wool (as Bill recommends in the video). You may find that timely hand-cleaning lets you avoid tumbling altogether — or you may choose to tumble (or ultra-sound) your brass only after a half-dozen or so firings.
Sinclair International has created a series of instructional videos illustrating the basics of metallic cartridge reloading. The 8-Part series starts with reloading basics and provides step-by-step, how-to instructions that will help new reloaders get started. Detailed, animated illustrations show you what happens inside the chamber when shooting, and inside the dies during each step of reloading. The videos can be viewed on Sinclair International’s YouTube channel. Shown below is the first video in the series:
Each of the Sinclair videos is hosted by then Sinclair Int’l President Bill Gravatt (now with Creedmoor Sports). Bill doesn’t just show you “how”, he tells you “why”. The how-to segments cover case inspection, proper die set up, case sizing, primer installation, powder measuring, bullet seating, crimping, and even goes into the record keeping needed for the handloader. “We wanted to give shooters who haven’t reloaded a look at all the advantages of creating your own ammo and how easy it is to get started,” said Gravatt, “without telling them they had to have any certain brand or type of equipment to do the job.”
The Eight Video Topics Are:
Part 1 — Intro to Video Series
Part 2 — Intro to Reloading Safety
Part 3 — Metallic Cartridge Components
Part 4 — The Firing Sequence
Part 5 — Tools for Reloading
Part 6 — Loading Bottle-Neck Cartridges (2 videos)
Part 7 — Loading Straight Wall Cartridges
Part 8 — Reloading Series Conclusion
Reloading Tools
Shown below is Part 5 of the video series, covering the tools used for precision reloading.
We also strongly recommend the Part 4 Video to readers who are getting started in reloading. This “How Things Work” segment covers the sequence of events inside the chamber (and barrel) when the cartridge is fired. The video includes helpful graphics that show what happens to the primer, powder, cartridge, and bullet when the round is fired. The video also illustrates “headspace” and explains how this can change after firing. We think this video answers many common questions and will help reloaders understand the forces at work on their brass during the firing process.
Sinclair Internationalhas released an interesting article about Case Concentricity* and bullet “run-out”. This instructional article by Bob Kohl explains the reasons brass can exhibit poor concentricity, and why high bullet run-out can be detrimental to accuracy.
Concentricity, Bullet Alignment, and Accuracyby Bob Kohl
The purpose of loading your own ammo is to minimize all the variables that can affect accuracy and can be controlled with proper and conscientious handloading. Concentricity and bullet run-out are important when you’re loading for accuracy. Ideally, it’s important to strive to make each round the same as the one before it and the one after it. It’s a simple issue of uniformity.
The reason shooters work with tools and gauges to measure and control concentricity is simple: to make sure the bullet starts down the bore consistently in line with the bore. If the case isn’t properly concentric and the bullet isn’t properly aligned down the center of the bore, the bullet will enter the rifling inconsistently. While the bore might force the bullet to align itself with the bore (but normally it doesn’t), the bullet may be damaged or overstressed in the process – if it even it corrects itself in transit. These are issues we strive to remedy by handloading, to maintain the best standard possible for accurate ammunition.
The term “concentricity” is derived from “concentric circle”. In simple terms it’s the issue of having the outside of the cartridge in a concentric circle around the center. That goes from case head and center of the flash hole, to the tip of the bullet.
Factors Affecting Concentricity
The point of using this term is to identify a series of issues that affect accurate ammunition. Ideally this would work best with a straight-walled case; but since most rifle cartridge cases are tapered, it equates to the smallest cross section that can be measured point by point to verify the concentric circle around the center. For the examples below, I’m working with .308 Winchester ammo.
Figure 1: The cartridge.
Figure 2: Centerline axis of the case, extending from flash hole to case mouth.
The case walls have to be in perfect alignment with the center, or axis, of that case, even if it’s measured at a thousandth of an inch per segment (in a tapered case).
Figure 3: Case body in alignment with its axis, or centerline, even in a tapered case.
The case neck must also be in alignment with its axis. By not doing so you can have erratic bullet entry into the bore. The case neck wall itself should be as uniform as possible in alignment and in thickness (see the M80 7.62x51mm NATO cartridge in Figure 5) and brass can change its alignment and shape. It’s why we expand the case neck or while some folks ream the inside of the neck and then turn the outside for consistent thickness, which affects the tension on the bullet when seated.
Figure 4: Neck in alignment with center of the case axis.
Figure 5: Variations in case neck wall thickness, especially on some military brass, can cause an offset of the bullet in its alignment. This is an M80 ball round. Note the distinct difference of the neck walls.
Having a ball micrometer on hand helps, especially with military brass like 7.62x51mm in a semi-auto rifle, where there are limits as to how thin you want the neck walls to be. In the case of 7.62 ball brass you want to keep the wall to .0145″.
Figure 6: A ball micrometer like this RCBS tool (#100-010-268) can measure case neck thickness.
Turning the outside of the neck wall is important with .308 military cases regardless of whether you expand or ream the neck walls. There are several outside neck turning tools from Forster, Hornady, Sinclair, and others. I’ve been using classic Forster case trimming (#100-203-301) and neck turning (#749-012-890) tools for 40 years.
Bullet Run-Out
The cartridge, after being loaded, still needs to be in alignment with the center of the case axis. Figure 7 shows a bad example of this, a round of M80 ball. A tilted bullet is measured for what’s known as bullet “run-out”.
Figure 7: An M80 round with the bullet tilted and not aligned with the axis. This will be a flyer!
Run-out can be affected by several things: (1) improperly indexing your case while sizing, which includes not using the proper shell holder, especially while using a normal expander ball on the sizing die (it also can stretch the brass). (2) The head of a turret press can flex; and (3) improper or sloppy bullet seating. This is also relevant when it comes to using a progressive press when trying to load accuracy ammo.
Mid Tompkins came up with a simple solution for better bullet seating years ago. Seat your bullet half way into the case, back off the seater die and rotate the case 180 degrees before you finish seating the bullet. It cuts down on run-out problems, especially with military brass. You also want to gently ream the inside of the neck mouth to keep from having any brass mar the surface of the bullet jacket and make proper seating easier. A tilted bullet often means a flyer.
Figure 8: Proper alignment from the center of the case head to the tip of the bullet.
(NOTE: This links to a Web Archive version of the original Sinclair Int’l article.)
*Actually some folks would say that if we are talking about things being off-center or out-of-round, we are actually talking about “eccentricity”. But the tools we use are called “Concentricity Gauges” and Concentricity is the term most commonly used when discussing this subject.
Sometimes you’ll get a barrel that doesn’t stabilize bullets the way you’d anticipate, based on the stated (or presumed) twist rate. A barrel might have 1:10″ stamped on the side but it is, in truth, a 1:10.5″ twist or even a 1:9.5″. Cut-rifled barrels, such as Kriegers and Bartleins, normally hold very true to the specified twist rate. With buttoned barrels, due to the nature of the rifling process, there’s a greater chance of a small variation in twist rate. And yes, factory barrels can be slightly out of spec as well.
After buying a new barrel, you should determine the true twist rate BEFORE you start load development. You don’t want to invest in a large supply of expensive bullets only to find that that won’t stabilize because your “8 twist” barrel is really a 1:8.5″. Sinclair International provides a simple procedure for determining the actual twist rate of your barrel.
Sinclair’s Simple Twist Rate Measurement Method
If are unsure of the twist rate of the barrel, you can measure it yourself in a couple of minutes. You need a good cleaning rod with a rotating handle and a jag with a fairly tight fitting patch. Utilize a rod guide if you are accessing the barrel through the breech or a muzzle guide if you are going to come in from the muzzle end. Make sure the rod rotates freely in the handle under load. Start the patch into the barrel for a few inches and then stop. Put a piece of tape at the back of the rod by the handle (like a flag) or mark the rod in some way. Measure how much of the rod is still protruding from the rod guide. You can either measure from the rod guide or muzzle guide back to the flag or to a spot on the handle. Next, continue to push the rod in until the mark or tape flag has made one complete revolution. Re-measure the amount of rod that is left sticking out of the barrel. Use the same reference marks as you did on the first measurement. Next, subtract this measurement from the first measurement. This number is the twist rate. For example, if the rod has 24 inches remaining at the start and 16 inches remain after making one revolution, you have 8 inches of travel, thus a 1:8″-twist barrel.
Determining Barrel Twist Rate Empirically
Twist rate is defined as the distance in inches of barrel that the rifling takes to make one complete revolution. An example would be a 1:10″ twist rate. A 1:10″ barrel has rifling that makes one complete revolution in 10 inches of barrel length. Rifle manufacturers usually publish twist rates for their standard rifle offerings and custom barrels are always ordered by caliber, contour, and twist rate. If you are having a custom barrel chambered you can ask the gunsmith to mark the barrel with the twist rate.
Shiny brass — it may not shoot more accurately, but it does make you feel better about your hand-loaded ammo. While it’s not necessary to get brass “bright and shiny” after every firing, it is a good idea to clean powder residue, grime, and grit off your brass before you run cases into sizing dies. There are many ways to clean cartridge cases. A quick wipe with solvent on a patch may suffice for recently-shot cases. Older brass with baked-on carbon may require lengthy tumbling. Ultrasonic cleaning is another popular option that gets your brass clean inside and out.
Sinclair International has a series of helpful videos on brass cleaning. These short “how-to” videos, hosted by Bill Gravatt, Sinclair’s past President and current Creedmoor Sports President, cover the various processes you can use — tumbling, ultrasonic cleaning, chemical cleaning, and cleaning by hand.
Video ONE — Cleaning Brass in Vibratory or Rotary Tumbler
TIP: Brass that has recently been shot will clean more easily than brass that has been sitting many days or weeks. If your tumbling media is fresh the job should be done in an hour or less. It’s your choice whether to tumble with primers removed or with primers still in the cases. If you choose to tumble with primers out, we suggest you deprime with a depriming die, rather that put dirty brass into your sizing die. Some people like to add a teaspoon of liquid polish to the media. This does work, cutting tumble time, and making your brass more shiny. However, if you add liquid polish, do that BEFORE you add the brass and let the tumbler run for a 15 minutes to get the polish completely mixed into the media. Otherwise you can else up with gooey gunk inside your cases — a very bad thing.
Video TWO — Ultrasonic Case Cleaning
TIP: There are many different types of solutions you can use. Soapy water suffices for some folks, particularly if you add a little Lemi-Shine. The Hornady One-Shot Sonic Clean and Lyman Turbo Sonic solutions both work well, and can be used multiple times, provided you strain the solution to remove dirt and grit after cleaning sessions. Many ultrasonic cleaning machines have timers. Experiment with dwell time to see how long you need to immerse your brass. A very small amount of Ballistol in the solution will help lubricate your necks on the inside. This can make bullet seating go more smoothly, with more consistent neck tension.
Video THREE — Chemical Cleaners (Soaking without Ultrasound)
TIP: After using chemical cleaners, such as the Iosso solution, you need to water-rinse your brass thoroughly. A kitchen strainer helps with this (see video at 0:20). Also, don’t forget your brass in the chemical solution — follow the manufacturers recommendations and don’t exceed the recommended dwell time. Chemical cleaners work surprisingly well to remove grease and grime, and the solution can be re-used multiple times. However, if you want your cases to look bright and shiny (like new brass), you will probably have to tumble. [Editor: A very effective new chemical cleaner is the Brass Monkey product from the makers of Wipe-Out and Carb-Out. Add a teaspoon to a gallon of water then soak your brass for 20-30 minutes. It really works — the cases clean up dramatically].
Video FOUR — Manual Cleaning (By Hand)
TIP: Keep some oversize patches in your range kit. At the end of your shooting sessions, wipe off your fired brass with a patch dampened with a mild, non-corrosive solvent (once again Ballistol works well). Before the carbon sets up on your brass it is very easy to remove. For tougher jobs, you can use 0000 Steel Wool (as Bill recommends in the video). You may find that timely hand-cleaning lets you avoid tumbling altogether — or you may choose to tumble (or ultra-sound) your brass only after a half-dozen or so firings.
The official first day of spring (the Vernal equinox) is just six days away. That means the spring shooting season will commence soon in most parts of the country. Before you head to the range for the first time, we recommend you do some basic tasks with your firearms. Here’s some good advice on readying your rifles for the 2025 shooting season.
by Ron Dague, Sinclair International I give my rifles a pre-season check before the shooting season starts. This starts with a general inspection starting with the butt-plate or recoil pad and making sure that all the screws and adjustable parts (on an adjustable butt-plate) move freely up or down and side to side. If you got caught in rain some of these screws and adjustable parts may not move when needed. I disassemble parts as needed and put rust preventative or a light oil and/or grease on threads and sliding parts. On rifles with recoil pads and fixed butt-plates, make sure the screws are tight and that holes in the stock aren’t stripped out. Make sure there are no cracks in the stock and around the butt-plate. If the recoil pad is glued-on, just make sure it hasn’t come loose.
Next I take the action out of the stock and check for cracks and wear marks. I look at the bedding to make sure that oils and cleaning solvents have not damaged the bedding. While the action is out of the stock, I look for any surface rust or dirt/dust in the recoil lug area and magazine well. Clean as needed and repair or re-bed if needed.
Trigger Assembly and Action With the barreled action out of the stock, it is a good time to spray out the trigger with cleaner. I use Ronson oil or lighter fluid. [Editor’s Note: Some trigger-makers advise against using any kind of lubricant, grease or oil — so plain lighter fluid is preferred.] After the trigger is cleaned you may want to check the trigger pull weight. If you don’t feel comfortable doing this, take it to a gun smith and have it checked. It is worth every penny to not have a trigger issue and/or a safety malfunction. I also take the bolt apart and clean the firing pin spring and bolt housing with Gun Scrubber or automotive brake cleaner. Then lube the firing pin-spring and firing pin with light oil. I use Kel Lube and/or Butch’s gun oil. Put a small dab of gun grease on the [bolt locking lugs] and cocking ramp.
I will also spray the outside of the action and barrel and give that a light coating of oil for rust prevention. I clean the action with Sinclair’s action cleaning tool. Don’t forget to clean the bore. Even though you didn’t fire the rifle, this makes sure nothing obstructs your barrel.
Checking Metal Fixtures and Fasteners Next I look at the trigger guard and hinged floor plate and make sure it works as designed. Make sure there are no cracks in the trigger guard from an accidental drop. Check guard screws and /or action screws for tightness and tighten to proper spec. There are torque specs for this, but on wood stocks the wood can crush and this should be checked throughout the year as weather change can affect this. My entire collection of rifles are bedded and I just tighten them just snug with screw driver or Allen wrench. The rimfire rifles have a spec of 55 to 74 inch/lbs and I think would carry over to center fire as well. I would caution you about torque wrenches as you need a good quality wrench, and read the directions on how to use it. You can over torque if not careful. Check the swivel studs and bipod to make sure there tight as well. You may want to take scope off and check the base screws and check the rings.
Test Fire the Rifle After Maintenance
After all cleaning and is done and everything is reassembled, take a few rounds out to the range and test fire to make sure everything works as it should. Don’t forget to run 3-5 rounds through the magazine at least two times for function. I look at this as preventive maintenance on the rifle. If you give it a look over you shouldn’t have any trouble during the rifle matches or hunting trip.
Ron Dague
Certified Reloading Instructor
Certified Range Safety Officer
This Article Originally Appeared in Sinclair International’s The Reloading Press.


 Sinclair International has released an interesting article about Case Concentricity* and bullet “run-out”. This instructional article by Bob Kohl explains the reasons brass can exhibit poor concentricity, and why high bullet run-out can be detrimental to accuracy.
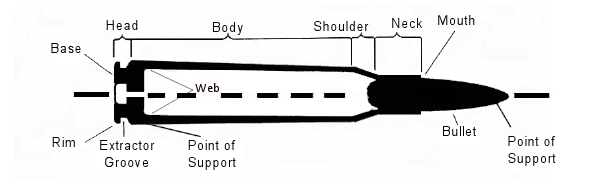

 A while back, Sinclair International’s Reloading Press Blog featured a “round-table” discussion of reloading techniques. Sinclair’s team of tech staffers were asked: “What do you feel is the one-most crucial step in precision reloading?”


 Neck-sizing dies resize only the neck of the case. The benefit of sizing only the neck is that the brass is “worked” very little, reducing the amount of changes to the brss. [We recommend full-length sizing for all applications after the first couple of firings, and semi-auto brass should be full-length sized every time!] Sinclair recommends that neck-sized-only cartridges should not be used any in other rifle besides the one they were originally fired from [unless they are also FL-sized], or in any action other than a bolt-action.


 Shiny brass — it may not shoot more accurately, but it does make you feel better about your hand-loaded ammo. While it’s not necessary to get brass “bright and shiny” after every firing, it is a good idea to clean powder residue, grime, and grit off your brass before you run cases into sizing dies. There are many ways to clean cartridge cases. A quick wipe with solvent on a patch may suffice for recently-shot cases. Older brass with baked-on carbon may require lengthy tumbling. Ultrasonic cleaning is another popular option that gets your brass clean inside and out.


 Sometimes you’ll get a barrel that doesn’t stabilize bullets the way you’d anticipate, based on the stated (or presumed) twist rate. A barrel might have 1:10″ stamped on the side but it is, in truth, a 1:10.5″ twist or even a 1:9.5″. Cut-rifled barrels, such as Kriegers and Bartleins, normally hold very true to the specified twist rate. With buttoned barrels, due to the nature of the rifling process, there’s a greater chance of a small variation in twist rate. And yes, factory barrels can be slightly out of spec as well.

 I give my rifles a pre-season check before the shooting season starts. This starts with a general inspection starting with the butt-plate or recoil pad and making sure that all the screws and adjustable parts (on an adjustable butt-plate) move freely up or down and side to side. If you got caught in rain some of these screws and adjustable parts may not move when needed. I disassemble parts as needed and put rust preventative or a light oil and/or grease on threads and sliding parts. On rifles with recoil pads and fixed butt-plates, make sure the screws are tight and that holes in the stock aren’t stripped out. Make sure there are no cracks in the stock and around the butt-plate. If the recoil pad is glued-on, just make sure it hasn’t come loose.
 With the barreled action out of the stock, it is a good time to spray out the trigger with cleaner. I use Ronson oil or lighter fluid. [Editor’s Note: Some trigger-makers advise against using any kind of lubricant, grease or oil — so plain lighter fluid is preferred.] After the trigger is cleaned you may want to check the trigger pull weight. If you don’t feel comfortable doing this, take it to a gun smith and have it checked. It is worth every penny to not have a trigger issue and/or a safety malfunction. I also take the bolt apart and clean the firing pin spring and bolt housing with Gun Scrubber or automotive brake cleaner. Then lube the firing pin-spring and firing pin with light oil. I use Kel Lube and/or Butch’s gun oil. Put a small dab of gun grease on the [bolt locking lugs] and cocking ramp.
 Next I look at the trigger guard and hinged floor plate and make sure it works as designed. Make sure there are no cracks in the trigger guard from an accidental drop. Check guard screws and /or action screws for tightness and tighten to proper spec. There are torque specs for this, but on wood stocks the wood can crush and this should be checked throughout the year as weather change can affect this. My entire collection of rifles are bedded and I just tighten them just snug with screw driver or Allen wrench. The rimfire rifles have a spec of 55 to 74 inch/lbs and I think would carry over to center fire as well. I would caution you about torque wrenches as you need a good quality wrench, and read the directions on how to use it. You can over torque if not careful. Check the swivel studs and bipod to make sure there tight as well. You may want to take scope off and check the base screws and check the rings.


