Many novice hand-loaders believe that neck bushing Inside Diameter (ID) size is the only important factor in neck tension. In fact, many different things will influence the grip on your bullet and its ability to release from the case neck. To learn more about neck tension and “case grip”, take the time to read this article carefully. We bet you’ll gain knowledge that will let you load more accurate ammo, with better ES/SD.
Editor: Guys, this is a VERY important article. You really should read it over carefully, twice. Variations in the force required to release a bullet can significantly affect accuracy and ES/SD. You really need to know how the grip on bullet can be altered by many different factors.
Neck Tension (i.e. Grip on Bullets) Is a Complex Phenomenon
While we certainly have considerable control over neck tension by using tighter or looser bushings (with smaller or bigger Inside Diameters), bushing size is only one factor at work. It’s important to understand the multiple factors that can increase or decrease the resistance to bullet release. Think in terms of overall brass-on-bullet “grip” instead of just bushing size (or the internal neck diameter in non-bushing full-length sizing dies).
Bullet grip is affected by many things, such as:
1. Neck-wall thickness.
2. Amount of bullet bearing surface (shank) in the neck.
3. Surface condition inside of neck (residual carbon can act as a lubricant; ultrasonic cleaning makes necks “grabby”).
4. Length of neck (e.g. 6mmBR neck vs. 6mm Dasher).
5. Whether or not the bullets have an anti-friction coating.
6. The springiness of the brass (which is related to degree of work-hardening; number of firings etc.)
7. The bullet jacket material.
8. The outside diameter of the bullet and whether it has a pressure ridge.
9. Time duration between bullet seating and firing (necks can stiffen with time).
10. How often the brass is annealed.
11. Amount (length) of neck sized (e.g. you can size only half the neck).
12. Interior diameter of bushing, or neck section of non-bushing die. – and there are others…
One needs to understand that bushing size isn’t the beginning and end of neck tension questions, because, even if bushing size is held constant, the amount of bullet “grip” can change dramatically as the condition of your brass changes. Bullet “grip” can also change if you alter your seating depth, and it can even change if you ultrasonically clean your cases.
6-time U.S. National Long-Range Champion John Whidden adds: “Our tests show us that the condition of the necks in regards to lubed or not, carbon inside or not, squeaky clean or not, etc., matter even more than the size of the bushing used. An ultrasonically cleaned or brand new dry case neck make for some quite high seating force.”
In our Shooters’ Forum a reader asked: “How much neck tension should I use?” This prompted a lengthy Forum discussion in which other Forum members recommended a specific number based on their experience, such as .001″, .002″, or .003″. These numbers, as commonly used, correspond to the difference between case-neck OD after sizing and the neck OD of a loaded round, with bullet in place. In other words, the numbers refer to the nominal amount of interference fit (after sizing).
While these commonly-used “tension numbers” (of .001″, .002″ etc.) can be useful as starting points, neck tension is actually a fairly complex subject. The actual amount of “grip” on the bullet is a function of many factors, of which neck-OD reduction during sizing is just one. Understanding these many factors will help you maintain consistent neck tension as your brass “evolves” over the course of multiple reloadings.
Seating Depth Changes Can Increase or Decrease Grip on Bullet
You can do this simple experiment. Seat a boat-tail bullet in your sized neck with .150″ of bearing surface (shank) in the neck. Now remove the bullet with an impact hammer. Next, take another identical bullet and seat it with .300″ of bearing surface in another sized case (same bushing size/same nominal tension). You’ll find the deeper-seated bullet is gripped much harder.
Neck-Wall Thickness is Important Too
I have also found that thinner necks, particularly the very thin necks used by many 6mm PPC benchrest shooters, require more sizing to give equivalent “grip”. Again, do your own experiment. Seat a bullet in a case turned to .008″ neckwall thickness and sized down .003″. Now compare that to a case with .014″ neckwall thickness and sized down .0015″. You may find that the bullet in the thin necks actually pulls out easier, though it supposedly has more “neck tension”, if one were to consider bushing size alone.
In practical terms, because thick necks are less elastic than very thin necks, when you turn necks you may need to run tighter bushings to maintain the same amount of actual grip on the bullets (as compared to no-turn brass). Consequently, I suspect the guys using .0015″ “tension” on no-turn brass may be a lot closer to the guys using .003″ “tension” on turned necks than either group may realize.
Toward a Better Definition of Neck Tension
As a convenient short-cut, we tend to describe neck tension by bushing size alone. When a guy says, “I run .002 neck tension”, that normally means he is using a die/bushing that sizes the necks .002″ smaller than a loaded round. Well we know something about his post-sizing neck OD, but do we really have a reliable idea about how much force is required to release his bullets? Maybe not… This use of the term “neck tension” when we are really only describing the amount of neck diameter reduction with a die/bushing is really kind of incomplete.
My point here is that it is overly simplistic to ask, “should I load with .001 tension or .003?” In reality, an .001″ reduction (after springback) on a thick neck might provide MORE “grip” on a deep-seated bullet than an .003″ reduction on a very thin-walled neck holding a bullet with minimal bearing surface in the neck. Bushing ID is something we can easily measure and verify. We use bushing size as a descriptor of neck tension because it is convenient and because the other important factors are hard to quantify. But those factors shouldn’t be ignored if you want to maintain consistent neck tension for optimal accuracy.
Consistency and accuracy — that’s really what this all about isn’t it? We want to find the best neck tension for accuracy, and then maintain that amount of grip-on-bullet over time. To do that you need to look not only at your bushing size, but also at how your brass has changed (work-hardened) with time, and whether other variables (such as the amount of carbon in the neck) have changed. Ultimately, optimal neck tension must be ascertained experimentally. You have to go out and test empirically to see what works, in YOUR rifle, with YOUR bullets and YOUR brass. And you may have to change the nominal tension setting (i.e. bushing size) as your brass work-hardens or IF YOU CHANGE SEATING DEPTHS.
Remember that bushing size alone does not tell us all we need to know about the neck’s true “holding power” on a bullet, or the energy required for bullet release. True bullet grip is a more complicated phenomenon, one that is affected by numerous factors, some of which are very hard to quantify.
Sometimes you’ll get a barrel that doesn’t stabilize bullets the way you’d anticipate, based on the stated (or presumed) twist rate. A barrel might have 1:10″ stamped on the side but it is, in truth, a 1:10.5″ twist or even a 1:9.5″. Cut-rifled barrels, such as Kriegers and Bartleins, normally hold very true to the specified twist rate. With buttoned barrels, due to the nature of the rifling process, there’s a greater chance of a small variation in twist rate. And yes, factory barrels can be slightly out of spec as well.
After buying a new barrel, you should determine the true twist rate BEFORE you start load development. You don’t want to invest in a large supply of expensive bullets only to find that that won’t stabilize because your “8 twist” barrel is really a 1:8.5″. Sinclair International provides a simple procedure for determining the actual twist rate of your barrel.
Sinclair’s Simple Twist Rate Measurement Method
If are unsure of the twist rate of the barrel, you can measure it yourself in a couple of minutes. You need a good cleaning rod with a rotating handle and a jag with a fairly tight fitting patch. Utilize a rod guide if you are accessing the barrel through the breech or a muzzle guide if you are going to come in from the muzzle end. Make sure the rod rotates freely in the handle under load. Start the patch into the barrel for a few inches and then stop. Put a piece of tape at the back of the rod by the handle (like a flag) or mark the rod in some way. Measure how much of the rod is still protruding from the rod guide. You can either measure from the rod guide or muzzle guide back to the flag or to a spot on the handle.
Next, continue to push the rod in until the mark or tape flag has made one complete revolution. Then re-measure the amount of rod that is left sticking out of the barrel. Use the same reference marks as you did on the first measurement. Next, subtract this measurement from the first measurement. This number is the twist rate. For example, if the rod has 24 inches remaining at the start and 16 inches remain after making one revolution, you have 8 inches of travel, thus a 1:8″-twist barrel.
Determining Barrel Twist Rate Empirically
Twist rate is defined as the distance in inches of barrel that the rifling takes to make one complete revolution. An example would be a 1:10″ twist rate. A 1:10″ barrel has rifling that makes one complete revolution in 10 inches of barrel length. Rifle manufacturers usually publish twist rates for their standard rifle offerings and custom barrels are always ordered by caliber, contour, and twist rate. If you are having a custom barrel chambered you can ask the gunsmith to mark the barrel with the twist rate.
When shooting targets, the closer to the center the better the result. But this is not necessarily true when it comes to using jags and patches. There are some good reasons to try spiking your patches away from the center. This Creedmoor Sports Tech Tip explains why you may want to spike (puncture) your patch away from the center. CLICK HERE to order patches and Swab-Its cleaning bore tips from Creedmoor Sports.
You begin to push your first patch down the barrel and you notice it is extremely tight and then it jams! How can this be? A commonly overlooked solution to remedy the frustrating occurrences of overly tight or jammed patches is what we like to call “Side-Spiking”. Side-Spiking is super simple and works!
“Side-Spiking”, as the words suggest, refers to moving your patch spiking position from the center of the patch towards the corner of a square patch or the edge of a round patch.
Moving From Center-Spiking To Side-Spiking
The closer toward the edge of the patch you spike your jag, the looser the patch will be when pushed down the bore.
Important: Be careful to not go to the very edge of the patch. Leave enough patch material to fully cover the first set of rings on your jag as this insures your jag is properly centered in the bore and that no contact with the rifling will occur.
Proper Side-Spiking Location Creedmoor Sports recommends side spiking all wet patches. This allows for a looser patch in the bore which removes gross powder fouling and leaves more cleaning solution behind to start working on the remaining fouling.
When a tighter patch is needed, simply move your spike closer toward the center of the patch. The closer to the center of the patch you get, the tighter the patch will become in the bore. The objective is to have a snug-fitting patch that allows you to smoothly push your rod down the bore. Remember you do not need to end up in the center of the patch!
Bore-Tech Patch Size Selection Chart Recommends Patch Sizes by Caliber:
What is Parallax?
Parallax is the apparent movement of the scope’s reticle (cross-hairs) in relation to the target as the shooter moves his eye across the exit pupil of the riflescope. This is caused by the target and the reticle being located in different focal planes.
Here’s a good explanation of scope parallax. This video has been watched over 790,000 times.
Why is it Important?
The greater the distance to the target and magnification of the optic, the greater the parallax error becomes. Especially at longer distances, significant sighting error can result if parallax is not removed.
How to Remove Parallax
This Nightforce Tech Tip video quickly shows how to remove parallax on your riflescope.
While keeping the rifle still and looking through the riflescope, a slight nod of the head up and down will quickly determine if parallax is present. To remove parallax, start with the adjustment mechanism on infinity and rotate until the reticle remains stationary in relation to the target regardless of head movement. If parallax has been eliminated, the reticle will remain stationary in relation to the target regardless of eye placement behind the optic.
When shooting groups at long range on paper it can be difficult to distinguish which bullet holes belong to a particular sequence of shots. If, for example, you shot three 5-shot groups at 600+ yards on a paper target, you would have 15 bullet holes on the target (assuming no misses). But at that distance it would be difficult to see the holes on target (even with a spotting scope). Accordingly, when you inspected the target up close, it would be hard to tell which shots belonged to which group. You might have a vague idea, but couldn’t be sure, without a target camera recording the shot sequence.
Here is a method to separate multiple shots into specific groups so you can better evaluate your load and shooting skills. The trick is pretty simple — mark your bullets with a color from a Sharpie or other felt marking pen. If you are shooting three 5-shot groups, mark five with red, five with green, and five with blue (or purple). Then, when you inspect the target, you can identify the group placements by the colors that appear on the paper.
Round Robin: Using colors you can shoot “Round-Robin” to evaluate seating depths, neck tension, or other variables without having the shot order (and barrel heating) affect group sizes unequally. For example you might have three different neck tensions, each marked with a different color on the bullets. Then shoot Red, Blue, Green in that sequence for five total shots per color.
Smart Tip to Show Colors More Vividly
If the bullet inks are not showing up on your target paper clearly, here is a simple trick that can make the colors “bleed” to be more visible. In your range kit, bring some alcohol solution along with some Q-tips. Then dab the shots on the paper target lightly with wet Q-Tips. Here is the front of a target before and after application of alcohol:
Forum Member NewbieShooter explains: “Dabbing a bit of alcohol on the bullet holes with Q-Tips makes the color pop a bit… especially on the back side.” See below:
In short order you will see the colors spread into the paper, clearly marking the shot holes by distinguishing colors. If you were shooting a dark bullseye, view the the BACK side of the target to see the colors on a light background.
Credits: Bullet Tips photo by Forum Member Dave Way; Target photos by Forum Member NewbieShooter; Story tip from Boyd Allen.
When shooting targets, the closer to the center the better the result. But this is not necessarily true when it comes to using jags and patches. There are some good reasons to try spiking your patches away from the center. This Creedmoor Sports Tech Tip explains why you may want to spike (puncture) your patch away from the center. CLICK HERE to order patches and Swab-Its cleaning bore tips from Creedmoor Sports.
You begin to push your first patch down the barrel and you notice it is extremely tight and then it jams! How can this be? A commonly overlooked solution to remedy the frustrating occurrences of overly tight or jammed patches is what we like to call “Side-Spiking”. Side-Spiking is super simple and works!
“Side-Spiking”, as the words suggest, refers to moving your patch spiking position from the center of the patch towards the corner of a square patch or the edge of a round patch.
Moving From Center-Spiking To Side-Spiking
The closer toward the edge of the patch you spike your jag, the looser the patch will be when pushed down the bore.
Important: Be careful to not go to the very edge of the patch. Leave enough patch material to fully cover the first set of rings on your jag as this insures your jag is properly centered in the bore and that no contact with the rifling will occur.
Proper Side-Spiking Location Creedmoor Sports recommends side spiking all wet patches. This allows for a looser patch in the bore which removes gross powder fouling and leaves more cleaning solution behind to start working on the remaining fouling.
When a tighter patch is needed, simply move your spike closer toward the center of the patch. The closer to the center of the patch you get, the tighter the patch will become in the bore. The objective is to have a snug-fitting patch that allows you to smoothly push your rod down the bore. Remember you do not need to end up in the center of the patch!
Bore-Tech Patch Size Selection Chart Recommends Patch Sizes by Caliber:
What is Parallax?
Parallax is the apparent movement of the scope’s reticle (cross-hairs) in relation to the target as the shooter moves his eye across the exit pupil of the riflescope. This is caused by the target and the reticle being located in different focal planes.
Why is it Important?
The greater the distance to the target and magnification of the optic, the greater the parallax error becomes. Especially at longer distances, significant sighting error can result if parallax is not removed.
How to Remove Parallax
This Nightforce Tech Tip video quickly shows how to remove parallax on your riflescope.
While keeping the rifle still and looking through the riflescope, a slight nod of the head up and down will quickly determine if parallax is present. To remove parallax, start with the adjustment mechanism on infinity and rotate until the reticle remains stationary in relation to the target regardless of head movement. If parallax has been eliminated, the reticle will remain stationary in relation to the target regardless of eye placement behind the optic.
Many novice hand-loaders believe that neck bushing Inside Diameter (ID) size is the only important factor in neck tension. In fact, many different things will influence the grip on your bullet and its ability to release from the case neck. To learn more about neck tension and “case grip”, take the time to read this article carefully. We bet you’ll gain knowledge that will let you load more accurate ammo, with better ES/SD.
Editor: Guys, this is a VERY important article. You really should read it over carefully, twice. Variations in the force required to release a bullet can significantly affect accuracy and ES/SD. You really need to know how the grip on bullet can be altered by many different factors.
Neck Tension (i.e. Grip on Bullets) Is a Complex Phenomenon
While we certainly have considerable control over neck tension by using tighter or looser bushings (with smaller or bigger Inside Diameters), bushing size is only one factor at work. It’s important to understand the multiple factors that can increase or decrease the resistance to bullet release. Think in terms of overall brass-on-bullet “grip” instead of just bushing size (or the internal neck diameter in non-bushing full-length sizing dies).
Bullet grip is affected by many things, such as:
1. Neck-wall thickness.
2. Amount of bullet bearing surface (shank) in the neck.
3. Surface condition inside of neck (residual carbon can act as a lubricant; ultrasonic cleaning makes necks “grabby”).
4. Length of neck (e.g. 6mmBR neck vs. 6mm Dasher).
5. Whether or not the bullets have an anti-friction coating.
6. The springiness of the brass (which is related to degree of work-hardening; number of firings etc.)
7. The bullet jacket material.
8. The outside diameter of the bullet and whether it has a pressure ridge.
9. Time duration between bullet seating and firing (necks can stiffen with time).
10. How often the brass is annealed.
11. Amount (length) of neck sized (e.g. you can size only half the neck).
12. Interior diameter of bushing, or neck section of non-bushing die. – and there are others…
One needs to understand that bushing size isn’t the beginning and end of neck tension questions, because, even if bushing size is held constant, the amount of bullet “grip” can change dramatically as the condition of your brass changes. Bullet “grip” can also change if you alter your seating depth, and it can even change if you ultrasonically clean your cases.
6-time U.S. National Long-Range Champion John Whidden adds: “Our tests show us that the condition of the necks in regards to lubed or not, carbon inside or not, squeaky clean or not, etc., matter even more than the size of the bushing used. An ultrasonically cleaned or brand new dry case neck make for some quite high seating force.”
In our Shooters’ Forum a reader asked: “How much neck tension should I use?” This prompted a lengthy Forum discussion in which other Forum members recommended a specific number based on their experience, such as .001″, .002″, or .003″. These numbers, as commonly used, correspond to the difference between case-neck OD after sizing and the neck OD of a loaded round, with bullet in place. In other words, the numbers refer to the nominal amount of interference fit (after sizing).
While these commonly-used “tension numbers” (of .001″, .002″ etc.) can be useful as starting points, neck tension is actually a fairly complex subject. The actual amount of “grip” on the bullet is a function of many factors, of which neck-OD reduction during sizing is just one. Understanding these many factors will help you maintain consistent neck tension as your brass “evolves” over the course of multiple reloadings.
Seating Depth Changes Can Increase or Decrease Grip on Bullet
You can do this simple experiment. Seat a boat-tail bullet in your sized neck with .150″ of bearing surface (shank) in the neck. Now remove the bullet with an impact hammer. Next, take another identical bullet and seat it with .300″ of bearing surface in another sized case (same bushing size/same nominal tension). You’ll find the deeper-seated bullet is gripped much harder.
Neck-Wall Thickness is Important Too
I have also found that thinner necks, particularly the very thin necks used by many 6mm PPC benchrest shooters, require more sizing to give equivalent “grip”. Again, do your own experiment. Seat a bullet in a case turned to .008″ neckwall thickness and sized down .003″. Now compare that to a case with .014″ neckwall thickness and sized down .0015″. You may find that the bullet in the thin necks actually pulls out easier, though it supposedly has more “neck tension”, if one were to consider bushing size alone.
In practical terms, because thick necks are less elastic than very thin necks, when you turn necks you may need to run tighter bushings to maintain the same amount of actual grip on the bullets (as compared to no-turn brass). Consequently, I suspect the guys using .0015″ “tension” on no-turn brass may be a lot closer to the guys using .003″ “tension” on turned necks than either group may realize.
Toward a Better Definition of Neck Tension
As a convenient short-cut, we tend to describe neck tension by bushing size alone. When a guy says, “I run .002 neck tension”, that normally means he is using a die/bushing that sizes the necks .002″ smaller than a loaded round. Well we know something about his post-sizing neck OD, but do we really have a reliable idea about how much force is required to release his bullets? Maybe not… This use of the term “neck tension” when we are really only describing the amount of neck diameter reduction with a die/bushing is really kind of incomplete.
My point here is that it is overly simplistic to ask, “should I load with .001 tension or .003?” In reality, an .001″ reduction (after springback) on a thick neck might provide MORE “grip” on a deep-seated bullet than an .003″ reduction on a very thin-walled neck holding a bullet with minimal bearing surface in the neck. Bushing ID is something we can easily measure and verify. We use bushing size as a descriptor of neck tension because it is convenient and because the other important factors are hard to quantify. But those factors shouldn’t be ignored if you want to maintain consistent neck tension for optimal accuracy.
Consistency and accuracy — that’s really what this all about isn’t it? We want to find the best neck tension for accuracy, and then maintain that amount of grip-on-bullet over time. To do that you need to look not only at your bushing size, but also at how your brass has changed (work-hardened) with time, and whether other variables (such as the amount of carbon in the neck) have changed. Ultimately, optimal neck tension must be ascertained experimentally. You have to go out and test empirically to see what works, in YOUR rifle, with YOUR bullets and YOUR brass. And you may have to change the nominal tension setting (i.e. bushing size) as your brass work-hardens or IF YOU CHANGE SEATING DEPTHS.
Remember that bushing size alone does not tell us all we need to know about the neck’s true “holding power” on a bullet, or the energy required for bullet release. True bullet grip is a more complicated phenomenon, one that is affected by numerous factors, some of which are very hard to quantify.
On Wednesdays, the U.S. Army Marksmanship Unit often publishes a reloading “how-to” article on the USAMU Facebook page. One “Handloading Hump Day” post covered bore-cleaning, specifically the use of pull-through style bore-snakes. Visit the USAMU Facebook page each Wednesday for other helpful tips.
Today, we’ll shift from handloading to rifle bore cleaning and maintenance, with information courtesy of the USAMU’s Custom Firearms Shop. We recently had some inquiries about bore cleaning, and this seems a good opportunity to share. After all, even the best handloads won’t yield their full potential in a poorly-cleaned and maintained rifle.
NOTE: Hoppes claims a trademark on the term “BoreSnake” (one word, no hyphen). For this article, the USAMU has used the term in hyphenated form, two words. We believe the USAMU is referring to a Hoppes Brand Boresnake, not a different bore cleaning rope.
BORE-SNAKES: MIRACLE REPLACEMENT FOR THE CLEANING ROD?
The experiences of both our firearms test specialist and this writer have given no evidence that proper use of a clean bore-snake will damage a match barrel. Of course, one does not pull the bore-snake at an angle to the crown when removing it — pull it straight out, parallel to the bore’s direction, to prevent crown wear over time.
Bore-snakes are very useful for some applications (primarily a hasty, interim wipe-down). In [my] experience they cannot replace a thorough cleaning with a proper rod and brushes. While the experiment cited here involves rimfire, it may help illustrate. Several years ago, the writer used his new, personal Anschutz to investigate the bore-snake issue. It had been fired ~350 rds with match ammo and had had 3 typical rod/brush cleanings.
Next, starting with a clean bore, the writer fired 300 more rounds without cleaning in order to build up a “worst-case” fouling condition. Afterwards, the writer examined the bore with a Hawkeye bore scope. There was a uniform, grey film down the entire barrel, with some small, intermittent lead build-up at and just forward of the throat.
Some bore-cleaning rope products feature separate, detachable bronze brush and bore mop segments. This allows more usage options (e.g. mop only), and makes it easier to clean the brush elements:
A new bore-snake was then wet with solvent and pulled through the bore. The Hawkeye revealed that the grey fouling was gone, and much of the visible fouling at the throat was reduced. However, nine more passes with the bore-snake, checking after each with the Hawkeye, revealed no further improvement in cleaning. The writer then cleaned with two wet patches, observed, then one stroke of a new, wet bronze brush, and one wet patch to clean out residue.
The Hawkeye showed a significant reduction in fouling at the throat; it was virtually gone. A second pass with a wet bronze brush and a wet patch removed the remaining fouling. Scrubbing the bore further, checking to see how much fouling was removed, revealed no significant improvement. The reason for this test was to learn what’s needed to get (and keep) this Anschutz clean with minimal cleaning rod use — and thus, minimal risk of bore damage/wear. Leaving fouling in the bore promotes corrosion over time.
Obviously, this applies to a nice, smooth rimfire match barrel, using good, well lubed ammo. It doesn’t apply directly to the use of copper-jacketed bullets, which leave a stubborn fouling all their own. However, it does suggest that while the bore-snake can be helpful and a useful field-expedient, to truly clean a rifle barrel one will still need a good quality rod, bronze brush and solvents. [Editor: Add a good-fitting cleaning rod bore guide.]
SO, WHAT ABOUT BORE SNAKES FOR BARREL BREAK-IN?
The goal of barrel break-in is to fire each shot through a clean barrel, preventing copper buildup and allowing the bullets their best chance at burnishing sharp edges. Thus, it seems this purpose would be best served by one’s usual rods, brushes and rod guides.
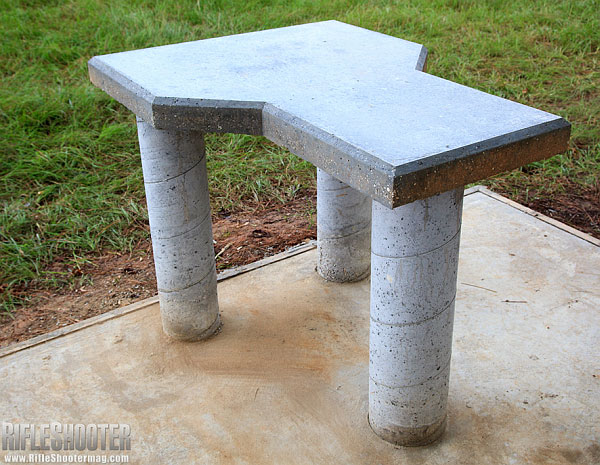
Who hasn’t dreamed of having a professional-quality, permanent shooting bench on their own property? Well here’s an article that can help you make that dream come true. This “how-to” feature from the archives of RifleShooter Magazine shows how to build a quality concrete shooting bench step-by-step.
All aspects of the construction process are illustrated and explained. The author, Keith Wood explains: “Construction happened in three phases — first creating the slab foundation, then the support pillars (legs), and finally the table.”
Click image below to load article with slide show.
Each step in the process is illustrated with a large photo and descriptive paragraph. Starting with framing the foundation (Step 1), the article illustrates and explains the 15 Steps that produce the finished, all-concrete bench (see top photo).


 In our Shooters’ Forum a reader asked: “How much neck tension should I use?” This prompted a lengthy Forum discussion in which other Forum members recommended a specific number based on their experience, such as .001″, .002″, or .003″. These numbers, as commonly used, correspond to the difference between case-neck OD after sizing and the neck OD of a loaded round, with bullet in place. In other words, the numbers refer to the nominal amount of interference fit (after sizing).
 Neck-Wall Thickness is Important Too
 Sometimes you’ll get a barrel that doesn’t stabilize bullets the way you’d anticipate, based on the stated (or presumed) twist rate. A barrel might have 1:10″ stamped on the side but it is, in truth, a 1:10.5″ twist or even a 1:9.5″. Cut-rifled barrels, such as Kriegers and Bartleins, normally hold very true to the specified twist rate. With buttoned barrels, due to the nature of the rifling process, there’s a greater chance of a small variation in twist rate. And yes, factory barrels can be slightly out of spec as well.
 “Side-Spiking”, as the words suggest, refers to moving your patch spiking position from the center of the patch towards the corner of a square patch or the edge of a round patch.


 Bore-snakes are very useful for some applications (primarily a hasty, interim wipe-down). In [my] experience they cannot replace a thorough cleaning with a proper rod and brushes. While the experiment cited here involves rimfire, it may help illustrate. Several years ago, the writer used his new, personal Anschutz to investigate the bore-snake issue. It had been fired ~350 rds with match ammo and had had 3 typical rod/brush cleanings.