Put the same load in a variety of barrels (with the same length and chamberings) and you’ll see a wide variance in muzzle velocity. In fact, it’s not unusual to see up to 100 fps difference from one barrel to the next. We demonstrated this with a comparison test of Lapua factory ammo.
Chron Testing Lapua Factory Ammo
At our Southern California test range, we chronographed Lapua 105gr 6mmBR factory ammo in three different 8-twist barrels of similar length. The results were fascinating. Lapua specs this ammo at 2790 fps, based on Lapua’s testing with its own 26″ test barrel. We observed a speed variance of 67 fps based on tests with three aftermarket barrels.
Brand ‘S’ and Brand ‘PN’ were pre-fit barrels shot on Savage actions. Brand ‘K’ was fitted to a custom action. All test barrels were throated for the 100-108 grain bullets, though there may have been some slight variances in barrel freebore. With a COAL of 2.330″, the rounds were “jumping” to the rifling in all barrels. Among the four barrels, Brand ‘PN’ was the fastest at 2824 fps average — 67 fps faster than the slowest barrel. Roughly 10 fps can be attributed to the slightly longer length (27″ vs. 26″), but otherwise this particular barrel was simply faster than the rest. (Click Here for results of 6mmBR Barrel Length Velocity Test).
Results Are Barrel-Specific, Not Brand-Specific
These tests demonstrate that the exact same load can perform very differently in different barrels. We aren’t publishing the barrel-makers’ names, because it would be wrong to assume that ‘Brand X’ is always going to be faster than ‘Brand Y’ based on test results from a single barrel. In fact, velocities can vary up to 100 fps with two identical-spec barrels from the SAME manufacturer. That’s right, you can have two 8-twist, 26″ barrels, with the same land-groove configuration and contour, from the same manufacturer, and one can be much faster than another.
Don’t Demand More Than Your Barrel Can Deliver
We often hear guys lament, “I don’t get it… how can you guys get 2900 fps with your 6BRs and I can only get 2840?” The answer may simply be that the barrel is slower than average. If you have a slow barrel, you can try using more powder, but there is a good chance it may never run as fast as an inherently fast barrel. You shouldn’t knock yourself out (and over-stress your brass) trying to duplicate the velocities someone else may be getting. You need to work within the limits of your barrel.
Factory Ammo Provides a Benchmark If you have a .223 Rem, 6BR, .243 Win, 6.5×47 Lapua, 6.5×55, .308 Win, 30-06, or 300 WM Rifle, we recommend you buy a box of Lapua factory-loaded ammo. This stuff will shoot great (typically around half-MOA), and it can give you a baseline to determine how your barrel stacks up speedwise. When you complete a new 6BR rifle, it’s wise to get a box of the factory ammo and chronograph it. That will immediately give you a good idea whether you have a slow, average, or fast barrel. Then you can set your velocity goals accordingly. For example, if the factory 6BR ammo runs about 2780-2790 fps in your gun, it has an average barrel. If it runs 2820+ in a 26″ barrel (or 2835 fps in a 28″), you’ve got a fast tube.
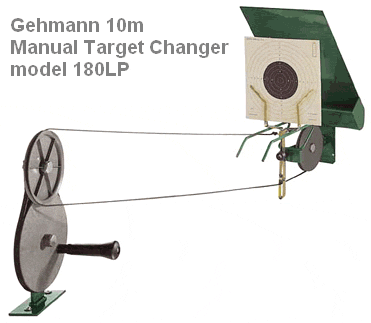
The great thing about shooting a precision air rifle is that you can practice indoors, for example in your garage or basement. All you need is a lighted room with an uninterrupted run of 10 meters (32.8 feet) and a secure backstop. Champion’s Choice, www.champchoice.com, has a neat, turn-key solution for Airgun shooters. The Gehmann 10 meter Target Set (item 180LP) offers everything you need for your own 10 meter shooting station. The set includes:
– Target holder (attaches to transport lines)
– Pellet trap with transporter wheel
– Transporter drive and cables
– Crank Drive wheel, v-belt, and mount
You can place the pellet trap against any solid backstop, and mount the drive wheel to a secure bench or platform at a convenient height. The entire manual system shown above costs $175.00. Note, Gehmann also makes a motorized 10m airgun target changer (model 182). It’s made for 230v only, and to get one in the USA, you’d probably have to special order it. Still, it’s pretty slick as you can see:
Better Targets for Better Airgun Scores
Champion’s Choice and PilkGuns.com also sell German-made Edelmann 10m air rifle and air pistol targets, the best available. These high-grade targets are printed on the finest cross-grain card stock so pellets punch clean, clear holes. This allows easier, more reliable scoring.
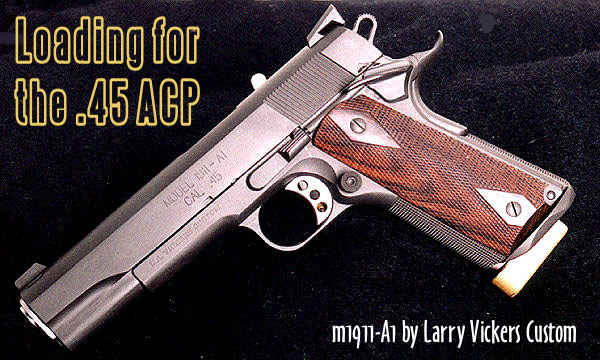
Man does not live by long-guns alone. We know that many of our readers own .45 ACP handguns and load for this extremely accurate “classic” cartridge. When selecting a powder for the .45 ACP, there are many good options. All the major powder manufacturers make propellants with appropriate density and burn rate characteristics for the .45 ACP. Popular choices include: AA #5 (Accurate Powder); Bullseye (Alliant); Clays, HP-38, and Titegroup (Hodgdon); VV N310 and N320 (Vihtavuori); and WW 231 and WST (Winchester). We’ve tried all those powders in a variety of .45 ACP handguns. When we consider all the factors that make for a good pistol powder, we think N320 is one of the best available propellants for the .45 ACP. Vihtavuori N320 is very accurate, it meters well, and it burns clean, with minimal smoke and flash. If you haven’t tried VV N320 yet, you should.
Pros and Cons of Different Powders for the .45 ACP
This Editor has personally tried out eight or more different powders for the .45 ACP. Bullseye works but it is very dirty (both smoke out the barrel and sooty powder fouling on case). Though it otherwise burns clean, Titegroup leaves a singular (and nasty) high-temp flame streak on your brass that is hard to remove. AA #5 is a good choice for progressive press newbies as you use more powder so a double charge will (usually) be obvious. I like AA #5 but N320 was more accurate. Clays burns clean but some powder measures struggle with flake powders like this. WW 231 offered excellent accuracy and metered well, but it kicked out sparks with little pieces of debris that would hit me in the face. Who wants that?
I personally tried all the powders listed above with lead, plated, and jacketed bullets. After testing for accuracy, consistency, and ease of metering, I selected VV N320 as the best overall performer.
Vihtavuori N320
No powder tested was more accurate (WW 231 was equally accurate).
Meters very well in all kinds of powder measures.
Produces very little smoke from muzzle.
Does not put nasty burn streak on brass like Tite-Group does.
Low Flash — you don’t get particles and sparks flying out like WW 231.
Cases come out from gun very clean — so you can tumble less often.
Forum member and gunsmith Michael Ezell agrees that N320 is a good choice for the .45 ACP. Mike has also found that WW 231, while accurate, produces sparks and a large flash. Mike writes: “I first started using N320 after my first night shoot, while shooting IDPA/IPSC matches. It was astonishing how much of a fireball the WW 231 created. I was literally blinded by the flash while trying to shoot a match. As you can imagine, that didn’t work out very well. I went from WW 231 to N320 and never looked back…and the flash from it was a fraction of what a kid’s sparkler would give off. I have nothing but good things to say about [N320] after using both. Night shoots are a real eye-opener! When it comes to a personal protection… there is, statistically, a very high chance that if you ever have to use a gun to protect yourself or your family, it’ll be in the darkness[.] Being blinded by muzzle flash (and deafened by the noise) are things that should be considered, IMO.”
This Editor owns a full-size, all-stainless S&W 1911. After trying numerous powders, I found VV N320 delivered the best combination of accuracy, easy metering, consistency, clean burning qualities, and low muzzle flash. My gun has proven exceptionally accurate using N320 with bullets from 180 grains to 230 grains — it will shoot as accurately as some expensive customs I’ve tried. At right is 5-round group I shot offhand at 10 yards with my 5″ S&W 1911. The bullet hole edges are sharp because I was using semi-wad-cutters. Rounds were loaded with Vihtavuori N320 and 200-grain SWCs from Precision Bullets in Texas.
The Hornady Handbook of Cartridge Reloading (9th Edition) will be available December 1st, 2012. The latest edition of this popular resource offers over 900 pages worth of reloading data covering 233 different cartridge types, 146 powders, and 304 bullet designs. Each cartridge write-up includes applicable Hornady bullets along with velocity and powder charts.
What’s New in 9th Edition New Cartridge Types — Cartridge additions include the 17 Hornet, 327 Federal Mag, 356 Winchester, 5.56 NATO, 416 Barrett, and 505 Gibbs. There is also expanded data on over 20 favorites like the 223 Rem, 300 Whisper/AAC Blackout, 308 Win, 25-06 Rem, 257 Wby Mag and many more.
New Powders — A variety of propellants such as Power Pro Varmint, AR-Comp, CFE-223, among others have been added to many popular cartridges.
New Bullets — The Handbook includes data on newer Hornady bullets like the MonoFlex, NTX, GMX and FTX, plus longtime favorites like the V-MAX™, SST, InterBond, InterLock, A-MAX, XTP.
The 9th Edition Hornady Handbook of Cartridge Reloading is worth adding to your library of reloading resources. In addition to comprehensive reloading charts, the Handbook provides in-depth, easy-to-understand explanations of internal, external and terminal ballistics. For further information regarding Hornady® products, visit the company web site at http://hornady.com.
Kowa Sporting Optics now offers a DigiScoping adapter for the iPhone 4 and 4S models. Kowa’s TSN-IP4S iPhone adapter comes with two standard rings, one for the 880/770 series scopes and one for the BD/SV/YF series of binoculars. Similar in design to Meopta’s Digiscoping adapter released last year, the Kowa product holds an iPhone securely and attaches to the rear ocular of a spotting scope (or binoculars) using a cylindrical sleeve (aka lens ring). Crafted from aluminum, the precision-fit Kowa lens rings are coated with a soft material so they won’t mar your eyepiece(s).
The Kowa adapter comes with two standard rings, one for the 88/77 series scopes and one for the BD/SV/YF series of binoculars. Additional adapter rings for the Genesis 33 and 44 series of binoculars and TSN 660/600/82SV spotting scope eyepieces (except long eye-relief eyepieces) and 21x, 32x, and 50x High Lander eyepieces may be purchased separately. The lightweight adapter is made of an epoxy resin material that will not damage the finish of your iPhone.
For more information, visit the Kowa’s Digiscoping Webpage. Watch the video below to see how the Adapter holds the iPhone on spotting scopes.
Some of our readers have questioned how to set up their body dies or full-length sizing dies. Specifically, AFTER sizing, they wonder how much resistance they should feel when closing their bolt.
Forum member Preacher explains:
“A little resistance is a good, when it’s time for a big hammer it’s bad…. Keep your full-length die set up to just bump the shoulder back when they get a little too tight going into the chamber, and you’ll be good to go.”
To quantify what Preacher says, for starters, we suggest setting your body die, or full-length sizing die, to have .0015″ of “bump”. NOTE: This assumes that your die is a good match to your chamber. If your sizing or body die is too big at the base you could push the shoulder back .003″ and still have “sticky case” syndrome. Also, the .0015″ spec is for bolt guns. For AR15s you need to bump the shoulder of your cases .003″ – .005″, for enhanced reliability. For those who have never worked with a body die, bump die, or Full-length sizing die, to increase bump, you loosen lock-ring and screw the die in further (move die down relative to shell-holder). A small amount (just a few degrees) of die rotation can make a difference. To reduce bump you screw the die out (move die up). Re-set lock-ring to match changes in die up/down position.
That .0015″ is a good starting point, but some shooters prefer to refine this by feel. Forum member Chuckhunter notes: “To get a better feel, remove the firing pin from your bolt. This will give you the actual feel of the case without the resistance of the firing pin spring. I always do this when setting up my FL dies by feel. I lock the die in when there is just the very slightest resistance on the bolt and I mean very slight.” Chino69 concurs: “Remove the firing pin to get the proper feel. With no brass in the chamber, the bolt handle should drop down into its recess from the full-open position. Now insert a piece of fire-formed brass with the primer removed. The bolt handle should go to the mid-closed position, requiring an assist to cam home. Do this several times to familiarize yourself with the feel. This is how you want your dies to size your brass, to achieve minimal headspace and a nearly glove-like fit in your chamber.”
We caution that, no matter how well you have developed a “feel” for bolt-closing resistance, once you’ve worked out your die setting, you should always measure the actual amount of shoulder bump to ensure that you are not pushing the shoulder too far back. This is an important safety check. You can measure this using a comparator that attaches to your caliper jaws, or alternatively, use a sized pistol case with the primer removed. See Poor Man’s Headspace Gauge.
Story by NRAHuntersRights.org and NRAblog.com
Shown above is the Belfast Wildlife Area rifle range in Kindards, South Carolina. Belfast was the first public, unmanned shooting range opened and paid for completely with funds raised by NRA Grants and the Wildlife and Sportfish Restoration Program … an act made possible through Pittman-Robertson grants. Several other state Natural Resource Departments have followed suit. Such facilities provide hunters and shooters with a convenient, low cost location to sight in firearms and practice shooting. Now that may be in jeopardy.
In the article below, NRAHuntersRights.org Managing Editor J.R. Robbins explains why government funding for Public Shooting Ranges is threatened:
OMB Threatens to Freeze Pittman-Robertson Funds
Sportsmen nationwide should be aware of a recently released report from the White House Office of Management and Budget that itemizes $31 million in Pittman-Robertson funds to be “sequestered” from the U.S. budget. Sequestration sets aside funding–effectively “freezing” it — until a debt is repaid.
The listing of the P-R funding (as well as $34 million of Dingell-Johnson funds that support sport fishing) is part of a huge package of across-the-board government budget reductions planned to take effect January 2, 2013, unless Congress can develop a plan to cut $1.2 trillion over the next decade.
This year is the 75th anniversary of the Pittman-Robertson Act, more formally known as the Federal Aid in Wildlife Restoration Act. As most hunters know, the act put an 11 percent excise tax on rifles, shotguns, ammunition and archery equipment that is distributed to state game and fish agencies for the purposes of habitat acquisition and improvement, reintroduction of declining species, wildlife research, hunter education, shooting range development and other conservation projects. (The tax on handguns is 10 percent.)
It is this funding and these projects that have brought back species such as whitetail deer, turkeys, wood ducks, antelope, bald eagles and Canada geese from dangerously low levels a century ago to the strong, sustainable populations we see today. Hunters’ dollars are directly responsible for these and other conservation milestones.
Since 1937, hunters have contributed nearly $7 billion dollars through the Pittman-Robertson Act for the benefit of wildlife conservation. For any given project, P-R funding pays 75 percent of costs, and states must contribute at least 25 percent–most of which comes from hunting license fees …
Part of the Precision Rifle Series, the GAP Grind is one of the premier precision tactical matches of the year. Top tactical shooters from around the country will compete for glory (and $100,000 worth of prizes) in this year’s GAP Grind, hosted at the K&M Precision Rifle Training Center in Baker, Florida. The GAP Grind is a notoriously challenging, “high tempo” match with minimal “down time” between stages. The course of fire involves multiple stages, with an assortment of steel, reactive, paper and automated moving targets situated from 50 to 1000 yards.
Target sizes will vary in difficulty based on the shooters position, distance and time allotted. To heighten the challenge, most stages will involve time limits and/or movement requirements. Scoring will follow Precision Rifle Series guidelines to reward the most consistent shooters. The cost of the GAP Grind is $275.00 per competitor and shooters must bring at least 175 rounds of ammunition. Rifles are limited to cartridge sizes no larger than .300 Win Magnum. The Course of Fire will be revealed at the start of the competition on Saturday, October 26th.
“Train-Up” Session on Friday, October 26
An 8-hour Train-Up Course will be offered to competitors on Friday, 26 October from 7:00 am to 3:00 pm. The course will review basic fundamentals and rapidly transition to range exercises and drills commonly seen in today’s precision rifle competitions. K&M Precision staffers and members from the GA Precision Rifle Shooting Team will provide hands-on instruction. During the Train-Up session, competitors can confirm their come-ups at 100-1000 yards, engage moving targets, and shot at multiple range props and targets. While the Train-Up will be held at the same location as the GAP Grind, but there will be no training that actually duplicate Grind competition stages. The Train-up and Match fee cost is $525 and will limited to maintain a 1 to 5 instructor to student ratio.
Sebastian (Seb) Lambang of SEB Coaxial, a brilliant designer and fabricator, has created an ingenious joystick bipod. The first coaxial bipod we’ve ever seen, Seb’s new bipod is a superb example of creative design and smart engineering. This unit gives F-TR and other bipod shooters precise, one-handed control of both windage and elevation. Seb’s innovative joystick bipod is yet one more example of the innovative, advanced engineering we’ve come to expect from his company. We think this guy could be building Formula 1 cars if he set his mind to it. We are fortunate that Seb loves shooting, so he applies his talent to designing and building great new products for the shooting sports.
Seb tells us: “I just finished a prototype joystick bipod, i.e. a bipod with joystick (coaxial) elevation and windage control. This patent-pending bipod is my newest project/invention. As far as I know, there is no one that makes this type of bipod… so it’s probably the only one in the world.” We already know some shooters who want to order Seb’s joystick bipod, but Seb cautions: “It’s not for sale yet. It’s still in prototype step. There is always a rough draft before the masterpiece.”
Seb will test and refine the design in the next couple of months before production starts. But Seb is quite satisfied with the design so far: “The rigidity, ease and comfort of use, and compactness, are already OK in my opinion.” Folks in Europe will be able to see the design very soon. The first real-world test of Seb’s new joystick bipod will be at the European F-Class Championship, slated for November 2-3 in the UK. Seb notes: “I won’t be shooting F-TR in the match, but I will ask some fellow F-TR shooters at the Bisley range to test it, and provide feedback.” Seb invites Daily Bulletin readers to look at the photos and provide comments or suggestions on design enhancements.
Technical Description At the lowest setting with the adjustable legs, the SEB bipod is approximately 6″ tall. At the highest setting, the unit is about 9″ tall. To smooth upward movement of the rifle, Seb designed the coaxial head with “built-in uplift”. The joystick itself is about 10″ long, with a collet-type head. When folded, the new SEB Bipod is relatively compact, about 9″ long x 5″ wide x 2″ thick. Most parts are made from aircraft grade 7000 series aluminum. The current weight of the prototype is 26 ounces (740 grams). Seb is working on reducing weight for the production models.
Joystick Function and Adjustment Range
As with SEB Coaxial front rests, the joystick function is user-selectable. The joystick handle can operate either ‘up for up’ or ‘up for down’, simply by reversing the unit and the joystick. The bipod’s effective windage and elevation range* is approximately 38 MOA horizontal (windage) and 16 MOA vertical (elevation). Seb explains: “That’s not as much as my other rests, but for F-Class use it should be adequate. The finer the adjustment, the better on the target and the smoother the joystick operation. It’s like using a scope with 1/8 MOA adjustment rather than 1/4 MOA.”
*True vertical travel is about 32 MOA but in the field the rifle stock will limit how far you can lift the joysticK. Note also that the adjustment range varies with your set-up geometry. The shorter the distance between the rear bag and the bipod, the greater the travel in MOA. This means that if you extend the distance between rear bag and bipod, you will lose some MOA travel.
Remington has announced that it is recalling four (4) lots of Remington .338 Lapua Magnum ‘Express Rifle’ Ammunition. The recalled lots are: L13SA29L, L13SA29R, L13SB29L, and L13SB29R. The reason for the recall is that the listed lots “may have been improperly loaded. Improper loading may cause malfunctions which may result in damage to the firearm, serious personal injury or death.” CLICK HERE for more information, and to download PDF Recall Notice from Remington.


 Man does not live by long-guns alone. We know that many of our readers own .45 ACP handguns and load for this extremely accurate “classic” cartridge. When selecting a powder for the .45 ACP, there are many good options. All the major powder manufacturers make propellants with appropriate density and burn rate characteristics for the .45 ACP. Popular choices include: AA #5 (Accurate Powder); Bullseye (Alliant); Clays, HP-38, and Titegroup (Hodgdon); VV N310 and N320 (Vihtavuori); and WW 231 and WST (Winchester). We’ve tried all those powders in a variety of .45 ACP handguns. When we consider all the factors that make for a good pistol powder, we think N320 is one of the best available propellants for the .45 ACP.
  This Editor owns a full-size, all-stainless S&W 1911. After trying numerous powders, I found VV N320 delivered the best combination of accuracy, easy metering, consistency, clean burning qualities, and low muzzle flash. My gun has proven exceptionally accurate using N320 with bullets from 180 grains to 230 grains — it will shoot as accurately as some expensive customs I’ve tried. At right is 5-round group I shot offhand at 10 yards with my 5″ S&W 1911. The bullet hole edges are sharp because I was using semi-wad-cutters. Rounds were loaded with Vihtavuori N320 and 200-grain SWCs from
  The
The 
 The Kowa adapter comes with two standard rings, one for the 88/77 series scopes and one for the BD/SV/YF series of binoculars. Additional adapter rings for the Genesis 33 and 44 series of binoculars and TSN 660/600/82SV spotting scope eyepieces (except long eye-relief eyepieces) and 21x, 32x, and 50x High Lander eyepieces may be purchased separately. The lightweight adapter is made of an epoxy resin material that will not damage the finish of your iPhone.
 To quantify what Preacher says, for starters, we suggest setting your body die, or full-length sizing die, to have .0015″ of “bump”. NOTE: This assumes that your die is a good match to your chamber. If your sizing or body die is too big at the base you could push the shoulder back .003″ and still have “sticky case” syndrome. Also, the .0015″ spec is for bolt guns. For AR15s you need to bump the shoulder of your cases .003″ – .005″, for enhanced reliability. For those who have never worked with a body die, bump die, or Full-length sizing die, to increase bump, you loosen lock-ring and screw the die in further (move die down relative to shell-holder). A small amount (just a few degrees) of die rotation can make a difference. To reduce bump you screw the die out (move die up). Re-set lock-ring to match changes in die up/down position.
 The listing of the P-R funding (as well as $34 million of Dingell-Johnson funds that support sport fishing) is part of a huge package of across-the-board government budget reductions planned to take effect January 2, 2013, unless Congress can develop a plan to cut $1.2 trillion over the next decade.


 Sebastian (Seb) Lambang of
 At the lowest setting with the adjustable legs, the SEB bipod is approximately 6″ tall. At the highest setting, the unit is about 9″ tall. To smooth upward movement of the rifle, Seb designed the coaxial head with “built-in uplift”. The joystick itself is about 10″ long, with a collet-type head. When folded, the new SEB Bipod is relatively compact, about 9″ long x 5″ wide x 2″ thick. Most parts are made from aircraft grade 7000 series aluminum. The current weight of the prototype is 26 ounces (740 grams). Seb is working on reducing weight for the production models.


