The U.S. Army Marksmanship Unit (USAMU) regularly releases a reloading “how-to” article on the USAMU Facebook page. Here’s a helpful USAMU guide on removing military primer pocket crimps. If you ever use surplus military brass, you really should this article. It contains vital information “learned the hard way”. The writer has tried many different options for removing/swaging out crimps. He weighs the pros and cons of various methods and provides some advice that will save you time and headaches. This article was the second in a 3-part series. Visit the USAMU Facebook page regularly for other informative articles on reloading methods.
A common question, and important issue with US GI surplus 5.56 brass is “what to do with the primer crimp?” Our Handloading Shop does not prime/re-prime GI 5.56 brass, as we receive it in virgin state (primed) and don’t reload it. However, our staff has extensive private experience handloading GI brass in our own competitive shooting careers, and have several tips to offer.
Once the brass is full-length sized and decapped, the staked-in ring of displaced metal from the primer crimp remains, and hinders re-priming. Some swaging tools exist to swage out this ring, allowing free access to the primer pocket. Some are stand-alone products, and some are reloading-press mounted. Early in this writer’s High Power career, he used the common press-mounted kit several times, with less than stellar results.
Setting Up Swaging Tools
Surplus brass tends to come from mixed lots, and primer crimp varies from very mild to strong. Also, primer pocket dimensions vary. So, setting up this “one size fits most” tool involves trying to find a happy medium for a selection of different types of brass in your particular lot. Some are over-swaged, some under-swaged, and some are “Just Right.” Overall, it was a time-consuming and sub-optimal process, in this writer’s experience.
Cutting Out the Crimp Ring with a Chamfer Tool
[After trying swaging tools] this writer evolved to using the ubiquitous Wilson/RCBS/Other brands chamfer and deburring tool to cut out only the displaced crimp ring at the top of the primer pocket. One caution: DON’T OVER-DO IT! Just a little practice will let the handloader develop a “feel” for the right degree of chamfer that permits easy re-priming without removing so much metal that primer edges start to flow under pressure. For this writer, it was three half-turns of the tool in the primer pocket, with medium pressure.
Here, as with all bulk reloading operations, mechanization is our friend. A popular reloading supply house has developed an inexpensive adaptor that houses the chamfer/deburr tool (retained by an allen screw) and allows mounting in a hand drill or drill press. This speeds the operation significantly, as does use of one of the popular Case Preparation Stations that feature multiple powered operations. (Say good-bye to carpal tunnel syndrome and arthritis!)
One advantage of chamfering the primer pockets lightly to remove remnants of primer crimp, vs. swaging, is that primer pockets are not loosened in this process. US GI (usually LC) NATO 5.56 brass has a great reputation for longevity due to the superior hardness of the case head vs. some softer brands of commercial brass. This means the brass will stand up well to multiple full-pressure loads without loosening primer pockets, and the chamfering method helps support this benefit.
Powered Case Prep Centers — What to Look For
A word of advice (often learned the hard way) — think carefully before jumping on the “latest/greatest” case prep center. One with a proven, long-time track record of durability and excellent customer support has a lot going for it, vs. the flashy “new kid on the block.” Analyze the functions each case prep center can support simultaneously — i.e., can it chamfer, deburr and clean primer pockets all at the same time, without having to re-configure?
Do the tool-heads that come with it look truly functional and durable? If not, can they be easily replaced with proven or more-needed versions, such as a VLD chamfer tool, or a solid/textured primer pocket cleaner rather than a less-durable wire-brush type?
Tips for Priming with Progressive Presses
When re-priming, a couple of factors are worth noting. When re-priming using either single-stage presses, hand tools, or bench-mounted tools (such as the RCBS bench-mounted priming tool), precise alignment of the primer pocket entrance with the primer is easily achieved, and priming goes very smoothly. When using certain progressive presses, due to the tolerances involved in shell-heads, etc., one may occasionally encounter a primer that isn’t quite perfectly aligned with the primer pocket.
If resistance is felt when attempting to re-prime, DO NOT attempt to force the primer in — doing so can be dangerous! Rather, just exert SLIGHT upward pressure to keep the primer in contact with the case-head, and with the support hand, move the case back/forth a trifle. The primer will drop into alignment with the primer pocket, and then prime as usual. After priming, check each seated primer by feel. Ensure it is below flush with the case head (cleaning primer pockets helps here), and that there are no snags, burrs or deformed primers.
More Info on Primer Pocket Swaging
For more information about removing military crimps in primer pockets, we recommend you read Get the Crimp Out on the Squibloads Gun Thoughts Blog. This is a detailed, well-illustrated article that shows how to use various primer pocket reamers/cutters. It also has a very extensive discussion of swaging using CH4D, RCBS, and Dillon tools. The Squibloads author had much better luck with swaging tools than did the USAMU’s writer — so if you are considering swaging, definitely read the Squibloads article.
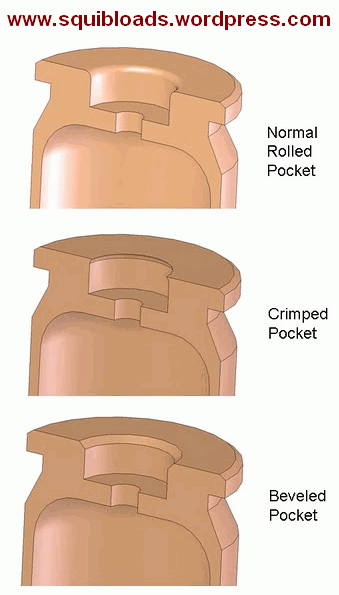
The illustration of primer pocket types is from the Squibloads Blog Article, Get the Crimp Out.
Erik Cortina is one of the nation’s top F-Class shooters. A member of Team Lapua-Brux-Borden, Erik has been a top performer at National and World F-Class Championships. Erik is also a very smart guy and a skilled toolsmith who has upgraded his shooting equipment in interesting ways. Today we feature three “How-To” videos from Erik. These show how to upgrade a SEB Coaxial Rest, how to improve the performance of an RCBS Chargemaster, and how to create your own Modified Case for measuring length to lands. Watch and learn…
1. How to Make a Modified Case for the Hornady OAL Tool
In this video, Forum member Erik Cortina shows how to create a custom modified case for use with the Hornady Lock-N-Load Overall Length Gauge (formerly the Stoney Point Tool). While Hornady sells modified cases for many standard cartridges, if you shoot a wildcat such as the 6mm Dasher or .284 Shehane, you’ll need to create a custom modified case. And even if you shoot a standard cartridge such as the .308 Win, you can get more consistent measurements if you make a custom modified case from a piece of brass fired in your chamber.
MORE INFORMATION: Want to learn more? We published a much longer story in which Erik explains in greater detail how to made the Modified Case. That article illustrates the 5/16″ – 36 RH HSS Tap required and shows how to set up the lathe to drill and tap your case. If you are serious about making your own Modified Cases, you should Read the Full Article.
2. How to Upgrade your SEB Co-Axial Joystick Rest
Joystick (coaxial) rests are used by top shooters in benchrest and F-Open disciplines. With coaxial rests, you can adjust both vertical and horizontal aim instantly in one fluid movement — there are no mariner wheels to spin or knobs to turn. Just gently stir the joystick to move up, down, or sideways. Erik Cortina explains: “If you want to get into F-Class (Open) and want to win, you should get a SEB rest. SEB makes an excellent product, but the one thing we upgrade automatically … is adding the F-Class feet. These have a bigger footprint and a spike on the bottom [so you can] dig the feet into the ground and make your rest a lot more stable.” In this video Erik installs a set of Blake Machine Co. F-Class feet. These feature a set-screw, so they are easy to attach and then remove for travel (no Loctite!). “Simple yet effective” declares Erik.
In the second half of the video (starting at 5:30), Erik installs a Dan Bramley Joystick Holder. This features two clamp-on cradles that hold the joystick crosswise below the top (see photo). This handy accessory ensures your handle always remains with the rest (and doesn’t get left at home when you travel to a big match). This joystick holder has been popular with competitors. Erik says, “The Bramley Joystick holder is $60.00 — money well spent.” To order, email Dan at dbramley [at] yahoo.com.
3. How to Make the RCBS ChargeMaster 1500 Work Better
Erik Cortina has been fiddling around with his RCBS ChargeMaster and he discovered something interesting. Through a series of tests he determined that the ChargeMaster dispensed slightly more precise charges when he trickled the last few 10ths of a grain on to the RCBS pan. Erik wasn’t expecting this result, but he confirmed there may be a slight benefit to this trickling method (as opposed to allowing the ChargeMaster to dispense the full charge). You can see Erik’s test procedure in this video:
We should note that Erik’s preferred method of weighing powder is to first dispense a slightly lower charge with the RCBS, transfer the pan to a laboratory-class Sartorius magnetic force restoration scale, then trickle up with his Omega (Dandy Products) Powder Trickler. However, if you don’t have a $800+ laboratory-grade scale, you might just try trickling on to the ChargeMaster pan.
MORE INFORMATION: We have published a more lengthy Bulletin Article that covers Erik’s Chargemaster Performance Findings in greater detail. That article has more photos plus a clever, bonus “Beep Defeat Tip”. If you own a Chargemaster, we recommend you READ the Full Article.
Summer is coming soon, and it’s already getting quite warm in many areas of the country. You never want your barrels to get too hot, which can happen more quickly in summertime. Accuracy suffers when barrels over-heat, and excessive heat is not good for barrel life. So how do you monitor your barrel’s temperature? You can check if the barrel is “warm to the touch” — but that method is not particularly precise. There is a better way — using temperature-sensitive strips. McMaster.com (an industrial supply house) offers stick-on temp strips with values from 86° F to 140° F. A pack of ten (10) of these horizontal strips (item 59535K13) costs $13.16. That’s a mere $1.32 per barrel for strips — cheap insurance for your precious barrels. For best barrel life, try to stay under 120 degrees F.
NOTE: On the McMaster.com website, you’ll need to scroll down to the multi-use “Temperature Indicating Labels”. Then click on the horizontal label and select item 59535K13, as shown below.
Forum member Nomad47 says: “I have temperature strips (bought at McMaster-Carr) on all my barrels. I try not to shoot when the barrel gets to 122 degrees or higher[.]” Here are photos of the McMaster-Carr temp strips on Nomad47’s customized Savage.
Bad things can happen if your barrel gets too hot. First, with some barrels, the point of impact (POI) will shift or “walk” as the barrel heats up excessively. Second, even if the POI doesn’t change, the groups can open up dramatically when the barrel gets too hot. Third, if the barrel is very hot, the chamber will transfer heat to your loaded cartridge, which can lead to pressure issues. Finally, there’s considerable evidence that hot barrels wear out faster. This is a very real concern, particularly for varmint shooters who may shoot hundreds of rounds in a day. For this reason, many varminters switch among various guns, never letting a particular barrel get too hot.
Neconos.com offers BAR-L Temp Strips that visually display heat readings from 86 to 140 degrees. Think of these strips as compact, unbreakable thermometers that monitor barrel heating.
Put a strip on the side of the barrel and the barrel’s temp will be indicated by a stripe that changes from black to green. There is also a “general purpose” strip that reads to 196 degrees (see bottom row). The Benchrest model strip (86°F to 140°F) is in the middle. These Bar-L temp strips cost $12.70 each, or $25.00 for a 3-pack.
NOTE: These strips can be permanently fixed to the barrel with the heavy-duty clear plastic tape strip provided with the BAR-L Temp strip.
John Weber, born 80 years ago in England, was given a metal mug by his grandfather in 1945. Though his grandfather had a “good eye” for antiques, John never thought the metal mug was worth much. He played with it as a child, and even used it as a target for his air rifle. The mug, assumed to be brass, languished in a shoe box under Weber’s bed for decades.
Well, it turns out Weber’s old mug may be the world’s most expensive plinking target! The cup is actually made of solid gold, and is a rare, ancient artwork, crafted over 2300 years ago. The unusual mug, decorated with twin, opposite-facing female heads, was appraised with a value exceeding one-quarter million dollars ($250,000)!
According to news reports, Weber decided to have the old mug (thought to be brass) appraised when he moved from his house. He was shocked to learn that the mug is a Persian gold treasure, beaten out from a single sheet of gold before the time of Alexander the Great. Experts said the type of gold and the way the cup was hammered was “consistent with Achaemenid gold and gold smithing” dating back to the third or fourth century BC. The Achaemenid Empire ruled most of the Middle East and was conquered by Alexander the Great in 330 BC. Could this cup be one of Alexander’s war trophies? What stories could it tell from the past 2300 years?
Ancient Gold Cup Brings $99,000 at Auction in 2008
The rare cup was sold at auction by Duke’s Auction house in southwest England in June, 2008. Though the Cup was valued much higher by experts, it only fetched £50,000, or roughly $99,000 U.S. Dollars (at 2008 exchange rates, $75,769 today). John Webber said he was still very pleased with that result.


 A common question, and important issue with US GI surplus 5.56 brass is “what to do with the primer crimp?” Our Handloading Shop does not prime/re-prime GI 5.56 brass, as we receive it in virgin state (primed) and don’t reload it. However, our staff has extensive private experience handloading GI brass in our own competitive shooting careers, and have several tips to offer.
 Tips for Priming with Progressive Presses


