Legendary competitive shooter and Team Vihtavuori member Bruce Piatt has claimed his eighth Bianchi Cup title, securing victory at the 2025 Bianchi Cup with the only perfect score of 1920 in the match. The Civilian Marksmanship Program (CMP) now oversees the Bianchi Cup competition, previously run by the National Rifle Association.
The 2025 Civilian Marksmanship Program (CMP) Bianchi Cup, known as the gold standard in action pistol shooting, was hosted once again at the Green Valley Rifle and Pistol Club in Hallsville, Missouri, May 20-23, 2025. Participants from all over the world competed in the Falling Plates, Moving Target, Barricade, and Practical events.
“The 2025 Bianchi Cup is coming home with me for the 8th time!” Piatt said after the match. “Dealing with a nasty cold the entire time and having to switch to my backup gun at the last minute didn’t exactly boost my confidence — but focus and determination paid off.”
Piatt won his impressive 8th Bianchi Cup title running the .38 Super cartridge powered by high-qualty Vihtavuori N320 powder. Beyond his individual triumph, Piatt also accompanied his 4-man team to victory, achieving a team score of 1918-175X. The winning quartet included Piatt, Mark Itzstein, Joey De Leon, and fellow Team Vihtavuori athlete, Doug Koenig.
Editor’s Note: Vihtavuori N320 is our favorite powder for .45 ACP target loads. It is very accurate and burns cleaner, with fewer sparks, than any other brand of powder we have tried for the .45 ACP. We highly recommend N320 and the slightly faster N310.
Our .45 ACP loads showed superb accuracy with coated lead bullets. This combination provided great performance and also had our pistols running very clean, reducing maintenance chores.
Bruce Piatt 3-Gun Skills on Display
Bruce Piatt also competes in 3-Gun Matches. This short video shows Bruce completing a 3-gun stage (shotgun 0.09 time-mark, pistol 0.18, then rifle 0.53) at the Rockcastle 3-Gun Pro-Am event. His speed with the AR-type rifle was very impressive as was his long-range accuracy.
About Vihtavuori
Vihtavuori is renowned its clean burning and temperature stable smokeless powders that have great lot-to-lot consistency. Vihtavuori is imported by Capstone Precision Group, exclusive U.S. distributor for Berger, Lapua, Vihtavuori and SK-Rimfire products. For more information, visit Vihtavuori.com.
FPC Urges U.S. Senate to Pass Suppressor Reforms
The Firearms Policy Coalition (FPC) has urged the U.S. Senate to pass H.R. 1, the “One Big Beautiful Bill Act”, with the legislation’s current suppressor reforms intact.
Last month, the House of Representatives passed the Act with three important provisions relating to suppressors, one removing these hearing protection devices from the extreme regulations of the National Firearms Act (NFA) and two others zeroing out the current significant Federal fees that must be paid when acquiring a suppressor.
Research by the Centers for Disease Control and Prevention (CDC) has shown that “[t]he only potentially effective noise control method to reduce students’ or instructors’ noise exposure from gunfire is through the use of noise suppressors that can be attached to the end of the gun barrel.” The CDC’s conclusion has been affirmed by many other health experts. The American Academy of Otolaryngology-Head and Neck Surgery has endorsed “the use of firearm suppressors as an effective method of reducing the risk of hearing loss, especially when used in conjunction with conventional hearing protective measures”.
See Through Suppressor in Super Slow Motion (110,000 fps) — Click Arrow to Watch:
“Firearm suppressors are incredibly important hearing protection devices that reduce the risk of permanent damage and hearing loss for shooters and others nearby”, explained FPC President Brandon Combs. “These important safety tools are no different than hard hats, safety glasses, and fire extinguishers and should be widely available for personal use, not taxed out of the reach of ordinary Americans.”
Suppressors, On Average, Reduce Noise Levels about 30 Decibels
Suppressors work similar to a car’s muffler, redirecting exhaust gases. In an article for Ammoland, gunwriter Sam Hoober says that you can expect about 30 decibels (dB) of noise reduction from the average suppressor: “Looking at a few different products, SilencerCo attests their suppressors reduce the sound pressure of a 9mm gunshot to anywhere from 125.7 dB to 131.5 dB, depending on the model. Advanced Armament Co, another popular supplier, attests a 23 dB to 33 dB reduction or down to 127 dB. In short, we can [expect] 30 dB of attenuation as an average.” Reducing gun shot noise to the 130dB range means that the sound level with NOT permanently damage hearing.
Emil Praslick III is widely recognized as one of the greatest wind wizards on the planet — a master at identifying wind value and direction, and predicting wind cycles. As coach of the USAMU and top civilian teams, Emil has helped win many high-level championships. In the three videos we feature today, Emil, who works with Capstone Precision Group (Berger, Lapua, SK, Vihtavuori) and Team Applied Ballistics, explains how to determine wind direction and velocity using a variety of indicators. Praslick, now retired from the U.S. Army, was an 18-time National and 2-time World Champion coach with the USAMU.
Video ONE: Wind Theory Basics — Understanding “Wind Values”
In this video from UltimateReloader.com, Emil explains the basics of modern wind theory. To properly understand the effect of the wind you need to know both the velocity of the wind and its angle. The combination of those variables translates to the wind value. Emil also explains that the wind value may not be constant — it can cycle both in speed and velocity. Emil also explains some of the environmental conditions such as mirage that can reveal wind conditions.
Video TWO: Determining the Direction of the Wind
Key Point in Video — Find the Boil
Emil explains how to determine wind direction using optic. The method is to use spotting scope, riflescope, or binoculars to look for the “Boil” — the condition in mirage when the light waves rising straight up. The wind will generate that straight-up, vertical boil in your optics when it is blowing directly at you, or directly from your rear. To identify this, traverse your scope or optics until you see the boil running straight up. When you see that vertical boil, the direction your optic is pointing is aligned with the wind flow (either blowing towards you or from directly behind you).
Video THREE: The No Wind Zero Setting
In this second video, Emil defines the “No-Wind Zero”, and explains why competitive shooters must understand the no-wind zero and have their sights or optics set for a no-wind zero starting point before heading to a match. In order to hit your target, after determining wind speed and direction, says Emil, “you have to have your scope setting dialed to ‘no wind zero’ first.”
Coach of Champions — Emil Praslick III
SFC Emil Praslick III, (U.S. Army, retired) works with Berger Bullets and Applied Ballistics. Emil served as the Head Coach of the U.S. National Long Range Rifle Team and Head Coach of the USAMU for several years. Teams coached by Emil have won 33 Inter-Service Rifle Championships. On top of that, teams he coached set 18 National records and 2 World Records. Overall, in the role of coach, Praslick can be credited with the most team wins of any coach in U.S. Military history.
Want to learn the basics of position shooting? Then you should check out an article by Gary Anderson, DCM Emeritus, in On the Mark digital magazine (Summer 2014, pp. 6-13). This article covers all the key elements: body position (prone, sitting, standing), sling use/adjustment, sight picture, aiming process, and trigger control. While this 8-page article was specifically written for Rimfire Sporter shooters, the techniques described by Anderson apply to all types of position shooting, whether you shoot air rifles, smallbore rifles, or centerfire rifles.
Here’s what Anderson says about aiming — how to keep your sights steady and get them centered on the middle of the target:
Trigger Contact and Center As soon as aiming at the target begins, the index finger must move from the trigger-guard to contact the trigger. It is important to get initial pressure on the trigger as soon as aiming begins. Then the shooter must focus on the sight picture and centering the sight picture movements over the aiming point. No one, not even champion shooters, can hold the aligned sights perfectly still. The sights are going to move a little bit or a lot, depending on the shooter’s skill level. The secret is to center those sight picture movements over the aiming point on the target (see trace illustration) before pulling the trigger.
When the sight picture movements on the target are centered, the last step in firing the shot is to add… smooth pressure on the trigger until the shot breaks.
Anderson also discusses the 5 Basics of Shot Technique:
BONUS: Olympic Gold Medalist Jamie Gray
Here’s an interesting video about three-position shooting. Produced by GOnra Media, this video demonstrates rifle hold and body alignment for prone, standing, sitting, and kneeling positions. Olympic Gold Medalist Jamie Gray demonstrates the proper stance and position of arms and legs for each of the positions. Ideally, in all of the shooting positions, the shooter takes advantage of skeletal support. The shooter should align the bones of his/her arms and legs to provide a solid foundation. A shooter’s legs and arms form vertical planes helping the body remain stable in the shooting position.
This video shows the process of cut-rifled barrel-making by Krieger Barrels, one of the world’s best barrel manufacturers. Krieger cut-rifled barrels have set numerous world records and are favored by many top shooters. The video show the huge, complex machines used — bore-drilling equipment and hydraulic riflers. You can also see how barrels are contoured, polished, and inspected.
For anyone interested in accurate rifles, this is absolutely a “must-watch” video. Watch blanks being cryogenically treated, then drilled and lathe-turned. Next comes the big stuff — the massive rifling machines that single-point-cut the rifling in a precise, time-consuming process. Following that you can see barrels being contoured, polished, and inspected (with air gauge and bore-scope). There is even a sequence showing chambers being cut.
Click Arrow to Watch Krieger Barrels Video:
Here is a time-line of the important barrel-making processes shown in the video. You may want to use the “Pause” button, or repeat some segments to get a better look at particular operations. The numbers on the left represent playback minutes and seconds.
Krieger Barrel-Making Processes Shown in Video:
00:24 – Cryogenic treatment of steel blanks
00:38 – Pre-contour Barrels on CNC lathe
01:14 – Drilling Barrels
01:28 – Finish Turning on CNC lathe
01:40 – Reaming
01:50 – Cut Rifling
02:12 – Hand Lapping
02:25 – Cut Rifling
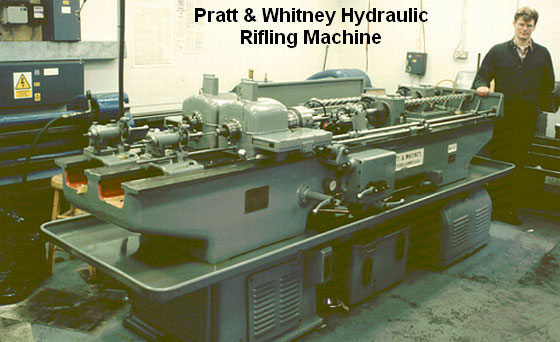
“At the start of World War Two, Pratt & Whitney developed a new, ‘B’ series of hydraulically-powered rifling machines, which were in fact two machines on the same bed. They weighed in at three tons and required the concrete floors now generally seen in workshops by this time. Very few of these hydraulic machines subsequently became available on the surplus market and now it is these machines which are sought after and used by barrel makers like John Krieger and ‘Boots’ Obermeyer. In fact, there are probably less of the ‘B’ series hydraulic riflers around today than of the older ‘Sine Bar’ universal riflers.” — Geoffrey Kolbe, Border Barrels.
Brownells is a well-known retailer of guns, gun parts, tools, accessories, ammo, and pretty much everything gun-related. What you may not know is that Brownells has a very active video production department that releases new “how-to” and product information videos every week. These videos offer helpful advice on gun cleaning/maintenance, reloading, as well as selecting/assembling components for various kinds of rifles. And every week Brownells serves up a new products video. There now over 3000 videos on the Brownells YouTube Channel, which is truly a remarkable resource.
Here are seven of our favorite videos from Brownells. There’s a helpful guide to scope installation, a guide to using the OAL tool properly, and a good video on building a rifle with a Howa barreled action. There’s a helpful video on air travel with rifles, and all gun owners should watch the video on ammunition storage.
Scope-Mounting — Common Mistakes to Avoid
Always be careful when mounting a rifle scope. This isn’t a super-complex or highly technical task, but there are ways you can mess it up. This video explains common pitfalls to avoid when mounting a scope.
1. Make sure the rings don’t touch ANY part of the turret housing, objective bell, or eyepiece.
2. Be certain the scope rings are tightly clamped to the scope base. Grasp the scope with one hand and the rifle with the other, then ensure there is no play.
3. Make sure there’s clearance between the objective bell and the rifle. No part of the scope should touch the rifle itself.
4. NEVER over-tighten the scope rings. You can actually crush the scope tube and damage the optic beyond repair. Stick to the torque specs!
Affordable Precision Rifle Build with Howa 1500 Barreled Action
In this video, Caleb from Brownells walks through a step-by-step build of an affordable precision rifle using a Howa 1500 barreled action, MDT stock, and Vortex optic — putting together a highly capable long-range setup for under $1,200. The video covers key components and shows the assembly tools needed (4:38). The video explains how to build a reliable, accurate bolt gun on a budget, with honest insight into gear selection and assembly techniques. From the stock and trigger to rings, base, and scope setup, this video is a very helpful guide for anyone looking to build an affordable precision rifle. Installation of the Howa 1500 barreled action into the MDT stock is shown in detail at 6:00 minute mark.
How to Use Hornady OAL Tool and Hornady Bullet Comparator
Gun Tech Steve Ostrem explains how to properly use Hornady’s Overall Length Gauge to determine length-to-land precisely. The OAL Gauge uses a “Modified Case” that threads onto the tool and holds a bullet. Push on the back of the gauge until you feel the bullet just touch the rifling. (We do this gently at first, tapping the rod a couple time to ensure the bullet is aligned correctly). Once you’ve got the length, then use the tool with a comparator on your calipers to get the length-to-lands. NOTE: We recommend taking the measurement 3-4 times in a row to get a reliable number. With a little practice your should be able to get repeatable measurements within .0015″.
How to Store Ammunition Safely and Securely
This is one of the most popular Brownells videos — with over 2.5 million views. Here’s the deal — ammunition WILL keep for a long time if you store it properly. DO store ammunition in a cool, dry place that doesn’t have wide temperature swings. Temperature cycling will also degrade primers and powder. Put it in airtight ammo cans to keep out the moisture. Tupperware containers will work too. Brownells also recommends putting moisture-absorbing silica packs in your ammo containers. DON’T just keep ammo in factory cardboard factory boxes stacked in the basement, attic, or garage (especially on the floor). Factory ammo boxes can absorb moisture which can degrade primers and corrode the brass cases. Yes, sealed military ammo will usually handle this kind of storage for quite a while, but it’s still not wise.
Air Travel with Firearms — Key Regulations You Must Follow
You can travel on commercial airlines with firearms. But you must follow the TSA regulations, and your particular airline’s rules. First, make sure your guns are UNLOADED before your leave home. Guns need to be carried in proper hard-sided cases that cannot be pried open. Be prepared to unlock the case if the TSA wants to inspect what’s inside. TSA agents can cut the locks if they need to open the case but can’t locate you. If you use special TSA-approved locks, TSA agents have master keys that let them open the case without destroying your locks. You CAN transport up to 11 pounds of ammunition — with restrictions explained in the video.
Cleaning Advice for .22 LR Rimfire Rifles
Gun Techs Steve Ostrem and Caleb Savant debunk some myths about cleaning .22 LR barrels. One myth is that cleaning will harm the accuracy of a .22 LR barrel. Caleb thinks this myth is the result of people cleaning a barrel from the muzzle and damaging the muzzle crown, which CAN diminish accuracy. If it’s done right, cleaning won’t damage the bore. However, you certainly do NOT have to clean your 22 LR’s bore every time you go to the range. But DO clean the action every time you shoot the rifle, especially on a semi-auto. What about shooting a lot of lead bullets? Won’t that lead up the bore? The guys give us the straight skinny on lead fouling, too. When you see your .22 LR rifle’s groups opening up, you may want to consider cleaning.
Must-Have Spare Parts for AR-Platform Rifles
In this video, two knowledgeable gun techs answer the question: “What spare parts should I keep on hand for my AR-15?” On the list are: Gas Rings, Buffer Spring, Extractor Spring and Pin. NOTE: You may want to try the one-piece spiral gas ring rather than the standard rings which require alignment. The cotter pin and cam pin can also easily get lost when the Bolt Carrier Group is disassembled for cleaning. On the lower receiver you’ll want spare springs and detents for the pivot/takedown pins. If you’re using lighter-power springs, keep standard-power spares on hand. If your rifle stops working, swap in the factory-spec springs to find out if the problem is the gun or your ammo. Also, if you have upgraded your trigger, always keep the original trigger as a backup.
This article is Copyright 2023 AccurateShooter.com. Reproduction on any other website gives rise to monetary damages.
Nearly 400 competitors descended on Grand Island, Nebraska, May 30th – June 1st, 2025, to battle the “undead” during the 2025 annual Zombies in the Heartland 3-Gun shooting match hosted by Hornady and the Heartland Public Shooting Park. “Make Zombies Dead Again” was the theme for this year’s competition. There were ten stages with targets for rifles, shotguns, and pistols. For complete results, visit: practiscore.com/results/new/289649.
2025 Zombies in the Heartland 3-Gun Match Highlights
Ten competitive stages mimicking post-apocalyptic situations were featured. Professional and amateur shooters from across the country enjoyed specially developed reactive zombie targets. The Heartland Zombies match is a veritable theme park for shootists, with many fun stages and innovative targets. Many unique, reactive zombie targets have been developed specifically for this match. The use of paper targets has been minimized — so it’s mostly “bang and clang”. Rifles, pistols, and shotguns are used on most stages. There were also fun side-matches. Watch the video above to see this year’s action.
See Stage with Jerry Miculek
Jerry Miculek with Steve Hornady
Top Shooters in Each Class
Open: Dillen Easley
Tactical: Daniel Jirasek
PCC: Aaron Hayes
Ladies: Dianna Muller
Junior: Dylan Mertens
Senior: Terry Lauwers
Super Senior: Jerry Miculek
LE: Alex Cady
Military: Michael Shuluk
“The 2025 Zombie match is in the books, and I have to say, this is one of the best matches we’ve ever run”, said Jeremy Millard, Hornady Engineer and Match Director. “I cannot thank the park staff, [Range Officers], volunteers, and workers enough for their efforts. Hosting a match of this magnitude is a monumental task, and we couldn’t do it without their efforts. Congratulations to all the competitors for a fun, challenging, and safe match”, he added.
For event photos and updates on next year’s match, visit the Zombies in the Heartland Facebook page: Facebook.com/ZombiesInTheHeartland.
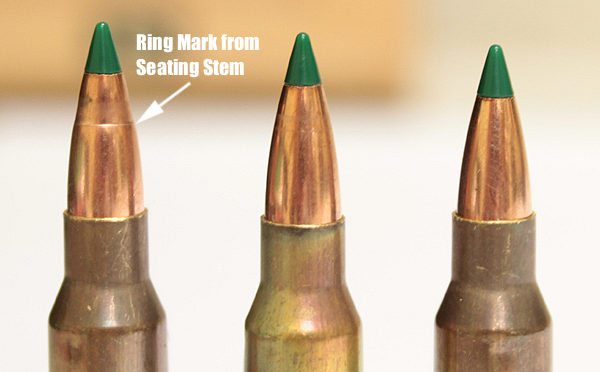
Here’s a simple task you can do that will give your seater die a more perfect fit to your match bullets. You can lap the inside of the seater stem so that it matches the exact profile of the bullet. This spreads out the seating force over a larger area of the bullet jacket. That allows smoother, more consistent seating, without putting dents, creases, or sharp rings in your bullets.
This process is demonstrated here by our friend Erik Cortina of Team Lapua-Brux-Borden. Erik, one of the nation’s top F-Class shooters and a skilled machinist, explains: “Here I’m lapping my new seater die stem with lapping compound. I chuck up a bullet in the lathe and lap the inside of the seating stem. I put lapping compound on the bullet and also in the stem. You can do the same with a hand drill and bore paste. You can see in the piture below how much contact area the stem has on the bullet after being lapped. This bullet is a Berger 7mm 180-grain Hybrid. ”
It can be helpful but it’s not necessary to make your seating stem an exact match to a bullet, particularly if you’re loading hunting or varmint rounds. But it is helpful to do some mild internal stem polishing. This should eliminate any ring (or dent) that forms on the bullet jacket during seating.
Sharp edges on a seating stem can cause a ring to be pressed into the bullet jacket — especially with compressed loads that resist downward bullet movement.
Q2: Is there any down-side to the process?
Not really. However, if you shoot many different bullet types for a particular cartridge, you may not want to conform the stem aggressively to one particular bullet design. Lightly lap the inside of the stem to remove burrs/sharp edges but leave it at that. A light lap will prevent a ring forming when seating bullets.
Report by Craig Arnzen, Area 419
As the PRS and other tactical/practical competitions continue to grow, a guy tends to wonder, just how good are the top competitors? And what are they actually doing (and viewing) as they complete a stage? Well, a great video from the Long Range Precision Shooters YouTube Channel let us see what the best in the sport see through their scopes when they shoot.
This video features Dave Preston, 2015 National Champion and consistent top performer, shooting the PRS Skills barricade. Dave Preston has been considered among the very best in the nation running this PRS stage. Dave nearly always shoots 100% with the fastest recorded time. In this video you’ll see him successfully engage all eight shots in under 43 seconds — that’s crazy fast. This includes a POV sequence (4:35 time-mark) showing the actual view through Dave’s scope as he completes the stage.
Watch this video! Dave offers excellent advice on gun-handling and body positioning for barricades. Listen to what he says and you WILL shoot better.
This video features the PRS Skills Barricade, an 8-round, 4-position stage featured at the majority of PRS matches throughout country. It’s called a “Skills Stage” as it is run the same way at every national match and gives shooters the ability to compare skill levels based on hit percentage and speed.
The target is a 10″ plate at 400 yards. There are four different positions, with two shots each. Most people run this stage in about 70 seconds, some in the mid-60s, the greats in the high 50s, and Dave does it in the low 40s… mighty impressive!
The Right Gear Aids Stability and Lets You Shoot Faster
Let’s also take a look at two pieces of gear that really helped Dave Preston get stable and shoot fast.
1. BARRICADE BAG — To Get Stable, Really Stable
In the video Dave is using a Solo Sac from Short Action Precision This bag was designed by USMC Solomon Mansalala. It’s a very soft/dense bag and is popular at matches.
The other bag that sees a LOT of use, and is far and away the most used, is the patented Gamechanger Bag from Reasor Precision Solutions and Armageddon Gear.
2. MUZZLE BRAKE — To Make Your Follow-Up Faster
You’ll notice that in the video the rifle is very steady through firing, even though he is not applying a lot of pressure to the rifle. Dave is using a Hellfire Muzzle Brake from Area 419. Combined with the soft-recoiling 6mmBR cartridge he is able to spot his impacts and make adjustments, and can also make very fast follow-up shots as his rifle hasn’t bounced way off target.
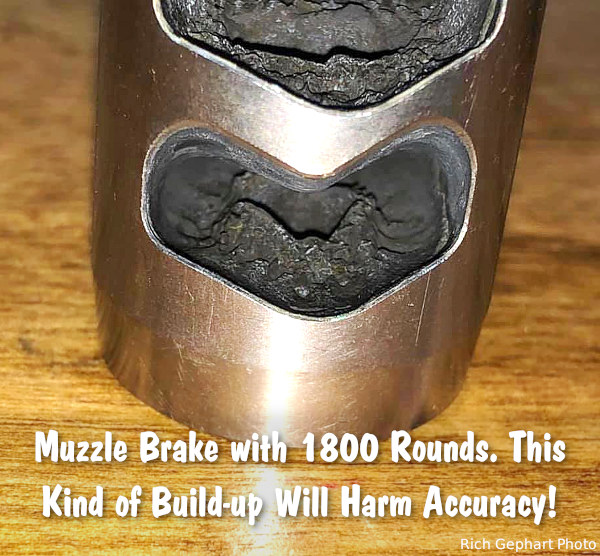
Many hunters and precision rifle competitors use muzzle brakes because these ported devices reduce felt recoil significantly. That make s real difference getting back on target for quick follow-up shots. While many rifle owners appreciate the benefits of muzzle brakes, they may also neglect their brakes, allowing hard carbon and powder residue to build up. Not good. You should regularly clean your muzzle brake to remove fouling and carbon build-up.
As Mark Edgreen posted: “Carbon build up on the crown and in the brake is a recipe for poor accuracy.” And another gunsmith reported that customers complained about guns that “shot out way too early” but they only needed to have the brakes cleaned.
Gunsmith and PRS/NRL competitor Jim See recently reminded his Facebook Fans about the importance of cleaning muzzle brakes: “How many times do I have to say it? You need to maintain your rifles. Clean your muzzle brakes people!”. Jim, who runs Elite Accuracy LLC, notes that hard carbon build-up in brakes can definitely harm accuracy. Look at this example:
Muzzle Brake Cleaning Methods
There are various methods for cleaning a brake, we list a variety of techniques, but we would start with NON-corrosive ultrasound. You’ll want to remove the muzzle device before doing these tasks.
1. Use Ultrasonic Cleaning Machine with cleaning solution. This may be the most efficient method: “I place my brake in the ultrasonic cleaner. Shiney as new.” (Jim Moseley).
2. Spray with commercial Carb Cleaner and brush. Then apply anti-corrosion coating.
3. Soak in half hydrogen peroxide and half vinegar. Suggestion: “Let sit over night and carbon melts off. Brush remaining carbon off, rinse and put the brake back on.” Apply anti-corrosive before mounting.
4. Soak in 50/50 solution of water and white vinegar and brush. (Be sure to apply anti-corrosion coating, such as Eezox, after soaking).
5. Tumble in liquid solution with stainless pins. Comment: “Comes out slightly faded, but perfectly clean on stainless, non-painted brakes though.” Warning — do NOT do this with threaded brakes — tumbling could affect threads of screw-on brakes. Also, tumbling can harm painted or Cerakote finishes.
Gunsmithing Tip: By fitting the muzzle brake so that the barrel crown is slightly forward, it is easier to wipe carbon fouling off the end of the barrel. See photo:


 Legendary competitive shooter and Team Vihtavuori member Bruce Piatt has claimed his eighth Bianchi Cup title, securing victory at the 2025 Bianchi Cup with the only perfect score of 1920 in the match. The Civilian Marksmanship Program (CMP) now oversees the Bianchi Cup competition, previously run by the National Rifle Association.

Editor’s Note: Vihtavuori N320 is our favorite powder for .45 ACP target loads. It is very accurate and burns cleaner, with fewer sparks, than any other brand of powder we have tried for the .45 ACP. We highly recommend N320 and the slightly faster N310.

 FPC Urges U.S. Senate to Pass Suppressor Reforms


 As soon as aiming at the target begins, the index finger must move from the trigger-guard to contact the trigger. It is important to get initial pressure on the trigger as soon as aiming begins. Then the shooter must focus on the sight picture and centering the sight picture movements over the aiming point. No one, not even champion shooters, can hold the aligned sights perfectly still. The sights are going to move a little bit or a lot, depending on the shooter’s skill level. The secret is to center those sight picture movements over the aiming point on the target (see trace illustration) before pulling the trigger.