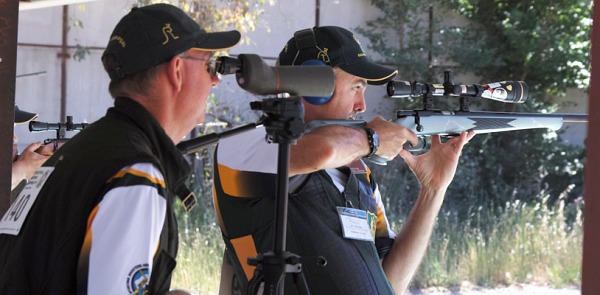
This week’s Shooting USA TV episode features CMP High Power competition. High Power Rifle, sometimes called XTC from “Across the Course”, is a shooting sport using centerfire (aka “fullbore”) target rifles. Major High Power matches are run by the CMP and NRA, as well as state rifle groups. The sport is divided into classes by equipment, and popular classifications include Service Rifle, and Open Class. This episode of Shooting USA focuses on High Power competition at the Talladega Marksmanship Park in Alabama.
This episode of Shooting USA airs Wednesday, July 7, 2021, 9:00 PM Eastern and Pacific, 8:00 PM Central on the Outdoor Channel. Shooting USA is also available On Demand via Vimeo.com.
This week Shooting USA TV features CMP High Power competition from the Talladega Marksmanship facility in Alabama. High Power is a challenging discipline that requires high accuracy in the rifle and great marksmanship skills in three positions — standing, sitting/kneeling, and prone. The CMP competition involves slow- and rapid-fire at 200, 300, and 600 yards in all three positions. There are separate Service Rifle and Open divisions.
Young 15-year-old Tyler Fisher from Arizona shot superbly at the 2020 CMP Western Games Match in Phoenix (Ben Avery). His impressive marksmanship secured second place overall (and High Junior) at the Western Games EIC Match shooting Service Rifle, a subclass of High Power.
High Power Open division Tubb 2000 with a shortened handguard, and custom hand support bracket forward of mag well.
HIGHPOWER CLINICS
The CMP conducts a number of High Power clinics each year. The CMP offers a pair of High Power clinics in conjunction with the U.S. Marine Corps Rifle Team and members of the Remington-Bushmaster rifle team. There is a Junior Clinic as well as an advanced High Power clinic. Both focus on service rifle disciplines.
USAMU PRO TIP: Bullseye Pistol Competition
In addition to the High Power rifle feature, this week’s Shooting USA episode has a good USAMU Pro Tips segment about bullseye pistols. Staff Sergeant Ryan Franks with the USAMU Service Pistol Team shows the fundamentals of bullseye shooting, the classic pistol competition shot from a one-handed standing position. In this Pro Tip, SSG Franks focuses on proper stance and grip.
Shooting USA will air Wednesday, July 7, 2021, at 9:00 PM Eastern and Pacific (8:00 PM Central) on the Outdoor Channel. Shooting USA is also available On Demand via Vimeo.com. Watch a single episode for $0.99, or get a full-month subscription for $3.99 and watch as many shows as you like with limited commercial interruptions.
The National Rifle Association (NRA) recently announced the reopening of the NRA Public Range Fund. Established in 2009, the NRA Public Range Fund is a grant-matching program that encourages city and county governments, along with state or federal agencies, to work with NRA to build and improve public ranges across the United States.
This matching grant program encourages federal, state, and local governments to work with NRA to construct, maintain, and augment public shooting facilities. At the NRA’s sole discretion, grants are awarded to assist with the acquisition, development, and improvement of public shooting facilities.
Make Range Improvements and Resolve Environmental Issues
In addition to physical improvements, NRA’s Public Range Fund allows qualifying agencies or local governments to improve community relations and address environmental issues related to range operations. With grants awarded on a 50/50 matching basis, 50% of project cost are provided by the applicant and the remaining 50% are provided by the Fund. In-kind services such as labor, materials, and equipment may be considered to provide the applicant’s 50% contribution.
“Our grants provide … recreational facilities for entire communities. Public ranges allow hundreds of thousands of hunters, competitive shooters, and target shooters to work on their marksmanship under safe and responsible conditions. More than 90 public ranges have been awarded funds to date and we look forward to assisting the next 90.” — Liz Bush, managing director of NRA Community Engagement
More than $2 million in NRA Public Range Fund grants have been awarded since the program began. To learn about this program and other available grants, visit the NRA Grant Program Webpage.
Range Improvement Grants
Helping clubs improve shooting range facilities is one of the main missions of the NRA Grant Program. Such programs might include: Berm improvements (example below), Clubhouse improvements, Target pits, Covered firing lines, Road improvements, Trap Machines, Storage buildings and other permanent improvements to club properties and/or facilities.
Today we feature a modern switch-barrel PRS chassis rifle set up for quick changes between 6mm Creedmoor and 6.5 Creedmoor barrels. The owner, Forum member Jeff Cosgrove (aka “Punkur67″) uses the 6 CM barrel for competition, favoring the reduced recoil over its 6.5 mm big brother. He does use the 6.5 CM barrel for practice (given its better barrel life). The 6.5 CM barrel also gives him the chance to shoot a variety of factory 6.5 Creedmoor ammo.
- Terminus Zeus action with Quick Change (QC) barrel option.
– 6mm Creedmoor Pre-Fit Bartlein Heavy Varmint 400MODBB barrel for matches
– 6.5 Creedmoor Pre-Fit Benchmark Heavy Palma barrel for training
– MPA BA Competition chassis with full weight kit
– Zero Compromise Optic ZCO 5-27x56mm FFP scope
– TriggerTech Diamond trigger
This rifle represents an evolution for Jeff. Each step along the way in his PRS journey, he has learned more about what he wants and needs in a competition rifle. And what you see here, from the $3760 ZC527 scope to his high-tech reloading equipment, represents pursuit of excellence. Jeff even created a modern, spacious man cave/reloading center in his new house (photos below).
Quick-Change Barrel System with Terminus Zeus QC Action
This rifle has two pre-fit barrels that work with the Terminus Zeus QC Action for fast and easy barrel swaps. To remove a barrel, you simply release two tension screws on the front of the action and then unscrew the barrel. To swap in a different pre-fit barrel, reverse the process and then tension the screws. The Terminus Zeus is 3-lug receiver with 60° bolt and integral recoil lug. Both the receiver and bolt are DLC-treated. Jeff reports this action is extremely smooth and has met all of his expectations. Some other Zeus features are threaded trigger pins for quick/easy trigger installation, and a roller-tipped cocking piece.
PRS Discipline Offers Fun, New Challenge for Long-Time Shooter
My name is Jeff Cosgrove, I live in Winchester, California and do commercial heating and air conditioning. I have shot for 20+ years but I found my interest in shooting was dwindling over time. I got somewhat bored with shooting paper at 100 yards or plinking cans out in the desert. About 18 months ago I decided I wanted to shoot long range. I picked up a used MPA in .300 Winchester Magnum and started shooting long range with a new buddy. That day I fell in love with guns all over again with more intensity than ever.
How I Got Started in PRS
With that new .300 WM I soon found my reloads were not up to my expectations (high ES/SD), so I purchased all new reloading hardware. One of my purchases was a used Benchsource Annealer. The guy I bought that from asked if I had ever tried PRS and he invited me to check out a match. So I went to a local PRS event as a spectator. I looked at many rigs on the firing line and took notes. By the end of the day I knew this was something I really wanted to do. I then acquired a used chassis rifle that I thought would work well for PRS. I went to a PRS match the following month but shot poorly.
After working with that first PRS rifle, a 6.5 CM with Stiller Tac30 action, MDT chassis, and Proof Carbon-wrapped barrel, I quickly learned that gun did not handle and balance the way I hoped.* It was too light in the front, the ergos were poor, and scope eye relief was not optimal. So I decided to build my own GEN 2 PRS rifle. This is the story of how I put together my new switch-barrel rig that I now use in competition.
PRS Rifle and Gear Selection — Learning What Works
Barrel availability was limited given the current shortages. Luckily I was able to obtain a 6mm Creedmoor pre-fit Bartlein Heavy Varmint 400MODBB from Southern Precision Rifles. The 6mm Creedmoor is notorious for being a barrel burner cartridge so I went with the special 400MODBB metal. Bartlein says that barrel life expectancy is 1.5 to 2 times longer than the standard 416 grade steel. I also purchased a 6.5 Creedmoor pre-fit Benchmark Heavy Palma barrel for training (Source: Straight Jacket Armory). With the Terminus Zeus quick change system I am able to swap from my match barrel to my trainer barrel in just a couple minutes. I loosen two set screws, unthread the barrel, thread the new barrel on, and torque the set screws to 10 inch-pounds. This also affords me caliber options in case I’m in a pinch for ammo. If I have some 6.5 CM loaded up and don’t have time to load 6mm Creedmoor for a match, then I’m covered.
For the trigger, I went with a TriggerTech Diamond Pro curve model. I have Timney, Jewell, and TriggerTech triggers in other rifles. I like them all but I liked the feel of the TT Diamond the best so that is what I used on this build. I set my triggers around 18-20 oz. — I am not a fan of ultra-light trigger pulls.
MPA BA Competition Chassis with Added Weight
I went with an MPA BA Comp chassis with full internal and external weight kit. I also have Gray Ops external weight on the handguard. I had the same chassis on my .300 WinMag and felt very comfortable with it. I took a PR1 class and found that, with a different gun, I had to force a comfortable hand position for proper trigger pull. After that class I grabbed my MPA and my hand fell in to the perfect position. I did not need to hunt or index my hand with the MPA. The built ARCA rail (RAT) lowered the rifles center of gravity more than my old setup with the ARCA rail bolted to the bottom of the handguard. With the current configuration, the rifle weighs in at 24 lbs. and balances three inches in front of the magwell. I now have the flexibility to add, subtract, or move approximately 6 lbs. of weight.
The Attraction of PRS/NRL Practical Competitions
I really enjoy PRS-style shooting because there seems to be a new challenge every time you compete — no matter what. With PRS I am shooting many different positions and ranges with the pressure of a stopwatch. This keeps things interesting for me. I have taken a few training classes to help establish good, clean fundamentals.
Jeff says it is hard to practice for the many unconventional shooting positions at PRS matches.
My biggest challenges so far have been: 1) building stable shooting positions that I have not practiced enough; 2) proper equipment selection; and 3) time management. Regarding the shooting positions — PRS/NRL is not like F-Class where you can always practice from one position. And it’s hard to practice for unusual set-ups (barriers and positions) you’ve not encountered before. Concerning equipment — you need some experience in the game to determine what really works best for you.
Innovative Zero Compromise Optic — Optimized for the Tactical Game
The scope is a Zero Compromise ZC527 (5-27x56mm FFP) with MPCT2 reticle. Zero Compromise Optic is a relatively new manufacturer, but their scopes are top-flight. The First Focal Plane ZCO has excellent glass that is extremely bright and clear. With a big 36mm main tube, the ZC527 offers 35 Mils Elevation and 21 Mils Windage adjustment. The field of view is 21 feet at 100 yards — one of the widest in the industry. The ZC527 also offers illuminated reticle and locking turrets. When I was at my first PRS match I looked through several different scopes. When I got behind a ZCO scope I knew this was what I wanted — the ZCO scope was super clear, super sharp, with very positive controls.
I put a protective wrap on the scope because with some of our PRS stages it is easy to scratch or dent the scope tube. You don’t want to bang up an expensive scope — the ZC527 retails for $3760.
Reloading for 6mm Creedmoor and 6.5 Creedmoor
When starting out with a new cartridge I like to search places like AccurateShooter.com and UltimateReloder.com for popular recipes used by knowledgeable shooters. I am all about paving your own way on certain things but with the consistency, higher cost, and limited supply of components these days I try to stick with the most common loads. I also want to limit barrel wear and get through load development quickly. I don’t want to chase loads for 300 rounds to ultimately land in the same place that so many other people have already found.
I start my new barrels with virgin brass and load three rounds at each charge weight in 0.2 grain increments. I put the most popular charge weight (for my chosen bullet) in the middle of my load range and load above and below to find a good node while paying close attention for pressure signs along the way. I use the 6.5 Guys spreadsheet (see below) to help analyze my results. With those results I like to re-test a narrower range with 5-10 rounds each charge weight in 0.2 grain increments. I again use the 6.5 Guys spreadsheet to make a final charge weight selection and then I move on to seating depth. I will load different depths to tighten the groups up.
Load Development Using 6.5 Guys Custom Spreadsheet
To hold and analyze my load development data I use the spreadsheet from 65Guys.com. It helps a ton with making a decision on your final load. This Excel spreadsheet works great and makes it simple to analyze your data. You can even copy and paste your chronograph data if your chrono logs on to a SD card.
In this 6.5 Guys video Steve provides an overview and tutorial for using the Excel load development analysis model that he has developed. The Excel Load Development Analysis Spreadsheet version 2.0 is FREE. Download from the 6.5 Guys Website.
In this video Steve explains some key statistical concepts for performing load data analysis. He also provides tips and guidance for determining the optimal load for your rifle as you analyze the load data you’ve collected.
New House, New Man Cave/Reloading Room
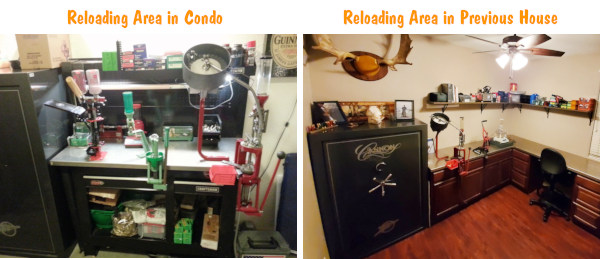
Jeff recently moved with his family into a great new house. One bonus of this move was that he upgraded from a cramped reloading area to a dedicated “Man Cave” that has ample space for his gun safes, multiple presses, and all his reloading components. Large upper and lower cabinets plus a dedicated “gun closet” provide plenty of storage. Read all about this move in this AccurateShooter Forum Thread.
Here is Jeff’s first reloading area years ago: “My first reloading setup was smashed in my two-bedroom condo so I had a very small bench that was very cluttered. I had to deal with the limited space I had but I made it work. Then in our first house I had a larger bench/cabinet, but it was still not ideal.”
Here is the new Man Cave in the new house — very open, spacious, with plenty of storage.
This animated GIF shows the new Man Cave move-in process start to finish:
About Jerry Miculek… The Man, The Myth, The Legend
The video above begins: “My name is Jerry Miculek. Guns are what I do.” Jerry Miculek is a true legend in the firearms community. Acknowledged as the best wheelgun speed-shooter in history, Jerry is also an accomplished rifle and shotgun shooter with many class victories in 3-Gun competition. He also has been a prolific YouTube Video creator. For this Saturday at the Movies story, we are featuring five notable Jerry Miculek videos. You will find over 200 more informative and entertaining videos on the Jerry Miculek Pro Shooter YouTube channel
Here Jerry shoots two, double-barrel .45 ACP 1911 pistols (AF2011) at the same time, one in each hand. Jerry was the first-ever person to accomplished this 4-barrel feat with twin handguns. Employing the dual double-barreled pistols, Jerry send 20 rounds downrange in under 1.5 seconds. This amazing sequence is captured with hi-speed cameras for vivid slow-motion playback. There are some spectacular close-ups as the bullets leave the muzzles. Worth watching!
2. Take-Down and Full Cleaning of AR-15
If you want to keep your black rifle running smoothly and reliably, you must clean it regularly and follow the correct maintenance procedures. In this video, Jerry Miculek takes down and cleans an AR-platform rifle belonging to his daughter Lena. This is a good video because Lena’s rifle was “run hard and packed up dirty” so you can see where carbon and grease build up. This 35-minute video is very thorough. Jerry is one of the nation’s top action carbine shooters, so listen carefully to his advice on cleaning and lubrication.
3. Jerry Reviews Magnetospeed T1000 Target Impact Indicator
MagnetoSpeed makes more than barrel-mounted chronographs. The T1000 is a target hit indicator that illuminates a super-bright red light when you hit a steel target. The T1000 was designed to be mounted to the back side of AR500 steel targets. In this video Jerry tests the MagnetoSpeed T1000 indicator light system. We like the T1000, especially for longer ranges where impacts on plates may not be easily visible. And you never have to paint your steel targets again to show impacts!
4. Shooting 240 Yards with 85-Year-Old K-22 Rimfire Revolver
Jerry Miculek is probably the greatest (certainly speediest) revolver shooter in history. He has set multiple world records with Smith & Wesson wheelguns. Here he tests a true classic — an 85-year-old S&W model K-22 revolver chambered for the .22 LR rimfire cartridge. Jerry uses this handsome classic blued revolver to hit targets at 240 yards!
5. 80,000 Philippine M1 Garands in One Place
Last year Jerry Miculek recently the CMP where he looked at the vast inventory of military rifles, including 80,000+ M1 Garands recently received from the Philippines. CMP tech staff showed Jerry some rare Garands that had never been issued. If you’re interested in classic military arms, you should definitely watch Jerry’s video. Gina Johnson, CMP’s general manager, told Guns.com that: “We have roughly 86,000 rifles from the Philippines and roughly 13,000 rifles from Turkey in our possession”.
Along with the 80,000+ Philippines Garands, the CMP received 13,000 from Turkey. The arrival of these 99,000 M1 Garands is great news for rifle collectors. Garands have been in short supply in recent years. Garands were getting harder to acquire from the CMP. In fact, over the past two years, many common Garand varients have been “sold out” on the CMP site.
If you want to stay current with trends in the firearms industry, and see important new product releases before they hit dealers’ shelves, you should check out Shooting Industry magazine. While tailored for firearms/outdoor gear retailers and industry professionals, this monthly journal also provides valuable information for all gun owners. We read Shooting Industry to learn about sales trends, new products, and current gun laws issues.
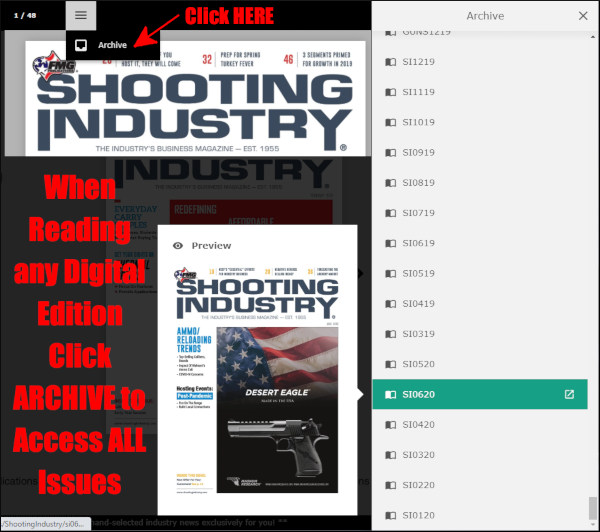
READ for FREE — Shooting Industry is now available in a digital format for FREE. There are free archives going back 14 years to December 2007.
Get FREE Digital Shooting Industry Magazines for the Past 13 Years
You can access, for free, 14 years of Shooting Industry back issues, plus all the recent 2021 issues. CLICK HERE for the current issue along with all issues for the previous three years: 2018, 2019, 2020. IMPORTANT — To access older issues, you much first launch a recent digital edition. That will give you access to the full 14-year archive, as explained below.
Here are links for the most recent three issues — July 2021, June 2021, and May 2021. Simply click each cover to read full issue for FREE:
July 2021
Top Stories:
Trends Of First-Time Buyers
COVID-19’s Effect On Hunting
June 2021
Top Stories:
Where’s All the Ammo?
Industry’s Public Companies
May 2021
Top Stories:
The Art of Instruction
New Gun Owners in America
How to Access Magazine Archives Back to December 2007
Once you have launched the digital version of a recent issue, you can access the past 14 years of Shooting Industry back issues by using the ARCHIVE Button. First click on the MENU icon (three horizontal lines). Then click on the link for ARCHIVE. When you click on “Archive”, a list appears on the right. Scroll down to select any issue from July 2021 back to December 2007. Note: The index is divided, so some of the more recent Shooting Illustrated issues are found at the BOTTOM of the Archive, while others are at the top, or the middle. Be patient and look for “SIxxxx”
BONUS! FREE Back Issues of GUNS Magazine and American Handgunner
In the Shooting Industry Archives, you will also find free digital editions of GUNS Magazine and American Handgunner. These will be found in the archive tables on the right. Just look for GUNSxxxx in the list entry for GUNS Magazine back issues, or AHxxxx for American Handgunner back issues.
Sako, and its subsidiary Tikka, make some of the finest hunting rifles you can buy. These offer smooth actions, and very good out-of-the-box accuracy for factory rifles. In addition, Sako and Tikka now offer high-tech carbon fiber stocks, along with Sako’s handsome wood stocks. With the three videos showcased today, you get a virtual tour of the Sako/Tikka production facilities in Finland.
In this informative video, the Canada in the Rough team tours the Sako/Tikka factory in Riihimäki, Finland. All aspects of the production process are covered — crafting actions, barrel-making, stock fitting and more. It was interesting to see the hammer-forging process for barrels, and the exacting measurements that are performed on the actions and bolt assemblies. If you have an interest in rifle production and the type of modern, computer-controlled machinery now being used, definitely watch this video.
Visit to SAKO/Tikka Carbon Fiber Stock Factory
This Sako-produced video shows how the company’s modern carbon-fiber stocks are produced. The stock production process is highly automated, to ensure that the finished stocks have very precise dimensions. These carbon Sakos are some of the nicest carbon-fiber stocks we’ve ever seen.
SAKO Factory Tour in Riihimäki Finland
In this segment, huntress and outdoor video host Mia Anstine tours the Sako manufacturing facility in Riihimäki, Finland. This video covers both firearms production and ammunition manufacturing. In a follow-up video Mia tests Sako rifles and Sako ammunition at a Finland range. Mia also reported on her Sako factory tour in the Beretta Blog. She notes: “Sako built its original manufacturing facility during World War I. To this day they still utilize the original buildings but have also grown over the years to include larger production areas and updated equipment.”
Canada in the Rough Video Tip from Boyd Allen — we welcome reader submissions
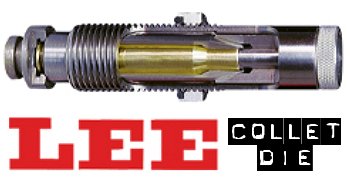
Editor’s NOTE: We generally recommend full-length sizing your cases. But there may be some situations where you may want to body-size your brass in one operation, and then neck-size the case as a final operation for reduced run-out. Or, perhaps you have a non-bushing FL sizing die and you want to modify the neck sizing. This article explains how to use a Lee Collet Die to size case-necks.
For those who prefer to neck-size their brass (rather than full-length-size), the LEE Collet Die is a popular, inexpensive option. It works by having collet tangs or “fingers” press the neck against a central mandrel. A collet squeezes the case neck against a precision mandrel for a perfect fit with minimum run-out. The benefit is that you get a very straight neck, which is sized consistently from top to bottom. Canadian shooter Jerry Teo explains: “LEE Collet Dies produce sized cases with very low runout (measured runout is under .001″ using a Sinclair concentricity gauge). You also don’t get the build-up of brass at the base of the neck, as can happen with bushing neck dies. The neck-shoulder junction stays nice and crisp.”
Here’s a good video that explains how to use a Lee Collet Die to Neck-Size .243 Win brass:
UPDATE to LEE Collet Dies — Neck Protrusion Change
The Lee Precision website notes a small design change: “If you’re a long-time user of Lee Collet Neck Sizing Die you may notice we have modified the Collet so a small portion of the neck protrudes through the end of the Collet-sizing portion. This often-requested modification was implemented in 2019. This change allows the portion of the neck that protrudes above the Collet to remain in its fire-formed condition. This provides a natural flare to the case neck allowing easy and concentric seating of bullets. This is especially important when seating cast bullets or low-drag coated bullets.”
TIP ONE — Adjusting Tension
LEE Collet dies don’t have a specific mechanical adjustment for neck tension. But you CAN easily modify the die to provide more or less tension. If you want to adjust the neck tension using a Lee Collet die, you can simply chuck the mandrel in a drill and reduce the diameter with some sand-paper (to increase neck tension) or you can order a mandrel the next caliber larger and turn it to whatever diameter you want (the larger the mandrel diameter, the less the neck tension). You can also order custom mandrels from Lee sized to any diameter you want.
Regarding neck tension, Boyd Allen makes an important point: “The only way to properly get more neck tension with collet dies is to either reduce the diameter of the mandrel, or order a smaller-diameter mandrel from Lee. I remind folks that adjusting the die position to have more toggle at the top of the ram stroke (not the factory recommended method), or leaning on the press handle with more force than recommended will NOT increase neck tension.”
No Custom Lee Collet Dies For Now
In years past, Lee also offered Custom Collet Dies, made from two fired cases. Hopefully these will be available in the future. However, earlier this year, Lee announced it had suspended sale of most custom dies including Collet Dies: “March 17, 2021: Due to unprecedented order volume, we have suspended custom services for Collet Necksizing Dies, Full-Length Sizing Die Sets, Quick Trim Dies, Case Length Gauges, Factory Crimp Dies, and Bullet Molds until we are able to meet the required volume of our standard products.”
TIP TWO — Polish and Tune for Easy Case Removal
Some users have complained that their Collet Dies grab the case-neck too firmly, making the case hard to remove. There are solutions to this problem. First inspect the collet fingers and smooth the inner surface up a bit with polishing compound or an extra-fine sanding pad. Second, you can open up the fingers a little bit. LEE recommends that if your Collet Die is sticking, take a steel punch and tap the fingers apart a little bit so that the natural “unloaded” position is wider. Lastly, you should lightly lubricate the outside of the collet fingers (see arrows) before you re-assemble the die. This will ensure they slide smoothly. Also, to prevent the collet fingers from closing too tight, never load up the die with your press without putting a case in place first. Without a case neck between the collet fingers and the mandrel, the collet can clamp itself too tight as you raise the ram.
TIP THREE — Always Have a Case Inside When Operating Collet Die
Our friend Boyd Allen tells us that you need to follow directions and NEVER operate the die without a case inside. Boyd explains: “This is because doing so will spring the quadrents of the collet inward so that they interfere with the insertion of a case, and the user will have to figure out how to undo the damage if the die is to operate properly. This advice would not be needed if everyone read the instructions before using the die…. but many times, they don’t. Another thing that I tell new users is to take the die apart so that they will have a better chance of understanding how it works.”
TIP FOUR — Size Twice and Spin Your Case 1/8th Turn
After reaching fully “down” on your press handle, withdraw the case about an inch and manually rotate it about 1/8th (NOT 1/4 or 1/2) turn while still in the shell-holder, then size again. This will place the die’s collet petals on the four “high spots” of the case neck and will result in a rounder, more evenly-sized neck with slightly more bullet tension. This takes only about one second more per case and is well worth the slight extra effort. (We thank reader Stonecreek for this smart tip).
For those of us in the Western USA facing drought, heat waves, and forest fires, it is a bit amazing to see a shooting range with verdant green fields, and lush vegetation. Well that is the environment in far-away Queensland, Australia. Here is a photo essay from Aussie Zac Link Cameron who hails from Cairns, Queensland, up near the Great Barrier Reef. On June 20, 2021, Zac was at a scenic range, shooting out to 1000 yards. He posted on Facebook: “Beautiful morning for it at a beautiful range!”
Zac was competing at 1000 yards with his lovely “missus” Morgan Crisp at the Atherton Rifle Club range, situated west of Cairns in Queensland. Zac and Morgan are members of the Cairns Rifle Club, which also has an 800m range north of Cairns, located inland from Wangetti Beach (see map below). Posting on Facebook, Zac wrote: “First time at 1000 yards for the Missus today with her factory Howa 1500 in .223 Remington. Conditions couldn’t have been more perfect other then the swirling wind not making up its mind! But the little .223 did bloody good for its first outing past 800m. 1000 yards today and my gosh Atherton is a beautiful range!”
Zac wrote: “Dropped 2 points on my first target and didn’t drop any on my second. I definitely need to work on my wind reading though.”
Zac Cameron: “Beautiful morning for it at a beautiful range!”
Indeed, this is a beautiful range. It’s great to see all that greenery. Here is a fly-over video from the Atherton Tableland Gun Club Range, west of Cairns, another popular Queensland shooting venue. You can see other Queensland shooting ranges on Zac Cameron’s Long Range Australia FNQ Facebook page.
Australia Rifle Competition Disciplines
As stated on the Cairns Rifle Club website, there are multiple disciplines sanctioned by the National Rifle Association of Australia (NRAA) which are shot by Cairns Rifle Club:
Target Rifle: This discipline is shot with a .308 or .223 caliber rifle, and held by the shooter using peep sights and a sling. Target Rifle has been actively contested since before World War I. The Cairns Rifle Club has operated continuously since 1893 — 128 years.
F-Class: This discipline is contested with optical sights (scopes) and the use of bipods or rests. Three categories of F-Class exist. Two are shot from an adjustable rest being F-Standard which is limited to either .308 Win or .223 Rem caliber rifles and F-Open which is unlimited up to a maximum of 8mm. The other discipline is F-TR which is shot from a bipod and limited to .308 Win caliber. [Editor’s Note — This is different than in the USA which has F-TR (bipod .223 Rem or .308 Win) and F-Open (front rest, open caliber) only.]
Sporting/Hunting Class: The most recent addition to the disciplines is the Sporting/Hunting Class.
The disciplines are contested at distances from 300m through to 800m at Wangetti and up to 1000 yards elsewhere. Here is a MAP for Wangetti, 40km north of Cairns.
Zac and Morgan are members of the Cairns Rifle Club, an organization with a rich history, going back to 1893. Here are Cairns Rifle Club members in 1903:
The NRA Blog ran an feature on Silhouette shooting by NRA Silhouette Program Coordinator Jonathan Leighton. Here are selections from Leighton’s story:
NRA Silhouette Shooting
The loud crack from the bullet exiting the muzzle followed by an even louder ‘clang’ as you watch your target fly off the railing is really a true addiction for most Silhouette shooters. There is nothing better than shooting a game where you actually get to see your target react to the bullet. In my opinion, this is truly what makes this game so much fun.
Metallic Silhouette — A Mexican Import
Silhouette shooting came to this country from Mexico in the 1960s. It is speculated that sport had its origins in shooting contests between Pancho Villa’s men around 1914. After the Mexican Revolution the sport spread quickly throughout Mexico. ‘Siluetas Metalicas’ uses steel silhouettes shaped like game animals. Chickens up front followed by rows of pigs, turkeys, and furthest away, rams. Being that ‘Siluetas Metalicas’ was originally a Mexican sport, it is common to hear the targets referred to by their Spanish names Gallina (chicken), Javelina (pig), Guajalote (turkey) and Borrego (ram). Depending on the discipline one is shooting, these animals are set at different distances from the firing line, but always in the same order.
Before Steel There Was… Barbeque
In the very beginnings of the sport, live farm animals were used as targets, and afterwards, the shooters would have a barbeque with all the livestock and/or game that was shot during the match. The first Silhouette match that used steel targets instead of livestock was conducted in 1948 in Mexico City, Mexico by Don Gonzalo Aguilar. [Some matches hosted by wealthy Mexicans included high-ranking politicians and military leaders].
As the sport spread and gained popularity during the 1950s, shooters from the Southwestern USA started crossing the Mexican border to compete. Silhouette shooting came into the US in 1968 at the Tucson Rifle Club in Arizona. The rules have stayed pretty much the same since the sport has been shot in the US. NRA officially recognized Silhouette as a shooting discipline in 1972, and conducted its first NRA Silhouette Nationals in November of 1972.
Silhouette Ace Eric Mietenkorte Shooting Smallbore Silhouette — Perfect Form:
Now There Are Multiple Disciplines
The actual sport of Silhouette is broken into several different disciplines. High Power Rifle, Smallbore Rifle, Cowboy Lever Action Rifle, Black Powder Cartridge Rifle, Air Rifle, Air Pistol, and Hunter’s Pistol are the basic disciplines. Cowboy Lever Action is broken into three sub-categories to include Smallbore Cowboy Rifle, Pistol Cartridge Cowboy Lever Action, and regular Cowboy Lever Action. Black Powder Cartridge Rifle also has a ‘Scope’ class, and Hunter’s Pistol is broken into four sub-categories. Some clubs also offer Military Rifle Silhouette comps.
Where to Shoot Silhouette
NRA-Sanctioned matches are found at gun clubs nation-wide. There are also many State, Regional, and National matches across the country as well. You can find match listings on the Shooting Sports USA website or contact the NRA Silhouette Department at (703) 267-1465. For more info, visit SteelChickens.com, the #1 website dedicated to Silhouette shooting sports.
Sinclair Internationalhas released an interesting article about Case Concentricity* and bullet “run-out”. This instructional article by Bob Kohl explains the reasons brass can exhibit poor concentricity, and why high bullet run-out can be detrimental to accuracy.
Concentricity, Bullet Alignment, and Accuracyby Bob Kohl
The purpose of loading your own ammo is to minimize all the variables that can affect accuracy and can be controlled with proper and conscientious handloading. Concentricity and bullet run-out are important when you’re loading for accuracy. Ideally, it’s important to strive to make each round the same as the one before it and the one after it. It’s a simple issue of uniformity.
The reason shooters work with tools and gauges to measure and control concentricity is simple: to make sure the bullet starts down the bore consistently in line with the bore. If the case isn’t properly concentric and the bullet isn’t properly aligned down the center of the bore, the bullet will enter the rifling inconsistently. While the bore might force the bullet to align itself with the bore (but normally it doesn’t), the bullet may be damaged or overstressed in the process – if it even it corrects itself in transit. These are issues we strive to remedy by handloading, to maintain the best standard possible for accurate ammunition.
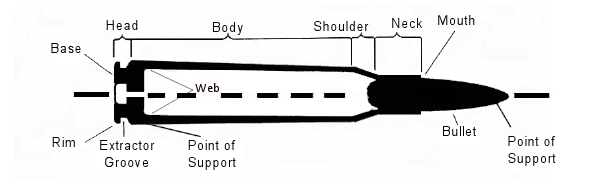
The term “concentricity” is derived from “concentric circle”. In simple terms it’s the issue of having the outside of the cartridge in a concentric circle around the center. That goes from case head and center of the flash hole, to the tip of the bullet.
Factors Affecting Concentricity
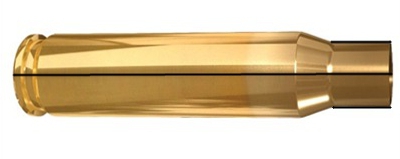
The point of using this term is to identify a series of issues that affect accurate ammunition. Ideally this would work best with a straight-walled case; but since most rifle cartridge cases are tapered, it equates to the smallest cross section that can be measured point by point to verify the concentric circle around the center. For the examples below, I’m working with .308 Winchester ammo.
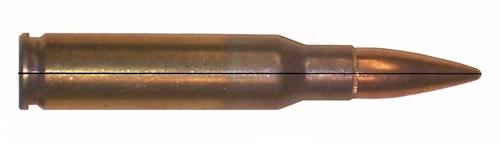
Figure 1: The cartridge.
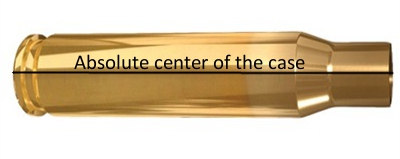
Figure 2: Centerline axis of the case, extending from flash hole to case mouth.
The case walls have to be in perfect alignment with the center, or axis, of that case, even if it’s measured at a thousandth of an inch per segment (in a tapered case).
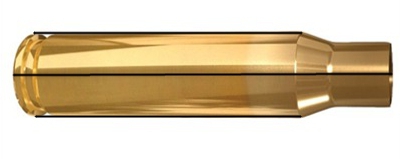
Figure 3: Case body in alignment with its axis, or centerline, even in a tapered case.
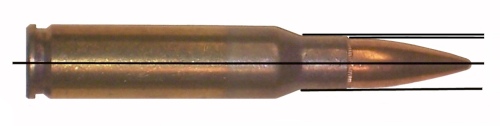
The case neck must also be in alignment with its axis. By not doing so you can have erratic bullet entry into the bore. The case neck wall itself should be as uniform as possible in alignment and in thickness (see the M80 7.62x51mm NATO cartridge in Figure 5) and brass can change its alignment and shape. It’s why we expand the case neck or while some folks ream the inside of the neck and then turn the outside for consistent thickness, which affects the tension on the bullet when seated.
Figure 4: Neck in alignment with center of the case axis.
Figure 5: Variations in case neck wall thickness, especially on some military brass, can cause an offset of the bullet in its alignment. This is an M80 ball round. Note the distinct difference of the neck walls.
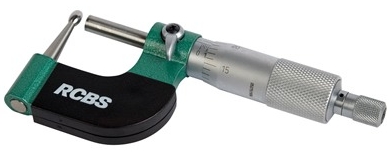
Having a ball micrometer on hand helps, especially with military brass like 7.62x51mm in a semi-auto rifle, where there are limits as to how thin you want the neck walls to be. In the case of 7.62 ball brass you want to keep the wall to .0145″.
Figure 6: A ball micrometer like this RCBS tool (#100-010-268) can measure case neck thickness.
Turning the outside of the neck wall is important with .308 military cases regardless of whether you expand or ream the neck walls. There are several outside neck turning tools from Forster, Hornady, Sinclair, and others. I’ve been using classic Forster case trimming (#100-203-301) and neck turning (#749-012-890) tools for 40 years.
Bullet Run-Out
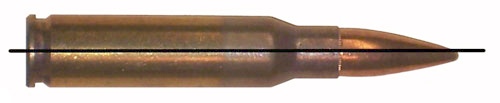
The cartridge, after being loaded, still needs to be in alignment with the center of the case axis. Figure 7 shows a bad example of this, a round of M80 ball. A tilted bullet is measured for what’s known as bullet “run-out”.
Figure 7: An M80 round with the bullet tilted and not aligned with the axis. This will be a flyer!
Run-out can be affected by several things: (1) improperly indexing your case while sizing, which includes not using the proper shell holder, especially while using a normal expander ball on the sizing die (it also can stretch the brass). (2) The head of a turret press can flex; and (3) improper or sloppy bullet seating. This is also relevant when it comes to using a progressive press when trying to load accuracy ammo.
Mid Tompkins came up with a simple solution for better bullet seating years ago. Seat your bullet half way into the case, back off the seater die and rotate the case 180 degrees before you finish seating the bullet. It cuts down on run-out problems, especially with military brass. You also want to gently ream the inside of the neck mouth to keep from having any brass mar the surface of the bullet jacket and make proper seating easier. A tilted bullet often means a flyer.
Figure 8: Proper alignment from the center of the case head to the tip of the bullet.
(NOTE: This links to a Web Archive of the original Sinclair Int’l article.)
*Actually some folks would say that if we are talking about things being off-center or out-of-round, we are actually talking about “eccentricity”. But the tools we use are called “Concentricity Gauges” and Concentricity is the term most commonly used when discussing this subject.
Story Tip from EdLongrange. We welcome reader submissions.


 TIP ONE — Adjusting Tension
 TIP TWO — Polish and Tune for Easy Case Removal


 The
The 
 Metallic Silhouette — A Mexican Import
 Before Steel There Was… Barbeque